Showing posts with label Canon. Show all posts

Tuesday, October 1, 2013

How do I import .mov file from Canon T4i/650D into Avid Media Composer

After learning this following guide, you will know how to import and convert Canon T4i/650D H.264 MOV footages to Avid Media Composer on Mac OS X and edit the 1080p mov video with DNxHD codec easily.


The Canon EOS Rebel T4i Digital Camera is an ideal camera for any level photographer. T4i features incredible image quality with an 18 Megapixel CMOS (APS-C) sensor, Canon DIGIC 5 Image Processor that helps capture all the action with high-speed continuous shooting of up to five frames per second and an extended ISO range of 100-12800 (expandable to 25600 in H mode) that gives digital photographers the opportunities to take the Canon EOS Rebel T4i into more shooting situations than ever before.

Canon T4i uses the same workflow as the Canon EOS series of cameras which includes the 550D (T2i), 600D (T3i), and 1000D (XS), because it records in the same H.264 MOV format. Although the tools for importing the footage have been updated by Canon, it seems not working well when ingesting T4i footage to Avid Media Composer. Below, I will throw a quick tutorial up on how to import videos from Canon T4i/650D into Avid MC without the EOS Movie Plugin-E1.

As H.264 codec is not good for editing, the H.264 compression format requires that files be transcoded into a format better suited to editing, effects, and color grading. To successfully put your Canon T4i footage into Avid Media Composer for smoothly editing on Mac, you're suggested to transcode Canon T4i mov to DNxHD, which perfectly supported by Avid software. Along with some help from a third-party software.

Pavtube HD Video Converter for Mac is a well known professional converter which can deal nearly all kinds of MOV videos, it can convert Canon T4i H.264 MOV files to DNxHD codec MOV natively for Avid Media Composer on Mac, and then you can edit Canon T4i MOV files natively in Avid MC.
Just download a free trial and take a look at the brief guide below.

Transcoding/Importing Canon T4i H.264 footage to Avid Media Composer


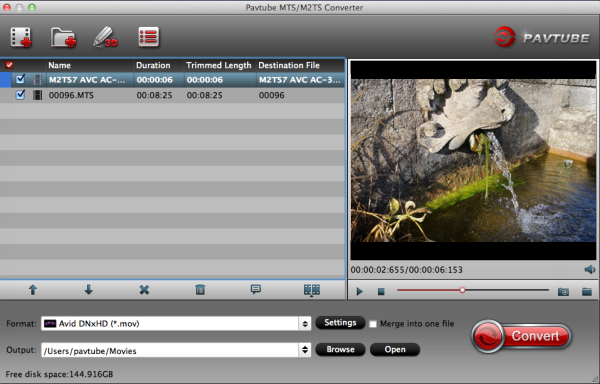
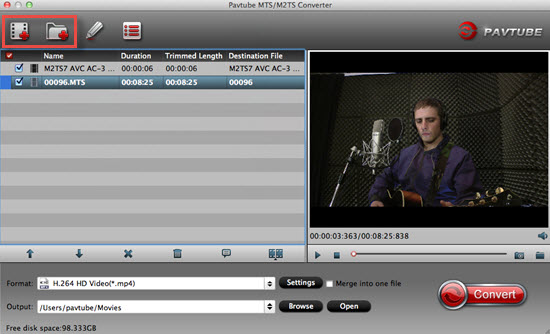
1. Run the top Mac Canon H.264 MOV Converter and load T4i H.264 MOV clips to the program.  You can click either “Add Video” button or “Add from folder” button to load source MOV files.
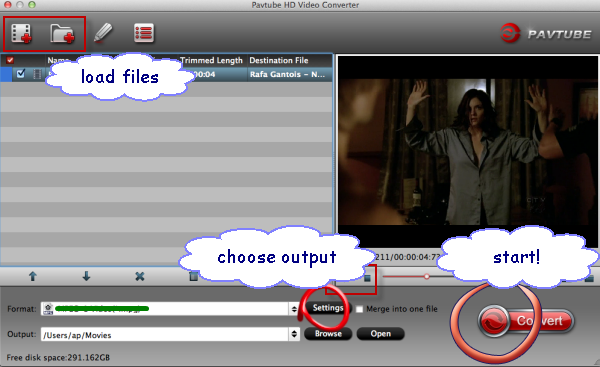

P.S. If you want to combine the loaded MOV clips into one file, simply tick off the checkbox before “Merge into one file”.

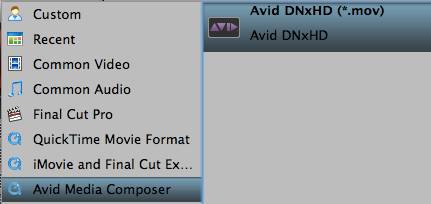
2. Click “Format” bar to determine output format.

You are recommended to choose Avid Media Composer -> Avid DNxHD (*.mov), this format is best for Avid MC editing.


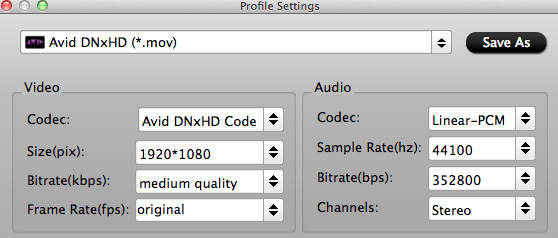
Tip: By clicking “Settings” button, you are able to enter the “Profile Settings” panel to adjust video and audio parameters for your Canon T4i MOV source files, including video size, bit rate, frame rate and more.  (Optional)

3. Click “Convert” to start.

The best H264 to DNxHD Converter can help you to convert Canon T4i MOV video to Avid Media Composer natively for editing. Once the process completes, you are able to import/ingest Canon T4i footage to Avid Media Composer for further editing on Mac as you want.

You can read more guides as below:

Wednesday, September 25, 2013

Convert Canon XF105 multi-track MXF to ProRes 422 MOV to edit in Premiere Pro CS6

If you encountered problems with importing XF105 multi-track MXF to PPro on Mac, please follow this post to effortlessly convert Canon XF105 MXF to Prores MOV for Premiere Pro CS6 with keeping multi audio channels.


The XF105 utilizes Canon's XF Codec – a file-based MPEG-2 compression with an MXF File Wrapper. The XF105 supports the highest HD quality with Full HD 1920*1080 resolution, up to a 50Mbps bit rate and 4:2:2 color sampling. However, some Canon users find that it is hard to import Canon XF105 HD MXF files into Premiere Pro CS6?

My Canon XF105 .mxf files won't import into Adobe Premier Pro 6.0.3...  Keep getting a "generic error".... and I've tried everything! I've downloaded the Canon utilitiy, tried merging the clips, tried isolating the .mxf files, tried not touching the clip structure at all..... 

Now I want convert them into any format that Premiere Pro adopts. The key point is I don't want to loss any of the audio channels that I recorded with two microphones. Is that any work flow for this?

The Adobe Premiere Pro CS6 isn't well compatible with the tough ""MXF"" file format. In the case, convert MXF file from XF105 to Premiere Pro well compatible file format like Prores .mov can be an effective way, and it will make the editing work much smooth and easier. But how to keep the original multi audio channels?

Here, Pavtube iMixMXF can exactly do this for you. It is a great MXF Mixer and Converter that enables you to convert multi-track MXF from Canon XF105 to Prores for Premiere Pro preserving all the audio channels without quality loss, but also can make it easy for merging multiple video clips.  

Overall, it is a wonderful tool to preserve all the audio and subtitle tracks from original MXF file when converting multi-track MXF files to multi-track MKV, MP4, MOV for playing back on iDevices and Android tablets; as well as multi-track Apple ProRes for FCP, Premiere Pro and Apple Aperture 3 editing. Besides selecting multiple tracks you need, you can also mix the multiple audio tracks into one for output. Below is a brief guide:
Preparation for XF105 to Premiere Pro CS6 Conversion:

Free download this Multi-track MXF Converter for Mac and follow these steps to easily convert multiple audio channel MXF to ProRes for Premiere Pro CS6.

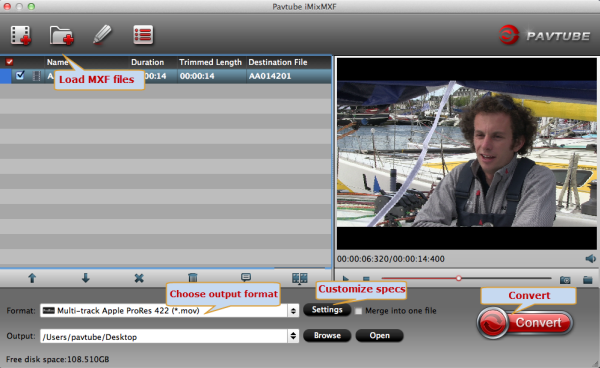
1. Connect your XF105 to Mac and keep it on; get this multi-track MXF to Premiere Converter installed. Now follow the top left two icons to load individual mxf or in batch.


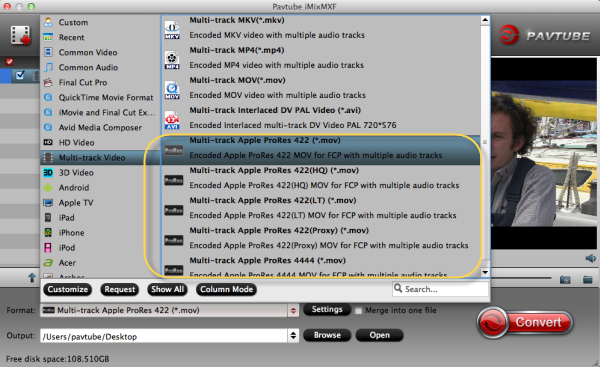
2. Click "Format" and choose Multi-track Video>Multi-track Apple ProRes 422(*.mov) as the most compatible codec for Premiere Pro CS6 editing.


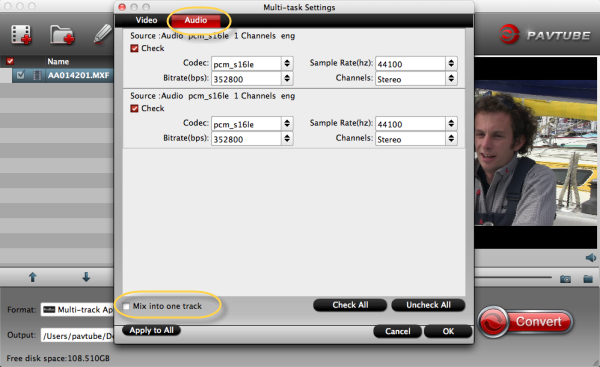
3. Click "Settings" to free select needed video/audio tracks.

Check the tracks you need and left others unchecked, thus you can get Multi-track MOV with your needed audio streams. Note there’s a mix into one track icon on the bottom, it will combine all your checked audio tracks into single one.


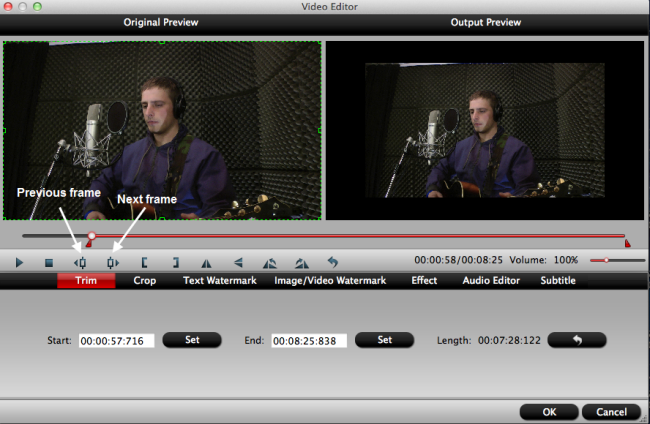
With this Pavtube iMixMXF program, you can also add some personal subtitles in it like this which makes the play backing much easier:


4. Click the red "Convert" to start to convert Canon XF105 multi-track MXF to ProRes 422 MOV.

After the conversion is finished, just run Premiere Pro CS6 and import the .mov files for editing. You will find the output video work perfectly on Adobe Premiere Pro CS6.

P.S.

Pavtube also have a Mac MXF to FCP converter program for users that do not need to deal with multi-track video/audio files; only $29 is needed atm. Refer to here to quick look this MXF Converter for Mac.

Read More:

Sunday, September 22, 2013

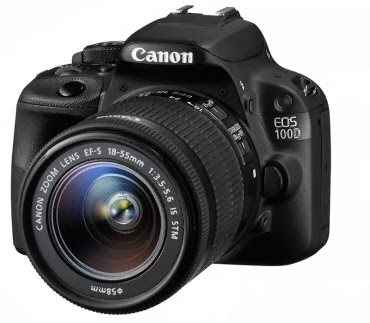
Final Cut Pro X – Edit 1080p videos files from Canon EOS 100D?

How to edit Canon EOS 100D H.264 Video in FCP X on Mac? Best Canon H.264 Video Converter can help you to encode 1080p MOV clips from Canon EOS 100D to FCP friendly code and Eit/Split/Cut/Merge the H.264 MOV footage on Mac.

Last year’s Canon EOS 650D was an excellent camera. But for all its whiz-bang features, like a capacitive touchscreen and continuous autofocus while shooting video, it just didn’t feel special. A DLSR for beginners just doesn’t make as much sense when there are smaller mirrorless cameras that can achieve similar results. So Canon shrunk the 650D down. Here’s the mini version: Canon EOS 100D.


Canon EOS 100D (Rebel SL1) may be the smallest and lightest DSLR currently in production, but does the 18-million-pixel 100D have what it takes to meet the demands of the enthusiast photographer? Canon EOS 100D features a 3in, 1.04-million-dot touch-sensitive LCD screen, a maximum sensitivity of ISO 25,600, and can shoot video at a resolution of 1080p at 30fps.

However the MOV files using variable bitrate MPEG-4 AVC / H.264 compression, which is well-supported by FCP X. Due to its high data rate (20-30mbps), the Canon 100D 1080 mov footage is quite demanding and your FCP X prone to freeze or crash if your Mac is not so up-to-date.

In order to process Canon EOS Rebel SL1 footage fast and seamless with Final Cut Pro X, it requires that the H.264 .mov videos to be transcoded into an editing friendly format before importing the mov video from 100D to FCP X. This is usually done with a Mac HD Video Converter.

Recommended Tool:
Pavtube HD Video Converter for Mac The best Canon H.264 MOV Converter 

With it, you can transcode Canon 100D MOV to a compatible format for FCP X on mac quickly and easily with preserving timecode. Before editing the footages from Canon 100D, you are advised to install the first-class HD Video Converter for Mac from Pavtube.

Step-by-step guide to learn how to convert Canon 100D 1080p MOV to Prores 422 for FCP X with keeping timecode.

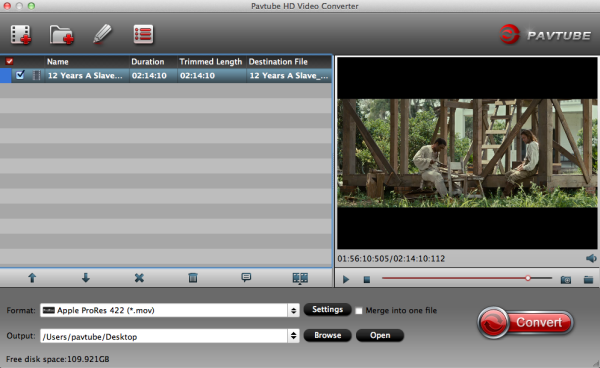
Step 1. Download and install the H.264 to Prores 422 Converter with timecode on your Mac. Launch it and import your Canon 100D .mov clips into it.


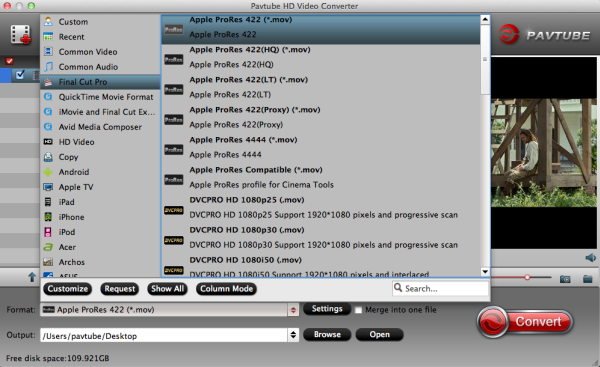
Step 2. Choose Apple Prores as output for FCP X.

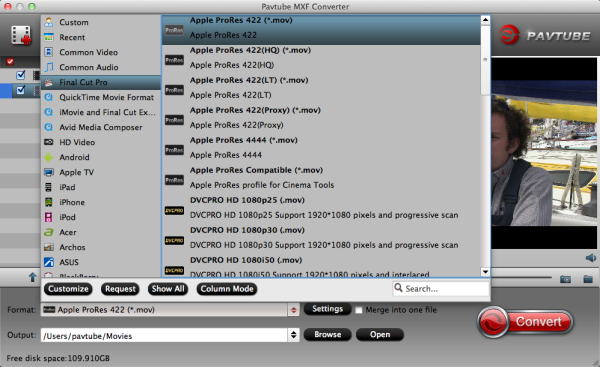
Click on "Format", follow "Final Cut Pro > Apple ProRes 422 (*.mov)" format for native importing and editing in FCP X.


Step 3. Click on Settings to adjust audio and video parameters including video size, video frame rate, bitrate, sample rate, audio channel.

Step 4. Start transcoding Canon 100D h.264 MOV to Prores 422 by clicking on "Convert" button.

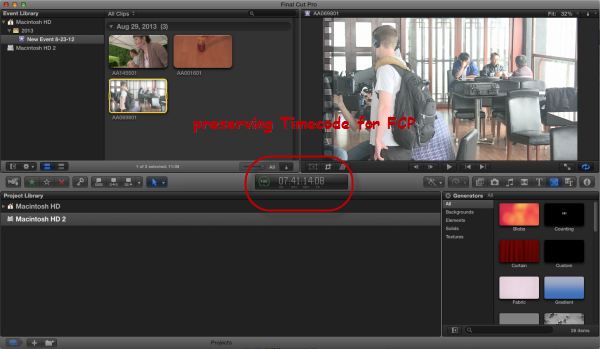
After the conversion is done, you can easily import Canon 100D h.264 footage into FCP X with retaining timecode.
  • Refer to the picture below to see how this cool mac mov converting tool keep the timecode for FCP. 


Hope this article will make the experience of editing h.264 mov footage from Canon 100D in FCP X easier and faster.

Related guide:

Tuesday, September 10, 2013

Convert MXF files to QuickTime MOV for playing on your Mac

In this article, you can learn the easy way to convert recorded MXF files to QuickTime MOV, and it will help you solve the playback issues with MXF and QuickTime Player on Mac.
 

QuickTime is a multimedia framework developed by Apple Inc., capable of handling various formats of digital video, picture, sound, panoramic images, and interactivity. As an excellent movie player, it is widely used by most of Mac users. But according to users' feedback, they usually have trouble with locating the Quicktime files once openning the MXF files.

What's the reason? As we know, MXF clips comes from like Panasonic HVX200/HPX300, Canon XF300/XF305, Sony EX camera, etc. It is not compatible with media players just like Apple QuickTime. So to get QuickTime Player natively accept MXF files, converting MXF file to Quicktime mov video is a necessary step if you want watch your MXF video on Mac with QuickTime Player.

Ane then what you need is a professional MXF to MOV Converter for Mac. Here I suppose you to use the top MXF Converter for Mac from Pavtube, it is just designed to convert MXF files to QT best supported MOV format so that you can freely enjoy MXF files with QuickTime on Mac.

Overall, this MXF to QuickTime Converter is very easy to use and can do MXF to MOV conversion fastly with preserving the original video quality perfectly. 
Just download this powerful Mac MXF to QuickTime Converter, and follow the guide as below.

Step by step guide to help you convert MXF file to QuickTime .mov for playing on Mac

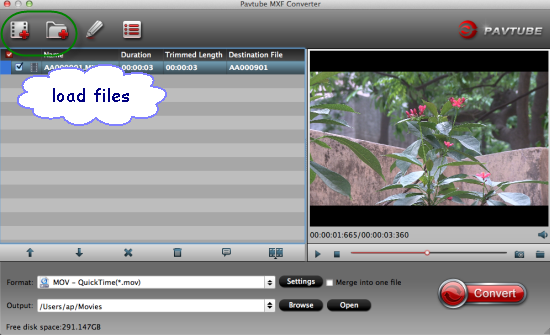
Step 1:Add mxf file into Mac MXF to MOV Converter

Install and run the program, click "Add" or "Add from folder" button to load your MXF video clips. You are allowed to add multiple files to convert at a time.


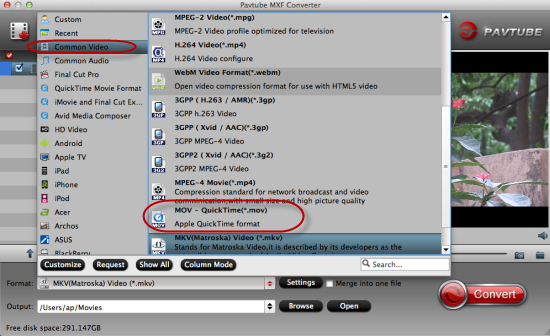
Step 2:Set Output format for QuickTime.

Click on the dropdown list of "Format" and select "Common Video -> MOV – QuickTime (*.mov)" as target format. This format is specially designed for QuickTime playback.


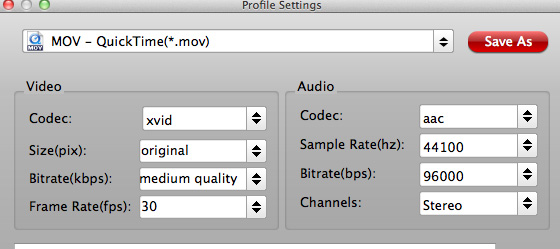
Step 3.Adjust video and audio parameters. (Optional)

Click "Settings" button to customize the output video and audio settings by yourself. You can also use the default parameters, they will ensure you a good balance between file size and image quality basically.


Step 4:Start Conversion

Click the "Convert" button to convert mxf file to QuickTime .mov on Mac.

After a few seconds or minutes (according to the length of source MXF file), you can finish the MXF to QuickTime Conversion. In this way, you can freely enjoy the output MOV file with QuickTime Player on Mac. Also you can edit the MOV file with Final Cut Pro.

Read More:

Wednesday, September 4, 2013

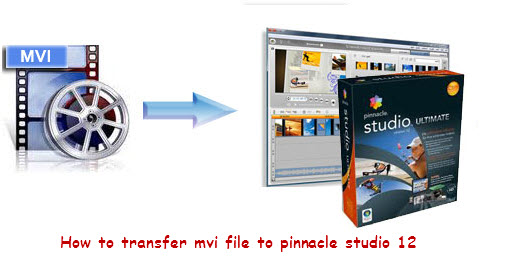
How to transfer mvi file to edit in Pinnacle Studio 12

Just get a video file with MVI format like MVI_xxx.avi, MVI_xxx.mov or xxx.mvi?The article will show you the easy way to transfer mvi file to edit in Pinnacle Studio 12.


What's MVI?


MVI stands for Musical Video Interactive, also a DVD-based means of packing audio, video and interactive visual content onto one disk, and the audio content is provided in multiple formats, including a high-definition version and and MP3 version for copying to portable audio players. The video content is compatible with DVD video, and can also optionally include high-definition video. 

How to transfer mvi file to Pinnacle Studio 12

Some digital video cameras like Canon Powershot will save the movie in MVI format; however, you will some codec problem for editing MVI file in Pinnacle Studio as the version of Pinnacle Studio 12 can not support this MVI format. And this is the reason why you need to convert MVI to Pinnacle Studio 12 supported format.

According to the Pinnacle Studio website, Pinnacle Studio 12 can read AVI format best. So to get full use of this MVI file on Windows applications, you can get help with this professional MVI Converter from Pavtube, which can convert MVI to Pinnacle Studio readable AVI with perfect quality and fast conversion speed.

What's more, it is the ideal conversion tool that offers several editing functions like cropping video dimension, trimming file length, adjust playing effects, etc. If you also wanna make your MVI footages editable in Winsdows Movie Maker, Sony Vegas Pro, Avid Media Composer, Adobe Premiere etc. I also strongly suggest you to try this , you'll make it!

Part I: Transcode MVI to Pinnacle Studio readable AVI format for editing

1. Load MVI files.

Run Pavtube Video Converter as the best Mac MVI to AVI Converter. Click "Add Video" or "Add from folder" icon to load MVI media files.


2. Select output format for video editing software.

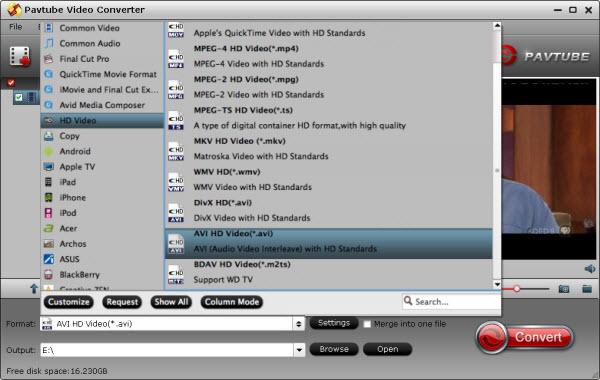
Click "Format" menu and choose "AVI HD Video (*.avi)" as target format from "HD Video" option for editing natively in Pinnacle Studio 12.

3. Edit loaded MVI files.

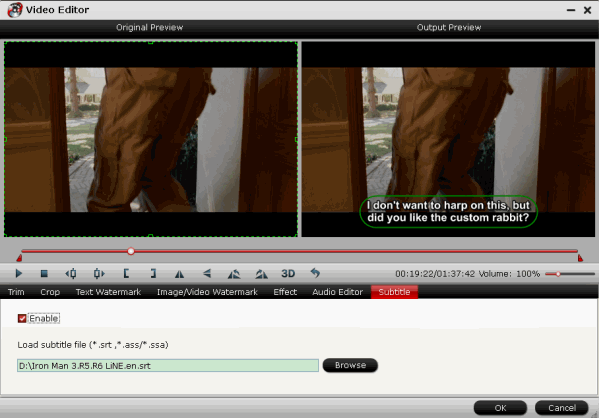
Click "Edit" button and you are allowed to trim, crop, add text/image/video watermark or some effect to your output video for making it perfect. Here the function of adding subtitles to output files will contribute to make your own videos. You can use free software Subtitle Edit to edit your subtitle content then add it to output videos.


Tips: Click "Settings" on the interface and you can adjust the parameters including size, bitrate, frame rate, etc. to get a high quality of output files. And keep the settings the same as original video recordings will provide you the least loss of video quality.

4. Start conversion.

Click the "Convert" button to start conversion. When it completed, click the "Open" button to get the generated videos for Pinnacle Studio 12.

Part II: Import converted HD AVI for editing in Pinnacle Studio 12

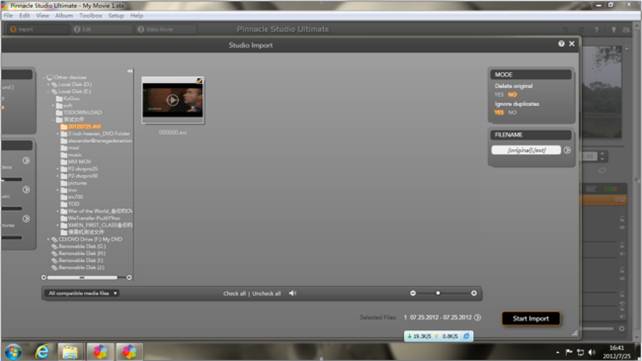
Launch Pinnacle Studio 12 and follow "Import"> "IMPORT FROM"> "Other devices"> "the folder stored the converted AVI files"> "Start Import”,import or transfer your hd .avi files to edit in Pinnacle Studio 12. 


MOV Related Guide:

Thursday, August 29, 2013

How can you burn dvd a disk directly for a Canon EOS 60D Camera

The Canon 60D raises the bar again with its full high-definition (HD) movie recording. You don’t have quite as many recording options as with a real (dedicated) video camera but you can make outstanding movies with your camera.

Before delving into the specifics, here’s a broad overview of moviemaking:

Movie quality: You can record movies at five different quality levels. In this case, quality means two attributes: pixel dimensions and frame rate. The setting you choose determines the frame size and aspect ratio of the movie:
  • Full high definition: 1920 x 1080
  • High definition: 1280 x 720
  • Standard definition: 640 x 480
As Canon 60D records video in H.264 mov format which contains a variety of codecs, this makes DVD burning workflow with MOV files can’t operate properly, neither using software iDVD nor Torast on Mac. This article will show you how to successfully burn/write MOV clips from Canon EOS 60D to DVD on Mac OS X (Mac Mavericks included).

How to Burn Canon 60D MOV files to DVD for playing with DVD player or backup on Mac?

Here a useful tool or software- Pavtube DVD Creator for Mac is recommended to you. Now Pavtube has released its Mac version. The DVD maker for Mac can help you burn any kind of video (MXF, MKV, AVI, MP4, WMV, MOV, TiVo, etc) to playable DVD with customized Menu and soundtrack . With its simple wizard-style user interface and powerful editing features, DVD authoring and burning can’t be easier.

Choosing DVD menu template/style, menu text, display aspect ratio and background for the DVD menu and setting chapter mark and playback mode, a DVD with your favourite style will present in front of your eyes!

Cant wait to have a try? Below is how Canon 60D MOV to DVD Burner works

1.
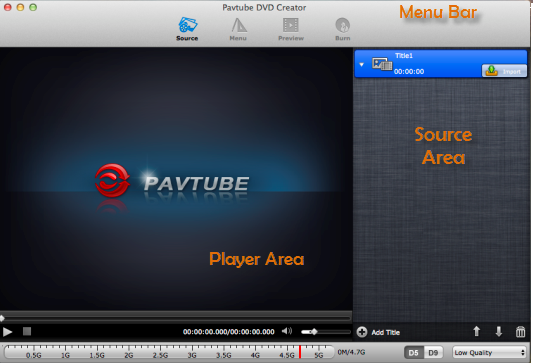
Free download this Mac MOV to DVD burnner. You can see the main interface. Connect your DVD Writer and insert a blank DVD.


2. Load your 60D mov files into the DVD creator for Mac. Use the 60D as a Firewire device, connect your camera to your computer via a Firewire cable and transfer and copy the footage onto your computer or another external Firewire device using the PC/Dub mode.

  • a. Drag and drop source files to source area (details in Source Screen)
  • b. Select “add Files” from the drop-down list of Quick Start menu
Each file is recognized as a chapter after being imported to DVD Creator. Press on “Add title” button to add more titles. And you can do some arrangement for titles or chapters.

3. You can Edit movie clip and Customize your DVD menu

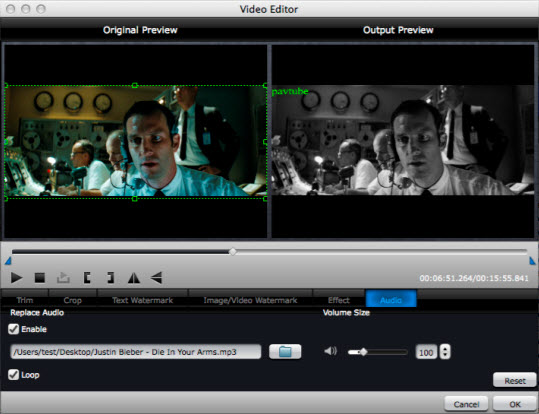
Pavtube DVD Creator for mac will enables you to edit your videos with trim, crop, watermark, effect settings, audio replacing settings features if necessary before burnning.

Tip: Swich to “Audio” Tab from Edit, and add audio to target video file so that you can replace the original audio track with favorite melody. Check the box of “Enable” and click “Browse” button and select the audio or video file you’d like to add. You may check “Loop” to make the audio repeat in order to fit the full length of the video.


This MOV-to-DVD Creator also allows you to design and create your own DVD menu or add background picture as well as music to make your DVD more personalized.  To use a preset menu template and simply double-click on the template.

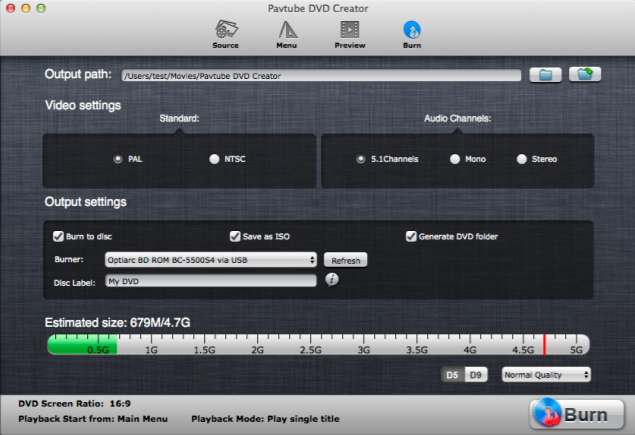
4. Preview Created DVD-Video. It’s great that you can preview the created DVD before burning to make sure everything is going well, and then you can choose to burn a DVD disc, a DVD folder, or a DVD ISO.

5. Start burning.

Click the “Burn” button to start burning Canon 60D mov files to DVD on Mac – video to a writable DVD (or ISO image) that will plays on standard DVD player after burning. Now you have finished the burning process and get the created DVD for watching on your home DVD player or TV.


With this professional mov  to DVD Maker, you will find it pretty easy to convert Canon 60D mov files to DVD for you to enjoy a quality time watching movies with your family at home.

Tips:

1. Learn write Sony XAVC footage to DVD.

2. Good news for Blu-ray/DVD fans! A way to save your money for more products: Have a look at some money-saving bundled products with special offer to get what you like. For example:

ByteCopy for Mac($42) + DVD Creator for Mac($35) = Only $44.9, Save $32.1
iMedia Converter Converter for Mac($65) + DVD Creator for Mac($35) = Only $64.9, Save $35.1
BDMagic for Mac($49) + DVD Creator for Mac($35) = Only $49.9, Save $28.1
DVDAid for Mac($35) + DVD Creator for Mac($35) = Only $35.9, Save $34.1

Wednesday, August 28, 2013

Canon Powershot N is a Facebook Ready Digital Camera

Facebook fanatics have a smartphone to call their own, and now they have a camera, too. Canon's PowerShot N, which first made its debut at CES, just scored a few (relatively minor) tweaks. The key distinguishing factor for this latest model in Canon's new Powershot lineup is the presence of a dedicated Facebook connect button which will, after a first time setup, allow users to directly upload their pictures to Facebook. Thanks to the presence of built-in WiFi capabilities, the user can subsequently comment on and share with others the pictures or videos throughout the social media site straight from the camera.


Canon PowerShot N Features

The Canon PowerShot N has a 12.1-megapixel CMOS sensor with an 8x optical zoom and 28mm wide-angle lens.

For the first time in the PowerShot range, Canon PowerShot N zoom lens and shutter are operated on the dual-ring lens. Users can also take a shot by pressing the touchscreen on the rear of the device. Holding their finger down will track the subject and releasing their finger takes the shot.

As the user rotates the camera to take a shot, the touch panel LCD also rotates the content with the movement of the camera.

With a DIGIC 5 Image Processor, the Canon PowerShot N has an Intelligent IS System that automatically changes the IS settings according to the current situation.

Capable of recording Full 1080p HD video via its dedicated movie button, users can try out the Hybrid Auto feature that creates a composite video of the day’s activities using short video clips.

Appealing to the social media addicts, Canon has included a dedicated Facebook Connect Button. After the user connects the camera to their Facebook account, they will be able to post photos and videos to their Facebook feed, either to everyone or select Facebook groups.

Canon PowerShot N Release Date and Price

The Canon PowerShot N will be released in September, available to buy from Canon Direct. It will be priced at $299.99, with UK pricing yet to be announced.

Thursday, August 22, 2013

Correct way to import Canon XA25 AVCHD MTS into Avid Media Composer and Xpress Pro

If you need to better edit Canon XA25 AVCHD footages in Avid Media Composer and Xpress Pro on Mac, just follow the guide to know the best way to convert Canon AVCHD to Avid DNxHD codec.


I am in school for broadcast journalism. I am stills photographer leaving print media behind. I'm think that it would be best for me to learn how to shoot video and tell unscripted stories using a small chip camera like the Canon XA25. I need to film on the go and get great footage, this is the camera I planned to buy.

And I have an iMac and installed Avid Media Composer 5; the question is whether Avid Media Composer or Xpress Pro works with mts videos for XA25? So it would be great if someone could provide me some timely advice.


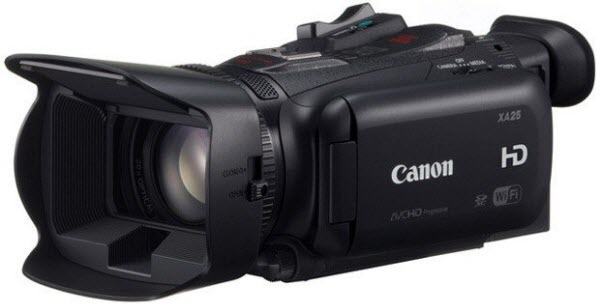
The XA25 camcorder combines outstanding image quality with dual-format recording and HD-SDI output in a compact form factor, making it ideal for professional broadcast and web-based content capture.

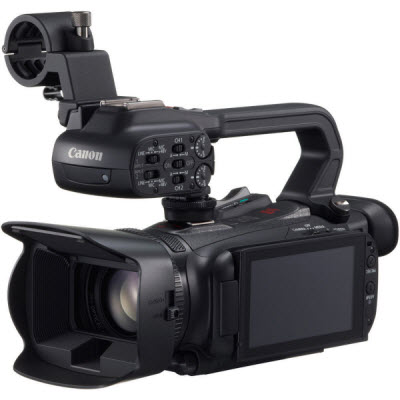
Canon XA25 recording file is AVCHD ( MTS/M2TS ) video format. Now the latest Avid MC is version 7, though it added many new features, but it can't support XA25 AVCHD footages well. And thus you can't easily import Canon X25 AVCHD MTS into Avid Media Composer and Xpress Pro. But things can be different if you get help wih a top third AVCHD Converter Tool.

Thiis MTS/M2TS Converter for Mac is an ideal converting program from Pavtube. I have used this tools for some time and it works perfectly in transcoding Canon XA25 AVCHD to DNxHD codec, which is best natively supported by Avid MC and Xpress Pro. After converting, you can edit your Canon XA25 AVCHD MTS files in Avid as well as Xpress Pro natively. Just take a look at the brief guide below.


(If you are a Windows user, try this MTS/M2TS Converter)

1. Connect your Canon XA25 to your Apple with USB2.0.

Install and launch MTS to Avid Converter on Mac. Drag and drop Canon XA25 AVCHD video files into file list. If it is necessary, you can double click the each file to have a preview.


Tip: If you have multiple 1080/50p MTS/M2TS files, you can tick the “Merge into one” box to merge the files into one single file so that you can edit Canon XA25 1080/50p AVCHD in Avid Media Composer and Xpress Pro on Mac without interruption.

2. Click on “Format” and you will get a dropdown menu, then move you pointer to Avid Media Composer -> Avid DNxHD (*.mov). The Avid DNxHD .mov format is the native format for Avid Media Composer and Xpress Pro. Then you can set the output folder by clicking “Browse” icon as you need.


3. If you would like to customize the video and audio parameters, you can click "settings", adjust the parameters as you want, like Video Codec, aspect ratio, bit rate, frame rate, Audio codec, sampling rate, bit rate, channels.


4. Click "Convert" botton, it will convert Canon XA10 mts footage to DNxHD for Avid Media Composer and Xpress Pro on Mac OS immediately.

After converting, you can follow this guide how to import media files to Avid Media Composer to know the importing process. Now you you will be able to import Canon XA25 AVCHD 1080p files to Avid Media Composer and Xpress Pro effortlessly.

Read More:

Tuesday, August 20, 2013

How to get iMovie to work with Canon Vixia HF G30 60p mts video?

Here is a simple guide for you to convert Canon Vixia HF G30 60p mts video to AIC for iMovie editing.

I just received the HF G30 and am still working my way through learning how it works. I'm using the iLife '11 version of iMovie on my MacBook Pro and MacPro desktop and neither is recognizing my Canon HF G30 camcorder when I connect it via the USB cable. The strange thing is the Canon icon and SD card icon both show up on my desktop but iMovie isn't recognizing the camcorder as connected and therefore won't import the 60p mts files.

When I try to manually import the AVCHD footage from the SD card, iMovie says there are no recognizable files, although the AVCHD files are definitely there (this is consistent with all my recordings and not just on one SD card). I wrote Canon and they have no idea why this occurring, claiming it's an Apple issue. Any idea what's going on and how I can solve it?

Canon VIXIA HF G30 Full HD Camcorder

Canon HF G30 supports MP4 recording at up to 35Mbps and AVCHD recording at up to 35Mbps. Both formats support Full HD 1080/60p resolution. Plus, images captured at 60 frames per second means that diagonal noise is mostly eliminated - even when shooting fast moving subjects. The camera also supports enhanced color and tonal gradation.

In fact, the 60p AVCHD MTS file is not an acceptable format by iMovie and then it has to convert them to a format it's able to edit in iMovie. So the best solution is to transcode Canon Vixia AVCHD to iMovie preferred format like AIC mov. If you have got one AVCHD camcorder Canon HF G30, and like editing with iMovie, below is a simple step by step guide for you to smoothly import and edit Canon HF G30 AVCHD 60p .mts files on iMovie editing with AIC codec.

Download Pavtube MTS/M2TS Converter for Mac

This best Canon AVCHD Converter for Mac offers optimal conversion by converting Canon HF G30 .mts to Apple Intermediate Codec, which works best in iMovie.

What's more, t
he software is a great choice for converting AVCHD videos to iMovie/Final Cut Express/Final Cut Pro editable formats. It works with Sony, Panasonic and Canon AVCHD .mts and .m2ts footage. There are various export format for users to choose from, including Apple’s ProRes 422 codec, Intermediate codec and QuickTime codec. It also lets users to convert AVCHD files into common video formats like AVI, MP4, WMV, MKV, MOV, M4V, etc.

How to convert Canon HF G30 60p AVCHD to AIC for iMovie on Mac

1. Connect Canon HF G30 Camcorder to Mac, and transfer the 60p mts files that you want to deal with onto Mac HDD.

2. Run the Mac MTS to iMovie Converter, click the "Add" button to browse and import Canon HF G30 60p .mts files.


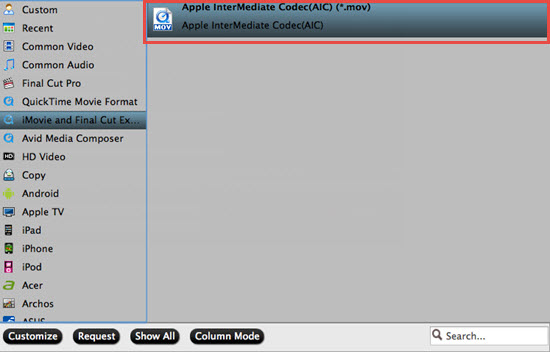
3. Click the "Format" bar, choose "iMovie and Final Cut Express>Apple Intermediate Codec (*.mov)" as output video format.


P.S. 

If you want to transfer Canon HF G30 MTS to Adobe Premiere Pro CS6 and After Effects CS6, choose Adobe Premiere/Sony Vegas> MPEG-2 (*.mpg) for editing.
4. Click the "Convert" button and the MTS Converter will start converting Canon HF G30 60p AVCHD MTS files to AIC .mov clips.

5. When the conversion completes, press "Open" to find encoded files. After Conversion, you can work with Canon HF G30 AVCHD MTS recordings in iMovie natively.


Tips:

1. For your original 1080/60i footages, you need to deinterlace 1080/60i AVCHD footages to remove all these interlacing artifacts from videos via ticking the “Deinterlacing” box in the Video Editor interface.

2. If the supposed size of the input files is 1GB, then the memory space should be up to 40GB.

3. Auto shutdown: Click Option and tick the box “Shut down the computer after conversion” before conversion starts.

4. 3D conversion. The Red-Blue/Red-Green 3D conversions are supported.

5. Crop: Edit --> Crop and you can get the imported videos cropped as you want.

6. Double click the imputed file, you can preview your footages in the software window.

Read More:

Sunday, August 18, 2013

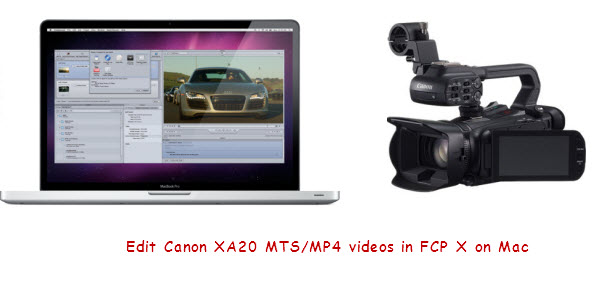
Lossless converting Canon MTS/MP4 files for editing in Final Cut Pro X

To get Final Cut Pro X working perfectly with MTS/MP4 files, a best way is to convert them to ProRes MOV. Read on to learn details. 


The XA20 is a compact, "run-and-gun" HD camcorder with an impressive Optical performance from a powerful new Genuine Canon 20x HD Video Lens with a new 8-Blade Circular Aperture, capable of focusing down to just 23.6 inches (60cm). Other features include multiple HD/SD Recording rates - including 24p for a "cinematic" look - together with a choice of industry-standard MP4 (up to 35 Mbps) and AVCHD (up to 28 Mbps) codecs. 

The high image quality and recording versatility make the XA20 ideal for independent and documentary filmmaking, as well as event videography and educational institutions. However, many Mac users complain that they can’t import the MTS/MP4 files recording from Canon XA20 to FCP X because FCP doesn’t accept .MTS/.MP4 footage.

Well, don’t worry. It is known to us that Apple ProRes codec is well compatible to FCP. So, in order to smoothly import Canon XA20 MTS/MP4 files into Final Cut Pro X for editing, you can use 3rd-party software to convert Canon XA20 MTS/MP4 to Apple ProRes encoded mov format with excellent quality of videos as it applies advanced audio and video sync technology, which is a native format for FCP X.

Here Pavtube HD Video Converter for Mac is highly recommended. It is an easy-to-use Canon Video Converter for Mac program with clean interface. And it is good at converting 1080/60p MTS and MPEG-2 MP4 videos from Canon XA20 to various formats for editing, playback, uploading, burning etc. on Mac OS X (Mountain Lion, Mavericks included). You can try the free trial versionto test the functions at first.

Now let' learn how to transcode Canon XA20 MTS/MP4 clips to Apple ProRes MOV for editing on Final Cut Pro X. At first, download, install and run the best and easy-to-use Mac MTS/MP4 to FCP Converter.

Step 1. Load AVCHD MTS/MP4 files. 

Connect your Canon X20 camcorder to your Mac via USB, or insert your SD card to Mac, browser the .mts files from AVCHD > BDMV > STREAM. Load your 1080/60p .mts or .mp4 files from XA20 or local computer which you have copied from camcorder before into Pavtube HD Converter for Mac. 
 

P.S. There are two ways for you to import files: add video directly and add the entire folder.
 

Step 2. Select Apple ProRes MOV format for FCP.

You are recommended to choose the “Format” under “Final Cut Pro” which is preferable to your FCP X, and it is the easiest way to find the suitable format. 


Tip 1: You are allowed to adjust output video and video parameters. However, if you have no idea about profile setting, keep it as original recordings will provide you the files with less quality loss, and keep default settings is also a good choice for your to get a high quality files.

Tip 2: In order to get customized videos, you can add subtitles to your own videos.
Step 3. Start MTS/MP4 to Apple ProRes conversion.

Click “Convert” button to start transcoding Canon XA20 AVCHD MTS/MP4 to Apple ProRes MOV, and then click “Open” button will bring you to the generated Apple ProRes MOV files for Final Cut Pro X.

In this way, you will have no difficulty in importing and editing Canon XA20 MTS/MP4 footage into FCP X with excellent audio and video quality. You can enjoy sharing edited video with friends and taking any individual frames you want.

What’s more, if you are a Windows user, try this Pavtube HD Video Converter, which is considered as best HD Video Converter. It is specially developed for HD camera/camcorder users to transcode all kinds of HD video footage to various fotmats accepted by Sony Vegas, Avid, Premiere, Pinnacle, Cyberlink and Windows Movie Maker and more similar Windows video editing software with least quality loss. 

Canon XA20 more related:

Read Related Articles:

Wednesday, August 14, 2013

Why Canon XA20 1080/50p mts video files can't be played with QuickTime?

This tutorial will give you a step by step instruction about how to play Canon XA20 AVCHD mts video files in QuickTime on Mac OS X.


Canon just announced three new handheld video HD Camcorder range with three compact models for professionals and video enthusiasts. And XA20 HD Professional Camcorder is one of them, as a X-series model, it combine a powerful, all-new imaging system with professional audio and Wi-Fi connectivity in a "versatile, compact package that fits neatly in the palm of a hand," the company says.

Canon XA20 allows you to record at AVCHD video of up to 28mbps in a 1080/50P setting. If its maximum quality you want though, a recording mode at 35mps in a 1080/50P is available. However, some Mac users find that QuickTime will not recognize the 1080/50p mts footage from XA20 and an error message will pop-out.

To solve the playback issue with Caon X20 1080/50p mts and QuickTime, at first, you need to make sure that the codec of your file is supported by QuickTime. If you are not very good at codec things, don’t try this one. To avoid certain severe problem might occurring, is there a better while equally simple solution? Absolutely yes! Hereby the best work flow is to convert Canon XA20 1080/50p mts footage to QuickTime MOV on Mac. 

No worries, this Mac MTS to QuickTime Converter is the top MTS/M2TS Converter for Mac from Pavtube, that can easily help you out with reliable efficiency and simple frank interface; no jitter, no slitter, all you need to do is a few clicks. Come and download Pavtube MTS/M2TS Converter for Mac and let's start!  

How to convert Canon XA20 1080/50p mts video clips to QuickTime MOV on Mac

Step 1. Install and launch this Canon AVCHD Converter for Mac, click top left two icons to load individual videos or load the entire folder. 


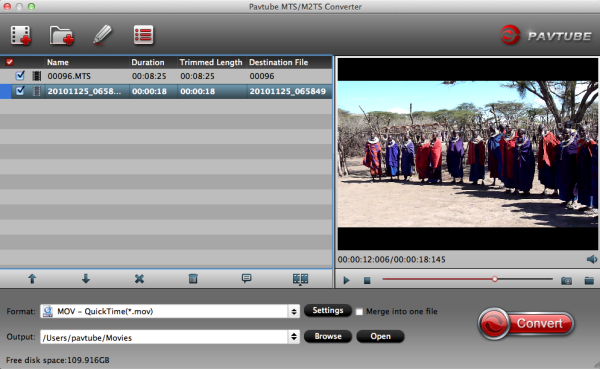
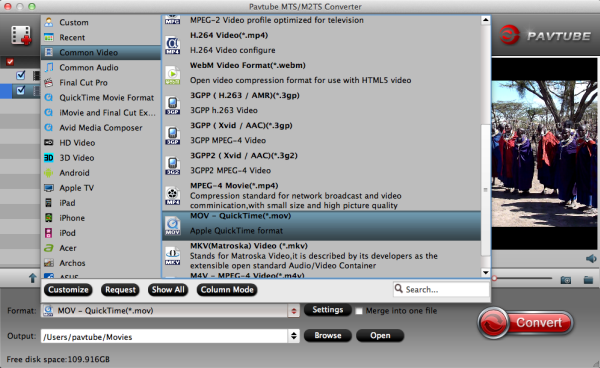
Step 2. Click Format and choose Common Video> MOV-QuickTime(*.mov) as the best video format for playback with QuickTime on Mac.


You can also click Settings to change the output video bitrate, frame rate, size, etc. all according to your needs. 

Monday, July 29, 2013

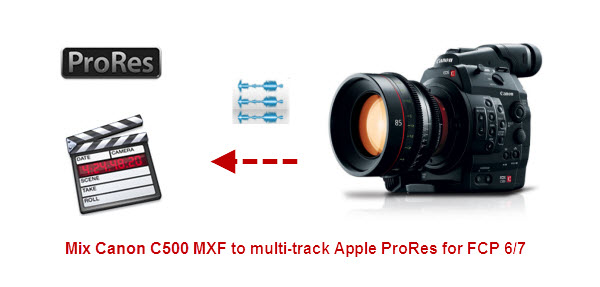
Audio Track Mixer: Mix Canon C500 MXF to multi-track Apple ProRes for FCP 6/7

If you have problems with importing Canon C500 MXF to Final Cut Pro 6/7 on Mac, please follow this post below to know the esay solution to convert Canon C500 mxf footage to multi-track apple prores. 
 

Canon has officially announced the EOS C500, the professional 4K video camera output that it promised at the NAB trade show in April. A continuation of the concept of the C300, it can capture Raw 4K video footage and offers frame rates of up to 120fps in compressed 4K. It also captures 2K footage (2,048 x 1,080 pixels) at 12-bit, with 4:4:4 Y'CbCr chroma sub-sampling for high colour resolution.

With this professional EOS C500, you may have recorded many footage and want to do some editing work with FCP 6/7 to get better video effect. And you will find the following problem:

Q1: Using a card reader to download my footage shot with my Canon EOS C500 into FCP. My FCP 7 crashed while opening. If I am using Canon XF utility to backup the files, find out they are not readable? What's that? I am sure the videos are playable on C500. So strange. Any insight here how can I import these files into FCP 7?

Q2: I want to extract a small clip from my C500 and edit it in FCP 6, is there anyway to keep all my audio tracks? 

I believe you this is a common issue many new Canon users may meet, and most of them will choose to install a Canon C500 XF plugin for FCP. But unfortunately, at last they get little success: some don't want to upgrade, some has audio problems, and some may be confused with the complex procedure.

Then to make it smooth and easy to edit Canon C500 MXF to FCP 6/7 on Mac (including Mavericks 10.9), you can switch to a third party tool - Pavtube iMixMXF. I think it's much easier for me. It can not only convert Canon EOS C500 MXF .mxf to FCP 6/7 best editing codec Apple prores, but also has editing functions and unique multi-track preserving feature.

Convert Muti-track MXF files from Canon C500 to FCP 6/7 for editing

Step 1. Free download, install, and run Muti-track MXF Converter for FCP 6/7. Click "Add Video" button to load your source MXF clips or drag and drop the C500 MXF files to the converter. You are allowed to add multiple files to convert at a time.


Step 2. Click "format" bar to choose output format. Click and choose Multi-track Video>Multi-track Apple ProRes 422(*.mov), it's the best format for editing Canon C500 multi-track MXF files in Final Cut Pro 6/7.


Step 3. Adjust video and audio parameters. (Optional)

Click "Settings" button to customize the output video and audio settings by yourself. But if you are not good at it, you'd better use the default parameters, they will ensure you a good balance between file size and image quality basically. You can change the resolution, bitrate, frame rate as you need.

Step 4. When above steps finished, you can click "Convert" button to start transcoding Canon C500 MXF to mult-track ProRes MOV for Final Cut Pro 6/7 with a super fast speed.

With the excellent multi-track MXF to FCP Converter, you can work with Canon C500 MXF files in FCP 6/7 on Mac Mavericks with multi-track preserving and with best video and audio quality as you want.

Additional Contents

If you don't want to get multi-track videos or your videos has less that two audio track, you can try Pavtube MXF Converter for Mac, a profession MXF Converter and a good partner with your simple and efficient MXF conversion workflow on Mac.

Canon Related Tutorial:

Edit Canon XF100 MXF files in iMovie/FCE
Convert Canon XF300 MXF to ProRes for FCP/Premiere Pro
Edit Canon XF100 MXF video with Avid Media Composer
...

Thursday, July 18, 2013

Batch script to transcode MXF video files for using with VLC Player

In this article, we aim to offer you an easy way to help you play MXF with VLC media player freely.


  • What is MXF?
MXF is abbreviation for Material eXchange Format, it is a "container" or "wrapper" for professional digital video and audio media defined by a set of SMPTE standards. MXF files are mainly from professional High Definition camcorders/cameras like Panasonic P2 camcorders AG-AC130EJ, AJ-HPX370, Canon XF series camcorder XF300, XF305, and Sony EX camera , etc.
  • The basic way to get MXF files played:
Find a media player that can support playing .mxf files as well as be compatible with the Mac or Windows OS.
VLC player is a powerful media player for viewing movies or videos on Mac and Windows. Playing MXF files on VLC is by using the Mainconcept Reference codec, by installing this codec you can directly run your MXF files on the VLC media player.
  • The Playback problems:
While, there are still groups of people complain of the imported with low video quality or incapability of video playback.

Q1: I read that VLC can easily play MXF but it's not working on mine. I have the latet VLC player. Any solutions? Thank you.

Q2Hey guys. I need some help.I am using a Canon camera to record rugby games. All of my previous stuff was saved on a desktop and all of my movies and videos are saved as MXF. I use a free program to convert MXF to MPEG-4 format for playing on my VLC player. The 1st file goes well but then appears to stop converting. Is the files too large to handle? What do I have to do? 

Q3:
I can play the MXF files from my XF-100 in VLC, but the audio is choppy or non-existant…The video plays without a hitch. But no audio. Any fixes for this problem, or am I the only one?
  • An quick workaround to solve the MXF playback issues with VLC Player 
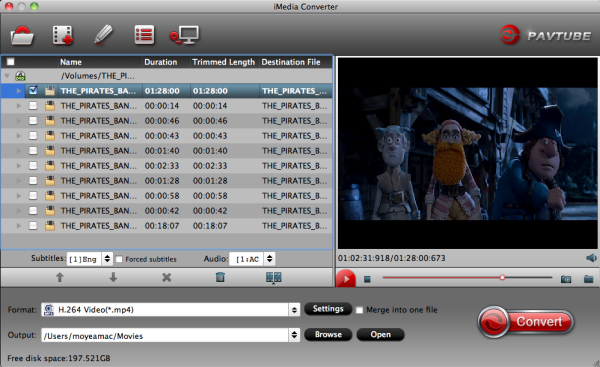
Nothing is absolute, if there are some special MXF can't be played by VLC or other Video Player, you can convert the MXF files to common formats (like AVI, MOV, MPEG, MP4, etc) to fit the local VLC media player with iMedia Converter for Mac from Pavtube.

This top MXF to Mac Converter which works successfully in MXF to MP4 conversion even you have a bunch of large MXF files. I have tried it to encode MXF to MP4, it turns out playing Canon, Sony, Panasonic MXF on Mac smoothly and at original quality.

It’s the best software application for Mac users. What’s more, this converter also supports many of other video formats like MOV,MKV, AVI, WMV, FLV, MPG, etc on Mac. Below is easy steps for you, you can convert MXF to VLC player compatible formats for watching in few steps.

Step 1: Add mxf video files

Run iMedia Converter for Mac on your Mac computer. Transfer the individual .mxf file or MXF file structure (P2 MXF, XDCAM MXF, Canon XF) to HDD first, and then click "Add Video" to import the MXF files to the converter.


Step 2: Choose H.264 MP4 as output format.

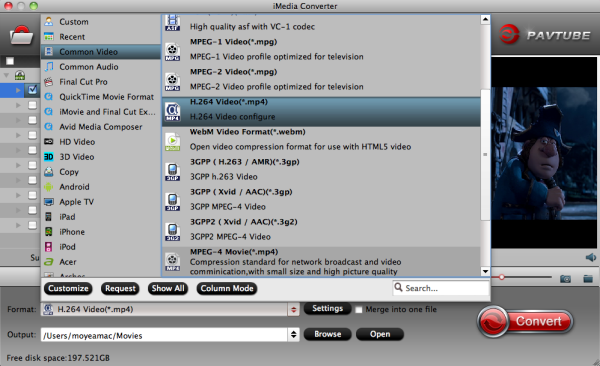
In “Format” drop down list box, you may select best video format for plaing on Mac. To convert MXF to MP4 format, if you want to get common MP4 files for playback, you can choose Common Video -> H.264 Video (*.mp4); if you want to get HD MP4 files to use, you can choose HD Video -> H.264 HD Video (*.mp4).


Step 3: Start Convert

Click “Convert” in the main interface to start transcoding MXF to Mac H.264 MP4.

After conversion, you can use converted MP4 files for playback easiliy and smoothly. You can also refer to the MXF to Quicktime MOV, MXF to AVI guide, and have a try.

Tips: 

If you are Windows users, you can try Pavtube Video Converter Ultimate. It you can easily import the MXF video and the audios for playing and editing.

Read More:

Tuesday, July 16, 2013

Transcode Canon XF100 MXF footage to FCP 6/7 for editing

From this article, you can know the best codec for importing Canon XF100 MXF clips to Final Cut Pro 6/7 editing on Mac by converting XF100 MXF to ProRes 422.

Canon XF100 Professional Camcorder can be tailored to fit a wide range of individual needs. XF100 offers some exciting new features of its own, it is geared for a wide range of applications where high image quality, extreme portability, and efficient workflow are of the utmost importance. And with infrared recording and true stereoscopic 3-D production capabilities, the XF100 allows users to explore new creative outlets and emerging markets.


The XF100 utilizes Canon's XF Codec – a file-based MPEG-2 compression with an MXF File Wrapper. If you record a great deal of MXF footages with Canon XF100 and desire to edit them with Final Cut Pro 6/7, you may encounter dilemma like the MXF files can't be recognized by FCP 6/7.

And the truth is, it is possible to smoothly import Canon XF100 MXF clips to FCP 6/7, as long as you convert Canon XF100 MXF to Final Cut Pro compatible ProRes 422 codec first. 


Here I recommend you the professional MXF to FCP Converter for Mac from Pavtube Studion that works fine for me. I like the batch processing and joining of multiple mxf videos into one file. The editing feature to trim the recorded videos is great, as I can control the content for conversion.

To help those who may face the same problem like me, or want to rewrap MXF to Prores .mov on Mac for HD editing in Final Cut Pro 6/7, I here list a few steps with the fast MXF video conversion.

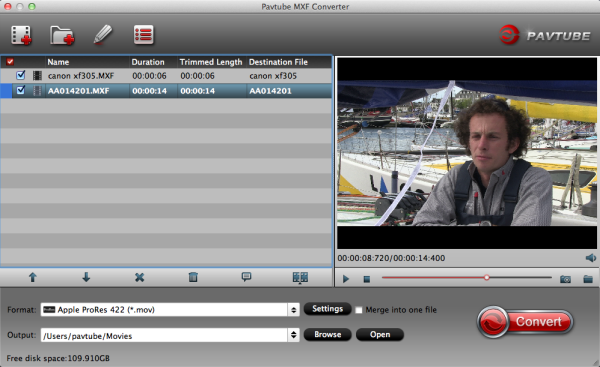
1. Download Pavtube MXF Converter for Mac, install this Canon XF100 MXF to FCP X converter. Import or drag and drop the XF100 MXF files to the converter you want to convert.


2. Click "Format" bar to choose output format. Click and choose "Final Cut Pro -> Apple ProRes 422 (*.mov)", it's the best format for editing in FCP 6/7.


3. If you want to customize the output settings, you can click "Settings" button to adjust the resolution, bitrate, etc.

4. Click "Convert" button to start transcode Canon XF100 MXF to ProRes 422 for FCP 6/7. with the excellent MXF to Mac Converter, you can use XF100 MXF files on Mac as you want.

P.S. You can try iMixMXF from Pavtube, which is a wonderful MXF multi audio track/ channel preserver, mixer and converter supporting Multi-track MXF importing and exporting on Mac.

Read More: