Showing posts with label Sony. Show all posts

Tuesday, September 10, 2013

Convert MXF files to QuickTime MOV for playing on your Mac

In this article, you can learn the easy way to convert recorded MXF files to QuickTime MOV, and it will help you solve the playback issues with MXF and QuickTime Player on Mac.
 

QuickTime is a multimedia framework developed by Apple Inc., capable of handling various formats of digital video, picture, sound, panoramic images, and interactivity. As an excellent movie player, it is widely used by most of Mac users. But according to users' feedback, they usually have trouble with locating the Quicktime files once openning the MXF files.

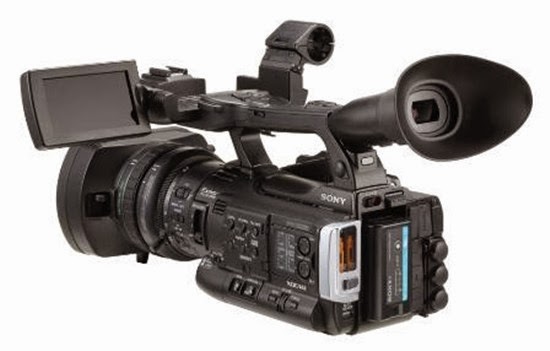
What's the reason? As we know, MXF clips comes from like Panasonic HVX200/HPX300, Canon XF300/XF305, Sony EX camera, etc. It is not compatible with media players just like Apple QuickTime. So to get QuickTime Player natively accept MXF files, converting MXF file to Quicktime mov video is a necessary step if you want watch your MXF video on Mac with QuickTime Player.

Ane then what you need is a professional MXF to MOV Converter for Mac. Here I suppose you to use the top MXF Converter for Mac from Pavtube, it is just designed to convert MXF files to QT best supported MOV format so that you can freely enjoy MXF files with QuickTime on Mac.

Overall, this MXF to QuickTime Converter is very easy to use and can do MXF to MOV conversion fastly with preserving the original video quality perfectly. 
Just download this powerful Mac MXF to QuickTime Converter, and follow the guide as below.

Step by step guide to help you convert MXF file to QuickTime .mov for playing on Mac

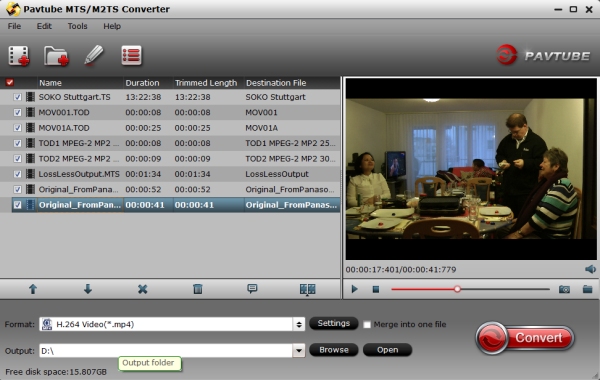
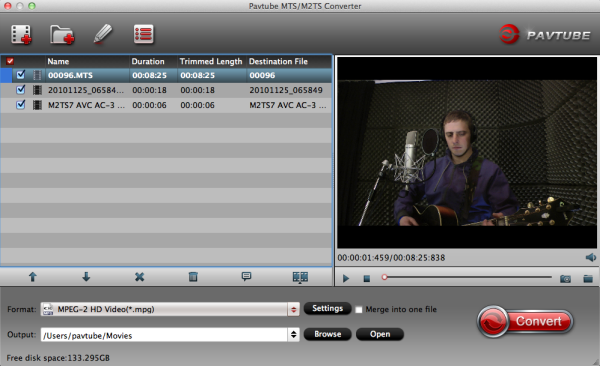
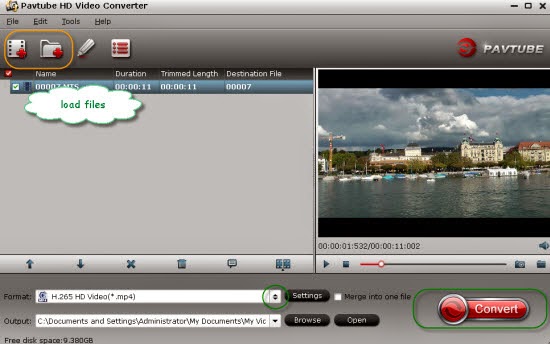
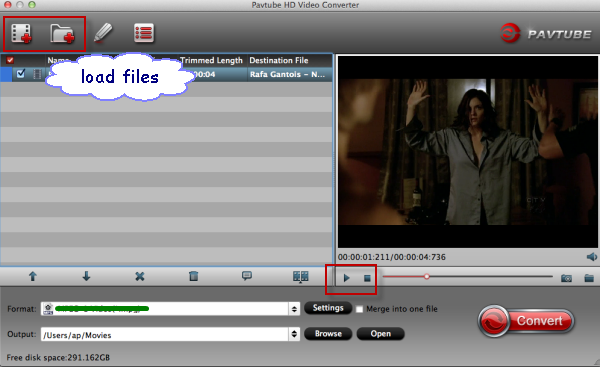
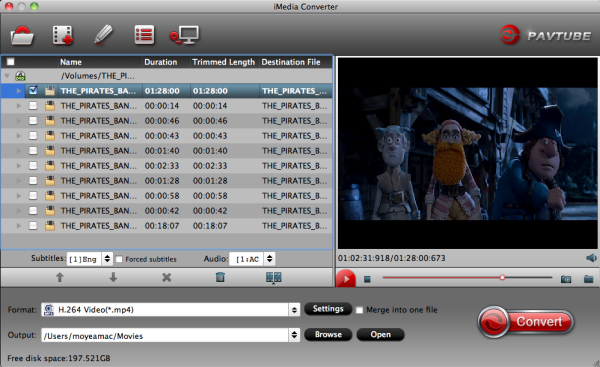
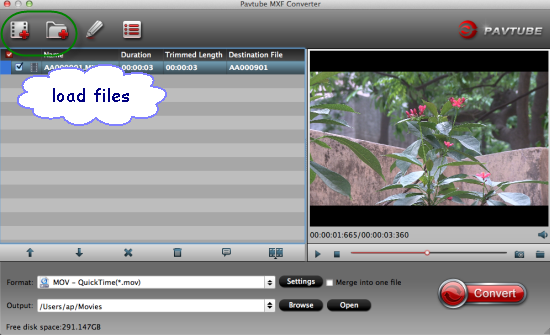
Step 1:Add mxf file into Mac MXF to MOV Converter

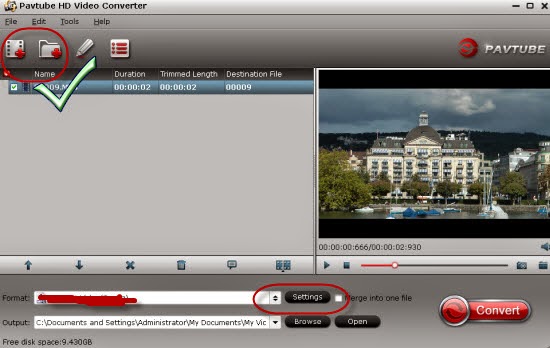
Install and run the program, click "Add" or "Add from folder" button to load your MXF video clips. You are allowed to add multiple files to convert at a time.


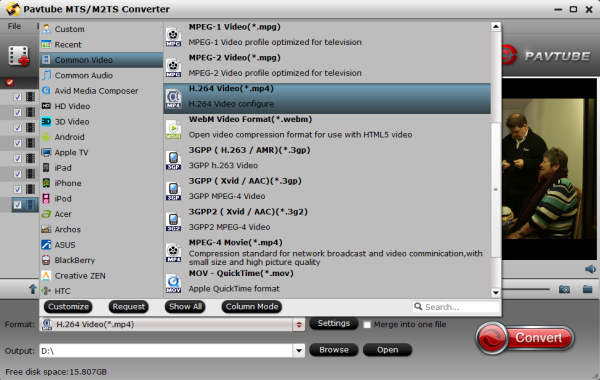
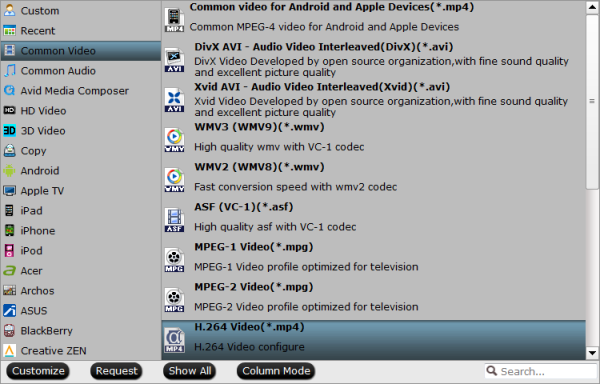
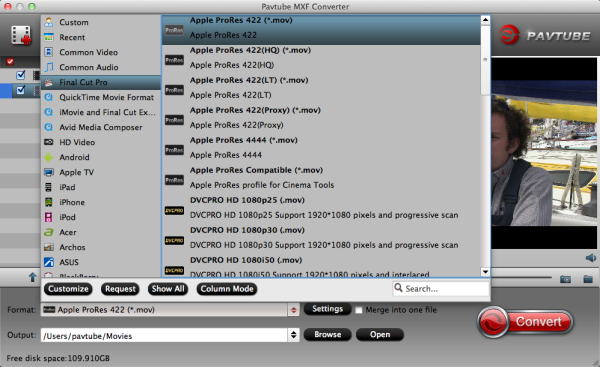
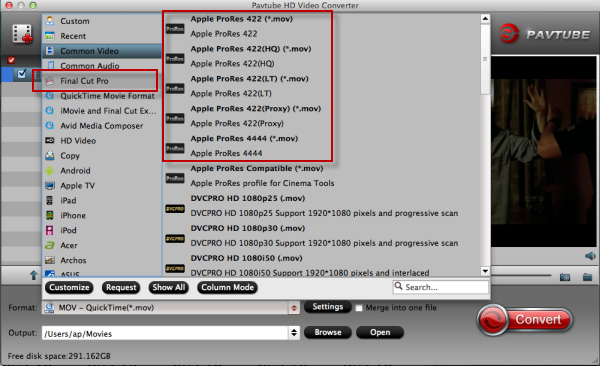
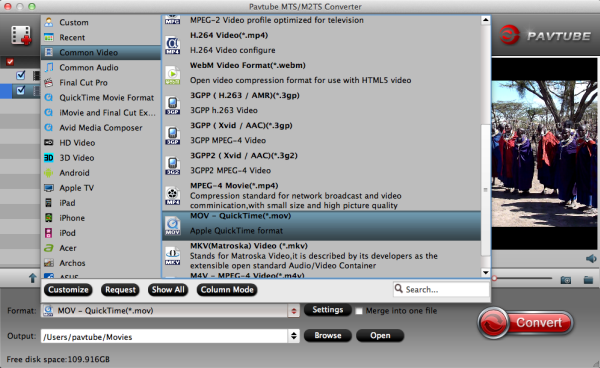
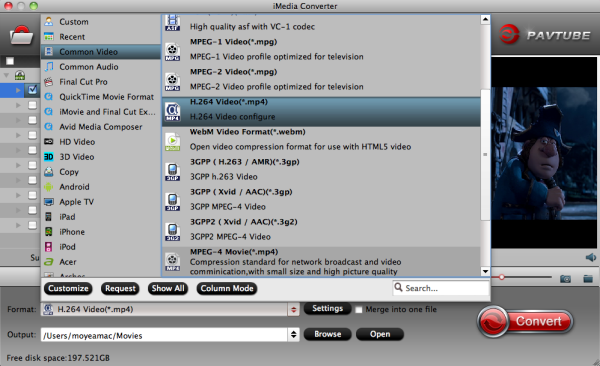
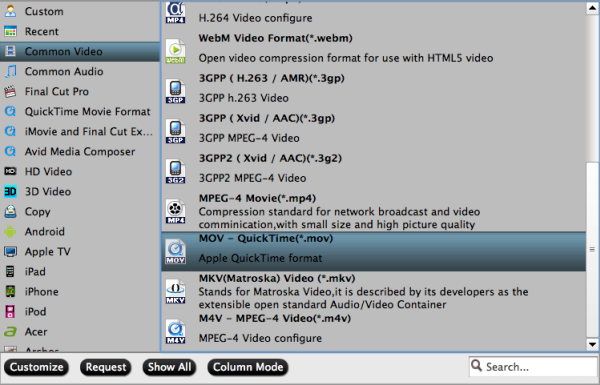
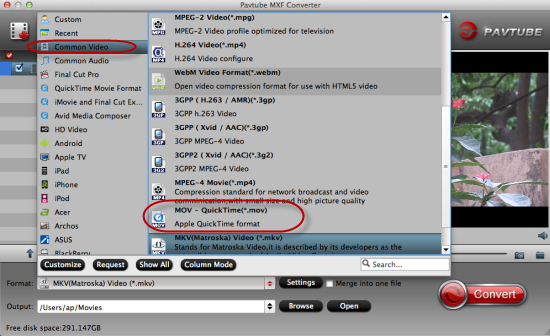
Step 2:Set Output format for QuickTime.

Click on the dropdown list of "Format" and select "Common Video -> MOV – QuickTime (*.mov)" as target format. This format is specially designed for QuickTime playback.


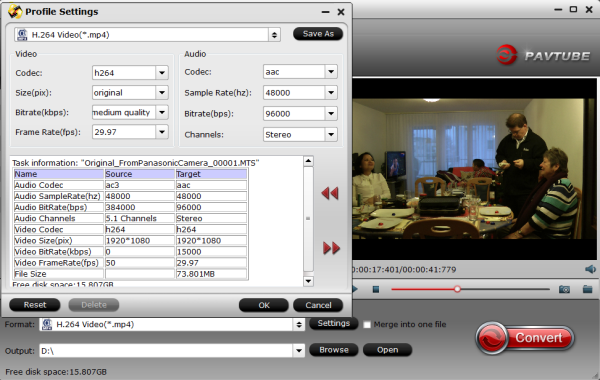
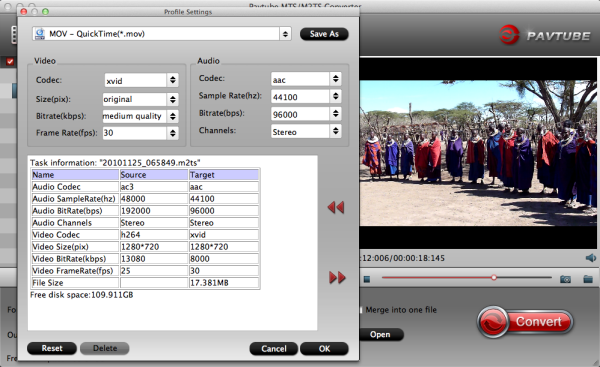
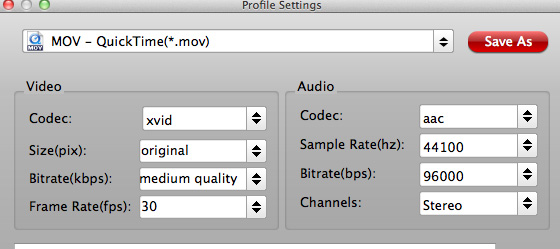
Step 3.Adjust video and audio parameters. (Optional)

Click "Settings" button to customize the output video and audio settings by yourself. You can also use the default parameters, they will ensure you a good balance between file size and image quality basically.


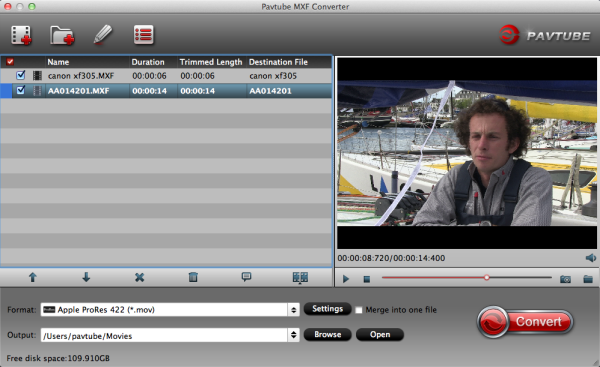
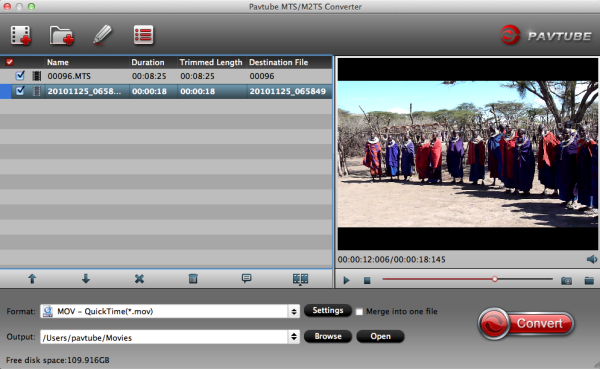
Step 4:Start Conversion

Click the "Convert" button to convert mxf file to QuickTime .mov on Mac.

After a few seconds or minutes (according to the length of source MXF file), you can finish the MXF to QuickTime Conversion. In this way, you can freely enjoy the output MOV file with QuickTime Player on Mac. Also you can edit the MOV file with Final Cut Pro.

Read More:

Monday, September 9, 2013

Re-encode Sony FS700 AVCHD to ProRes for freely importing in FCP

Sony FS700 users often meet the problem that they cannot edit AVCHD MTS files made by Sony high definition camcorder in FCP. The following will tell how to use FCP to edit Sony FS700 AVCHD MTS, which is not a Mac friendly format.


I've just got a bunch of CF cards in from a shoot from yesterday. I believe the camera used for the interview was a Sony FS700 On the CF cards, I have 2 folders: }CLP{ and then a }STT{ file, but FCP L&T doesn't like that structure so I can't use that. The files here are QT movs (M-PEG2) and I need to convert to ProRes 422. Not using MPEG since they don't keep source TC, so I'm using Compressor but it's taking EXTREMELY long, even for a 2 minute clip. Is there a quicker way to do these batches because I have to get all this footage over to the editor, but fear at this rate it will take all day!

  
The FS700 shoots AVCHD. And with any tapeless workflow, you need to copy the ENTIRE card structure to a hard drive. (refer to the guide). If you don't like the complex workflow as above, here hands down the best and easiest way we've found, that is to convert to Prores from a FS700 for importing. You should know that the FCP's native format is Apple ProRes, so after converting you can avoid the headache "FS700 and FCP incompatibility importing problem". Here is a simple tip for you how to make Sony FS700 AVCHD editable in FCP.

If you are planning to edit FS700 MTS clips with FCP, you'd better give the app a try. Here Pavtube MTS/M2TS Converter for Mac is recommended. It is an easy-to-use MTS to FCP Converter for Mac program with clean interface. And it is good at converting Sony FS700 MTS files to Mac native format for editing. You can try the free trial version to test the functions at first.

Guide: Re-encode Sony FS700 AVCHD to ProRes for freely editing with FCP on Mac OS X

Step 1. Download and install the best MTS to ProRes Converter and connet FS700 cam to Mac, or insert the SD or Memor card into the computer.


Step 2. Open the encoder and click "Add File" or "Add from folder" to load .mts from FS700.

Note: If necessary, you can click "Edit" to edit the file- trim, crop and add special effects to the file.

Step 3. Click on "Format" bar, you will see the "Final Cut Pro" menu. The menu has several formats for choosing as the best output format. You'd better choose Apple proRes 422(HQ)(*.mov) to keep the original video qaulity.

Tip: If your source file is 1080p, you'd better keep the video frame rate as 30fps, video size as 1920*1080.


Step 4. Start ticking "Convert" button to convert Sony FS700 MTS file for editing in Final Cut Pro.

As soon as the conversion ends, you can clcik "Open" to get the converted file. Now, you can directly drag and drop the ProRes MOV file to Finla Cut Pro for further editing on your Mac OS X.

PS:

With the top MTS Converter for FCP, you also can transocde AVCHD/MTS/M2TS clips to compatible formats for editing with iMovie, Adobe PPro, Avid MC, FCE, ect. Mac OS X editors.

Read Related Articles:

Tuesday, September 3, 2013

Convert Sony Handycam video to MP4 format for playback,backup and sharing

Do you have got one Sony Handycam camcorder? In this article, you will get the best solution to convert Sony Handycam mts video to MP4 format for playback,backup and sharing.

Sony Handycam is a high-definition camcorder with hybrid video recording capability. With extraordinary imaging quality, Sony Handycam has all the capabilities of being a professional choice and acceptable by users to record videos with good clarity.


After 
celebrating your son’s birthday and recording videos of that moment using Sony Handycam, you may busy with looking for a way to backup, play or share your Sony Handycam videos with friends and family.

As the videos from Sony Handycam are recorded with AVCHD format which is not support by many device, like iPad, iPhone, Galaxy Tab, Nexus 7, etc, Media Players like Windows Media Player, QuickTime, VLC player, and some video sharing website, such as Youtube, Viemo and Facebook. Converting Sony handycam video to the compatible mp4 format on Windows and Mac is the best solution.

Here a professional app for converting MTS to H.264 is strongly recommended, that is Pavtube MTS/M2TS Converter for Windows/Mac. It is an easy-to-use MTS/M2TS to H.264 Mac app for completing the task to convert sony hanycaom video to MP4 format on window and mac. You can totally depend on it. 

Now begin to operate the Sony Handycam MTS to H.264 MP4 Mac app.

1. Add Sony Hanycam MTS files to the application

Install and run the best Sony Handycam Video Converter, import the mts videos from Sony Hanycam by clicking "Add video" or "Add from folder",you can also directly drag and drop MTS files to the program.


2. Choose the output format

Now you should choose MP4 as the output format, H.264 as the video codec. This is the best and native format for storage, playback and sharing.


3. You can click settings to adjust the parameters


4. Start the Sony Handycam MTS to H.264 HD mp4 Mac Conversion

Click the "Convert" button to get the Mac conversion done.

Just in a few minutes, you can transfer or put HD mp4 videos on iPad, iPhone and other tablets or samrtphones for watching, backup the mp4 video on your Mac, or upload the video for sharing .

With Pavtube MTS/M2TS Converter for Win/Mac, you can convert Sony Handycam mts video to H.264 MP4 format easily.

Read more:

Sunday, September 1, 2013

How to import Sony AVCHD mts video files dans premiere pro cs5

Have some .mts files from Sony camcorder and want to import/edit AVCHD .mts footages in Adobe Premiere CS5 without rendering; check out the guide to learn how to convert Sony AVCDH MTS to Adobe Premiere Pro CS5 compatible MOV/MPEG-2 video format.


Recently, we have a France client who has the question that "How to importer video mts sony dans premiere pro cs5". So I searched Sony MTS and Adobe Premiere Pro on Google, and found there are other users who are also facing the importing problems:

Q1: The videos are from Sony NEX-5N and the format shows AVCHD Video (.MTS) - into Adobe Premiere. Can someone explain the best way to get my video into the editing software?

Q2: I have a Sony FS700, when I wanna edit those AVCHD MTS footage in Adobe Premiere, I met problems: the Premiere handled with the mts files so slowly, and I couldn't edit my videos smoothly. What's the problem?

Q3: I'm getting a failure error "... unsupported compression format" when importing video from Sony NX5U AVCHD camera (which has MTS files) into CS5.5 Adobe Premiere Pro. Never had this problem with CS5. The video was shot at 1080i/24fps. I tried to convert it into AVI format but lost image quality. I will appreciate assistance from anyone with solution. Thanks.

In fact, we have used many AVCHD camcorders but only met the similar trouble many times. I know the main reason is that AVCHD is a compressed format, and not fit for editing. The best method to solve those problems is to transcode Sony AVCHD .mts to Adobe Premiere Pro CS5 most compatible format, like MOV or MPEG-2 format.

At this time, you need a Mac Sony MTS to Premiere Pro Converter, Pavtube MTS/M2TS Converter for Mac can help you, it can transcode Sony MTS to MPG/MOV for Premiere Pro CS5 native editing on Mac with maintaining the original effect, below is a brief guide for you to convert Sony AVCHD mts video to Premiere CS5 on Mac.

Steps to transcode Sony MTS video files for importing into Adobe Premiere Pro CS5

1. Download and install Pavtube Mac AVCHD to Premiere Converter. It's an excellent software which can convert Sony AVCHD for Premiere Pro, more output formats are also supported, such as MKV, AVI, MP4, MOV, WMV, FLV, etc.

2. Import the Sony AVCHD MTS video to the best MTS/M2TS Converter for Mac.


3. Click "Format" column to choose the best video format for editing in Adobe Premiere Pro CS5 on Mac. Click and choose Adobe Premiere/Sony Vegas -> MOV or MPEG-2 for output. You can also choose Final Cut Pro  -> Apple ProRes 422 MOV for editing in Premiere Pro CS5.


4. You can customize output parameters as you want. Adjust the resolution, bitrate, etc according to your need; you can also keep the parameters as original.

After these steps above, click convert button to start converting Sony AVCHD MTS to MOV/MPEG-2 for Premiere Pro CS5.

With this best Sony MTS/M2TS Converter for Premiere Pro CS5, you can convert you mts videos with best quality, supported devices include Sony HDR-CX160, CX130, TD10, PJ760V, HDR-CX11E, CX155, CX150, CX100, SR1, etc. Now just have a try, and then you can get quick and smooth Sony AVCHD editing workflow in Adobe Premiere Pro CS5 as you want with no codec problems.

If you want to import or edit your Sony camera video files on FCP 6/7, FCP X, iMovie, FCE, Avid, Song Vegas, Pinnacle, Windows Movie Maker, etc., you can check out "Sony Camcorder/Camera Video Tips or MTS Tools" to get your solutions.

Read More:

Sunday, August 25, 2013

Sony F55/F5 Workflow- Converting 4K XAVC to MP4 MPEG-4

Want to convert 4K XAVC files from Sony F55/F5  to an MP4/Mpeg 4 video file so it can be played on your iPhone, iPad, Samsung Galaxy, Sony Xperia, Google Nexus, Surface, HTC One, etc. or easily edited or shared on uploading website? Then a XAVC to MP4 converter is needed to accomplish the task.


With the successful sale of new CineAlta 4K cameras, like Sony PMW-F55 and Sony PMW-F5, the XAVC format has been widely adopted in the marketplace. The format holds various advantages for high quality image reproduction including 4K pixel resolution, 10 bit color depth, wide color space (S-Gamut) and refined gamma (S-log). Sony is announcing Long GOP (4K 4:2:0 and HD 4:2:2) as choice of high-efficiency codec to serve more widely the requirements of the content production market. 

XAVC is introduced as an open format, to serve as a driver to promote and establish 4K content production infrastructure. A license program is proposed not only for editing software manufacturers but also for hardware manufacturers. However, this 4K XAVC format is not supported by many editing software and online video website, neither nor tablets, like iPad, iPhone and HTC Desire, etc.

So you may need to convert 4K XAVC video to a frienly video file like MP4 or MPEG-4. Here, Pavtube HD Video Converter is a powerful and  easy-to-use software for converting high resolution XAVC footage. With the help of the XAVC to MP4 Converter, you can convert Sony PMW-F5 or PMW-F55 recording 4K XAVC videos to MP4/MPEG-4 format, then you can play, edit or share Sony XAVC footage. You can totally depend on it. 

Overall, it is a piece of cake for this Ultimate XAVC Converter to transcode XAVC files to MP4, MPEG-4, MOV, FLV, MKV, AVI, WMV, VOB and so on. Besides it can convert more various formats to another, and rip and convert the latest DVDand Blu-ray.


With the best XAVC Video Converter, you can also convert XAVC footage to Avid Media Composer, Adobe Premiere, Sony Vegas, Pinnacle Studio, CyberLink, Windows Movie Maker, etc. Compatible format for editing. (The detailed steps reference the article)

What's more, you are allowed to edit the videos, like cutting off the unnecessary part, adding watermarks including text, image and video, adding 3D effect, and so on. And attaching subtitles to output video can be achieved here.

The following instruction will show you how to Convert 4K XAVC to MP4/MPEG-4.

First, choose the right version to download and install: XAVC Video Converter (Windows 8 supported)

Step 1: Import XAVC footage.

Run the Pavtube XAVC Video Converter, click "Add video" or "Add from folder" button to load XAVC recording videos from Sony PMW-F5 or F55 4K camcorders to the program, or also support to drag and drop XAVC files to the program.

Step 2: Choose MP4/MPEG-4 format.

Go to choose the proper format what you need. Click "Format" to choose "Common Video > H.264 Video(*.mp4)" or "MPEG-4 Movie (*.mp4)"other popular format you want.


Step 3. Attach subtitles to a video/movie.

Find "Edit" icon and then click it, you will find video editor. There you can Trim, Crop, Add watermark and Effect. Above all, Subtitle can be added here.

For creating customized subtitle, you can count on free software for subtitle editing: Subtitle Edit. Go to write the subtitle content there and it will be saved as SRT files, which is supported by Video Converter Ultimate. Then load it to the software for output videos and you will get a characteristic video.

Step 4. Start Song F55/F5 4D XAVC videos to MP4/MPEG-4 conversion.

Click "Convert" button to start conversion. After conversion, go to find the converted MP4 files with subtitles by clicking "Open" button. With CUDA acceleration conversion will become faster.

After converting, you can transfer Sony F55/F5 4K XAVC footages to tablets/phones/tvs like iPad Air, Kindle Fire HDX, NotePro, Galaxy Tab 3, iPhone 5S/5C, Galaxy S5, Apple TV 3 and other portable devices for playback, or upload the MP4 videos to YouTube, Vimeo, FaceBook for sharing with your friend and family.  

Wednesday, August 21, 2013

Sony PMW-200 XDCAM MXF to Apple Final Cut Pro 6/7 or Aperture 3

This guide shows you how to convert/transcode Sony PMW-200 XDCAM MXF file to Final Cut Pro/Aperture 3 supported files with Pavtube MXF Converter for Mac.


Sony PMW-200 camcorder features a broadcast-friendly 50Mbps data rate drawing from three half-inch CMOS sensors -- bigger than any other broadcast handheld cam, according to Sony -- though that size is still a far cry from its own super-35 filmmaking cams and others on the market.

50Mbps HD422 Recording
In the UDF/MXF recording mode, you can record Full HD video (1920x1080) at up to 50Mbps using MPEG HD422 compression technology and enjoy the benefits of proven, high-speed and intuitive XDCAM HD422 workflow. With the PMW-200, you can also record video in MPEG HD (420) or DVCAM™ format. (Note: Proxy video is not available with the PMW-200).

Import XDCAM MXF recordings to FCP 6/7 or Aperture 3. 

Q: Hi! I was wondering if the FCP 6/7 works with mxf footages natively. Aperture 3 seems not work with these mxf recordings. I have some .mxf video from Sony PMW-200 to edit for group work, and it would be great if anyone could help me with the importing workflow. Thanks!

A: If you want to edit Sony PMW-200  XDCAM MXF in Final Cut Pro 6/7 or Apple Aperture 3, you first need to convert the XDCAM MXF video to compatible format like ProRes 422 codec. This is a common format developed by Apple. Below are some useful tips.

Solution: Transcode Sony PMW-200 XDCAM MXF to FCP 6/7 or Aperture 3 with Apple ProRes 422 codec.

Step 1: Download Pavtube MXF Converter for Mac. This is excellent software which can help you convert Sony PMW-200 XDCAM MXF video to ProRes for FCP 6/7 or Aperture 3. Besides, it supports many other formats for output.Install and launch the Sony Mac XDCAM MXF Converter, import the MXF video from Sony PMW-200 by clicking "Add video" button.


Step 2: Choose the best output format for Final Cut Pro 6/7 or Aperture 3. Click on "Format" and choose "Final Cut Pro >>Apple ProRes 422 (*.mov)" as output format.


Step 3: You can click "Settings" to adjust the output parameters, such as resolution, bitrate and frame rate.

Step 4: You can click "Edit" button to edit MXF video, such as deinterlace, denoise, mute, volume up and crop.

Step 5: Click "Convert" button to start Sony MXF to ProRes conversion. It will transcode Sony PMW-200 MXF to Apple ProRes codec MOV format flawlessly.

After converting, you can import converted video files to FCP 6/7 or Aperture 3 instantly without rendering. More output formats are supported.

Read Related Articles:

Tuesday, August 13, 2013

Sony QX10 and QX100 Lenses for Smartphones Leak Out

Sony has a pair of incredible new lenses coming out to work in tandem with smartphones for higher quality mobile photography. The Sony DSC-QX10 and DSC-Q100 are actually lenses with an image sensor built-in.

We’ve seen similar designs with the Ricoh GXR system; however, the novel approach of the Sony QX10 and QX100 is the use of a smartphone as the camera interface. The QX10 and QX100 are controlled by smartphones via WiFi or NFC connectivity.

While the leaked image above shows the unit connected to a Sony Xperia smartphone, rumors suggest it will also be compatible with iOS and Android devices.

It appears that the QX10 will feature a 10x zoom range – given the 4.45-44.5mm zoom range (probably about 25-250mm equivalent). The sensor is rumored to be a 1/2.3″ 18MP sensor – so it is definitely in the compact camera territory.

According to SonyAlphaRumors, the electronics giant is expected to release two models: the DSC-QX10 (pictured above) and the DSC-QX100. The latter will ship with the same 1-inch sensor used with the RX100 Mark II, while the other lens will include a larger 10x focal range and a 1/2.3-inch 18-megapixel CMOS sensor. There's no word on pricing or availability, but with Sony's IFA press conference right around the corner, we'll likely get the full scoop (and hopefully some hands-on time) come September 4th.

Alternatively, the QX100 is rumored to be a direct clone of the RX100 II – complete with a 20.2MP 1-inch sensor. Depending on the execution, this could be a big wow factor for smartphone photographers. That said, it’s a big chunk of lens to carry around in addition to one’s smartphone…

While it is nice to see innovation from Sony, this is just the first round of these devices. If there’s a future in this market, I would expect to see something much different and more compact over the next couple generations.

Thursday, August 8, 2013

Get an effective way to edit XAVC file with Avid Media Composer

If you fail to import Sony XAVC videos to Avid Media Composer, you can refer to the following guide to easily convert Sony XAVC to Avid DNxHD codec for native editing.


XAVC is an open format that will be licensed to companies that want to make XAVC products. XAVC uses level 5.2 of H.264/MPEG-4 AVC which is the highest level supported by that video standard. Sony developed XAVC to handle the higher data rates of high-speed and 4k. Thus, many experienced Avid users may wonder about the XAVC codec and Avid Media Composer workflow, and some will search for the best XAVC/XDCAM Plug-in for Avid. Here let's see what users discuss in the forum.

Q1: Hi, We've got some material from Sony's new XAVC codec and using MC 6.5.2 and the newest AMA plugin 2.31. We can AMA link and getting all the footage from the XDROOT directory and then transcode everything EXCEPT the clips that is 20 minutes and more, they cannot be transcoded...I do think this is a Sony_PDZK-MA2_v2.31 AMA plugin issue and used my contacts at Sony to get some feedback.

Q2: Hello, I've been researching possible workflows for a doc we'll be shooting soon. The team is interested in the Sony F55 and I am trying to find specifics about a workflow through AVID, as I will be the one working with the footage. My knowledge is mostly with FCP, and I know the camera and the codec have yet to be released, but I'm hoping to find out more about this camera and AVID workflows.Thank you in advance.

Now you can see many Sony F5/F55 users are talk about how to get XAVC files to work with Avid Media Composer. In fact, Avid Media Composer/Symphony 6/6.5 has native support of 2k XAVC and 4K Raw (not 4k XAVC). Requires the appropriate AMA plugin available from the Avid or Sony download site. Sony said in July 2013: "with the v7 release of Avid Media Composer we will release the updated plugin supporting 4K XAVC editing".

Since you will have problem for import Sony XAVC videos into Avid MC even with the XAVC/XDCAM Plug-in, to make things easier, you had better to transcode Sony F5/F55 XAVC footage to a more editing-friendly format, such a Avid Media Composer's DNxHD.

First all of, you need to get Sony XAVC Converter for Avid, a powerful Sony XAVC to Converter for Mac which can help you effortlessly transcode Sony's new XAVC codec to DNxHD encoded MOV files, which will create an Avid MC friendly file format keeping the XAVC orginal quality. Besides Avid, this software can also export Proes for FCP, AIC for iMovie and FCE, MOV for Adobe Premiere and more NLE systems for native editing. 

How to import and edit Sony XAVC file with Avid Media Composer

Step 1. Install and launch this Pavtube HD Video Converter for Mac, click top left two icons to load individual videos or load the entire folder.


Step 2. Click Format and choose Avid Media Composer>Avid DNxHD (*.mov) as the best video format for editing in Avid Media Composer on Mac.


Click Settings to change the video bitrate, frame rate, size, etc. all according to your needs.

Step 3. Click the big red circle at the bottom right to start converting Sony XAVC footage to Avid Media Composer on mac. Wait for a while; you can load the fresh hot converted video to AMC now.

Read More:

Monday, August 5, 2013

How to convert XAVC video for editing Pinnacle, Cyberlink, Sorenson Squeeze and Windows Movie Maker

In this article, you will know details about XAVC  format, and the best way to edit Sony 2K/4K XAVC on Windows editors like Pinnacle, Cyberlink, Sorenson Squeeze, Windows Movie Maker, etc.


XAVC format ——
XAVC is a brand new recording format introduced by the famous Japanese camera manufacturer Sony on October 30, 2012. XAVC is usually a video format that was introduced by Sony and extensively exist in Sony PMW-F55 and Sony PMW-F5. XAVC will be used by more and more popular HD camcorders with features of level 5.2 of H.264/MPEG-4 AVC which is the highest level supported by that video standard. XAVC can support 4K resolution (4096 × 2160 and 3840 × 2160) at up to 60 frames per second (fps).

XAVC to Windows Editor Solution ——
Since XAVC is quite new a format that most of the editing application and programs such as Pinnacle, Cyberlink, Sorenson Squeeze, Windows Movie Maker, and more, cannot run such footages. In this case, you need to transcode the the unfriendly 2K or 4K XAVC footages to other kind of popular video formats like MPEG-2, WMV, AVI, MOV, etc. for better compatibility by using the best XAVC Video Converter.

Pavtube HD Video Converer for Windows is particularly designed with future-proof technology to solve all the format compatibility issues of the new Sony XAVC files. It can help all Windows users losslessly convert the 2K/4K XAVC footages to most popular video formats as well as importing XAVC to Pinnacle, Cyberlink, Sorenson Squeeze, Windows Movie Maker, etc. for editing. Besides, this smart converting program also provides users with useful editing functions and new features such as converting 2D videos to 3D, etc.

How to edit XAVC files smoothly in Pinnacle, Cyberlink, Sorenson Squeeze and Windows Movie Maker

To use XAVC footages on Windows smoothly, the best way is to transcode Sony XAVC to Windows PC best supported codec. Now you can follow the easy steps below to convert XAVC to MPEG-2, WMV, AVI, MOV for editing with Pinnacle, Cyberlink, Sorenson Squeeze and Windows Movie Maker.

1. Download Pavtube Video Converter Ultimate, follow the prompts to install the program. Click "Add" to load XAVC video files or directly drag the files into file list.


2. Click "Format" bar to determine output format. This software has many presets for editing software, you just need to choose in the profile column.

For editing with Pinnacle, Cyberlink, Sorenson Squeeze and Windows Movie Maker, you can choose "WMV (VC-1) (*.wmv)" , "MPEG-2 HD Video (*.mpg)" or "MOV(AVC) (*.mov)" from "Adobe Premiere/Sony Vegas" option.


3. If you would like to customize the video and audio parameters, you can click "settings", adjust the parameters as you want, like Video Codec, aspect ratio, bit rate, frame rate, Audio codec, sampling rate, bit rate, channels.

4. Click "Convert" to start to convert XAVC to Windows editing software.

With this Ultimate XAVC Video Converter, it becomes easy for you to convert Sony XAVC video to Windows editing software compatible file formats for editing in Pinnacle, Cyberlink, Sorenson Squeeze and Windows Movie Maker, so you are recommended to take a try.

For Mac software, like Final Cut Pro (X), FCE, iMovie and Avid Media Composer, you can convert XAVC to MOV for editing with the professional Mac XAVC Converter.

See also:

Thursday, August 1, 2013

Easily import Sony XDCAM EX Footage to Avid, Premiere, Sony Vegas, Pinnacle, CyberLink, Windows Movie Maker

Summary: This article offers a brief guide about how to transcode and transfer Sony XDCAM EX footages to Windows editing programs like Avid, Premiere, Sony Vegas, Pinnacle, CyberLink, Windows Movie Maker for editing. 

Sony XDCAM EX series camcorders, like like PMW-EX3, PMW-200, PMW-EX1, PMW 150, etc, are high-end professional camcorders which can capture high definition shootings, they can offer very high quality HD recording at a data rate of up to 50Mbps wrapped with MP4 format. While enjoying the stunning videos recorded of HD image quality, many users are having problems when trying to edit Sony XDCAM EX videos on Windows editing software, like Avid, Premiere, Sony Vegas, Pinnacle, CyberLink and Windows Movie Maker,etc. 

Hot search: Sony XDCAM to MPEG-2 for Sony Vegas Pro | Sony XDCAM HD IMX Files on Mac NLEs | Sony XDCAM HD422 to Final Cut Pro X | Sony XDCAM in MOV on Mac Yosemite | Sony XDCAM EX for Avid, FCP, DaVinci Resolve, etc 
 

The reason that we can't successfully import Sony XDCAM EX MP4 recordings to Windows Platform for editing is because of the format compatibility. Since the XDCAM EX MP4 footage is a peripheral non-standard format which is not supported by editors on Windows PC. 

In order to import Sony XDCAM MP4 footage into Avid, Premiere, Sony Vegas, Pinnacle, CyberLink and Windows Movie Maker for smoothly editing, we can render to the third-party software to help convert XDCAM EX MP4 to AVI/MOV/WMV/MPG– native format for Avid, Premiere, Sony Vegas, Pinnacle, CyberLink and Windows Movie Maker. This is the best way to help XDCAM users to edit Sony XDCAM EX MP4 on Window PC smoothly..To achieve our goal, the quickest and easiest way is to use the easy-to-use yet professional software called Pavtube Video Converter , with which, we can effortlessly and flawlessly transcode Sony EX MP4 footage to AVI/MOV/WMV/MPG for Avid, Premiere, Sony Vegas, Pinnacle, CyberLink and Windows Movie Maker editing. It is safe to install and easy to use. And you can enjoy the powerful edit function, like trim, crop, watermark for text, image and video, 3D effect, subtitles and so on. Below will show you how to 


Other Download: 
- Pavtube old official address: http://www.pavtube.com/video_converter/ 
- Amazon Download: http://download.cnet.com/Pavtube-Video-Converter/3000-2194_4-75734821.html 
- Cnet Download: http://download.cnet.com/Pavtube-Video-Converter/3000-2194_4-75734821.html 


Free download and follow below step to convert Sony XDCAM EX MP4 for Windows . 

Step 1. Load Sony XDCAM EX MP4 files.You can choose "add video" directly to add the whole folder. 


Step 2. Select output format for video editing software. 

Click "Format" menu and choose "Adobe Premiere/Sony Vegas -> MPEG-2 HD Video (*.mpg)",or select WMV/MOV/MPEG-2, you can also choose "HD Video -> AVI HD Video (*.avi)". Finally, click the file icon beside output bar, and choose a destination folder for saving output files. 


Step 3. Edit loaded Sony XDCAM EX MP4 files. 

Click "Edit" button and you are allowed to trim, crop, add text/image/video watermark or some effect to your output video for making it perfect. Here the function of adding subtitles to output files will contribute to make your own videos. 

Tips: Click "Settings" on the interface and you can adjust the parameters including size, bitrate, frame rate, etc. to get a high quality of output files. And keep the settings the same as original video recordings will provide you the least loss of video quality. 

Step 4. Start conversion. 

Click the "Convert" button to start transcoding Sony XDCAM EX MP4 footage for editing in Avid, Premiere, Sony Vegas, Pinnacle, CyberLink and Windows Movie Maker. When it completed, click the "Open" button to get the generated videos for your editing software. 

More related tips: 

Thursday, July 25, 2013

Make Sony NEX-FS100U 1080/60p mts editable in FCP X on Mavericks

Follow the guide below and you will know how to import Sony NEX-FS100U 1080/60p AVCHD to Final Cut Pro X without rendering on Mac Mavericks.


The NEX-FS100U super 35mm sensor camcorder is Sony's first fully professional large-sensor video camera. Hot on the heels of the PMW-F3, this compact, highly modular camera uses the same S35-size CMOS sensor as the F3. Able to shoot full 1080p video in a range of frame rates up to 60p, Sony FS100 provides the option of recording 28Mbps AVCHD footage onto SD or Memory Stick media.

When you are takeing part in applications like indie film, commercials, music promos, education, and wedding videos, Sony NEX-FS100U can be your best partner. After that, you may use Sony FS100U 1080/60p AVCHD recordings in a post-production FCP X workflow on Mac Mavericks.

Unfortunately, Mac users (including the latest Mavericks users) will get frustrated when importing FS100U 1080/60p AVCHD mts to FCP X due to the incompatibility of the AVCHD format and 60p high definition .As is known to us, Apple ProRes is the best editable Codec for Final Cut Pro (X). So to make Sony FS100U 50/60p AVCHD files compatible and editable with Final Cut Pro X, the best way is to transcode NEX-FS100U 1080/60p mts to Prores.

To accomplish this goal, this Professional Mavericks Sony AVCHD MTS Converter is your ideal tool. With it, you can easily convert Sony FS100U 1080p recordings to ProRes 422 MOV for FCP X on Mavericks with high quality kept.  Follow the steps below.
Good News! Pavtube Release a New Site - multipelife.com with Product Migration and Name Change.

To thanks for your continued support all along our previous site and the new www.multipelife.com, we are holding a 'New Site Special' with fantastic discounts up to 40% off. You can get 20% off BDMagic, 30% off ByteCopy, 40% off DVDAid and 20% off Video Converter Ultimate on Windows/Mac platform:

https://www.facebook.com/pavtubefans/app_209569249055691

Read more: http://pc-mac-compatibility-issues.blogspot.com/2014/05/pavtube-new-site-release.html


1.Download Pavtube AVCHD to FCP Converter.


2.Install and launch this AVCHD Converter for Mavericks. Import Sony FS100U 1080/60p mts footage to the Converter.


3.Click "Format" bar to choose the output format. Click and choose "Final Cut Pro -> Apple ProRes 422 (*.mov)" as Final Cut Pro X compatible codec for editing.


4.You can click "Settings" to customize the output parameters, adjust the resolution, bitrate as you want.

5.Click "Convert" button to start transcoding Sony FS100U 1080/60p AVCHD to ProRes for FCP X on Mac OS X Mavericks 10.9.

Now everthing is done, after conversion, you can easily import Sony FS100U 1080/60p mts files to FCP X for editing. This software runs fast, so you can do AVCHD to FCP conversion in less time, video and audio synchronization are perfectly guaranteed, and you can use accurate trim function when you edit Sony AVCHD video in the software before conversion.

Related Link:

Tuesday, July 23, 2013

Hasselblad unveils new Stellar compact camera modeled on Sony RX100

Hasselblad has just unveiled the new Stellar compact camera on the company's website. While Imaging Resource has not received any official announcement on the camera, which appears to be based on the Sony RX100 but with some distinctive exterior modifications, the Stellar has its own page on the Hasselblad site with images and some info on the camera. 


"The Hasselblad Stellar redefines quality with its elegantly designed aluminium body and metal operation controls," the Stellar page reads. "Only the finest materials are used to craft the ergonomic handgrip, making it a beautifully powerful, pocket-sized camera."

Hasselblad's strategy of sprucing up Sony cameras must be paying off -- that would explain Photo Rumors' apparent leak of the Stellar, a Hasselblad take on the RX100. The already high-end compact cam will reportedly switch to a tan metallic body and offer several choices of exotic grip material, including carbon fiber and padouk wood. There's no mention of functional upgrades over the Sony original, though. As with the Lunar, we're more likely to see a price hike instead -- Photo Rumors claims the Stellar should launch on July 26th for between $1,600 to $3,200, which would limit it to particularly well-heeled photographers.

See also:
Sony RX100 Mark II (M2) Hands-on

Convert Sony NEX-FS700U 1080/60p MTS to QuickTime MOV on Mac OS X 10.9 Mavericks

Follow the guide you can Convert Sony FS700U AVCHD files to QuickTime MOV on Mac OS X 10.9 Mavericks easily via Mac Sony AVCHD Converter.


Sony NEX-FS700U Reviews:

Hot on the heels of the FS100, this compact, highly modular camera uses a very similar-sized Super 35 CMOS sensor as the FS100. But as a marked improvement over that earlier model's sensor, Sony NEX-FS700U features a native 4K resolution sensor. - Unlike smaller, broadcast-style sensors or the larger "full-frame" sensors of some DSLRs, the NEXFS700's imaging area matches that of standard Hollywood film cameras, providing complete compatibility with cine-style film lenses (sold separately).

FS700U 1080/60p AVCHD shootings:

The Sony NEX-FS700U Super 35 Camcorder (Body Only) is a fully professional large-sensor video camera. Able to shoot full 1080p video in a range of frame rates up to 60p, the FS700 provides the option of recording AVCHD footage onto SD card/MemoryStick or via the FMU (flash memory unit) port, or it can output 4:2:2 video (with embedded timecode) via HDMI 1.4 or 3G/HD-SDI to an external recording unit.

Play Sony FS700U MTS with Mac QuickTime Player:

If you have shot some MTS videos with your FS700U, then you probably want to play the 1080/60p MTS files on Mac conveniently with Apple players like QuickTime. But unfortunately these AVCHD mts footage is not compatible with QuickTime Player on Mac OS X 10.9 Mavericks.

So you have the need to convert the format of AVCHD, M2TS or MTS from Sony FS700U to QT supported formats like MOV. The solution is easy to think, but to practice it, you need a professional AVCHD Converter for Mac to be your helper. Now, Pavtube AVCHD Converter for Mavericks will help you convert Sony FS700U 1080/60p AVCHD files to MOV for QuickTime playback on Mac OS X 10.9 Mavericks. With ultrafast conversion speed, loss-less video quality, broad format support and so on. Besides, you are able to convert any video file including AVCHD M2TS, MTS to FCP, iMovie or more formats with ease.

This article shows you the method about how to convert Sony FS700U 1080/60p AVCHD MTS to QuickTime on Mac ( Mac OS X 10.9 Mavericks included) step by step.

1. Download Pavtube MTS to QuickTime Converter, install and run, and import the Sony FS700U AVCHD files you want to convert.


 2. Click format bar and choose best output format for output. Click and choose common video -> MOV-QuickTime (*.mov). You can also choose other formats for output as you want.


3. You can click “settings” to adjust the output parameters, such as resolution and bitrate.


4. Edit function is very easy to use, you can trim, crop, add watermark or adjust effect.

5. Click convert button to start converting Sony FS700U 1080/60p AVCHD to QuickTime MOV on Mac OS X 10.9 Mavericks.

After conversion, you can use converted files for natively watching Sony FS700U 1080/60p AVCHD mts on QuickTime Player freely.

P.S. You can also know more about QuickTime Player and get more solutions at Sony Column.

Read More:

Thursday, July 18, 2013

Batch script to transcode MXF video files for using with VLC Player

In this article, we aim to offer you an easy way to help you play MXF with VLC media player freely.


  • What is MXF?
MXF is abbreviation for Material eXchange Format, it is a "container" or "wrapper" for professional digital video and audio media defined by a set of SMPTE standards. MXF files are mainly from professional High Definition camcorders/cameras like Panasonic P2 camcorders AG-AC130EJ, AJ-HPX370, Canon XF series camcorder XF300, XF305, and Sony EX camera , etc.
  • The basic way to get MXF files played:
Find a media player that can support playing .mxf files as well as be compatible with the Mac or Windows OS.
VLC player is a powerful media player for viewing movies or videos on Mac and Windows. Playing MXF files on VLC is by using the Mainconcept Reference codec, by installing this codec you can directly run your MXF files on the VLC media player.
  • The Playback problems:
While, there are still groups of people complain of the imported with low video quality or incapability of video playback.

Q1: I read that VLC can easily play MXF but it's not working on mine. I have the latet VLC player. Any solutions? Thank you.

Q2Hey guys. I need some help.I am using a Canon camera to record rugby games. All of my previous stuff was saved on a desktop and all of my movies and videos are saved as MXF. I use a free program to convert MXF to MPEG-4 format for playing on my VLC player. The 1st file goes well but then appears to stop converting. Is the files too large to handle? What do I have to do? 

Q3:
I can play the MXF files from my XF-100 in VLC, but the audio is choppy or non-existant…The video plays without a hitch. But no audio. Any fixes for this problem, or am I the only one?
  • An quick workaround to solve the MXF playback issues with VLC Player 
Nothing is absolute, if there are some special MXF can't be played by VLC or other Video Player, you can convert the MXF files to common formats (like AVI, MOV, MPEG, MP4, etc) to fit the local VLC media player with iMedia Converter for Mac from Pavtube.

This top MXF to Mac Converter which works successfully in MXF to MP4 conversion even you have a bunch of large MXF files. I have tried it to encode MXF to MP4, it turns out playing Canon, Sony, Panasonic MXF on Mac smoothly and at original quality.

It’s the best software application for Mac users. What’s more, this converter also supports many of other video formats like MOV,MKV, AVI, WMV, FLV, MPG, etc on Mac. Below is easy steps for you, you can convert MXF to VLC player compatible formats for watching in few steps.

Step 1: Add mxf video files

Run iMedia Converter for Mac on your Mac computer. Transfer the individual .mxf file or MXF file structure (P2 MXF, XDCAM MXF, Canon XF) to HDD first, and then click "Add Video" to import the MXF files to the converter.


Step 2: Choose H.264 MP4 as output format.

In “Format” drop down list box, you may select best video format for plaing on Mac. To convert MXF to MP4 format, if you want to get common MP4 files for playback, you can choose Common Video -> H.264 Video (*.mp4); if you want to get HD MP4 files to use, you can choose HD Video -> H.264 HD Video (*.mp4).


Step 3: Start Convert

Click “Convert” in the main interface to start transcoding MXF to Mac H.264 MP4.

After conversion, you can use converted MP4 files for playback easiliy and smoothly. You can also refer to the MXF to Quicktime MOV, MXF to AVI guide, and have a try.

Tips: 

If you are Windows users, you can try Pavtube Video Converter Ultimate. It you can easily import the MXF video and the audios for playing and editing.

Read More:

Monday, July 15, 2013

Best .mts to Quicktime .mov converter for QuickTime Player

In this is AVCHD to MOV conversion guide, you will learn the best solution to play AVCHD .mts footages with QuickTime Player on your mac easily.

Q: I have a number of clips I downloaded onto my Win7 machine from a Canon HF S11 which are AVCHD .mts files, and tried to send them to someone with a Mac, but she couldn't open them. I'd like to convert them from .mts to Quicktime .mov and then resend them so she can open them. Once she opens them, she'll be doing some editing for me so I'd like to send her the highest quality resolution. What's the best .mts to QT .mov converter for that?

A: Usitng the best mts to Quicktime .mov Converter to do AVCHD to MOV conversion for QuickTimr Player on Mac.
            
.MTS file format is an AVCHD file (Advanced Video Codec High Definition), a video file format created specifically for high-definition (HD) digital camcorders, like Sony HDR-SR-1,Panasonic HDC-SD1, Canon, JVC and Sanyo video camcorders. AVCHD video is MPEG-4 AVC/H.264 video compression, that allows the large data files created by HD video recording to be captured and saved on digital media such as hard disk drives and flash memory cards, or DVD disc.

QuickTime
is a multimedia framework developed by Apple Computer Inc. that consists of a QuickTime player, the QuickTime framework which provides a common set of APIs for encoding and decoding audio and video and the QuickTime movie file format .MOV.

AVCHD (MTS/M2TS/TS) video usually can not accepted by QuickTime. If you want to enjoy MTS files with QuickTime Players, you need to convert mts file to QuickTime supported .mov format.

Here, this Mac MTS to QuickTime Converter as the best .mts to Quicktime .mov converter, can easily help you convert mts file to mov for QuickTime easily with reliable efficiency and simple frank interface; no jitter, no slitter, you will have regardless HD video quality lost after converting. Come and download the powerful AVCHD Converter and let's start! 

Fast Convert AVCHD .mts videos to QuickTime MOV format

Step 1. Copy your AVCHD file to mac and keep it on. Launch Pavtube iMedia Converter for Mac; click the top left two icons to load your footages individually or in batch correspondingly.


Step 2. Click Format, choose "Common Video > MOV-QuickTime(*.mov)" as the best video format for QuickTime Player.


You can also click the Setting which is marked as 3 above, choose the output video size, video bitrate, frame rate, etc. all according to your needs.

Step 3. Now click the big red circle at the right bottom to start converting AVCHD .mts file to QuickTime preferred mov format. This program will help you to stream the converted video to home shared network so that you can playback the on another mac directly.

More Tips about QuickTime Player: