Sunday, August 18, 2013

Lossless converting Canon MTS/MP4 files for editing in Final Cut Pro X

To get Final Cut Pro X working perfectly with MTS/MP4 files, a best way is to convert them to ProRes MOV. Read on to learn details. 


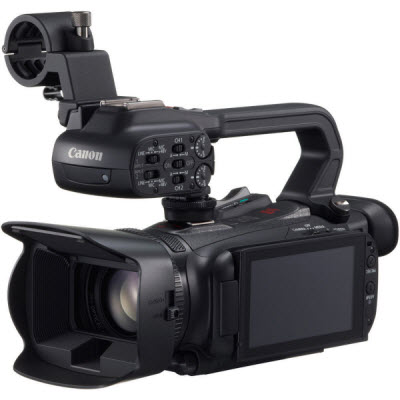
The XA20 is a compact, "run-and-gun" HD camcorder with an impressive Optical performance from a powerful new Genuine Canon 20x HD Video Lens with a new 8-Blade Circular Aperture, capable of focusing down to just 23.6 inches (60cm). Other features include multiple HD/SD Recording rates - including 24p for a "cinematic" look - together with a choice of industry-standard MP4 (up to 35 Mbps) and AVCHD (up to 28 Mbps) codecs. 

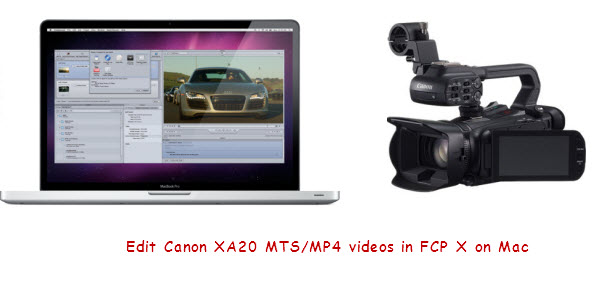
The high image quality and recording versatility make the XA20 ideal for independent and documentary filmmaking, as well as event videography and educational institutions. However, many Mac users complain that they can’t import the MTS/MP4 files recording from Canon XA20 to FCP X because FCP doesn’t accept .MTS/.MP4 footage.

Well, don’t worry. It is known to us that Apple ProRes codec is well compatible to FCP. So, in order to smoothly import Canon XA20 MTS/MP4 files into Final Cut Pro X for editing, you can use 3rd-party software to convert Canon XA20 MTS/MP4 to Apple ProRes encoded mov format with excellent quality of videos as it applies advanced audio and video sync technology, which is a native format for FCP X.

Here Pavtube HD Video Converter for Mac is highly recommended. It is an easy-to-use Canon Video Converter for Mac program with clean interface. And it is good at converting 1080/60p MTS and MPEG-2 MP4 videos from Canon XA20 to various formats for editing, playback, uploading, burning etc. on Mac OS X (Mountain Lion, Mavericks included). You can try the free trial versionto test the functions at first.

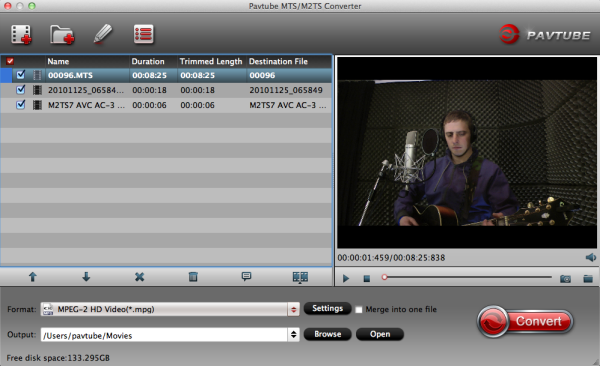
Now let' learn how to transcode Canon XA20 MTS/MP4 clips to Apple ProRes MOV for editing on Final Cut Pro X. At first, download, install and run the best and easy-to-use Mac MTS/MP4 to FCP Converter.

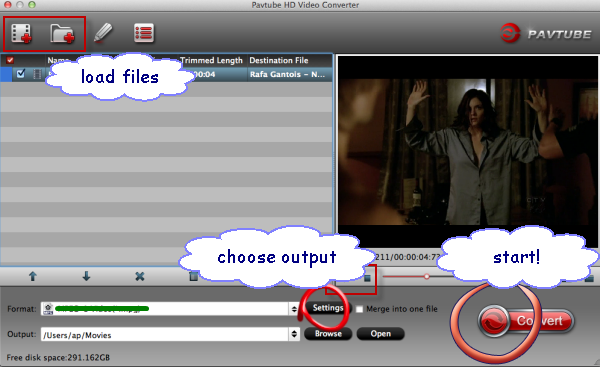
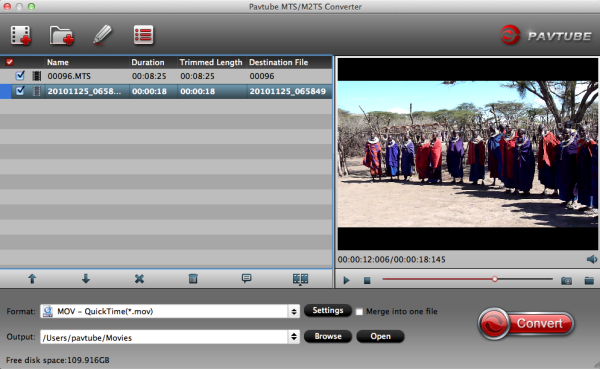
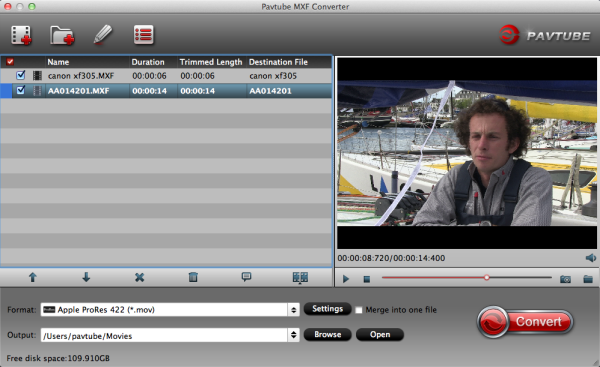
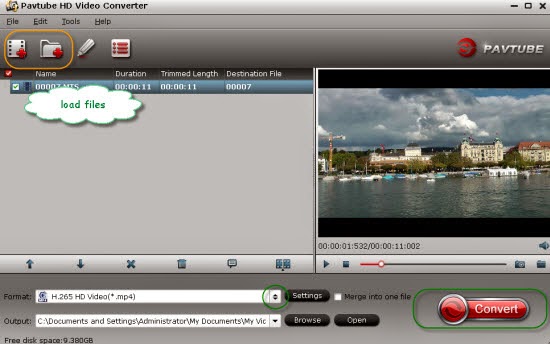
Step 1. Load AVCHD MTS/MP4 files. 

Connect your Canon X20 camcorder to your Mac via USB, or insert your SD card to Mac, browser the .mts files from AVCHD > BDMV > STREAM. Load your 1080/60p .mts or .mp4 files from XA20 or local computer which you have copied from camcorder before into Pavtube HD Converter for Mac. 
 

P.S. There are two ways for you to import files: add video directly and add the entire folder.
 

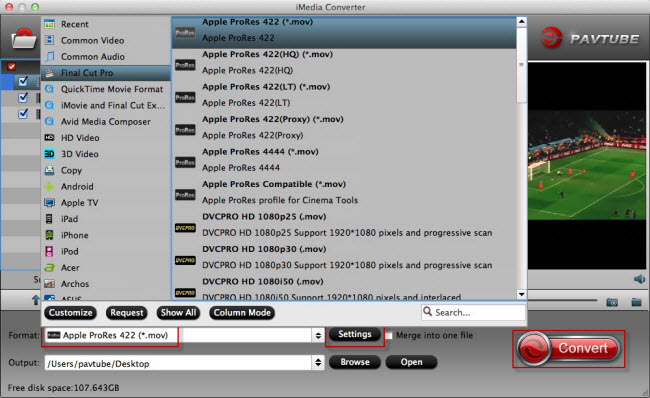
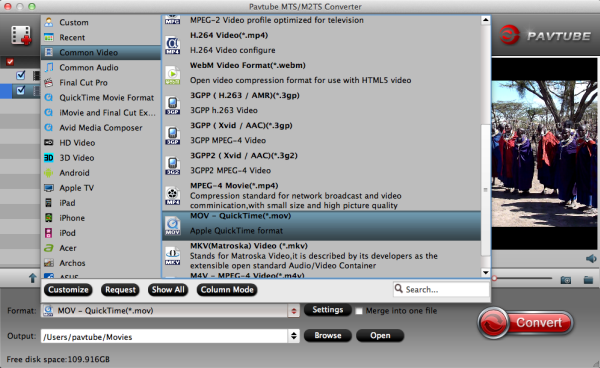
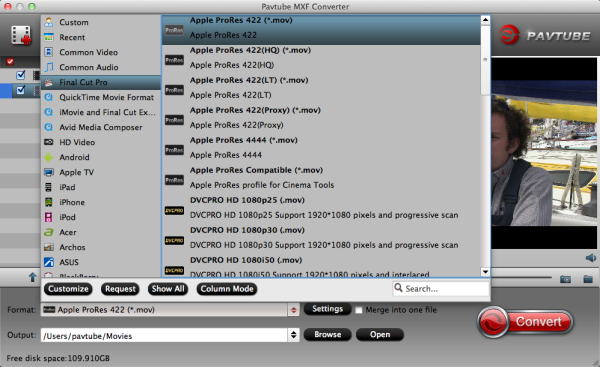
Step 2. Select Apple ProRes MOV format for FCP.

You are recommended to choose the “Format” under “Final Cut Pro” which is preferable to your FCP X, and it is the easiest way to find the suitable format. 


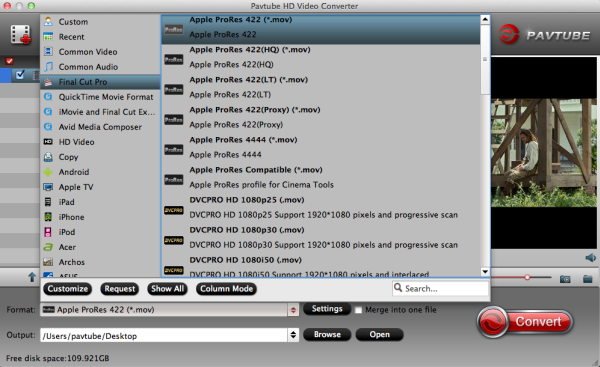
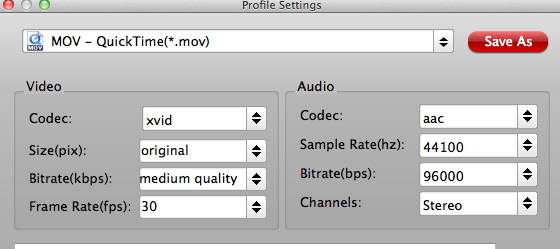
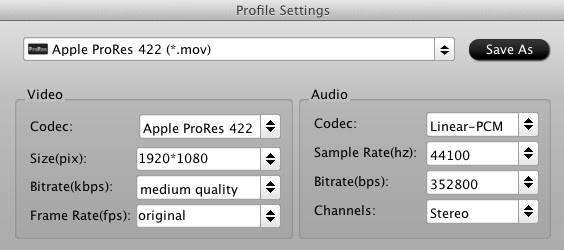
Tip 1: You are allowed to adjust output video and video parameters. However, if you have no idea about profile setting, keep it as original recordings will provide you the files with less quality loss, and keep default settings is also a good choice for your to get a high quality files.

Tip 2: In order to get customized videos, you can add subtitles to your own videos.
Step 3. Start MTS/MP4 to Apple ProRes conversion.

Click “Convert” button to start transcoding Canon XA20 AVCHD MTS/MP4 to Apple ProRes MOV, and then click “Open” button will bring you to the generated Apple ProRes MOV files for Final Cut Pro X.

In this way, you will have no difficulty in importing and editing Canon XA20 MTS/MP4 footage into FCP X with excellent audio and video quality. You can enjoy sharing edited video with friends and taking any individual frames you want.

What’s more, if you are a Windows user, try this Pavtube HD Video Converter, which is considered as best HD Video Converter. It is specially developed for HD camera/camcorder users to transcode all kinds of HD video footage to various fotmats accepted by Sony Vegas, Avid, Premiere, Pinnacle, Cyberlink and Windows Movie Maker and more similar Windows video editing software with least quality loss. 

Canon XA20 more related:
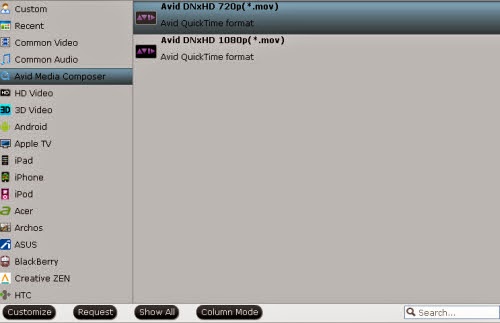
Read Related Articles:

Thursday, August 15, 2013

Working with Panasonic HC-X920M 1080/50p mts Footage in FCE and FCP 6

Is there anyway we can injest MTS Files shot on canon Panasonic HC-X920M into FCE and FCP 6? Keep on reading to learn.

I'm the owner and publisher of Australian Videocamera. My media experience can be dating back to 1979 when I first got involved with photojournalism in motorsport. Recently we have got this Panasonic HC-X920M.


Reviews:

I am more than impressed with the HC-X920M. At this stage of the game, if anyone asked me what camcorder to buy sub $2K, this would unquestionably be it. It has all the functions you will ever need, and I'd almost call it a game changer. If there is camcorder to sway the pro away from the larger models as used in "run and gun"shooting for current affairs, short documentaries or films etc, then at the moment this is it.

All the necessaries are there; top lens, manual programmable focus ring, face detection, manual or auto controls for contrast, shutter speed etc and of course superb imaging. And for future proofing, the HC-X920 also supports the optional 3D lens.

Recordings:

Panasonic HC-X920M can provide us 1080p Full HD. We live in Australia - so we are PAL.


Recording Format: [AVCHD] AVCHD 3D / Progressive / [iFrame] MP4

Compression Method: [2D] MPEG-4 AVC/H.264 / [3D] MPEG-4 MVC/H.264


Asks:

Now we are doing some editing work. We make some 1080/50p AVCHD videos from Panasonic HC-X920M, working on Final Cut Express and also FCP 6, but when loading into the FCE and FCP 6, the .mts files need rendering and everytime I touch them they again need to be rendered. Hoping anyone can help - rendering takes so much time... 

Answers: 

At last, I have figured out Pavtube HD Video Converter for Mac. Having used it as the best Panasonic AVCHD Converter and now I have successfully converted the Panasonic HC-X920M 1080/50p mts video files from the camera to AIC/Prores .mov which is native for editing in FCE and FCP 6. It works great and wonderful video quality.

Detailed instructions: 

In case that you may have the same issue with importing Panasonic HC-X920M 1080/50p mts footage into FCE and FCP 6, here offers you a step by step guide:

Convert Panasonic HC-X920M 1080/50p AVCHD MTS to AIC/Prores MOV format

Step 1. Add .mts files to the Mac MTS to MOV Converter.

Launch the MTS/M2TS to AIC/Prores Converter for Mac. Click "Add Video" or "Add from folder" button to load your source 1080/50p .mts or .m2ts files from Panasonic HC-X920M.


Tip: If you want lossless merge multiple MTS, M2TS files, pleas check the "Merge into one file" box.

Step 2. Choose FCE and FCP 6 compatible foramt as output.

For FCE, click "Format > iMovie/Final Cut Express", choose "Apple Intermediate Codec(AIC) .mov" as the best output format.


For editing in FCP 6, you can choose Final Cut Pro -> Apple ProRes 422 (*.mov).


Tip: If you wanna edit the video/audio parameters, you need to go to "Settings" window.

Step 3. Start MTS to FCE 6/FCP Conversion.

Click the "Convert" button under the preview window, and the best Mac MTS to MOV Converter will start converting Panasonic HC-X920M 1080/50p MTS clips to FCE and FCP 6 compatible AIC/Prores mov format on Mac OS X.

When the conversion is done, you will be directed to open the folder where you saved the converted files, and then you can import output video files to FCE or import converted videos to fcp to edit.

More Tips for you:

Wednesday, August 14, 2013

Why Canon XA20 1080/50p mts video files can't be played with QuickTime?

This tutorial will give you a step by step instruction about how to play Canon XA20 AVCHD mts video files in QuickTime on Mac OS X.


Canon just announced three new handheld video HD Camcorder range with three compact models for professionals and video enthusiasts. And XA20 HD Professional Camcorder is one of them, as a X-series model, it combine a powerful, all-new imaging system with professional audio and Wi-Fi connectivity in a "versatile, compact package that fits neatly in the palm of a hand," the company says.

Canon XA20 allows you to record at AVCHD video of up to 28mbps in a 1080/50P setting. If its maximum quality you want though, a recording mode at 35mps in a 1080/50P is available. However, some Mac users find that QuickTime will not recognize the 1080/50p mts footage from XA20 and an error message will pop-out.

To solve the playback issue with Caon X20 1080/50p mts and QuickTime, at first, you need to make sure that the codec of your file is supported by QuickTime. If you are not very good at codec things, don’t try this one. To avoid certain severe problem might occurring, is there a better while equally simple solution? Absolutely yes! Hereby the best work flow is to convert Canon XA20 1080/50p mts footage to QuickTime MOV on Mac. 

No worries, this Mac MTS to QuickTime Converter is the top MTS/M2TS Converter for Mac from Pavtube, that can easily help you out with reliable efficiency and simple frank interface; no jitter, no slitter, all you need to do is a few clicks. Come and download Pavtube MTS/M2TS Converter for Mac and let's start!  

How to convert Canon XA20 1080/50p mts video clips to QuickTime MOV on Mac

Step 1. Install and launch this Canon AVCHD Converter for Mac, click top left two icons to load individual videos or load the entire folder. 


Step 2. Click Format and choose Common Video> MOV-QuickTime(*.mov) as the best video format for playback with QuickTime on Mac.


You can also click Settings to change the output video bitrate, frame rate, size, etc. all according to your needs. 

Tuesday, August 13, 2013

Sony QX10 and QX100 Lenses for Smartphones Leak Out

Sony has a pair of incredible new lenses coming out to work in tandem with smartphones for higher quality mobile photography. The Sony DSC-QX10 and DSC-Q100 are actually lenses with an image sensor built-in.

We’ve seen similar designs with the Ricoh GXR system; however, the novel approach of the Sony QX10 and QX100 is the use of a smartphone as the camera interface. The QX10 and QX100 are controlled by smartphones via WiFi or NFC connectivity.

While the leaked image above shows the unit connected to a Sony Xperia smartphone, rumors suggest it will also be compatible with iOS and Android devices.

It appears that the QX10 will feature a 10x zoom range – given the 4.45-44.5mm zoom range (probably about 25-250mm equivalent). The sensor is rumored to be a 1/2.3″ 18MP sensor – so it is definitely in the compact camera territory.

According to SonyAlphaRumors, the electronics giant is expected to release two models: the DSC-QX10 (pictured above) and the DSC-QX100. The latter will ship with the same 1-inch sensor used with the RX100 Mark II, while the other lens will include a larger 10x focal range and a 1/2.3-inch 18-megapixel CMOS sensor. There's no word on pricing or availability, but with Sony's IFA press conference right around the corner, we'll likely get the full scoop (and hopefully some hands-on time) come September 4th.

Alternatively, the QX100 is rumored to be a direct clone of the RX100 II – complete with a 20.2MP 1-inch sensor. Depending on the execution, this could be a big wow factor for smartphone photographers. That said, it’s a big chunk of lens to carry around in addition to one’s smartphone…

While it is nice to see innovation from Sony, this is just the first round of these devices. If there’s a future in this market, I would expect to see something much different and more compact over the next couple generations.

Monday, August 12, 2013

Convert and Import Panasonic AG-HPX250 AVC-Intra 100 MXF to Final Cut Pro

Want to import Panasonic AG-HPX250 MXF files to Final Cut Pro? First you need to encode Panasonic AG-HPX250 MXF footage to ProRes codec.

Panasonic has just announced the AG-HPX250, a camera that can be positioned as the successor to the HPX170 and a compact version of the HPX370. Built using the 1/3″ 3-MOS sensors of the HPX370, the HPX250 records to P2 media in AVC-Intra 100/50, as well as DVCPRO HD, DVCPRO50, DVCPRO and DV. This is the first time that AVC-Intra 100 has been made available in a small form factor, so the ability to record a full 10-bit 4:2:2 I-frame image in a compact, 5.5 pound package makes the HPX250 truly unique.


Panasonic AG-HPX250 MXF files to FCP solution:

"I have a Panasonic AG-HPX250 camcorder, this camcorder record in AVCintra or DVCPRO HD codec in MXF format. I just want to import the MXF recordings to Final Cut Pro for editing, but the FCP doesn't accept it. So what can I do? Is there an easier and effective way? And how to import incomplete folder files or single MXF files to FCP?"

As we know, FCP best codec is Apple ProRes 422, this codec in MOV format is native for importing and editing, original P2 MXF footages is not good for editing as you may find the video is not processed smoothly.

And here, you are suggested to try a third party converter: the professional Mac P2 MXF Converter from Pavtube to help you to transcode Panasonic P2 mxf cilps to ProRes for FCP with best video quality. It enables editing before conversion and you can check the deinterlacing option. Below I will provide a brief guide for you.

Steps: Transcode Panasonic AG-HPX250 P2 MXF to Apple ProRes for Final Cut Pro editing

1.Download Pavtube MXF converter for Mac. It's the best Panasonic MXF Converter for Mac, an user-friendly software can help you convert MXF to rich formats, such as Apple ProRes, AIC, Avid DNxHD, or MP4, AVI, MKV, etc, then you can make MXF files compatible with iMovie, FCP 6/7, FCP X, FCE, Avid Media Composer and so on.


2.Install and launch, and import Panasonic P2 AG-HPX250 MXF videos to the MXF converter for Mac.


3.Click format bar to choose the best video format for output. You are recommended to choose Final Cut Pro -> Apple ProRes 422 (*.mov) for native FCP editing.


4.You can click settings button to adjust the output video's parameters, such as resolution, bitrate, etc. 


5.Edit function is easy and useful, you can trim, crop, or add watermark to the video.

6.Click convert button to start converting Panasonic AG-HPX250 P2 MXF to Apple ProRes for FCP on Mac.

All folders and single files are supported, after conversion you can import converted MOV files to FCP without rendering, it can deal with all the MXF files, such as Panasonic P2 series, Canon XF series, Sony XDCAM series, etc.

Tips:

If you want to convert MXF video clips with multiple audio channels, Pavtube iMixMXF - an ideal P2 MXF to FCP Converter that can ouput multi-track Apple Prores MOV for further editing in Final Cut Pro, it will definitely helps you.

Read More:

Flawlessly Convert Panasonic AG-HMC150P AVCCAM MTS to MP4 and burn into DVD

In this article, you will get to know how to transcode Panasonic AG-HMC150P AVCHD videos to MP4 format and burn Panasonic AG-HMC150P mts recordings to DVD for sharing, storing or managing on Mac.


The AG-HMC150 handheld is Panasonic's exciting new introduction to the AVCCAM series. Representing a major step forward in affordable HD video capture, the HMC150 utilizes highly efficient AVCHD recording, the industry's new long GOP standard based on MPEG-4, to provide stunning image quality and longer record time. The new handheld incorporates three 1/3-inch progressive CCD imagers to produce stunning 1920 x 1080 resolution picture quality far exceeding older Long GOP formats like HDV.

"The camera I have is a Panasonic AG-HMC150P. Having shot many AVCHD high definition recordings with it, it's as easy to use as a digital still camera. What I want is to present the 1080p full HD videos on my portable device for playbak or create into DVD for wathing? Then my video can be shared with my family and my dear friends. So hope to find the best workaround here. Thanks.”

If you love photographing, AG-HMC150 is a very nice choice. As above, to successfull enjoy and share the exciting AVCHD footages from Panasonic AG-HMC150 with your friends, you just need to do Panasonic AVCHD to MP4 convertion and DVD burning on Mac.

To do this, Pavtube MTS/M2TS Converter for Mac and DVD Creator for Mac come out to help you. Easy-to-use and time-saving as they are, they are ideal tools for AVCHD converting and DVD burning.

Now please follow the easy steps below to encode Panasonic AG-HMC150 1080p AVCHD video to playable MP4 format and write the mts footage into DVD on Mac.

Part 1: Convert Panasonic AG-HMC150 AVCHD MTS to MP4 

1. Download Pavtube MTS to MP4 for Mac. Install and launch and import Panasonic AG-HMC150 recorded mts footage to the converter.


2. Click format bar to choose the output format. Click and choose HD Video -> H.264 HD Video (*.mp4).

3. You can click “settings” to customize the output parameters, adjust the resolution, bitrate as you want. Besides, you can use this software to edit your recordings, you can trim, crop, add watermark or adjust effect to the video, just need to click the “edit” button. 


4. Click convert button to start.

Pavtube AVCHD Converter for Mac will convert Panasonic AG-HMC150P 1080p mts videos to MP4 with best video and audio quality.

After converting, you can enjoy and play the Panasonic AG-HMC150P mts footage on your smartphone or talbet as you want. Of course, you can also take it for storage on Mac.

Part 2: Burn Panasonic AG-HMC150P mts to DVD on Mac 

1.Please download and install Pavtube DVD Creator for Mac, import  1080p MTS files from Panasonic AG-HMC150P to the software.


2.Click the import button to load your HD footages, you can click Add title button to add more titles.

3.Switch to Menu pane. Double-click a DVD menu beneath the Menu Template to apply it to your DVD. You can customize the background video/image, background music, text, title thumbnail and more for your DVD menu.


4.Click the Burn button to start making Panasonic AG-HMC150P mts movies into DVD on Mac. You can choose to burn Panasonic AG-HMC150P recorded MTS file to DVD disc, save as ISO file, or Generate videos to DVD Folder.

Now just have a try! You can not only convert Panasonic AG-HMC150P MTS to MP4 for playbak or storage and burn the MTS recordings into DVD for sharing, but also downscale or retain the 1080p/1080i/720p videos to resolution 720p/1080p which is supported by most players. That means you can play with the highest video quaility! It is definitely the best workaound for you!

Read More:

Thursday, August 8, 2013

Get an effective way to edit XAVC file with Avid Media Composer

If you fail to import Sony XAVC videos to Avid Media Composer, you can refer to the following guide to easily convert Sony XAVC to Avid DNxHD codec for native editing.


XAVC is an open format that will be licensed to companies that want to make XAVC products. XAVC uses level 5.2 of H.264/MPEG-4 AVC which is the highest level supported by that video standard. Sony developed XAVC to handle the higher data rates of high-speed and 4k. Thus, many experienced Avid users may wonder about the XAVC codec and Avid Media Composer workflow, and some will search for the best XAVC/XDCAM Plug-in for Avid. Here let's see what users discuss in the forum.

Q1: Hi, We've got some material from Sony's new XAVC codec and using MC 6.5.2 and the newest AMA plugin 2.31. We can AMA link and getting all the footage from the XDROOT directory and then transcode everything EXCEPT the clips that is 20 minutes and more, they cannot be transcoded...I do think this is a Sony_PDZK-MA2_v2.31 AMA plugin issue and used my contacts at Sony to get some feedback.

Q2: Hello, I've been researching possible workflows for a doc we'll be shooting soon. The team is interested in the Sony F55 and I am trying to find specifics about a workflow through AVID, as I will be the one working with the footage. My knowledge is mostly with FCP, and I know the camera and the codec have yet to be released, but I'm hoping to find out more about this camera and AVID workflows.Thank you in advance.

Now you can see many Sony F5/F55 users are talk about how to get XAVC files to work with Avid Media Composer. In fact, Avid Media Composer/Symphony 6/6.5 has native support of 2k XAVC and 4K Raw (not 4k XAVC). Requires the appropriate AMA plugin available from the Avid or Sony download site. Sony said in July 2013: "with the v7 release of Avid Media Composer we will release the updated plugin supporting 4K XAVC editing".

Since you will have problem for import Sony XAVC videos into Avid MC even with the XAVC/XDCAM Plug-in, to make things easier, you had better to transcode Sony F5/F55 XAVC footage to a more editing-friendly format, such a Avid Media Composer's DNxHD.

First all of, you need to get Sony XAVC Converter for Avid, a powerful Sony XAVC to Converter for Mac which can help you effortlessly transcode Sony's new XAVC codec to DNxHD encoded MOV files, which will create an Avid MC friendly file format keeping the XAVC orginal quality. Besides Avid, this software can also export Proes for FCP, AIC for iMovie and FCE, MOV for Adobe Premiere and more NLE systems for native editing. 

How to import and edit Sony XAVC file with Avid Media Composer

Step 1. Install and launch this Pavtube HD Video Converter for Mac, click top left two icons to load individual videos or load the entire folder.


Step 2. Click Format and choose Avid Media Composer>Avid DNxHD (*.mov) as the best video format for editing in Avid Media Composer on Mac.


Click Settings to change the video bitrate, frame rate, size, etc. all according to your needs.

Step 3. Click the big red circle at the bottom right to start converting Sony XAVC footage to Avid Media Composer on mac. Wait for a while; you can load the fresh hot converted video to AMC now.

Read More: