Friday, January 31, 2014

Workaround for converting Canon 60D/70D H.264 MOV to ProRes 422 MOV for Adobe Premiere Pro

The article shows you the best workaround for editing Canon 60D/70D mov videos in Adobe Premiere Pro by transcoding Canon H.264 .mov to Premiere native editing format - Apple Prores 422 Codec.

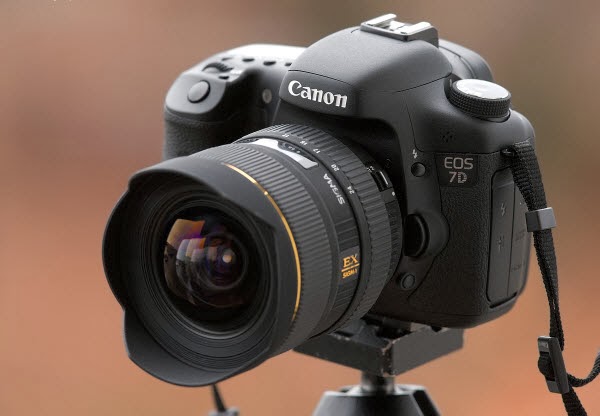
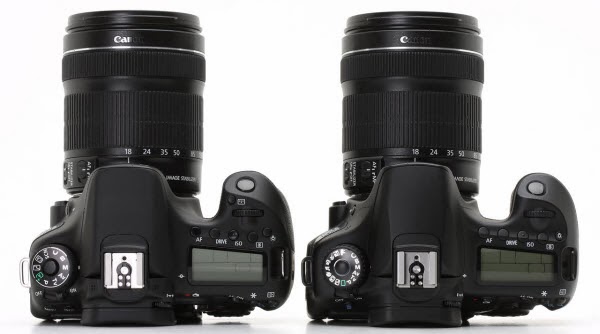
The EOS 70D is a middle range SLR for the photographer. It appears to be a good upgrade for the EOS 60D, but it basically has the same design and build. On the video mode, you can record in full HD 1920 x 1080 (29.97, 25, 23.976, or 60 and 50fps in 720p) with 60D and 70D. Both are all great for us to take high quality images and record vivid full HD videos.


If you have got the Canon 60D and 70D and often use it to record full HD video in H.264 MOV format, you may find this format can't be well accepted by Adobe Premiere Pro. This is because the HD MOV clips are encoded in H.264 codec, a most advanced codec that compresses video in highest compression ratio which is not fit for editing. In this case, the following passage will guide you how to convert Canon EOS 60D/70D MOV footages to Premiere Pro MOV for editing.

Software Requirement 

Mac Canon MOV Video Converter from Pavtube

The software does a good job in converting Canon EOS H.264 .mov files to Prores, MOV formats for editing in Premiere Pro and not loose much quality. Also supports MOV to AIC transcoding for iMovie and FCE. Becides, it allows you to join the Canon 60D/70D clips together, and add audio track to the video as background music.

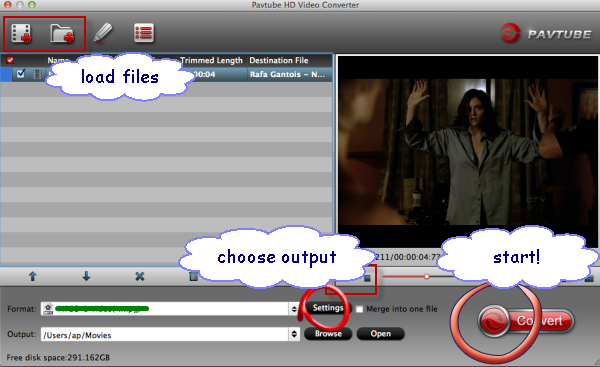
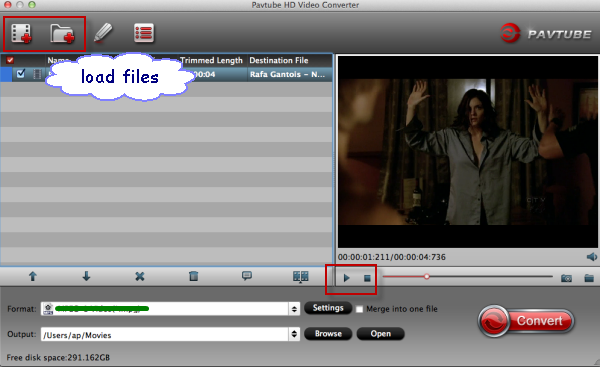
Step 1. Load Canon EOS 60D/70D .mov footage to Canon H.264 MOV Converter.

Transfer h.264 encoded .mov files from Canon 60D/70D to computer via USB cable.

Download HD Video Converter for Mac from Pavtube and run the software as the best Canon MOV converter. Click the "Add Video" icon to load .mov videos from 60D/70D.


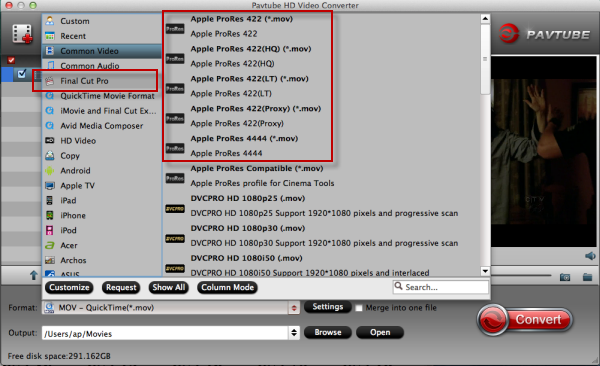
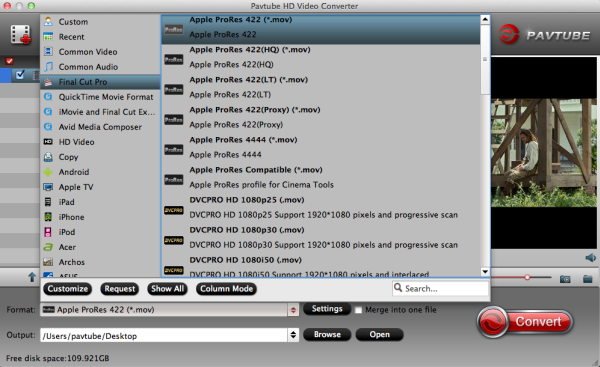
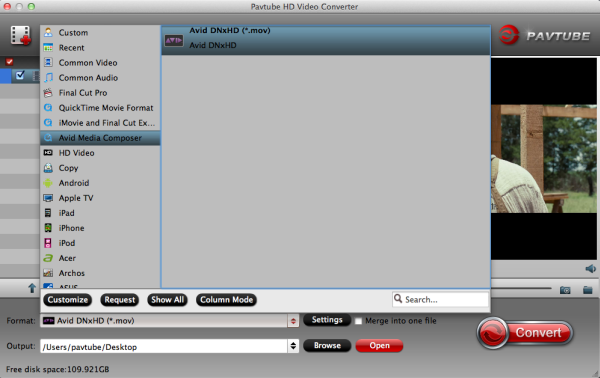
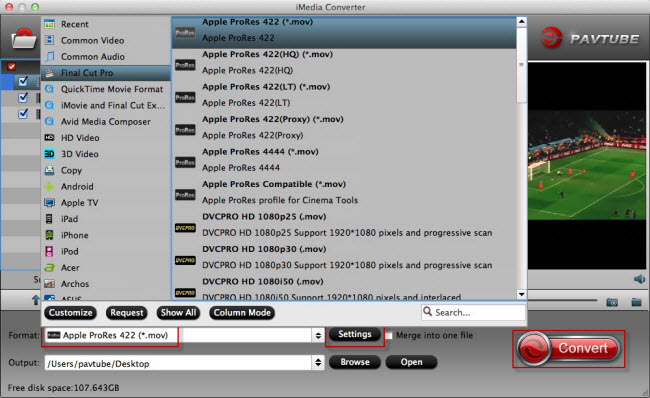
Step 2. Set MOV format as output format for editing.

Click format bar to choose the format for output. Select "Final Cut Pro >Apple ProRes 422 (*.mov)" for MOV to Premiere importingIf you prefer smaller file size, choose "Apple ProRes 422 (LT) (*.mov)" instead. 


Learn more Apple ProRes, please refer to Types of Apple ProRes Codecs 
You can also choose "MOV (AVC)(*.mov)" under Adobe Premiere/Sony Vegas for editing in Adobe Premiere Pro.

Step 3. Adjust video and audio settings to keep 1080p HD quality

Click "Settings" button, then you will be able to adjust audio and video parameters on the popup window to customize the output file quality, these adjustable parameters include codec name, aspect ratio, bit rate, frame rate, sample rate, and audio channel.

To maintain original HD quality, you may set "original" in the fields of "Size", "Bitrate" and "Frame rate".

To downsize the Canon 60D/70D .mov files, just set a smaller bitrate.

Step 4. Click "Convert" button to convert Canon 60D/70D MOV files to Premiere Pro.

Once the conversion is finished by Canon MOV to Premiere Converter, you can click "Open" button to get the output files effortlessly. Now you have got it right, just import and edit Canon 60D/70D MOV files in Adobe Premiere Pro without rending time.

FYI:

1. To get Canon 60D/70D MOV work for FCP, pls refer to the guide transcoding Canon 60D/70D MOV files to FCP.

2. Click here to learn: How to import Media Files to Premiere Pro on Mac

3. This iMedia Converter for Mac is not only able to convert Canon MOV files to Premiere, but also able to convert various camcorder footage to compatible formats for iPad/iPhone, Android devices, editing program such as FCP, iMovie, Avid MC other Adobe editing software and so on. 

See also:

Wednesday, January 29, 2014

Batch transcode Tivo shows to Adobe Premiere Elements 10 without commercials

A guide to show how to remove Tivo TV show commercials and batch convert them to MPEG-2, so that we can edit in Adobe Premiere Elements 10.


Q: I have TIVO and I have downloaded some programs, using TIVO Desktop, onto my computer. The thing is, I want to be able to import these programs onto my Adobe Premiere Elements 10, but always got an error said file format not supported. I have the Media Access key and can play them on Tivo box. So what's the next step?

Yes Tivo files cannot be playback unless you have the Media Access Key which should be on the back of your Tivo box; but it's not all. Tivo recordings are embedded in unique codecs so that you cannot load them into editing programs like Adobe Premiere as the latter doesn't include a proper decoder to unblock this.

Moreover, it's so annoying to have the commercials in Tivo recordings while most popular TV show or TV play have many episodes, like The Big Bang Theory, Grey's Anatomy, Revenge, Teen Wolf, etc. so we have many ads in TV head and end.

I was so confused with all the tasks but finally found out a workflow to finish all of them: the Pavtube Tivo Video Converter. (Mac version is available here: Tivo Video Converter for Mac)

Pavtube Video Converter, which works as a prefect Tivo to Premiere Elements 10 Converter, can help you batch convert Tivo recordings to Adobe Premiere Elements 10 acceptable format without commercials, so that you can edit the trimmed videos smoothly.

How to batch convert Tivo to MPEG-2 for Adobe Premiere Elements 10?

Step 1. Load TiVo files.

You can directly drag and drop the TiVo files to the software, or click "Add" button to locate and import the TiVo files into the TiVo converter.


Tip: When first loading, this TiVo Converter will ask you to input your Media Access Key. Enter your Media Access Key, and click "OK" to confirm.


Step 2. Choose Premiere preferred format

Click "Format" pull down list to select Adobe Premiere/Sony Vegas> MPEG-2(*.mpg) as the best video format for Adobe Premiere Elements 10. WMV, MOV formats are the good choice as well.


Tips: If the default settings do not fit you requirement, you can click "Settings" icon to and enter "Profile Settings" panel to adjust video size, bit rate, frame rate, sample rate and audio channels.

Step 3. Remove Tivo commercials

Click "Edit" on the top to enter video editor window. Follow the "Trim" tab to choose the i/o point; click OK to confirm the trimming.

Step 4. Start Conversion

Click "Convert" button to start encoding TiVo to MPEG-2 for Premiere Elements 10; it will convert all the files in queue. When the conversion task is completed, click "Open" button to get the exported files quickly. Now load these videos to Premiere Elements 10 for editing.

Friday, January 24, 2014

How to View Blu-ray movies (ISO image files) on projector via WDTV with 3D effect

This article aims to help projector users to look for an easily and quickly way to play Blu-ray movies in projector via WDTV with 3D effect.

Questions:

“Hi, I’ve got a couple of latest 3D Blu-ray movies that I wanted to transfer to my projector via WDTV. Is there a program or a way that I can do this?”

“I have already backup my Blu-ray disc to ISO files, and wished to continue with ripping to them for playing on my projector with 3D effect for a better enjoyment and my iPad mini when traveling. Any suggestions for the best Blu-ray Ripping software which is simplicity in GUI with reasonable price?”

Answer:
According to new figures released from survey, there is a increasing number that people prefer to enjoy movies at home in projector. You just need three things to be able to watch 3D at home on a TV or video projector:


1. A 3D-enabled Television or 3D-enabled Video Projector:

This includes LCD, Plasma, and DLP Televisions, as well as DLP and LCD-type video projectors. All 3D-enabled Televisions and Projectors will be able to work with the 3D standards now approved for Blu-ray and over-the-air, Cable, and Satellite transmission.

2. 3D Content
Since you have had many 3D Blu-ray discs in hand, how can it be playable in projector? The only thing need to be solved now is find a good blu-ray ripper that can convert Blu-ray discs to projector supported format and preserve the 3D effect at the same time. After searching term blu-ray ripper review, Pavtube BDMagic comes up. I try it for free that was the catcher right there and I liked the ease and simple select and convert and done.

Tip:
3D effect on converted video is added by program; it may not be exactly the same as your original 3D blu-ray disc, But it do not influence the watching effect.

If you want to backup your blu-ray movies with keeping multiple audio tracks and subtitles, try to use Pavtube ByteCopy.

Tutorial: Convert Blu-ray movies (IFO files) to SBS MKV for playing on projector

Step 1: Run this Pavtube BDMagic, load Blu-ray discs, Blu-ray folder, Blu-ray ISO image files.

This program will help you analysis ISO files automatically so that there’s no need to run virtual drive to mount ISO image files any more.


Step 2: Click the “Format” menu, here you are suggested to choose “MKV Side-by-Side 3D Video (*.mkv)”


Step 3: If you like, modify profile settings such as video size, bitrate, frame rate, etc to get optimized video and audio playback.

Step 4: Return to the BDMagic main interface, and hit the “Convert” button to start encoding ISO image files from Blu-ray to mkv format. Once it finshes, open output folder, locate the created mkv file and you can transfer to your projector via WDTV.

3. 3D Glasses
Yes, you will need to wear glasses to watch 3D. The glasses that will be used is mostly likely be one of two types: Passive or Active.

Passive Polarized glasses look and wear much like sunglasses and have enough front space to place over existing eyeglasses for those than need to.

Active Shutter glasses are slightly bulky, since they have batteries and a transmitter that synchs that rapidly moving shutters for each eye with the onscreen display rate.

Depending on which brand and model TV or video projector you buy will determine which type of glasses you will be enquired for use with that TV or video projector.

Everything is done! Just have a fun of your 3D Blu-ray discs movies on your projector.

Related posts:

Monday, January 20, 2014

Workflow for Ingesting Canon 7D mov Media files Into FCP X

Here it mainly shows you an easy way to import and edit Canon EOS 7D mov files in Final Cut Pro X on Mac by transcoding mov to Apple ProRes Codec.

The 7D is a joy to shoot and never gets in the way. Images, as expected, look great. All of these are great, till you find it is a problem importing the recorded H.264 MOV footages to Final Cut Pro for X editing.


Q1: I'm hoping some folks can help me here as I'm stumped. I shot around 60 minutes of last evening with my Canon 7D. But FCPX doesn't like them, won't import them and, in fact, I delete them. Not sure what use they were but they are of no use in FCPX now. 

Q2: Hi, I know this is a pretty basic question, but I don't feel like spending a lot of time on google. The way I thought was set it to 60fps and shutter at 125 in camera...then slow it by 50% in FCPX, but I'm not real happy with the results. Also, I saw a tutorial that used "Retiming" in Final Cut but I didn't have any luck with that. Best way to get smooth 7d Slow-Motion in FCP X? Thanks!

Q3: I cant seem to figure out how to import converted h.264 files to prores 4444 using compressor into FCPX. It doesnt seem to read the files? or if i import the h.264 file straight into FCP X and make an optimized media copy so that its 422 it doesn't read it in FCPX?
Generally the H.264 is a delivery codec rather than editing code. To get those Canon 7D mov videos work flawlessly in Final Cut Pro X without rendering time, you need to transcode the video to a format more friendly for FCP, for instance, Apple ProRes codec.
If you’re looking for ease of use yet professional tool, I’ve had success using Pavtube’s HD Video Converter for Mac to convert Canon 7D mov to FCP X native Apple ProRes. If you’re interested in doing likewise, check out the Mac MOV to ProRes Transcoder for Final Cut Pro X.

In short, the program is an easy-to-use and intuitive Mac tool for camcorder users. It is good at converting *.tod, *.mod, *.mov, *.mts, *.m2t, *.m2ts, *.mxf recordings shot by Panasonic, Sony, and Canon camcorders and cameras to formats compatible with your video editing software like iMovie, Final Cut Pro (X), Final Cut Express, Avid Media Composer, Adobe Premiere, and more. Below is a brief guide for you.

If you have the same problem about importing Canon 7D mox video into FCP X for editing, you may follow the step-by-step guide.

Step 1. Assuming you have downloaded the Mac Canon H.264 Video Converter to your Mac, the first step is to load your recordings.


Click ‘Add’ button, browse to the footages and load them to the converter. The converter supports batch conversion, so you can add multiple files into it to convert at a time. If you wanna combine several 7D videos into a single file, you can put a checkmark in the checkbox “Merge into one file”.

Step 2. Click on ‘Format’ bar to set a FCP friendly format in Final Cut Pro template. Basically, “Apple ProRes 422 (*.mov)” is the best format for converting 7D footage to FCP. If you prefer smaller file size, choose “Apple ProRes 422 (LT) (*.mov)” instead.


Tips – You can click “settings” to customize the output parameters, adjust the resolution, bitrate as you want.

Step 3. Click convert button to start transcoding Canon 7D mov video to Apple ProRes for FCP X on Mac.

Once the conversion completes, you can transfer the result ProRes videos to FCP X. So there you have it. Now you may have gotta known how to convert/import Canon 7D  video to Final Cut Pro X for editing smoothly.

Canon related guide:
How do I import .mov file from Canon T4i/650D into Avid MC

Saturday, January 18, 2014

Sony F5 XAVC codec and Avid Media Composer Workflow

If you fail to import Sony F5 XAVC videos to Avid Media Composer, you can refer to the following guide to easily convert XAVC to Avid DNxHD codec for native editing.

Sony developed XAVC to handle the higher data rates of high-speed and 4k. Thus, many experienced Avid users may wonder about the XAVC codec and Avid Media Composer workflow:


I'm a producer and editor. We do a lot of broadcast programming for a sports network, I shoot some videos from Sony F5 to record the opening sequences for a few college football games. But I'm hoping to find out the way to edit the F5 in Avid Media Composer.

Did a google search for my issue and 
Sony XAVC Converter for Avid came up. It is easy to use and pretty fast as well. This program can transcode Sony F5 XAVC files to Avid DNxHD files, including converting the frame rate keeping the XAVC orginal qualityIt did sort of choke when more than 2 streams were working at once, so as long as I kept it set for 2, it was good.  Besides Avid, this software can also export Prores for FCP, AIC for iMovie and FCE, MOV for Adobe Premiere and more NLE systems for native editing. 

How to import and edit Sony F5 XAVC file with Avid Media Composer

Step 1. Install and launch this Sony XAVC Converter for Mac, click top left two icons to load individual videos or load the entire folder from Sony F5 camcorder.


Step 2. Click Format and choose Avid Media Composer >Avid DNxHD (*.mov) as the best video format for editing in Avid Media Composer on Mac.


Click Settings to change the video bitrate, frame rate, size, etc. all according to your needs.

Step 3. Click the big red circle at the bottom right to start converting Sony F5 XAVC footage to Avid Media Composer on mac. Wait for a while; you can load the fresh hot converted video to AMC now.

Tip:

You can trim out a few clips before converting XAVC to Avid.

Now click the pencil-like icon (Edit) and locate the Trim icon. Drag the small triangle icons to locate the opening and ending

See also:


Thursday, January 16, 2014

Solution to Import Sony Alpha 7R MTS to FCP X

Sony Alpha 7R users often meet the problem that they cannot edit AVCHD MTS files in FCP X. The following will tell how to use FCP X to edit Sony Alpha 7R AVCHD MTS, which is not a Mac friendly format.

Sony a7R Full-Frame Camera is the world's lightest interchangeable lens full-frame camera, and it can capture Full 1920 x 1080 HD uncompressed clean-screen video files to external recording devices via an HDMI connection in 60p and 60i frame-rates. Selectable in-camera AVCHD codec frames rates include super-smooth 60p, standard 60i or cinematic 24p.


But there is some problem in importing these AVCHD MTS files into your FCP X for editing because it is not a Mac friendly format for editing in FCP X. It is known that Apple ProRes codec is well compatible to FCP. Now you need a program help you to transcode Sony Alpha 7R AVCHD MTS to FCP X.

Here, Pavtube iMedia Converter for Mac is the best tool you need to help you convert Sony Alpha 7R MTS to ProRes 422 for FCP X editing. It does not only convert AVCHD to Apple ProRes for FCP X editing on Mac, but also convert AVCHD MTS to iMovie, FCE, Avid, Premiere Pro, Aperture 3, Kdenlive, After Effects CS6, DaVinci Resolve etc. compatible format/codec on Mac (Mavericks included).

What's more, with Pavtube MTS to FCP Converter, you can also add *.srt, *.ass, *.ssa subtitle to a video/movie files. Here I share a guide of how to add subtitles and some free subtitle files download website:
Here is the step-by-step guide for you to convert and import Sony Alpha 7R AVCHD MTS to Final Cut Pro X on iMac/MacBook Pro with Mac OS X like Mavericks, Lion, Snow Leopard.

Download Pavtube AVCHD MTS to ProRes Converter, install it on Mac.

Step 1. Load Sony a7R MTS files from SD card.

Connect your a7R to your Mac with USB2.0. Run Pavtube MTS to ProRes Converter and then click "Add video" button to load 1080p MTS files from Sony Alpha 7R AVCHD camcorder to the Mac program. You can tick the box in front of the file you want to convert.


Tip: If you have multiple MTS/M2TS files, you can select the "Merge into one file" box to merge/combine MTS files, so that you can import these files to FCP X without interruption.

Step 2. Set MOV as output format.

Click the "Format" option, and choose "Final Cut Pro -> Apple ProRes 422 (*.mov)" as output format, the output video will be kept as high definition 1920×1080.


Tip 1: You can also choose "Apple ProRes 422(HQ) (*.mov)" as output format for FCP X. The Apple ProRes 422 (HQ) codec offers the utmost possible quality for 4:2:2 or 4:2:0 sources (without an alpha channel) and provides the following:

  • Target data rate of approximately 220 Mbps (1920 x 1080 at 60i) 
  • Higher quality than Apple ProRes 422 
Tip 2: If you prefer smaller file size, please choose "Apple ProRes 422 (LT) (*.mov)" instead.

Tip 3: You can set the output folder by clicking "Browse" icon as you need.

Step 3: Add effect or Subtitle for your footage.

If necessary, click "Edit" icon to start video editing with your mts files, such as adding effect as well as adding watermark, trim your videos and so on.

You can also click "Subtitles" option, add srt, ass, ssa suntitle you want.

Step 4: Convert Sony a7R AVCHD MTS to Apple ProRes MOV for Final Cut Pro X.

Click the "Convert" button under the preview window, the Mac MTS to ProRes Converter starts converting Sony Alpha 7R AVCHD MTS to ProRes MOV, and joining the MTS files for editing in FCP X.

After converting and merging the MTS files, just import the output ProRes MOV files to FCP X and the video is in HD 1920×1080. You can also import the output ProRes videos to Final Cut Pro X, iMovie or Premiere Pro,etc for editing.

Read More:

Thursday, January 9, 2014

How to import AVCHD video from Panasonic HDC-MDH1 to iMovie 11 on Mavericks 10.9

Follow this article to learn how to edit Panasonic HDC-MDH1 AVCHD in iMovie 11 on Mac. The latest Mavericks is also supported!

Panasonic's HDC-MDH1 AVCHD Camcorder (PAL) is a shoulder-mount HD camera with a pro-style form factor that gives you added comfort and stability during long handheld shoots. Capable of capturing full HD 1920 x 1080 or downconverted standard-definition 576i video, the camera provides the versatility and convenience necessary for getting your shots the way you want them.


I bought this camera for using it with 2 other professional cameras to edit a life recording of a concert, musical or theatre performance. Regarding the camcorder Panasonic HDC-MDH1 AVCHD Camcorder PAL, I wonder if it allows me import mts video from my my camcorder easily into iMovie 11 on Mavericks 10.9 to do editing for post-productionnly. Can anyone to answer this please, because I plan to buy it. Thanks for your answer!
Best Answer:
AVCHD format is not well supported by iMovie 11 on Mac OS X 10.9. As we all know, iMovie favorable video format is Apple Intermediate Code(AIC). If you want to edit Panasonic HDC-MDH1 AVCHD in iMovie 11, you need to convert MTS to iMovie best supported AIC .mov format.

In that case, a third party AVCHD to AIC Converter is needed. And Pavtube MTS to AIC Converter for Mac comes to help you out. You can follow the steps below and learn how to transcode Panasonic HDC-MDH1 MTS videos to AIC codec for iMovie 11 on Mac OS X 10.9 for editing smoothly.

How to handle your Panasonic HDC-MDH1 AVCHD in iMovie 11 effortlessly

Free download a free version before purchase and let’e move on!

1. Keep your HDC-MDH1 on and connect it to Mac, your camcorder will show as a hard drive on desktop which means your mac recognized it now.

Launch this MTS to iMovie Converter.

Click top left icon “Add videos” to load individual mts files, or try the second one “Add from folder” to load the entire folder.


2. You can find many presets in “Format” drop-down list. Choose “iMovie and Final Cut Express > Apple InterMediate Codec(AIC)(*.mov)” as the output video format.


3. Click “Settings”, you can find some other settings such as Size, Bitrate, Frame Rate and son on. The video quality is corresponding to bitrate, the higher bitrate you choose the better video quality you will get. You can check the file size easily here.

4. Start converting Panasonic HDC-MDH1 AVCHD to AIC for iMovie 11

Click the red convert icon at right bottom and start to convert Panasonic HDC-MDH1 AVCHD to AIC MOV for iMovie 11. You can check Shut down computer after conversion if you are doing a batch conversion and do not want to wait on the front of computer.

Wait for some time, now you get the converted videos for importing/editing in iMovie.

More details can be found here

Importing Panasonic HC-X900M MTS to FCP X
Convert Panasonic records for upload to YouTube
Workflow for Panasonic HX-WA03 MP4 and Premiere Pro