Summary: As a consumer-based non-linear video editing software designed for the PC, Sony Movie Studio may be a good choice. When work MP4 with Sony Movie Studio, you may be confused: it supports MP4 files, but why I can’t import MP4 to Sony Movie Studio?
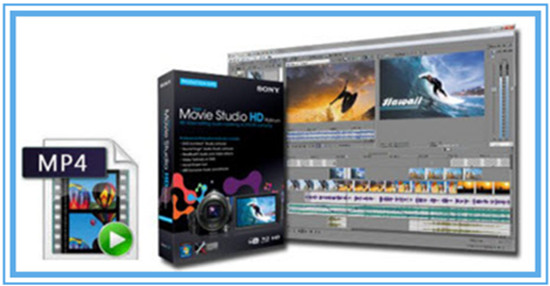 Sony Movie Studio’s efficient controls and low price make it the ideal choice for casual users. It supports most commonly-used video codecs including AVI, MPEG-1, MPEG-2, MPEG-4, QuickTime MOV, WMV. You can refer to detailed Sony Movie Studio supported formats below:Import: AAC, AA3, AIFF, AVI, BMP, CDA, FLAC, GIF, JPEG, MP3, MPEG-1, MPEG-2, MPEG-4, OGG, PCA, PNG, QuickTime, SND, SFA, W64, WAV, WDP, WMA, WMVExport: AAC, AIFF, AVC, AVI, BMP, FLAC, JPEG, LPEC, MP3, MPEG-2, MPEG-4, OGG, PCA, PNG, TIFF, QuickTime, W64, WAV, WDP, WMA, WMVBack to the point, why sometimes you can edit MP4 in Sony Movie Studio but sometimes you can’t? Well, that's because Sony Movie Studio prefers MPEG-4 codec instead of others while MP4 as a container format can include various video codecs. So if your MP4 files are not accepted by Sony Movie Studio, it's probably because of the video codec incompatibility.Since Sony Movie Studio might not work with some MP4 files due to the codec issue, to get rid of the trouble, you need to convert MP4 to Sony Movie Studio preferred codec and then transfer the converted MP4 videos to Sony Movie Studio for editing. To achieve the goal, you can use Pavtube Video Converter, which can help you convert MP4 to Sony Movie Studio compatible video with original quality. Besides, this software can also convert MP4 files for editing in FCP, iMovie/FCE, Avid Media Composer, Adobe Premiere, and etc. In addition, you can convert MP4 files for playing on VLC, QuickTime and more.
 Other Download:- Pavtube old official address: http://www.pavtube.com/video_converter/- Amazon Download: http://download.cnet.com/Pavtube-Video-Converter/3000-2194_4-75734821.html- Cnet Download: http://download.cnet.com/Pavtube-Video-Converter/3000-2194_4-75734821.htmlFollow the steps to convert MP4 to Sony Movie Studio for editing:Step 1: Download and install the program. Click “Add video” on the main interface to load MP4 videos to the program. You can also drag the files to the program’s window list directly. This program can also support the batch video clips.
 Step 2: Select the right formats for Sony Movie Studio. Here we suggest you to go to the “Adobe Premiere/Sony Vegas” list, you will get the “MPEG-2 (*.mpg)” as the best output.
 Step 3: By clicking the “Settings” button, you can adjust the output video/audio resolution, frame rate, bit rate, etc. to customize the output files to get the best quality you want.
Step 4: At this point, you can change the output filename or output path if you wish. If you feel satisfied with your options, Just hit the “Convert” button to activate MP4 file to Sony Movie Studio MPEG-2 conversion.Conclusion: This program is highly efficient because it’s boosted with CPU and GPU (30X faster). And a neat process bar will show the percentage and remaining time. When all conversions completed, you’ll get a pop-up notice. Just click “Open Folder”, you can fast find where your converted files are saved.Further Reading:
Summary: We would like to use Avid Media Composer to edit 4K videos so as to get more amazing video files. How to convert Nabi Square HD 4K video to Avid MC to achieve this goal?
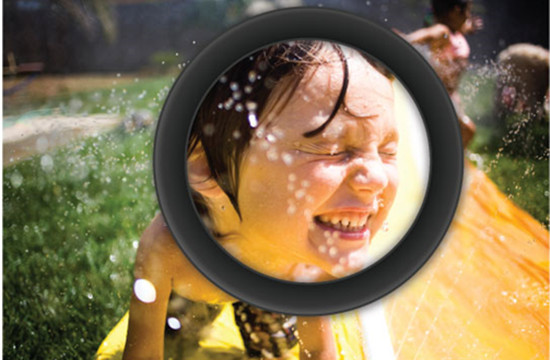 Today, Nabi has announced a new 4K action camera called the Nabi Square HD. This is a rugged action camera that’s designed especially for kids with a rugged case to protect the camera from broken, dust or water. Even without the case, the camera still works at 30 feet under water.The Nabi Square HD can record full HD 1080p video at 60 fps, 2.7K video at 30 fps, 4K video at 15 fps and also support for slow motion with 120 fps at 720p video. The Nabi Square HD action camera also works with Nabi tablet, let your kid to edit videos and upload to share with friends or family. The app will also come to Apple iOS and Google Android platform soon in next short time.As the most proven video editing software in the industry, Avid Media Composer has been trusted by professional editors in every segment of movie making, television, broadcast, and streaming media. Designed to handle high volumes of disparate file-based media, Media Composer delivers accelerated high-res and HD workflows. Before importing Nabi Square HD 4K video to Avid MC for editing, you’d better to know main supported video formats for Avid Media Composer to avoid incompatible issues.DNxHD: This is Avid’s baby. All kinds of DNxHD are supported natively via either of the import methods mentioned above.H.264: H.264 is the ubiquitous codec, and it looks like it will stay for quite some time. Avid Media Composer supports H.264 natively, via AMA as mentioned above.MPEG-4: Like H.264, Avid Media Composer supports MPEG-4 natively, via AMA as mentioned above. The Quicktime plug-ins are installed by default.Several main Avid Media Composer are listed above, may be the DNxHD can be the best codec which is the most native one for Avid. However, someone there will be confused: How could we import those incompatible videos to Avid for editing? Fortunately, you won’t worry about that, for seeking the best codec for Avid, we here can strongly introduce you the Pavtube HD Video Converter for Mac, which has the strong ability of converting all different videos for editing in various NLEs.
 Other Download:- Pavtube old official address: http://www.pavtube.com/hd-video-converter-mac/- Amazon Store Download: http://www.amazon.com/Pavtube-Video-Converter-Mac-Download/dp/B00QI9GNZS- AppStore Download: https://itunes.apple.com/de/app/pavtube-hd-video-converter/id502792488?mt=12- Cnet Download: http://download.cnet.com/Pavtube-HD-Video-Converter/3000-2194_4-76177786.htmlHow to import Nabi Square HD 4K video to Avid MC for editing?Step 1: Download and have a quick installation. The trial version will have a watermark on your converted files. Except for that, there are no time limitation, no virus, and no unnecessary bundle apps while downloading. After that, click “Add Video” button to load your 4K videos. You can load several files at once thanks to “Add from folder” button.
 Step 2: Click the “Format” bar to get the drop-down menu and you can get “Avid Media Composer”. Choose “Avid DNxHD (*.mov)” as output format.
 Step 3: Click “Settings” button to customize the output video and audio settings by yourself. But if you are not good at it, you’d better use the default parameters, they will ensure you a good balance between file size and image quality basically. You can change the resolution, bit rate, frame rate as you need.Step 4: With all the preparations work done? Why not go back to the main interface to click the “Convert” button to get the work started?Conclusion: Once the conversion is finished, click “Open” to quickly find the converted files. Then, Avid Media Composer will recognize, catalog, play and stream them just fine. You can edit Nabi Square HD 4K video in Avid MC flawlessly.Further Reading:
Summary: What’s the best solution for importing Panasonic AG-HVX200A P2 MXF to iMovie for editing? Perhaps you can try to convert P2 MXF to iMovie. How to get P2 MXF converted to iMovie?
 Panasonic AG-HVX200A answers the demands of the professional HDTV photographer with a compact and feature packed acquisition tool. This versatile prosumer High Definition camcorder packs an array of features into a handheld design. For recording video, the HVX200A includes a Mini DV tape mechanism along with two P2 (Professional Plug-in) card slots. The P2 cards allow for true variable frame rates and recording options that Mini DV tape can't offer. These include DVCPRO HD 1080/24p and 720/60p, along with normal interlaced video. Have you got one? As many users get HVX200A, more problems are coming up.“My work with the prototype camera I used over a period of six weeks started with what I know, which is 720p/24p. The P2 card of AG-HVX200A is capable of storing large amounts of video and audio data in MXF-format files. I prefer iMovie for editing with AG-HVX200A, but I failed to open the MXF files with iMovie many times. (iMovie 11, Mac Mavericks). I am looking for the easy-to-use and reasonably priced converter to make my MXF files from AG-HVX200A to be readable in iMovie. I have more than 200 MXF files, I need to batch process them. Can anyone help regarding this conversion?”As far as I know, in order to edit Panasonic AG-HVX200A P2 MXF files in iMovie 8/9/11 flawlessly, the best method is to convert Panasonic P2 MXF to Apple InterMediate Codec (AIC) which is a best editing codec for iMovie 8/9/11. At first, you need third-party software. Considering the easy of use and lossless quality drop, Pavtube MXF Converter for Mac is highly recommended. It is a professional MXF to iMovie Converter which can not only convert Panasonic AG-HVX200A recorded MXF files to AIC for iMovie 8/9/11 editing on Mac OS X Yosemite, but also provide simple video editing functions for you. This Mac MXF Converter is especially designed for converting Panasonic P2 MXF, Sony XDCAM MXF, Canon XF MXF files for editing in FCP, iMovie/FCE, Avid Media Composer, Adobe Premiere and etc. Other downloads:AppStore Download: https://itunes.apple.com/us/app/pavtube-mxf-converter/id502807634?mt=12Amazon Download: http://www.amazon.com/Pavtube-MXF-Converter-Mac-Download/dp/B00QID8K28Cnet Download: http://download.cnet.com/Pavtube-MXF-Converter/3000-2194_4-76177789.htmlHow to flawlessly edit Panasonic AG-HVX200A P2 MXF in iMovie?Step 1: Download Mac MXF Converter, and follow the prompts to install the program. When the installation is complete, the best MXF to iMovie Converter will launch automatically.Step 2: Click “Add video” button to load Panasonic AG-HVX200A P2 MXF files or directly drag the files into file list. By default, the files are selected. You can delete files which you don’t want to import to.
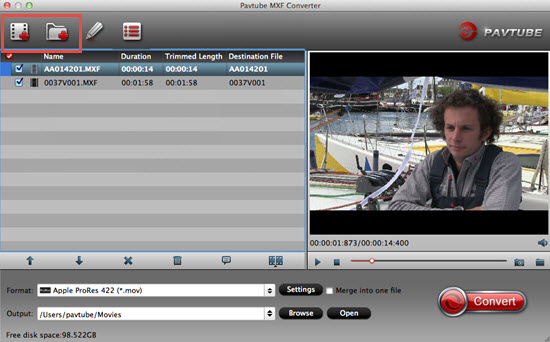 Step 3: Click “Format” bar to determine output format. For best image quality, click the format bar and choose “iMovie and Final Cut Express>>Apple InterMediate Codec (AIC) (*.mov)” format.
 Step 4: Click “Convert” button to start to convert Panasonic AG-HVX200A P2 MXF to AIC MOV format. After conversion, import the converted MXF videos to iMovie 8/9/11 for real time editing and mastering.Conclusion: You can click “Open” button to check your converted files, if you are doing the batch conversion, you can choose “Shut down computer after conversion”, then leave it run. There is no more difficulty in editing P2 MXF in iMovie8/9/11.Further Reading:
Summary: The following is the detailed information of my own experience to convert Sony/Canon/Panasonic MTS to YouTube/Google/Myspace. Move on and find something useful to you.
 What are MTS files?The MTS extension file is a high-definition MPEG Transport Stream video format used by Sony, Panasonic and other HD camcorders. It is based on the MPEG-2 transport stream and supports 720p and 1080i HD video formats. MTS files are opened and edited using the software included with Sony and Panasonic HD camcorders.The MTS file extension is known as the Advanced Audio Coding File and is associated with the video file format of AVCHD (Advanced Video Coding High Definition), which was developed by Sony and Panasonic Corporation in 2006. This video coding gives users the ability to record and playback videos in high definition.Problems when converting Sony MTS to YouTube:“I have a bunch of MTS recordings from my Sony Handycam. Now I want to upload them to YouTube for sharing. How do I do? I heard that MTS should be converted to FLV which maintains high quality and compatibale with YouTube. Is there any software to convert MTS files to FLV? Thanks for any recommendations.”YouTube Supported Video Formats are listed below:MP4 (a multimedia container format standard specified as a part of MPEG-4)FLV (Flash Video, a kind of video format )AVI (Audio Video Interleaved,a kind of video format)MOV (the QuickTime multimedia file format)3GP (a multimedia container format defined by the Third Generation Partnership Project for 3G UMTS multimedia services.)MKV (an free container format that holds an unlimited number of video, audio, picture, or subtitle tracks in one file)MPEG (the Moving Picture Experts Group, a kind of video format)WMV (Windows Media Video)SWF (Shockwave Flash)Solutions about how to convert Sony/Canon/Panasonic MTS to YouTube/Google/Myspace:Do you have so many valuable or interesting moments you took with your AVCHD camcorder that you would like to share with your friends and family in YouTube, Google Video, Myspace or other video sharing websites? As you know, MTS/M2TS format is not supported on most video-sharing websites. You might need a video converter first to convert MTS to workable formats to YouTube/Google/Myspace. Here I’d like to recommend an excellent piece of MTS/M2TS converter- Pavtube MTS/M2TS Converter (Mac version). The program is specifically designed for MTS/M2TS converting which excels on output quality and its conversion speed. A detailed guide on converting Sony/Canon/Panasonic MTS to YouTube/Google/Myspace:Step 1: Download MTS/M2TS Converter, and follow the prompts to install the program. When the installation is complete, the best program will launch automatically.Step 2: Click “Add video” button to load MTS files or directly drag the files into file list. By default, the files are selected. You can delete files which you don’t want to import to.
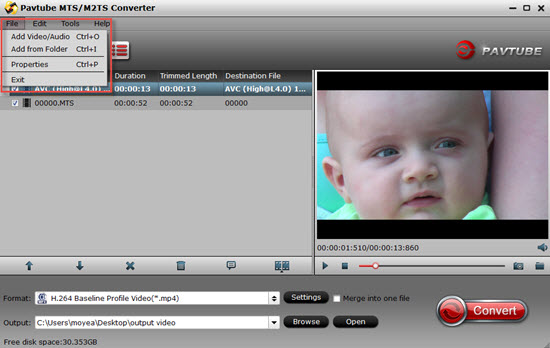 Step 3: Click “Format” bar to determine output format. For best image quality, click the format bar and choose “Flash Video>>FLV H.264 (*.flv)” as output format for YouTube. You can select other output format according to your requirements for Google/Myspace using.
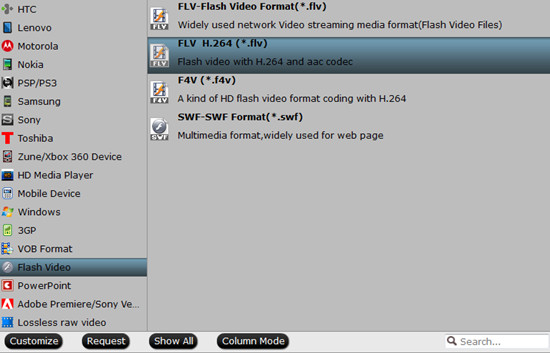 Step 4: Click “Convert” button to start to convert Sony/Canon/Panasonic MTS to suitable format for YouTube/Google/Myspace. After conversion, import the converted MTS videos for real time mastering.Conclusion: You can set auto shutdown in progress window or leave it there and come back later. There is no more difficulty in converting Sony/Canon/Panasonic MTS to YouTube/Google/Myspace.Further Reading:
Summary: Does Premiere Pro have native support for Sony AX-100 4K XAVC S files? If you are trying to import 4K XAVC S to Premiere Pro for editing, you may wish to read this post.
 The Sony AX-100 camcorder records 4K and HD movies in XAVC S, a consumer friendly format based on the XAVC codec developed for 4K/HD and professional use, which uses MPEG-4 AVC/H.264 for video compression and linear PCM for audio compression, while saving files in a MP4 wrapper. However, if you want to import the XAVC S videos from Sony AX-100 to Premiere Pro for editing, you may encounter incompatibility issues.“I can not get Premiere Pro CS6 to recognize the 4K XAVC S files from AX-100. I get the ‘generic error’ message all the time. is there a way to get it to work?”To be clear, Adobe Premiere Pro CS5, CS5.5, CS6 and the latest PPro CC don’t have native support for Sony XAVC S footage wrapped in MP4 recording format. If you are searching for a plug-in to help you open Sony AX-100 4K XAVC S video in Premiere Pro, the searching results may let you down, that’s because presently there is no such a kind of plug-ins available for viewing and editing XAVC S MP4 footage in Premiere Pro and other mainstream editing programs like Avid Media Composer, FCP X and Vegas Pro.Since XAVC S codec is a new one, and is not widely supported. For those who stick with Premiere Pro, a quick fix is to convert AX-100 4K XAVC S to Premiere editable format such as MPEG-2 before editing. Pavtube HD Video Converter for Mac is the solid tool to help users make the 4K XAVC S to Premiere Pro transcoding on Mac OS X Yosemite. How to convert Sony AX-100 4K XAVC S to Premiere Pro for editing?Step 1: Install and import AX-100 4K videos.Backup your 4K XAVC S videos from your AX-100 camcorder to hard drive. Install and launch 4K HD Video Converter for Mac. Drag and drop 4K video files to the software. You can import multiple files at once thanks to batch conversion.Step 2: Set Premiere Pro friendly format.Click the drop-down list in the format line to get the format box. Then choose “Adobe Premiere/Sony Vegas>>MPEG-2 (*.mpg)” as output format.Tips: WMV (VC-1) (*.wmv) and MOV (AVC) (*.mov) are both supported. Generally, MPEG-2 is a well-accepted file format for its ability to keep up the video quality and its popularity.
 Step 3: Do some simple edit work.De-interlace: By default the 4K HD Video Converter for Mac will apply de-interlacing facility to some clips that are interlaced. Just click “Edit” to enter the video editor, switch to “Effect” tab, and check the “Deinterlacing” box.Trim: Basically, video hosting sites restrict video clips to be in certain file size and length. For example, YouTube stated that “videos can be up to 2GB in size and 10 minutes long”. You can trim the video to desired length with this HD Video Converter for Mac. Simply click “Edit” menu>>”Trim” tab and set start and end time point.Merge: To join multiple videos together, just select them in file list, and tick off the checkbox “Merge into one file” on the main interface.Step 4: Start to convert AX-100 4K XAVC S to Premiere friendly format.You can preview to check the final result. Once you are satisfied with it, click the “Convert” button to start converting AX-100 4K XAVC S to MPEG-2 .mpg format. It will take you a little while.Conclusion: After conversion, you’ll get no troubles in editing AX-100 4K XAVC S in Premiere Pro. Follow the steps and have a try!Further Reading:
Summary: Have issues with importing PJ275 1080/60p AVCHD MTS files to iMovie on your Mac? Just follow the steps below to convert 1080/60p AVCHD to iMovie compatible format AIC MOV to solve it.
 The Sony HDR-PJ275 is the least expensive Handycam with a projector (13 lumens). The camera records in exquisitely rich 1920 x1080/60p Full HD video and Internet ready MP4. It's not easy to ingest Sony HDR-PJ275 AVCHD to iMovie. Though Apple claims that iMovie 09/11 supports most commonly-used video codecs which including AVCHD format, there are always all kinds of problems. The time-consuming rendering process, the astonishing enlarged file size when iMovie automatically encode AVCHD to AIC and the quality degradation that can not be ignored, are really a pain when we desperately want to bring AVCHD to iMovie for post production.I guess many guys have the experiences with free converters, such as Handbrake. But free product seems have limits. The multiple steps make me confused when I need to preset profile. And once, after conversion, I get only video but no audio from Sony AVCHD MTS files. In the Apple forum, many posts are about no audio or unsynchronized problem. Pavtube MTS/M2TS Converter for Mac is the best to keep audio and video sync without rendering time and file size enlargement when bring 1080/60p AVCHD progressive to iMovie. For 60i/50i AVCHD files, the problem may be the thin horizontal lines radiating from all moving objects or wild flickering on still images containing thin horizontal lines. The program can easily remove and deinterlace the bad interlace if you need.Find it's difficulty to keep or change frame rate as you want after try many conversion tools? The program we mentioned above allows you easily to set video frame rate with one click. And the built-in editor tool will help you trim, crop, add watermark, add effecting, join video and capture pictures, etc. Now since the 3D camera are emerging after CES 2014, it is able to convert AVCHD to 3D video in MKV, MP4, MOV, WMV, and AVI with HD quality. Here is a step-by-step tutorial for you to figure out your AVCHD MTS to iMovie problem:Step 1: Import Sony HDR-PJ275 files to Mac MTS Converter. Run it as the best Mac MTS Converter, and click the “Add video” button to load your original files. You may also directly drag and drop files to application UI for importing files.
 Step 2: Click the “Format” option and navigate the mouse cursor to “iMovie and Final Cut Express>>Apple InterMediate Codec (AIC) (*.mov)” as output format.Step 3: Click “Settings” button to customize the output video and audio settings by yourself. But if you are not good at it, you’d better use the default parameters, they will ensure you a good balance between file size and image quality basically. You can change the resolution, bit rate, frame rate as you need.Step 4: When everything is ready, click “Convert” to start converting PJ275 AVCHD MTS to AIC MOV. This Mac MTS/M2TS Converter supports batch conversion so you may load multiple files and convert them at one time.Conclusion: After converting, you can get the generated files by clicking “Open” button. Now, you can edit PJ275 1080/60p AVCHD MTS in iMovie freely.Further Reading:
Summary: Have a lot of Sony HDV files at hands? Before uploading them to Vimeo for sharing with others, do you want to polish Sony HDV files with the help of FCP 7? Move on to find out how to edit Sony HDV files in FCP 7.
 HDV is a format for recording of high-definition video on DV cassette tape. The format was originally developed by JVC and supported by Sony, Canon, and Sharp. Conceived as an affordable high definition format for digital camcorders, HDV quickly caught on with many amateur and professional videographers due to its low cost, portability, and image quality acceptable for many professional productions. It is also possible to record M2TS file to any media that offers enough capacity, like a DVD, external HDD drive or a memory card.As default editing software on Mac, FCP must be the first choice. It’s suitable for both amateur and professional videographers. On the other hand, problems have shown up: “Hi, all, I’m trying to import Sony HDV files to FCP 7 for editing. Unfortunately, FCP 7 seems not to recognize my Sony HDV files as import. I’ve visited Apple’s website, but couldn’t find a remedy for my issue. ”From online technical datas, we know that FCP supported file formats are as follows:Video Formats: Apple Animation codec, Apple Intermediate codec, Apple ProRes(all versions), AVC-intra, AVCHD (including AVCCAM, AVCHD Lite, and NXCAM), DV (including DVCAM, DVCPRO, and DVCPRO50), DVCPRO HD, H.264, HDV, iFrame, Motion JPEG(OpenDML only), MPEG IMX(D-10), REDCODE RAW (R3D), Uncompressed 10-bit 4:2:2, Uncompressed 8-bit 4:2:2, XAVC, XDCAM HD/EX/HD422, QuickTime formats.Audio Formats: AAC, AIFF, BWF, CAF, MP3, MP4, WAVContainer Format: 3GP, AVI, MP4, MXF, QuickTimeIt’s obviously that HDV is in the video formats that supported by FCP. However, we couldn’t get clear the container format of your original Sony HDV files. Only the container format and the video format are both supported by FCP can you edit files in FCP 7 smoothly.Generally, we can use Log and Transfer or Log and Capture to import Sony HDV files to FCP 7 for editing, but don’t expect it to result in top quality. From Apple official website or the information we mentioned above, you will know that FCP best supported video codec is Apple ProRes codec, which is native codec for Final Cut Pro editing on Mac. So we could depend on Pavtube MTS/M2TS Converter for Mac. The one used here can meet your demands with its simple interface but rich functions. How to edit Sony HDV files in FCP 7?Step 1: Import Sony HDV files to Mac MTS Converter. Run it as the best Mac MTS Converter, and click the “Add video” button to load your original files. You may also directly drag and drop files to application UI for importing files.Step 2: Click the “Format” option and navigate the mouse cursor to “Final Cut Pro>>Apple ProRes 422 (*.mov)” as output format.
 Step 3: Click “Settings” button to customize the output video and audio settings by yourself. But if you are not good at it, you’d better use the default parameters, they will ensure you a good balance between file size and image quality basically. You can change the resolution, bit rate, frame rate as you need.Step 4: When everything is ready, click “Convert” to start converting Sony HDV to ProRes. This Mac MTS/M2TS Converter supports batch conversion so you may load multiple files and convert them at one time.Conclusion: Now, you can edit Sony HDV files in FCP 7 freely. After polishing, you can uploading them to Vimeo for sharing.Further Reading: