I have many friends across the country, we have common hobbies, such as travel, so we often share our recorded videos on YouTube, Vimeo. We enjoy the beauty sights together and discuss where to go next weekend.
I have just got the Blackmagic URSA Mini last week, it really good at shooting, the pictures and videos' quality high enought, howwver, it trouble me very much when I am importing the Blackmagic URSA Mini videos to YouTube and Vimeo, it alway show me something error. Who can get me out of the trouble or any good suggestions? THXBlackmagic URSA Mini capture high resolution CinemaDNG RAW video files on one card while creating a lower data rate MP4 more suitable for the web on the other card. With its CinemaDNG RAW, URSA Mini now supports 1080/60p in that format, and for MP4 video, it boosts MPEG-4 support to a 35Mbps 1080/60p codec. So maybe the video with CinemaDNG or .mp4 for Blackmagic URSA Mini is rejected by YouTube, Vimeo for being too big or unsupported codecs or whatever reason.Hot Search: 360-Degree Videos from YouTube | Play YouTube Videos on VLC | Watch YouTube Videos on TVConverting Blackmagic URSA Mini Lossless CinemaDNG RAW Video to MP4 file will makes it easier to upload into YouTube and Vimeo. Here I would recommend you a professional video tool--Pavtube HD Video Converter for Mac(read the review). It can convert URSA Mini Lossless CinemaDNG RAW Video files to MP4, MOV, FLV, MKV, AVI, WMV, VOB and so on. Meanwhile, it can convert URSA Mini into any other format provide you transfer URSA Mini Lossless CinemaDNG RAW Video to tablets/phones/tvs like iPad 3, Kindle Fire HD, Note 2, Galaxy Tab 3, iPhone 5, Galaxy S4, S3, Apple TV 3 and other portable devices for playing, or upload the MP4 videos to YouTube, Vimeo for sharing with your friend and family. Now free Download the Pavtube HD Video Converter.
 1. Start the program on your computer, add Blackmagic URSA Mini Lossless CinemaDNG RAW Video to the program by clicking the "Add Video" or "Add folder" button.
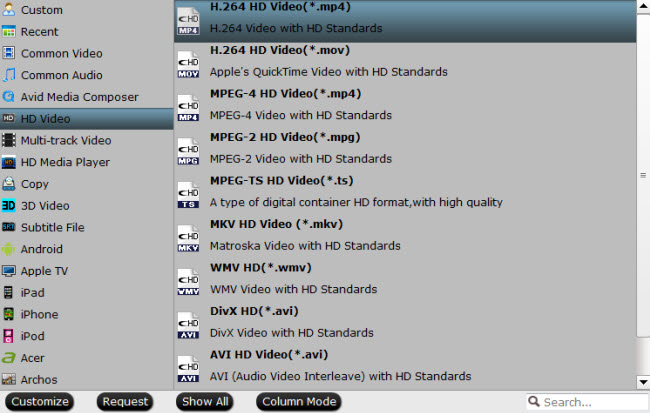
 2. Click the format option and choose HD Video >H.264 HD Video (*MP4), it’s the best format for YouTube,Vimeo or Facebook.
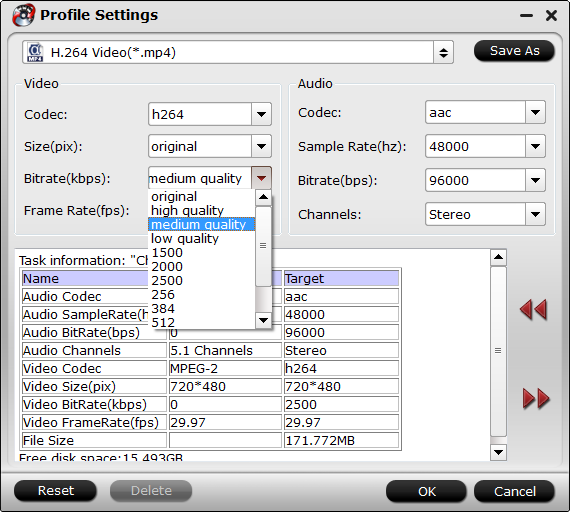
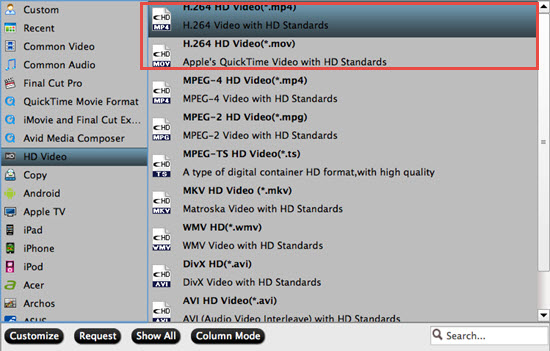 3. Click settings to set the output profile, you can change the size and bitrate in video column, for watching on YouTube, Vimeo, you are recommended to choose lower parameter.
 4. Click conversion to start, Video and audio synchronization is perfectly guaranteed.Now, you just follow the steps and have a try how to convert Blackmagic URSA Mini Lossless CinemaDNG RAW Video to MP4 for uploading to YouTube/Vimeo for Playback or sharing.Related program: Pavtube MXF Converter / Mac Version: can handle MXF/MXF footage produced by Canon, Sony and Panasonic camcorders and convert MXF video files to various video format supported by popular devices such as iPad Air/4/3, iPhone 5S/5C/5/4S/4, Apple TV 3, Google Nexus, Samsung Galaxy Tab S/3/2, Samsung Galaxy S5/S4/S3, Surface RT/Pro, PS4/PS3, WDTV, etc.Pavtube MTS/M2TS Converter / Mac Version:The best MTS converter on the market, which can convert MTS videos and other HD formats to FCP X Apple ProRes codec MOV format, or convert MTS to Avid Media Composer/Adobe Premiere Pro/iMovie native supported video format.Pavtube Media Magician / Mac Version: A nice camcorder assistant manager, lossless camcorder video joiner, MTS/ M2TS/ MXF/ MOV/ MKV/ TiVo/ WMV/ AVI/ MPG converter and editor. Meamwhile it supported upload edited video to YouTube directly.Read More:
Summary: If you are facing the issue when importing and editing Canon XA30 AVCHD footage in Final Cut Pro X, here recommend you the best Mac Canon XA30 AVCHD to ProRes Converter to achieve your goal smoothly. I have just got a Canon XA30 camera and I have taken it on my trip. After recording some footage, I wanna share this with others. To get better effect, just now I'm trying to get the AVCHD recording from it into Final Cut Pro X, but without much success, that is, I can get the Canon to show up on my desktop, but can't seem to get FCP X on my El Capitan to capture the video from the Canon XA30 camera using the USB Cable. AVCHD is highly compressed and not ideal for editing with Final Cut Pro X you can't natively import Canon XA30 AVCHD in FCP X. In order to smoothly edit Canon HF R306 AVCHD files in Final Cut Pro X without crashing problem and avoid rendering, you'd better transcode the Canon AVCHD to FCP native format, say, Apple ProRes Codec with some help from a third-party software. Hot Search: Sony 4K with QuickTime | Edit XA30 AVCHD MP4 | Alpha 68 XAVC S to FCP 7/XPavtube HD Video Converter for Mac(read the review) is an easy to use yet professional AVCHD Converter on Mac OS X El Capitan which can not only transcode Canon XA30 AVCHD files to Apple ProRes codec videos for Mac editing, but also provide simple video editing functions for you. Besides, the program can also convert HD videos from HD camcorders or DVs (like JVC, Panasonic, Sony and Cannon) for editing in Final Cut Pro, Final Cut Pro X, Final Cut Express, iMovie, Avid, Adobe Premiere etc. The following guides you how to convert Canon XA30 AVCHD footages to Apple ProRes 422 encoded MOV file for FCP X. If you have the same problem about editing Canon XA30 AVCHD videos in Final Cut Pro X, check out the brief guide below. Other Download:
Step 1. Import Canon XA30 AVCHD videos. You can import multiple files at once thanks to “Add from folder” button. Step 2. Click the format bar, and move mouse cursor to "Final Cut Pro > Apple ProRes 422 (*.mov)" as output format. Step 3. Click "Convert" button to start transcoding Canon xa30 AVCHD files to Apple ProRes Codec for Final Cut Pro X under Mac OS X El Capitan. Some more helpful features of the app: 1. Settings- click to set video resolution(1920×1080/1440×1080/1280×720/720×480), bitrate(from 1Mbps to 20Mbps), frame rate (24p/30p) 2. Editor (next to "Add" icon)- click to set deinterlace, denoise, mute, volume up, trim, crop, etc. After a shot conversion, you will be able to load/transfer Canon XA30 AVCHD videos into Final Cut Pro X editing without rendering. Tips: Before you try to do the conversion, if you are also a FCP X user, please make sure that you have installed theApple ProRes Codec manually since the FCP X asks users to install it by themselves. Related program: Pavtube MXF Converter / Mac Version: can handle MXF/MXF footage produced by Canon, Sony and Panasonic camcorders and convert MXF video files to various video format supported by popular devices such as iPad Air/4/3, iPhone 5S/5C/5/4S/4, Apple TV 3, Google Nexus, Samsung Galaxy Tab S/3/2, Samsung Galaxy S5/S4/S3, Surface RT/Pro, PS4/PS3, WDTV, etc.Pavtube MTS/M2TS Converter / Mac Version:The best MTS converter on the market, which can convert MTS videos and other HD formats to FCP X Apple ProRes codec MOV format, or convert MTS to Avid Media Composer/Adobe Premiere Pro/iMovie native supported video format.Pavtube Media Magician / Mac Version: A nice camcorder assistant manager, lossless camcorder video joiner, MTS/ M2TS/ MXF/ MOV/ MKV/ TiVo/ WMV/ AVI/ MPG converter and editor. Meamwhile it supported upload edited video to YouTube directly.Read More:
Summary: Now some tips and tricks for Sony Alpha 68 XAVC S Files to iMovie/FCE best workflow are listed below.Sony Alpha 68 has a number of updated features, including a three-CCD sensor system capable of 120fps, a range of codecs including XAVC S. Now I just got one, how can I make iMovie/FCE work well with the Alpha 68 4K XAVC S videos to make these videos more stylish? XAVC S has been created as an open format, giving a license system for other companies within the broadcast and production sector to create their very own good quality and higher frame price merchandise. However, the latest high definition XAVC S video format introduced by Sony--is not supported by iMovie/FCE so far.To edit Sony Alpha 68 XAVC S footage in iMovie/FCE smoothly, the easy workaround is to change the file extention from "XAVC S" to "AIC", which is a friendly format supported by iMovie/FCE. Here is an easy and efficient solution for you.Hot Search: GoPro Hero+ to iMovie/FCE | Lumix GX8 to iMovie/FCE/FCP | DJI Osmo to iMovie/FCEI just googled for a software that could do what I need and found a couple of articles that mentioned Pavtube HD Video Converter for Mac. With it, I complete the job by XAVC S to iMovie/FCE AIC Conversion perfectly and easily import Sony Alpha 68 XAVC S files in iMovie/FCE for editing smoothly without quality loss. Now I will share the easy steps below.Transcode Sony Alpha 68 XAVC S footage to iMovie/FCE editable formatStep 1. Launch the Mac XAVC to iMovie/FCE Converter. Click "Add Video" and browse to XAVC S clips from Alpha 68 and the software will add it to file list. Or you may click the "Add Folder" button to import all the XAVC S files in the file structure.Step 2. Click on "Format" and choose "Apple Intermediate Codec(AIC) (*.mov)" from "iMovie and Final Cut Express" as the best codec for editing Sony Alpha 68 XAVC file in iMoive/FCE.
 Step 3. Click on "Settings" to redefine output quality. You can also set a different video resolution, frame rate, bitrate, audio channels, etc. For users who would like to retain exactly the same settings (without any quality loss), set target settings the same to source video.Step 4. Click "Convert" to start transcoding Sony Alpha 68 XAVC S to AIC for iMoive/FCE editing on Mac.The XAVC S to iMovie/FCE Converter for Mac supports batch conversion, so if you have lots of xavc s videos to convert, check "Shut down computer after conversion", and you can go away without keeping an eye on it.When the conversion is done, you can find the output files by clicking "Open" button on the main interface, then you can transfer the files to your iMoive/FCE to edit with ease.In addition, you can play XAVC on QuickTime, edit XAVC in FCP, work with XAVC in Avid Media Composer on Mac as you want with no codec problems.Related program: Pavtube MXF Converter / Mac Version: can handle MXF/MXF footage produced by Canon, Sony and Panasonic camcorders and convert MXF video files to various video format supported by popular devices such as iPad Air/4/3, iPhone 5S/5C/5/4S/4, Apple TV 3, Google Nexus, Samsung Galaxy Tab S/3/2, Samsung Galaxy S5/S4/S3, Surface RT/Pro, PS4/PS3, WDTV, etc.Pavtube MTS/M2TS Converter / Mac Version:The best MTS converter on the market, which can convert MTS videos and other HD formats to FCP X Apple ProRes codec MOV format, or convert MTS to Avid Media Composer/Adobe Premiere Pro/iMovie native supported video format.Pavtube Media Magician / Mac Version: A nice camcorder assistant manager, lossless camcorder video joiner, MTS/ M2TS/ MXF/ MOV/ MKV/ TiVo/ WMV/ AVI/ MPG converter and editor. Meamwhile it supported upload edited video to YouTube directly.Read More:
Summary:This article mainly shows you the way for playing QuickTime files export from Premiere Pro/FCP and converting them to playable format for PCS or Macs.QuickTime is a player for computers to play various formats. The QuickTime movie file format, often abbreviated to QuickTime file, is a special file format that contains multiple tracks for storing different kinds of media. However, it's sometimes hard to play QT video export from Premiere Pro/FCP on PCs pr Macs. Below are the questions:Q1: Hi, I have been trying to play QuickTime files export from Premiere Pro/FCP on my Mac air for about two weeks without success. I have tried both the stock Internet browser app and Dolphin Browser HD. Could you please let me know how to do it? Thanks.Q2: Now I have an issue with a QuickTimefiles export from Premiere Pro/FCP failing to run on my Thinkpad. Perhaps it won’t play at all, or perhaps you’ve got a picture, but don’t have any sound? What's the problem? Hot Search: AVCHD to QuickTime | MOV Player | Playback QuickTime MOV FilesIn that case, you can either get a video player that support QuickTime video, or convert them to theire comingtable format. You can also refer to this following guide to learn how to do it.
Part 1: Get a Video Player App That Supports QuickTime Video1. VLC media player
VLC media player is an lightweight, open-source multimedia player that supports nearly all digital audio and video formats (e.g. H.264 ,MKV, TS (but not from Technisat DigiCorder), MPEG-2, mp3, AVI, MPEG-4, Ogg, DivX, aac, ...). It can also transcode and convert media files, and act as a streaming server over unicast or multicast and IPv4 or IPv6. VLC does not need any codecs to work.2. The KMPlayer
The KMPlayer is a versatile media player which can cover various types of container format such as TS (also from Technisat Digicorder), VCD, DVD, AVI, MKV, Ogg Theora, OGM, 3GP, MPEG-1/2/4, WMV, RealMedia, and QuickTime among others. It handles a wide range of subtitles and allows you to capture audio, video, and screenshots in many ways.
Part 2: Convert QuickTime Video to a Format Compatible.First of all, download and install Pavtube Video Converter, which is the best tool to accomplish your goal by converting QuickTime Video file to best supported mp4 format for playback. The Mac version also available here.(read the review). Other Download:- Pavtube old official address: http://www.pavtube.com/video-converter-mac/- Amazon Store Download: http://www.amazon.com/Pavtube-Video-Converter-Mac-Download/dp/B00QIBK0TQ- Cnet Download: http://download.cnet.com/Pavtube-Video-Converter/3000-2194_4-76179460.htmlStep 1. Run the best QuickTime Video file Converter, click "Add Video" and load your QuickTime file. Step 2. Clicking the "Format" menu, here you are suggested to choose "Common Video > H.264 Video(*.mp4)" format for playback on iPad/iPhone/Android.
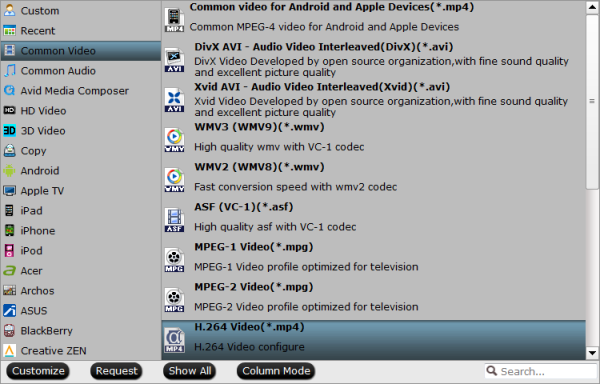 Step 3. If you like, modify profile settings such as video size, bitrate, frame rate, etc to get optimized video and audio playback.Step 4. Return back to main interface, and hit the "Convert" button to start encoding QuickTime Video to MP4. Once it finishes, open output folder, locate the created file for watching or you can transfer QuickTime Video to your other devices for playback, or even conveniently upload converted videos to YouTube, Vimeo or any other online video sharing sites.Related program: Pavtube HD Video Converter / Mac Version: It is designed for converting HD videos from HD camcorders or DVs (like JVC, Panasonic, Sony and Cannon), non-protected HD or movies, DVR files (*.tivo) to other file types for playback on popular media devices like Apple TV, PS3, Xobx, Xobx360, WD TV HD Player.Pavtube Media Magician / Mac Version: A nice camcorder assistant manager, lossless camcorder video joiner, MTS/ M2TS/ MXF/ MOV/ MKV/ TiVo/ WMV/ AVI/ MPG converter and editor. Meamwhile it supported upload edited video to YouTube directly.Pavtube Video Converter Ultimate /iMedia Converter(Mac Version): An all-inclusive converter to complete 2D/3D Blu-ray, DVD, ISO, SD/HD/4K Video to m3u8, H.265 MP4, do H.265 to non-H.265 conversion on Mac OS X El Capitan.Read More:
Pansonic DMC-GH4R is a new 4K camcorder which released several weeks ago, since it released it has attracted a lot of users’ attention, because this camcorder is very powerful but at a low price.Many Pansonic users have encountered the issue to import and edit Pansonic DMC-GH4R with iMovie and Final Cut Express, the iMovie/FCE can’t support Pansonic DMC-GH4R 4K videos, so Pansonic DMC-GH4R users want a solution for this. From iMovie and Final Cut Express official website you will know that Pansonic DMC-GH4R videos can’t best supported by iMovie and FCE, iMoive/Final Cut Express supported video formats are limited, it can only support AIC codec MOV files well, and AIC codec is the native codec for iMovie/FCE.Hot Search: iMovie project to MPEG-2 | iMovie videos on YouTube | GoPro Hero+ LCD to iMovie/FCETo fix this issue, you can transcode Pansonic DMC-GH4R 4K to iMovie/FCE most compatible editing format-Apple Intermediate Codec (AIC). To encode Apple Intermediate Codec, you can download Pavtube HD Video Converter for Mac to encode Pansonic DMC-GH4R 4K to Apple Intermediate Codec(AIC) for importing with iMovie or FCE. It is capable of converting 4K, 2K, Full HD 1080p/1080i, HD 720p and SD video files in format of AVCHD, MTS, M2T, M2TS, TS, MXF, MKV, H.264, P2 MXF, AVI, MP4, WMV, MOV, M4V, etc. to any formats you request. You can download a demo to see if it is able to do what you want in simple steps with good quality.The 4K MOV files recorded with Pansonic DMC-GH4R will require a lot of computer CPU and GPU power to handle it, you can get a fast and fluid post workflow by compressing 4K to 1080p in the "Profile Settings" window of the program. Other Download:- Pavtube old official address: http://www.pavtube.com/hd-video-converter-mac/- Amazon Store Download: http://www.amazon.com/Pavtube-Video-Converter-Mac-Download/dp/B00QI9GNZS- AppStore Download: https://itunes.apple.com/de/app/pavtube-hd-video-converter/id502792488?mt=12- Cnet Download: http://download.cnet.com/Pavtube-HD-Video-Converter/3000-2194_4-76177786.htmlHow to transcode and import Pansonic DMC-GH4R 4K MOV to iMovie/FCE?Step 1: Add Pansonic DMC-GH4R 4K MOV files.Launch the program on your computer, add Lumix GX8 4K MP4 files to the program by clicking the "Add Video" or "Add folder" button.Step 2: Choose output file format.From "Format" drop-down option, choose the output format according to your own preference, for iMovie or FCE editing, select "iMovie and Final Cut Ex..." >"Apple Intermediate Codec (AIC)(*.mov) to output, for FCP editing, choose "Final Cut Pro" >"Apple Prores 422(*.mov)" to output.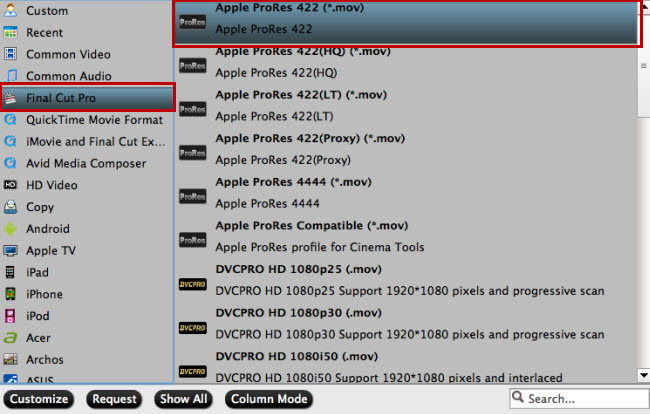 Tips:1.When converting video to Final Cut Pro oriented format templates(e.g. Apple Prores), please ensure that your computer has Final Cut Pro installed, otherwise the converted files will have audio only without image.2.If you are using FCP X, please make sure you have installed ProApps QuickTime Codecs, or you may get files with sound only without video.Step 3: Customize output video and audio settings.Open "Profile Settings" window to adjust output video and audio parameter settings according to your own preference. For smooth workflow of Pansonic DMC-GH4R 4K video with NLE programs, you are recommended to downscale 4K MOV video to 1080p from "Size(pix)" drop-down selection.
 Step 4: Start the conversion process.After all the setting is over, go back to the main interface and hit right-bottom "Convert" button to start Pansonic DMC-GH4R 4K MOV video to iMovie/FCE conversion process.When the conversion is completed, following the guides below to import Pansonic DMC-GH4R video to iMovie/FCE individually. How to media files to iMovie? Import Video Files to FCP X and Log & Transfer Files to FCP 6/7Read More:
Summary: In this page, you'll learn how to convert RED 4K R3D files to 2K for editing within Premiere Pro on Mac OS X El Capitan.
RED one as the first generation of digital camera, which redefined digital cinema upon its arrival, democratizing 4K capture and challenging the status quo. The point here, you will find it a painful experience when editing 4K footage recorded from Read One in Adobe Premiere Pro CC. Your computer freezes when editing the 4K video. So, what's the fluid workflow for editing RED one 4K in Adobe Premiere on Mac El Capitan smoothly?
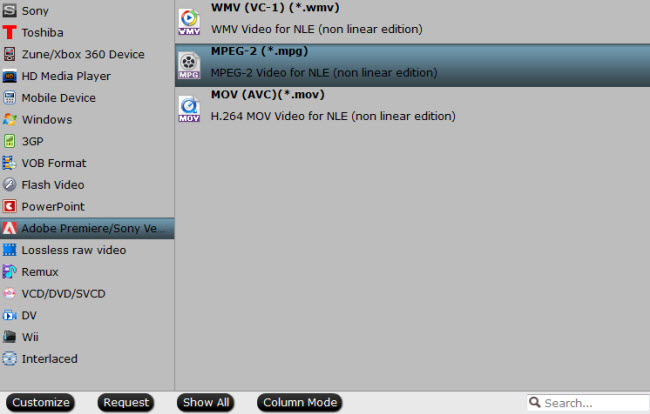
Premiere CC can deal with 4K videos. However, the fact is that users still encounter many problems while importing RED 4K R3D Raw media to Premiere CC. For example, users followed the guide on Adobe and did s fresh install of Premiere CC, but it will NOT accept 4K video at all due to some computer configuration and codec problems. If you wanna edit RED 4K R3D videos in Premiere CC or previous version without any problem, you'd better downscale 4K footage to 1080p and transcode the 4K R3D to a more friendly format, such a Premiere's MPEG-2.
In the following article, we will show you how to downscale and convert 4K to 2K MPEG-2 videos so that you can edit 4K footage in Adobe Premiere CC without bogging down your computer. The process is surprisingly easy and can be done using Pavtube HD Video Converter for Mac.
It is an easy-to-use yet professional 4K Video Converter truly and fully supports input and output videos at up to 4K resolution. With it, you can effortlessly transcode Red One 4K videos to MPEG-2 with 1080p settings on Mac El Capitan - - ensuring maximum editing quality and efficiency when working with Premiere Pro CC. Besides Premiere Pro CC, the program also supports more professional encoders, ProRes, DNxHD, AIC, DVCPRO, HDV - ensuring the best results when editing with Final Cut Pro, iMovie, Avid Media Composer, etc. respectively. Plus, this 4K Video Converter is also available to customize the output resolutions to any size like 1080p, 2K, 4K as users want.
Hot Search: Blu-ray/DVD to Premiere | MTS to Premiere | MXF to Premiere | MP4 to Premiere | 4K to Mac
Free download 4K to Premiere Pro CC Converter free trial:
Other Download:
- Pavtube old official address: http://www.pavtube.com/hd-video-converter-mac/
- Amazon Store Download: http://www.amazon.com/Pavtube-Video-Converter-Mac-Download/dp/B00QI9GNZS
- AppStore Download: https://itunes.apple.com/de/app/pavtube-hd-video-converter/id502792488?mt=12
- Cnet Download: http://download.cnet.com/Pavtube-HD-Video-Converter/3000-2194_4-76177786.html
Downscale the 4K Red One RAW Video to MPEG-2 for Editing in Premiere Pro CC on Mac El Capitan
Step 1. Load Source Red One 4K Video
Launch the best 4K Video Converter Mac; click "Add Video" and load your 4K UHD files from Red One.
Step 2. Select "Premiere Pro CC" preset as the output format
Go to the Editing Software category and click "Premiere Pro CC" to set it as the output format.
 Tips: Adjust video, audio settings
Click the "Settings" button and customize proper video/audio parameters including Video size, bitrate and fame rate and mroe. Usually 1920*1080 video size and 30fps video frame rate are recommended for Premiere Pro CC editing.
Step 3. Start Red One 4K video to Premiere Pro CC conversion
Hit "Convert" button to let the Red One 4K R3D to MPEG-2 conversion on Mac El Capitan begin. When the conversion finished, check the generated .mpg video for video importing, you will certainly be satisfied with its final video quality. It would be easier for you to edit with Premiere Pro CC.
Related programs:
Pavtube Video Converter for Mac
Tips: Adjust video, audio settings
Click the "Settings" button and customize proper video/audio parameters including Video size, bitrate and fame rate and mroe. Usually 1920*1080 video size and 30fps video frame rate are recommended for Premiere Pro CC editing.
Step 3. Start Red One 4K video to Premiere Pro CC conversion
Hit "Convert" button to let the Red One 4K R3D to MPEG-2 conversion on Mac El Capitan begin. When the conversion finished, check the generated .mpg video for video importing, you will certainly be satisfied with its final video quality. It would be easier for you to edit with Premiere Pro CC.
Related programs:
Pavtube Video Converter for Mac:
An all-in-one program integrating conversion and editing 4K videos, 1080p/720p MKV, MXF, M2TS, etc. on Mac OS X El Capitan.
Pavtube iMedia Converter for Mac: An all-inclusive converter to complete 2D/3D Blu-ray, DVD, ISO, SD/HD/4K Video to m3u8, H.265 MP4, do H.265 to non-H.265 conversion on Mac OS X El Capitan.
Read More:
Summary: Why can't you get 1080p M2TS video to HDTV for USB playback? Are you seeking for a solution? This article will explains.
HDTV is one of the most popular way to enjoy the video, movie and other clips you get from internet, nowadays, almost all HDTV supports to play them via USB port, which is great, USB port solution free you free the cable clusters and the expense for storing videos.
Though many TV like Bravia enables us to enjoy video files from a USB device, it has video format limitation. It only supports videos in MPEG-1, MPEG-2, MP4, WMV, ASF, DivX HD through USB. If you have a collection of movies in format like M2TS, naturally, the solution is to convert these videos into the right format HDTV supports for USB playback first.
To cater to all the video lover's need, the following will introduce a step by step guide on how to transcode 1080p M2TS to HDTV supported video format effortlessly.
What you need:
1. USB mobile hard disk or flash disk. The disk file systems should be FAT12, FAT16, FAT32, or exFAT for Sony TV acceptable.
2. Video Converter software. To convert current MKV/AVI/M2TS videos to be supported by Sony Bravia HDTV, Pavtube Video Converter/Mac version is needed to convert any HD or SD video format to Sony Bravia HDTV friendly format. It provides optimized preset for playing HD video on Sony Bravia HDTV without scarifying image quality. 3D effect on converted video is also supported by this program.
Guides on converting 1080p M2TS Videos to MP4 for playing on HDTV via USB
Step 1. Free download Pavtube Video Converter, install and launch the program.

 Other Download:- Pavtube old official address: http://www.pavtube.com/video_converter/- Amazon Download: http://download.cnet.com/Pavtube-Video-Converter/3000-2194_4-75734821.html- Cnet Download: http://download.cnet.com/Pavtube-Video-Converter/3000-2194_4-75734821.html Other Download:- Pavtube old official address: http://www.pavtube.com/video-converter-mac/- Amazon Store Download: http://www.amazon.com/Pavtube-Video-Converter-Mac-Download/dp/B00QIBK0TQ- Cnet Download: http://download.cnet.com/Pavtube-Video-Converter/3000-2194_4-76179460.html
Once you run it, click "Add Video" button to load the videos you'd like to convert. When all the videos are loaded to the program, you can preview the videos.
Other Download:- Pavtube old official address: http://www.pavtube.com/video_converter/- Amazon Download: http://download.cnet.com/Pavtube-Video-Converter/3000-2194_4-75734821.html- Cnet Download: http://download.cnet.com/Pavtube-Video-Converter/3000-2194_4-75734821.html Other Download:- Pavtube old official address: http://www.pavtube.com/video-converter-mac/- Amazon Store Download: http://www.amazon.com/Pavtube-Video-Converter-Mac-Download/dp/B00QIBK0TQ- Cnet Download: http://download.cnet.com/Pavtube-Video-Converter/3000-2194_4-76179460.html
Once you run it, click "Add Video" button to load the videos you'd like to convert. When all the videos are loaded to the program, you can preview the videos.
 Step 2. Select best supported format for HDTV.
Click on "Format", and select output format from the drop-down list. Simply follow "Common Video -> H.264 Video(*.mp4)" which is accepted for almost all HDTV.
Step 2. Select best supported format for HDTV.
Click on "Format", and select output format from the drop-down list. Simply follow "Common Video -> H.264 Video(*.mp4)" which is accepted for almost all HDTV.
 Tip: If you want to get 3D movies for your 3D TV, choose "3D -> MP4 Side-by-Side 3D Video (*.mp4)".
Step 3. Settings.
You can customize the A/V parameters based on your personal requirements. Adjust the resolution, bitrate, frame rate or codec to meet your requirement by clicking "Settings".
Tip: If you want to get 3D movies for your 3D TV, choose "3D -> MP4 Side-by-Side 3D Video (*.mp4)".
Step 3. Settings.
You can customize the A/V parameters based on your personal requirements. Adjust the resolution, bitrate, frame rate or codec to meet your requirement by clicking "Settings".
 Step 4: Start converting 1080p M2TS video to Sony Bravia HDTV.
After the above steps are done, you can click "Convert" button to convert your M2TS Video to HDTV MP4 format.
Tips: How to tranfer converted videos to HDTV?
1. Through an USB
You can connect your movable equipment (iPad, iPhone, Galaxy S2/S3, Sony Xperia S/P/U, HTC One X etc.) and TV via USB. Let TV read these video files.
Step 4: Start converting 1080p M2TS video to Sony Bravia HDTV.
After the above steps are done, you can click "Convert" button to convert your M2TS Video to HDTV MP4 format.
Tips: How to tranfer converted videos to HDTV?
1. Through an USB
You can connect your movable equipment (iPad, iPhone, Galaxy S2/S3, Sony Xperia S/P/U, HTC One X etc.) and TV via USB. Let TV read these video files.
 2. Via USB Flash Disk.
You need to transfer the movies to USB Flash Disk first. Then, insert the USB Flash Disk into USB interface.
2. Via USB Flash Disk.
You need to transfer the movies to USB Flash Disk first. Then, insert the USB Flash Disk into USB interface.
 If you are disc lovers, you can rip Blu-ray, DVD and ISO files to play on your TV.
Read More:
If you are disc lovers, you can rip Blu-ray, DVD and ISO files to play on your TV.
Read More: