Summary: I have an Apple TV and I want to join my XviD and Divx video into Apple TV 4- the new generation for playback but there seems to be some problem with it. Which is the best way?Cause the Xvid/Divx becomes more and more popular due to its ability to compress lengthy video segments into small sizes while maintaining relatively high visual quality. Have tried directly syncing the Xvid/Divx to Apple TV, but failed? No worry, this article is written just to resolve the Xvid/Divx on Apple TV 3 issues.If you have searched the Apple TV official website, we will find that the biggest limitation of Apple TV is the lack of codec support (like Xvid, DivX, etc.) and not even having the ability to do basic surround sound like Dolby Digital 5.1. These issues were resolved almost immediately after the Apple TV was released, although the hacks were somewhat less than practical. Something as simple as getting your Apple TV to, say, sync and recognize your Xvid movies as playable was no simple feat.Apple TV is a hot media device for us watching movies. However, just like other Apple devices it can only supports MP4, MOV, M4V videos. As you see, the XviD/Divx AVI isn’t in the supported format list. If you wanna view XviD/Divx files on your Apple TV, the best solution is to encode/re-encode XviD/Divx to Apple TV supported video format first.First of all, download and launch Pavtube Video Converter for Mac(read the review) which would do XviD/Divx AVI to ATV conversion which only a few clicks. Compared with others, we have found the Pavtube Video Converter has the strong ability of transcoding the Xvid or Divx files well. This program offers quite effective solution for you to convert almost all the videos Xvid, DivX as well as MKV, MOV, MTS, TiVo, VOB, etc. It also allows you to adjust the video, audio parameter to get a decent output video that you want. Barely several steps are enough. Just download it and follow the steps below to sync Xvid/Divx files to Apple TV for playing smoothly. The equivalent Windows version is Pavtube Video Converter. 
 Other Download:- Pavtube old official address: http://www.pavtube.com/video-converter-mac/- Amazon Store Download: http://www.amazon.com/Pavtube-Video-Converter-Mac-Download/dp/B00QIBK0TQ- Cnet Download: http://download.cnet.com/Pavtube-Video-Converter/3000-2194_4-76179460.htmlFollowing is the guide about how to XviD/Divx file formats to M4V for Apple TV:Here choose Mac version as example, Windows version has the same ability as Mac version. Please choose the right version for you.Step 1: Download and Install Video Converter. Select your movie. Click “Add Video” to import your source materials in XviD/Divx format. Batch conversion is supported so that you can add multiple files.
 Step 2: Choose the output format. Click on Format > Apple TV. From the drop down menu, select the proper output format.a. For Apple TV 3 users, Apple TV 3 Dolby Digital Pass-through (*.m4v) is recommended.b. For Apple TV 2 users, please select the Apple TV 2 Dolby Digital Pass-through (*.m4v).c. For Apple TV users, Apple TV H.264 1280×720(*.m4v) will be better to keep the videos in HD.
 Step 3: Click the “Settings” icon and you will go into a new interface named “Profile Settings”. You can adjust codec, aspect ratio, bit rate, frame rate, sample rate and audio channel in the interface to optimize the output file quality.Find no 5.1 Surround Sound from Apple TV, here is the solution. Actually, Apple TV cannot support AC3 5.1 audio track. While, we usually have the demand to get the full AC3 5.1 surround sound to let Apple TV pass-through Dolby Digital to A/V receiver to take advantage of our surround sound system. This Apple TV Video Converter provides pre-set Apple TV profiles. The particular profiles are H.264 video files with AC3 5.1 pass through and AAC stereo. Both AC3 and AAC audio are retained so that you can either let Apple TV pass-through Dolby Digital to A/V receiver to take advantage of your surround sound system, or have Apple TV decodes AAC and exports stereo audio
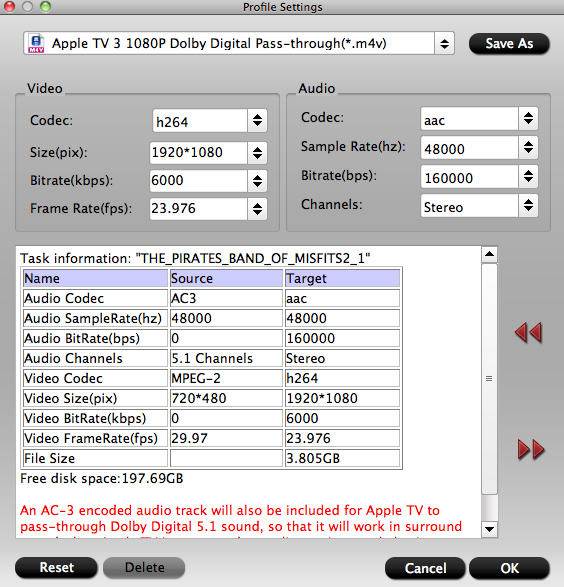 Step 4: After above settings, you can start the XviD/Divx to Apple TV conversion. Once the process completes, locate the files and transfer and copy the converted .m4v videos to Apple TV. As you see, now you can effortlessly watch XviD/Divx videos on Apple TV with the best quality. Besides mkv, you can also rip Blu-ray/DVD or convert MKV and MTSto play on Apple TV.Read More:
Summary: For a person who have both Mac and PC always confuse with which one should they choose to edit video. Here I give you some suggestions avoid choosing the worse one and make edit work more smoothly.Most folks will tell you that both can do the job, and that is quite true. Almost all the video pros I know who are using this level of hardware use Macs. You can draw your own conclusion. My experience, as a non-pro who has nonetheless been doing a moderate amount of video digitizing, rendering and editing on Macs and PCs since the mid-90s, is that I can usually do the same amount of work in less time on a Mac. If you're already a pro with most of your experience on Windows boxen, your experience may be different. This depends on what editor you use. For example, Final Cut X will be work better on Mac, while Adobe Premiere have good effect on windows.Here we talk about how to edit video on window or mac with FCP or Premiere. In generally, almost camera recording video with easy-to-record format like XAVC, XAVC S, AVCHD, MTS, MXF, ect. while the most compatible format for editing in FCP X is Apple Prores, the most compatible format for editing in Premiere is MPEG-2. That is, you just need a video tool to help you convert the incompatible video format to target format for editor in either FCP X or Premiere or other professional editor with it’s best compatible format. Here I would recommend you a professional any video to FCP X compatible Apple ProRes converter or Premiere compatible MPEG-2 converter--Pavtube HD Video Converter for Mac(read the review). It can provide quite effective solution for you to convert almost all the videos such as Xvid, DivX, MKV, MTS, TiVo, VOB, etc. to Apple ProRes for smoothly editing in FCP X or to MPEG-2 for smoothly editing for Premiere. It also allows you to adjust the video, audio parameter to get a decent output video that you want. Barely several steps are enough(FCP X on Mac as example). Other Download:
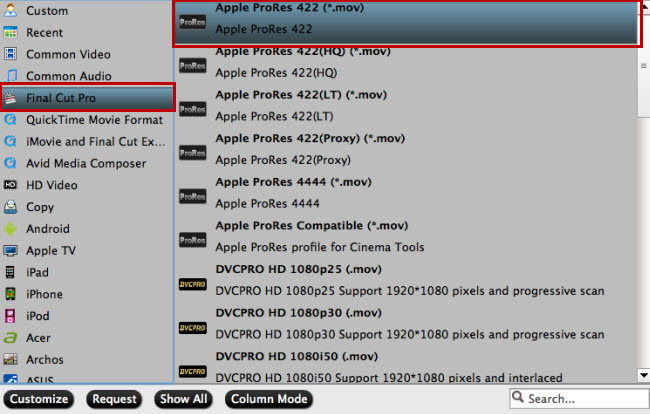
How to import and edit video with Final Cut Pro X on Mac?Step 1: Import videos.From "File"drop-down option, select "add Video/Audio"to add source video files to the program. Step 2: Select output file format.Click "Format"bar, from its drop-down list, select "Final Cut Pro"> "Apple Prores 422(*.mov)"as your desired output file format. For Premiere, you can choose it compatible MPEG-2.
 Step 3: Convert drone video to Apple Prores format.Go back to the main interface and press the "Convert"icon on the right-bottom to start drone video to Final Cut Pro Apple Prores process.When the conversion is done, you can easily import the converted video to FCP X for furthering professional editing.Read More:
Summary: You have both FCP and iMovie, you are confused with which is better for editing HD videos? If so, here give you the solution what you should choose.
Q: Which is better for editing HD videos, FCP or iMovie?
I recommend experimenting with both to see which best fits your needs. iMovie may be sufficient and Final Cut overkill, or the reverse may be true, iMovie too simplistic and the tools in Final Cut are needed. It also depends on what is "small videos" (I'm deducing you mean "shorts" of some sort). If: videos of family gatherings to share, iMovie will likely work for you. If: a short film for mass distribution, Final Cut.
Something you may not know about Final Cut Pro/iMovie:
As a non-linear video editing software which provides non-destructive editing of any QuickTime-compatible video format including DV, HDV, P2 MXF (DVCProHD), XDCAM (via plug-in), and 2K film formats, Final Cut Pro/iMovie made up 49% of the United States professional editing market according to a 2007 SCRI study. Such strong user group still leads to some video format incompatibility issues with Final Cut Pro/iMovie. This is why many people wonder the best video format for Final Cut Pro/iMovie so as to edit video in it at liberty. However, there are still some incompatible video formats that cannot be imported to FCP/iMovie, such like some 4K videos or high definition XAVC videos, etc.
Best Video/Audio Settings for Final Cut Pro/iMovie
Final Cut Pro/iMovie uses QuickTime technology, which means you can import and export almost any almost any QuickTime-compatible file format. But for other formats like WMV, RM, MKV, MPG, etc. Fortunately we here have thePavtube HD Video Converter for Mac(read the review) that can easily convert our original videos to ProRes codec files for FCP. Through this HD Video Converter review, we will know more about this professional video converter for FCP on Mac. What’s more, with the suggestions below, we can also set the files nicely with video and audios.
In order to receive a better effect after editing in FCP/iMovie, here we would like to introduce you some additional useful tips on how to adjust your video and audios which is the best for Final Cut Pro/iMovie.
Best Video Format for Final Cut Pro/iMovie: MP4, MOV
Aspect Ratio: Native aspect ratio without letterboxing (examples: 4:3, 16:9)
Resolution: You can choose different resolutions, all the way to 5K. The lowest resolution supported is 640 x 480. You cannot choose custom resolutions or aspect ratios. This is a huge negative.
Frame Rate: The lowest frame rate possible is 23.976p, and the maximum is 60p. No 12 or 18 fps options.
Audio Settings: Generally, audio only has ‘Surround’ or ‘Stereo’, and the maximum audio bit depth isn’t specified. Sequenced audio is always mixed using 32-bit floating-point values. Tips: Final Cut Pro/iMovie allows you to directly import any audio file format compatible with QuickTime. However, only uncompressed file formats should be used for editing.
Other Download:
How can we deal with those files which are not suitable for FCP/iMovie?
Step 1. Import source video to HD converter
Download and launch this Mac HD video converter, and click “File” and “Add Video/Audio” to add source videos.
Step 2. Choose FCP/iMovie supported video format
To make it easy and smooth to import source videos to these professional editing systems, you’d better choose an output format fully compatible with Final Cut Pro,iMovie.
Click the format bar to follow “Final Cut Pro” > “Apple ProRes 422 (*.mov)”, “iMovie and Final Cut Ex…” > “Apple Intermediate Codec (AIC) (*.mov)”.
 Step 3. Compress source videos (Optional)
If you want to reduce the size of the recorded source videos not only for smooth editing but for other purposes like uploading to Youtube, this HD video converter can definitely meet your demand. In addition to high definition videos, large FLV files can also be compressed.
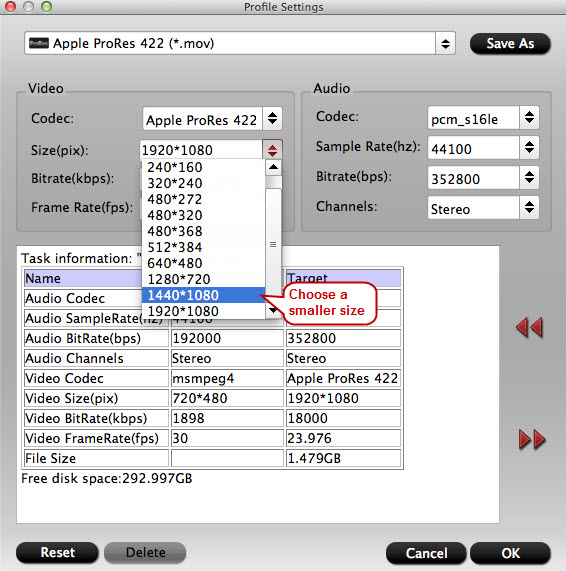
Hit the button “Settings” near the format bar, and you’ll brought to the “Profile Settings” interface where you can compress source videos by choosing a smaller video size from the “Size” dropdown list.
Step 3. Compress source videos (Optional)
If you want to reduce the size of the recorded source videos not only for smooth editing but for other purposes like uploading to Youtube, this HD video converter can definitely meet your demand. In addition to high definition videos, large FLV files can also be compressed.
Hit the button “Settings” near the format bar, and you’ll brought to the “Profile Settings” interface where you can compress source videos by choosing a smaller video size from the “Size” dropdown list.
 Step 4. Convert source video to FCP/iMovie
Once everything is settled for conversion, click “Convert” on main interface to make your source videos converted. After conversion, you’ll get the expected and desired video format well accepted by Final Cut Pro,iMovie.
Step 5. Import converted videos to FCP/iMovie.
Run the editing software installed on your Mac, and import the converted videos to FCP,iMovie you usually do.
Related program:
Pavtube Media Magician / Mac Version: A nice camcorder assistant manager, lossless camcorder video joiner, MTS/ M2TS/ MXF/ MOV/ MKV/ TiVo/ WMV/ AVI/ MPG converter and editor. Meamwhile it supported upload edited video to YouTube directly.
Read More:
Step 4. Convert source video to FCP/iMovie
Once everything is settled for conversion, click “Convert” on main interface to make your source videos converted. After conversion, you’ll get the expected and desired video format well accepted by Final Cut Pro,iMovie.
Step 5. Import converted videos to FCP/iMovie.
Run the editing software installed on your Mac, and import the converted videos to FCP,iMovie you usually do.
Related program:
Pavtube Media Magician / Mac Version: A nice camcorder assistant manager, lossless camcorder video joiner, MTS/ M2TS/ MXF/ MOV/ MKV/ TiVo/ WMV/ AVI/ MPG converter and editor. Meamwhile it supported upload edited video to YouTube directly.
Read More:
Summary: Wanna to import MKV files to Final Cut Pro for editing but FCP doesn't let you do it? Take it easy, this article is born to solve the problem.Q:"How can I import my MKV recordings to Final Cut Pro for editing? I got some film clips that with multi-track audios from my company and I need to do some image processing in FCP. However, there's always something wrong when adding MKV to FCP. Should I change the MKV to MOV for FCP?"Why can't I transfer my MKV file into Final Cut Pro X?In order to answer this question, it is important to know what is MKV format and how is it used. MKV format is the Matroska Multimedia Container format. It can store video, picture, audio or subtitles tracks in one file. It is similar to other format but it uses open source software. The goal of this format is to provide a simple and easy to use file system with many different features. It wants to be able to be a flexible system that can be used on multiple platforms. It wants to offer streaming support and it wants to be able to display menus similar to what people are used to seeing on DVDs. One of the key features of this format is the use of Extensible Binary Meta language instead of the binary format that is used by others.MKV format can offer many advantages and is becoming more popular. The problem is that it is not compatible with Final Cut Pro X. It is not possible to transfer the MKV files directly to Final Cut Pro X. Instead you have to follow a set of steps that allow you to accomplish this goal.Why we choose edit MKV in FCP over other editor?As a major breakthrough in video editing, Final Cut Pro may be the first choice for Mac users. It makes video editing faster and better with motion graphics and file-based workflow, offers a new way to organize. As we know, Final Cut Pro(FCP) allows users to edit any QuickTime compatible video format including DV, HDV, P2 MXF (DVCProHD), XDCAM, and 2K film formats without any quality loss.Hot Search: MKV to DaVinci Resolve 11 | Blu-ray DVD to H.265 HEVC HD MKV | Import Media Files to Final Cut Pro (6/7/X)To do MKV video to Final Cut Pro mac task, you're highly recommended to get Pavtube HD Video Converter for Mac(read the review) which can convert 1080p/720p MKV to Apple Prores 422 which is the most most compatible codec with Final Cut Pro on Mac with fast speed by keeping the original quality. Then you can easily import the 1080p/720p MKV to Final Cut Pro X, Final Cut Pro 6, Final Cut Pro 7 for editing on Mac. This will help you import the file correctly, saving the rendering time and keep the HD quality. Why not to download this easy-to-use and useful software for you and transcode MKV to Apple ProRes codec.If you are windows user, please turn to Pavtube HD Video Converter. It has the same features as Mac version. Other Download:
How to transcode MKV to ProRes (HQ) for FCP?Step 1. Import 1080p MKV to the best MKV to FCP Converter for Mac.Launch the best MKV to ProRes 422 (HQ) Converter for Mac and click the button "Add video" or "Add from folder" to import MKV files to the program. If necessary, you can double click the file name to preview it. Tips:If you would like to combine multiple MKV files into one file, you can simply tick off the checkbox of "Merge into one file".Step 2. Select "Apple ProRes 422(HQ) (*.mov)" as output format for FCPClick on the "Format" menu to get the format profile list, and then move to "Final Cut Pro" dialogue, under which there are couples of format presets for Final Cut Pro. Simply click on "Apple ProRes 422(HQ) (*.mov)" to make your selection.
 Step 3. Start converting MKV movies to ProRes 422 (HQ) for using in Final Cut ProClick "Convert" button at the right bottom corner to start MKV to FCP Conversion. As the Apple ProRes 422 (HQ) has extremely high quality, please make sure you have enough space to store the generated ProRes 422 (HQ) MOV files.After the MKV to Apple ProRes for FCP conversion finished, you will be able to get the final output files for FCP via clicking on "Open" button with ease. Now it's time for you to get those files into FCP without re-encoding. After transferring the files into FCP, we are glad to enjoy editing MKV videos in FCP. Would you like to have a try?Read More:
Pavtube Facebook Rolls out 2015 Thanksgiving & Black Friday & Cyber Monday Crazy Promotion with 50% OFF for All Blu-ray/DVD/Video Softwares Are you ready for a crazy online shopping after Thanksgiving Coupons in the next few days on Black Friday and Cyber Monday? These meaningful major festivals is best the best chance for people to find out the best deals to reserve for upcoming Chrismas.The discount offering is to show gratitude to valued customers and potential users of Pavtube software, so we Roll out 2015 Black Friday & Cyber Monday Sales with 50% Discount for top-selling Windows/Mac Blu-ray/DVD rippers and Video converters, which can help you move favorite Blu-ray/DVD movies or convert digital videos to any home devices for home use! Pavtube video products can also assist you to creat special timeless memories for this year's festivals.What can Pavtube do?1) Convert common, HD, 3D, 2K/4K Videos and Blu-ray/DVD into H.265/HEVC, M3U8, MP4, Apple ProRes, DNxHD, MOV, M4V, MOV, MKV, AVI, Xvid, Divx, VOB, MPEG-2, SWF, FLV... for playback on smartphone, tablet, TV set, HD media player, streaming server, Hard drive, Game console, or edit in Final Cut Pro, iMovie, Adobe Premiere Pro, Avid Media Composer, etc. 2) Convert Canon/Sony/Panasonic/Nikon/JVC/Blackmagic shooted H.265, XAVC, XAVC S/L, MXF, MOV, AVCHD, AVI, MP4, VOB footages into common video formats, so you can watch or edit them on PC/Mac. 3) Convert MXF, P2 MXF, XAVC MXF, XACAM MXF with Multiple audio track/channel preserver or mixer.4) 1:1 Backup Blu-ray/DVD without region code or protection limit in two clicks. 5) Convert Blu-ray/DVD movies to MKV/MP4/MOV with multiple audio tracks and subtitlesExpire on Dec 6.Part 1. 50% Discount for Top-selling Windows/Mac Video ConvertersTop 1. 50% OFF Video Converter UltimateOriginal Price: $65Now: Only $32.5Free Trial Limit PurchaseHow-ToTop 2. 50% OFF iMedia Converter for Mac Original Price: $65Now: Only $32.5Free Trial Limit PurchaseHow-ToTop 3. 50% OFF Video Converter for WindowsOriginal Price: $35Now: Only $17.5Free Trial Limit PurchaseHow-ToTop 4. 50% OFF Video Converter for MacOriginal Price: $35Now: Only $17.5Free Trial Limit PurchaseHow-ToTop 5. 50% OFF HD Video Converter for WindowsOriginal Price: $35Now: Only $17.5Free Trial Limit PurchaseHow-ToTop 6. 50% OFF HD Video Converter for MacOriginal Price: $35Now: Only $17.5Free Trial Limit PurchaseHow-ToTop 7. 50% OFF MTS/M2TS Converter for WindowsOriginal Price: $29Now: Only $14.5Free Trial Limit PurchaseHow-ToTop 8. 50% OFF MTS/M2TS Converter for MacOriginal Price: $29Now: Only $14.5Free Trial Limit PurchaseHow-ToTop 9. 50% OFF MXF MultiMixerOriginal Price: $45Now: Only $22.5Free Trial Limit Purchasehttp://www.multipelife.com/mxf-multimixer/tipsTop 10. 50% OFF iMixMXF: $22.5Original Price: $45Now: Only $22.5Free Trial Limit PurchaseHow-ToTop 11. 50% OFF MXF Converter for WindowsOriginal Price: $29Now: Only $14.5Free Trial Limit PurchaseHow-ToTop 12. 50% OFF MXF Converter for MacOriginal Price: $29Now: Only $14.5Free Trial Limit PurchaseHow-ToPart 2. 50% Discount for Top-selling Windows/Mac Blu-ray/DVD ripping & copying SoftwaresTop 1. 50% OFF BDMagic for WindowsOriginal Price: $49Now: Only $24.5Free Trial Limit PurchaseHow-ToTop 2. 50% OFF BDMagic for MacOriginal Price: $49Now: Only $24.5Free Trial Limit PurchaseHow-ToTop 3. 50% OFF ByteCopy for Windows Original Price: $42Now: Only $21Free Trial Limit PurchaseHow-ToTop 4. 50% OFF ByteCopy for MacOriginal Price: $42Now: Only $21Free Trial Limit PurchaseHow-ToTop 5. 50% OFF DVDAid for WindowsOriginal Price: $35Now: Only $17.5Free Trial Limit PurchaseHow-To Top 6. DVDAid for MacOriginal Price: $35Now: Only $17.5Free Trial Limit PurchaseHow-To Learn more at Pavtube Facebook: https://www.facebook.com/pavtubefans/?sk=app_186981981345123If you have any problem to buy or use Pavtube, pls feel free to contact support@pavtube.com (for Windows user),macsupport@pavtube.com (for Mac user).Read moreClick here get more Pavtube programsClick here to get 20% off for Pavtube Facebook FansClick here to get Blu-ray/DVD/Video/DRM software bundle PromotionsClick here to get HD/MXF/MTS/DVD Creator software bundle PromotionsClick here to get Weekend Special offers
Summary: You still confused with why Panasonic GX8 AVCHD video cannot be play on LG TV? You have got the answer here.The Panasonic Lumix DMC-GX8 is the follow-up to the company's successful GX7 rangefinder-style mirrorless camera. 4K is a big deal on the GX8. The camera can capture UHD (3840 x 2160) video at 30p or 24p and 1080/60p is available as well.How do I make AVCHD files playable on a LGTV?Everything seemed fine until I tried loading videos onto a card to play on my LGTV. The LGTV didn't recognize anything. If I format the card with the camera, record some video, then stick the card in the TV, everything is fine. So I am guessing the LGTV needs the folder structure, index, thumbnail files and whatever else goes with AVCHD, to see & play the actual video?Hot Search: TOP 10 4K TVs | XAVC S on 4K UHD TV | H.265 4K to Ultra HD TVThe folder structure on the cards is not "pointless." It is consistent with the structure used for Blu-ray. The only trouble is that SDHC slots on older LGTVs may not be equipped to recognize or open anything but JPEG files. Some more recent models (Sony or Panasonic in particular) will play the video files, but require that the folder structure be like that created by the cameras. However, there is no guarantee that any HDTV with an SDHC slot will recognize or play video files. no matter what the format or structure. Some will, many won't.To solve LG TV AVCHD playback issues, the best bet is to convert AVCHD to LG Smart TV more compatible video format. And from LG TV official website we know that LG TV best video format is H.264 codec MP4 format. To playing AVCHD files on LG TV, we’d better convert AVCHD to the best compatible format for LG TV, so that you can avoid video playback issues. I’ve tried the solution; it really works. Here I will share a quick solution with you. Follow me. Download Pavtube Video Converter for Mac, the software is a video transcoding tool, equipped with a codec pack that contains various codecs, including both AVCHD and mp4. The software is able to convert AVCHD, XAVC L, MXF, H.265 HEVC,MKV, AVI, MTS, WMV, MOV, MPG… any popular video files to a decent format you need. Plus, it offers kinds of preset profiles for media players including iPad, iPhone, Nexus 7, Nexus 10, Nook HD, Samsung Galaxy Tab, Galaxy s4, etc to meet your different needs. Other Download:- Pavtube old official address: http://www.pavtube.com/video-converter-mac/- Amazon Store Download: http://www.amazon.com/Pavtube-Video-Converter-Mac-Download/dp/B00QIBK0TQ- Cnet Download: http://download.cnet.com/Pavtube-Video-Converter/3000-2194_4-76179460.htmlHow to Watching Panasonic GX8 AVCHD Videos to LG TV?Note: The Mac Version as example, Windows Version has the same Steps except the main interface logo.Step 1. Import source video from Panasonic GX8 to this app by clicking the "Add video" button on the main UI. Or choose to add multiple videos from the same folder on your computer hard drive.Step 2. Choose UHD TV playable "HD Video" > "H.264 HD Video" from "Format" bar drop-down selections. 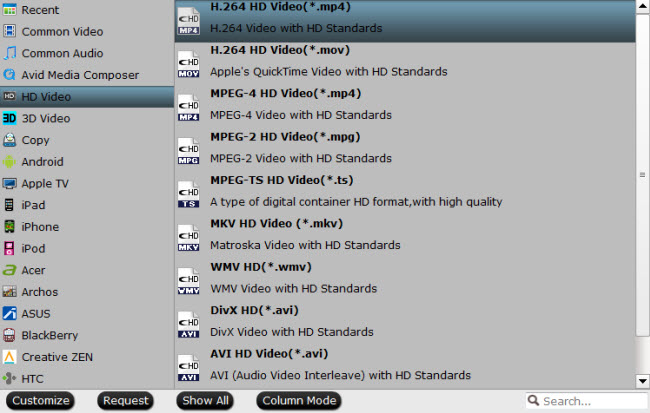 Tips: You can also choose compatible video format from "TVS" extended selections, here you can select the specific TV optimized format according to your TV brand.
 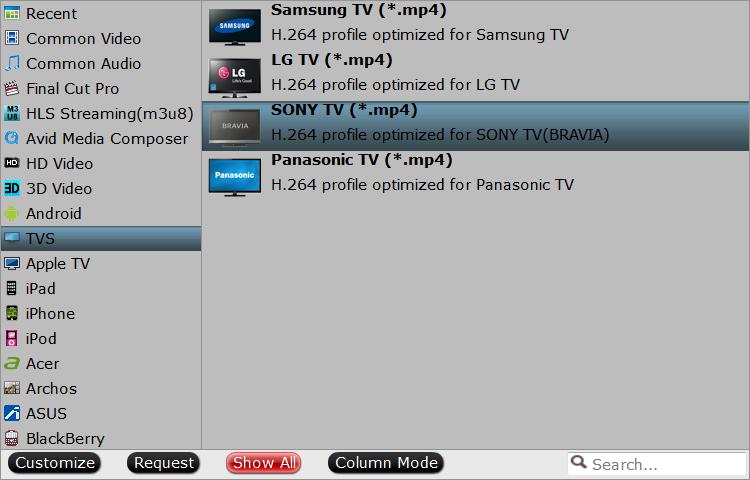 Step 3. Adjustments like video size, bitrate, frame rate, sample rate, and channels are available. The 5.1 channel allows you to enjoy sounds from different directions and turns your home to a grand concert.
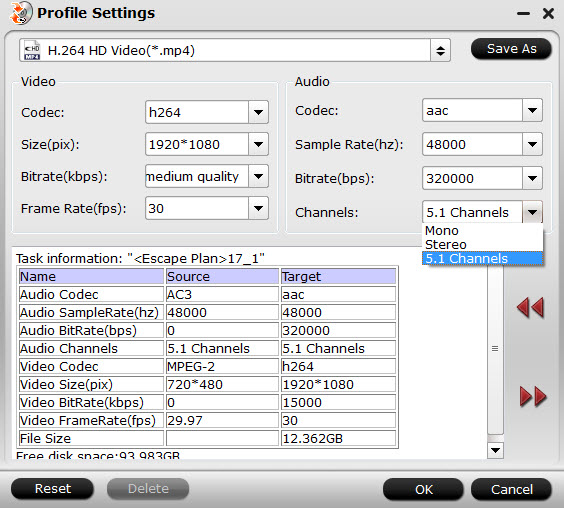 Step 4. After you have properly set up all the output profile parameters, start the conversion process by hitting right-bottom convert button.You can find the generated files by clicking "Open output folder" when the conversion is completed. Transfer them to an external USB hard drive and plug the drive into your Toshiba TV, you will have no difficulty to watch Panasonic GX8 Recorded Videos on your large screen LG TV.Related program: Pavtube MXF Converter / Mac Version: can handle MXF/MXF footage produced by Canon, Sony and Panasonic camcorders and convert MXF video files to various video format supported by popular devices such as iPad Air/4/3, iPhone 5S/5C/5/4S/4, Apple TV 3, Google Nexus, Samsung Galaxy Tab S/3/2, Samsung Galaxy S5/S4/S3, Surface RT/Pro, PS4/PS3, WDTV, etc.Pavtube MTS/M2TS Converter / Mac Version:The best MTS converter on the market, which can convert MTS videos and other HD formats to FCP X Apple ProRes codec MOV format, or convert MTS to Avid Media Composer/Adobe Premiere Pro/iMovie native supported video format.Pavtube Media Magician / Mac Version: A nice camcorder assistant manager, lossless camcorder video joiner, MTS/ M2TS/ MXF/ MOV/ MKV/ TiVo/ WMV/ AVI/ MPG converter and editor. Meamwhile it supported upload edited video to YouTube directly.Read More: