Wednesday, February 8, 2017

Import Olympus E-M1 Mark II 4K to Premiere Pro (CC 2017) for editing

Olympus' OM-D E-M1 has been one of our favorite mirrorless cameras since its introduction in 2013. It impressed us with its build quality, image quality, ridiculous amount of manual control (that's a compliment) and boatload of features. Three years later, it's still very competitive.

Key Specifications of Olympus E-M1 Mark II

  • 20MP Live MOS sensor
  • 5-axis in-body image stabilization system
  • 121-pt hybrid AF system
  • 60 fps burst shooting (18 fps with continuous AF)
  • Fully articulating 3" LCD display
  • High-res electronic viewfinder
  • Cinema (DCI) and UHD 4K video
  • 50MP High-Res Shot mode
  • Weather-sealed body
  • USB 3 (Type-C)

So like to record some happy time videos by Olympus E-M1 Mark II? Want to import the Olympus E-M1 Mark II 4K video to Premiere Pro (CC 2017)? Maybe you will encounter some problems.

How to Solve can't import and edit Olympus E-M1 Mark II 4K video in Premiere Pro (CC 2017)

Granted, Premiere Pro (CC 2017) can handle (usually) Olympus E-M1 Mark II 4K files without much problem, but it is extremely hardware intensive. Thankfully you probably don't have to buy a new computer... but you do need to convert Premiere Pro (CC 2017) video to Premiere Pro using MPEG-2 (1080p) as primary delivery format. The following paragraphs show us how to edit 4K footage with Premiere Pro without bogging down your computer. The process is surprisingly easy and can be done with the help of Pavtube HD Video Converter for Mac.

With it, you can effortlessly encode/re-encode various video including 4K H.264(MP4), XAVC, XAVC S, MTS etc footage for smoothly importing and editing in various non-linear editing systems (NLE), including Adobe Premiere Pro, Avid Media Composer, Final Cut Pro, iMovie, FCE and more. If you work Olympus E-M1 Mark II 4K files in Adobe Premiere Pro on Windows PC, please get Pavtube HD Video Converter to solve the issues.

How to import Olympus E-M1 Mark II 4K video into Adobe Premiere Pro

1. Add video files > Run the program you just set up. Drag and drop the Olympus E-M1 Mark II 4K video files to the converter. You can also hit Add files button to import videos to the app. If you wanna combine several videos into one file, you can click the "Merge into one" box.

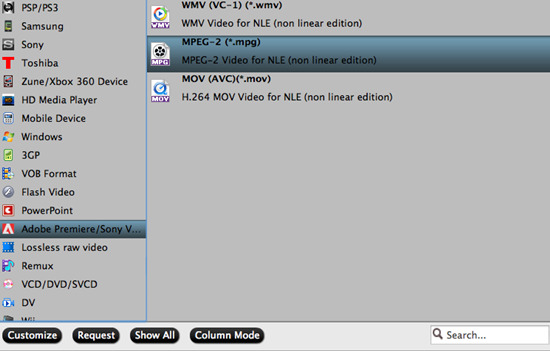
2. Choose output format > Click "Format" bar and choose Adobe Premiere/Sony Vegas -> MPEG-2(*.mpg) as output format for editing 4K in Adobe with natively supported video codec.

Tip: Advanced V/A settings > Click "Settings" button if you'd like to customize advanced audio and video parameters like Video Codec, aspect ratio, bit rate, frame rate, Audio codec, sample rate, audio channels. Note: If you want to get original 4K resolution, just keep the video size as original.

Start converting Olympus E-M1 Mark II 4K footage > Hit the convert button of the best 4K Video Converter. It will start converting 4K for importing to Adobe Premiere Pro immediately. Soon after the conversion, just click "Open" button to get the generated files for natively editing in Premiere Pro (CC 2017) perfectly.

Related Articles:

Friday, February 3, 2017

Importing all AVI video to PowerPoint 2016, 2013, 2010, 2007 etc for smooth playing

Audio Video Interleave (AVI) is a file format for storing synchronized video and audio data. Digital cameras commonly use AVI to record video. PowerPoint is a popular presentation software included in the Microsoft Office package. Converting an AVI clip into a PowerPoint file allows you to play the movie during the presentation. Use the PowerPoint program toolbar to insert the AVI file and then save it in the presentation format.

Any AVI to PowerPoint 2016 video converter?

To accomplish the task, you need to seek help from a AVI Video converter that supports the VOB video input and WMV, MPEG-1 output. Here Pavtube Video Converter is highly recommended to help you achieve your task.

The program can help you change almost any popular file format including AVI, VOB, MKV, MOV, MP4, WebM, etc. to PowerPoint compatible video format with fast encoding speed and excellent output quality. After the conversion, you can easily use your movie files in any version of PowerPoint Presentation including PowerPoint 2016, 2013, 2010, 2007, 2003, 2000, 2002, 2005 or even PowerPoint 95, 97. If you're using a Mac, please turn to Pavtube Video Converter for Mac Just get the right version and follow the guide below to convert AVI to PowerPoint supported video formats. Now just get the right version and follow the guide below to convert AVI to PowerPoint supported video formats.

Hot search: MKV video into PowerPointMP4 to PowerPointMP4 to PowerPoint 2016, MPG to PowerPoint

More features of Pavtube Video Converter
Powerful Video Converter: Converts almost every video format to or from H.265 video filess rapidly in high quality.
Wide Selection of Formats Supported: Converts any video files to MKV, AVI, MP4, MOV, 3GP, WMV, and a lot more.
Fast-Speed Video Converter: Converts videos faster than any other video convert software programs.
Lossless Conversion: Convers any video files without the risk of losing its original quality.
Compatible with Windows 10, Windows 8.1, Windows 8, Windows 7, Windows XP.

Free download the AVI to PowerPoint 2016 video converter for Windows

Free download the AVI to PowerPoint 2016 video converter for Mac (Mac version)

Step-by-step-guide to Convert AVI to PowerPoint supported video formats for Playing

Step 1. launch the AVI to PPT converter. Click the Add Files button on the main interface to import AVI files to the app. The AVI Video converter supports batch conversion, so you can add a pile of videos to enjoy the fast conversion speed.

load-files

Step 2. Click on “Format” bar, and Choose PowerPoint compatible format WMV or MPEG-1 from “PowerPoint”.

Tips: For some advances users, you can go to adjust video and audio parameters like bitrate, resolution, channels, etc. Click "Settings" button you can go to check and change them as you like.

Step 3. Press on “Convert” to start encoding AVI Videos to Microsoft PowerPoint Presentation compatible video. When conversion completes, press on “Open” to locate converted videos.

Before starting adding video to PowerPoint, you need to create a folder and put both your converted video and your PowerPoint presentation in this folder. Then open the PowerPoint in this folder to insert the converted video file which is just located in this folder.

Read More:

Source: http://mediaconverting.blogspot.com/2017/02/insert-avi-video-to-powerpoint.html

Tuesday, January 31, 2017

How Do I Convert YouTube video to MP4 on Windows or Mac

If you are a video/movie lover, you may like uploading videos from Youtube. Torrent format also develops good connections between different computers making it possible for people to track each other. Is there any need to convert YouTube to MP4? Yes, there is and top on the list is improved compatibility. With your YouTube files on MP4, you can playback on different platforms and enjoy to the fullest.

Simplest Way to Convert YouTube video Files to MP4

Never overlook Pavtube Video Converter when converting YouTube files to MP4 because it is well suited. To very many people, it’s the best and only solution available for managing the conversion process. There are some unique features that make it standout and you should be on the lookout to enjoy their service. Media browser is one of them and it helps to access all files in the computer for importing to the timeline. Mac user can get Mac version - Pavtube Video Converter for Mac.

Best YouTube to MP4 Video Converter - Pavtube Video Converter

-It supports to convert videos to 150+ video/audio formats, including MP4, AVI, MOV, TOD, WMV, MKV, MOD, DV, HD MOD, WMA, M4B, MP3, M4A, OGG, M4R, WAV, etc.
-With this video converter you can perform basic video editing such as trimming, rotating, splitting, merging, cropping, adjusting brightness, contrast and saturation.
-It is built to convert media files to support different devices like Gear VR, PSP, PS3, PS4, XBOX, Apple TV, TV, Samsung Phones, Android Generic phones, iPhone, iPad, Blackberry LG and other phones.
-It supports Windows XP, Vista, 7, 8, 10 and macOS 10.7 and above to the latest macOS 10.12 Sierra.

Free download the Youtube to MP4 Video Converter

Other Download:
- Pavtube old official address: http://www.pavtube.com/video_converter/
- Cnet Download: http://download.cnet.com/Pavtube-Video-Converter/3000-2194_4-75734821.html
- Softonic Download: http://pavtube-video-converter.en.softonic.com/

Step-by-step Guide on How to Convert YouTube to MP4

Step 1: Import YouTube Files

When you launch the program, click on “Files” and then choose “Add Video” from the menu bar and you will easily add the files that you want to work on. With that option, it’s easy adding multiple files at the same time. There is the easier alternative of dragging and dropping the files.

Step 2: Choose ouput format

Set right output format. Click "Format" bar, and select .mp4 from "Common video" or "HD video" according to your needs.

Step 3: Start Converting YouTube to MP4

There is a button marked “Convert” which you should click to begin the conversion process. It might be very fast if the file is short but if it’s long, you will have to wait for some time.

Read More:

Source: http://mediaconverting.blogspot.com/2017/02/convert-youtube-to-mp4.html

Friday, January 27, 2017

Transcode MP4 to Xbox One S friendly format for smooth playback

Slimline consoles are nothing new, but Microsoft really mixed things up with its Xbox One S. While the original Xbox One maxed out at 1080p, the new Xbox One S takes it all the way to 2160p, otherwise known as 4K. Thouh Xbox One S supports 4K video playback, it does not support all videos like MP4 video. When playing MP4 on Xbox One S, many people just encounter various problems, such as no audio when playing video, and Xbox One S can’t read some of MP4 files, etc.

xbox one s mp4 solution

So if you can’t play your MP4 video, here is no other ways but to convert MP4 to Xbox One S supported MP4 for successfully playback.

Best Xbox One S Video Converter: Transcode MP4 to Xbox One S Supported Format

To help fix Xbox One S MP4 playback issue and watch MP4 on Xbox One S without any problems, Pavtube Video Converter for Mac, the best Xbox One S video converter, is highly recommended to convert any video to the format accepted by Xbox One S, such as convert MP4 to Xbox One S, AVI to Xbox One S, MKV to Xbox One S, WMV to Xbox One S, MOV to Xbox One S, H.265 to Xbox One S etc. Besides, it also can encode MP4 in 4K/HD/SD resolution video to other PS3, PS4, Xbox One, Xbox 360 supported video formats for better playing. Windows user can get Pavtube Video Converter to convert MP4 to Xbox One S playable format on Windows.

Now free download this MP4 to Xbox One S converter here, install and run it on your Mac. It has a perfect compatibility with macOS Sierra, Mac OS X 10.11 El Capitan, 10.10 Yosemite, 10.9 Mavericks, 10.8, 10.7, 10.6, 10.5. (Read review)

Other Download:

- Pavtube old official address: http://www.pavtube.com/video-converter-mac/
- Cnet Download: http://download.cnet.com/Pavtube-Video-Converter/3000-2194_4-76179460.html
- Top4download.com: http://www.top4download.com/pavtube-video-converter-for-mac/iujpttsg.html

User guide on Converting unsupported MP4 Videos to Xbox One S friendly format

Step 1: Add MP4 files

Download the MP4 video converter on your computer, install and run the program. Then add .mp4 videos. You can choose to import videos or the entire folder by clicking the top left two icons.

Step 2: Choose Xbox One compatible formats

Click on the drop down menu of the Format, select "Zune/Xbox 360 Device"> "Xbox 360 HD Video (*.wmv)" as the target format. It fits on Xbox One S as well.

Tip: If the default video/parameters can't meet your needs, just click Settings icon to adjust the video codec, bitrate, frame rate, audio sample rate, etc to get a decent video as you want. In principle, the larger input values, the better output quality, but the corresponding larger file size.

Step 3: Start converting MP4 to Xbox One S

After all necessary settings, you can hit the "Convert" to start converting MP4 to Xbox One S friendly format with best video settings.

Once the conversion finished, click "Open" in main interface to quick locate the converted video. Then, you can stream the converted MP4 movies to Xbox One S via DLNA or USB freely. Enjoy!

If you are a Windows user, you can get Pavtube Video Converter to convert MP4 to Xbox One S Supported Format on Windows (10).

Free download MP4 to Xbox One S Video Converter for Windows

Other Download:
- Pavtube old official address: http://www.pavtube.com/video_converter/
- Cnet Download: http://download.cnet.com/Pavtube-Video-Converter/3000-2194_4-75734821.html
- Softonic Download: http://pavtube-video-converter.en.softonic.com/

Related Articles:

Source: http://iappsnow.com/2017/01/play-mp4-on-xbox-one-s/

Tuesday, January 24, 2017

How to Importt HD MP4, 4K MP4 to Camtasia Studio 9/8/7?

Camtasia Studio is a very popular application when it comes to editing/record videos on your computer, but unfortunately a lot of users have encountered problems from time to time, most of them related to problems regarding importing a quite hot file extension - MP4 in Camtasia Studio. So what's the matter? To get better videos or more wonderful video editing workflow, how to get Camtasia Studio to accept all your MP4 files? Refer to the following paragraph.

As we know, MP4 is a widely used format which can be ripped from Blu-ray/DVD, downloded from video sharing sites such as YouTube and Fox or captured from a GoPro camera. MP4 is a widely used format which means, you may download MP4 videos from video sharing sites such as YouTube and Fox, shared some MP4 videos from others, or captured MP4 videos from a GoPro camera.

While Camtasia Studio only accepts some MP4 video codecs:

Video File Format Supported by Camtasia Studio 8.4 and later

AVI
WMV
MPEG-1
MP3
WAV
WMA
MP4 (AVC/h.264 at no more than 30 frames per second)
MOV (QuickTime for Windows must be installed for MOV import.)  See here for more information.
MTS and M2TS files. (Version 8.4 and later) You will need the AC-3 Filter if running Windows 7 or Winodws 8.0.

Best MP4 Video Converter for Camtasia Studio to get all MP4 into Camtasia Studio 9/8/7

For unsupported MP4 file formats, you can record the playback in a desktop player or web browser window with Camtasia Recorder to create a .TREC file and import that into your project. You can also convert MP4 video formats to allow importing. But for the video footage from various cameras, the quick workaround is to convert or re-encode them into one of Camtasia Studio supporting formats, like AVI, mp4/h.264 (AVC) or WMV formats. And Pavtube Video Converter (Mac version), one of best MP4 video to Camstasia Studio converter for importing, is highly recommended here for you.

What Pavtube Video Converter can do for you?

The program is an easy-to-use Camstasia Studio converter, which can help you effortlessly transcode MP4 videos for smoothly editing in Camtasia Studio with zero quality loss, so that you can easily merge, split, trim, crop, edit and create MP4 videos with Camtasia. What's more, it can help you to convert H.265, MKV, MOV, AVI, WMV, MPEG-2, VOB, TiVo, MTS, MXF, XAVC to Camtasia studio editable formats as you need.

Hot search: MXF to Camstasia Studio ǀ MOV to Camstasia Studio ǀ AVCHD to Camstasia Studio

Even necessary, it can generates more optimal editing formats/codecs for you to use in different NLE apps, such as Adobe After Effects, Adobe Premiere Pro, Sony Vegas Pro, Pinnacle Studio, DaVinci Resolve, Windows Movie Maker and more. Now follow the step by step guide set out below to convert MP4 to Camtasia Studio and any video to Camtasia Studio.

Other Download:
- Pavtube old official address: http://www.pavtube.com/video_converter/
- Cnet Download: http://download.cnet.com/Pavtube-Video-Converter/3000-2194_4-75734821.html
- Softonic Download: http://pavtube-video-converter.en.softonic.com/

Follow the guide to Convert MP4 to Camtasia Studio supported video format

Step 1. Add MP4 video files

Run the Camtasia converter program and click "File" button to load the MP4 files which are needed to convert and import to Camtasia Studio. As you can see, you can also drag and drop the media to the program's main interface.

Step 2. Choose output format for compatible with Camtasia

Click "Format" button to select one Camtasia Studio supporting format, AVI, mp4/h.264 (AVC) or WMV formats are recommended.

Tip: if necessary, you can click the “Setting” button and customize proper video/audio parameters to get your desired video size, bitrate and fame rate.

Step 3. Start the conversion to Camtasia Studio

Click the "Convert" button to start transcoding MP4 video for Camtasia Studio. After the process completes, click "Open" button to find the generated videos, and then you can transfer and edit the video in Camtasia Studio 9/8/7/6 easily and quickly.

After conversion, now you can keep everything you use to edit and enhance your footages and videos project (Camtasia video and audio recordings, images/PowerPoint slides, music files). Enjoy now.

Read More:

Source: http://mp4gear.over-blog.com/2017/01/edit-mp4-in-camtasia-studio

Tuesday, January 17, 2017

3 Methods of Playing MKV on Windows Media Player

Can Windows Media Player Play MKV files?

Since MKV becomes a popular video format, many people have been wondering "Windows Media Player 11 won't play files with mkv extension even when the appropriate codec is installed??"

According to Microsoft support website, Windows Media Player still won't support MKV files. Though we can make WMP play MKV video by install some codec, sometime we still encounter can't play MKV in Windows Media Player issue. MKV is a container format which may contain multiple video and audio streams. And the video and audio stream can be encoded any of several ways. If the MKV video or audio codec is not WMP installed codec supported one, Windows Media Player won't play MKV video of this kind.

Here we recommend you 3 ways to play all MKV on Windows media Player

Method 1: Install Windows Media Player codec package

Just try to install the Combined Community Codec Pack (short for CCCP). The CCCP is a a codec pack specifically developed for playing videos including MKV. When you've installed it, you can smoothly play MKV files with Windows Media Player or Media Classic Player.

Method 2: Try another media player

If you don't like installing codecs for Windows Media Player, or the codec doesn't work for some unknown reasons, you can try to use another media player. You may know of VLC player. Yeah, VLC is a great open-source cross-platform multimedia player. And it can play most multimedia file formats like MKV, AVI, MP4, FLV, WMV, etc, as well as discs.

Method 3: Converting MKV to Windows Media Player playable format for smooth playing

Serving as a high-class MKV to Windows Media Player Converter, Pavtube Video Converter can batch convert MKV to Windows Media Player recognizable formats like WMV, AVI, ASF, etc to solve "Windows Media Player won't play MKV files". Furthermore, Pavtube Video Converter does support converting nearly all video formats like MP4, AVI, H.265, MOV, MTS, WTV, MKV, FLV, 3GP, WebM, MXF, XAVC, RMVB, etc to WMP compatible formats to play MOV, WTV, MKV, FLV, 3GP, etc in Windows Media Player.

Even more amazing, this MKV to Windows Media Player Converter has the feature of converting almost all video formats to Windows Media Player supported audio formats like WMA, MP3, WAV, AU, and AIFF so that you can only enjoy audio in WMP if you don't like the image of the video.

Besides, it is not only a video to WMP Converter but also an audio to WMP Converter. By using it, you can fast convert various kinds of audio formats like FLAC, APE, 3GA, M4A, VOC, M4R, OGG, DTS, RA, etc to Windows Media Player popular audio formats in order to play these audio in WMP.

Free download the Video Converter for converting MKV to Windows Media Player

Other Download:
- Pavtube old official address: http://www.pavtube.com/video_converter/
- Cnet Download: http://download.cnet.com/Pavtube-Video-Converter/3000-2194_4-75734821.html
- Softonic Download: http://pavtube-video-converter.en.softonic.com/

Start converting MKV to Windows Media Player Compatible format

Step 1. Click the "File" button to import the MKV files to this MKV WMP Converter. Or simply drag and drop the MKV video to the main window of this program.

Step 2. Click the “Format” bar to get the drop-down menu and you can get “Common Video -> WMV3 (WMV9) (*.wmv)” or go to “HD Video” > “HD WMV” as the best output format for playing in Windows Media Player (12).

Step 3. The built-in editing function provided by MKV Video Converter is something worth trying. To trim the video, add artistic effects, adjust audio, add watermark, customize video parameters and so on. You can get the work done splendidly. Of course, if you don’t think it’s a necessary to do, you can skip it and move onto the next step directly.

Step 4. Press the “Convert” button on the bottom-right corner of this MKV Video Converter to start doing video conversion. The larger the MKV files are, the more conversion time should be taken.

Play MKV in Windows Media Player

Playing MKV in Windows Media Player will become a piece of cake with the help of the ideal MKV to Windows Media Player Converter and the above step by step guide. Then never worry about the following Windows Media Player won't play MP4 files troubleshooting:

  • When I try to play MKV in Windows Media Player, it won't play my .mkv files -- no video, just sound, and Media Player will hang trying to exit.
  • I downloaded a video of the MKV format from keepvid and when it went to Windows Media Player it did not work since and could not play and I got a message saying that windows media player cannot play mkv files.
  • My Windows Media Player 11 won't play files with .mkv extension even when the appropriate codec is installed: my windows media player just won't play anything that has an .mp4 extension; it keeps saying "Windows Media Player cannot play the file. The Player might not support the file type or might not support the codec that was used to compress the file."
  • When try to add the MKV to Windows Media Player 12 for playing, the MKV file type isn't recognized by the Media Player and therefore isn't added to the Media Library.
  • Some of my MP4 video can play in WMP, while other of my MP4 won't play in Windows Media Player 12.

Read More:


Friday, January 13, 2017

How can I open DVD files on Windows?

Many people will meet the problem that open DVD movie on Windows, there is too many ways to do. Following will provided some ways to solve it.

Windows supported media formats is based on file types supported by system-attached Windows Media Player. You can use Windows Media Player to open your DVD files. Most of us to open DVD files on Windows Media Player like this:

1. Insert the disc you want to play into the drive.

2. Open Windows Media Player, and then, in the Player Library, select the disc name in the navigation pane.

However, sometimes it shows an error message as below. Because DVD protection schemes/region codes or on Windows without requiring additional DVD codes. You can download a DVD decoder to solve it.


Maybe you don’t want to install any decoders and also just can decode DVD online. In view of its low security and easily affected by network speed when you are decoding a huge DVD file, it’s not a wise choice.

A third software: VLC Media Player (Windows 10&Windows8)

The easiest way to play DVDs in Windows 8 or Windows 10 is by installing a third-party DVD player. Like VLC media player. It’s free, and after you install it, you’ll be able to play DVDs in VLC. You just need to choose your Disc and open it.


From above ways, Microsoft makes playing DVDs a little confusing, as some versions of Windows include support, while other versions do not. Finding a Professional software which can support any DVDs to play on any Windows versions or any players on Windows. this confusion will be solved by Pavtube ByteCopy, It will be your good assistant.

Play DVD on Windows with Pavtube ByteCopy
 
Pavtube ByteCopy is easy to operate with an friendly interface. You just need to open it, then click the ‘File’to choose your DVD, DVD will be imported into it, you can enjoy your DVD at the ByteCopy right window directly.

I’ve always used Pavtube ByteCopy to deal with issues about DVD for a long time.There is many reasons for me to choose it. I want to share Pavtube ByteCopy with you.

Firstly. Some uses may have used online decoder and found some video or audio parameters which are needed to choose by yourself. If you don’t know which parameters is best for a video or audio, how to do? ByteCopy can help you. It automatically can rip and decode any protection DVD with 100% audio and video quality. You just need to click with your mouse, a perfect video will be ready smoothly. ByteCopy is very comprehensive. It also provides numerous video and audio parameter settings for you to alter video or audio parameters by yourself if you want to edit it. You can be the master of video or audio.

Secondly. It allows you to select multiple video, audio of the DVD to be converted into the MKV, MP4, MOV, and AVI container formats for playing on popular Windows players, such as Windows Media player, RealPlayer, VLC Media Player, Quicktime, KMPlayer and so on or other devices.  

Thirdly. ByteCopy can not only convert files from your hard drive to almost any format, you can also convert abundant DVDs at the same time with fast speed and stability. You must can’t wait to know this powerful software, click here to bring you to the ByteCopy world.

Free download and buy ByteCopy

Here is the top 5 popular Windows players list for your reference. As Windows Media player for example to show you the ByteCopy operation.


How to Rip and Convert DVD to WMV Video Format

Step 1. Import your DVD files 

First, you will insert your DVV to your PC driver, then open ByteCopy (If you download the free version, please click ‘’Trial’’), Then click ‘’File’’, choose ‘’Load From disc,’’ the software can automatically detect the main title of the DVD. And before the conversion, you can choose desired subtitle and forced subtitle.

 load DVD

Step 2. Choose output format and location

Click ‘’Format’’ to choose video format: WMV, then click ‘’Browse’’ to choose save location. 


As we said above, you click ‘’Setting’’ can set the video and audio parameters. For example, you want to alter the’’ Size’ to ‘’1280*720’’ or alter ‘’Channels’’ to ‘’stereo’’.

Step 3. Click the ‘’Convert’’ button to start converting. Waiting for a moment, when it shows 100%, you can click ‘’Open output folder’’ to find your DVD, then enjoy DVD on Windows.  

Further Reading