Wednesday, May 3, 2017

How to Merge multiple 4K Clips into one on PC/Mac?

Do you like taking up camcorders/cameras/dronesto record the 4K video of your love and yours? Sometimes, you may need to merge your 4K video files you captured to create funny short stories and to preserve memories in a more creative way. So how to merge multiple 4K Clips into one on PC/Mac? You need to get a 4K video joiner software for merging 4K videos.

Why We Need A 4K Video Joiner?

In order to make a compilation of 4K videos, to bundle full episodes of TV series together, to assemble a movie with separated parts and so on. Good 4K video joiner software grants an efficient procedure to merge various video files into one. If you are unwilling to waste huge time and energy to hunt an appropriate application to merge videos from the crowded market, this article will lead you to free download the best 4K video joiner for PC/Mac and give a thorough user guide.

Get the Best 4K Video Joiner

4k Video file merging can be done quickly and easily with the stylish and solid video merger: Pavtube Video Converter Ultimate. This program has a high compatibility with nearly all the media formats including 4K MP4, 4K MOV, 4K MXF, 4K XAVC, 4K XAVC S, 4K MTS, 4K M2TS and HD/SD videos. After merging into one big file, you can play the shot camera/camcorder/drone videos, recorded TV programs, downloaded videos and movies, or presentation video/audio files without any interruption.

Besides merge multiple 4K Clips into one, this program also is a professional 4K video converter. With it, you can convert 4K MP4, 4K MOV, 4K MXF, 4K XAVC, 4K XAVC S, 4K MTS, 4K M2TS and HD videos, Common videos etc to any formats you need like popular MP4, MOV, MKV, AVI, WMV etc for using on iPhone, iPad, Samsung, Game Console, VR, TV, video editors, etc without any problems. Read its review to learn more. Its Mac version is Pavtube iMedia Converter for Mac. You can read how to merge 4K video clips into one on Mac.

Free download the trial version of Video Merger

How to Merge multiple 4K Clips into one on PC?

Step 1. Import Videos

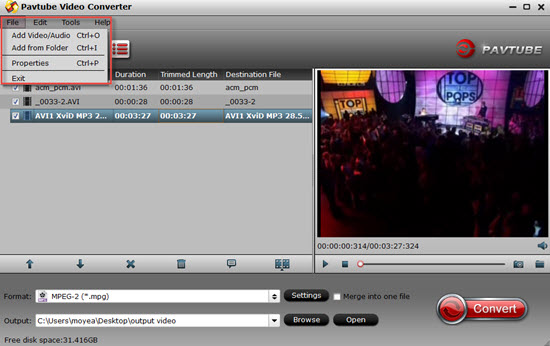
Launch Pavtube Video Converter Ultimate and click "+ Video" button or directly drag 4k video files to main interface.

Step 2. Join Videos

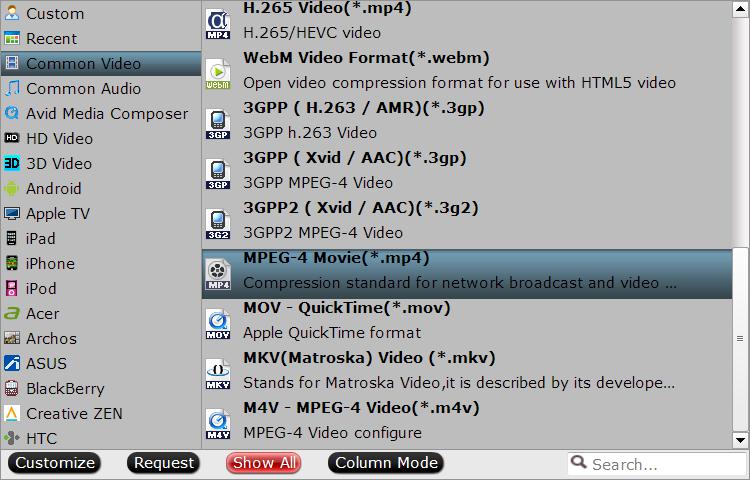
When you import the first video to this video joiner, it will require you to pick an output format, choose one like MP4, MOV, AVI etc from “Common Video” or “HD Video” and click OK. When you add the second and more, the output format will be automatically selected as the same of the first one.

After that, by checking the “Merge into one file” option beside the “Settings” button, the program will join all the selected video into one single file. If you want to change the output format, click the format icon.

Merge 4K clips into one

Tips: Edit 4K video

This program also provides you some basic video editing functions: split, merge, trim, crop, add watermark, adjust video effect, edit audio and insert subtitles. You can “Edit” menu to edit your 4K videos easily.

Step 3. Run to Merge

If necessary, click Browse button to set destination folder to save joined video file. Then, hit "Convert" button to start merging videos into a single file.

Wednesday, April 26, 2017

How to Import MOV Files to Sony Vegas Pro?

Sony claims that Vegas Pro 10/11/12/13/14 supports most commonly-used video codecs, including the MOV. However, problems like "Sony Vegas won't Open MOV files" come up from time to time.

Hot search AVI to Vegas Pro MP4 to Vegas Pro 4K to Vegas Pro DJI 4K to Vegas Pro

MOV to Sony Vegas Pro Issues

Qustion 1: “I have tried all the solutions on this forum and on others to open mov file in VEGAS PRO 14 but no way to open it. I have installed all quicktime versions, i have tried to install QTLite, but it's impossible to open mov file.

What is wrong with vegas 14? With vegas 13, I havn't this problem. Now I need to open mov files and I cant, I'm blocked in my project !!”

Qustion 2: “At some point in time I must have installed what was necessary to import .mov files into Vegas Pro 13. However, when I opened a v13 project in Vegas Pro 14, and selected the appropriate .mov file source, it rejects it.

So, what do I need to install/configure so that Vegas Pro 14 supports importing/using .mov files?    (Note: I don't need to render as .mov -- I just need to be able to use those files as source material.)”

Why I cant Open MOV files with Sony Vegas Pro

Yes, Sony Vegas Pro does support MOV. But MOV is a container format, which has a lot of codecs. Some codecs of MOV are not supported by Sony Vegas Pro. So if you want to edit MOV video in Sony Vegas Pro, you can convert MOV to Sony Vegas Pro supported video like MPEG.

Sony Vegas Pro Import Format

4K XAVC S, 4K XAVC, XDCAM EX, XDCAM Optical, DV, HDV, AVCHD, NXCAM, MOV, MP4, WMV, MPEG-1/2/4, H.264/AVC, H.265/HEVC, WAV, FLAC, AAC, MP3, OGG, WMA, Surround Sound/5.1, BMP, PNG, JPEG, TIFF, OpenEXR-, DPX- and WDP image sequences

How to Get MOV to Sony Vegas Pro?

To import MOV to Sony Vegas Pro, the most obvious and direct solution here is to convert MOV to a format that's compatible with Sony Vegas Pro as mentioned before. The first thing we need is a powerful video converter to convert MOV to Sony Vegas Pro compatible format. I would recommend you Pavtube Video Converter, a powerful and practical video converter for Windows (10). With it, you can convert SD MOV, HD MOV, 4K MOV video to Sony Vegas Pro best video for smooth editing. (Read Review)

Why Choose Pavtube Video Converter:

-It is capable of converting a video like MOV, MP4, AVI, MKV, MXF etc. to a format that is compatible of working with Sony Vegas Pro.
-It enables you to convert the videos from the tape based camcorders like Canon 5D Mark IV, Canon T7i, Canon C15 etc.
-It supports converting video between any video and audio formats like MKV to MP3, MP4 to MP3, etc.
-It comes with a lot of practical video editing features like Trimming, Cropping, Adding watermark/effect etc..
-It comes with built-in device and editor presets like iPhone, iPad, Sony Vegas Pro, Avid MC, Premiere Pro, Windows Movie Maker etc.
-Compatible with Windows 10, Windows 8.1, Windows 8, Windows 7, Windows XP.

Free download the MOV to Vegas Pro video converter

How to Convert MOV to Sony Vegas Pro supported video on Windows (10)

Step 1. Add MOV Files

You need to add MOV files to the MOV to Sony Vegas Pro converter before all. You can do this by dragging the video files to the program. Alternatively, you can go to "Add file" to import MOV files you want to play on Sony Vegas Pro. Note you can only add MOV file one by one.

Step 2. Choose Format

Click the format column to choose output format. For Sony Vegas editing, Adobe Premiere/Sony Vegas > MPEG-2 (*.mpg) is one of the best compatible video formats for you to choose.

Step 3. Convert MOV to Sony Vegas Pro

You can then start MOV video to Sony Vegas Pro conversion. When the conversion is done, you can edit MOV video in Sony Vegas Pro without any problems. Enjoy!

Wednesday, April 19, 2017

Adding avi files into Davinci Resolve 12

Does Davinci Resolve 12 not import AVI video files? If not, why not? Is there a list of compatible file formats?”

If you also have some issues importing AVI videos to Davinci Resolve 12, you can referece this guide to know what formats Davinci Resolve 12 supports and how to get AVI video to Davinci Resolve 12 with a powerful video converter for Mac.

Do you like sharing movies with your family or friends? Have you ever tried to share some special movies? You know that you can make your movies differently by editing them on Davinci Resolve. However, in several scenarios, users will encounter various problems in importing the AVI video files in Davinci Resolve including Davinci Resolve 12. Since some movies in AVI format are not recognizable by Davinci Resolve, in order to edit all kind of AVI files in Davinci Resolve on Mac (OS Sierra included), you need a top AVI video covnerter to change MP4 to formats recognized by Davinci Resolve 12 at first.

Davinci Resolve Supported Formats 

Codec support: DPX, CIN, EXR, QuickTime, Prores, DNxHD, MXF

Camera raw support: Blackmagic Design cameras, CinemaDNG RAW, CinemaDNG RAW, ARRIRAW Alexa™, Amira™, RED Camera R3D files including +5K, monochrome and HDRx, Cineform™, Cineform™ 3D, Phantom Raw™, Nikon™, Canon™ C300, C500, 1D, 5D, 7D and the raw cameras from, Panasonic™, Sony™ F65/F55/F5 RAW and their XAVC variants.

Best way to Convert AVI to Davinci Resolve

The first thing we need is a powerful video converter to convert AVI to Davinci Resolve 12 compatible format. I would recommend you Pavtube Video Converter for Mac, a powerful and practical video converter for Mac. With it, you can effortlessly transcode 720p/1080p/2k/4k AVI files to DNxHD or Prores for Resolve on Mac (OS Sierra included) without losing quality.

Besides, you can also convert any video file incluing AVI, MP4, MKV, MTS, M2TS, AVI, XAVC S, H.265, MXF, VOB, FLV, and more to DNxHD encoded MOV files - ensuring maximum editing quality and efficiency when working with Davinci Resolve 12. With this program, you can also convert videos, audio to other NLEs like FCP, iMovie, Premiere Pro, Avid Media Composer etc editable fomrats for your smooth editing on Mac.

Free download this AVI to Davinci Resolve 12 Converter for Mac

If you're a Windows users, you can turn to Pavtube Video Converter, which can help you transcode AVI to DNxHD for Resolve 12 on Windows (Windows 10 included).

How to Convert AVI video to Davinci Resolve 12 supported video on Mac

Step 1. Add video files

Run the Davinci Resolve 12 converter program and click "Add file" button to load the AVI video which are needed to convert and import to Davinci Resolve 12. As you can see, you can also drag and drop the media to the program's main interface.

Step 2: Specify output file format

Click "Format" bar, from its drop-down list, select Davinci Resolve 12 best supported editing codec such as "Avid DNxHD (*.mov)" from "Avid Media Composer" main category menu extended list.

Tip: If necessary, you can click the "Setting" button and customize proper video/audio parameters to get your desired video size, bitrate and fame rate.

Step 3: Start the conversion to Davinci Resolve 12

Click the "Convert" button to start transcoding AVI video for Davinci Resolve 12. After the process completes, click "Open" button to find the generated videos, and then you can transfer and edit the video in Davinci Resolve 12 easily and quickly.

Wednesday, April 12, 2017

Import H.265 to Edius Pro for editing

Edius is a video editing software package for PC computers running Windows. EDIUS edits more resolutions, formats and frame rates than any other editor - including 4K! But H.265 codec videos are not supported by Edius Pro including Edius Pro 8. So is it impossible to import H.265 video to Edius Pro for smooth editing? How to get Edius Pro to accept your H.265 files? Refer to the following paragraph.

In fact Edius Pro only supports some formats like AVI, MPEG-4, WMV etc (you can learn more detailes about Edius Pro supported formats). It means that those videos incompatible cannot be imported to Edius Pro directly and must be converted or re-recorded. Have you found H.265 in the supported format list by by Edius Pro? No! It's not supported natively.

How to Import Unsupported H.265 videos to Edius Pro

The best method to avoid those problems and save time is to convert H.265 to a more editing-friendly format such as AVI, MPEG-4. The article would show you how to change H.265 to Edius Pro editing-friendly format step by step with Pavtube Video Converter. With it, you can effortlessly and losslessly transcode H.265 files to Edius Pro best video format with no quality loss, and then you can load the footages to Edius Pro for editing as you want.

Besides, it can help you convert H.265 for smoothly importing and editing in other non-linear editing systems (NLE), including Adobe Premiere Pro, Premiere Elements, Pinnacle Studio, After Effects, Avid Media Composer, GoPro Studio and more with suitable formats for your nice editing life.

Free download this professional H.265 converter for Edius Pro

  • Wide range of formats: It supports 160+ video formats, including 4K/HD/SD H.265, AVI, MKV, MP4, MOV, FLV, WMV, MXF, XAVC, MTS, WMA, M4A etc to Edius Pro supported formats.
  • Various devices output files: Convert videos, audios to PS3/PS4, mobile phones, Android, iPad, iPhone, Apple TV, NLE and other popular end devices.
  • High quality video output: It supports lossless video conversion, making you get a high output file without losing the original video quality.
  • Support H.265/H.264 Encoding GPU Tecnology: Encode any videos to H.265, H.264 with NVIDIA GPU Acceleration
  • Fast video converter: The 30X fastest video conversion speed makes it excels other competitors.
  • Great video editor: Edit your video files by trimming, croppng, adding effects or watermark.
  • Easy-to-use Allow you to complete the conversion process with three simple clicks.

How to Convert H.265 video to Edius Pro supported video on Windows (10)

Step 1. Add H.265 videos

Launch the H.265 to EDIUS Converter, you can click "Add" button to load source files. It supports batch conversion, so you are allowed to add multiple files to convert at a time.

Step 2. Select output format for Edius Pro

From “Format” bar drop-down option, choose one of Edius Pro 6/7/8 supported file formats such as “Common Video” > “MPEG-4 Movie (*.mp4)” to output. Other formats like AVI, WMV also can be selected.

Tip: Click the Settings icon to adjust video and audio parameters on the Profile Setting as you need to get the best quality video.

Step 3. After all settings, hit Convert button to start transcoding H.265 for EDIUS with the best H.265 file converter.

Once the conversion is completed, click "Open" button to find the generated videos, and then you can transfer the converted H.265 files to EDIUS 6/7/8 easily and quickly.

Related Articles:

Wednesday, April 5, 2017

Import H.265 to iMovie on macOS Sierra

H.265 will surely become the mainstream video codec soon. If you got some H.265 files and want to edit your iMovie videos on macOS Sierra, iMovie could be your good choice. But can iMovie support H.265 codec?

When is full support for H.265 going to be implemented into iMovie? I want to import my H.265 videos from Samsung NX500 4K camera.

The answer is NO. Currently, H.265 codec lacks of compatibility with the Apple ecosystem including iMovie program. To be able to ingest H.265/HEVC video to iMovie for further editing, you will need to transcode H.265/HEVC video to a Mac friendly format first, such as Apple InterMediate Codec encoded MOV format, which iMovie will recognize and handle well. The article is the very one working on the H.265 to iMovie Mac conversion.

Choose a H.265 to iMovie Video Converter for macOS Sierra

For converting files from H.265 to iMovie, one of the most efficient software packages available in the market is Pavtube HD Video Converter for Mac. It contains a number of additional features and supports a number of file formats. When you download Pavtube HD Video Converter for Mac, you have complete video file management software from which you cannot only transform videos but also download videos from the Internet.

Hot search MP4 to iMovie MXF to iMovie QuickTime to iMovie
AVCHD to iMovie YouTube to iMovie iMovie Converter Blu-ray to iMovie

Besides it is compatible with all H.265 videos from Camera, Drones, sites etc to convert H.265 to AVI, convert H.265 to MOV, convert H.265 to WMV, convert H.265 to MP4, convert H.265 to MPG, convert MXF to any file format, to iPhone, iPad, TV, YouTube, Facebook, Instagram etc. with excellent audio and image quality for using in video editing software and multimedia devices.

Below is the entire process to convert H.265 to iMovie editable video using this H.265 Video Converter for iMovie. By running it, there's no need to set the codec yourself: the program has optimized presets for iMovie.

Free download Pavtube HD Video Converter for Mac

Follow the guide to Transcode H.265 video to iMovie editable video on macOS Sierra

Step 1. Load H.265 files

Launch the software and then drag your H.265 files to the program. If you need to convert multiple clips, you need to add them one by one.

Step 2. Choose iMovie as the output format

Click Format bar to choose the format for output. For editing H.265 in iMovie, you can choose iMovie and Final Cut Express -> Apple InterMediate Codec(AIC)(*.mov); it's best for iMovie editing.

Tip 1. Click the Settings icon to adjust video and audio parameters on the Profile Setting as you need to get the best quality video. You can set video resolution(1920X1080/1440X1080/1280x720/720X480), bitrate(from 1Mbps to 20Mbps) , frame rate (24p/30p) as you want.

Tip 2. Click "Edit" to set deinterlace, rotate, add special effect, add watermark, trim, etc. to realize different needs.

Step 3. Start H.265 to iMovie conversion on Mac

Now click the "Convert" button, and then leave the Mac H.265 encoder to do the rest automatically for you. After the H.265 to iMovie Mac conversion, go to "File" > "import" > "movies" and then you can freely use your H.265 files in iMovie.

Read More:

Wednesday, March 29, 2017

Copy .mts/.m2ts to USB sticks (USB Flash Drive)

USB flash drives are often used for the same purposes for which floppy disks or CDs were once used, i.e., for storage, data back-up and transfer of computer files. They are smaller, faster, have thousands of times more capacity, and are more durable and reliable because they have no moving parts. Some camcorder lovers want to copy MTS or M2TS video files to USB sticks. But USB does not accept MTS/M2TS video files. Luckily, you can get the solution from this guide.

How to Copy MTS/M2TS to USB sticks (USB Flash Drive)

Now is a digital life. With advanced tecnoloy, Pavtube Video Converter can copy your MTS/M2TS to USB sticks (USB Flash Drive) by converting MTS/M2TS from various camcorders to USB sticks (USB Flash Drive) supported video file like MP4 format.

Besides, this program also can convert other videos like MKV, MOV, XAVC, MXF, H.265, MP4 etc and FLAC, AAC, AC3, DTS etc to USB supported video and audio. What’s more, the program also beneficially offer fully optimized presets format settings for mainstream devices or apps such as iPhone, iPad, Android/Samsung phone and tablet, TV, game consoles, VR, editors, online websites, etc. so it's extremely easy for you to recognize the one to fit your requirement. There is no need for you to know which parameters are suitable, even if you’re a complete newbie for technical parameters towards media formats.

Mac user can get Pavtube Video Converter for Mac to copy MTS/M2TS to USB on Mac.

Free download this MTS/M2TS video converter for USB (Windows)

  • Convert MTS/M2TS to USB supported video file
  • Convert MTS/M2TS to Windows Movie Maker, Premiere Pro, Sony Vegas Pro, Avid MC, Resolve, GoPro Studio etc supported video
  • Convert MTS/M2TS to MP4, MOV, MKV, AVI, FLV, WMV, H.265 and more.
  • Edit MTS/M2TS with editing functions: split, merge, trim, crop, add watermark, adjust video effect, edit audio and insert subtitles.
  • Converts videos faster than any other video convert software programs.
  • Convers any video files without the risk of losing its original quality.
  • Compatible with Windows 10, Windows 8.1, Windows 8, Windows 7, Windows XP

Start converting MTS/M2TS to USB sticks (USB Flash Drive) format with Pavtube Video Converter

Step 1: Launch Pavtube Video Converter

The very first step is to install Pavtube Video Converter on computer. Then double click on installation file to launch it.

Step 2: Add mts/m2ts video files to be converted

Now, it is time to add your MTS/M2TS video files you want to convert. You can simple drag and drop video files into the interface or click "Add File" button located on the top, it will open a file explorer from where you can choose the video file for conversion.

Step 3: Choose MP4 video as output format

After imported source video to Pavtube Video Converter, open "Format" drop-down list to choose MP4 from "Common Video" or "HD Video" category under "Format".

Tips: By clicking "Settings" button, you can adjust the output video/audio resolution, frame rate, bit rate, etc. to customize the output files to get the best quality you want.

Step 4: Specify output folder

After all the settings is completed, define an output folder on your computer to save the generated files.

Step 5: Start conversion process

Click "Convert" button to start MTS/M2TS to USB video conversion process. It will take a few minutes (depending on file size) for the conversion to complete. Once the conversion is completed, click on "Open" or "Open Output Folder" button to view the generated video file.

Free download this MTS/M2TS video converter for USB (Mac)

Read More:


Thursday, March 23, 2017

Import MOV to Windows Movie Maker for editing

Windows Movie Maker is a popular editing software for Windows user. You can import your MOV videos, camera, camcorder, drone MOV recordings etc to Windows Movie Maker for professional editing. But when you import MOV to Windows Movie Maker or Windows Live Movie Maker, it may stops working. Windows Movie Maker even can't recognize your MOV files? What’s the matter? That’s because Windows Movie Maker does not support MOV natively. So you need to convert MOV to Windows Movie Maker compatible format like WMV before importing.

Hot search:

To get MOV files work with Windows Movie Maker perfectly, you need to transcode MOV to Windows Movie Maker more edit-friendly format like WMV. Pavtube Video Converter can be of great help in this task.

With it, you can effortlessly transcode 720p/1080p/2k/4k MOV files to WMV for Windows Movie Maker on Windows (Win10 included) without losing quality. Besides MOV, this video convert program can also help to convert between any popular video and audio formats like MP4, MKV, MTS, MXF, H.265, MKV, VOB, AVI etc. as you need. Plus, with the built-in video editing feature of the program, you can trim, crop, add watermark, adjust effect and more to your video files. Now just download the program and achieve your goal smoothly.

Free download this MOV to Windows Movie Maker video converter

Other Download:
- Pavtube old official address: http://www.pavtube.com/video_converter/
- Cnet Download: http://download.cnet.com/Pavtube-Video-Converter/3000-2194_4-75734821.html
- Softonic Download: http://pavtube-video-converter.en.softonic.com/

How to Convert and Import MOV into Windows Movie Maker

Step 1. Add MOVfiles

Run the best MOV to Windows Movie Maker Converter, and click the "Add" button to load MOV videos. If you want to merge multiple clips just need to check the "Merge into one" box.

Step 2. Choose output format

This video converter offers optimized format preset for Windows Movie Maker. Just click "Format" menu firstly and then follow "HD Video" to set WMV HD(*.wmv) format

Tip: If the default settings do not fit you requirement, you can click "Settings" icon to and enter "Profile Settings" panel to adjust video size, bit rate, frame rate, sample rate and audio channels.

Step 3. Start converting MOV to Windows Movie Maker

Click "Convert" button to start converting MOV to WMV/AVI for Windows Movie Maker program.

Once the conversion is finished you can click "Open" button to get the output files effortlessly, and now you are ready to import and edit MOV files with Windows Movie Maker. Just import the converted files to WMM for editing via its "Import video" option.

Read More: