Friday, August 11, 2017

Free and Easier Ways to Export VLC to MP4

As a powerful free and open source multimedia player software, VLC can handle a large variety of media types including video, audio as well as CD and DVDs. Have stored a lot of movies, videos or TV shows in the VLC library and wish to convert the VLC files to the popular MP4 file format so that you can conveniently transfer and play them on MP4 format compatible smartphone, tablet, game consoles, TVs, etc. The following article will show you 2 different ways to convert VLC files to MP4.

Part 1: Convert VLC files to MP4 with VLC
Part 2: Fast tool to batch convert VLC to MP4

Part 1: Convert VLC files to MP4 with VLC

Step 1: Import Video to VLC

First of all, we need to open our VLC Media Player, and after it opening, we should click of top navigation bar, and click on the "Media" point, which will open a little dropbox.

In this dropbox we should click on the "Open Multiple Files&..." tab, (or use a hotkey Ctrl+Shift+O) and wait until the menu will appear on our screen.

Step 2: Go to the Convert menu

In the menu, which has appeared, click on "Add" button, and choose the file you need to convert. After this you should click on the arrow, which is situated near the "Play" button. Clicking on this arrow will open a dropbox, in which we should choose a link, called "Convert", or just use a hotkeys Alt+O.

Step 3. Choose the settings as you like.

In the menu, which has appeared, you'll see such things:

The path to the source of the video, type of this file, and the setting, which we need to set up.

First of all, we need to manage our profiles, and choose which one fits us the best. In the dropbox one can see very many profiles ... for iDevices, TVs, Androids, etc. But we need to choose only one ... it's called "Audio ... MP3 (MP4)".

As you have noticed there are some buttons to the right of the dropbox, there we've chosen the type of profile. These buttons are used for:
Press to configure the type of video or audio codecs, which you need exactly for the video or an audio you're trying to convert. By the way, there are some more great functions and abilities for you to explore.

Delete the profile which is chosen in the dropbox.

This one is used for creating a new type of profile with managing all the audio and video codecs for the file you need to convert.

Step 4: Start the conversion process

You need to choose the destination file, where all the information will be containing. In our case, we can use "Browse" button, come to the Desktop, write a name of the file, let it be "container.mp4", and after this, web should click on the "Start" button, and the process of the conversion will begin.

The estimated time of the converting depends on the power of your PC, and the type of the codec you are using to convert.

Part 2: Fast tool to batch convert VLC to MP4

If you have need to convert one VLC files to MP4, VLC can be a good choice. However, if you have tons of video or movie files to convert from VLC to MP4, you will be disappointed to find that VLC doesn't support batch conversion mode, it also means that you will have to convert your video one by one at a time.

Here, a more powerful and fast conversion program called Pavtube Video Converter Ultimate is highly recommended to you. Thanks to its batch conversion mode, you can load multiple VLC files at one time to save your precious time. Apart from convert digital files to MP4, you can also use this program to rip commercial Blu-ray/DVD disc to MP4.

The program outweighs VLC also in its rich output MP4 format options. You can convert VLC files to MP4 with various different compression codec such as MPEG-4, MPEG-2, H.264, H.265, WMV/VC-1, etc and file resolution such as 4K video like H.264 High Profile video, H.265 video, HD video like H.264 HD, H.265 HD, MPEG-4 HD or SD video like MPEG-4 video and even 3D Side by Side/Top and Bottom/Anaglyph mode MP4 format for viewing with 3D TV/VR Headsets/3D Projectors/3D Video Players. Moreover, the program can also do you a great favor to directly output smartphone, tablets, game consoles, TVs, etc preset profile MP4 file formats with the optimal playback settings.

For Mac users, you can download Pavtube iMedia Converter for Mac to convert VLC files to MP4 on macOS Sierra or macOS High Sierra.

Get Pavtube Video Converter Ultimate with 20% off discount, coupon codec: 45K2D47GJH

How to Convert VLC Files to MP4 with Pavtube Video Converter Ultimate?

Step 1: Import VLC files to the program for conversion.

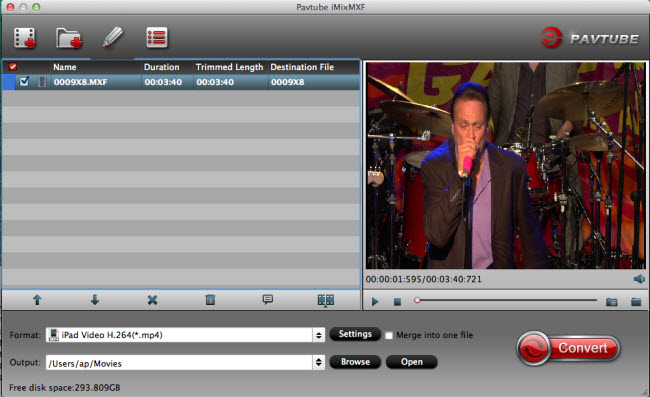
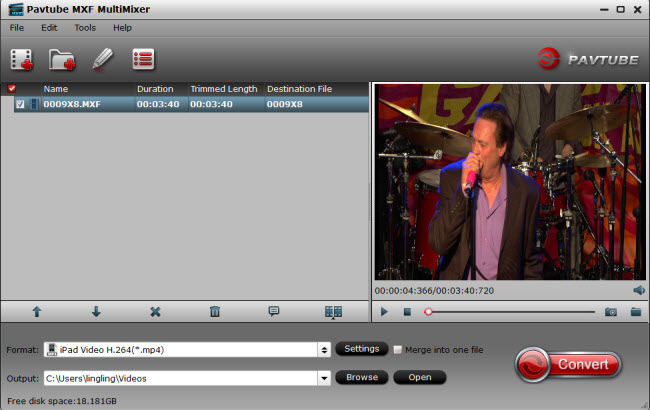
Navigate to the folder that contains your local VLC video files. And then select the files you want, next, simply drag them to this application's main interface. Or you can Click "File" menu and select "Add Video/Audio" or click the "Add Video" button on the top tool bar to import VLC files into the program.

Import VLC files

Step 2: Define the output format.

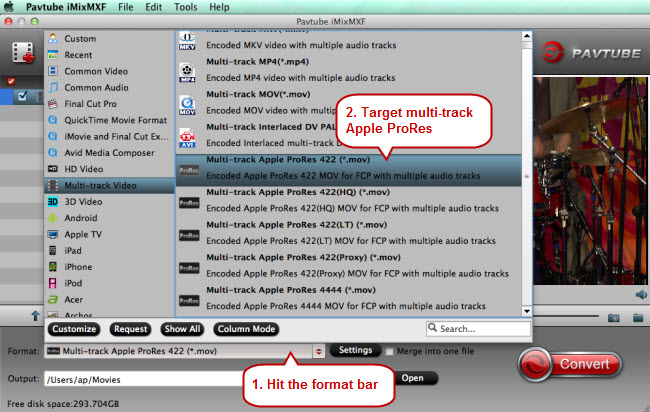
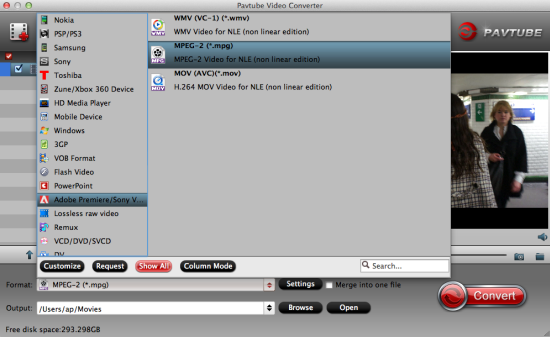
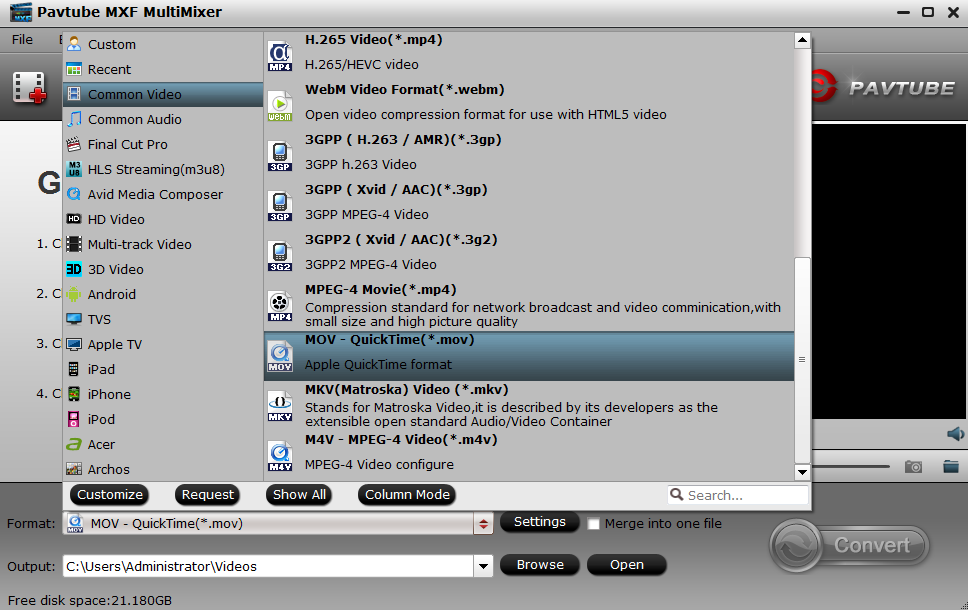
Click the "Format" bar drop-down list, select one of your desired MP4 file format according to your own needs.

Define the output format

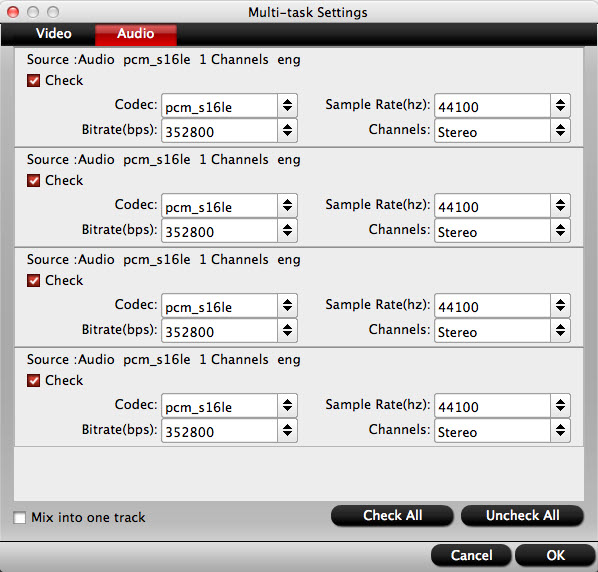
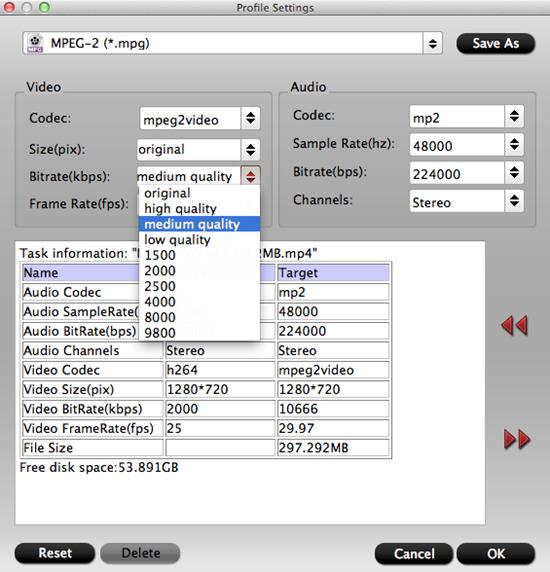
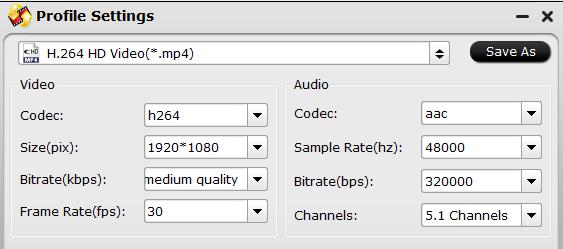
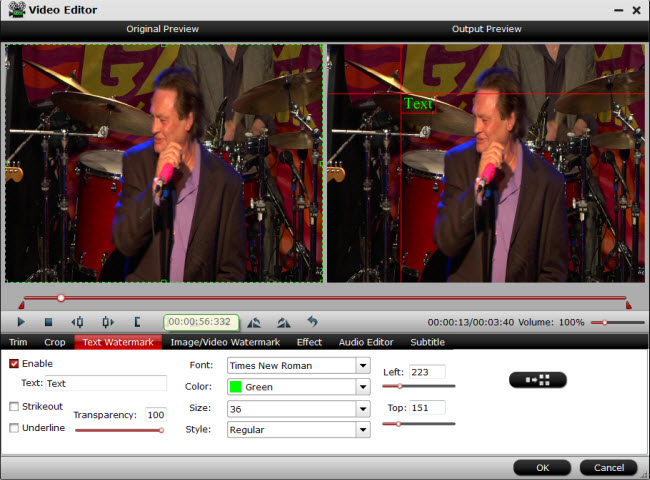
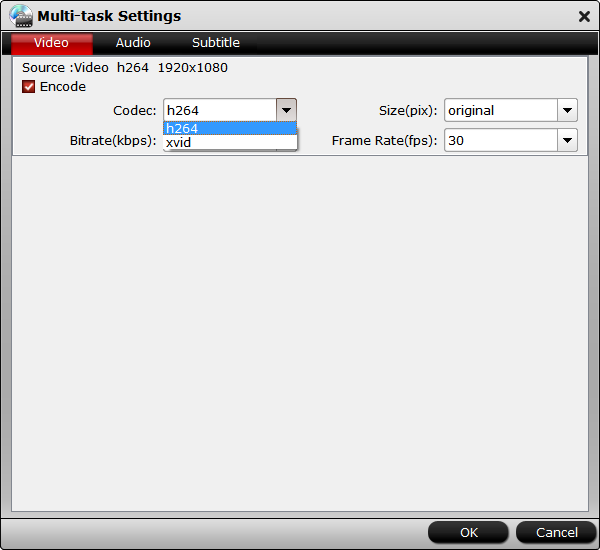
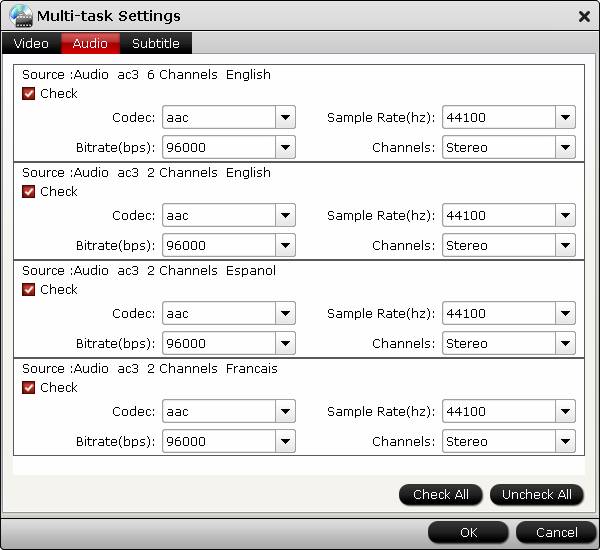
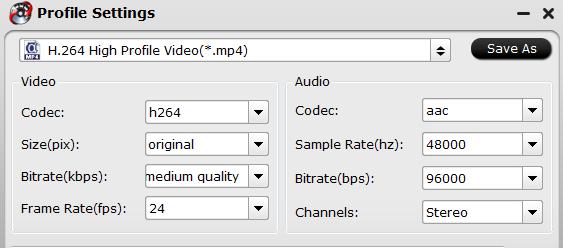
Tips: Click "Settings" on the main interface to open "Profile Settings" window, here, you can flexibly choose or specify exactly the profile parameters including video codec, resolution, bit rate, frame rate, audio codec, bit rate, sample rate, channels, etc as you like to get better output video and audio quality.

adjust settings

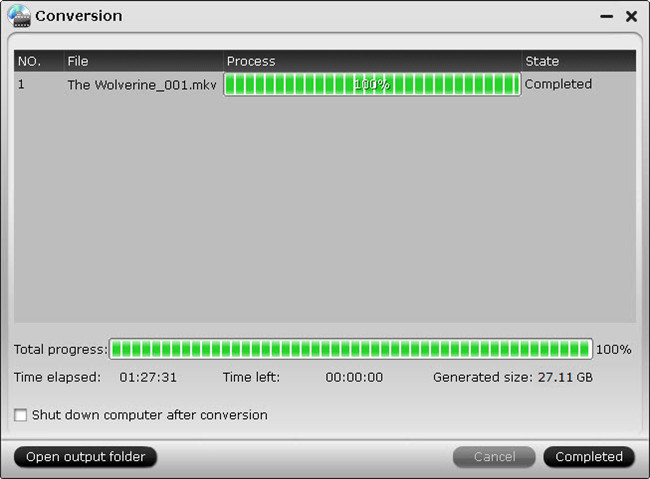
Step 3: Begin the conversion process.

After all setting is completed, hit the "Convert" button at the right bottom of the main interface to begin the conversion process from VLC files to your desired MP4 files.

When the conversion is finished, click "Open Output Folder" icon on the main interface to open the folder with generated files.

Tuesday, August 8, 2017

Encode HPX2700 MXF to Prores with Multiple Audio Tracks for FCP X

The Panasonic AJ-HPX2700 VariCam Camcorder is a high-end professional camera which can record AVC-Intra 100, AVC-Intra 50 and DVCPRO HD. Have recorded some clips with the Panasonic AJ-HPX2700 and wish to import the Panasonic AJ-HPX2700 MXF video into FCP X and also keep the 4 audio tracks in original MXF files. The following article will show you how to smoothly edit Panasonic AJ-HPX2700 MXF in FCP X with audio tracks preserved.

Can FCP X handle Panasonic HPX2700 MXF video?

Although both the AVC- Intra and DVCPro HD compression codec used by Panasonic HPX2700 MXF is included in FCP X supported file formats, however, decoding native AVC-Intra or DVCPro HD for playback on FCP X will require a lot of processing power. To reduce the processing demands on your computer, it would be much ideal for you to transcode the Panasonic AVC-Intra/DVCPro HD MXF to the less processor-intensive Apple Prores format.

Best tool to transcode Panasonic HPX2700 MXF to Prores with multiple audio tracks

When are you searching on the market, you may find that there are many solutions for you to encode MXF to Apple Prores, however, very few of them can helps to preserver the multiple audio tracks or channels in original MXF files. Fortunately, here comes Pavtube iMixMXF (3 Reasons to choose iMixMXF), which is specially designed to handle MXF files produced not only from Panasonic P2 camcorder, but also from Sony XDCAM, Canon XF or Blackmagic Design HyperDeck Studio or Avid Media Composer.

The program supports batch conversion mode, so that you can load multiple MXF files at one time for conversion. The biggest merits of this program is that it enables you to directly output Panasonic HPX2700 MXF to Multi-track Apple Prores format in various different file types including Multi-track Apple Prores 422, Multi-track Apple Prores 422 HQ, Multi-track Apple Prores 422 LT and Multi-track Apple Prores 422 Proxy, so that you can keep all the audio tracks in original MXF video. Besides that, you can flexibly adjust multi-task settings, remove those audio tracks that you don't want to output.

Related article: Panasonic P2 MXF to QuickTime | Play Panasonic MXF on TV

With this remarkable MXF Multi-track converter, you can also produce some popular Multi-track formats such as multi-track MKV/MP4/MOV, etc for conveniently switching between your favorite audio channels when viewing with HD media player apps.

Step by Step to Encode Panasonic HPX2700 MXF to Apple Prores with Multiple Audio Tracks

Step 1: Import source MXF files to the program.

Start up the program on your computer, click the "Add video" or "Add folder" icon to import source MXF files from Panasonic HPX2700 to the program.

Load MXF files

Step 2:Choose Muti-track Apple Prores format.

Go to "Format" drop-down bar, select "Multi-track Video" > "Multi-track Apple Prores 422 (*.mov)" as the output file format, you can also choose other Prores format according to your own needs.

Output Muti-track Apple Prores format

Step 3: Adjust multi-track settings.

After you choose to output "Multi-track Video" from "Format" drop-down list, click "Settings" button to open "Multi-task Settings" window, click "Audio" tab, check the audio track you want to output and specify the codec you'd like to encode with.

Adjust multi-track settings

Step 4: Start the conversion process.

After all setting is completed, hit the "Convert" button at the right bottom of the main interface to begin the conversion process from Panasonic HPX2700 MXF to Apple Prores with Multiple Audio Tracks.

When the conversion is finished, click "Open Output Folder" icon on the main interface to open the folder with generated files. Then feel free to import the video into FCP X for professional post editing with multiple audio tracks preserved.

Wednesday, August 2, 2017

Tricks for Editing DJI Zenmuse X4S 4K video in Premiere Pro/Elements/After Effects

The DJI Zenmuse X4S is a powerful camera featuring a 20 megapixel 1-inch sensor and a maximum ISO of 12,800. Its 84° FOV, high resolution lens makes the Zenmuse X4S as powerful during aerial imaging as it is on the ground. Combined withCineCore 2.0, the Inspire 2’s powerful image processing system, it can record 4K/60 H.264 and 4K/30 H.265 videos at a 100Mbps bitrate, and oversample 5.2K video into 4K video in real-time, capturing fine image details. With such perfect 4K camera in hands, you may want to edit DJI Zenmuse X4S 4K video in Premiere Pro/Elements/After Effects for adding some effects. In fact, 4K movies are limited to edited in Premiere Pro/Elements/After Effects.

Generally, the DJI Zenmuse X4S captures 4K video in MP4 or MOV (H.264 or H.265 codec) format, which is not native support formats by Premiere Pro/Elements/After Effects. To resolve DJI Zenmuse X4S 4K video and Premiere Pro/Elements/After Effects issues, the quick and easy workaround is to transcode the 4K videos to Premiere Pro/Elements/After Effects compatible videos and even downscale 4K to 1080p if necessary. The process is surprisingly easy and can be done with the help of  Pavtube Video Converter for Mac.

Overall, this program is the best 4K video converter for handling 4K videos. With this program, you can effortlessly transcode 4K video to MPEG-2 , which will create an After Effects/ Premiere Pro/ Premiere Elements friendly file format keeping the 4K original quality. Except for transcoding DJI Zenmuse X4S 4K video to MPEG-2 format for Premiere Pro/Elements/After Effects, this 4K Video Converter also able to export DNxHD for Avid Media Composer, Apple ProRes for Final Cut Pro, Apple InterMediate Codec for iMovie and more NLE systems for native editing.

Free Download Pavtube Video Converter for Mac:


If you are a Windows user, and in need of edit DJI Zenmuse X4S 4K video in Premiere Pro/Elements/After Effects, etc. Please turn to Pavtube Video Converter.

How to transcode and import DJI Zenmuse X4S 4K video to Premiere Pro/Elements/After Effects?

Step 1: Load the DJI Zenmuse X4S 4K video to the converter

Install and run the 4K Video Converter, and then import the source 4K videos to it. To do so, you can directly drag & drop the files onto the main interface, or you can click the “Add File” icon to locate the videos from your local disk.

load video

Step 2: Choose Premiere Pro/Elements/After Effects native format - MPEG-2

Since we have known the best format for Premiere Pro/Elements/After Effects, just go to the output format list where you need to follow “Adobe Premiere/Sony Ve…”> “MPEG-2 (*.mpg).”

mpeg2

Step 3:  Advanced Settings (Optional)

If you’d like to customize advanced audio and video parameters like Video Codec, aspect ratio, bit rate, frame rate, Audio codec, sample rate, audio channels, please turn to “Settings” page. If you are using After Effects CS6/CS5/CS4 which does not fully support native 4K files, 1080p would be the best settings. You can downscale 4K to 1080p here.

1080p

Step 4. Start the conversion

Finally, simply hig the big Convert button to start converting DJI Zenmuse X4S 4K video to Premiere Pro/Elements/After Effects friendly video formats. 

Within several minutes, you can find the converted file on your computer by clicking the "Open" button. And then you can import the converted files to Premiere Pro/Elements/After Effects for editing smoothly.


Wednesday, July 26, 2017

Play GoPro Karma 4K Video on PC/Mac

Combing the Karma Quadcopter with the Hero 5 Black action camera, the GoPro Hero 5 Black becomes a fully integrated aerial imaging tool. With the GoPro Karma, you can record up to 30fps UHD video in MP4 format.

Play GoPro Karma 4K video on PC/Mac

Don't want to just stop at the footage shooting stage, after transferring the footage from the camera to your PC or Mac computer, you may also come the need to play the GoPro Karam footage on your PC with Windows Media Player, on Mac with QuickTime player or transfer and view the GoPro Karma 4K video on iPhone, iPad, Android phone/tablet, Windows phone/tablet or stream to TV via media streaming devices or game consoles, etc. But due to the incompatible file format, compression codec, file size, bit rate, frame rate, etc, you may either fail to open the GoPro Karma 4K video with those programs or devices or won't get a smooth playback experience. The following article will offer a all in one stop solution to get GoPro Karma 4K video played on PC/Mac.

Best way to play GoPro Karma 4K video on PC/Mac

Even though the Gopro Karma 4K MP4 format is widely supported by majority of media player software or devices on both PC and Mac. It won't be that easily to successfully get 4K video smoothly played. The main reason is that 4K video playback has strict requirements on both hardware and software. Your computer doesn't meet the minimum requirements to play 4K video, sometimes, even if your computer are powerful to handle 4K video, you may still find that the 4K video playback is very choppy, this is due to the immense processing power required to play 4K video.

Therefore, to get a smooth playback experience of Gopro Karma 4K video on PC or Mac, it would be much ideal for you to compress 4K to 1080p. Here, you can easily get the job done with our best 4K Video Conversion tool: Pavtube Video Converter, which assists you to compress Gopro Karma 4K video to 1080p or 720p video in various HD file formats such as H.264 HD MP4, H.264 HD MOV, H.265 HD, MPEG-4 HD MP4, MPEG-2 HD, MPEG-TS HD, MKV HD, WMV HD, Divx HD, AVI HD, BDAV HD, etc for smooth playback experience on PC/Mac with Windows Media Player, QuickTime Player, VLC or portable devices like iPhone, iPad, Android phone/tablet, Windows phone/tablet or streaming to TV via media streaming devices or game consoles.

Pavtube Video Converter is is available on Windows 10, 8.1, 8 and 7. It is accompanied by an up-to-date Mac version - Pavtube Video Converter for Mac for macOS Sierra and its previous version. The program is very clean since it doesn't feature any ads or bundled adware. In addition, it can produce high-quality results, you can't tell the difference between the converted video and the original Gopro Karma 4K video.

Step by Step to Convert and Compress Gopro Karma 4K video for Playing on PC/Mac

Step 1: Load Gopro Karma 4K video.

Download the free trial version of the program. Launch it on your computer. Click "File" menu and select "Add Video/Audio" or click the "Add Video" button on the top tool bar to import Gopro Karma 4K video into the program.

Load Gopro Karma 4K video

Step 2: Define the output format.

Clicking the Format bar, from its drop-down list, you can choose to compress Gopro Karma 4K video a popular HD file formats such as "H.264 HD Video(*.mp4)" under "HD Video" main category so that you can smoothly playback the Gopro Karma 4K video on Mac/PC with media player apps or transfer to iPhone, iPad, Android phone/tablet, Windows phone/tablet, etc for viewing on the move.

<

Define the output format

Step 3: Compress 4K to 1080p.

Click "Settings" on the main interface to open "Profile Settings" window, in video section, click "Size(pix)" drop-down list and select "1980*1020" or "1080*720" to compress Gopro Karma 4K to 1080p. You can also adjust other profile parameters including video codec, bit rate, frame rate, audio codec, bit rate, sample rate, channels, etc as you like to get better output video and audio quality.

Compress 4K to 1080p

Step 4: Begin the conversion process.

After all setting is completed, hit the "Convert" button at the right bottom of the main interface to begin to convert and compress Gopro Karma 4K video for playing and editing on Mac/PC.

When the conversion is finished, click "Open Output Folder" icon on the main interface to open the folder with generated files. Then feel free to transfer and play the generated video on computer with media players, on portable devices or load into video editing software.

Wednesday, July 19, 2017

Edit (4K) MXF files in iPhoto

We may think of iPhoto as just a tool for photos but iPhoto has also added the ability to import, view and trim videos, then share them online. This means that not only can you import the entire contents of your camera, you can also edit that video content in iPhoto. As we all know, many camcorders, such as the Canon XC10 4K Camcorder, are able to capture 2MP stills and 3840 x 2160 resolution, high bit-rate 4K video footage. And the 4K video is recorded with H.264 compression and packed in the widely supported MXF container. Wanna to import these 4K MXF files to iPhoto for editing? Please keep on reading.

As we all know, the MXF format is a container that is encoded with a variety of video and audio formats. It is the commonest format that all popular camcorders record in. The MXF format was designed for professional videographers use which include timecode and metadata support so the files can be edited in a number of video or audio applications. 

However, some people have had issues when importing 4K MXF files into iPhoto. That's because the MXF video format can't be natively supported by many professional video editing softwares including iPhoto. What's more, it also would be a little hard to handle 4K video with iPhoto. In such occasion, still want to edit (4K) MXF files in iPhoto? Is there any way to successfully import (4K) MXF files to iPhoto? Don't worry, all things will become easier if you get a professional MXF to iPhoto converter software.

The best MXF to iPhoto Converter

Pavtube MXF MultiMixer is a professional MXF to iPhoto Converter, which is capable of converting MXF to any popular formats to meet different needs, because of supporting a large range of video formats, including MKV, MP4, AVI, MPEG, WMV, FLV, SWF, F4V, MOV, VOB, etc. Besides converting MXF to iPhoto, this app also helps transcode MXF to editable formats for other editing programs, such as Avid Media Composer, Adobe Premiere, and Sony Vegas.

While converting MXF video format, you can also adjust parameters such as video size, bitrate, and frame rate for your MXF video files to get better visual and audio effect. What's more, this MXF to iPhoto converter also provide simple video editing functions for you, such as spliting MXF video into several clips according to clip quantity, duration time and file size. Thanks to its batch conversion ability, you are allowed to import several MXF video files and output them into the same video format in batch to save much time and energy.

Now, just download it and follow the tutorial below to get the work done.

If you are Mac user, please click here to get Pavtube iMixMXF.

Convert 4K MXF to QuickTime MOV for iPhoto editing

Step 1. Load MXF files to the converter

Install and run the MXF to iPhoto Converter on your computer, and then import 4K MXF file to the converter by clicking the "Add File" button. There is another button "Import from Folder" beside "Add File", this button helps detect and import all MXF files under the folder you specified.

MXF

Step 2: Choose the right video format for iPhoto

Click the "Format" bar and get the dropdown menu, then move your pointer to choose "Common Video > MOV-QuickTime (*.mov)" as the output format. QuickTime MOV is the best supported format for iPhoto.

mov

Step 3: Make editing before converting MXF. (Optional)

Click "Edit" icon on the tool bar, in the Video Editor Window, you can play and preview the original MXF video and output effects. On the buttons bar, you can trim, crop, add special effect, add watermark, insert subtitles and more.

trim

Tips:

Click "Settings" button to customize advanced audio and video parameters like Video Codec, aspect ratio, bit rate, frame rate, Audio codec, sample rate, audio channels.

By ticking the Merge into one file option behind Settings button, you can merge the several MXF files into one single file.

By clicking the Split button mxf multimixer split button on file list, or from Edit menu, you can launch the Video Split window. Ticking Enable to enable it, and then you can split the MXF file by file count, time length, or file size.

Step 4: Begin converting MXF file. 

When everything gets ready, simply hit lower right Convert button to begin changing videos from MXF to iPhoto supported MOV file.

After the  4K MXF to QuickTime MOV conversion is completed, you can click "Open Output Folder" button to locate the generated QuickTime .mov files. Then transfer the converted files to iPhoto for editing smoothly with ease.


Friday, July 14, 2017

How to Rip Blu-Ray in the Right Way?

For a long time I have ripped my movies for home use and have been fighting through many different programs of swinging character and swinging prisms. Most functionally work for specific purposes or have the great advantage of being free, but no one can do all tasks as well. There are programs like Makemaker that makes MKV files of your DVDs but can not handle Blu-Ray, Pavtube iMedia Converter that manages Blu-Ray but not in lossless format or with multiple audio and subtitle or Handbrake that's free but Which can not combine sections on a Series DVD / Blu-Ray and is quite slow.

For a long time I have also experimented with file formats and found that MKV is just becoming?the most useful format in all respects, so this guide focuses on an end result in MKV.

Additionally, I am tired of having to install different software to handle the different discs I would like to rip and should remember the different settings and procedures for each program.

I have chosen that ByteCopy from Pavtube should be my favorite tool as it has some obvious benefits when it comes to ripping. You can rip Blu-Ray and DVD on 2 methods. Either as lossless copy or as a converted encoded file with a less natural quality loss, but more importantly you can select multiple audio and subtitle tracks and you can encode them individually in the entire file to match your hardware setup as best as possible.?I personally rarely use lossless as it takes too much and would like my Blu-Ray into a 4-5 GB file for network playback for my ATV4.

Pavtube ByteCopy

So what can ByteCopy do? It looks like many of the other programs on the market when it rips and copies Blu-ray Disc and DVD movies to MKV. ByteCopy plays an irreplaceable role as the exclusive Blu-ray ripper that converts the main movie on Blu-ray, audio tracks and subtitles exactly as you want without compromising video and audio quality. When it encoder and diminish Blu-ray content, CUDA acceleration is turned on by default whenever possible and it gives a significant boost in speed.

Export file format: MKV
Video: H.264 / MPEG-4 AVC, VC-1, MPEG pass-through; H.264, Xvid, MPEG, VC-1 encoded
Audio: Dolby Digital, Dolby Digital Plus, Dolby TrueHD, DTS Digital, DTS-HD High-Def, DTS-HD MA Pass-through; Dolby Digital 5.1, DTS, AAC, MP3 encoded.

Method 1

Step 1. Blu-ray rip in Lossless Mode, ie a rip of Blu-Ray main movie with all original video, audio and subtitle tracks without changing anything. For those who have a lot of disk space and who do not want to compromise on anything. Start ByteCopy and load your disk by clicking the DVD / Blu-Ray button. The movie is now loaded (copy protected or not) and the main movie is automatically selected, but everything can be selected. Useful if you have plenty of space.

Load Blu-ray movies

Step 2. Click the converter button to start riping your Blu-Ray to MKV, with the main file, all audio and subtitle tracks. If you have finished ripping, you can click "Browse Export Path" to find the MKV file. TIP! You can change the output path under settings in the software. Then just wait

Start Blu-ray to MKV Ripping process

Under lossless (default) mode, Pavtube ByteCopy will convert Blu-ray movies to MKV without changing anything. All it takes is to rip the main movie file from the disk and pack it in an MKV container. You get lossless quality with all subtitles and audio tracks, because original video, audio and subtitles are preserved. In addition, you also keep chapter marks.

Method 2

Certainly the method I use most. It shreds the disc with the subtitles and audio tracks you want, while compressing the file to a somewhat more handy size without compromising on quality compromises. I will show you how to do this, but you can change the different parameters for what suits you best. I rip my movies for a setup with an NAS that streams to a jailbreaked ATV4 with Firecore media player installed. This gives the smallest file the exact content I want.

Step 1. Load the file from ByteCopy. The main movie is automatically selected.

Load Blu-ray movies

Step 2. Select the title in the window and click edit disk. You can now choose which audio tracks and subtitles you want. TIP! You can set your selection by default in ByteCopy's settings, so they are remembered each time. In addition, you can also select a specific player you want to rip to, so ByteCopy converts light and subtitles to file formats that are compatible with your player. I always use lossless and put my own choice of file types.

Select desired Blu-ray subtitles and audio tracks

Step 3. If it's only a specific part you want to rip (for example, only main), go directly to the selected track and click Title Settings. Here you can choose to rip in Full HD, or as I do just below HD. At Full HD, I recommend bitrate of 8000, at HD you can reach 6000. Is it a DVD you rip, then choose 720x576 in Size and you can beat a bitrate of around 2000. Remember to tick the Enco if you Will change the resolution and bitrate.

Customize video settings

Step 4. Next turn is the sound. I always start by clicking uncheck All, as I usually only want Danish and English audio. After checking the checkboxes you want, you can choose whether you want the Encode audio, or just keep it as it is in Source. I always keep it as ATV4?can handle DTSHD for a stereo TV speaker, but for some, it may be necessary to convert to a stereo track.

Remove unwanted audio tracks

Step 5. Then we are on subtitles. Again Unchecl All and select the subtitle (s) you want. I always choose Danish only, but some may want others too. When done, click OK, and click the MKV button to begin.

Remove unwanted subtitles

Then the task is created and ByteCopy starts calculating time and size based on your choices and the power of your computer. As you can see in the screenshots below, ByteCopy is quite accurate in its calculations, and only diverges a very small amount. The time you see listed is on a 2012 13 "Macbook Air, and I think it's quite good to be able to rip and compress / encode a Blu-Ray disc in less than 2 hours. Is it just a DVD, then we talk for half an hour.

Start Blu-ray movie copying process

ByteCopy is by far the best and fastest program I've tried. You can download a trial version from Pavtube, either ByteCopy for Windows or ByteCopy for Mac OS X. You can make 7 lossless rips with the trial and want to rip and encode to get a watermark on the movie. You can purchase the software for only $ 42 including unlimited lifetime upgrades. Enjoy.

Wednesday, July 12, 2017

Best 4K MXF Converter for Mac

Have shot some MXF files with your Sony XDCAM, Panasonic P2, Canon XF camera, but find it is pretty difficult to play the MXF files on your Mac computer with media player software, load into popular NLE editing software like Final Cut Pro, Premiere Pro, Davinci Resolve, etc or upload and share on popular video sharing sites like YouTube, Vimeo, Facebook, etc. Fortunately, here comes Mac MXF Converter, which can assist you to fix all the MXF file playing, editing and sharing issues. The following article has picked 4 best MXF Converter for Mac for you as a reference.

Best 4 MXF Converter for Mac

Top 1: Pavtube Video Converter for Mac

Pavtube Video Converter for Mac is a professional professional that's specially designed for handling MXF files conversion, editing work. With the program, you can batch load 4K/HD MXF files shot with Sony XDCAM, Panasonic P2, Canon XF camera or export from some professional editing program such as Avid Media Composer, Blackmagic Design, etc for conversion at one time. Apart from letting your converting MXF files to some plain digital file formats such as H.264/MPEG-4, MKV, MP4, AVI, MPEG, WMV, FLV, SWF, F4V, MOV, VOB, etc, you can also use this program to produce hot devices like iPhone, iPad, Android phone/tablet, Windows phone/tablet, game consoles, TVs, etc preset profile formats with the optimal playback settings.

For people who wish to complete some editing work on the MXF files, you can use our program to directly output popular Mac NLE editing software best compatible editing codec such as Apple Intermediate Codec for iMovie/Final Cut Express, Apple Prores for Final Cut Pro, DNxHD for Avid Media Composer or Davinci Resolve or Premiere Pro/Premiere Elements/After Effect Preset optimized MPEG-2 editing codec. If you just want to do some simple editing task, the program's built-in editing functions can assist you to trim MXF files to cut off unwanted parts or segments, crop MXF to remove the blackbars or unwanted area, deinterlace interlaced MXF into progressive form, add video/image/text watermark, apply special rendering effect, add external SRT/ASS/SSA subtitle to MXF files.

Besides MXF files, you can also use this program to handle other HD file formats such as AVCHD (MTS/M2TS), XAVC/XAVC S, H.264, H.265, etc. Pavtube Video Converter for Mac is available on macOS Sierra and previous Mac OS version. In addition, it also keeps constant update with perfect support for the new Mac OS. The program is quire simple to use, any one can learn to use it in minutes. Moreover, it produces high quality conversion results with better video/audio quality

Top 2: Pavtube MXF Converter for Mac

Different from Pavtube Video Converter for Mac, Pavtube MXF Converter for Mac is developed for handing MXF files exclusively. It assists you to convert MXF video files generated by Canon/Sony/Panasonic camcorders to various video formats such as H.264/MPEG-4, MKV, MP4, AVI, MPEG, WMV, FLV, SWF, F4V, MOV, VOB, etc or hot devices preset profile formats.

In addition to outputting video formats suitable for popular devices, Pavtube MXF Converter for Mac can also convert MXF video files to compatible video formats for editing programs like iMovie, FCP(6/7/X), FCE, Avid MC, Premiere Pro, DaVinci Resolve, etc.

Top 3: Pavtube iMixMXF

Pavtube iMixMXF has almost the same function as Pavtube MXF Converter for Mac. What distinguishes it from MXF Converter for Mac is that it enables you to convert MXF files with multi-track preserving. You can use the program to convert MXF files to popular Multi-track MKV/MP4/MOV formats for playing with all your desire audio tracks keep to output MXF to Multi-track Apple Prores mov format for Final Cut Pro editing. What's more, it also enables you to mix multi tracks into one track. This feature help you mix the audios of interviewer, interviewee, surroundings, or editors'/directors' comments into one.

Top 4. MXF4Mac Player

MXF4mac Player can open most MXF variations. It supports, XDCAM HD, AVC-Intra, JPEG2000 (optional with J2K Codec) , DNxHD, HDV, Uncompressed SD/HD, Uncompressed Avid 10 bit, DVC-Pro HD, IMX-D10,DV, Meridien, Sony Proxy and more.The MXF4mac Player is also able to play Panasonic P2 XML documents like movie files with video and audio linked together. Of course it is compatible to QuickTime movies and more (e.g. .mp4, .avi, .m4v, .wav, .aif, .aiff). Open or just drag nearly any flavour of MXF files into the MXF4mac Player to watch it, even in full screen.

To better distinguish those 4 MXF Converter for Mac for you, the following article will show you a comparison chart with detailed comparison parameters:

Software Pavtube Video Converter for Mac Pavtube MXF Converter for Mac Pavtube iMixMXF MXF4Mac Player
Price
$35
$29
$45
Free
Import Files Formats
AVI/WMV/MP4/MOV/FLV/3GP/MKV/H.264/H.265/Prores
-
-
-
Panasonic P2

Sony XDCAM

Canon XF

-
Avid MXF      
Blackmagic MXF

Output MXF
AVI/WMV/MP4/MOV/FLV/MKV/3GP
-
HD AVI/WMV/MP4/MOV/MKV/MPEG-2
-
QuickTime Player X & 7
-
iMovie/FCE Preset Profile Formats
-
FCP 7 & X
-
Multi-track Apple ProRes MOV for Final Cut Pro (X)
-
-
-
After Effects CS5.0.3 & 5.5 & 6.0 & CC & CC2014
-
Premiere Pro CS5.0.3 & 5.5 & 6.0 & CC & CC2014
-
Avid Media Composer Preset Profile Formats
-
Device Preset Profile Formats
-
Create 3D Movies
-
Advanced Features
Preserving MXF Multi-tracks/channels
-
-
-
Mix multiple audio tracks/channels MXF into one
-
-
-
Trim/Crop/Merge/Split/Watermark/Subtitle
-
Adjust Video/Audio Parameters
-
Batch Converting MXF Files
-

Conclusion:

From above reviews and comparisons, we highly recommend Pavtube Video Converter for Mac as the best MXF Converter for Mac thanks to its high MXF files handling capability, various output format options, fast conversion speed, perfect output quality and constant Mac OS compatibility.