Tuesday, February 27, 2018

Upload Phantom 4 Pro+ 4K to YouTube

Upload Phantom 4 Pro+ 4K to YouTube

Have did a 4K video of your DJI Phantom 4 Pro+ flight, after spending long hours uploading to YouTube, the quality was still awful. You know that there are enough 4K videos on YouTube from fellow members and you firmly believe that the uploading job can be done really well with good quality. So what is the secret? The article article will show you the best format and settings to fast upload Phantom 4 Pro+ 4K to YouTube.

Best 4K uploading settings for YouTube

To let your video upload successfully and look beautiful on YouTube, make you to optimize you Phantom 4 Pro+ 4K video with the following settings for format, codec, frame rate, bit rate, resolution, time length and file size limitation.

Container: MP4

Video codec: H.264
Progressive scan not interlacing
High Profile
2 consecutive B frames
Closed GOP. GOP of half the frame rate.
CABAC
Variable bitrate, no bit rate limit required, though we offer recommended bit rates below for reference,
Chroma subsampling: 4:2:0

Audio codec: AAC-LC
Channels: Stereo or Stereo + 5.1
Sample rate 96khz or 48khz

Compatible frame rate and bit rate for 4K video uploading

Resolution

Video Bitrate, Standard Frame Rate
(24, 25, 30)

Video Bitrate, High Frame Rate
(48, 50, 60)

2160p (4k)

35-45 Mbps

53-68 Mbps

Audio bit rate for uploads

Type

Audio Bitrate

Mono

128 kbps

Stereo

384 kbps

5.1

512 kbps

Resolution and aspect ratio

YouTube uses 16:9 aspect ratio players. If you're uploading a non-16:9 file, it will be processed and displayed correctly as well, with pillar boxes (black bars on the left and right) or letter boxes (black bars at the top and bottom) provided by the player.

Time and file size limitations for YouTube video upload

Size: Make sure you're using an up-to-date version of your browser so you can upload files greater than 20GB. The maximum file size you can upload to YouTube is 128GB.
Length: By default, you can upload videos that are up to 15 minutes long, but you can upload longer videos by following the steps below to verify your account.
1. go to the upload page at youtube.com/upload.
2. At the bottom of the page, click Increase your limit. You can also go directly to https://www.youtube.com/verify.
3. Follow the steps to verify your account. You can choose to receive a verification code through a text message on a mobile phone or an automated voice call.
4. Once you've verified your account, you can upload videos that are longer than 15 minutes long

Upload Phantom 4 Pro+ 4K to YouTube with best settings

The DJI Phantom 4 Pro+ shot both 4K H.264 video at 60fps and 4K H.265 video at 30fps with a maximum bit rate of 100 Mbps. Here, if you try to upload Phantom 4 Pro+ 4K H.264 60fps video to YouTube, just lower the output bit rate as YouTube supported bit rate range between 53-68. If you try to upload Phantom 4 Pro+ 4K H.265 30fps video to YouTube, you will not only need to change the video codec to 4K H.264 but also the bit rate between a range from 35-45 Mbps.

Here, you can get YouTube best uploading settings listed above from Phantom 4 Pro+ 4K video with the assistant of Pavtube Video Converter Ultimate (get Mac version). It not only assists you to export Phantom 4 Pro+ 4K H.264/H.265 to YouTube most favorable 4K format, but also flexibly change other profile settings such as video codec, bit rate, frame rate, resolution, audio codec, bit rate, sample rate and channels, etc to make them adapt with YouTube best sharing settings listed above.

Related article: Import Phantom 4 4K to FCP X | Phantom 4 Pro Preview | Downscale Phantom 4 4K to 1080p

Trim/Split Phantom 4 Pro+ 4K video

If the Phantom 4 Pro+ 4K video you try to upload to YouTube exceeds the upload length limitation, you can use the trim function of the program to shorten the video length by cutting off unwanted parts from the beginning or end. If the video file size is too large, feel free to split it into smaller by file size, count or length.

Get Pavtube Video Converter Ultimate with 20% off discount, coupon codec: 45K2D47GJH

Step by step to Upload DJI Phantom 4 Pro+ 4K to YouTube with Best Uploading Settings

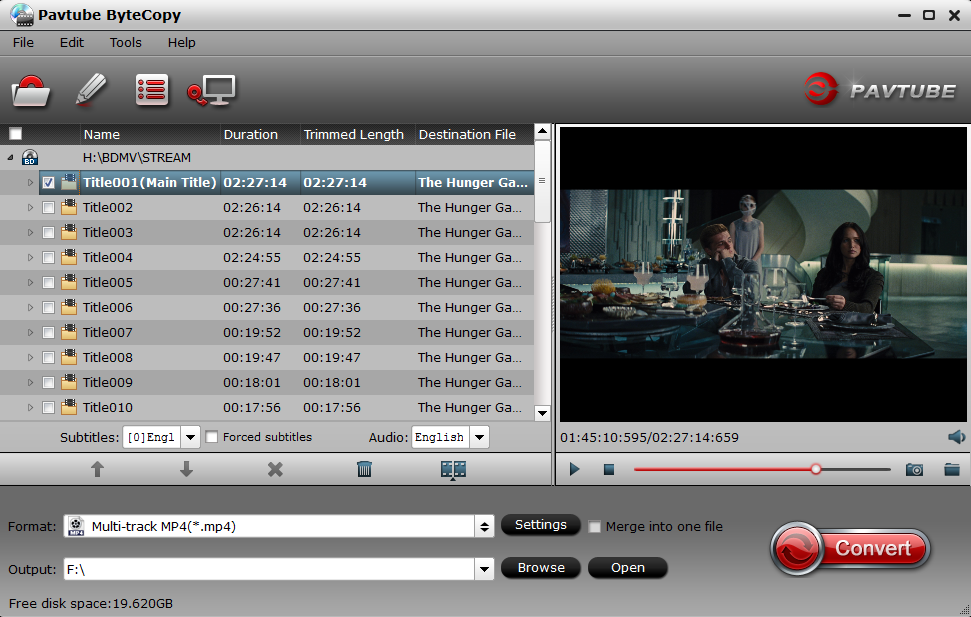
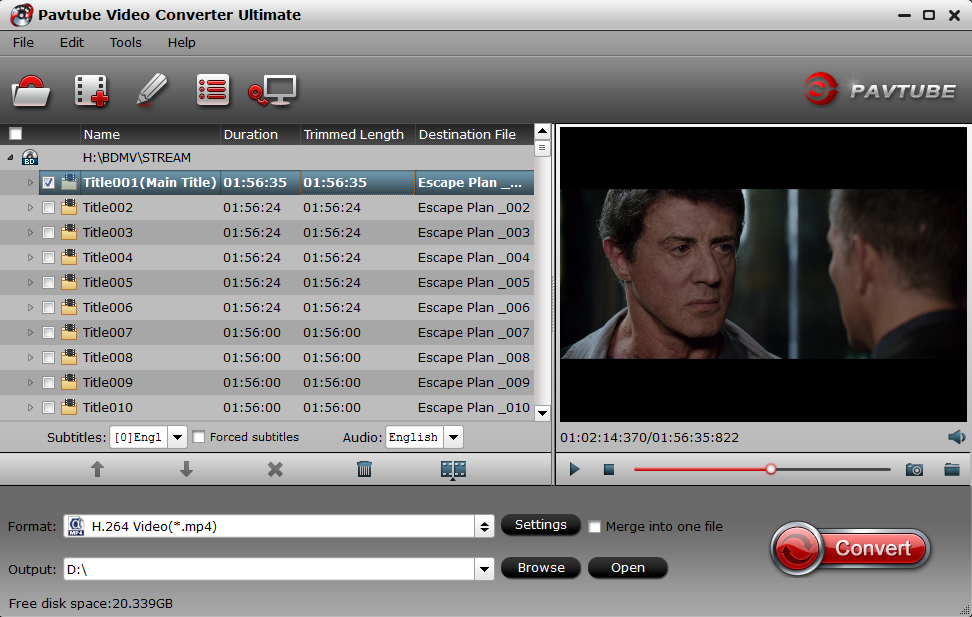
Step 1: Load DJI Phantom 4 Pro+ 4K video into the program.

Start the program on your computer, click "File" menu and select "Add Video/Audio" or "Add from folder" to import DJI Phantom 4 Pro+ 4K video.

Load DJI Phantom 4 Pro+ 4K video

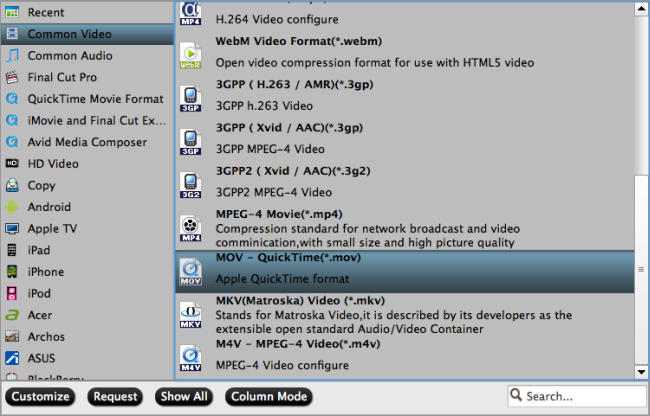
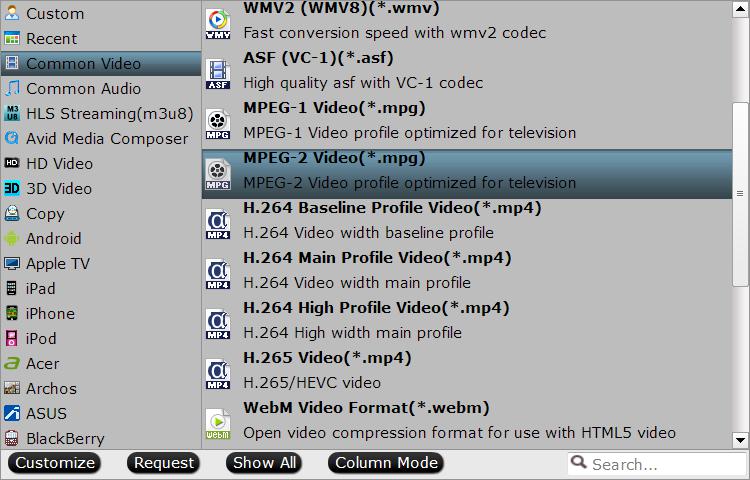
Step 2: Output Youtube best uploading format for 4K video.

Click "Format" bar, from its drop-down options, choose YouTube best compatible uploading format from "Common VIdeo" > "H.264 High Profile Video(*.mp4)".

Output Youtube best 4K uploading format

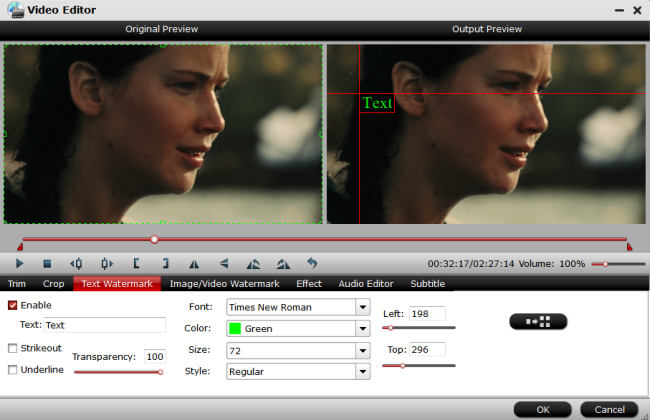
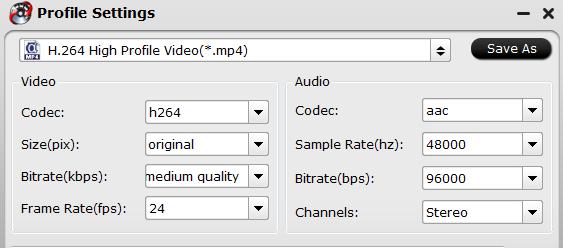
Step 3: Tweak encoding settings for YouTube upload.

Click "Hit "Settings" to open the "Profile Settings" window, here you can adjust the output video codec, resolution, bit rate, frame rate and audio codec, bit rate, sample rate and channels to let them fit them YouTube.

Adjust output profile parameters

Step 4: Trim/Split video file.

If the 4K video is longer than 15 minutes, you can shorten the video length with the trimming function to set the start time and end time to remove unwanted clips from the video.

Trim video length

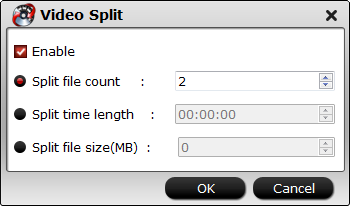
If the 4K video exceeds the uploading file size limitation, you split the file by file count, time length, or file size in the video splitting window.

Split video file size

Step 5: Start the conversion.

Start DJI Phantom 4 Pro+ 4K video to YouTube best format conversion by hitting the right bottom convert button, when the conversion is over, you will have no limitation to upload and share DJI Phantom 4 Pro+ 4K video on YouTube with fast speed and perfect quality.

Wednesday, February 21, 2018

Edit DJI Mavic Air 4K Video with iMovie

As the most portable DJI drone, the Mavic Air houses a 3-axis gimbal to shoot 8K Sphere panoramas, HDR photos, 4K 30 fps 100 Mbps video, and slow-motion video in 1080p at 120 fps. For Mac users who are looking for a free but professional editing software to handle the DJI Mavic Air 4K video, iMovie can be your best choice. Then how about the workflow of Mavic Air 4K video with iMovie?

Can iMovie native import Mavic Air 4K video

Apple has also updated iMovie 10.1 for Mac with support for 4K editing, in addition, the 4K H.264/MOV video shot with Mavic Air is also included in iMovie supported editing formats. However, it is well known that H.264 is a good delivery file format but no a good editing format. In addition, if your Mac computer doesn't meet the minimum requirements to edit 4K video, you won't get a smooth editing workflow.

Best editing codec for iMovie editing Mavic Air 4K video

For those people who wish to get a high quality and high performance editing workflow of Mavic Air 4K video with iMovie on underpowered computer, it would be much idea for you to transcode and compress Mavic Air 4K to iMovie favorable less processor-intensive editing codec - Apple Intermediate Codec (AIC) with either 1080p or 720p file resolution.

Here, you can download Pavtube Video Converter for Mac to directly generate Apple Intermediate Codec from Mavic Air 4K video. The program supports batch conversion mode, so that you can load multiple Mavic Air 4K video into the application for conversion at one time to save your precious time.

Related article: Import Mavic Pro 4K to FCP X | Edit Mavic Pro 4K with PPC on Mac | Compress Mavic Pro 4K to 1080p

The application not only assists you to encode Apple Intermediate Codec efficiently from Mavic Air 4K video, but also assists you to downscale Mavic Air 4K to 1080p or 720p so that you can get a smooth editing workflow even on slow Mac computer.

Pavtube Video Converter for Mac has perfect compatibility with the new macOS High Sierra, macOS Sierra, Mac Mac OS X El Capitan, Mac OS X Yosemite and Mac OS X Mavericks, etc. It is very simple to use, anyone can learn to use it in minutes. What's more, it produces high quality conversion results with better video/audio quality.

Step by Step to Transcode and Compress Mavic Air 4K to iMovie 1080p AIC

Step 1: Load Mavic Air 4K video.

Download the free trial version of the program. Launch it on your computer. Click "File" menu and select "Add Video/Audio" or click the "Add Video" button on the top tool bar to import Mavic Air 4K video into the program.

Load Mavic Air 4K video

Step 2: Choose output file format.

From "Format" drop-down option, choose iMovie best editing codec by selecting "iMovie and Final Cut Ex..." > "Apple Intermediate Codec (AIC)(*.mov).

Output iMovie best favorable AIC editing codec

Step 3: Compress 4K to 1080p.

Click "Settings" on the main interface to open "Profile Settings" window, from "Size(pix)" drop-down list, choose "1980*1020" or "1080*720" to compress 4K to 1080p.

Step 4: Edit Mavic Air 4K video.

By default the Edit icon is grayed out. To activate the Edit menu, you have to select an item first. When a video or movie is selected, click the pencil like Edit icon on the left top tool bar to open the video editor window, here, you can play and preview the original video and output effects. Also you can flip or rotate video, trim, crop, add watermark, apply special effect, edit audio or insert external subtitle.

Edit Mavic Air 4K video

Step 4: Start the conversion process.

After all the settings is over, go back to the main interface and hit right-bottom "Convert" button to start to convert and compress Mavic Air 4K video to iMovie best compatible Apple Intermediate Codec editing format with 1080p file resolution.

When the conversion is completed, launch iMovie on your Mac computer to import converted video to iMovie for smooth editing workflow on either fast or slow Mac computer.

Wednesday, February 14, 2018

Import Video_TS to FCP X

What is Video_TS folder?

When you insert a video DVD into your computer, you can open the DVD and view the contents just like a folder on your hard drive. Most video DVDs have two folders in the root directory - AUDIO_TS and VIDEO_TS. The VIDEO_TS folder contains all the DVD's video data and playback information. There are three kinds of files inside a Video_TS folder: VIDEO_TS.IFO, VIDEO_TS.BUP, and VIDEO_TS.VOB.

Import Video_TS folder to FCP X?

Obviously, Video_TS folder doesn#8217;t natively work with FCP X, you must convert the Video_TS folder to FCP X supported editing file formats. As a matter of fact, what you need is simply a Mac Video_TS Converter. The program we highly recommend to you here is called Pavtube ByteCopy for Mac, it has perfect compatibility with the all Mac OS including macOS High Sierra, macOS Sierra, Mac OS X El Capitan, Mac OS X Yosemite, Mac OS X Mavericks, etc.

Related article: Import Phantom 4 4K to FCP X | Import NX1 H.265 to FCP X | Can FCP Support DJI Osmo 4K Video

Apart from the Video_TS folder, the program also provides loading support for DVD disc, IFO/ISO image file and also Blu-ray disc/BDMV folder/ISO image file. With this powerful yet simple to use application, you can not only transcode Video_TS to FCP X editable digital file formats such as MP4, MOV (QuickTime), DV, HDV, etc file formats, but also directly output FCP X most favorable high quality and high performance editing codec - Apple Prores in different file types including Apple Prores 422, Apple Prores 422 HQ, Apple Prores 422 Proxy, Apple Prores 422 LT, etc for different editing needs on either powerful or underpowered Mac computer.

Step by Step to Import and Edit Video_TS Folder with FCP X

Step 1: Load Video_TS folder.

Download, install and run this Video_TS Converter on your Mac computer. For loading DVD Video_TS Folder, just click "File" > "Load from folder", you can also load DVD disc by clicking "File" > "Load from disc" or load DVD IFO/ISO image by clicking "File" > "Load IFO/ISO".

Load Video_TS folder

Step 2: Define the output format.

Clicking the Format bar, from its drop-down list, you can choose one of FCP X best compatible editing formats such as "MOV - QuickTime(*.mov)" under "Common Video" main category.

Output FCP X best compatible editing formats

If you wish to achieve a high quality and high performance editing workflow of Video_TS with FCP X, just output FCP X most preferable "Apple Prores 422(*.mov)" under "Final Cut Pro" main category to get the optimal editing experience.

Output FCP X most favorable Apple Prores editing codec

Step 3: Edit Video_TS files with built-in editing options.

By default the Edit icon is grayed out. To activate the Edit menu, you have to select an item first. When a movie title or chapter is selected is selected, click the pencil like Edit icon on the left top tool bar to open the video editor window, here, you can play and preview the original video and output effects. Also you can flip or rotate video, trim, crop, add watermark, apply special effect, edit audio or insert external subtitle.

Edit Video_TS files

Step 4: Begin the final conversion process.

After all setting is completed, hit the "Convert" button at the right bottom of the main interface to begin Video_TS to FCP X supported editing formats or most preferable Apple Prores editing codec transcoding process.

When the conversion is finished, click "Open Output Folder" icon on the main interface to open the folder with generated files. Then just feel feel to import converted video to FCP X for professional post editing workflow.

Tuesday, February 6, 2018

Transcode H.265 to Prores

The relatively new H.265 High Efficiency Video Coding (HEVC) offers roughly double the compression ratio for the same quality. This means that a video file encoded with HEVC can occupy half the space of its H.264 equivalent with no noticeable change in quality, or the same amount of space with improved quality. H.265 is adopted for shooting 4K quality resolution by more and more cameras such as Samsung NX1/NX500, DJI Phantom 4 Pro, DJI Inspire 2, GoPro Hero 6 and even some iPhone models such as iPhone 7/7 Plus/8/8 Plus/X. However, the problem is that many editing application lacks the ability to handle this new editing codec. Even both Premiere Pro CC has officially claimed importing support for H.265 video with a resolution of up to 8K, however, unless you owns a very powerful computer, you won't get a smooth editing workflow, since the decoding of H.265 video especially 4K H.265 video is very processor intensive. The good news is that by encoding H.265 to Prores codec, you can get many great benefits listed below during the post editing workflow with many professional NLE applications.

Great advantages of Prores codec when using as an editing codec

- Perfect compatibility with various popular NLE software including Premiere Pro CC, Final Cut Pro X, Avid Media Composer, Lightworks, etc.
- Supports all of the current frame size such as SD, HD, 2K, 4K and 5K
- As a 10 bit codec, Apple Prores can process a lot of more color data and make the color correction process easier.

Best tool to encode H.265 to Prores on PC and Mac

When you are searching on the market, you may find that there are many Prores Converter can assist you to transcode H.265 to Prores. However, some may only be available on Mac platform, others may lacks the ability to perfectly handle H.265 codec especially 4K H.265 codec.

Related article: Edit 4K Prores in Vegas Pro | GoPro 4K to Prores 4K in FCP | 1080p MKV to Prores 422 HQ for FCP 

Fortunately, here comes Pavtube Video Converter for Mac, a cross-platform application that's can be downloaded and installed on both Windows (get Windows version) and Mac platform. The program has perfect importing support for both HD/4K H.265 codec wrapped with different container file formats including MP4, MOV and MKV. It allows you to directly convert H.265 to Apple Prores codec in different file types including Apple Prores 422, Apple Prores 422 HQ, Apple Prores 422 LT, Apple Prores 422 Proxy, Apple Prores 4444, etc to satisfy your different editing demands. If you have a powerful computer and you wish to do more effects editing, just choose the Apple Prores 422, Apple Prores 422 HQ format, if you just want to do some rough editing on slow computer or for offline editing, the Apple Prores 422 Proxy or Apple Prores would be a good choice.

Step by Step to Transcode H.265 to Prores for NLE Editing

Step 1: Load H.265 files into the application.

Download the free trial version of the program. Launch it on your computer. Click "File" menu and select "Add Video/Audio" or click the "Add Video" button on the top tool bar to import source H.265 files into the program.

Load source H.265 files

Step 2: Define the output format.

Clicking the Format bar, from its drop-down list, select your desired Prores format according to your own needs.

Output Apple Prores 422 or 422 HQ format

Output Prores 422 or 422 HQ format

Output Apple Prores 422 Proxy or LT format

Output Apple Prores 422 Proxy or LT format

Step 3: Begin the conversion process.

After all setting is completed, hit the "Convert" button at the right bottom of the main interface to begin the conversion process from H.265 to Prores with your desired file types.

When the conversion is finished, click "Open Output Folder" icon on the main interface to open the folder with generated files. Then you can get a smooth workflow of Prores in NLE editing software.

Wednesday, January 31, 2018

Edit 4K Prores with Sony Vegas Pro 14/13/12

As one of the Windows exclusive professional non-linear editing software, Sony Vegas Pro gains great popularity for its fast speed, ease of use, comprehensive and rich editing features and also wide format import capability. However, a lot of people complain that fail to load the 4K Prores to Sony Vegas Pro 14 or early versions.

Media compatibility of 4K Prores with Sony Vegas Pro

From the specification page of Sony Vegas Pro 15, we can find the information that it has included native importing support for Prores format. In addition, as Vegas Pro 9 has included editing support for 4K resolution video, therefore, you will have no problem to load 4K Prores to Vegas Pro 15. However, we find no Prores importing support on Vegas Pro 14 specification page, not to mention the earlier version such as Vegas Pro 13/12, etc. There, to edit 4K Prores with Vegas Pro or earlier version, you will need to perform a codec transcoding process.

Transcode 4K Prores for Vegas Pro 14/13/12 editing

Here, you can get the job easily done by downloading our most powerful 4K Prores Converter - Pavtube Video Converter. The program has perfect importing support for 4K Prores in various different file types including Apple Prores 4444 XQ, Apple Prores 4444, Apple Prores 422, Apple Prores 422 LT, Apple Prores 422 LT. The program not only assists you to transcode 4K Prores to Vegas Pro 14/13/12 editable MP4, MOV, WMV, MPEG-1/2/4, etc but also facilitates you to directly export Vegas Pro 14/13/12 specially optimized MPEG-2 codec with the optimal editing settings.

Related article: Top 10 Prores Converter | Blu-ray to Prores 422 | 1080p MKV to Prores 422 HQ 

Pavtube Video Converter is pretty simple to use, no matter experienced user or fresh could handle it very well. In addition, it has perfect compatibility with all Windows OS including Windows 10, 8.1, 8 and 7. The final results produced by the program are pretty high quality, you can't tell the difference between the converted video and the original 4K Prores video.

How to Convert 4K Prores for Vegas Pro 12/13/14 Editing?

Step 1: Load 4K Prores files.

Download the free trial version of the program. Launch it on your computer. Click "File" menu and select "Add Video/Audio" or click the "Add Video" button on the top tool bar to import 4K Prores files into the program. The program supports batch conversion mode, you can batch load multiple files at one time.

Load 4K Prores files

Step 2: Define the output format.

Clicking the Format bar, from its drop-down list, select one of Vegas Pro 14/13/12 supported editing formats such as "MPEG-2 Video(*.mpg)" under "Common Video" main category.

Output Prores supported editing format

Tips: Click "Settings" on the main interface to open "Profile Settings" window, here, you can flexibly choose or specify exactly the parameters including video codec, resolution, bit rate, frame rate, audio codec, bit rate, sample rate, channels, etc as you like to get better output video and audio quality for Vegas Pro users.

Alternatively, you can also choose to directly output Vegas Pro 14/13/12 specially optimized editing codec by following "Adobe Premiere/Son..." > "MPEG-2 (*.mpg)".

Output Vegas Pro specially optimized editing format

Step 3: Begin the conversion process.

After all setting is completed, hit the "Convert" button at the right bottom of the main interface to begin the conversion process from 4K Prores to Vegas Pro 12/13/14 supported editing formats or preset profile editing formats.

When the conversion is finished, click "Open Output Folder" icon on the main interface to open the folder with generated files. Then feel free to load and import and edit converted Prores files with Vegas Pro 12/13/14 for high quality and high performance editing workflow.

Tuesday, January 23, 2018

Import DJI Osmo+ 4K to Davinci Resolve

The DJI Osmo+ is a handheld Gimbal with an integrated Zoom Camera, it offers up to 7x zoom when shooting in Full 1080p resolution, and up to 3.5x zoom at all other resolutions. As an advanced 4K camera, it shoots up to crisp DCI 4K (4096 x 2160) resolution at 24/25 fps, UHD 4K at up to 30 fps in either MP4 or MOV container format with MPEG-4 AVC/H.264 compression codec. When the shooting is done, for people who want to do some color correction and professional audio post production of the DJI Osmo+ 4K video, Davinci Resolve can be the best choice for you. The following article will show you how to smoothly import DJI Osmo+ 4K to Davinci Resolve for a high quality editing workflow.

Can Davinci Resolve support 4K resolution video editing?

Davinci Resolve's official website shows that the Davinci Resolve 12.5 and later version only supports to import UHD video with a resolution of 3840 x 2160, it also means that if you try to load DJI Osmo+ DCI 4K video with 4096 x 2160 to Davinci Resolve, you will definitely suffer video playback choppy or stuttering issues.

Native work Osmo+ H.264 MP4/MOV with Davinci Resolve

Although the H.264 MP4/MOV video shot with DJI Osmo+ is included in Davinci Resolve supported file formats list. However, it is well known that H.264 is just a good delivery file format, it is not a good editing format. If you try to edit H.264 native with Davinci Resolve, you start to lose image quality as you do color correction or composite gradients to create greenscreen keys.

To solve above listed image quality issues, it would be much ideal for you to transcoding DJI Osmo+ H.264 to a Davinci Resolve compatible higher bit-rate format such as Prores files, which render faster but have more room, you can create great looking effects without losing any quality.

Related article: Can FCP Support Osmo 4K Video | Osmo 4K with PPC 2015 | Edit Osmo 4K with Vegas Pro

Best tool to transcode DJI Osmo+ 4K H.264 to Prores for Davinci Resolve

Here, you can get the job easily completed by downloading our best Prores Converter - Pavtube Video Converter for Mac. The application can assist you to batch convert DJI Osmo+ 4K H.264 to Davinci Resolve most favorable high bit-rate editing format Apple Prores in various different file types including Apple Prores 422, Apple Prores 422 HQ, Apple Prores 422 Proxy and Apple Prores 422 LT. You can choose the suitable one according the following standards:

If you computer is old or slow, or you just want to do some rough editing, you can select to output "Apple Prores Proxy)(*.mov)"or "Apple Prores (LT)(*.mov)"format to save more space and bandwidth. However, if your computer are powerful enough to handle multicam and high-resolution video and you are going to do many effects editing work with Davinci Resolve, you'd better choose to output "Apple Prores 422(*.mov)"or "Apple Prores 422(HQ)(*.mov)"for better performance.

For Windows users, you can go to download Pavtube Video Converter to complete the conversion on Windows 10/8.1/8/7.

How to Import and Edit DJI Osmo+ 4K Video with Davinci Resolve?

Step 1: Load DJI Osmo+ 4K video.

Download the free trial version of the program. Launch it on your computer. Click "File" menu and select "Add Video/Audio" or click the "Add Video" button on the top tool bar to import source DJI Osmo+ 4K video files into the program.

Load DJI Osmo+ 4K video

Step 2: Select output file format.

Click "Format"bar, from its drop-down list, select your desired Prores format such as "Final Cut Pro" > "Apple Prores 422(*.mov)", you can also choose other prores formats on your own needs.

Define output file format

Step 3: Edit DJI Osmo+ 4K video.(optional)

Select an item on the main interface to active the "Editor" menu, then click the pencil like icon to open "Video Editor" Window, you can play and preview the original video and output effects. Also you can flip video, trim, add special effect, reset, and adjust volume.

Edit DJI Osmo+ 4K video

Step 4: Convert DJI Osmo 4K video to Apple Prores format.

Go back to the main interface and press the "Convert" icon on the right-bottom to start DJI Osmo+ 4K video to Davinci Resolve Apple Prores conversion process.

When the conversion is done, feel free to import converted video to Davinci Resolve for furthering professional editing.

Wednesday, January 17, 2018

Workflow of XDCAM EX MP4 with Davinci Resolve

XDCAM EX is a variation of XDCAM HD that records full HD resolution as either 1920 x 1080 or 1280 x 720 footage. XDCAM EX video and audio content is stored on disc within MP4 container files. The footage is recorded on SxS cards, based on the PCMCIA ExpressCard/34 form factor. Some people try to import and edit XDCAM EX footage with Davinci Resolve, but they often fail to do that due to the format incompatible issue.

Can Davinci Resolve native import XDCAM EX files?

From Davinci Resolve supported file formats list, we can see that it offers no native importing support for the XDCAM EX files. Therefore, to successfully load the XDCAM EX MP4 files into Davinci Resolve, the best solution is transcoding XDCAM EX to Davinci Resolve editable codec such as QuickTime, Prores, DNxHD, etc.

Related article: Edit VOB with Davinci Resolve | Import AVCHD to Davinci Resolve | Convert Davinci Resolve to AVI

Transcode XDCAM EX MP4 to Prores or DNxHD for Davinci Resolve

Here, you can easily produce Davinci Resolve compatible QuickTime, DNxHD or Prores codec by download this powerful yet simple to use application called Pavtube Video Converter for Mac (Best Mac Video Converter Review). The program has perfect importing support for the XDCAM EX MP4 files shot with Sony camera. Thanks to its batch conversion mode, you can load multiple XDCAM EX MP4 files into the application for conversion at one time.

The application can assist you to direct convert XDCAM EX to Davinci Resolve native compatible Prores, QuickTime or DNxHD codec with perfect quality and super-fast encoding speed. To get better output video and audio file quality, feel feel to adjust the output profile parameters such as video codec, resolution, bit rate, frame rate, audio codec, bit rate, sample rate, channels, etc as you like.

For Windows users, you can go to download and install the Windows version - Pavtube Video Converter to perform the conversion on Windows 10/8.1/8/7.

Step by Step to Transcode XDCAM EX MP4 for Davinci Resolve Editing

Step 1: Load XDCAM EX files into the program.

Start the program on your computer, on the main interface, click "File" > "Add Video/Audio" or "Add from folder" to load Sony XDCAM EX MP4 files into the program.

Load XDCAM EX MP4 files

Step 2: Specify output file formats.

Click "Format" bar, from its drop-down list, select Davinci Resolve best supported editing codec such as "Avid DNxHD (*.mov)" from "Avid Media Composer" or "Apple Prores 422(*.mov)" from "Final Cut Pro" main category menu extended list.

Output Davinci Resolve supported editing codec

Step 3: Start the conversion process.

After all the setting is done, click right-bottom "Convert" button to start encoding XDCAM EX MP4 files to Davinci Resolve preferred editing codec.

When the conversion is completed, click "open Output Folder" button on the main interface to pop out the folder with converted files, then you will have no problem to import and edit XDCAM EX files with Davinci Resolve on either Windows or Mac.