Wednesday, April 16, 2014

Apple and Other Smartphone Makers Back Global Anti-Theft Measures

Apple, Google, HTC, Huawei, Motorola, Microsoft, Nokia and Samsung have announced a voluntary agreement to include anti-theft technology on all smartphones beginning next year, according to a report by Re/code.

The pledge has device makers agreeing that all devices going on sale after July of 2015 will have capabilities to remotely wipe data and to prevent the device from being reactivated without the owner's permission.


A number of state and local lawmakers praised the agreement, though it was panned as inadequate by California state Sen. Mark Leno, who has proposed a mandatory kill-switch law.

“The wireless industry today has taken an incremental yet inadequate step to address the epidemic of smartphone theft,” Leno said in a statement. “Only weeks ago, they claimed that the approach they are taking today was infeasible and counterproductive. While I am encouraged they are moving off of that position so quickly, today’s ‘opt-in’ proposal misses the mark if the ultimate goal is to combat street crime and violent thefts involving smartphones and tablets.”The senator pointed out that all smartphones must have similar kill switch features, or violent street crime and thefts will continue to occur as at least some of the device thefts will still be profitable.

A federal bill introduced earlier this year would mandate the inclusion of such a smartphone "kill switch" after California introduced a similar bill.

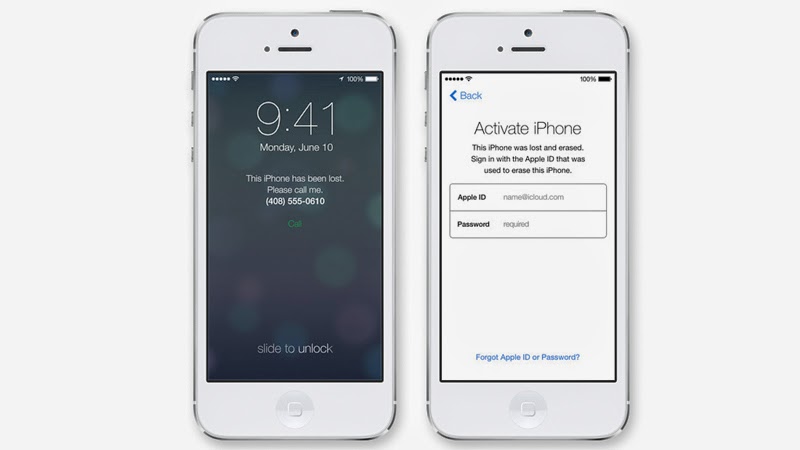
It is likely that Apple's Activation Lock, introduced alongside iOS 7, satisfies the requirements of the agreement already. Activation Lock effectively disables a stolen smartphone by preventing it from being wiped and reactivated without an Apple ID and password. Apple's Find My iPhone also allows for devices to be remotely wiped and locked.

From: http://www.macrumors.com/2014/04/15/apple-anti-theft-agreement/

Monday, April 14, 2014

Ripping Blu-ray movie to iOS devices on Mac 10.9 Mavericks for playing without BD drive

Maybe you’ve got an iOS phone or tablet and want to play your favorite Blu-ray movies on it without BD drive anytime and anywhere you like, now get this top Blu-ray Ripper for Mac which enables you transfer Blu-ray movie on iOS device on Mac 10.9 Mavericks.

With more and more advanced features built-in Blu-ray technology, it seems Blu-ray has ruled Home Entertainments. If you are a owner of an iOS devices, you may want to get your favourite Blu-ray movie on these iOS based portable phones and tablets.
 

However, let’s face it: Apple OS based devices don't support playing/loading Blu-ray movies. Thus, in order to watch Blu-ray movies on your iOS phone/tablet, you need to convert those discs to an Apple-friendly format (e.g. MP4). If you're using a Mac and want to get your movies off of your Blu-ray discs and onto your iOS tablet or smartphone, keep on reading for a brief how-to.

First, the most important piece of the equation is that you have a Blu-Ray/DVD Ripping tool hooked to your Mac. Searched widely and I got some tech support for converting Blu-ray to iOS MP4 video on Mac 10.9 Mavericks without losing quality in a simplest way, I find more than one people suggest to rip Blu-ray to iOS device on Mac with BDMagic for Mac.

Overall, it is an ideal app for you to rip Blu-ray, DVD, ISO/IFO files to MP4 video. Plus, it also can help you to convert Blu-ray, DVD to almost any other common video format such as VOB, FLV, WMV, AVI, MKV or backup the BD, DVD keeping the whole movie structure as you need.

With it, you can enjoy 2D/3D Blu-ray/DVD on iOS devices like: iPhone (original iPhone, iPhone 3G, iPhone 3GS, iPhone 4, iPhone 4S, iPhone 5, iPhone 5C and iPhone 5S), five of iPod Touch (first through fourth generations and fifth generation), five of iPad (first generation, iPad 2, third and fourth generations, and iPad Air), and two of iPad Mini (first and second generations), etc. The Windows version is Pavtube BDMagic.

Tip:

If you have any requirements of outputting 3D (Anaglyph, T/P, SBS) or keeping multiple audio
tracks/subtitles on Mac, you are suggested to try this ByteCopy for Mac.

Now just download it and follow the tutorial below.

Rip Blu-ray to iOS device for watching on Mac 10.9 Mavericks

1. Click the "Load file(s)" icon to import Blu-ray disc (need an external Blu-ray drive), Blu-ray ISO image files and Blu-ray folder.


2. Click the drop-down list on the bottom; choose proper presets according to your device model. You can see columns for normal Apple iOS devices, like Apple, iPad, iPhone, iPodcatalogue, or you can use the small search box to locate your device quickly.

Basically the “H.264 Video(*.mp4)” is a universal format for your Apple iOS device.


Tips:

a. You can check the pencil-like icon to activate the editing function. Here you can trim video for your needed length, crop video to get rid of annoying black edges, join multiple video clips into one, add text/image watermark and add subtitles. For example, if the original Blu-ray movie has no subtitle or the subtitles you need, you can download it from website and then add it into the output videos for full enjoyment with this software.

Notice the small triangles under the progress bar? Click them to adjust frame by frame easily.


b. If you want to output video in specific size, bitrate or frame rate, click “Settings” (which is marked as “3″) and change the digits as you need. Pls notes that the video quality improved with the bitrate, but not the higher the better. You need to consider your device configuration as the high bitrate required higher read&write speed.

3. Ok now click the “Convert” button to start converting/copying Blu-ray iOS devices for playing on Mac 10.9 Mavericks. After conversion, click “Open” to locate the converted video directly.

Don’t know how to transfer videos from PC to iOS device? You can view the posts below:

More tips:


If you are a DVD lover, turn to the gudie to learn watch DVD movies with External Subtitles (srt/ass/ssa) on Android/iOS device.

Want to view Blu-ray on Apple device with multi-tracks? This is the Solution: Convert Blu-ray to MOV with multiple language for viewing on iOS device.

Find any unsupported format with iOS? This is the All-in-one Solution: Converting 1080p Videos to 720p for smoothly playing on Apple iOS Devices

Read More;

Friday, April 11, 2014

Ingest and Edit Blu-ray in iMovie/FCE to make your own masterpiece

What is the best Way to work with Blu-ray in iMovie/FCE on Mac? This article will give you the best answer. 

It's a great fun if you have a pretty large Blu-ray collection for sharing with your friends or familiars. When you have the digital copies of these movies saved on your hard drive or personal server, you may also like to edit Blu-rays in iMovie/FCE to make your own masterpiece.


However, Apple might not be ready to add Blu-ray to its computers yet, so you can't directly ingest Blu-ray files in iMovie/FCE. As iMovie/FCE best supported video formats is AIC (Advanced Intermediate codec), so it's the best way to convert Blu-ray to AIC codec for editing in iMovie/FCE. Nowadays there are seldom Blu-ray applications developed for Mac users, not to mention a program that can rip Blu-ray to AIC codec for iMovie/FCE Editing. 

However, a professional Mac Blu-ray to iMovie/FCE Converter from Pavtube can realize it. It can help you rip/convert Blu-ray movie to AIC for iMovie/FCE without quality loss in a fast speed on Mac OS (os x lion included). Also with this tool, you can rip and import a Blu-ray clip to FCP for editing. Here is an easy guide to show you how to convert Blu-ray to iMovie/FCE with Pavtube iMedia Converter for Mac for your reference. 

Step 1. Insert the Blu-ray disc you want to convert into your BD drive. Install and run the blu-ray to AIC Converter for iMovie/FCE on your Mac, then load your Blu-ray files into it. You can also add Blu-ray ISO/IFO, Blu-ray folders to it. 


Step 2. Click "Format" bar and select "iMovie and Final Cut Express--> Apple Intermediate Codec(AIC)(*.mov)" as best codec for iMovie/FCE. 


Step 3. Click on "Settings" button to adjust audio and video parameters, bitrate, aspect ratio, frame rate, sample rate, and channels are all changeable in the following interface, so you can adjust them according to your own requirements.


Step 4. Click "Convert" button to start ripping Blu-ray to iMovie/FCE AIC.mov.

Once get the converted ProRes files from BD, you can import AIC.mov files to iMovie/FCE for editing freely.

Very simple? If any of you have figured out a straight way to convert Blu-ray to AIC codec for iMovie/FCE, please let me know, and any suggestion is appreciated. Thanks in advance. 

Refer to here to learn how to import video files into iMovie

Extra Tips:

Convert DVD to Multi-track Apple ProRes for FCP with Timecode
How to edit DVDs in FCP, FCP X, FCE on Mac?
Import DVD to iMovie 8/9/11 on Mac Mountain Lion 10.8

Thursday, April 10, 2014

Best way editing a Blu-ray movie in Sony Vegas Pro

How to import your favorite Blu-ray movies to Sony Vegas Pro? Here, Pavtube Blu-ray Ripper is a practical app helping you transcode Blu-ray into to WMV/MPEG-2 for editing in Sony Vegas Pro.

"Hi all! I'm new and I am looking for help with ripping DVD content for editing in Sony Vegas Pro? What do you use that works?!"

"Hey there! I need to be able to edit clips from movies in Sony Vegas Pro. So I need to convert the movie into a file format that Sony Vegas Pro understands. what software is best for converting the movie?"

"Is it possible to import a movie from bluray to Sony Vegas Pro?"

Many Blu-ray lovers are looking for the way to edit their favorite BD in editing tools to create their masterpiece. However, the users found easily that they can not directly import the Blu-ray movie to Sony Vegas Pro for smoothly editing. Then how can they upload the Blu-rays to editing systems, such as Sony Vegas Pro for postproduction?

As we all know, the most compatible video format for Sony Vegas Pro editing is MPEG and WMV format. So we need to transcode the Blu-rays to Vegas editable format first before importing. In order to perform the task smoothly, I recommend you a powerful Blu-ray Ripper which has an exclusive function to support Blu-rays and DVDs to editing tools, such as Adobe Premiere Pro, Avid Media Composer and Sony Vegas Pro.

With it, you can rip/convert Blu-ray movies to Sony Vegas Pro without quality loss in a fast speed. Follow the guide below to get Blu-ray movies transferred to Sony Vegas smoothly.

What do you need in advance?

1. Get a PC
2. Connect Blu-ray Driver to your PC
3. Download Pavtube Blu-ray to Sony Vegas Converter

Guide: How to convert Blu-ray movies to WMV/MPEG-2 for Sony Vegas Pro?

Step 1. Load Blu-ray movie.

Download the best Blu-ray Ripper from Pavtube, install and run the app. Insert Blu-ray to disc drive, click the “Load disc” button to import source Blu-ray.


Pick one audio track and subtitles in the drop-down list of Audio and Subtitles. You are free to preview Blu-ray movie in the right preview window to check if you get the correct audio track and subtitles.

Step 2. Select output format.

Choose the suitable output format from the “Format” menu, and here choose "WMV (VC-1) (*.wmv)" from "Adobe Premiere/Sony Vegas" as output format.


Tip: If you like, click on the "Settings" icon to adjust audio and video parameters, such as Bitrate, Size, frame rate, etc to your own requirements.


Step 3. Start ripping Blu-ray movies to WMV/MPEG-2 for Sony Vegas Pro.

Double check all press and hit the “Convert” button to start ripping Blu-ray movies to Sony Vegas Pro compatible format. Once the conversion finishes, import the ripped video files to Sony Vegas Pro and edit them to get your own video clip with ease.

Read more:

Tuesday, April 8, 2014

Playing your favorite Blu-ray and DVD movies on TV via Personal Cloud Server

This article shows how to remove your BD/DVD protection and rip them into MP4/MKV format, so that you can playback the movies on TV via my personal cloud server.

My job position is in IT and my hobbies are mostly outdoor stuff. Now I have some personal DVD and BD Collections and I'm looking for a way getting them playable on TV via my personal cloud server. Don't need to keep the original file size as we have limited storage, but want to get pretty good video quality.


We did a lot of researches online and searched for the best video conversion software, finally we got this SW named Pavtube Video Converter Ultimate (Windows based); I like the the multiple choices in formats and ease of use interface. It offers me the best features I need in BD/DVD conversion. The most important thing is it accepts my every disc, which Handbrake and Jack the Ripper couldn't. The Mac version is Pavtube iMedia Converter for Mac.

For people who want to backup all the audio tracks or subtitles, you are suggested to try Pavtube ByteCopy or ByteCopy for MacDownload a trial version and do as follows.

How to rip BD/DVD movies to view on TV via personal cloud server
Step 1. Load disc

Click "Load files(s)" to import DVDs and Blu-rays. Note you need to have an external Blu-ray drive if you want to rip Blu-rays.

Keep Internet connected during importing.


Step 2. Choose format.

Here, I recommend MP4/MKV format as it's most acceptable by most TV. Click "Format" and choose H.264 Video(*.mp4) or  MKV(Matroska) Video (*.mkv) from "Common Video" option as below:


Step 3. Adjust output settings (Optional)

Click "Settings" to change video size, bitrate, frame rate and audio specs. I chose "original" size to playback on TV.

Step 4. Start conversion

Click "Convert" in the main interface to start the conversion (batch conversion supported). After conversion, click "Open" which is below the "Settings" to find the converted video.

Use a USB drive to transfer the ripped MP4/MKV media file to TV via personal cloud server, now just enjoy your Blu-ray/DVD movies anytime and anywhere!

Related articles:

Sunday, April 6, 2014

How to Rip/Convert Blu-ray to QuickTime on Mac

This guide offers you the easiest solution to rip and convert Blu-ray movies to QuickTime MOV format for watching Blu-ray on Mac.

QuickTime is an extensible multimedia framework developed by Apple Inc. It's powerful media technology that works on Mac and PC with just about every popular video or audio format you come across. You may have a lot of Blu-ray discs and wanna enjoy and share the Blu-ray movies in QuickTime with family or friends at home. Howver, the Blu-ray files are saved in high-definition content with copyright protection, which make it hard to play Blu-ray video in QuickTime on Mac.


So, is there an app which makes it easy to either just watch or to convert Blu-rays to QuickTime format in an almost Apple-like way? Here, I will provide you with an effective solution to play Blu-ray movies on QuickTime with Mac OS X.

At first, in that case, a Mac Blu-ray to QuickTime Converter to transcode Blu-ray to a format that QuickTime can recognize. To convert Blu-ray to QuickTime on Mac successfully and quickly, an easy-to-use yet efficient tool-Pavtube Blu-ray Converter for Mac is highly recommended. It provides super-fast converting speed and high quality output video. Furthermore, it has optimized presets for QuickTime, which can save your much worry. Install and run the application. Do as follows. 

Tip: If you want to backup your blu-ray/dvd movies with keeping multiple audio tracks and subtitle streams, try to use Pavtube ByteCopy for Mac.

Step 1. Load Blu-ray movie.

Free download Mac Blu-ray to QuickTime Converter, run it and load Blu-ray disc from disc driver. Before that, you need an extended BD drive connected to Mac. Check the main title of the movie and then you can also click to preview the Blu-ray movie.


Step 2. Set output format.

Click on “Format” bar to select an appropriate format from the profile list, here you can choose “Common Video > MOV – QuickTime (*.mov)”as output format.


Tip: If you like, you can click “Settings" to change the video encoder, resolution, frame rate, etc. Remember bitrate higher results in big file size, and lower visible quality loss. If you want to keep 1080p Full HD resolution, set the video size as 1080*1920.


Step 3. Start ripping Blu-ray to QuickTime MOV on Mac.

After choosing the output format, just click on “Convert” button to start ripping Blu-ray to QuickTime MOV on Mac 10.9 Mavericks for playback. When the conversion is completed, click the “Open” button to get the converted MOV videos for QuickTime playing.

Related article:

Tuesday, April 1, 2014

Ripping Children & Family DVDs for watching on Mobile Devices

This article walks you through the whole process of converting DVD movies to mobile devices so that kids and family members are able to enjoy movies at home or anywhere they like.

Kid’s favorite animations like Olivia, Ice Age 4, Big Top Scooby-Doo, Madagascar, The Jungle Book, Despicable Me 2, and more movies will release the DVD version soon. Would you like to move and watch these new movies on your iPhone, iPad, Samsung Galaxy Tab, Google Nexus, Kindle Fire HDX or other portable device with your kids and family members? Without the assistance of any tool you cannot accomplish this because there is no mobile devices that are equipped with a disc driver natively.


Among all the software applications, free or paid, Pavtube DVDAid is my first choice for two reasons. One is its easy-to-use feature with user friendly interface; another is its reasonable price and lifetime support.

Anyway, I would tell you how I rip DVD movie “UP” to my iPad Air and similar steps could be found from below tutorial for your mobile device as well.

Step 1: Download a free copy of Pavtube DVDAid, install and launch it. Insert DVD disc, hit the “Load Disc” icon to browse to disc driver and load DVD movie into this app.


Step 2: Choose the optimized format for output. In order to watch DVD movies on my iPad Air, I select “iPad” > “iPad Air HD Video(*.mp4)” as output format. To get iPad Air preset, download the patch file here.


If you have other mobile device, search for the particular profile from the “Format” drop-down list. When you cannot find your smartphone or tablet there, don’t worry, use the similar format with your device or choose Android or Window profile, and then adjust profile presets to achieve the best video and audio quality for your device.


Step 3: Click on the “Convert” button and start ripping DVD movie. When the conversion is done, I will find the converted MP4 movie in output folder and transfer to my iPad Air via iTunes 11. And the whole process of ripping DVD to iPad Air completes and I am ready to reach my DVD collection on iPad Air, iPhone 5S, and other mobile devices.

Read more: