Saturday, October 11, 2014

How to Convert Video on Mac Yosemite and Mavericks Easy as Can Be

Here is a Yosemite and Mavericks tutorial which offers you a best video converter for converting all kinds of video to any formats and gadgets on Mac Yosemite and Mavericks in a Breeze.

As promised, Mac OS has a new look on June 2, 2014 and this fall is the time for Mac users to upgrade to the latest Mac OS Yosemite, which is unveiled at Apple's 2014 WWDC.  However, compatibility problems with video playback on Mac OS X 10.10 will be confused like the previous Mavericks,for example:
  • 1. Your videos are still out of reach of mobile devices like iPhone, iPad, iPod, Android tablets,Xbox 360, PSP, etc, and even cannot be played by PC directly if there’s no proper player or codec installed;
  • 2. Your video file is somewhat "heavy" for storing/saving, transferring and sharing;
  • 3. Some old HD videos are not compatible with our new Mac OS anymore, such as Mavericks and Yosemite.

Of course a suggested video converter for Mac OS X 10.10 and Mavericks to solve issues with converting on your new system is needed.To be honest, I tried several softwares online and I can tell you that NO ONE comes even close to the simpleness and great quality that Pavtube HD Video Converter for Mac delivers. (Read Top 5 Best HD Video Converter for Mac Review) It is such a extremely powerful app which are sure to meet just about every one of your video conversion needs. When it comes to Apple's new operating system Mac OS X 10.10 Yosemite and Mavericks, this converter software makes quick response to it and ensures full compatibility with the latest platform. Below is how to convert hd video on Mac Yosemite and Mavericks with simple clicks.

How to convert HD Videos on Mac Yosemite and Mavericks

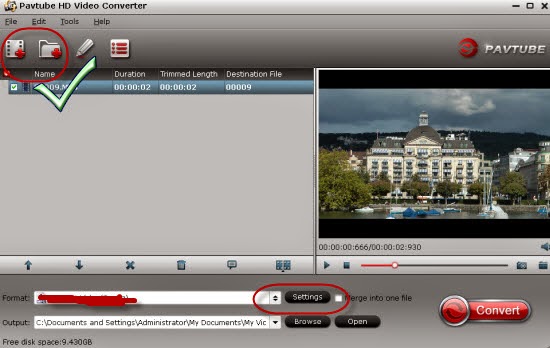
Step 1. Run the Pavtube Video Converter for Yosemite/Mavericks, drag and drop source video to the program.

Video Converter for Yosemite/Mavericks

Step 2. Click on “Format” bar, and Choose Mac Yosemite and Mavericks compatible format for playing.

From "Format" dropdown list, you can go to "Common Video" option to find what you like. I think H.264 Video(*.mp4) format is better for Mac Yosemite and Mavericks.

Play video on Mac Yosemite and Mavericks

Tips:

1. For some advances users, you can go to adjust video and audio parameters like bitrate, resolution, channels, etc. Click "Settings" button you can go to check and change them as you like.

2. The "Edit" button on the main interface of this program is also available for you to trim your recordings, crop them to suit your device's screen, add watermark and even plug in SRT subtitle to MP4 video to make your video understandable.

MP4 Video Settings

Step 3. Press on “Convert” to start encoding HD videos (like MKV, VOB, AVI, MPG, Tivo, WMV, Flash, etc.) to Yosemite/Mavericks compatible video.

Step 4. When conversion completes, press on “Open” to locate converted videos and just enjoy your videos on Mac Yosemite and Mavericks and transfer to your mobile devices for watching wherever you are. 

See also:

Thursday, October 9, 2014

Transcode Canon MXF footage for importing to Davinci Resolve on Mac

This article shares the way to import Canon MXF files into Davinci Resolve for film-making by converting MXF to Davinci native DNxHD mov video. 

DaVinci Resolve is the world's most advanced color grading system. With an incredible range of digital film cameras available, Resolve includes more native camera file support. According to Blackmagicdesign official website, it can support Cineform, Cineform 3D, Phantom, GoPro, Canon C300, C500 and 1D, 5D, 7D and Sony F65/F55/F5 RAW. (Learn DaVinci Resolve Workflows- Tutorial on how to use Resolve 9)

import Canon MXF files into Davinci Resolve

As you can see, the MXF files is not listed as a supported media. And you may always encounter problems when ingesting MXF footage to DaVinci Resolve. Then how to get DaVinci Resolve to recognize Canon recorded MXF files?

Rejoice, mates, Rejoice. For there’s finally being a solution that does what it says it’s supposed to do. Come and meet Pavtube iMixMXF which would be a vital part of your workflow. It can transcode Canon MXF shootings to easily adapted to DaVinci Resolve. What's more, it can do some little editing some simple editing features, such as merging several videos into one file, deinterlacing the original footages, cropping video size, trimming video clips, adding special effects and text/image/video watermarks to output videos.

And if you are also interested in how to convert Canon .mxf files into DaVinci Resolve preferred video on Windows PC, Pavtube MXF MultiMixer if you best choice. Guys, follow this link to order a license directly, or free download a trial version.

How to import Canon MXF video to DaVinci Resolve for editing without rendering?

Step 1: Connect your Canon MXF camcorder to your Apple with USB2.0.

Free Download the best Mac MXF to DaVinci Resolve Converter. Install and run it on you Mac. Click “Add videos” to load individual videos, or click “Add from folder” to load the whole folder.

Tips:

1. If your MXF files have already been transferred to your Apple hard drive, you can easily drag them to the best MXF to DaVinci Resolve Converter.

2. If you have multiple mxf files, you can select the “Merge into one file” box to merge the mxf files into one single file for DaVinci Resolve so that you can play these files without interruption.

Step 2. Click on the “Format” and get the dropdown menu, then move you pointer to “Avid Media Composer”. Here we recommend the Avid DNxHD (*.mov)” for as best video format for editing Canon MXF footage in DaVinci Resolve. Then you can set the output folder by clicking “Browse” icon.

best video format for editing in DaVinci Resolve

What's more, the most important feature of Pavtube iMixMXF is that it allows you to preserve multiple audio tracks by outputting multi-track formats. Just follow the “Multi-track Video” and choose what you want.

Multi-track MOV format

Step 3. Click the “Settings” icon and you will go into a new interface named “Profile Settings”. You’d better set the video frame rate as 30fps, video size as 1920*1080 to keep the best quality for editing in DaVinci Resolve . If you want to have a smaller file size but keep the good quality, you can change the video size to 1440*1080.

Step 4: Click the “Convert” button; it will convert Canon MXF to DNxHD for DaVinci Resolve editing on Mac immediately.

3..2..1..Bingo! After the workflow, you can go to the output folder to find the converted video files. Now you are free to import the DNxHD MOV to DaVinci Resolve under Mac without rendering.

Also also learn how to rip feature documentary footage, convert Avid MXF and other video files like MKV/MTS/AVI/MP4/FLV in DaVinci Resolve.

Read More:

Wednesday, October 8, 2014

Convert G2M WMV Video to iMovie for editing Using GoToMeeting Video Converter

Just read this article and get the best G2M WMV Converter to help you solve GoToMeeting video to iMovie importing and editing issues quickly and easily. 

We're recording and creating wmv files about webinar from gotomeeting software. Before uploading to Vimeo so our customers and potential customers will have access, I needed a software to convert a G2M WMV for editing in my iMovie. Having tried one bit, it displays "failed to convert" underneath the wmv file. But I tried an avi file that was produced through camtasia and it worked. Any ideas?

Convert G2M WMV Video to iMovie

GoToMeeting is a nice recording software in capturing webinar, however, this greatly attributes to the proprietary WMV with incompatible G2M codec that only renders on GoToMeeting's own platform, but not a standard codec installed in any kind of video editing package like iMovie.

So if we would like to edit GoToMeeting G2M WMV video in iMovie for sharing, we can rely on some video converter, such as Pavtube HD Video Converter for Mac to convert G2M WMV to iMovie native AIC.mov for smoothly editing. It’s an easy-to-use and decent GotoMeeting video converter that can always deliver what you need, with an easy intuitive interface.

Step-by-step tutorial on how to convert G2M WMV videos to iMovie for editing

Step 1: After the installation of the professional G2M WMV to iMovie Converter, run the program to load your G2M WMV video files.

G2M WMV to iMovie Converter

Step 2: Click on the dropdown menu of “Format” and choose iMovie and Final Cut Express -> Apple InterMediate Codec (AIC) (*.mov) as the target format.

iMovie best video format

Go the Profile Settings panel to adjust the video size, bitrate, frame rate, audio channel, etc as you want.

iMovie AIC settings

Step 3: Tap the Convert button to start the G2M WMV to iMovie conversion. When the conversion ends, you can launch iMovie and add the converted camera clips to your Even library through "File -> Import -> Movies..." like this:

File Importing Steps: How to import video files or projects to iMovie 8/9/11 on Mac?

What's more, you can convert G2M WMV to Youtube for sharing and Moviemaker, Camtasia, FCP for editing. And converting MTS video to iMovie is not a big deal.

Sunday, September 28, 2014

How to save/convert WLMP to iPhone 6 Plus and Galaxy Note 4 video format

See how to convert Windows Live Movie Maker Project file - WLMP to iPhone 6 Plus and Galaxy Note 4 compatible format for watching step by step.

WLMP is a Windows Live Movie Maker project file which records the path to all the source files and records the transitions effects etc; but it does not include copies of the source files like photos, video clips, and audio clips. Therefore, we can only view WLMP in Windows Live Movie Maker and cannot play it directly on the hot devices like iPhone 6 Plus and Galaxy Note 4.
iPhone 6 Plus and Galaxy Note 4

Then how to turn the wlmp file extention into iPhone 6 Plus and Galaxy Note 4 supported mp4 format? This is what the article says.

Part I: Save WLMP project as a video

This method is applicable for Windows 7/Vista users only. Follow these steps:

Step 1 – First, you’ll import your WLMP file into Windows Live Movie Maker.

Step 2 – Select File > Save Movie. You can then choose to save it as WMV.

Save WLMP project as a video

Tips: You can save WLMP project file as MP4 directly if you are using Windows Live Movie Maker 2012.

Part II: Get a WLMP converter to convert WLMP to iPhone 6 Plus and Galaxy Note 4 MP4 format

If you save your WLMP file as WMV format with Windows Live Movie Maker, you need to get a video converter to convert your saved WLMP file to iPhone 6 Plus and Galaxy Note 4 supported MP4 format. (See Top 6 best Free iPhone 6 & iPhone 6 Plus Video/Audio Converters)

Here I humbly recommend Pavtube HD Video Converter, which can convert WLMP to almost any format you desire like MOV, AVI, MKV, VOB, RMVB, MPEG, MPG, and MPEG-2, etc. And most importantly, it can realize WLMP to iPhone 6 Plus and Galaxy Note 4 MP4 conversion with best video quality and simplest workflow as Pavtube now upgrade for iPhone 6 (Plus) & Galaxy Note 4 support.

FYI: You can reach the Mac version here: WLMP to iPhone/Galaxy Converter for Mac.

Tutorial: How to transfer WLMP Video files to iPhone 6 Plus and Galaxy Note 4 for watching

Step 1. Run this WLMP Video Converter; add videos.

You can click "Add Video" to choose import WLMP videos. Drag-and-drop is also supported.


Step 2. Choose iPhone 6 Plus and Galaxy Note 4 video format.

Hit the menu bar of “Format”, find the optimal video format for  iPhone 6 Plus and Galaxy Note 4.

To enjoy WLMP files on iPhone 6 Plus, choose "iPhone 6 Plus H.264 Full Screen/Full HD 1080P(*.mp4)" from "iPhone".

For transferring WLMP to Galaxy Note 4,  “Samsung > Samsung Galaxy Note(*.mp4)” is recommended here.

Step 3. Customize video specs (Optional).

Your can click "Settings" to free change video size, bitrate, frame rate and others. If you do not want to keep videos in large size, you can lower the bitrate settings to get video in proper size.
For iPhone 6 Plus:

iPhone 6 Plus Video Settings

For Galaxy Note 4:

Galaxy Note 4 Video Settings

Step 4. Start Conversion.

Now hit the big red "Convert" to start converting WLMP video to MP4 format. After conversion, you can click "Open output folder" to quick locate the converted video. Just connect iPhone 6 Plus and Galaxy Note 4 to PC and then sync to iPhone 6 Plus via iTunes and transfer to Galaxy Note 4 via Kies.

Saturday, September 27, 2014

Pavtube HD Video Converter 4.6.1 Adds iPhone 6 Output

Good News! We are so proud to announce that Pavtube has an amazing updated version of its all multimedia tools. Acted on customers requests and Pavtube adds some amazing new features at the latest release.

What's New?

1. Add profiles for iPhone 6, iPhone 6 Plus and Samsung Galaxy Note 4
2. fix some bugs

The new version of Pavtube HD Video Converter 4.6.1 is specially designed for converting your downloaded movies, camcorder recorded videos, tv shows, tv series,etc. for viewing with iPhone 6, iPhone 6 Plus and Samsung Galaxy Note 4!

Pavtube HD Video Converter 4.6.1

Version:
 4.6.1
Supported OS: Windows 2003/XP/Vista/Windows 7/Windows 8/Windows 8.1
Download the lateast version of Pavtube HD Video Converter here.

Three new profiles:

iPhone 6 Video Format

iPhone 6 Plus Video Format

Galaxy Note 4 Video Format

Best Profile Settings:

iPhone 6 Video Settings


iPhone 6 Plus Video Settings

Galaxy Note 4 Video Settings

Tuesday, September 23, 2014

Top 6 best Free iPhone 6 & iPhone 6 Plus Video/Audio Converters

This article is a Review of Top 6 Free iPhone 6 & iPhone 6 Plus Video/Audio Converters. Which one is right for you? Take 60 seconds and easily compare and see how each performs. Now choose your best converting tool for iPhone 6(Plus) with you.

The baking-hot iPhone 6 comes with a 4.7 inch 1334 x 750 (348 ppi) Retina display and the 5.5 inch iPhone 6 Plus sports a Full HD (1,920×1,080 resolution) plus a 16:9 screen ratio to support watch HD widescreen movies. Hence, no doubt that iPhone 6(Plus) will bring the Apple junkies a more enjoyable HD video experience.

iPhone 6 Plus

However, as always, video cannot be played back on iPhone 6 or iPhone 6 Plus only if you are playing videos in MOV, MP4, M4V format, which is too limited for other unsupported movie watching. So you are advised to to try some top free Video/Audio Converters for your new iPhone 6 and larger iPhone 6 Plus. 

Most video converters work in a similar way, requiring the user to upload their files and select an appropriate output setting before choosing a save location within their computer’s directory. However, some falter when it comes to speed and conversion quality, while others pave the way with intuitive features that go well beyond your typical video converter and push the software into an entirely different realm — one where video editing and multimedia players intersect. Now I will list our picks for the top 6 best free iPhone 6 & iPhone 6 Plus Video/Audio Converter so you can free yourself from the ball-and-chain formats of yesterday and convert video so that it’s playable on your new iPhone 6(Plus). 


Top 6 Free iPhone 6 & iPhone 6 Plus Video/Audio Converters

1. Pavtube Free Video DVD Converter Ultimate (Windows)
Pavtube Free Video DVD Converter Ultimate  

Pavtube Free Video DVD Converter Ultimate is a professional Video & DVD convering tool with strong ability to remove DVD protection and convert videos file to any video and audio format including iPhone 6(Plus) compatible mov format. With it, you are aslo allowed to edit DVD/Video (trim, crop, and layer video effects) to create your personal movie. The software features batch processing for converting multiple files simultaneously. The resulting video quality is excellent– making it one of the most user-friendly and adoptable freemium products in our roundup.

2. Handbrake (Windows/Mac OS X)

Handbrake

Handbreak is a neat, open source video transcoder for ripping DVD video and other content into a variety of formats that you can then take on the go. Handbrake includes a system of presets that allow novice users to quickly rip DVD videos into formats optimized for a variety ofdevices and more advanced users will find a plethora of technical features and settings that they can tweak to configure the output to their liking.

However, the HandBrake guide and forums are always available if you need help without having to spend ample time fumbling with the program. So it won't cut through some copy protection. Handbrake simply can’t be topped when converting files to MP4 or MKV format, but it also isn’t for beginners unwilling to learn the software.

3. Freemake Video Converter (Windows)

Freemake Video Converter

Freemake Video Converter is an all-in-one free converter program that can take numerous audio and video file formats and convert them into various device-friendly forms. Freemake supports numerous input file formats for both audio and video, and includes some basic editing features for trimming out sections of your input, and numerous device presets allow you to ensure compatibility when importing videos or music to a particular smartphoneor tablet. An easy to use interface simplifies workflow and guides you through the process, making it Freemake powerful and user-friendly.

4. Format Factory (Windows) 
  Format Factory

Format Factory strikes a nice balance between usability and customization. The main pane allows you to drag and drop files for conversion, and there's numerous supported formats, a wealth of device and quality presets to keep things simple, and the ability to further modify settings within these presets to your liking. Besides audio and video conversions,Format Factory also includes DVD ripping, as well as audio and video joining features for extra value.

5. MediaCoder (Windows/Mac OS X)

MediaCoder

MediaCoder is a capable program loaded with terrific conversion features. The interface, though bewildering at first glance, is relatively straightforward once you learn your way around, offering a boatload of customizable features for converting video to a specified output format of your choice. There are other basic tools bundled in the software, such as a direct audio extractor and a CD burner, but they are merely bonuses given the software’s focus on transcoding and output compatibility.

6. Clip Converter (Web-based)

Clip Converter

Clip Converter was one of the first online converters and it remains one of the simplest for multiple reasons. The free software is primarily designed for downloading and converting video files from their native format into something more accessible. Unfortunately, the site doesn’t allow much customization when it comes to video or audio files. You can typically download video files at the highest resolution available, or less if you’re worried about space, but audio is limited to 320 kbps or the highest quality available.

Honorable mentions 

These free video & audio converters for iPhone 6(Plus) are more powerful and robust compared with others and worthy trying, but if you found your files can't be encoded, please take a look at this paid iPhone 6 & iPhone 6 Plus converting tool- Pavtube Video Converter Ultimate which standouts amid the myriad of video-conversion software and is capable of accomplish the task by converting all kinds of videos to iPhone 6 (Plus) supported video formats.

Pavtube Video Converter Ultimate

It features an easy-to-use interface, numerous device and setting presets for painless conversion settings, the option to tweak settings further, as well as a basic editing tool for cropping, adding watermarks, and other features. The program is well-organized, and quite user-friendly. Mac version is iMedia Converter for Mac.

Friday, September 19, 2014

How To Install Custom Keyboards on iPhone 6

In this article we’ll be going over how to setup and install custom keyboards on your new iPhone 6 or 6 Plus.  This is a really simple trick that’s sure to help those of you that are new to custom keyboards or iOS in general.

Custom Keyboards on iPhone 6

The first thing you’re going to want to do is install your custom keyboard of choice from the app store, next go into the settings, tap on general, keyboards, tap on keyboards again, and now we’ll add our custom keyboard.  Tap again on your custom keyboard and toggle the full access on.  Next go ahead and hit edit and drag your keyboard of choice to the top to set it as your default.

So now when you go into your browser or any application that uses a keyboard, you have a brand new one.  As you can see mine is working flawlessly and this really is a great feature.  If anyone of you have questions, feel free to leave them in the comments section below and I’ll try my best to respond to as many as I can.

From: gadgetguruhd.com 

More tips about iPhone 6/6 Plus: