Pavtube Video Converter for Mac- upgrade to the version 4.8.5.0
This upgraded Pavtube Video Converter for Mac is the professional and easy-to-use Mac Video Converter, which is specially designed for Mac users to easily convert between various video formats including H.265/HEVC, H.264, MP4, MOV, MKV, AVI, MPEG, Xvid, DivX, 3GP, WMV, FLV, MOD, TOD, WTV, MXF, MVI, F4V, WebM, VP8, 720p, 1080p, 1080i HD, AVCHD videos and more, convert between various audio formats including APE, MP3, AAC, AC3, WAV, WMA, and even extract audio from movie files. You can know more details on the official website.
What’s new of Pavtube Video Converter for Mac (version 4.8.5.0)?
1.Support H.265 decoder and refine asm.
2.Support XAVC codec contained in MXF.
3.Better support for VPx series decoder.
Key features of Pavtube Video Converter for Mac (version 4.8.5.0):
1. Convert various videos/audios as input and output.
2. So many popular editing tools and media players are available.
3. Easy operation workflow and faster conversion speed.
4. Extra acceleration function for Mac users.
5. Strong ability of setting and editing output videos.
Tips: Before May 1st, you can get a discount on Pavtube Video Converter for Mac. Why not click the link to know more about this 40% off event and seize the chance to buy excellent products with such pretty attractive price?
Simple guide on how to convert videos with this Mac Video Converter:
Step 1: Run the upgraded Mac Video Converter, and click the “Add video” button to load your original recordings. If you want to load several files at one time, “Add from folder” button is available. Besides, you can also drag and drop the files to the main interface directly.

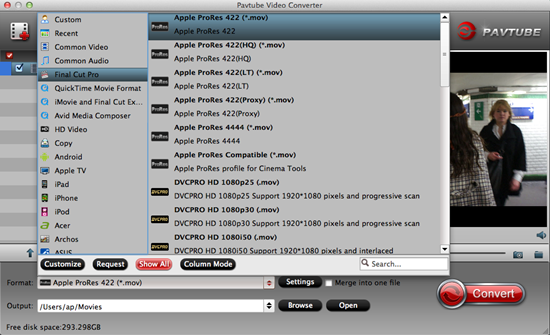
Step 2: When you launch the program and load your files in , then we can choose the suitable output formats. For example, if you want to convert XAVC MXF to FCP X/7/6 for editing, you can click the “Format” bar and choose “Final Cut Pro>>Apple ProRes 422 (*.mov)” as target output. There are many presets in the software, you can choose the output format according to your requirements.

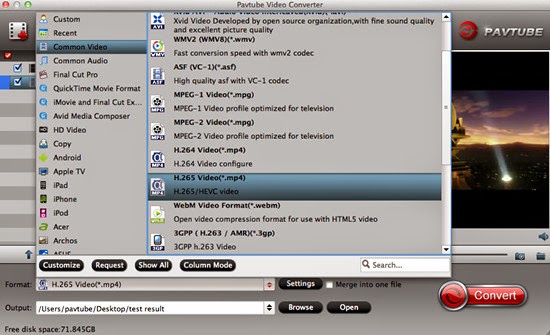
Tips: If you want to convert your recordings to H.265 codec, let’s go to the “Common Video” to get the “H.265 Video (*.mp4)” as the best. You can also choose “HD Video>>H.265 HD Video (*.mp4)” to get higher definition.

Step 3: Click “Settings” button to customize the output video and audio settings by yourself. But if you are not good at it, you’d better use the default parameters, they will ensure you a good balance between file size and image quality basically. You can change the resolution, bit rate, frame rate as you need.

Step 4: Most of you guys must have the desire of a further editing with your output videos, right? On the main interface, “Edit” is waiting for you. “Trim” to decide where to start and where to end, “Crop” to cut some unwanted clips, “Subtitles” to add some explanations to your audience.

Step 5: When everything is ready, you can take a preview by hitting “Play” button. If you are satisfied with the final result, you can click “Convert” button to finish the conversion work.
Conclusion: When the conversion is done, you can click “Open” to get your generated files. Now, you can use them for editing, playing, uploading, sharing and all you want.
Download Address:
Official download:
http://download.pavtube.com/video-converter-mac/videoconvertermac_setup.dmg
Amazon download:
http://www.amazon.com/Pavtube-Video-Converter-Mac-Download/dp/B00QIBK0TQ/ref=sr_1_3/175-5152965-3528837?ie=UTF8&qid=1430103806&sr=8-3&keywords=pavtube
Further Reading:
- Top 5 YouTube Video Converters for Mac: When enjoying videos downloaded from YouTube on mobile devices, or upload videos shot by your camera or smart phones to YouTube, you may encounter the troubles.
- Top-ranked Pavtube H.265 Video Converter Review: The big trend of 4K put a eager need for higher shooting quality, fast playback , powerful stream function. This H.265 just came as a best connection between the 4K generation and video making equipment.
- Top 3 Best XAVC/XAVC S Video Converter for Mac Review: XAVC is put forward to follow 4K trend. But this XAVC is pretty much new while the existing NLE may not handle it very well.