Showing posts with label Backup. Show all posts

Monday, July 21, 2014

Copy Blu-ray to Hard Drive for watching with one audio track or multiple audio tracks

This article will show you how to convert Blu-ray for storing on hard drive for watching on your computer with two ways, one is keeping multi-track, another is keeping one audio track.

If you are a BD movie lover and have large Blu-ray collections, you may want to copy Blu-ray to computer hard drive at first. Once you create digital backup of your BD disc, it will prevent your Blu-ray from scratching, cracking and other physical damages even lost. Meanwhile, you are set free to all kinds of other neat stuff with it, such as transcode Blu-ray to MP4 and other format so you can watch it on a handheld devices and digital media player. Then how to get it done? Is it possible to play Blu-ray movies in different languages or simply one native language?

Copy Blu-ray to Hard Driv


Then you are required to start Blu-ray to MP4 conversion with one audio track or multiple audio tracks. Here Pavtube ByteCopy is the best tool to accomplish your goal. It can not only convert convert Blu-ray to MP4 format with multi-track quickly and easily for freely selecting the subtitles you wanted and force subtitles you need for watching, but also can rip Blu-ray to MP4 in only one audio track without quality loss. With it, you can also rip Blu-ray to External Hard Drive with Forced Subtitles.

Here is the Mac version- Pavtube ByteCopy for Mac.

Part I: Convert Blu-ray to Multi-track mp4 for watching

Step 1: Download and install Pavtube Bytecopy

Step 2: Load the Blu-ray Movies you want to convert or Backup

This step is quick and easy, and the software will help you choose the main movie, if you want to convert other parts of movies you can manual select.
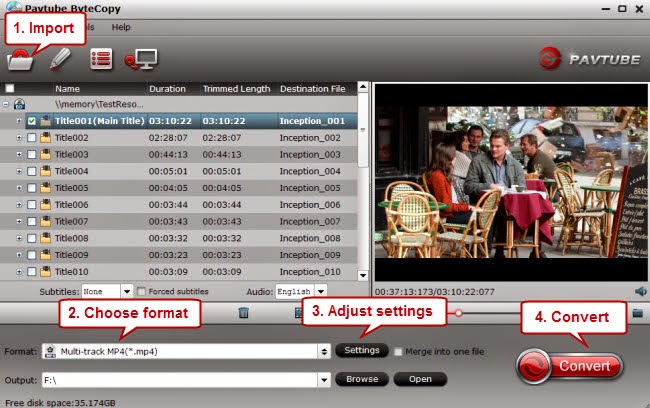
Rip Blu-ray to Multi-track MP4

Step 3: If you want to convert your Blu-ray movie with Multi-track, please click "format" bar and choose the "Multi-track MP4(*.mp4)" under "Multi-track Video" option.
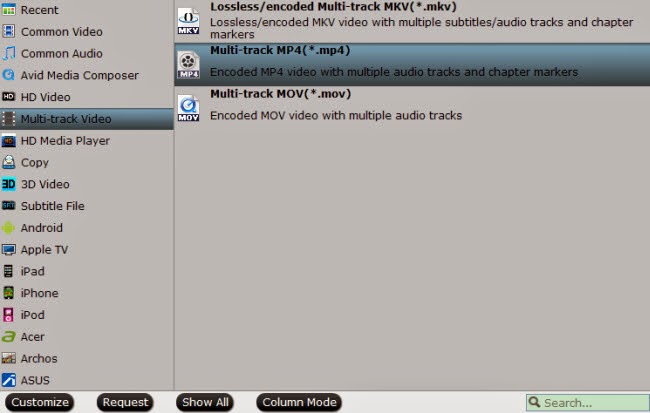
Multi-track MP4 format

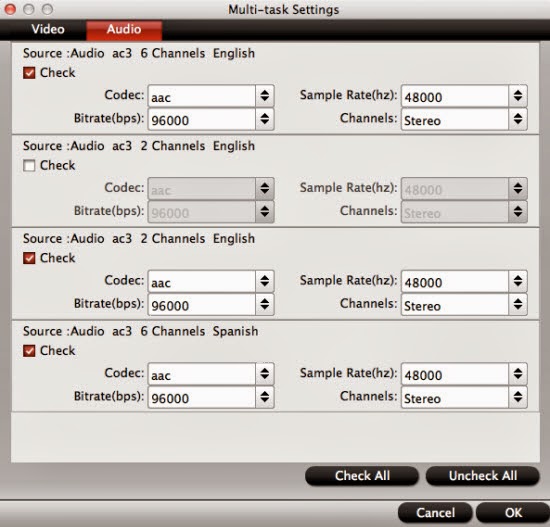
Tip: Click the "Settings" button to check all video & audio settings. By default it will check all the audio tracks (languages), so if you only need some of the languages, just check the unwanted ones.

Btw, video size, bitrate and frame rate can all be changed if you are not satisfied with default settings.

Don't forget to click OK to confirm all the changes.
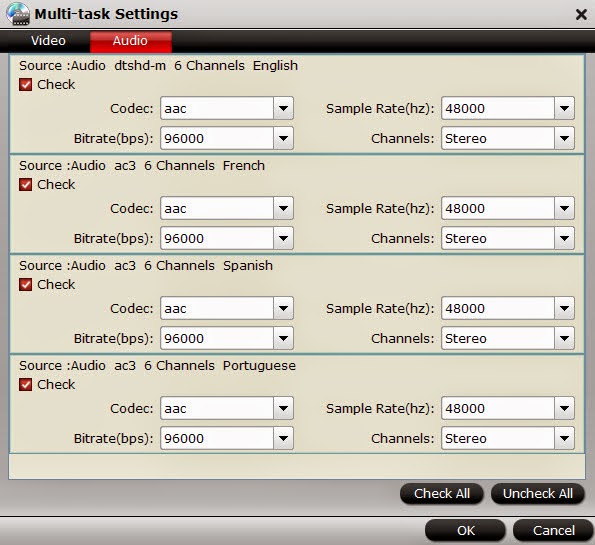
Multi-track settings

Step 4: Start to convert Blu-ray to multi-track mp4.

At the same time of converting, you can enjoy other things. Once conversion completed, you can enjoy the Blu-ray movies on your computer with VLC player with multiple languages.

Part II: Convert Blu-ray  to mp4 for watching with only one audio track

Step 1. Run the program, load your Blu-ray movies into it.

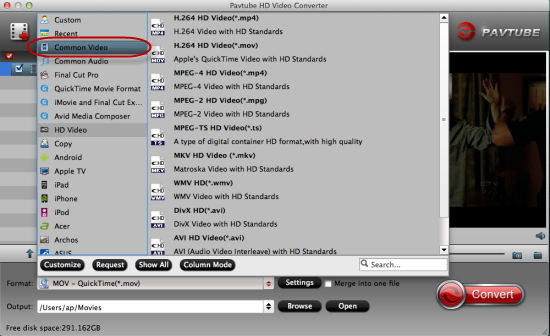
Step 2. Choose video formats for playing on computer. Click on “Format” box, you can easily find the “Common Video” category and you can find "H.264 Video(*.mp4)" for easily playing on your portable devices.

You can select the one accroding to your device model. If this choice can’t meet your need, you can also click on “Settings” to set parameters.

Step 3. After the above steps, start the process by converting Blu-ray to MP4.

Once the task is finished, locate the converted video files by clicking on “Open”. Then you can enjoy and watch your Blu-ray movies the way you like (with multiple audio tracks or one audio track). Pretty simple. Hope the article helps.

Learn how to backup Blu-ray with lossless mkv with ByteCopy. If you have only DVD movies, read the way to fast copy and rip Iron Man 3 DVD on Windows or Mac.
Wednesday, July 9, 2014

Best MKV Video Converter for Mac OS X 10.10 Yosemite

Here introduce you the best mkv video converter for Mac OS X 10.10 to solve issues like MKV converting issues on Mac OS X 10.10 Yosemite.

How incredible that Mac OS X 10.9 hasn't been with us for long, but its successor Mac OS X 10.10 is coming to us! Mac OS X Yosemite comes with new features like improved Today view in Notification Center, brighter spotlight, Safari with new streamlined toolbar and so on.

Mac OS X 10.10 Yosemite

If you have downloaded some MKV movies, you may consider converting these MKV to on Mac OS X 10.10 Yosemite for watching on iOS/Android/Windows-based tablet/phone and media players. In this case, a powerful MKV video converter for Mac OS X Yosemite is needed.

Here I recommend Pavtube HD Video Converter for Mac, which is compatible with all Mac OS, including Mac OS X Tiger/Leopard/Snow Leopard/Lion/Mountain Lion/Mavericks 10.8/ Mavericks (10.9), and it is all set for the coming Mac OS X 10.10 Yosemite.

It is the best choice to convert MKV videos on OS X 10.10 Yosemite with:

- Fastest speed: the kernel perfectly compatible with Yosemite makes the mkv converting speed even faster.

- Powerful video compatibility: It is capable of handling all SD, HD and 4K UHD videos including all kinds of MKV videos.

- First-class output quality: With High Quality Engine, it keeps the original video audio effect to the utmost during converting mkv on Mac OS X Yosemite at one go.

First, you need to download and install the app. Converting MKV video on Mac OS X (10.10) will be as easy as pie for such professional MKV Video Converter for Mac OS X 10.10 Yosemite. Follow the steps below.

Step 1. Run Pavtube HD Video Converter for Mac on your computer, click “Add Video” button or just drag and drop to import MKV files.


Step2. Edit (optional). You can edit the video if you want.(Include Trim, Effect, Crop, Add Watermark, Add Subtitle etc)

Step3. Select an output format or device. You may convert MKV to MP4 on Mac OS X 10.10, MKV to MPEG, WMV, AVI, iPhone 5S/5C, iPad Air/iPad Mini 2, Samsung Galaxy S5, HTC, Google Nexus, Sony PS4, etc.


Step4. Click "Convert" button to start your MKV converting on Mac OS X 10.10 Yosemite.

Knowledge: How to play MKV files on Mac freely?

In fact, you can try this free VLC Media Player software which contains a decoder to decode the .MKV files. It also supports a lot of other video formats.

Mac OS X 10.10 Yosemite Related Tutorial:

Tuesday, May 27, 2014

Get my BD copied in lossless MKV format for easily controlling multiple audio sound tracks when watching

This guide provides a simple way to complete lossless backup Blu-ray Disc to lossless mkv format keeping multiple audio tracks, subtitle streams and chapter markers on Mac(Mavericks included).

My problems are I can't seem to create a mkv of the full blu ray (BD) with all the sound tracks. Each time I do it I only get one audio sound track. One time Japanese. I would like to choose English French and Spanish. Sound tracks and subtitles. I also see a problem when down converting the BD from HD to SD. Again I can't seem to control the audio sound tracks that get copied. Is there a way to go from blu ray direct to SD MKV multi track?


Every time you play blu-ray in blu-ray drive, the disc will suffer little quality loss. So a digital backup will help to save the storage space of blu-ray collection, and make it easier to access and carry with. As most Blu-ray Discs include multiple audio and subtitle tracks so that people from different countries who speaking different languages can enjoy same movies in their native languages, so this is reason why people choose to "go from blu ray direct to lossless MKV format" as above.

If you are a Mac use, here recommend you Pavtube Bytecopy for Mac which can help you to backup BD/DVD to mkv without any quality loss. It helps to convert to lossless mkv files with all multiple audio and subtitle tracks, and chapter markers from original BD/DVD. So you can enjoy your movies at any time just like watching BD/DVD and freely choose your desired language.

Let me show you how to do it and you will find the workflow is so easy.

Firstly, you should have download and installed the software. (PS: If you wanna a Windows version, please go to Pavtube Bytecopy. Both are 30% off now.)

Let's go!

Lossless Backup BD disc to MKV with Multi-track/stream on Mac

Note: Put Blu-ray onto Blu-ray drive before ripping Blu-rays.

1. Run the Pavtube ByteCopy for Mac. Press “Load Disc” icon to import Blu-ray movie.


2. Go to Format to find "Multi-track Video catalogue. Select "Loss/encoded Multi-track MKV(*.mkv) , which will provide lossless backup Blu-ray to MKV with multiple audio and subtitle tracks.


Tip: One special function that makes ByteCopy stands out is you can easily select you needed tracks, subtitles.


3. Click "Convert to start conversion. Conversion can be completed within a short time, then click "Open to find generated mkv files.

With a very easy operation, you get the lossless mkv files from Blu-ray, which make you to enjoy movies with high quality wherever you want. However, what Bytecopy for Mac can do is more than it, let's go to below tips to find more.
Tip 1: You may be confused about the other two options under "Multi-track Video" catalogue: Muti-track MP4(*.mp4) and Multi-track MOV(*.mov). They are used to transcode BD/DVD to .mp4 and .mov output files. The point is that they support saving encoded multiple audio tracks. So you could enjoy it in your iPhone or iPod.

Tip 2: Directly Copy will provide you another way to lossless output. It will provide you a 100% backup in original format without extracts. If you do not want to output mkv files or your player cannot play mkv files, directly copy is the best choice for you. It will save 100% intact .M2TS main movie from original BD disc, and allow all. subtitle and audio tracks preservation. You can see more details about it in backup blu-ray disc to M2TS streams flawlessly.

Good news for you: To save your money, Pavtube Special Offer offers various product bundles, save up to $35.1, such as:

ByteCopy($42) + Video Converter Ultimate($65) = Only $79.9, Save $27.1
ByteCopy($42) + DVD Creater($35) = Only $44.9, Save $32.1
ByteCopy($42) + Vidpie($29) = Only $54.9, Save $16.1
ByteCopy($42) + MXF MultiMixer($45) = Only $69.9, Save $16.1

Related articles:

Rip Blu-ray to multi-track MP4/MOV for iPad Air, iPad Mini 2, iPhone 5S/5C
Convert DVD ISO/IFO to Multi-track MP4 for watch on iPad Air
Fastest Digitize your Disney DVD collections to Mac Hard Drive keeping original structure

Thursday, May 8, 2014

Move "The Lego Movie(2014)" Blu-ray onto Western Digital My Book Live for roku streaming with Mac OS X

This article introduces how to backup or copy "The Lego Movie(2014)" Blu-ray disc to Western Digital My Book Live on Mac, so that you can watch the movie on Roku without format problems.

Review: Everything About 'The Lego Movie"


It would have been so much easier, and so much safer, for directors Phil Lord and Christopher Miller to just make the kind of Lego Movie that you probably expected from the marketing. They could have crafted a simple hero’s journey, crammed with celebrity cameos and postmodern humor, and called it a day while watching the money roll in and the toy sales shoot through the roof.

And there are all of these elements in this particular Lego Movie, but there is also something more. The film goes in some wonderfully unexpected directions and takes real storytelling risks. I cannot say how everyone will respond to its narrative left turns and unexpected poignancy, but they elevate to the film far above a glorified toy commercial. The Lego Movie may in fact be brilliant. Expected release date for The Lego Movie DVD and Blu-ray discs is May-June, 2014.

How to bacup "The Lego Movie(2014)" Blu-ray onto Western Digital My Book Live" on Mac

With "The Lego Movie(2014)" to be released on Blu-ray, I have the question: how to digitize a blu-ray movie and put it on my western digital mybooklive device for streaming onto roku devices with Mac OS X?

To copy my Blu-ray on My Book Live with Mac, it may take a lot of energy. Although, MacX DVD Ripper Pro Wondershare Video Converter Ultimate and iDVD can do this, none of them can be easier to use that Pavtube.

The best BDMagic for Mac from Pavtube can help you back up Blu-ray and DVD movies to Mac hard drive, copy them to Home Server, NAS for storage and watching them on HDTV and HD Media player including PS3, PSP, Xbox, Dune HD Player, WD TV Live within few clicks. Really simple interface and powerful function. On the roku, I use the roksbox channel, configured to steam movies from the WD/apache server. Works really good on my home network.

Detailed steps to copy "The Lego Movie(2014)" Blu-ray to My Book Live on Mac

Before copying Blu-ray discs check what you need:

1. An external Blu-ray drive.

2. Top Mac Blu-ray Ripper software - Pavtube Blu-ray Ripper for Mac

3. Internet connection.

4. "The Lego Movie(2014)" Blu-ray disc.

You can also free download Pavtube Blu-ray Ripper for Mac and have a try.

Step 1. Install and run the Top Blu-ray Ripper for Mac and insert Blu-ray disc into the Blu-ray drive, the Ripper will automatically load the disc information.

Make sure you have enough space on your drive (depending on the disc, this could be up to 50 GB).


Step 2. To copy the M2TS/ VOB streams only without menus and ads, pls choose the "Directly copy" option in "Copy". (The main movie is selected by default.)


Or you can click on “Copy the entire disc” button to back up Blu-ray movie to Mac. A 90 min. Blu-ray takes about 40 min to copy to Mac hard drive. The ripped Blu-ray directory contains two folders, “BDMV” and “CERTIFICATE”. Then the ruku is able to play the M2TS files from Blu-ray directory.

Step 3. Specify an output folder to save Blu-ray movie.

Click “Browse” button and specify an output location. Make sure there is enough space for a whole BD movie (usually 25GB-50GB) when backing up Blu-ray disc to Mac HDD.

Step 4. Back up Blu-ray/DVD for My Book Live on Mac.

After the copying process completes, you can get the final output files by clicking “Open” button with ease, then copy resulting file to My Book Live and then stream onto your Roku.

Additional Tips

The Top Blu-ray Ripper for Mac can help you remove Blu-ray protection and rip "The Lego Movie(2014)" Blu-ray to common formats: MP4, AVI, MOV, MKV, WMV, SWF, FLV, F4V, etc. Most popular portable devices are also supported, so that you can enjoy Blu-ray movies on your iPhone 5S, iPhone 5C, iPad 4, iPad 3, Surface RT/Pro, Surface 2, Surface Pro 2, Sony Xperia Z1, Xperia Z2, Motorola Droid Mini, Moto X, Samsung Galaxy Tab Pro, Galaxy Note 3, Google new Nexus 7, Kindle Fire HDX...

Plus, Pavtube application takes advantage of the NVIDIA CUDA technology and AMD APP technology, and the conversion speed can be increased up to 6 times faster than ever before. Moreover, Pavtube programs support adding *.srt and *.ass subtitles into video and merge into one file for output.

Related Articles:


How to Watch Blu-ray on 50”Plasma Plasma TV via Plex Server?

Tuesday, April 8, 2014

Playing your favorite Blu-ray and DVD movies on TV via Personal Cloud Server

This article shows how to remove your BD/DVD protection and rip them into MP4/MKV format, so that you can playback the movies on TV via my personal cloud server.

My job position is in IT and my hobbies are mostly outdoor stuff. Now I have some personal DVD and BD Collections and I'm looking for a way getting them playable on TV via my personal cloud server. Don't need to keep the original file size as we have limited storage, but want to get pretty good video quality.


We did a lot of researches online and searched for the best video conversion software, finally we got this SW named Pavtube Video Converter Ultimate (Windows based); I like the the multiple choices in formats and ease of use interface. It offers me the best features I need in BD/DVD conversion. The most important thing is it accepts my every disc, which Handbrake and Jack the Ripper couldn't. The Mac version is Pavtube iMedia Converter for Mac.

For people who want to backup all the audio tracks or subtitles, you are suggested to try Pavtube ByteCopy or ByteCopy for MacDownload a trial version and do as follows.

How to rip BD/DVD movies to view on TV via personal cloud server
Step 1. Load disc

Click "Load files(s)" to import DVDs and Blu-rays. Note you need to have an external Blu-ray drive if you want to rip Blu-rays.

Keep Internet connected during importing.


Step 2. Choose format.

Here, I recommend MP4/MKV format as it's most acceptable by most TV. Click "Format" and choose H.264 Video(*.mp4) or  MKV(Matroska) Video (*.mkv) from "Common Video" option as below:


Step 3. Adjust output settings (Optional)

Click "Settings" to change video size, bitrate, frame rate and audio specs. I chose "original" size to playback on TV.

Step 4. Start conversion

Click "Convert" in the main interface to start the conversion (batch conversion supported). After conversion, click "Open" which is below the "Settings" to find the converted video.

Use a USB drive to transfer the ripped MP4/MKV media file to TV via personal cloud server, now just enjoy your Blu-ray/DVD movies anytime and anywhere!

Related articles:

Friday, March 28, 2014

Copy the complete DVD disc for watching on your PC/TV/iPad

Do you want to backup/copy your favourite DVD movies for watching on your PC/TV/iPad? Here you will find an easy way to do it.

I'm a DVD lover, and I'm looking for an easy tool to backup my entire DVD film for watching on my player or portable device. So how to copy the complete dvd in its original format? Then I can use it primarily for watching on my windows computer, TV, and iPad. Plus, I have two 16GB iPhones and two 16GB iPads. One each for my wife and one each for me, so it is necessary to do so, I think.

At first, I have used DVD decrypter and DVD shrink. The programs were free on the net about 15 years ago. They work well but do not decrypt and they are no longer in business. But then My son recommended Pavtube to me. Yeah, Pavtube DVDAid is an efficient and top DVD Copying software. I find I like the software the way it is, like the fact that it copies everything with ease. It can easily and fastly remove DVD protection, and lossless copy my precious DVD movies to hard drive. The Mac version is Pavtube DVDAid for Mac. Now I will show how to perform it.

Before copying DVD discs check what you need:

1. DVD disc.
2. Internet connection.
3. Top DVD Ripper software- Pavtube DVDAid for Win/Mac

You can also free download Pavtube DVDAid and have a try. It is easy to use.

Step 1. Install and run the Top DVD Ripper. Insert DVD disc, the Ripper will automatically load the disc information and click “Load Disc” to import your DVD movie.


2. Select the main title and set subtitles/audio language you'd like to preserve.

3. Select a format for conversion. To backup DVD to PC/TV/iPad, press on "Format" and choose  "MKV HD Video (*.mkv)" or "H.264 HD Video(*.mp4)" from "HD Video" option.


PS: If you just leave out the extract and just output the main movie, “Directly Copy” is your first choice which save storage and conversion time.


4. Start ripping DVD movie to MKV/MP4 format.

5. After conversion completes, press "Open" to locate resulted MKV/MP4 files. Copy these videos to PC/TV/iPad for watching.

Additional Tips

Pavtube application takes advantage of the NVIDIA CUDA technology and AMD APP technology, and the conversion speed can be increased up to 6 times faster than ever before. Moreover, Pavtube programs support adding *.srt and *.ass subtitles into video and merge into one file for output.

Related Articles:

Rip/Copy Blu-ray collections to external hard disc for a safe storage
Quick backup intact Blu-ray to M2TS file without any quality loss or conversion
Get my BD copied in lossless MKV format for easily controlling multiple audio sound tracks

Friday, March 21, 2014

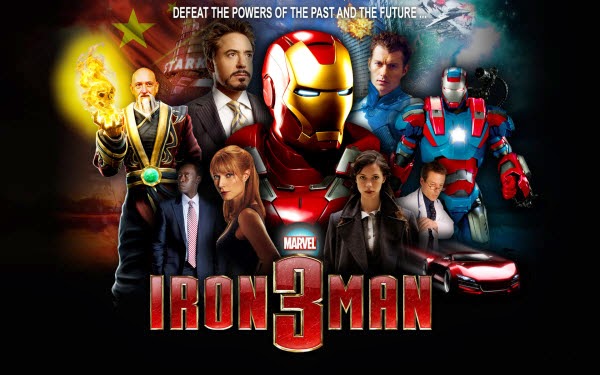
How to fast Backup, Copy and Rip Iron Man 3 DVD on Windows 8.1 or Mac 10.9 Mavericks?

The guide will help you copy your favourite Iron Man 3 DVD movies on Windows 8.1 or Mac 10.9 Mavericks easily by ripping and converting DVD Iron Man 3 to compatible videos for watching.

Everywhere you look Iron Man 3 is considered either "one of the best movies of 2013" or "the best Iron Man yet".  Here is some reviews for this movie:

“Iron man is almost the toughest role in The Avengers, you know, the hottest movie yesteryear, and Robert Downey Jr. is really a badass star and I love him.” – Ricky Barnes

“Oh man... this is really good in an unfamiliar way. In a race that began in 2008 to be crowned Hollywood's Coolest and Most Awesome Superhero Movie.” – Lee Aequus

"I really enjoyed this movie. hey what can I say i'm an iron man fan. and a superhero fan as well."- David A. Smith


Now that its DVD was released on Sep 24,2013, you my have ordered Iron Man 3 already. For DVD lovers, it's a good idea to make a copy and rip the Iron Man 3 DVD for permanent collection and convenient playback anytime and anywhere. Then how to complete this task? Let's discuss in this article.

At first, you need a DVD Backup Tool. With so many DVD Copiers available on the market, it can be tough to know exactly which DVD copying program to choose. Here I will recommend you 2014 Top DVD Copy- a powerful DVD Ripper and Copier.

Overall, Pavtube DVDAid is designed as a professional DVD converting program which works with 1:1 backup solution and convert DVD to Apple/Android/Windows Devices for watching, etc. It's ease of use, not fuss and simple to follow. Don't you like to have a try?

They provide free trial (no time limitation) before purchase; and you can reach the Mac version here.

How to fast Backup, Copy and Rip Iron Man 3 DVD on Windows 8.1 or Mac 10.9 Mavericks?


Step 1. Run Best DVD Ripper and import disc.

Click this icon to load Iron Man 3 DVD disc from ROM, IFO/ISO or folder. I also noticed if you have a ISO file to import, it will recognize the ISO file automatically with no need to run virtual driver and mount ISO files firstly. Good design.

Step 2. Choose format.

Click "Format" drop-down list and choose proper format for different using.


For instance, if you simply want to back up DVD to hard drive on Windows 8.1 or Mac 10.9 Mavericks. Here are two solutions:

1. Click the "computer" icon on the top to output 1:1 DVD file exactly the same as original.
2. Select "Copy>Directly Copy" in format list to output an intact m2ts file of the main title.


For people who want to watch DVD on Apple/Android/Windows devices, you can choose "Common Video > H.264 Video (*.mp4)”, or select corresponding video from “iPad” or “Android” or other option, to get a suitable video compatible with your device.


Step 3. Change video specs. (Optional)

If you are not satisfied with default specs, then click "Settings" to enter Profiles Settings windows. You can customize video frame rate, bitrate, size and other settings freely.

(It does not work for directly copy)

Step 4. Start conversion.

Click the big red "Convert" to start backing up or converting your Iron Man 3 DVDs. Usually backup will be quicker because it does not need to do trancoding.

After the conversion, click "Open output folder" to quick locate converted files. Connect your hard drive to computer and transfer them into it.

See also:

Backup Harry Potter: Complete 8-Film DVD to Barnes & Noble Nook HD/HD+
Top 10 Best Animation Films for Kids/Children in 2014 (Reviews + Backup)
Converting MKV, AVI, VOB, Tivo, M2TS, WMV, MPG, WebM, MVI, FLV to Android Tablet & Smartphone on Windows 8.1/8

Thursday, March 20, 2014

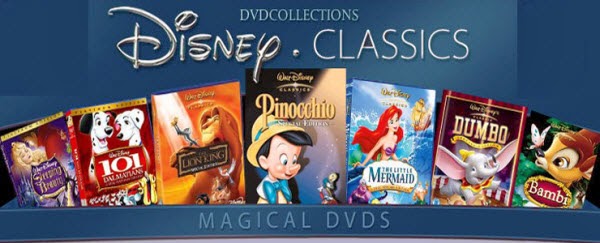
Fastest Digitize your Disney DVD collections to Mac Hard Drive keeping original structure

If you want to search for an useful conversion software to digitize your Disney DVD movie collection on Mac Hard Drive keeping original structure, this article will give my own experience and provide some reference for you.

You must have heard about the name of Walt Disney. Disney movies have created a charm of fantasy and this fantasy has enveloped everyone irrespective of there are or sex. Who can forget the cartoon character of Mickey Mouse and Donald Duck? Never!


Disney DVD are waiting for your coming. As we know, all children love cartoon and Disney DVDs Collection must be the first choice for them. When you were a kid, you must also love them, for their funny stories or cute and beautiful character. They will feel much happier in the cartoon world. Let your kids have a happy childhood and action now to fastest Digitize your Disney DVD collections to Mac Hard Drive keeping original structure for your kids watching freely!

I am downsizing drastically and would like to have my collection at the touch of a button, either on laptop hard drive or onto external one. I have been recommended ISO DVD, but it seems more like a burner. DVD Shrink? A bit lost actually…

Actually what you need is only a professional DVD ripper for Mac that can help you convert Disney DVD movies to Mac Hard Drive on Mac OS X supported video formats fast with good video quality and keeping original structure.

Pavtube Bytecopy for Mac is an ideal tool to help you quickly digitize your Disney DVD collections to Mac Hard Drive. Besides, you can crop the black bars, add special video effects, split or merge videos, etc. as you like with the built-in editor. The equivalent Windows version is ByteCopy for Windows, which can help you transfer DVD to compatible video formats like MOV, M4V, MP4 under Windows 8/7/XP/Vista etc. Now download the program and follow the steps below to get the work done.

How to Copy Disney DVD collections to Mac Hard Drive keeping original structure

After downloading the ByteCopy for Mac, install and launch it, then follow the steps below.

1. Load DVD movies.

First, insert your Disney DVDs into DVD Drive, and then click "Add dics" icon to load the DVD files to the program. You can also add DVD ISO, DVD folder files that you can want to rip to iTunes.


2. Choose output format and output folder.

In order to preserve the chapter structure and subtitles, you’d better choose the “Multi-track Video”. Under this profile, you have three choices which all can preserve chapter structure.

If you choose "Lossless/encoded Multi-track MKV(*mkv)" format, you can output the Disney DVD with lossless quality and allow multiple audio tracks, multiple subtitles.


3. Stark Digitize your Disney DVD collections

When all the settings are finished, you can just click the "Convert" button to start to digitize your Disney DVD collections.

Tip: One special function that makes ByteCopy for Mac stands out is you can easily select you needed tracks, subtitles. Before the conversion, you can click "Setting" button to go to this function.


Related Posts:

Convert DVD to MP4 with multi-tracks on Mac
Play multi tracks (3D) Blu-ray on Galaxy Tab 3 10.1
Transcode Blu-ray to FCP with multi-track

Sunday, February 23, 2014

Confused about copying Shirley Temple Movies on Mac? Solved!

Have many Shirley Temple's Movies collection in Blu-ray/DVD? This article mainly tells you how to backup/copy these discs on hard drive with Mac OS X for wathing. Action now to keep these precious memories fovever!

When it comes to the child stars, Shirley Temple will first come to people's mind; When it comes to movies, Shirley Temple's films may be one of the most memorable and fantastic ones.

I wanted to store my Temple's Movie collections on my mac, then I can watch the videos from any mobile device or on my tv. How to make it?

To can easily backup Blu-ray/DVD content for playing with no restrictions and without needing the DVDs every time. You need to use the best software to copy Blu-ray/DVD digitally without sacrificing the picture quality.

Searching on the internet for quite a while until I met this Best Blu-ray Ripper for Mac . I like that it's simple to use as I'm not a computer technician. The ripped video works well on my galaxy s4, iPad 2, and tv. And it works on Mountain Lion and Mavericks 10.9.

Overall, this Blu-ray Ripper for Mac is a professional Blu-ray/DVD converting program which works with 1:1 backup solution and convert Blu-ray/DVD to MKV/MP4/MOV/M4V/MPG/FLV/AVI/WMV, etc on Mac. Well I haven't got the chance to try every profile, but it's really the top Mac Blu-ray/DVD backup tool I've met ever; I mean it's ease of use, not fuss and simple to follow. This best Blu-ray Ripper can rolls off Blu-ray/DVD disc protection, supports loseless 1:1 Blu-ray backup and keeps all the disc titles and chapter structure perfectly.

Don't you like to have a try?

They provide free trial (no time limitation) before purchase; and you can reach the Window version.

How to backup Shirley Temple Movies on Mac with best video quality

Step 1. Import Blu-ray/DVD discs to Pavtube Blu-ray Ripper for Mac.

Run the best Mac BD/DVD backup software, click "Load files" icon to load the DVD discs. After successful 100% load, click the select main title you are able to preview the whole movie in the preview window, which works just like a media player.

I also noticed if you have a ISO file to import, it will recognize the ISO file automatically with no need to run virtual driver and mount ISO files firstly. Good design.

Step 2. Different ways for copying Blu-ray/DVDs to hard drive.

Here I will show you two different ways of lossless backup DVD disc:

Method 1. Full disc copy: 1:1 backup the entire disc with original structure and chapter marks

If you want to copy a 3D/2D DVD discs and remain 3D/2D in output files for further playback, or keep the original structure of disc for further creating ISO files or DVD discs, that is what exactly "Full disc copy" can do for you.

Click "Copy the entire disc" icon on the interface and you are brought to conversion progress immediately.


After conversion, go to "Open output folder" you will get a generated folder combined with two folders: "BDMV" and "CERTIFICATE". All the M2TS files are located in BDMV folder.

Method 2. Directly Copy: 100% backup the intact main movie of Blu-ray/DVD discs

If you just want to copy the main movie for playback without the menu and promotional clips etc, "Directly Copy", which will takes less time for conversion and occupies less space than Full disc copy, is right for you.

Click "Format" menu and go to "Copy" option, choose "Directly Copy" for output format.


Then click "Convert" button to start coping. Once finished, you will get a converted file in M2TS format for Blu-ray/DVD disc.

Every time when the conversion is finished, "Open" button on the main interface will help you to locate the generated files. If you try to copy one Shirley Temple Movies in different ways, you do not need to worry about that the previous one will be covered because of the same file name. In this case, the software will automatically add number 1, 2, 3… in the end of file name because of built-in setting of renamed the same file name.

You can choose any way of them to copy your Blu-ray/DVD disc without quality loss. Now you can transfer/sync Shirley Temple Movies to your portable device and TV, then share them with your family or friends.

Related articles:

Copy/Move Shirley Temple's DVD ISO/IFO to Galaxy Note 10.1 2014
Shirley Temple Death: Hollywood Mourns Child Star 
  • Copy/Backup DVD to Memory Stick or Memory Card
  • Monday, February 17, 2014

    Copy Jack the Giant Slayer 3D Blu-ray Disc to Hard Drive for enjoying

    Want to keep the 3D Blu-ray Disc "Jack the Giant Slayer" on your Hard Drive for storage? Check out this article to learn how to backup/copy Blu-ray/DVD discs onto hard drive with the best 3D Blu-ray Backup Tool.
     
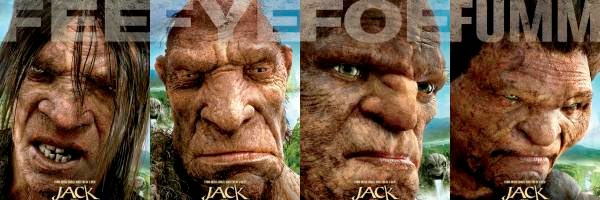
    In order to be a giant slayer, one must first have giants. Luckily for Jack, played by Nicholas Hoult in Jack the Giant Slayer, he’ll get a chance to earn his moniker by battling Fee, Fye, Foe and/or Fumm. We’ve got a great look at the four named giants from the famous “Jack and the Beanstalk” quatrain in addition to some giants with unfamiliar names (Fallon?) in these newly released posters from the Bryan Singer film.


    Jack the Giant Slayer is now in 3D Blu-ray version, it will bring us an imaginative fantasy realm straight into our room without going to the cinema. Need to back up your favourite Blu-rays like "Jack the Giant Slayer" on your hard drive, then you can easily get the 3D movies playback on any device?

    At first, to backup Jack the Giant Slayer 3D Blu-ray Disc to Hard Drive, you need to a third-party software to backup Blu-ray discs without sacrificing the picture quality seems to the best choice for you. And for those who rent lots of movie of discs, it is also a great way to copy the discs for future watching.

    Here Pavtube BDMagic is a professional program in making digital copy of Blu-ray. It can rip the latest 3D/2D Blu-ray and DVD and convert to various video formats for some popular smartphones and tablets as well as editing software. Simple interface and CUDA acceleration will bring you an easy but effective conversion. The following guide will show you detailed steps. (Another two programs can also do the job like ByteCopy and Video Converter Ultimate.)

    Now you can have the trial version to try all the functions firstly, and then download the retail version to install it. (Mac users go to get BDMagic for Mac).

    How to convert/copy Jack the Giant Slayer 3D Blu-ray Disc to Hard Drive for enjoying


    1. Import Blu-ray source.

    Click "Load file" button to import the inserted Jack the Giant Slayer 3D Blu-ray disc. After few second, it will be imported successfully and you can preview the whole movie in the preview window.

    Then, you need to select the subtitle and audio track for output. As blu-ray movie contains multiple audio and subtitle tracks, you could choose your favorite one for output.


    Note: Force subtitle can be checked for output so as to help you to read the unknown language and fully enjoy the blu-ray.

    2. Choose output format.

    Now go to "Format" menu to select output format there. A variety of options are listed such as many portable devices, video editing software, various HD video formats, etc. Choose the one you desired.


    Note: You can find the "Directly Copy" option there. It will support to backup 100% intact the blu-ray main movie with all multiple tracks preserved. And you will get one M2TS file for output. If you want to backup blu-ray, it is a good choice for you.


    By the way, if you want, you can adjust output video and audio parameters according to your own needs. You can change bitrate, frame rate, channels, etc. Click "Settings" button to set output profiles.

    3. Convert  Jack the Giant Slayer 3D Blu-ray disc.

    Now it's time to start conversion. Click big Convert button on the interface and then you will get a conversion dialogue box to show the exact progress, like time left, estimated size, state and so on.

    Note: If you are bothered about waiting for conversion to finish, you can choose to check "shut down computer after conversion". Then just let it alone, you are free to go out to do anything you like.

    Now you have copied Jack the Giant Slayer 3D Blu-ray onto your hard drive. With the best 3D Blu-ray Backup and copy tool, you can take your favorite blu-ray anywhere and enjoy them whenever you want to. Just try it now!

    Meanwhile, there are many Money Saving Software Bundles, such as Blu-ray Ripper + DVD Creator for rip blu-ray and burn to DVD. You will get 49% off for bundled software. Go to find the one you need.

    Read More: