Showing posts with label Media Player. Show all posts

Friday, November 6, 2015

Watch 1080p M2TS movies on HDTV via USB

Summary: Why can't you get 1080p M2TS video to HDTV for USB playback? Are you seeking for a solution? This article will explains. 

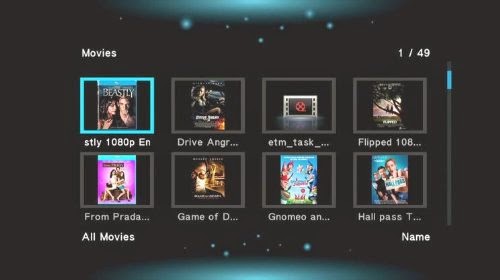
HDTV is one of the most popular way to enjoy the video, movie and other clips you get from internet, nowadays, almost all HDTV supports to play them via USB port, which is great, USB port solution free you free the cable clusters and the expense for storing videos. 

Though many TV like Bravia enables us to enjoy video files from a USB device, it has video format limitation. It only supports videos in MPEG-1, MPEG-2, MP4, WMV, ASF, DivX HD through USB. If you have a collection of movies in format like M2TS, naturally, the solution is to convert these videos into the right format HDTV supports for USB playback first. 

To cater to all the video lover's need, the following will introduce a step by step guide on how to transcode 1080p M2TS to HDTV supported video format effortlessly. 

What you need: 

1. USB mobile hard disk or flash disk. The disk file systems should be FAT12, FAT16, FAT32, or exFAT for Sony TV acceptable. 

2. Video Converter software. To convert current MKV/AVI/M2TS videos to be supported by Sony Bravia HDTV, Pavtube Video Converter/Mac version is needed to convert any HD or SD video format to Sony Bravia HDTV friendly format. It provides optimized preset for playing HD video on Sony Bravia HDTV without scarifying image quality. 3D effect on converted video is also supported by this program. 

Guides on converting 1080p M2TS Videos to MP4 for playing on HDTV via USB 

Step 1. Free download Pavtube Video Converter, install and launch the program. 


Other Download:
- Pavtube old official address: http://www.pavtube.com/video_converter/
- Amazon Download: http://download.cnet.com/Pavtube-Video-Converter/3000-2194_4-75734821.html
- Cnet Download: http://download.cnet.com/Pavtube-Video-Converter/3000-2194_4-75734821.html


Other Download:
- Pavtube old official address: http://www.pavtube.com/video-converter-mac/
- Amazon Store Download: http://www.amazon.com/Pavtube-Video-Converter-Mac-Download/dp/B00QIBK0TQ
- Cnet Download: http://download.cnet.com/Pavtube-Video-Converter/3000-2194_4-76179460.html
Once you run it, click "Add Video" button to load the videos you'd like to convert. When all the videos are loaded to the program, you can preview the videos. 


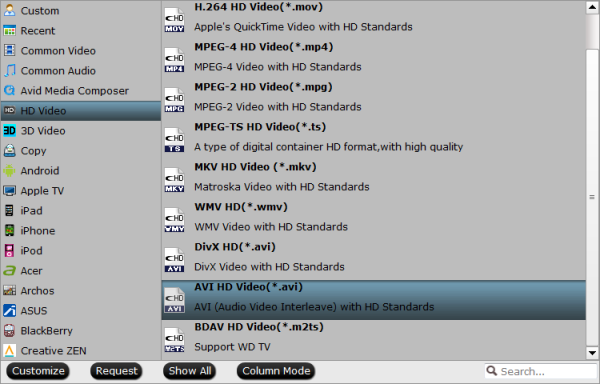
Step 2. Select best supported format for HDTV. 

Click on "Format", and select output format from the drop-down list. Simply follow "Common Video -> H.264 Video(*.mp4)" which is accepted for almost all HDTV. 


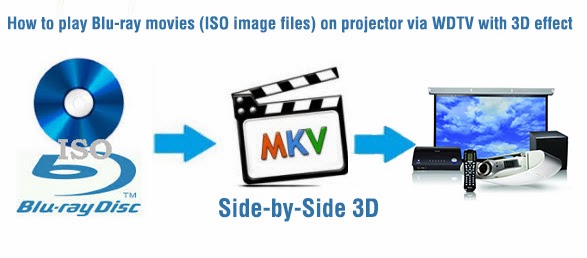
Tip: If you want to get 3D movies for your 3D TV, choose "3D -> MP4 Side-by-Side 3D Video (*.mp4)". 
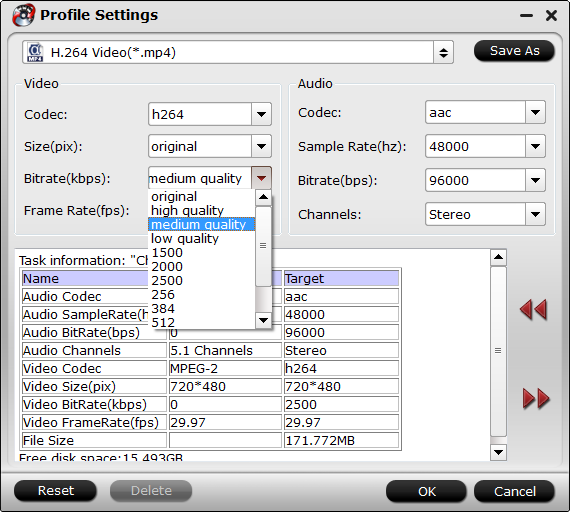
Step 3. Settings. 

You can customize the A/V parameters based on your personal requirements. Adjust the resolution, bitrate, frame rate or codec to meet your requirement by clicking "Settings". 


Step 4: Start converting 1080p M2TS video to Sony Bravia HDTV. 

After the above steps are done, you can click "Convert" button to convert your M2TS Video to HDTV MP4 format.

Tips: How to tranfer converted videos to HDTV? 
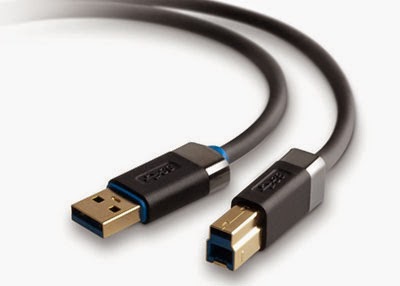
1. Through an USB 

You can connect your movable equipment (iPad, iPhone, Galaxy S2/S3, Sony Xperia S/P/U, HTC One X etc.) and TV via USB. Let TV read these video files. 


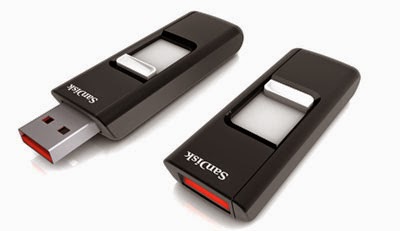
2. Via USB Flash Disk. 

You need to transfer the movies to USB Flash Disk first. Then, insert the USB Flash Disk into USB interface. 


If you are disc lovers, you can rip Blu-rayDVD and ISO files to play on your TV. 

Read More:

Saturday, October 11, 2014

How to Convert Video on Mac Yosemite and Mavericks Easy as Can Be

Here is a Yosemite and Mavericks tutorial which offers you a best video converter for converting all kinds of video to any formats and gadgets on Mac Yosemite and Mavericks in a Breeze.

As promised, Mac OS has a new look on June 2, 2014 and this fall is the time for Mac users to upgrade to the latest Mac OS Yosemite, which is unveiled at Apple's 2014 WWDC.  However, compatibility problems with video playback on Mac OS X 10.10 will be confused like the previous Mavericks,for example:
  • 1. Your videos are still out of reach of mobile devices like iPhone, iPad, iPod, Android tablets,Xbox 360, PSP, etc, and even cannot be played by PC directly if there’s no proper player or codec installed;
  • 2. Your video file is somewhat "heavy" for storing/saving, transferring and sharing;
  • 3. Some old HD videos are not compatible with our new Mac OS anymore, such as Mavericks and Yosemite.

Of course a suggested video converter for Mac OS X 10.10 and Mavericks to solve issues with converting on your new system is needed.To be honest, I tried several softwares online and I can tell you that NO ONE comes even close to the simpleness and great quality that Pavtube HD Video Converter for Mac delivers. (Read Top 5 Best HD Video Converter for Mac Review) It is such a extremely powerful app which are sure to meet just about every one of your video conversion needs. When it comes to Apple's new operating system Mac OS X 10.10 Yosemite and Mavericks, this converter software makes quick response to it and ensures full compatibility with the latest platform. Below is how to convert hd video on Mac Yosemite and Mavericks with simple clicks.

How to convert HD Videos on Mac Yosemite and Mavericks

Step 1. Run the Pavtube Video Converter for Yosemite/Mavericks, drag and drop source video to the program.

Video Converter for Yosemite/Mavericks

Step 2. Click on “Format” bar, and Choose Mac Yosemite and Mavericks compatible format for playing.

From "Format" dropdown list, you can go to "Common Video" option to find what you like. I think H.264 Video(*.mp4) format is better for Mac Yosemite and Mavericks.

Play video on Mac Yosemite and Mavericks

Tips:

1. For some advances users, you can go to adjust video and audio parameters like bitrate, resolution, channels, etc. Click "Settings" button you can go to check and change them as you like.

2. The "Edit" button on the main interface of this program is also available for you to trim your recordings, crop them to suit your device's screen, add watermark and even plug in SRT subtitle to MP4 video to make your video understandable.

MP4 Video Settings

Step 3. Press on “Convert” to start encoding HD videos (like MKV, VOB, AVI, MPG, Tivo, WMV, Flash, etc.) to Yosemite/Mavericks compatible video.

Step 4. When conversion completes, press on “Open” to locate converted videos and just enjoy your videos on Mac Yosemite and Mavericks and transfer to your mobile devices for watching wherever you are. 

See also:

Thursday, September 4, 2014

VLC AVCHD Playback- Play and Convert AVCHD Files with VLC Media Player

Wonder how to smoothly play AVCHD media files on your VLC Media Player? Read on to find the solutions here.

VLC Media Player is a lightweight media utility that won't use a lot of your computer's available system resources while playing video files. AVCHD Video (Advanced Video Coding High Definition) is an effective file format for camcorders and digital cameras with HD recording capability. AVCHD Video's foremost advantages are contained in much smaller files on your hard drive and achieving Full 1920x1080 Resolution.


How to play AVCHD Videos with VLC?

Tip 1: If you meet a VLC Media Player No Sound Problem, here is a solution.

Step 1: Download VLC from Videolan.org. Install and launch the software when installation is complete.

Step 2: Connect your AVCHD camera or camcorder with your computer using a camera cable. Turn on your camera and set it to playback mode. And when your camera is detected by windows explorer, go to the "My Computer" section and open the camera by double clicking the device icon.

Locate the AVCHD file that you want to play and drag and drop it into the computer or any other specific folder. Alternatively, you can click on the 'media' button on the top left corner of VLC interface and then press 'open file' button.

vlc add media

Step 3: Then you can go direct to the AVCHD file location, select and click 'open'. Your AVCHD Files will automatically start to play with VLC Media Player.

vlc locate avchd

Troublesome issue:

However, as for one of the most popular AVCHD playback tools, VLC still has some shortcomings. Firstly, if your VLC version is not up to date, there's a chance that you will only see a grey background, and will hear the sound for a while, but it can crash after that. Moreover, if you don't have sufficient fire power on your Windows PC, there's a very big chance that you will only see flashes of images and will only hear sound. You may also see broken video images (lines going through it). And besides that, the playing process always encounter unexpected troubles. Even try it on the Centrino.

Don't worry! Here are some suggestions that will guide you out of this trouble.

Solution 1: You can use VLC to convert AVCHD files 

Tip 2: By using VLC, you can convert video files, download Youtube videos, etc. Many powerful functions!

Step 1:
Click the "Media" tab and select the option "Save/Convert."

vlc convert avchd

Proceed to the top left corner of VLC and click the "File" tab.

file tab

Step 2: Click "Add" button of VLC to access the search screen pop up section that shows the contents of the hard drive.

vlc add

Select your desired AVCHD and click on the "Open" button to load your desired AVCHD file. Then click "Save/Convert" button to access the Convert window.

vlc convert

Step 3: Press the drop-down box named "Profile" and select a format you need for fit VLC. There are several options that include MPEG-2, WMV, MPEG-4, ASF and many others each designed with their own encoding types.

profile settings

Step 4: You can go into the advanced setting and change some settings. You may also create your own profile to hold your output video.

Step 5: Click the "Browse" button to choose a save computer folder for your converted file. Rename your converted file. Make sure to put the file extension for the format that you previously chose. Click the "Save" button to return to the Convert window sections.

save file

Step 6: Click the "Start" button to start the conversation process.

start conversion

Solution 2: You can use Pavtube Video Converter Ultimate to convert AVCHD as an alternative way.

The following are the pros of using VLC Converter:
  • Supports outputting a wide range of video and audio formats
  • Good converter with hotkey support
  • Easy to use interface and features
  • Very lightweight and flexible
  • Convert various formats as well as Blu-ray, DVD discs
Step 1: Add AVCHD files

Install and launch this best AVCHD to VLC Converter; click the "Add Video" button to import the AVCHD files.

Convert AVCHD Files with VLC Media Player

Step 2: Choose VLC most compatible format

Click Format bar to choose output format and you can choose MP4, AVI, MKV or other common formats for playing with VLC.

best format for playing with VLC

P.S. You can adjust the parameters by clicking "settings" button, choose the resolution, bitrate, frame rate as you want.

Step 3: Convert AVCHD to VLC

Click Convert button to start encoding AVCHD files for playing in VLC player.

After the conversion, tap the Open icon in the main interface and you can locate the converted files there. Just add the files to your VLC, and you can play the converted AVCHD on VLC easily without any issues.

Tip 3: If you are mac users, try Pavtube iMedia Converter for Mac, which can also stream DVD to VOB for Playback on VLC.

Read more: 

Friday, August 1, 2014

Convert DVD movies to play on TV with a 16:9 widescreen display and burn into new DVD disc

If you have large collection of DVD movies, you may choose to watch with TV with a 16:9 widescreen display and then burn to DVD for playing, this article tells you how to.

There is nothing eye catching as enjoying a high definition DVD on TV with big screen with family and friends in the comfort of your home. Nevertheless, if you want to become one of those who are enjoying these incredible new TV experiences, then you will have to convert your video to a TV supported file. For this purpose, you will have to find a good DVD ripper or a converter.
Play DVD on TV


To complete the conversion, you need a DVD converter tool. Here Pavtube DVDAid is recommended to help you rip DVD to TV compatible video formats with easy operation and high output quality. Furthermore, you can even extract audio files from DVD for playing on TV.

Mac version is available here; well support Mac Mavericks: Pavtube DVDAid for Mac.

Download it right now and start enjoying your DVD movies with full HD quality on TV!

Step 1. Run Best DVD Converter and import DVD disc.

Click "Load disc" icon to load DVD disc from ROM, or DVD folder, ISO images files.

I also noticed if you have an ISO file to import, it will recognize the ISO automatically with no need to run virtual driver and mount ISO files firstly. Good design.

DVD to TV Converter

Step 2. Choose format.

Click“Format” drop-down list and choose "Common Video >H.264 Video(*.mp4)"; it's the most widely used format which will be supported by your TV.

TV suppported format

Step 3. Adjust video specs or change aspect ratio (Optional)

If you are not satisfied with default specs, then click "Settings" to enter Profiles Settings windows; here you can customize video frame rate, bitrate,size and other settings freely.

TV mp4 settings

If you want to trim, crop, editaudio/subtitles or adjust aspect ratio, click the pencil-like icon and switchto "Crop" tab. Choose Advanced mode, lock the "Keep Ratio" and you can free change aspect ratio.Usually it will be set to "Original"; it would be ok to playback on TV, or you can change it to 16:9.

watch on widescreen tv

Step 4. Start conversion.

Click the big red "Convert" to start converting your DVDs to H.264 MP4.

After the conversion, click "Open output folder" to quick locate converted files; transfer the files to the USB drive then plug the drive in the TV.

If you want to rip your DVD as well as burn all kinds of videos into playable DVD for watching, try the bundled software DVDAid($35) + DVD Creator($35) = Only $35.9, Save $34.1.

It is so easy to stream the DVD disc from PC to TV for enjoying on a 16:9 screen display and burn into DVD for watching with my family. Just enjoy!

Here is the way streaming Blu-ray to TV and how to watch all your movies on TV.

Wednesday, June 25, 2014

How to make a copy of your Blu-ray movie to KDLinks media player for watching

This article introduces how to backup or copy Blu-ray disc into m2ts files or BDMV folder for viewing on KDLinks media player without format problems.


I had been using an XBox 360 for streaming media content to our hdtv, but the file type limitations have been a real bother, so this is the reason I choose KDLinks media player. The way I use my KDLinks is to run my hard drive off of it to watch movies and shows and I have to say I'm very impressed with the KDLINKS. It's played every format i've tried, including MP4, MKV, AVI, TSO, M2TS.

However, the problem I ran into is that I don't know the way playing my Blu-ray movie direcly on my WDTV steaming from KDLinks media player. As I already know KDLinks media player supports BDMV and M2TS fils, I was trying to copy a Blu-ray disc to m2ts file or BDMV folder at first.

For copying your Blu-ray discs for enjoying with KDLinks media player, you need to remove the Blu-ray copy protection first. I just recently purchased Pavtube BDMagic to replace my method of using MakeMKV/Handbrake to rip my Blu-ray/DVD movies since Pavtube was advertised as being quicker. Now with this tool, I can easily backup 1:1 copying BD/DVD Disc content to local computer or directly copy only BD/DVD main movie and leave out extras. Really simple interface and powerful function. Needless to say I was excited to see this product under the tree!

The mac version is Pavtube BDMagic for Mac.

Now download the program and follow the steps below to backup Blu-ray movie to KDLinks media player for watching.

How to Rip, Convert and Backup Blu-ray movie for KDLinks media player Effortlessly

Step 1: Load Blu-ray movies into the program

Once you run the top Blu-ray Ripper, click BD disc button to load Blu-ray movie up into the Blu ray ripping program.

Note: A BD drive is needed for Blu-ray ripping & copying


Step 2. Set format

Decide Blu-ray Copy Mode (Option 1)


A. Full Disc Copy Mode: Copy Blu-ray Disc to a full BDMV folder containing all the content in original BD.

B. Directly Copy Mode: Backup Blu-ray Disc to a file with M2TS as filename extension. This mode enables copy movie only from Blu-ray discs, compared with former mode, save time in copying Blu-ray Disc and space to store the output M2TS file to make reasonable and practical use.


Choose an output video format  (Option 2)

If you wanna rip Blu-ray to your needed file types, you need specify a format as output format. Click on the dropdown menu of "Format", and then choose your needed one from the multiple output format presets. You can rip Blu-ray to MKV, MP4, MOV, WMV, or rip Blu-ray for playback on KDLinks media player or other portable devices.

Tip: Click "Settings" button, then you are able to adjust all the settings in the following window to customize the output file quality, including codec, size, bit rate, frame rate, sample rate and audio channel.

Step 4: Rip and copy Blu-ray movie

Once the above mentioned steps are finished, you can click "Convert" button to copy Blu-ray movie to the hard drive of your PC.

When the copying/ripping task is completed, you can click "Open" button to get the ripped files of Blu-ray movie. Now add your ripped or copied files in KDLinks media player, and kdlinks will play the movie smoothly in order.

Begin your money-saving Trip here:

BDMagic($49) + Vidpie($29) = Only $49.9, Save $28.1
BDMagic($49) + DVD Creator($35) = Only $49.9, Save $28.1

Monday, May 5, 2014

Convert DVD to PS4 without quality loss for enjoying freely

This post will give you the easiest solution to rip DVD movies to PS4 for playing on HDTV or Home Theatre, especially for users who want to keep their DVD from scratched.

Sony PS4 is released in more and more countries, many fans have got this striking video game console, with it, we can play latest games on HDTV’s big screen and home theatre. If you happen to have a great DVD collection, you can play DVD on PS4 and enjoy a fantastic movie night with your family. But as we know, DVD Discs are easy to break after playing on PS4's drive over and over again.

To get hundreds of DVDs playable with a remote control on PS4, the best choice is make a digital copy of the DVD discs for permanent enjoying. To get it done, Pavtube DVD Ripper is the best tool for you. Overall, this program can help you extract DVD movies to PS4 playable format with fast speed and zero quality loss. The Mac version is Pavtube DVDAid for Mac. Below is guide for you to learn how to convert DVD to PS4 for watching or streaming.

Overall, in addition it is also a good tool for user making DVD enjoyment, and this powerful function is always be overlooked by consumers, it supports many media formats such as MP4, H.264, H.263, DivX, XviD, WMV, MPEG-2, and if you have some DVD movies at hand, you can use this Pavtube DVD Ripper ripping and converting them to store on PlayStation 4 (PS4), then you can take it everywhere for playing.

Tip:

If you also want to enjoy Blu-ray/DVD movies to 3D videos for playback, trying Pavtube Bytecopy (Win/Mac), which can help you to backup your BD/DVD keeping original subtitle streams and multi-track audios.

Step 1: Run Pavtube DVD to PS4 Converter, and load DVD files to it. You can click “DVD ROM” to load movie from DVD drive or “ISO/IFO” DVD ISO file.


Step 2: Select output format for PS4. Click on the drop-down list at the opposite side of “Format”, and then choose “PS3 Video(720P) MPEG-4(*.mp4)” format for streaming DVD rips to PS4.


Tip: This PS4 DVD Ripper let users control/customize output file quality. To improve video quality, simply click “Settings” and set video bitrate up.


Step 3: Start ripping DVD to mp4 video for PS4 streaming.

Click “Convert” button to rip DVD to PS4, once the ripping task is finished by Pavtube DVD to PS4 Converter, you can click “Open” button at the bottom of the main interface to get the output mp4 file for streaming to PS4.

You can use a PC with PS4 Media Server, TVersity, Windows Media Player 11, Vuse, Nero MediaHome or Mezzmo configured. (Learn how to set up Windows PC as a DLNA Media Server for PS4 streaming.)

More related:

Tuesday, April 8, 2014

Playing your favorite Blu-ray and DVD movies on TV via Personal Cloud Server

This article shows how to remove your BD/DVD protection and rip them into MP4/MKV format, so that you can playback the movies on TV via my personal cloud server.

My job position is in IT and my hobbies are mostly outdoor stuff. Now I have some personal DVD and BD Collections and I'm looking for a way getting them playable on TV via my personal cloud server. Don't need to keep the original file size as we have limited storage, but want to get pretty good video quality.


We did a lot of researches online and searched for the best video conversion software, finally we got this SW named Pavtube Video Converter Ultimate (Windows based); I like the the multiple choices in formats and ease of use interface. It offers me the best features I need in BD/DVD conversion. The most important thing is it accepts my every disc, which Handbrake and Jack the Ripper couldn't. The Mac version is Pavtube iMedia Converter for Mac.

For people who want to backup all the audio tracks or subtitles, you are suggested to try Pavtube ByteCopy or ByteCopy for MacDownload a trial version and do as follows.

How to rip BD/DVD movies to view on TV via personal cloud server
Step 1. Load disc

Click "Load files(s)" to import DVDs and Blu-rays. Note you need to have an external Blu-ray drive if you want to rip Blu-rays.

Keep Internet connected during importing.


Step 2. Choose format.

Here, I recommend MP4/MKV format as it's most acceptable by most TV. Click "Format" and choose H.264 Video(*.mp4) or  MKV(Matroska) Video (*.mkv) from "Common Video" option as below:


Step 3. Adjust output settings (Optional)

Click "Settings" to change video size, bitrate, frame rate and audio specs. I chose "original" size to playback on TV.

Step 4. Start conversion

Click "Convert" in the main interface to start the conversion (batch conversion supported). After conversion, click "Open" which is below the "Settings" to find the converted video.

Use a USB drive to transfer the ripped MP4/MKV media file to TV via personal cloud server, now just enjoy your Blu-ray/DVD movies anytime and anywhere!

Related articles:

Wednesday, March 26, 2014

Ripping Blu-ray movie in MKV HD to your VLC Player with perfect aspect ration

A brief guide assist you rip Blu-ray to MKV HD with unlocking the aspect ration, so that you can watch Blu-rays on VLC in full screen smoothly.

VLC Media Player Portable is the popular VLC media player packaged as a portable app, so you can take your audio and video files along with everything you need to play them on the go. You can place it on your USB flash drive, iPod, portable hard drive or a CD and use it on any computer, without leaving any personal information behind.


You may use to watch Blu-rays on Windows/Mac computer with the help of an external Blu-ray drive, or rentblu-ray movies online with your VLC Player, then come the question as below:

I want to backup my Blu-ray discs then watch most of my Blu ray films on VLC Player in full screen. So how to convert my bluray movies to a file format that unlocks the aspect ration?

Surely, it’s not necessary to purposely buy a Blu-ray Player just for watching Blu-rays on VLC; as long as you havean external Blu-ray drive, we can make all this happen.

Pavtube BDMagic is such a magic tool to help you roll off your Blu-ray protection and rip Blu-ray to best MKV HD for playback on VLC with perfect aspect ratio. Mac version is available here; well support Mac Mavericks: Pavtube BDMagic for Mac.

How to watch my Blu-rays on VLC player in full screen?

Step 1. Run Best Blu-ray to VLC Converter and import disc.

Click "Load file" icon to load Blu-ray disc from ROM, or Blu-ray folder, ISO images files. DVDs are also supported.

I also noticed if you have an ISO file to import, it will recognize the ISO automatically with no need to run virtual driver and mount ISO files firstly. Good design.


Step 2. Chooseformat.

Click“Format” drop-down list and choose “HD video> MKV HD Video (*.mkv)”; it’sthe most widely used format which will be supported by your VLC Player.


Step 3. Adjustvideo specs or change aspect ratio (Optional)

Ifyou are not satisfied with default specs, then click “Settings” to enter Profiles Settings windows; here you can customize video frame rate, bitrate,size and other settings freely.

If you want to trim, crop, editaudio/subtitles or adjust aspect ratio, click the pencil-like icon and switch to “Crop” tab. Choose Advanced mode, lock the “Keep Ratio” and you can free change aspect ratio. (Usually it will be set to “Original”).

Step 4. Start conversion.

Clickthe big red “Convert” to start converting your Blu-rays to H.264 MKV HD. After the conversion, click “Open output folder” to quick locate converted files; now add the converted Blu-ray movie in MKV to your VLC Player for watching in full screen. Enjoy your movies with your friends and family!

More Related guides:
AVI to VLC4K to VLCH.265 to VLC
3D to VLCISO to VLCBlu-ray to VLC
M2TS to VLCAVCHD to VLCDVD to VLC

Friday, January 24, 2014

How to View Blu-ray movies (ISO image files) on projector via WDTV with 3D effect

This article aims to help projector users to look for an easily and quickly way to play Blu-ray movies in projector via WDTV with 3D effect.

Questions:

“Hi, I’ve got a couple of latest 3D Blu-ray movies that I wanted to transfer to my projector via WDTV. Is there a program or a way that I can do this?”

“I have already backup my Blu-ray disc to ISO files, and wished to continue with ripping to them for playing on my projector with 3D effect for a better enjoyment and my iPad mini when traveling. Any suggestions for the best Blu-ray Ripping software which is simplicity in GUI with reasonable price?”

Answer:
According to new figures released from survey, there is a increasing number that people prefer to enjoy movies at home in projector. You just need three things to be able to watch 3D at home on a TV or video projector:


1. A 3D-enabled Television or 3D-enabled Video Projector:

This includes LCD, Plasma, and DLP Televisions, as well as DLP and LCD-type video projectors. All 3D-enabled Televisions and Projectors will be able to work with the 3D standards now approved for Blu-ray and over-the-air, Cable, and Satellite transmission.

2. 3D Content
Since you have had many 3D Blu-ray discs in hand, how can it be playable in projector? The only thing need to be solved now is find a good blu-ray ripper that can convert Blu-ray discs to projector supported format and preserve the 3D effect at the same time. After searching term blu-ray ripper review, Pavtube BDMagic comes up. I try it for free that was the catcher right there and I liked the ease and simple select and convert and done.

Tip:
3D effect on converted video is added by program; it may not be exactly the same as your original 3D blu-ray disc, But it do not influence the watching effect.

If you want to backup your blu-ray movies with keeping multiple audio tracks and subtitles, try to use Pavtube ByteCopy.

Tutorial: Convert Blu-ray movies (IFO files) to SBS MKV for playing on projector

Step 1: Run this Pavtube BDMagic, load Blu-ray discs, Blu-ray folder, Blu-ray ISO image files.

This program will help you analysis ISO files automatically so that there’s no need to run virtual drive to mount ISO image files any more.


Step 2: Click the “Format” menu, here you are suggested to choose “MKV Side-by-Side 3D Video (*.mkv)”


Step 3: If you like, modify profile settings such as video size, bitrate, frame rate, etc to get optimized video and audio playback.

Step 4: Return to the BDMagic main interface, and hit the “Convert” button to start encoding ISO image files from Blu-ray to mkv format. Once it finshes, open output folder, locate the created mkv file and you can transfer to your projector via WDTV.

3. 3D Glasses
Yes, you will need to wear glasses to watch 3D. The glasses that will be used is mostly likely be one of two types: Passive or Active.

Passive Polarized glasses look and wear much like sunglasses and have enough front space to place over existing eyeglasses for those than need to.

Active Shutter glasses are slightly bulky, since they have batteries and a transmitter that synchs that rapidly moving shutters for each eye with the onscreen display rate.

Depending on which brand and model TV or video projector you buy will determine which type of glasses you will be enquired for use with that TV or video projector.

Everything is done! Just have a fun of your 3D Blu-ray discs movies on your projector.

Related posts:

Monday, December 9, 2013

Converting HD-DVD (.evo) files to NAS for streaming to Xbox 360

This article will help you to convert HD-DVD .evo videos to NAS server compatible files so you can stream them from NAS for watching on your Xbox 360 easily.

Question: Hi - obviously it's possible to play .ts files through an xbox 360 connected to a media center pc...but anyone know if it's possible to play .evo files (movies ripped from my HD-DVD collection) through the same setup?


As the .evo files didn't work with Xbox 360, you need to convert HD-DVD (.evo) movie files into H.264 MP4 before streaming from NAS to Xbox360.

To accomplish this goal, you are highly suggested to try this Pavtube Video Converter, a professional tool to help you quick convert various video formats including .evo videos ripped from HD-DVD collection to Xbox compatible MP4 format with best video quality and simplest workflow.

Below is a user's Review:

Having tried Cuda Video Converter Advanced Verision, but I think Pavtube will be a winner, as for its best UI, best Features, easy-to-Use workflow and reasonable Price. I like its Cuda acceleration, the User Interface is nice too. It not also has the ability to convert HD-DVD (.evo) files, but also support all my input and output video formats. Oh, what I like best is its batch mode. 

FYI: You can reach the Mac version here: Pavtube VideoConverter for Mac.

How to watch BHD-DVD (.evo) files on Xbox 360??

Step 1. Run Best EVO Converter and import .evo videos.

Click "Add Video" or "Add from folder" icon to load  to choose import individual videos or the entire folder. Drag-and-drop is also supported.


Step 2. Choose Format.

Click"Format" drop-down list and choose "Common video>H.264 Video(*.mp4)"; it'sthe most widely used format which will be supported by your TV.


Step 3. Adjustvideo specs or change aspect ratio (Optional)

If you are not satisfied with default specs, then click "Settings" to enter Profiles Settings windows; here you can customize video frame rate, bitrate,size and other settings freely.

If you want to trim, crop, edit audio/subtitles or adjust aspect ratio, click the pencil-like icon and switch to "Crop" tab. Choose Advanced mode, lock the "Keep Ratio" and you can free change aspect ratio.Usually it will be set to "Original"; it would be ok to playback on Xbox 360, or you can change it to 16:9.

Step 4. Start conversion.

Clickthe big red "Convert" to start converting your HD-DVD EVO files to H.264 MP4. After the conversion, click "Open output folder" to quick locate converted files; now stream the converted EVO movie in MP4 to your NAS and stream to Xbox 360. Now freely enjoy your HD-DVD evo movies with family!

More related:

Tuesday, November 12, 2013

ISO to AVI - How to Convert Backup ISO to AVI to read it on PS3

If you want to convert Backup ISO to AVI to read it on PS3, using Pavtube BDMagic is a good choice for you to store you Bluray/DVD favourite ISO files as AVI format.

Blu-ray, DVD and kinds of video files boost your multimedia life, if you have a large Blu-ray/DVD ISO files collection, it should be such a cool thing to enjoy them on portable devices anytime and anywhere. You may meet problems when transferring BD/DVD ISO image files for playback.


Now I have backup an ISO file from my blu-ray disc, but how to get my PS3 to read the ISO files? My friends recommended me to convert my Backup ISO to AVI for streaming my PS3 via PS3 Media server. Then I can play them with my iPhone5? But how to make it? Which is the best software for my ISO converting?

AVI is a popular video format that supported by most portable media player devices such as iPod, iPhone, iPad, Xbox, Zune, PSP, smart phones and so on. For people who gather lots of Blu-ray or DVD movies at home, you can convert your Backup Blu-ray/DVD ISO image into AVI format for playback as well as editing. Here we mainly talk about how to convert Blu-ray/DVD ISO to AVI.

After testing several Blu-ray protection removing programs, we choose the Pavtube BDMagic for its simple interface, easy workflow and reliable video quality. It is your best tool to rip and convert Blu-ray movies and DVD ISO files to AVI container format with fast speed and high video quality.  Surprisingly we found it's on 30% off atm; are you still waiting?  Just have a try, if you are Mac users, try Pavtube BDMagic for Mac. Now download it and then follow the steps below.

Step 1.
Run Pavtube BDMagic, click “Load file” to choose Load IFO/ISO file. It will recognize the ISO image file automatically so that you will not have to run virtual drive to mount the ISO any more.


Step 2.
Choose MP4 format as output, here “Format > HD Video > AVI HD Video(*.avi)” is recomended for you.


Note: If you want to combine .avi files into one, please check the "Merge into one file" option.

Step 3. Click the “Convert” button to start Blu-ray/DVD ISO image to AVI format conversion. It will not take much time. Just wait for the conversion process to get done.

Note: Keep in mind that some of the settings can be tweaked to improve the video quality but it's a balance between quality and size. Using the settings we suggested, a 120-minute Blu-ray encoded to about a 1.3GB AVI file.

After the conversion, you can click “Open output folder” to quick locate the converted video.

Additional Tips:

If you are looking for a powerful all-in-one ultimate video converter software to convert various 1080p/720p videos, Blu-ray and DVD movies to your tablet or phone for enjoying, simultaneously saving time and effort, the Video Converter Ultimate program will be a nice choice for you. If you are running a Mac OS X computer, iMedia Converter Mac is the alternative.

This Blu-ray to AVI Converter is really easy to use for blu-ray/dvd iso to avi converting. Then you can easily stream the converted AVI format on PS3 for enjoying. Hope it also works well for you.

Read more:

How do I make MKV files playing on my PS3?
Convert DVD to PS3 Compatible AVI Video with AC3 5.1 channel
Play Blu-ray with your PS3 using Dolby True HD audio