Showing posts with label Final Cut Pro. Show all posts

Saturday, September 28, 2013

Fluid Workflow For Editing Sony HDR-TD10 3D mts/m2ts footage in Premiere Pro and FCP X

This article will talk about how to import Sony HDR-TD10 AVCHD MTS/M2TS files in FCP and Premiere Pro for editing smoothly on Mac with the best 3D AVCHD Converter for Mac. 


I'm working on a Mac but have a Sony HDR-TD10 camera that can shoot .mts/.m2ts 3D videos. I'm trying to figure out how to get this 3D footage onto my Mac so I can edit using either Premiere Pro or FCP X in 3D. Does any software support this directly on the Mac or do I have to use some converting program on the Mac to do this?

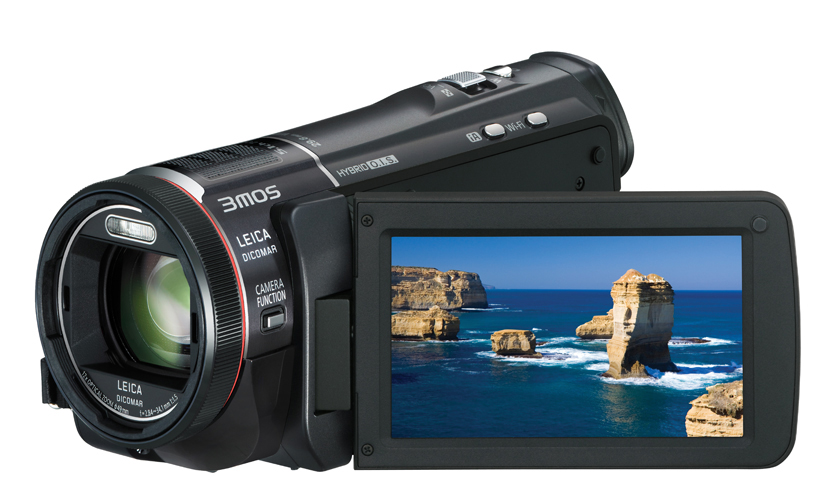
Sony HDR-TD10 camcorder allows you to easily switch between recording in 3D and 2D,1920x1080 Full HD 60p/24p recording. If you shoot 3D AVCHD video in .mts or .m2ts format with TD10, you will find the 3D AVCHD is not easy to use on Mac as it's not well supported by many editing software, such as the Premiere Pro and FCP X, you may encounter many problems as above.

In order to edit your Sony HDR-TD10 3D MTS in Premiere Pro and FCP X natively and to keep the HD video quality and avoid rendering, you'd better use the Apple ProRes codec which is best accepted by Premiere Pro and FCP X to convert Sony TD10 3D AVCHD mts/m2ts files for importing.

To accomplish you goal, Pavtube MTS/M2TS converter for Mac can do this with ease. It is the tool that I have used for about one year, I rewrap and transcode Sony TD10 3D AVCHD mts/m2ts files footage to Prores .mov for editing in Premiere Pro and FCP X on Mac, this software can deal nearly all kinds of MTS videos. Free downlad it and  take a look at the brief guide below.

Convert Sony TD10 3D MTS/M2TS to Prores .MOV for editing in Premiere Pro and FCP X

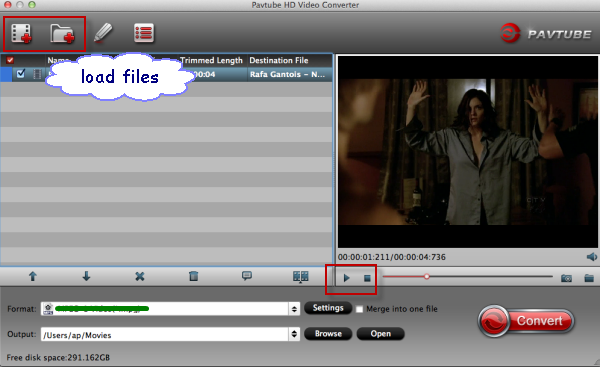
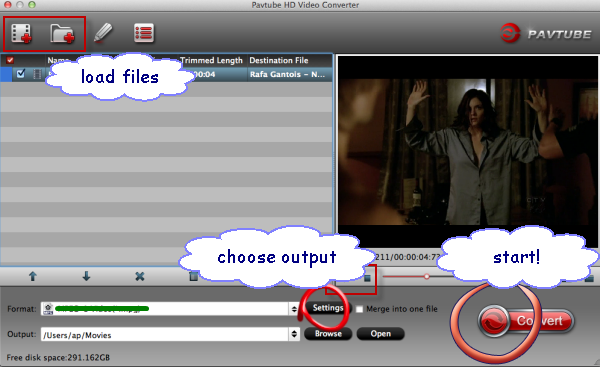
Step 1: Install and launch the best 3D AVCHD Converter for Mac. Once its main interface appears, you can import 3d .mts or .m2ts media into the program from "Add video" or "Add from folder" icon.


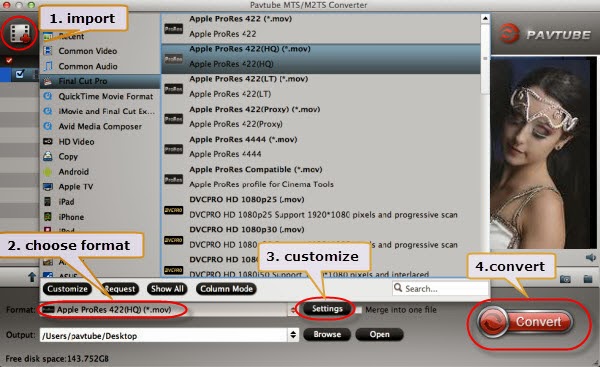
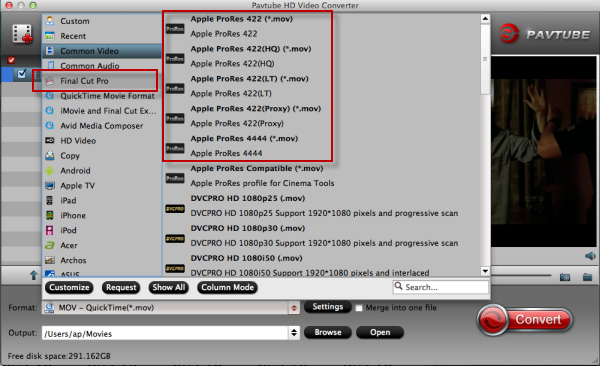
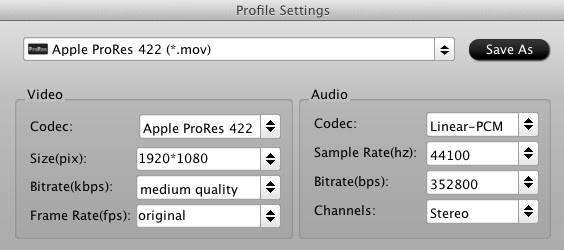
Step 2: Click format column and choose the output format. You are recommended to choose  Final Cut Pro -> Apple ProRes 422(HQ) (*.mov) as the best codec for editing Sony TD10 3D AVCHD in Premiere Pro and FCP X.

Notes: If you want to output 3D video, you can also chooce “MOV Side-by-Side 3D Video/MOV Anaglyph 3D Video/MOV Top-Bottom 3D Video (*.mov)” format from “3D Video” option, this H.264 MOV format is also supported by Premiere Pro and FCP X.


Step 3: Click settings button to adjust the output video's parameters, such as bitrate, resolution, etc.

Step 4: Start converting Sony HDR-TD10 3D AVCHD videos to Apple ProRes .MOV for  Premiere Pro and Final Cut Pro X .

As soon as the conversion process finished, you can click "Open" button to get the generated file that is ready for editing with Premiere Pro/Final Cut Pro X.
  • Start up Premiere Pro, choose File > Import…, and navigate to the source folder to import files. 


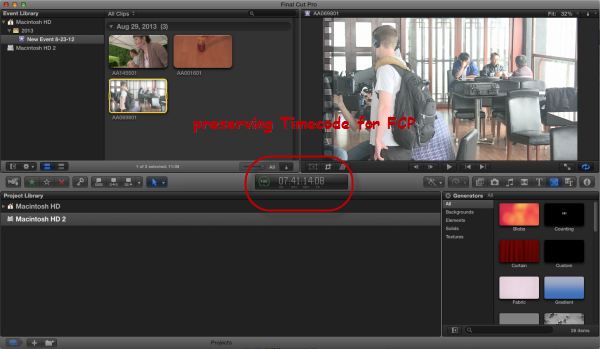
  • Launch Final Cut Pro X, choose File > Import > Files…, and browse to where you save the converted AVCHD clips to. Choose the videos that you’d like to add. 
 

Read More:

Sunday, September 22, 2013

Final Cut Pro X – Edit 1080p videos files from Canon EOS 100D?

How to edit Canon EOS 100D H.264 Video in FCP X on Mac? Best Canon H.264 Video Converter can help you to encode 1080p MOV clips from Canon EOS 100D to FCP friendly code and Eit/Split/Cut/Merge the H.264 MOV footage on Mac.

Last year’s Canon EOS 650D was an excellent camera. But for all its whiz-bang features, like a capacitive touchscreen and continuous autofocus while shooting video, it just didn’t feel special. A DLSR for beginners just doesn’t make as much sense when there are smaller mirrorless cameras that can achieve similar results. So Canon shrunk the 650D down. Here’s the mini version: Canon EOS 100D.


Canon EOS 100D (Rebel SL1) may be the smallest and lightest DSLR currently in production, but does the 18-million-pixel 100D have what it takes to meet the demands of the enthusiast photographer? Canon EOS 100D features a 3in, 1.04-million-dot touch-sensitive LCD screen, a maximum sensitivity of ISO 25,600, and can shoot video at a resolution of 1080p at 30fps.

However the MOV files using variable bitrate MPEG-4 AVC / H.264 compression, which is well-supported by FCP X. Due to its high data rate (20-30mbps), the Canon 100D 1080 mov footage is quite demanding and your FCP X prone to freeze or crash if your Mac is not so up-to-date.

In order to process Canon EOS Rebel SL1 footage fast and seamless with Final Cut Pro X, it requires that the H.264 .mov videos to be transcoded into an editing friendly format before importing the mov video from 100D to FCP X. This is usually done with a Mac HD Video Converter.

Recommended Tool:
Pavtube HD Video Converter for Mac The best Canon H.264 MOV Converter 

With it, you can transcode Canon 100D MOV to a compatible format for FCP X on mac quickly and easily with preserving timecode. Before editing the footages from Canon 100D, you are advised to install the first-class HD Video Converter for Mac from Pavtube.

Step-by-step guide to learn how to convert Canon 100D 1080p MOV to Prores 422 for FCP X with keeping timecode.

Step 1. Download and install the H.264 to Prores 422 Converter with timecode on your Mac. Launch it and import your Canon 100D .mov clips into it.


Step 2. Choose Apple Prores as output for FCP X.

Click on "Format", follow "Final Cut Pro > Apple ProRes 422 (*.mov)" format for native importing and editing in FCP X.


Step 3. Click on Settings to adjust audio and video parameters including video size, video frame rate, bitrate, sample rate, audio channel.

Step 4. Start transcoding Canon 100D h.264 MOV to Prores 422 by clicking on "Convert" button.

After the conversion is done, you can easily import Canon 100D h.264 footage into FCP X with retaining timecode.
  • Refer to the picture below to see how this cool mac mov converting tool keep the timecode for FCP. 


Hope this article will make the experience of editing h.264 mov footage from Canon 100D in FCP X easier and faster.

Related guide:

Sunday, September 15, 2013

Import Sony PDW-F800 XDCAM MXF files into FCP 6/7 keeping all the audio tracks

If you need to edit Sony PDW-F800 MXF footages in Final Cut Pro 6/7 on Mac, you can follow this article to convert XDCAM MXF to FCP native Prores codec and edit without rendering.

The PDW-F800 camcorder is the newest member of the XDCAM family. On top of the exceptional technology, the PDW-F800 offers very high quality HD recording at a data rate of up to 50Mbps using the MPEG-2 4:2:2P@HL compression. Sony PDW-F800 XDCAM camcorders' video format is MXF, but many users will find using these XDCAM MXF files on Mac is really a nightmare.


As MXF is not compatible with Mac Editors like Final Cut Pro 6/7, you can't direcly log & transfer your MXF videos from Sony PDW-F800 in FCP 6/7 sommothly. Even with the Plu-gin installed, some users would still meet the trouble due to its complex procedures. We also searched the solution, we find out there is an easy way to fix this issue, that is to convert Sony XDCAM MXF files to Apple ProRes, which is natively suported by Final Cut Pro. 

In addition, in case that your Sony PDW-F800 XDCM MXF files may have several video streams or audio tracks. For people who want to edit them in FCP 6/7, is there anyway to keep all the multiple audio/video track separately as original?

Fortunately, Pavtube iMixMXF can help you to get it done. With it you are allowed to preserve all or any audio tracks for output Prores .MOV and mix the multiple audio tracks into one if you need.

Below, we give you the step-by-step guide to convert Sony PDW-F800 XDCAM HD422 MXF files to Prores .MOV with multiple audio tracks for FCP 6/7.

Step 1. Get this Mac multi-track MXF Converter installed, click  to load individual mxf videos; or click    to load the entire folder. It will recognize all the audio channels.


Step 2. Click "Format" and choose Multi-track Video>Multi-track Apple Prores 422 (*.mov) for importing in to FCP 6/7.


Step 3. Click "Settings" to customize your video size, bitrate, frame rate and other specs; and check video channels that you want to keep. (Optional)

Notes:

1. Follow the bottom left icon to "mix into one channel"; or that it will keep all the audio tracks apart.


2. With this Pavtube iMixMXF program, you can also add some personal subtitles in it like this which makes the play backing much easier:

Step 4. Click "Convert" to start converting Sony PDW-F800 multi-track MXF to multi-track MOV for playback or editing on Mac Mavericks.

Tips:For users don“t need to deal with multi-track thing, just simple want to convert MXF to other formats, the MXF Converter for Mac (only $29) is highly recommended.

See more XDCAM MXF other tips:

Monday, September 9, 2013

Re-encode Sony FS700 AVCHD to ProRes for freely importing in FCP

Sony FS700 users often meet the problem that they cannot edit AVCHD MTS files made by Sony high definition camcorder in FCP. The following will tell how to use FCP to edit Sony FS700 AVCHD MTS, which is not a Mac friendly format.


I've just got a bunch of CF cards in from a shoot from yesterday. I believe the camera used for the interview was a Sony FS700 On the CF cards, I have 2 folders: }CLP{ and then a }STT{ file, but FCP L&T doesn't like that structure so I can't use that. The files here are QT movs (M-PEG2) and I need to convert to ProRes 422. Not using MPEG since they don't keep source TC, so I'm using Compressor but it's taking EXTREMELY long, even for a 2 minute clip. Is there a quicker way to do these batches because I have to get all this footage over to the editor, but fear at this rate it will take all day!

  
The FS700 shoots AVCHD. And with any tapeless workflow, you need to copy the ENTIRE card structure to a hard drive. (refer to the guide). If you don't like the complex workflow as above, here hands down the best and easiest way we've found, that is to convert to Prores from a FS700 for importing. You should know that the FCP's native format is Apple ProRes, so after converting you can avoid the headache "FS700 and FCP incompatibility importing problem". Here is a simple tip for you how to make Sony FS700 AVCHD editable in FCP.

If you are planning to edit FS700 MTS clips with FCP, you'd better give the app a try. Here Pavtube MTS/M2TS Converter for Mac is recommended. It is an easy-to-use MTS to FCP Converter for Mac program with clean interface. And it is good at converting Sony FS700 MTS files to Mac native format for editing. You can try the free trial version to test the functions at first.

Guide: Re-encode Sony FS700 AVCHD to ProRes for freely editing with FCP on Mac OS X

Step 1. Download and install the best MTS to ProRes Converter and connet FS700 cam to Mac, or insert the SD or Memor card into the computer.


Step 2. Open the encoder and click "Add File" or "Add from folder" to load .mts from FS700.

Note: If necessary, you can click "Edit" to edit the file- trim, crop and add special effects to the file.

Step 3. Click on "Format" bar, you will see the "Final Cut Pro" menu. The menu has several formats for choosing as the best output format. You'd better choose Apple proRes 422(HQ)(*.mov) to keep the original video qaulity.

Tip: If your source file is 1080p, you'd better keep the video frame rate as 30fps, video size as 1920*1080.


Step 4. Start ticking "Convert" button to convert Sony FS700 MTS file for editing in Final Cut Pro.

As soon as the conversion ends, you can clcik "Open" to get the converted file. Now, you can directly drag and drop the ProRes MOV file to Finla Cut Pro for further editing on your Mac OS X.

PS:

With the top MTS Converter for FCP, you also can transocde AVCHD/MTS/M2TS clips to compatible formats for editing with iMovie, Adobe PPro, Avid MC, FCE, ect. Mac OS X editors.

Read Related Articles:

Monday, August 26, 2013

I can't import HD videos from Panasonic into Final Cut Pro 6

Facing issues when importing Panasonic HD media files to Final Cut Pro 6 for editing? The easy workaround is to convert Panasonic 1080p videos to ProRes codec. Below is how.
Panasonic offers wide choices in professional and high-quality camcorders to meet virtually any application, from Full HD 3D and P2 HD to AVCCAM and SD.
I have a Panasonic camcorder which records some 1080p video files, and I use L&T to load the footage to FCP 6 on my iMac. FCP 6 crashed while opening. When I open the program agiain, find out they are not readable? What’s that? I am sure the videos are playable on camera. So strange. Any insight here how can I import these files into FCP 6? Thanks for help.

Many users are facing some frustrating result when importing Panasonic HD videos into Final Cut Pro 6 as above. The basic reason is that MXF is not a fully supported format by Final Cut Pro. So how can you get/import your 1080p recordings to FCP 6 easily for editing? At first, you’d better to transcode Panasonic HD videos to Apple ProRes first, as it is the best codec for Final Cut Pro editing.

Below is the simple step-by-step guide for Panasonic camcorder users: using Pavtube HD Video Converter for Mac to convert Panasonic HD videos to ProRes 422 for FCP on iMac/MacBook Pro with Mac OS X, Leopard, Snow Leopard, Lion, Mountain Lion and Mavericks 10.9. Download it and get the full guide below to have a smooth editing with the Panasonic HD footage in Final Cut Pro 6.

Easily importing and editing Panasonic HD videos in Final Cut Pro 6

Step 1. Get this Mac Panasonic Video Converter installed and load your footages. Click top left icon to load individual 1080p videos files; or click the second one to import the whole folder.


Step 2. Choose proper format for editing in Final Cut Pro 6.

Click Format drop-down list, choose Final Cut Pro>Apple ProRes 422(HQ)(*.mov), as it’s FCPX’s most compatible codec.


The Apple ProRes 422 (HQ) codec offers the utmost possible quality for 4:2:2 or 4:2:0 sources (without an alpha channel) and provides the following:
  • Target data rate of approximately 220 Mbps (1920 x 1080 at 60i)
  • Higher quality than Apple ProRes 422
More options:
Step 3. Fix the output ProRes video settings for FCP 6.

Click Settings at the bottom, you can fix the video size, bitrate, frame rate, etc. The video quality is related with video bitrate, the higher you choose, the larger output file size will be.


Step 4. Start conversion.

Ok now click the "Convert" botton to start converting Panasonic HD footage to ProRes for FCP 6 on Mac. Wait for while, or you can choose to shut down computer after conversion done.

Wednesday, August 21, 2013

Sony PMW-200 XDCAM MXF to Apple Final Cut Pro 6/7 or Aperture 3

This guide shows you how to convert/transcode Sony PMW-200 XDCAM MXF file to Final Cut Pro/Aperture 3 supported files with Pavtube MXF Converter for Mac.


Sony PMW-200 camcorder features a broadcast-friendly 50Mbps data rate drawing from three half-inch CMOS sensors -- bigger than any other broadcast handheld cam, according to Sony -- though that size is still a far cry from its own super-35 filmmaking cams and others on the market.

50Mbps HD422 Recording
In the UDF/MXF recording mode, you can record Full HD video (1920x1080) at up to 50Mbps using MPEG HD422 compression technology and enjoy the benefits of proven, high-speed and intuitive XDCAM HD422 workflow. With the PMW-200, you can also record video in MPEG HD (420) or DVCAM™ format. (Note: Proxy video is not available with the PMW-200).

Import XDCAM MXF recordings to FCP 6/7 or Aperture 3. 

Q: Hi! I was wondering if the FCP 6/7 works with mxf footages natively. Aperture 3 seems not work with these mxf recordings. I have some .mxf video from Sony PMW-200 to edit for group work, and it would be great if anyone could help me with the importing workflow. Thanks!

A: If you want to edit Sony PMW-200  XDCAM MXF in Final Cut Pro 6/7 or Apple Aperture 3, you first need to convert the XDCAM MXF video to compatible format like ProRes 422 codec. This is a common format developed by Apple. Below are some useful tips.

Solution: Transcode Sony PMW-200 XDCAM MXF to FCP 6/7 or Aperture 3 with Apple ProRes 422 codec.

Step 1: Download Pavtube MXF Converter for Mac. This is excellent software which can help you convert Sony PMW-200 XDCAM MXF video to ProRes for FCP 6/7 or Aperture 3. Besides, it supports many other formats for output.Install and launch the Sony Mac XDCAM MXF Converter, import the MXF video from Sony PMW-200 by clicking "Add video" button.


Step 2: Choose the best output format for Final Cut Pro 6/7 or Aperture 3. Click on "Format" and choose "Final Cut Pro >>Apple ProRes 422 (*.mov)" as output format.


Step 3: You can click "Settings" to adjust the output parameters, such as resolution, bitrate and frame rate.

Step 4: You can click "Edit" button to edit MXF video, such as deinterlace, denoise, mute, volume up and crop.

Step 5: Click "Convert" button to start Sony MXF to ProRes conversion. It will transcode Sony PMW-200 MXF to Apple ProRes codec MOV format flawlessly.

After converting, you can import converted video files to FCP 6/7 or Aperture 3 instantly without rendering. More output formats are supported.

Read Related Articles:

Sunday, August 18, 2013

Lossless converting Canon MTS/MP4 files for editing in Final Cut Pro X

To get Final Cut Pro X working perfectly with MTS/MP4 files, a best way is to convert them to ProRes MOV. Read on to learn details. 


The XA20 is a compact, "run-and-gun" HD camcorder with an impressive Optical performance from a powerful new Genuine Canon 20x HD Video Lens with a new 8-Blade Circular Aperture, capable of focusing down to just 23.6 inches (60cm). Other features include multiple HD/SD Recording rates - including 24p for a "cinematic" look - together with a choice of industry-standard MP4 (up to 35 Mbps) and AVCHD (up to 28 Mbps) codecs. 

The high image quality and recording versatility make the XA20 ideal for independent and documentary filmmaking, as well as event videography and educational institutions. However, many Mac users complain that they can’t import the MTS/MP4 files recording from Canon XA20 to FCP X because FCP doesn’t accept .MTS/.MP4 footage.

Well, don’t worry. It is known to us that Apple ProRes codec is well compatible to FCP. So, in order to smoothly import Canon XA20 MTS/MP4 files into Final Cut Pro X for editing, you can use 3rd-party software to convert Canon XA20 MTS/MP4 to Apple ProRes encoded mov format with excellent quality of videos as it applies advanced audio and video sync technology, which is a native format for FCP X.

Here Pavtube HD Video Converter for Mac is highly recommended. It is an easy-to-use Canon Video Converter for Mac program with clean interface. And it is good at converting 1080/60p MTS and MPEG-2 MP4 videos from Canon XA20 to various formats for editing, playback, uploading, burning etc. on Mac OS X (Mountain Lion, Mavericks included). You can try the free trial versionto test the functions at first.

Now let' learn how to transcode Canon XA20 MTS/MP4 clips to Apple ProRes MOV for editing on Final Cut Pro X. At first, download, install and run the best and easy-to-use Mac MTS/MP4 to FCP Converter.

Step 1. Load AVCHD MTS/MP4 files. 

Connect your Canon X20 camcorder to your Mac via USB, or insert your SD card to Mac, browser the .mts files from AVCHD > BDMV > STREAM. Load your 1080/60p .mts or .mp4 files from XA20 or local computer which you have copied from camcorder before into Pavtube HD Converter for Mac. 
 

P.S. There are two ways for you to import files: add video directly and add the entire folder.
 

Step 2. Select Apple ProRes MOV format for FCP.

You are recommended to choose the “Format” under “Final Cut Pro” which is preferable to your FCP X, and it is the easiest way to find the suitable format. 


Tip 1: You are allowed to adjust output video and video parameters. However, if you have no idea about profile setting, keep it as original recordings will provide you the files with less quality loss, and keep default settings is also a good choice for your to get a high quality files.

Tip 2: In order to get customized videos, you can add subtitles to your own videos.
Step 3. Start MTS/MP4 to Apple ProRes conversion.

Click “Convert” button to start transcoding Canon XA20 AVCHD MTS/MP4 to Apple ProRes MOV, and then click “Open” button will bring you to the generated Apple ProRes MOV files for Final Cut Pro X.

In this way, you will have no difficulty in importing and editing Canon XA20 MTS/MP4 footage into FCP X with excellent audio and video quality. You can enjoy sharing edited video with friends and taking any individual frames you want.

What’s more, if you are a Windows user, try this Pavtube HD Video Converter, which is considered as best HD Video Converter. It is specially developed for HD camera/camcorder users to transcode all kinds of HD video footage to various fotmats accepted by Sony Vegas, Avid, Premiere, Pinnacle, Cyberlink and Windows Movie Maker and more similar Windows video editing software with least quality loss. 

Canon XA20 more related:

Read Related Articles:

Thursday, August 15, 2013

Working with Panasonic HC-X920M 1080/50p mts Footage in FCE and FCP 6

Is there anyway we can injest MTS Files shot on canon Panasonic HC-X920M into FCE and FCP 6? Keep on reading to learn.

I'm the owner and publisher of Australian Videocamera. My media experience can be dating back to 1979 when I first got involved with photojournalism in motorsport. Recently we have got this Panasonic HC-X920M.


Reviews:

I am more than impressed with the HC-X920M. At this stage of the game, if anyone asked me what camcorder to buy sub $2K, this would unquestionably be it. It has all the functions you will ever need, and I'd almost call it a game changer. If there is camcorder to sway the pro away from the larger models as used in "run and gun"shooting for current affairs, short documentaries or films etc, then at the moment this is it.

All the necessaries are there; top lens, manual programmable focus ring, face detection, manual or auto controls for contrast, shutter speed etc and of course superb imaging. And for future proofing, the HC-X920 also supports the optional 3D lens.

Recordings:

Panasonic HC-X920M can provide us 1080p Full HD. We live in Australia - so we are PAL.


Recording Format: [AVCHD] AVCHD 3D / Progressive / [iFrame] MP4

Compression Method: [2D] MPEG-4 AVC/H.264 / [3D] MPEG-4 MVC/H.264


Asks:

Now we are doing some editing work. We make some 1080/50p AVCHD videos from Panasonic HC-X920M, working on Final Cut Express and also FCP 6, but when loading into the FCE and FCP 6, the .mts files need rendering and everytime I touch them they again need to be rendered. Hoping anyone can help - rendering takes so much time... 

Answers: 

At last, I have figured out Pavtube HD Video Converter for Mac. Having used it as the best Panasonic AVCHD Converter and now I have successfully converted the Panasonic HC-X920M 1080/50p mts video files from the camera to AIC/Prores .mov which is native for editing in FCE and FCP 6. It works great and wonderful video quality.

Detailed instructions: 

In case that you may have the same issue with importing Panasonic HC-X920M 1080/50p mts footage into FCE and FCP 6, here offers you a step by step guide:

Convert Panasonic HC-X920M 1080/50p AVCHD MTS to AIC/Prores MOV format

Step 1. Add .mts files to the Mac MTS to MOV Converter.

Launch the MTS/M2TS to AIC/Prores Converter for Mac. Click "Add Video" or "Add from folder" button to load your source 1080/50p .mts or .m2ts files from Panasonic HC-X920M.


Tip: If you want lossless merge multiple MTS, M2TS files, pleas check the "Merge into one file" box.

Step 2. Choose FCE and FCP 6 compatible foramt as output.

For FCE, click "Format > iMovie/Final Cut Express", choose "Apple Intermediate Codec(AIC) .mov" as the best output format.


For editing in FCP 6, you can choose Final Cut Pro -> Apple ProRes 422 (*.mov).


Tip: If you wanna edit the video/audio parameters, you need to go to "Settings" window.

Step 3. Start MTS to FCE 6/FCP Conversion.

Click the "Convert" button under the preview window, and the best Mac MTS to MOV Converter will start converting Panasonic HC-X920M 1080/50p MTS clips to FCE and FCP 6 compatible AIC/Prores mov format on Mac OS X.

When the conversion is done, you will be directed to open the folder where you saved the converted files, and then you can import output video files to FCE or import converted videos to fcp to edit.

More Tips for you:

Monday, August 12, 2013

Convert and Import Panasonic AG-HPX250 AVC-Intra 100 MXF to Final Cut Pro

Want to import Panasonic AG-HPX250 MXF files to Final Cut Pro? First you need to encode Panasonic AG-HPX250 MXF footage to ProRes codec.

Panasonic has just announced the AG-HPX250, a camera that can be positioned as the successor to the HPX170 and a compact version of the HPX370. Built using the 1/3″ 3-MOS sensors of the HPX370, the HPX250 records to P2 media in AVC-Intra 100/50, as well as DVCPRO HD, DVCPRO50, DVCPRO and DV. This is the first time that AVC-Intra 100 has been made available in a small form factor, so the ability to record a full 10-bit 4:2:2 I-frame image in a compact, 5.5 pound package makes the HPX250 truly unique.


Panasonic AG-HPX250 MXF files to FCP solution:

"I have a Panasonic AG-HPX250 camcorder, this camcorder record in AVCintra or DVCPRO HD codec in MXF format. I just want to import the MXF recordings to Final Cut Pro for editing, but the FCP doesn't accept it. So what can I do? Is there an easier and effective way? And how to import incomplete folder files or single MXF files to FCP?"

As we know, FCP best codec is Apple ProRes 422, this codec in MOV format is native for importing and editing, original P2 MXF footages is not good for editing as you may find the video is not processed smoothly.

And here, you are suggested to try a third party converter: the professional Mac P2 MXF Converter from Pavtube to help you to transcode Panasonic P2 mxf cilps to ProRes for FCP with best video quality. It enables editing before conversion and you can check the deinterlacing option. Below I will provide a brief guide for you.

Steps: Transcode Panasonic AG-HPX250 P2 MXF to Apple ProRes for Final Cut Pro editing

1.Download Pavtube MXF converter for Mac. It's the best Panasonic MXF Converter for Mac, an user-friendly software can help you convert MXF to rich formats, such as Apple ProRes, AIC, Avid DNxHD, or MP4, AVI, MKV, etc, then you can make MXF files compatible with iMovie, FCP 6/7, FCP X, FCE, Avid Media Composer and so on.


2.Install and launch, and import Panasonic P2 AG-HPX250 MXF videos to the MXF converter for Mac.


3.Click format bar to choose the best video format for output. You are recommended to choose Final Cut Pro -> Apple ProRes 422 (*.mov) for native FCP editing.


4.You can click settings button to adjust the output video's parameters, such as resolution, bitrate, etc. 


5.Edit function is easy and useful, you can trim, crop, or add watermark to the video.

6.Click convert button to start converting Panasonic AG-HPX250 P2 MXF to Apple ProRes for FCP on Mac.

All folders and single files are supported, after conversion you can import converted MOV files to FCP without rendering, it can deal with all the MXF files, such as Panasonic P2 series, Canon XF series, Sony XDCAM series, etc.

Tips:

If you want to convert MXF video clips with multiple audio channels, Pavtube iMixMXF - an ideal P2 MXF to FCP Converter that can ouput multi-track Apple Prores MOV for further editing in Final Cut Pro, it will definitely helps you.

Read More:

Wednesday, July 31, 2013

Transcode Blu-ray to FCP 6/7/X preserving multiple audio tracks and subtitles

Having a lot of Blu-Ray Discs and want to edit the content with Final Cut Pro? The following article will show you how to transcode Blu-ray to Prores codec for FCP 6/7/X with multiple audio and subtitle tracks.


Final Cut Pro is a professional editing tool for Mac users. May be you are video hobbyists or independent filmmakers, and want to make some Blu-ray HD contents into your own film with FCP 6/7/X. However, FCP will refuse to accept blu-ray discs. So do you have the problem for importing blu-ray to FCP as below.

"I need to get scenes from a series of blu-ray disks (have permission) into FCP for editing a promo. I'm not adept at ripping Blu-Rays. Can anyone recommend a way to do this? I can't seem to find any software for Mac that deals with BDs. Thanks!"

"I want to edit some Blu Rays in Final Cut Pro, these are some projects of the kids for their grandparents. What is the best way to go about it? From what I have read, converting Blu-rays to Prores codec seems to be the best / easiest way. Is that correct? The top blu-ray ripping program for FCP? Any suggestions?

"Have been struggling with this for a while. Having a lot of blu-ray collections on my mac. When I use FCP for editing the Blu-ray files, they are grayed out. How to get these blu-ray video files into Final Cut Pro for importing. 

In this case, how can we rip Blu-rays and edit Blu-ray movies in FCP 6/7/X? FCP prefers Apple Prores 422 as the native editing codec. To ingest Blu-rays to FCP, the quick and easy way is to transcode Blu-rays to Prores so that you can easily get the files into FCP on Mac.
  
To do this, what I recommend is Pavtube Bytecopy for Mac , a powerful conversion program for  converting Blu-ray to Prores with multiple audio and subtitle tracks. Becides, it is capable of helping you to transcode Blu-ray discs to various output formats. Suppose you are good at both English and Francia, and want to preserve both of them from original Blu-ray discs when converting, that is what Pavtube ByteCoy can do for you. And you can select the audio you want when enjoying movies.

Now let's download and install it and follow the guide to see how to transcode Blu-ray to FCP 6/7/X preserving multiple audio tracks and subtitles.

Step 1. Launch this Blu-ray to FCP Converter and click "" to load Blu-ray discs.


Step 2. Click "Format" to find "Multi-track Video" catalogue, select "Multi-track Video>Multi-track Apple ProRes 422(*.mov)" as output format for editing in FCP 6/7/X.


With output default "Settings" you can get all audio tracks preserved. In addition, if you want more customization, you can also uncheck the audio tracks you do not need to output. Just find "Audio" under "Settings" button, then uncheck the undesired audio.


PS. If you wanna add external subtitles(like *.srt, *.ass and *.ssa) in video, only click "Edit", choose "Subtitle" > "Enable", you need download a subtitle file, then click "Browse" to load it.
You can get to konw the best and top 5 Subtitle Sites to download subtitles you need here.


Step 3. Click "Convert" to start Blu-ray to FCPconversion, when completed, click "Open" to find the generated .mov files.

Obviously, it is easy to use the Blu-ray to Prores Converter to use Blu-ray HD contents in FCP 6/7/X preserving multiple audio tracks and subtitles, without any audio and video out of sync issue

And if you prefer to work with single audio channel and want to output each audio/video track separately, another Blu-ray/DVD Ripper for Mac software can do this for you, features in various output formats selection and editing options support. Worthy to point out that it also supports lossless quality output.

Related article: 

Monday, July 29, 2013

Audio Track Mixer: Mix Canon C500 MXF to multi-track Apple ProRes for FCP 6/7

If you have problems with importing Canon C500 MXF to Final Cut Pro 6/7 on Mac, please follow this post below to know the esay solution to convert Canon C500 mxf footage to multi-track apple prores. 
 

Canon has officially announced the EOS C500, the professional 4K video camera output that it promised at the NAB trade show in April. A continuation of the concept of the C300, it can capture Raw 4K video footage and offers frame rates of up to 120fps in compressed 4K. It also captures 2K footage (2,048 x 1,080 pixels) at 12-bit, with 4:4:4 Y'CbCr chroma sub-sampling for high colour resolution.

With this professional EOS C500, you may have recorded many footage and want to do some editing work with FCP 6/7 to get better video effect. And you will find the following problem:

Q1: Using a card reader to download my footage shot with my Canon EOS C500 into FCP. My FCP 7 crashed while opening. If I am using Canon XF utility to backup the files, find out they are not readable? What's that? I am sure the videos are playable on C500. So strange. Any insight here how can I import these files into FCP 7?

Q2: I want to extract a small clip from my C500 and edit it in FCP 6, is there anyway to keep all my audio tracks? 

I believe you this is a common issue many new Canon users may meet, and most of them will choose to install a Canon C500 XF plugin for FCP. But unfortunately, at last they get little success: some don't want to upgrade, some has audio problems, and some may be confused with the complex procedure.

Then to make it smooth and easy to edit Canon C500 MXF to FCP 6/7 on Mac (including Mavericks 10.9), you can switch to a third party tool - Pavtube iMixMXF. I think it's much easier for me. It can not only convert Canon EOS C500 MXF .mxf to FCP 6/7 best editing codec Apple prores, but also has editing functions and unique multi-track preserving feature.

Convert Muti-track MXF files from Canon C500 to FCP 6/7 for editing

Step 1. Free download, install, and run Muti-track MXF Converter for FCP 6/7. Click "Add Video" button to load your source MXF clips or drag and drop the C500 MXF files to the converter. You are allowed to add multiple files to convert at a time.


Step 2. Click "format" bar to choose output format. Click and choose Multi-track Video>Multi-track Apple ProRes 422(*.mov), it's the best format for editing Canon C500 multi-track MXF files in Final Cut Pro 6/7.


Step 3. Adjust video and audio parameters. (Optional)

Click "Settings" button to customize the output video and audio settings by yourself. But if you are not good at it, you'd better use the default parameters, they will ensure you a good balance between file size and image quality basically. You can change the resolution, bitrate, frame rate as you need.

Step 4. When above steps finished, you can click "Convert" button to start transcoding Canon C500 MXF to mult-track ProRes MOV for Final Cut Pro 6/7 with a super fast speed.

With the excellent multi-track MXF to FCP Converter, you can work with Canon C500 MXF files in FCP 6/7 on Mac Mavericks with multi-track preserving and with best video and audio quality as you want.

Additional Contents

If you don't want to get multi-track videos or your videos has less that two audio track, you can try Pavtube MXF Converter for Mac, a profession MXF Converter and a good partner with your simple and efficient MXF conversion workflow on Mac.

Canon Related Tutorial:

Edit Canon XF100 MXF files in iMovie/FCE
Convert Canon XF300 MXF to ProRes for FCP/Premiere Pro
Edit Canon XF100 MXF video with Avid Media Composer
...

Thursday, July 25, 2013

Make Sony NEX-FS100U 1080/60p mts editable in FCP X on Mavericks

Follow the guide below and you will know how to import Sony NEX-FS100U 1080/60p AVCHD to Final Cut Pro X without rendering on Mac Mavericks.


The NEX-FS100U super 35mm sensor camcorder is Sony's first fully professional large-sensor video camera. Hot on the heels of the PMW-F3, this compact, highly modular camera uses the same S35-size CMOS sensor as the F3. Able to shoot full 1080p video in a range of frame rates up to 60p, Sony FS100 provides the option of recording 28Mbps AVCHD footage onto SD or Memory Stick media.

When you are takeing part in applications like indie film, commercials, music promos, education, and wedding videos, Sony NEX-FS100U can be your best partner. After that, you may use Sony FS100U 1080/60p AVCHD recordings in a post-production FCP X workflow on Mac Mavericks.

Unfortunately, Mac users (including the latest Mavericks users) will get frustrated when importing FS100U 1080/60p AVCHD mts to FCP X due to the incompatibility of the AVCHD format and 60p high definition .As is known to us, Apple ProRes is the best editable Codec for Final Cut Pro (X). So to make Sony FS100U 50/60p AVCHD files compatible and editable with Final Cut Pro X, the best way is to transcode NEX-FS100U 1080/60p mts to Prores.

To accomplish this goal, this Professional Mavericks Sony AVCHD MTS Converter is your ideal tool. With it, you can easily convert Sony FS100U 1080p recordings to ProRes 422 MOV for FCP X on Mavericks with high quality kept.  Follow the steps below.
Good News! Pavtube Release a New Site - multipelife.com with Product Migration and Name Change.

To thanks for your continued support all along our previous site and the new www.multipelife.com, we are holding a 'New Site Special' with fantastic discounts up to 40% off. You can get 20% off BDMagic, 30% off ByteCopy, 40% off DVDAid and 20% off Video Converter Ultimate on Windows/Mac platform:

https://www.facebook.com/pavtubefans/app_209569249055691

Read more: http://pc-mac-compatibility-issues.blogspot.com/2014/05/pavtube-new-site-release.html


1.Download Pavtube AVCHD to FCP Converter.


2.Install and launch this AVCHD Converter for Mavericks. Import Sony FS100U 1080/60p mts footage to the Converter.


3.Click "Format" bar to choose the output format. Click and choose "Final Cut Pro -> Apple ProRes 422 (*.mov)" as Final Cut Pro X compatible codec for editing.


4.You can click "Settings" to customize the output parameters, adjust the resolution, bitrate as you want.

5.Click "Convert" button to start transcoding Sony FS100U 1080/60p AVCHD to ProRes for FCP X on Mac OS X Mavericks 10.9.

Now everthing is done, after conversion, you can easily import Sony FS100U 1080/60p mts files to FCP X for editing. This software runs fast, so you can do AVCHD to FCP conversion in less time, video and audio synchronization are perfectly guaranteed, and you can use accurate trim function when you edit Sony AVCHD video in the software before conversion.

Related Link: