Monday, December 30, 2013

How to edit JVC GY-HM650U MXF, MOV, AVCHD, MP4 on Mac?

Here is the quick tutorial for you that will show you the simplicity of JVC GY-HM650U workflow for importing MXF, MOV, AVCHD, MP4 files in FCP, iMovie, Premiere Pro, Avid for editing by transcoding JVC MTS to Mac editable format (Mavericks 10.9 included). 

Mobile Newsgathering is now faster and better then ever with the introduction of JVC's GY-HM650. It supports

Multiple encoding formats:

HD MPEG2 (35/25/19Mbps)
AVCHD 1920x1080 60i
SD H.264
480x270 H.264 (web)
960x540 H.264 mode

—NEW! (eff. May 2013)


Wide media format compatibility:

.MXF with rich Metadata (optimized for asset management)
.MOV (Final Cut Pro)
.MP4 (XDCAM EX™)
AVCHD with additional lower bitrate AVCHD modes

—IMPROVED! (eff. May 2013)


JVC GY-HM650U is good enough to most photographers, however, using the HM650U MXF/MOV/AVCHD/MP4 footage on Mac is not an easy job without some other apps’ help.

As a Mac user, to easily play JVC GY-HM650U video files on QuickTime and edit these  MXF/MOV/AVCHD/MP4 footage in FCP, FCE, iMovie, Avid MC and Premiere Pro on Mac, here, I will recommend you a smart JVC Video Converter for Mac- Pavtube HD Video Converter for Mac to help you get it done.

It will not only transcode JVC GY-HM650U video to MOV for native editing and playing on Mac, but also keeping audio and video synchronization on Windows and Mac (including Mountain Lion/Mavericks). Overall, With the program, you can transcode MXF/MOV/AVCHD/MP4 files at 1080i, 1080p, and 720p to proper format for:
  • Editing on FCP, iMovie, FCE, Avid, Premiere, iPhoto and more;
  • Playing on portable devices (iPad, iPhone, iPod, Nexus 4, Nexus 7, Galaxy S4, S3, Tab 3, Tab 2, HTC One and so on); or Media Players (QuickTime, VLC Player)
What's more, the Ultimate Converter for Win/Mac supports adding .srt, .ass, .ssa subtitle to your videos or movies.
At first, you can download a free trail version of this iMedia Converter for Mac.

Step 1. Add MXF, MOV, AVCHD, MP4 files to the converter.

Launch the Mac JVC Video Converter. Click "Add Video" or "Add from folder" button to load your source clips from JVC GY-HM650U.


Tip: If you want lossless merge multiple video files, pleas check the "Merge into one file" box.

Step 2. Choose Mac native foramt as output.

You can choose Final Cut Pro -> Apple ProRes 422 (*.mov), this codec is optimized for FCP editing;


You can also choose Avid Media Composer -> Avid DNxHD (*.mov), it's for Avid editing;


For playback, you can choose HD Video -> QuickTime MOV;

For sharing on website like YouTube or portable devices, you can choose MP4 format for output.

P.S. If you wanna edit the video/audio parameters, you need to go to "Settings" window.

Click the "Convert" button under the preview window, and the best JVC Video Converter will start converting JVC GY-HM650U MXF, MOV, AVCHD, MP4 clips to Mac compatible mov format.

When the conversion is done, you will be directed to open the folder where you saved the converted files, and then you can import output video files for editing and playing on Mac. Please take a try now, hope it will do a great favor for you.

Find more related guides:

Friday, December 27, 2013

FAQs & Answers: Canon XF plugins and Final Cut Pro Problem Solved

If you are using a Canon camera and camcorder, and also want to edit on Final Cut Pro 6 or FCP 7/FCP X, you can choose Canon XF plugins. Having problems with plugins? This article will offers you the best solution.


I'm in the process of purchasing a Canon XF Professional camcorder which uses MXF format files. I want to make a short video for my daughter. Next month is her birthday. I am using Apple Final Cut Pro. I always have problems with Canon XF plugins. Is there a place for solving my problems?

Canon developed Canon XF Utility for exclusive use with movies captured with the XF camcorders (XF305/300/105/100) and Cinema EOS C300 camera. The Canon XF Utility offers various options for managing and playing back clips recorded with the camcorder with which the software was supplied. Mainly, Canon XF Utility lets you do the following:

* Checking and playing back clips – Display a list of all the clips recorded on a CF card, search the list and play back clips.

* Saving and writing back clips – Save clips that were recorded on a CF card to the computer, or write back preciously saved clips from the computer onto a CF card.

* Creating and editing User Memo profiles – Create, edit and save User Memo profiles on SD memory cards. Later, you can load a User Memo file from the SD memory card to the camcorder and embed this information with the clips you record.

Canon XF plugin helps users a lot while importing Canon .MXF footage to work with non-linear video editing programs. However, users still have problems one or another when utilizing the software, especially with Final Cut Pro on Mac OS X. We have a collection of frequently asked questions about Canon XF Plugin for Final Cut Pro here, and aim to provide available solutions to these issues.

Problem 1

"We are using FCP 7, and as far as I know it does not read Canon C300 files natively. We tried Canon XF utility, with very limited success, on few different machines. Main problem with that piece of software is that it expects to see compact flash cards straight from the camera and doesn't seem to work very well with folders on an HDD. Is there a recommended workflow for us to move MXF files from an HDD to FCP 7?"

Solution to Problem 1:

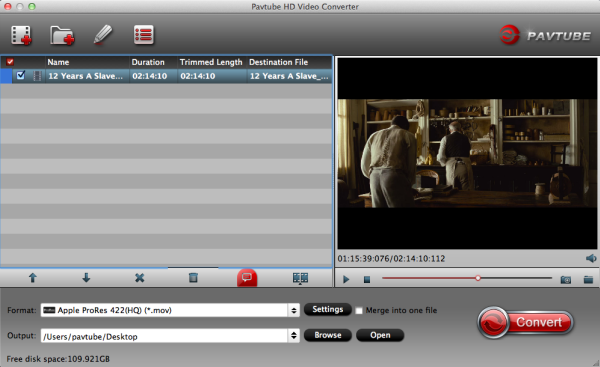
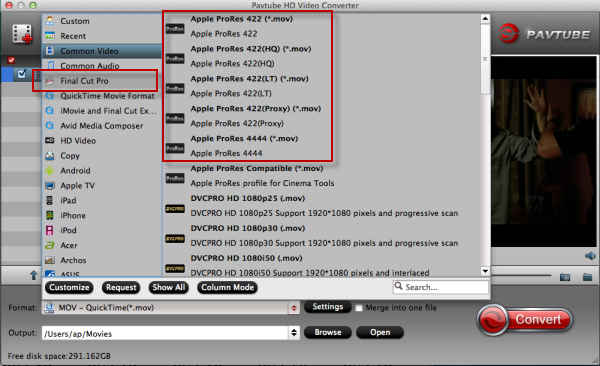
It is strongly suggested to 
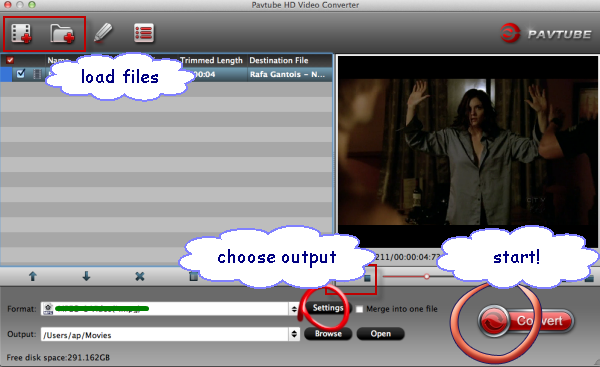
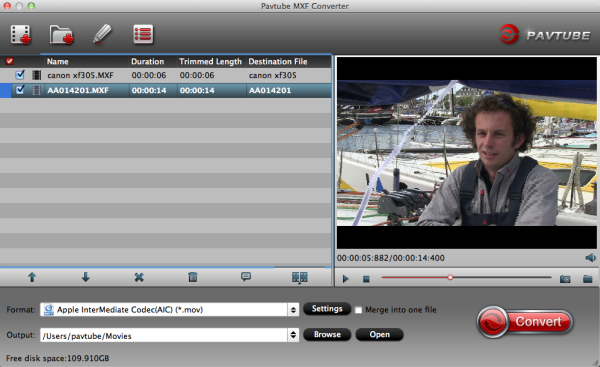
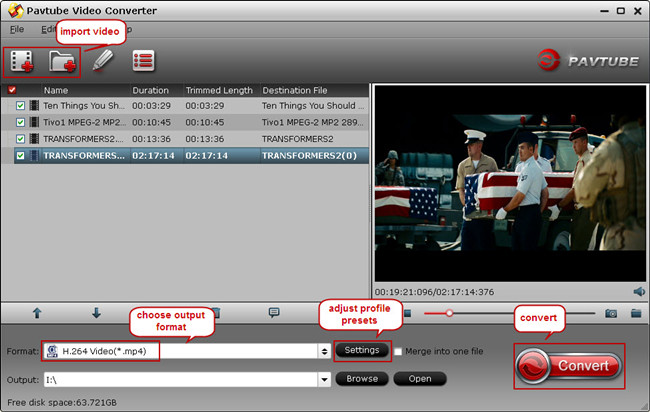
convert MXF clips to Apple ProRes 422 using Pavtube Canon MXF Converter software, because FCP 7 needs to have all the footage on a timeline in the single codec, otherwise it needs to render everything and does not preview clips in realtime. The Canon Camera Video Converter tool is able to load MXF files directly from your camera, or read from a folder stored on your computer's HDD or an external hard drive, as well as separate .MXF clips out of the camera's original folder structure. Plus, this solution is particular helpful when you need combine footage coming from different cameras with different video modes. Best of all, it is capable of keeping multiple audio tracks in your source material.

Problem 2

"Hi, I am about to begin editing a film shot on Canon XF100. I have a hard-drive onto which all of the raw files were dumped, and am now trying to find a way of working with the files. As far as I can make out everything was copied as it should be (i.e. with the directory structure intact):


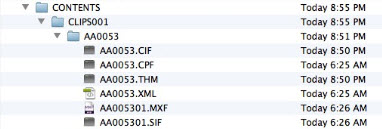
I have installed the Canon XF plugin for FCP. Problems arise when I try to use Log & Transfer to transcode the MXF material. I have tried Native/Pro Res 422/ ProRes LT/in fact all of the options from the drop down destination menu, and keep getting the same problem: namely, that about 80-90 percent of files are only transcoded in part. What I mean is that a 5 minute clip ends up as only 10 seconds. I have FCP 7.0.3 and the relevant Canon XF plugins...Now I'm at a loss as to what to do... Anyone have any suggestions as to how I can start editing this film on FCP?"

Solution to Problem 2:

It seems that Canon XF utility somehow messed up when rendering the MXF media for use in Final Cut Pro 7. We heard people have troubles with EOS plugin of similar nature. Can we L&T footage without utilizing Canon plugin? Actually, there are a large number of Canon MXF converter programs claiming to be good at transferring MXF media files to Apple ProRes 422 for FCP. The thing is that it's difficult to make audio and video always in sync in the generated ProRes MOV files. As for video and audio synchronization, Pavtube Canon MXF Converter does a good job. So, it's wise to use this software for MXF to FCP ProRes codec conversion.

Problem 3

"I especially get confused when I need to download the plug-ins from the Canon site, which is a real mess! I have MXF footage shot on the Canon C300 and I'm trying to convert it from true 24p to ProRes 422(HQ) 23.976. Does anyone know an easy-to-use converter to do this?"

Solution to Problem 3:

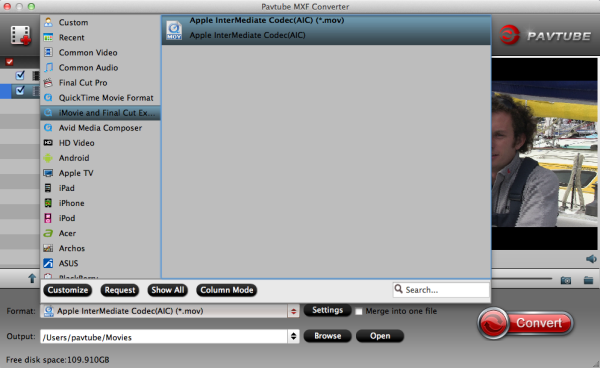
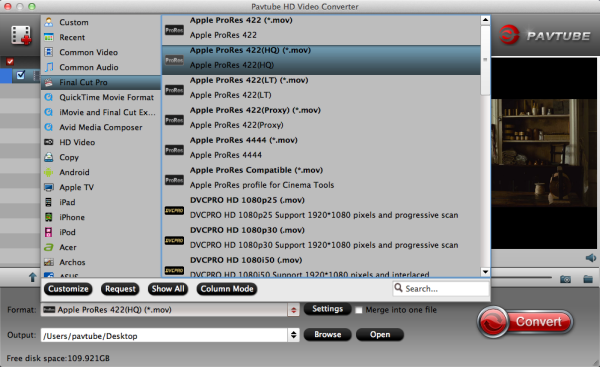
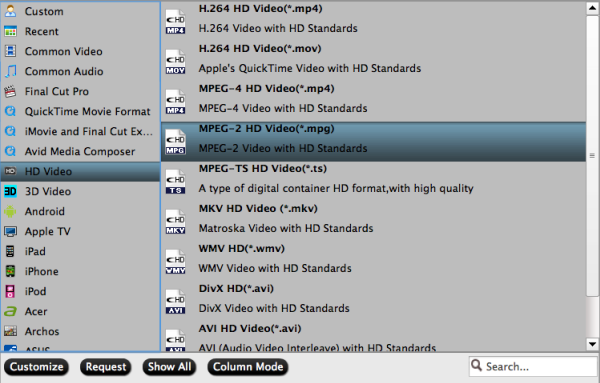
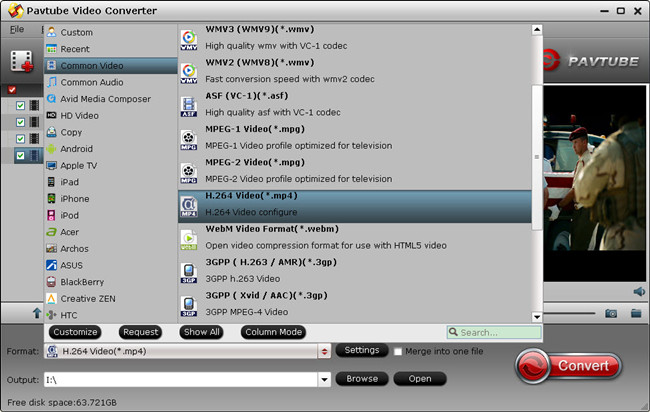
Pavtube Canon Video Converter
will shed you some light on this problem. More than encoding true 24p C300 MXF files to ProRes 422(HQ) 23.976, it can also rewrap MXF to PrpRes 422, ProRes LT, ProRes Proxy, and ProRes 4444 to fit different FCP use.

Problem 4
"I've run into a problem with a project. I copied the entire card file structure of XF305 onto a hard drive, installed all the right codecs...and it's telling me the file structure is invalid."

Solution to Problem 4:

Final Cut Pro users often meet unknown errors when editing Canon MXF clips. Fortunately, we always have workaround to deal with these incompatible issues. Simple convert MXF files recorded by a Canon camera to Apple ProRes 422 via using a Canon MXF Converter, this is the simplest solution.

Basically, with the versatile Canon Camera Video Converter, it will be possible to let Final Cut Pro touch MXF material shot on a Canon XF305/300/105/100 and C300 camera even without utilizing Canon XF plugin.

Read Related Articles:

Thursday, December 26, 2013

Canon MXF Workflow - How to import Canon MXF footage to iMovie

Learn from this article, you can easily convert and import Canon MXF footage into iMovie for further editing on Mac (OS X 10.9 Mavericks included).

Specially designed for video hobbyists and independent filmmakers, iMovie is a proprietary video editing software application which allows Mac, iPod Touch 4th generation, iPhone 4, iPhone 4S, and iPad 2 users to edit their own home movies. iMovie makes it easy to turn your home videos into your all-time favorite films. Here it mainly talks about how to get Canon XF footages to iMovie for editing smoothly.


As you see, iMovie supports importing directly from a large amount of popular camcorders or digital still cameras. But as for Canon XF footages, this becomes a bit tacky that you can not natively import and edit .mxf wrapped footage from the XF100, XF105, XF300 and XF305 cameras in iMovie without rendering time.
A newbie may feel disappinted when the iMovie failed to import recordings from Canon XF105 or XF300 while experienced users will convert the Canon MXF to something iMovie can edit natively, say Apple Intermediate Codec (AIC) encoded MOV format. Along with some help from the third-party software. Video Converter Varies, a recommended one is Pavtube MXF to iMovie Converter for Mac.

The program can not only convert MXF to AIC codec videos for Mac editing, but also provide simple video editing functions for you. After conversion, you can import the output files in iMovie directly without rendering, but you should make sure you select the right codec and parameters to encode. Below is how.

Free Download the Canon MXF Converter for Mac


Guide -Transcode Canon XF MXF footage to AIC for iMovie importing/editing under Mac OS X Mavericks

Step 1. Install and run this Canon MXF to iMovie Converter to your Mac Mavericks 10.9, add you video files.


Step 2. Click on Format, select iMovie and Final Cut Express category, then choose Apple InterMediate(AIC) (*.MOV).


Step 3. Start converting Canon mxf footage to iMovie AIC by clicking "Convert".

Some more helpful features of the app:

1. Settings- click to set video resolution(1920×1080/1440×1080/1280×720/720×480), bitrate(from 1Mbps to 20Mbps), frame rate (24p/30p)

2. Editor (next to “Add” icon)- click to set deinterlace, denoise, mute, volume up, trim, crop, etc.

Tips:

If your videos files have more than two audio channels, and you want to convert to MOV file with all multiple audio tracks preservation, Pavtube iMixMXF can help you to get it done. With it you are allowed to preserve all or any audio tracks for output MOV and mix the multiple audio tracks into one if you need.

Once the conversion completes, you can can import Canon MXF footage to iMovie successfully and get down to video editing.

Read more:

Panasonic GM1 and iMovie - Convert Lumix GM1 MTS for Editing in iMovie 11/9/8

Summary: Encountered problems when importing Panasonic Lumix GM1 AVCHD mts clips in iMovie 11, iMovie 9 & iMovie 8 for further editing? Just follow this article to find the best solution here.

The Panasonic Lumix DMC-GM1 is the company's latest Micro Four Thirds interchangeable lens camera (ILC), and the first in its new GM series. This new range of ILCs focuses on cameras that are compact, and sure enough, the GM1 is the company's smallest yet, measuring just 98.5 x 54.9 x 23.5mm.

I like the high quality video in AVCHD recorded with GM1. I'm a Mac user and shoot many 60i AVCHD videos with my Panasonic Lumix GM1, I find that the AVCHD is a wonderful codec for playback but not so good for editing in iMovie, no matter the version 11/9/8.


I googled and find the reason that I can’t successfully ingest those recorded AVCHD footages to iMovie is limited by the iMovie itself. Currently AVCHD is a very non-standard format and it’s unsupported in iMovie even the lastest iMovie 11. In order to import Panasonic Lumix GM1 AVCHD footage into iMovie 11, iMovie 9 & iMovie 8 for smoothly editing, you can use 3rd-party software to re-wrap and convert MTS to Apple Intermediate Codec first, which is a native format for iMovie. It’s a great way to achieve your goal smoothly. For this purose, this article will show you how to transcode Panasonic Lumix GM1 MTS to AIC MOV in detail.

At first, here suggest you to try Panasonic AVCHD to AIC Converter for Mac. It is an ideal tool which can be used as a Panasonic AVCHD MTS Converter under Mac OS X 10.9 Mavericks, 10.8 Mountain Lion, 10.7 Lion, Snow Leopard 10.6, Leopard 10.5. It is free, clean and safe to install and use. With it, you can effortlessly transcode MTS to Apple Intermediate Codec, ProRes and DNxHD with ease and high video quality kept for working with iMovie, Final Cut Pro, Adobe Premiere, Avid Media Composer etc. non-linear editing systems. Below are the steps.

Guide on how to convert Panasonic Lumix GM1 AVCHD mts videos to iMovie 11, iMovie 9 & iMovie 8 

Step 1. Download Pavtube iMedia Converter for Mac. This professional MTS to AIC Converter can help you convert Panasonic AVCHD MTS files to rich formats for use on Mac (Mountain Lion 10.8 and Mavericks 10.9 included).

Step 2. Install and launch this Panasonic AVCHD MTS Converter. Import Lumix GM1 MTS footage to the Mac converter.


Step 3. Click "Format" bar to choose the output format. If you want to edit Panasonic Lumix GM1 MTS in iMovie/FCE, please choose iMovie and Final Cut Express -> Apple InterMediate Codec(AIC) (*.mov). This is best format for iMovie 11, iMovie 9 & iMovie 8 editing on Mac, once converted, you won't need to render.


Step 4. You can click “settings” to customize the output parameters, adjust the resolution, bitrate as you want.

Step 5. Click convert button to start converting Panasonic Lumix GM1 AVCHD MTS to AIC MOV for iMovie 11, iMovie 9 & iMovie 8 editing.

When the conversion finished, you can directly import the output AIC MOV files to iMovie or Final Cut Express for editing and make your movies. The importing needn’t any rendering because the AIC MOV isone of the compatible video formats in iMovie 11, iMovie 9 & iMovie 8 on Mac OS X (Mavericks 10.9 included).

More related:

Tuesday, December 24, 2013

Merry Christmas! Enjoy your holiday season from now !

2013 Christmas is coming, you may have bought many new digital for play in the holidays, such as tablet, smartphone, camera or camcorders, you may need multimedia software to better enjoy content on the portable devices or recorded by the cameras. Now we are pleased to announce our Year-End Holiday Big Deal, in which four promotionitems allowing you to get awesome free Xmas gifts and Specials at the coming Christmas Day! 

Merry Christmas to everyone! Pavtube is offering our best wishes to every Pavtube member and all potential customers in this holiday season. In addition, it provides excellent customersupport service, including lifetime free upgrade of product and technicalsupport. Users can contact the support staff via email for help and suggestion. For detailed information, please visit the activity page toget the latest news.


Finally, Pavtube Studio members give our best wishes to all our customers inadvance:

Merry Christmas and Happy New Year!

Wednesday, December 18, 2013

Convert MP4 to ProRes 422 (HQ) from Panasonic HX-WA03 to work with FCP

Follow this guide you will know how to import Panasonic HX-WA03 1080P video to FCP 7/X for editing with the best Panasonic MP4 to Prores Converter.

Panasonic HX-WA03 is the perfect travel companion for your next outdoor adventure or journey. This active lifestyle camcorder will work as hard as you and is ready to go anywhere. The HX-WA03 is waterproof, freezeproof, dustproof and is designed to fit firmly in your hand to deliver exceptional performance. Capture the tiniest details in 16-megapixel high-resolution still pictures and even 2-megapixel still images while recording a video by simply pressing the Photo Shooting Button.


The HX-WA03 renders images in breathtaking Full-HD (1920 x 1080)* beauty, so you can save your memories in stunning image quality and watch them on a big screen TV. It can shoot MP4 video with 1920 x 1080 pixels refers to video recordings with 1920 pixels in the horizontal direction and 1080 pixels in the vertical direction. It's great for us to take high quality images and record vivid full HD videos.

If you have got the WA03 and use it to record 1080P video, you may have the need to edit WA03 MP4 in Final Cut Pro on Mac before sharing the videos with others. However, to tell you the truth, MP4 format is not easy to edit, many Mac users complained that they cannot load WA03 recorded MP4 videos in FCP smoothly, the main reason is the H.264 codec and MPEG-4 codec, which is not well accepted.

FCP best supported video format is Apple ProRes 422 codec MOV format. To solve the incompatibility problem, the best method is to convert Panasonic WA03 MP4 footage to ProRes for editing in Final Cut Pro, now you can follow the steps below to transcode WA20 MP4 to FCP X for editing.

To achieve this goal, Pavtube HD Video Converter for Mac is a program my friends recommended to me last year. I am working well with it, and you can try it yourself. With it, you are able to ingest Panasonic HX-WA03 mp4 videos into Final Cut Pro by encoding the MP4 to Apple ProRes 422 (HQ) codec, which is naturally supported by Final Cut Pro 6/7 and FCP X.

Step 1. Add Source Videos

Launch the professional MP4 to Prores Converter, and then click “Add video” button to browse and load your source files. If you need to import an entire file folder directly, simply click “Add from folder” tab.


Step 2. Choose Output format
Go to “Format” menu and choose “Apple ProRes 422 (*.mov)” or "Apple Prores 422(HQ)(*.mov)" as target format from “Final Cut Pro” option to work fine with FCP 7/X.


Learn more Apple ProRes, please refer to Types of Apple ProRes Codecs

Tip:
If you want to set some parameters for the output profile, you could click the “Settings” button to set the output bitrate, encode, frame rate, resolution, sample rate, channels, etc.

Step 3. Start Panasonic HX-WA03 MP4 to FCP Conversion


When the former steps finished, you can press “Convert” button to start rewrapping MP4 files from Panasonic WA03 to Apple ProRes MOV for FCP. Once the conversion process is done, click “Open” button to get the generated MOV files.

NOTE:
The FCP X does not install the QuickTime Codecs automatically, so you need download and install the codec manually from here.

Step 4. Import the converted footages to FCP project


In this way, you can effortlessly import and edit Panasonic WA03 MP4 files in Final Cut Pro smoothly.

P.S.

Need to convert more various formats besides MP4, or convert DVD and blu-ray movies for backup or further playback? Pavtube HD Video Converter for Mac can help you to accomplish both of them. It is integrated software for converting different videos, DVDs and blu-ray discs. 

Tuesday, December 17, 2013

Import MP4 Video into Adobe Premiere Pro CS3/CS4/CS5/CS6

Read this article and you will learn the best and easiest way editing MP4 files in Premiere Pro CS3/CS4/CS5/CS6 by transcoding mp4 to Premiere Pro compatible videos.

Q1: Hi I'm Hayley, I was just wondering, I have footage in a strange format; .mp4, and it wont import into Premiere CS3. Someone asked me if I had all the updates, etc, I do, and still no luck with it...I was thinking of doing a reinstall of it, but if i do that, I will likely have to download all my updates and stuff all over again, and in the end, the mp4 thing still may not work. Before I try the reinstall, I was just wondering if anything else can be done about the format.
Any ideas, friends? Thanks in advance!


Q2: I recorded using camera app in Windows 8. It names the files as mp4 but Adobe Premier Pro CS4 wasn't able to import it. Try rename to mpg, m4v doesn't work, converting using Free Make Video Converter to WMV, MP4, MPG also doesn't work.

Q3: When I attempt to import XDCAM EX clips or MP4 files into Adobe Premiere Pro CS5, I receive the error message "Unsupported format or damaged file." Every time I try, all I get are codes/words and I'm having trouble. Please help?

MP4 files are compressed using h.264 codec which is a final delivery codec not use for editing, while Adobe Premiere Pro CS3/CS4/CS5/CS6 lets you edit faster with true native format support. Therefore you may have problems when importing MP4 footage into Premiere Pro. For smoothly editing .MP4 files in Premiere Pro CS3/CS4/CS5/CS6, you first need to convert MP4 to a more editing-friendly format with Premiere Pro, such MPEG-2/WMV.

To get the work done, a third-party software is needed. Here HD Video Converter for Mac and Pavtube HD Video Converter is highly recommended. They are professional and powerful high-quality Windows/Mac video converter and editor. With it, you can effortlessly transcode 720p/1080p MP4 files to MPEG-2/WMV format for Premiere Pro  CS3/CS4/CS5/CS6 editing. Just download it and follow the tutorials.

Guide: Transcoding MP4 to Premiere Pro CS3/CS4/CS5/CS6 for editing and importing

Step 1: Add mp4 footage from MP4 file folder to MP4 Converter for Premiere Pro. You can directly drag and drop .mp4 video files to this software.


Step 2: Choose Premiere Pro CS3/CS4/CS5/CS6 best editing codec.

Select to rewrap your mp4 files to" Adobe Premiere/Sony Vegas --> MPEG-2 (*.mpg) or WMV (VC-1) (*.wmv)." which work fine with Premiere Pro.


Step 3: Hit "Convert" button to carry out the MP4 to Premiere Conversion process.

When the conversion ends, you can run the Premiere Pro CS3/CS4/CS5/CS6 and click File --> Import --> Files to import the resulted files in Premiere Pro.

From the steps above, I think you got the point to convert MP4 files to MPEG-2/WMV for Premiere Pro editing, please have a try, this software will solve you MP4 files conversion and editing problems, and then you can easily import and use your MP4 files in Premiere Pro  CS3/CS4/CS5/CS6 without any problems.

Read More:

Saturday, December 14, 2013

40% OFF ByteCopy : Enjoy your Xmas Gifts at Pavtube Facebook within Two Days!

Will you take your favorite BD/DVD discs with you for the journey to hometown this Christmas? Are you bothered by naughty kids who always like to throw discs to the air around or make noise during your work? Do you feel boring with no sound around during your housework?

Come on! Just build an e-library of your own Blu-ray/DVD discs from now on~

Wellcome to Pavtube Facebook Weekend Special Offer (Only Two Days)


Get 40% discount for Pavtube Bytecopy for Windows or Mac users:

ByteCopy for Windows 40% off:

https://usd.swreg.org/cgi-bin/s.cgi?s=48737&p=48737-78&q=1&v=0&d=0&rc=45K2D47VH9&a=fb-weekend-bc40%

ByteCopy for Mac 40% off:

https://usd.swreg.org/cgi-bin/s.cgi?s=48737&p=48737-81&q=1&v=0&d=0&rc=45K2D47VH9&a=fb-weekend-bc40%

Pavtube ByteCopy is an all-in-one Blu-ray/DVD solution to meet all the needs of movie fans for multi-track backup and conversion.

Ease of use is the feature liked by every users as backup and conversion are only several clicks away on the straightforward interface.

Bytecopy also supports multi-track subtitles and audio language so that users are free to select preferred subtitle to see and listen.

Another remarkable feature is 3D effect output. It enables users to get fantastic visual experience.

With all these features, users will get easy access to watch movies on portable devices on the go, commute, or during journey on the plane, or train etc.

Learn more:
http://www.pavtube.com/bytecopy/
http://www.pavtube.com/bytecopy-mac/

Interesting?

Don't miss it and tell your friends as well!

It will be expired on 16-Dec,2013.

Other Christmas discount:

http://www.pavtube.com/2013-christmas-specials.html

Now get 40% off for BD&DVD Ripper tool to play Christmas movies on your tablets/smart phone/TV etc at the Facebook Page:

https://www.facebook.com/pavtubefans/app161683100556760

Top 5 Free Online MTS to MOV Converter

In this article, I will show you the top 5 free online mts to mov converter and a desktop video converter, choose the best one to help you achieve the video conversion process.

Do you want to enjoy MTS with QuickTime Players and import in your Windows editor for editing? But you will find your AVCHD (MTS/M2TS/TS) video usually can not be accepted by media players and editing programs easily? Then finding a suitable MTS to MOV converter and an excellent conversion tool for Windows users is a necessity.


Of course, there are really some free video converters, but they often can not accept AVCHD format or not contain MOV output format, some just video editor software, may not convert video clear or sync video and audio. To convert mts to mov perfectly and quickly, I suggest you to choose the desktop video converter to do conversion.
  • Top 5 Free Online MTS to MOV Converter

1. Apowersoft Video Converter

Apowersoft Free Online Video Converter is a great video converter application, which helps you convert videos from hard disk to other compatible video or audio formats for your iPhone, iPad, PSP, DVD or VCD. It supports converting videos to MP4, AVI, MOV, WMV, WEBM, ASF, MKV, MPG, 3GP, DV, SWF, FLV, VOB (video formats) and MP3, WAV, WMA, AAC, FLAC, OGG, RA (audio formats).


2. BenderConverter

Bender Converter is an easy-to-use online application for converting audio and video files. It supports the following formats: MP3, Avi, Mpeg, Flash video, iPod / iPhone, iPad, Gif, Jpeg and other popular formats.

This free online mts to mov converter lets you convert videos less than 100 MB. If your mts file is beyond the limitation, you will need to register it to get more benefits. Then the max file size would be 500 MB. Or if you don't want to, you can just turn to the other 5 converters.


3. Convertfiles

Convertfiles lets you use a free and simple online file converter that works with a wide range of file types, ant it's capable of processing files up to 250 MB. You can convert larger video files at http://www.videotoolbox.com - another premium file conversion service brought to you by the ConvertFiles team.


4. Cellsea Video Converter

Cellsea video converter lets you convert videos to AVI, MOV, MPG, VOB, and etc. You can upload the music from your PC or website url. The maximum file size is 25MB.


5. Clipconverter

Clip Converter is a free online media conversion application, which allows you to reocord, convert and download nearly any audio or video URL to common formats. Currently supported services: Direct Download, YouTube (HQ and HD), Dailymotion (HQ) and many more. This free and fast converter allows you to watch your favorite YouTube videos on your cell phone, PSP, iPhone or nearly any other device.

Its main feature lies in that you can set the beginning and end of your video to be converted. It means that it supports converting a part of the mts instead of the whole video file.


  • Highly recommended Destop Video Converter 
With Pavtube Free Video DVD Converter Ultimate - the best MTS to MOV converter, you can convert MTS to Prores/AIC/H.264/QuickTime with super fast speed and best video quailty.


Key Features:

  • Supports adding *.srt and *.ass subtitle
  • Allows you to adjust 4:3 or 16:9 video aspect, edit video files by trimming (set starting time and ending time), cropping (set aspect ratio) and adjusting video effect (brightness, contrast and saturation) and setting (Resolution, Bit Rate, Frame Rate and Encoder). 
(P.S If you are a Mac user, you can try Pavtube iMedia Converter for Mac)

If you want to convert to more popular portable devices and editing software, Updrade version will give you more great features. You can 1:1 backup DVD or 100% backup the main movie of DVD. Also you can choose to output MP4/M4V files for all portable devices to enjoy videos anywhere.

Good News! Pavtube Release a New Site - multipelife.com with Product Migration and Name Change.

To thanks for your continued support all along our previous site and the new www.multipelife.com, we are holding a 'New Site Special' with fantastic discounts up to 40% off. You can get 20% off BDMagic, 30% off ByteCopy, 40% off DVDAid and 20% off Video Converter Ultimate on Windows/Mac platform:

https://www.facebook.com/pavtubefans/app_209569249055691

Read more: 

http://pc-mac-compatibility-issues.blogspot.com/2014/05/pavtube-new-site-release.html
 

I'm glad to tell that you can get 20% OFF upgrade discount now. Do not miss it. Hurry up to try the upgrade now.
Read more:

Top 5 Free FLV to MPEG Converter
How to convert MKV to M4V with external srt subtitles embedded
How to Convert AVI to MP4 With Zero Quality Loss in Windows 8.1/Mavericks

Thursday, December 12, 2013

Convert .mts files from JVC Everio GZ-HM330SAA in iMovie/FCE/FCP/Avid MC

Here is the quick tutorial for you that will show you the simplicity of JVC Everio GZ-HM330SAA workflow for importing MTS files in FCP, iMovie, Premiere Pro, Avid for editing by transcoding JVC MTS to Mac editable format (Mavericks 10.9 included).

I work at at CyberNet Evolution, and below is a question from one of my friends: 


I purchased a JVC Video recorder, the model is GZ-HM330SAA and I shot some footage about my kids basketball games. I am not sure I just converted the video and gave it to my daughter who edited it on her Apple Mac for me. Just keeping the videos as a record. But I find I couldn’t convert the software to copy to a DVD. I made a mistake purchasing this camera not realisied how difficult it was. I contacted JVC and they were no help at all. 


So I took his camera to my local Tech guy and I couldn’t help much at all either but I start to surf the net and see if I could find something. While searching for solutions, I find some plug-in for Mac can do some work. But the importing way is a tedious process, which needs you patience. Fortunately, I found Pavtube web site and its software, and there is an alternative easy way to fix the issue. 

The easy workaround is to convert JVC Everio GZ-HM330SAA mts files to Mac native editable format along with some help from a third-party tool. Well, if you make the recordings editable before taking to the program, the incompatible error won’t happen any more. Keep reading for a brief how-to below. 

Convert JVC Everio GZ-HM330SAA MTS files for editing in Avid, FCP (X), iMovie, Premiere 

Now go to find Pavtube HD Video Converter for Mac. Lots of users are impressed by this converter since it is powerful enough to convert camcorder videos to multiple video formats for iOS/Android/Windows Tablets & Phones and HD Media Players as well as video editing software including Avid Media Composer, Final Cut Pro (X), iMovie, Premiere and more. And you can enjoy the powerful edit function, like trim, crop, watermark for text, image and video, subtitles and so on. 

The following guide will show you how to transcode/convert JVC HM330SAA mts files for editing on Mac. Download it and follow below steps. 

Step 1. Load HM330SAA MTS files. 

You can choose "add video" directly to add the mts files. 


Step 2. Select output format for video editing software. 

Click "Format" menu you will find various video formats listed by different devices. Choosing the editing software option directly will help you to take less time to find a more preferable video format. 

You can choose Final Cut Pro -> Apple ProRes 422 (*.mov), this codec is optimized for FCP editing; 


For Avid Media Composer, choose "Avid Media Composer -> Avid DNxHD 1080p (*.mov)"; 

For iMovie, choose "iMovie and Final Cut Express > Apple intermediate Codec (AIC) (*.mov)"; 

For Adobe Premiere, just choose "Adobe Premiere/Sony Vegas > WMV (VC-1) (*.wmv)". 

Step 3. Edit loaded JVC HM330SAA MTS video files. 

Click "Edit" button and you are allowed to trim, crop, add text/image/video watermark or some effect to your output video for making it perfect. Here the function of adding subtitles to output files will contribute to make your own videos. You can use free software Subtitle Edit to edit your subtitle content then add it to output videos. 

Tips: Click "Settings" on the interface and you can adjust the parameters including size, bitrate, frame rate, etc. to get a high quality of output files. And keep the settings the same as original video recordings will provide you the least loss of video quality. 

Step 4. Start conversion. 

Click the "Convert" button to start conversion. When it completed, click the "Open" button to get the generated videos for your editing software. 

More features about it: 

1. Rip and convert Blu-ray and DVD including 1:1 backup Blu-ray/DVD movies to Mac hard device for future needs. 

2. Directly Copy feature will save 100% intact .M2TS main movie from original BD disc. 

It is an integration of BDMagic for MacDVDAidfor Mac and Video Converter for Mac and it will meet almost all your requirements about converting videos. 

Now get ready for importing and editing JVC Everio GZ-HM330SAA AVCHD mts videos in FCP/iMovie/Avid MC for editing easily without any problem. Enjoy your editing workflow! 

Learn more JVC video tips: 

Get mts Videos from JVC Everio GZ-HM330SAA into FCP
Transcode GZ-R70 mts clips to iMovie/FCE
How to edit JVC GY-HM650U MXF, MOV, AVCHD, MP4 on Mac?

Tuesday, December 10, 2013

2013 Christmas Biggest Discount: Freebies, Up to 66% off and Buy One Get One Free

Description:  For celebrating the coming Christmas, Pavtube gives best Christmas gifts and biggest discount promotion to our customers for their undying support.

“Jingle bells, jingle bells, jingle all the way, oh what fun it is to ride in a one-horse open sleigh.” Along with the cheerful songs, the annual traditional Christmas Day is coming. Christmas Day, the 25th of December, is the biggest festival celebrated in the Christian countries of the world. Christmas is also a family celebration. As any members of the family as possible gather to eat, play party games and watch the special Christmas programmes on TV. At Christmas, Santa Claus is indispensable which will bring presents for everyone.

Now it is good news for you that Pavtube Studio will play the role of Santa Claus to bring gifts for you. Now we are offering FREE apps and UP to 66% OFF promotion on our Chrstmas Best Sellers 2013. Many featured Blu-ray/DVD/Video Converters (both Windows and Mac versions are available) for you to celebrate the coming Christmas Day from December 10, 2013 to February 10, 2014.


2013 Christmas Special Offer at Pavtube:

Part 1. Freebies and Giveaway
Pavtube DVD Ripper (Win/Mac): A fun, easy and fabulous way to rip DVDs to various video formats with fast speed. Support adding SRT, ASS, SSA subtitles.

Pavtube Video DVD Converter Ultimate: Provides with full Blu-ray, DVD and video solutions for your ultimate multimedia entertainment needs. Users can edit videos and add subtitle files.

  • 30% OFF Deals 
Pavtube Blu-ray Ripper (Win/Mac): 1:1copy BD/DVD disc content; backing up only movie content without extras

Pavtube DVD Ripper (Win/Mac): The best DVD ripping software to convert DVD movies to MP4/AVI/MKV/WMV and many other video and audio formats with high quality.
  • 20% OFF Treats 
Pavtube Video Converter (Win/Mac): the best video editor and converter tool

Pavtube Video Converter Ultimate (Win/Mac): An extremely powerful all-in-all app to meet every one of your Blu-ray, DVD and video conversion needs. Fast conversion speed and high quality conversion.

Part 2. Buy one Get One Free
a. Buy MTS/M2TS Converter (Win/Mac) – Handle AVCHD MTS/M2TS files in an easy way

You can get MKV Converter (Win/Mac) or FLV/F4V Converter (Win/Mac) for free.

b. Buy MXF Converter (Win/Mac) - Encode MXF clips for editing and playback.

You can get one of MKV Converter (Win/Mac), FLV/F4V Converter (Win/Mac), MOD Converter (Win/Mac), and TOD Converter (Win/Mac) for free.

c. Buy HD Video Converter (Win/Mac) - An all-in-one Video Converter to get your camera videos and TiVo recordings onto editors and players.

You can get DVD Creator (Win/Mac) for free.

d. Buy Media Megician (Win/Mac) - A nice camcorder assistant manager, lossless camcorder video joiner. An easy tool helping you to convert videos and upload to YouTube.

You can get DVD Creator (Win/Mac) for free.

Part 39.9 products:

a. MKV Converter - select wanted subs/audio/video track from MKV to be kept in the output files.

b. FLV/F4V Converter – convert, trim, crop FLV or F4V to other formats.

c. TOD Converter - fast convert, compress, and edit TODs from JVC camcorders for any portable devices.

d. MOD Converter – stream, convert and edit MOD recordings shot by camcorders(JVC, Panasonic, Sony)

Part 4: Sharing at your Facebook Page to get more discount

Share this activity on your face to get 20% Coupon on any product at Pavtube like the following ones:

a. ByteCopy (Windows/Mac)

b. MXF MultiMixer

c. iMixMXF

Click "Share on Facebook" button, insert "#PavtubeChristmas2013", choose "Public", and click "Share Link". You will get another 20% coupon. The discounted link will be sent to your Facebook "Inbox" or "Other" within 24 hours on work days.


If don't receive message from strangers, please don't forget to contact us for the discounted link via faq@pavtube.com.

Money-Saving Bundle - Save Up to $35


ByteCopy($42) + Blu-ray Video Converter Ultimate($65) = Only $80, Save $27
ChewTune ($29) + Blu-ray Video Converter Ultimate($65) = Only $75, Save $19
ChewTune($29) + ByteCopy($42) = Only $54, Save $17
ByteCopy($42) + DVD Creator($35) = Only $60, Save $17
ByteCopy($42) + MXF MultiMixer($45) = Only $70, Save $17
ByteCopy($42) + Video Converter($35) = Only $60, Save $17
Blu-ray Video Converter Ultimate($65) + DVD Creator($35) = Only 65$, Save $35

If don't receive message from strangers, please don't forget to contact us for the discounted link via faq@pavtube.com

More Christmas Gifts are available on Pavtube Christmas Specials 2013

From: http://open-mobile-share.com/2013-christmas-crazy-promotion/ 

Monday, December 9, 2013

Converting HD-DVD (.evo) files to NAS for streaming to Xbox 360

This article will help you to convert HD-DVD .evo videos to NAS server compatible files so you can stream them from NAS for watching on your Xbox 360 easily.

Question: Hi - obviously it's possible to play .ts files through an xbox 360 connected to a media center pc...but anyone know if it's possible to play .evo files (movies ripped from my HD-DVD collection) through the same setup?


As the .evo files didn't work with Xbox 360, you need to convert HD-DVD (.evo) movie files into H.264 MP4 before streaming from NAS to Xbox360.

To accomplish this goal, you are highly suggested to try this Pavtube Video Converter, a professional tool to help you quick convert various video formats including .evo videos ripped from HD-DVD collection to Xbox compatible MP4 format with best video quality and simplest workflow.

Below is a user's Review:

Having tried Cuda Video Converter Advanced Verision, but I think Pavtube will be a winner, as for its best UI, best Features, easy-to-Use workflow and reasonable Price. I like its Cuda acceleration, the User Interface is nice too. It not also has the ability to convert HD-DVD (.evo) files, but also support all my input and output video formats. Oh, what I like best is its batch mode. 

FYI: You can reach the Mac version here: Pavtube VideoConverter for Mac.

How to watch BHD-DVD (.evo) files on Xbox 360??

Step 1. Run Best EVO Converter and import .evo videos.

Click "Add Video" or "Add from folder" icon to load  to choose import individual videos or the entire folder. Drag-and-drop is also supported.


Step 2. Choose Format.

Click"Format" drop-down list and choose "Common video>H.264 Video(*.mp4)"; it'sthe most widely used format which will be supported by your TV.


Step 3. Adjustvideo specs or change aspect ratio (Optional)

If you are not satisfied with default specs, then click "Settings" to enter Profiles Settings windows; here you can customize video frame rate, bitrate,size and other settings freely.

If you want to trim, crop, edit audio/subtitles or adjust aspect ratio, click the pencil-like icon and switch to "Crop" tab. Choose Advanced mode, lock the "Keep Ratio" and you can free change aspect ratio.Usually it will be set to "Original"; it would be ok to playback on Xbox 360, or you can change it to 16:9.

Step 4. Start conversion.

Clickthe big red "Convert" to start converting your HD-DVD EVO files to H.264 MP4. After the conversion, click "Open output folder" to quick locate converted files; now stream the converted EVO movie in MP4 to your NAS and stream to Xbox 360. Now freely enjoy your HD-DVD evo movies with family!

More related:

Wednesday, December 4, 2013

Problem with loading Nikon D3100/D3200 H.264 MOV files to FCP 6/7

This article offers a brief guide about how to transcode and transfer Nikon D3100/D3200 H.264 MOV footages to Mac editing program in FCP 6/7.

Qusstion:

I am using the older FCP 6.0.6 with a new Nikon D3200 DSLR that shoots "MOV" files.  I can't seem to find "settings" that enable "copying," "importing" "log and caputure," whatever process. FCP crashes every time I try to get the files. FYI:  I am shooting in 1920x1080 at 24p and mostly trying the Apple ProRes 422 (HQ) setting, but have tried DVCPRO also. Anybody got suggestions about what I need to do?

Best Answer:

You need to convert the native format that camera shoots Before you import. There is no plugin that allows FCP 6/7 to deal with that tapeless format, like it does with Canon DSLRs via Log and Transfer. You'll need to convert the H.264 mov files to ProRes 422(HQ), then import those files into FCP .

As a Nikon D3200 user, you may also have this question. Nikon D3200 shoot videos in h.264 mov format. Except D3200, most Nikon D series camcorders record videos with this format, like Nikon D800, Nikon D4, Nikon D3100, Nikon D3200, Nikon D5100,etc. As far as i know, h.264 is the maximum compression ratio codec. On one hand, it will give us resonable video size, on the other hand, it's not suitable for editing by most editing software. Final Cut Pro 6/7 also included.

To solve the importing problem loading Nikon D3100/D3200 H.264 MOV files in FCP 6/7, you’d better choice to convert Nikon H.264 MOV to ProRes 422 codec MOV format, then you can edit video well in FCP 6/7 on Mac.

Check out Pavtube HD Video Converter for Mac, a top H.264 MOV to ProRes MOV Converter. It supports transcoding all Nikon 1080p MOV files to Apple ProRes so that you can easily import the Nikon D3100/D3200 h.264 recordings to Final Cut Pro X, Final Cut Pro 6, Final Cut Pro 7 for editing on Mac (Mountain Lion and Mavericks 10.9 included). Plus, it also supports converting H.264 MOV to iMovie, FCE, Adobe, Avid and more.


Free Download and install the top Nikon H.264 Video Converter and follow the steps below to convert Nikon D3100/D3200 MOV to Final Cut Pro 6/7.

1. Transfer h.264 encoded .mov files from Nikon D3100/D3200 camera to your Mac HDD via USB cable. Run Pavtube HD Video Converter for Mac, click “Add video” to load the Nikon DSLR recorded MOV video or directly drag the files to this Mac HD Video Converter.


Tips: If you have multiple MOV clips, you can select the “Merge into one file” box to merge your multiple MOV files into one file.

2. Click “Format” bar and choose “Final Cut Pro -> Apple ProRes 422 HQ (*.mov)” as export format.


The Apple ProRes 422 (HQ) codec offers the utmost possible quality for 4:2:2 or 4:2:0 sources (without an alpha channel) and provides the following:
  • Target data rate of approximately 220 Mbps (1920 x 1080 at 60i)
  • Higher quality than Apple ProRes 422

Of course, Apple ProRes 422, Apple ProRes 422 LT, Apple ProRes 422 Proxy, Apple ProRes 4444, etc are all the proper format.

Learn more Apple ProRes, please refer to Types of Apple ProRes Codecs

3. Click the “Settings” button and customize proper video/audio parameters if necessary. Video size, bitrate and frame rate are flexible and can be adjusted as you like. E.g. Set video size to 1920*1080 when you feel like to keep 1080p as the source file features.

Before start the conversion, edit function is useful and convenient for you to use. You can deinterlace, trim, crop, adjust effects or add watermark to the video.


4. Click “Convert” button and transcode Nikon D3100/D3200 H.264 MOV to Apple ProRes MOV for using in Final Cut Pro 6/7 on Mac.

Once the conversion is finished, you can click “Open” button to get the output files effortlessly. Now you have got it right and them import the Apple ProRes .mov videos to FCP 6/7 for editing. Launch the Final Cut Pro, choose from File menu > Import > Files…

Read more:

Get iMovie/FCE to recognize or import Nikon D4 mov
Lossless edit best DSLR Cameras H.264 HD clips in FCP X
Compatibility of Nikon mov files with Mac

Tuesday, December 3, 2013

Cyber Monday 2013 Sales- Share your sports photos, Get 50% off Pavtube products

Cyber Monday deals are here at Pavtube, now upload your sports photos to win any BD/DVD/Video Converter with 50% off. Read on for the best Pavtube Cyber Monday Specials has to offer.

Some of us simply aren't brave enough to face the Black Friday hordes, that doesn't mean stay-at-home shoppers aren't still looking for a bargain: Cyber Monday is upon us, and there are deals aplenty. If you skipped this weekend's brick-and-mortar discounts, read on to see Cyber Monday Deals 2013.

With so many ads posted all over online and offline, are you tried of waiting in front of stores or browsing the Cyber Mondy ads? Now take a look at Pavtube Cyber Monday Specials!

Are you a photography lover? Now upload your favorite sports photos to win any Pavtube Blu-ray/DVD/Video Converting programs with 50% off on Cyber Monday. Only two days!!! Never miss!!!


Do you play any sport? Or are your kids part of a team?

Upload your kid's team photo (or yours!) for the most unforgettable moment of 2013.

Photos with most appealing content as well as title (as short explanation of the photo) will have the chance to win any Pavtube product (BD/DVD Ripper and video converter series) with 50% off! And these photos will be shared on our Facebook~

Upload photo to faq@pavtube.com via www.wetransfer.com

It will be expired on 3-Dec,2013

Come on! Click here: https://www.facebook.com/pavtubefans/posts/661087180602388


Source: http://surface-video-converter.blogspot.com/2013/12/cyber-monday-2013-begins.html