Friday, November 29, 2013

Enable iPad Air, iPad Mini 2, iPad Mini to play HD Videos on Mac

Want to play MKV, VOB, Divx AVI, Tivo, WMV, MTS, MXF, M2TS, FLV, F4V, 3GP, M4V on iPad Air, iPad Mini 2, iPad Mini? Follow the guide convert all kinds of HD videos to iPad series supported video format before transferring on Mac.

The iPad Mini's ultrathin and light design is far more intimate and booklike than the larger iPad, and its cameras, storage capacities, optional LTE antenna, and general functionality offer a full iPad experience. The screen's dimensions elegantly display larger-format magazines and apps. Andt the iPad Air and iPad mini 2 with Retina Display were announced on Tuesday, October 22, and the new tablets are pretty much a reflection of Apple's quest for perfection.


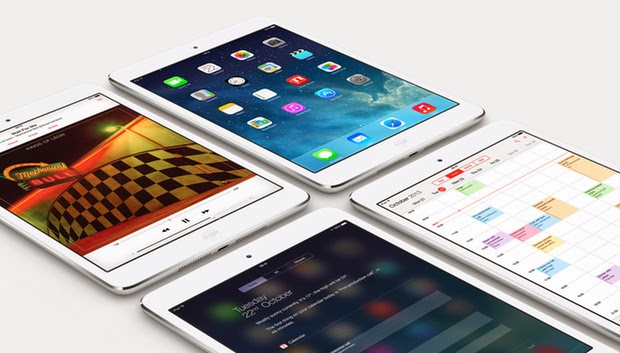
From HD movies, TV shows to music video, the high-resolution display of iPad Air, iPad Mini 2, iPad Mini will give you perfect visual perception. However, you should also be aware that, iPad series only support limited video formats like .m4v, .mp4, .mov, MPEG-4, H.264, M-JPEG, etc, you can't play MKV, VOB, Divx AVI, Tivo, WMV, MTS, MXF, M2TS, FLV, F4V, 3GP, etc. HD videos on iPad Air, iPad Mini 2, iPad Mini directly. Well, to play MKV, VOB, MPG, Tivo, MTS, FLV/F4v on iPad Series, the easy way to convert HD video to iPad Series compatible MP4 format using iPad Video Converter software before dragging them into iTunes.

Here Pavtube iPad Series Video Converter for Mac is your best choice. It has easy quick interface, and great final file quality. (Windows users: iPad Series Video Converter .)

Fistly download it and now you can follow the easy steps below to convert HD Videos to iPad Air, iPad Mini 2, iPad Mini support format on Mac for playback.

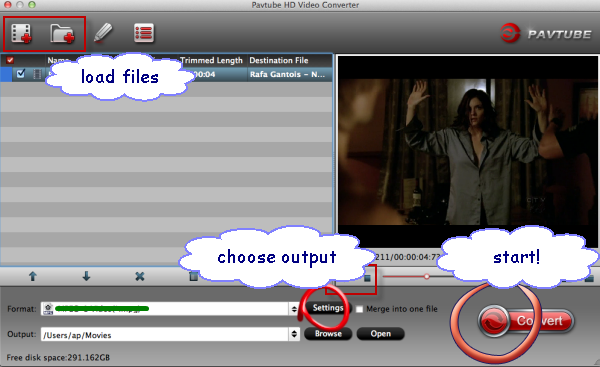
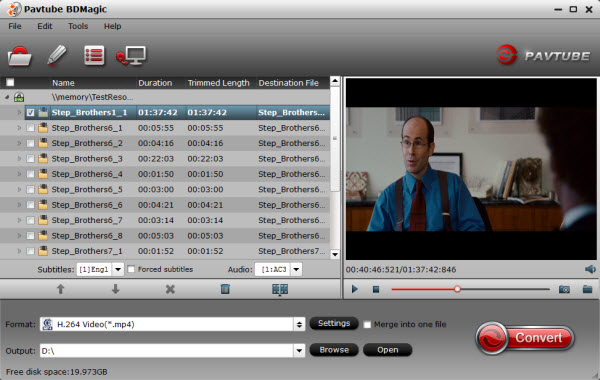
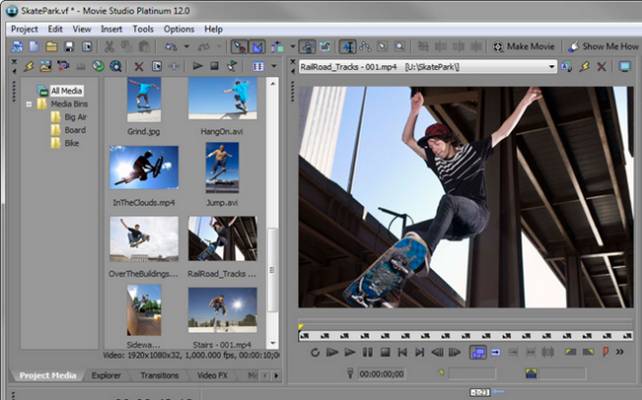
Step 1. Load HD Video files.

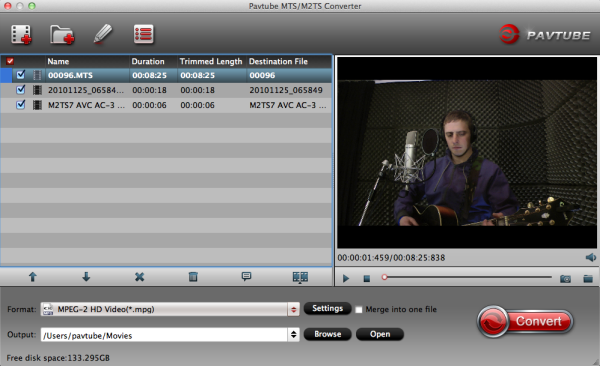
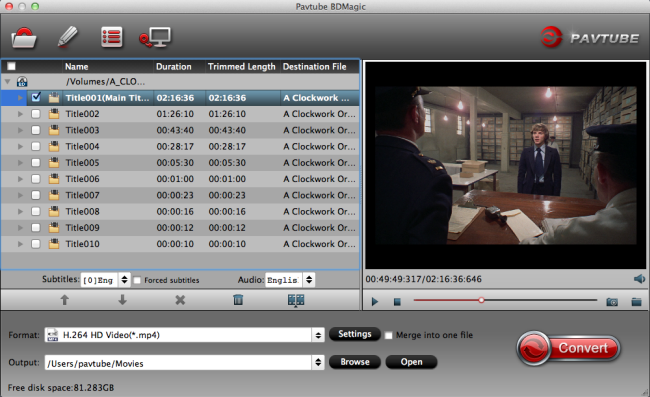
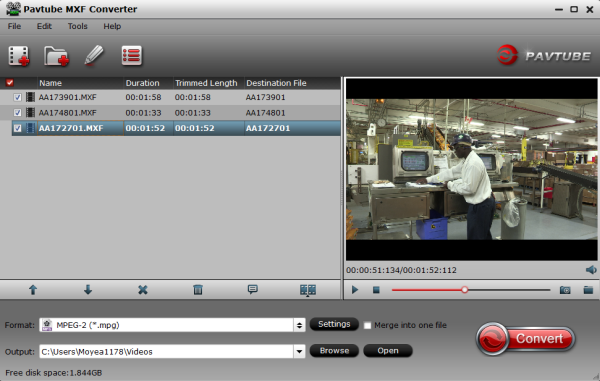
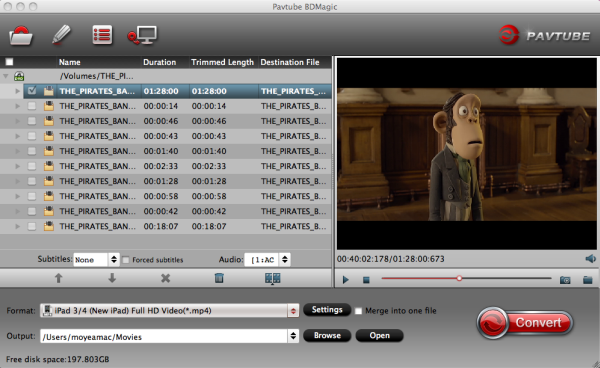
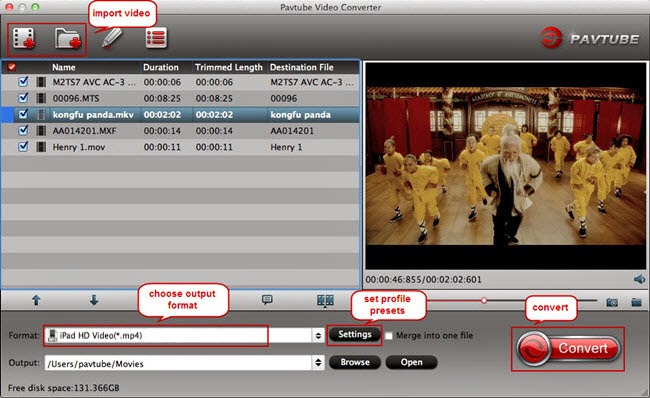
After downloading, install and run the Mac iPad Video Converter on your Mac, then click "Add videos" or "Add from folder" to import your source videos. Pavtube Video Converter for Mac support batch conversion.


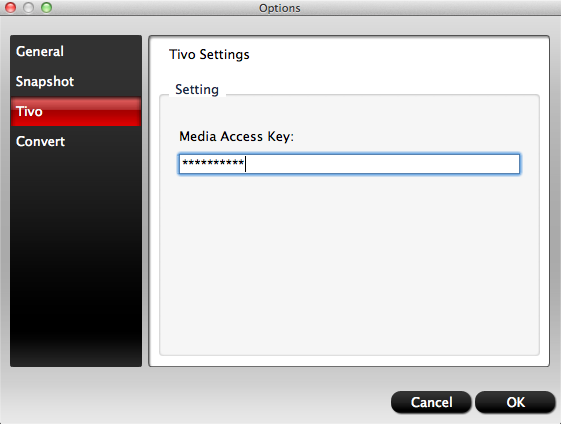
Note: when load tivo file to Pavtube Video Converter for Mac, The program will ask you to enter you Media Access Key, Do as the program requires, and then click ok to continue.


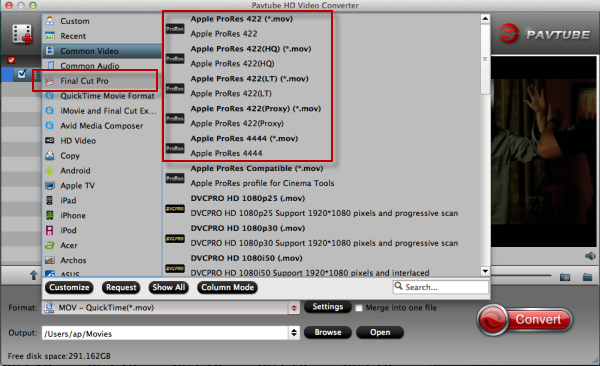
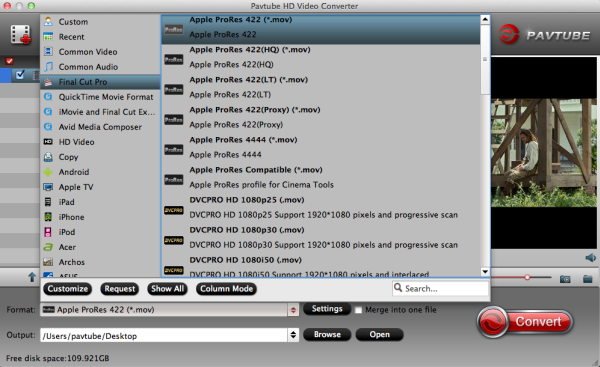
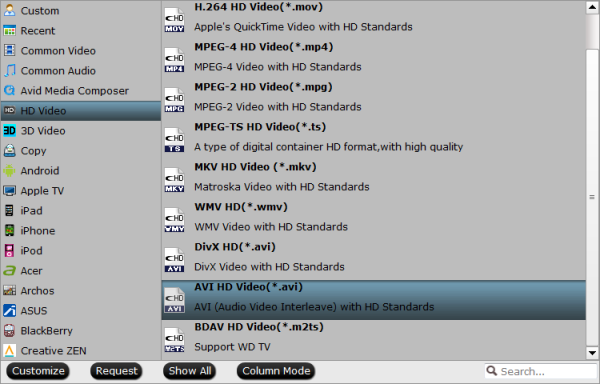
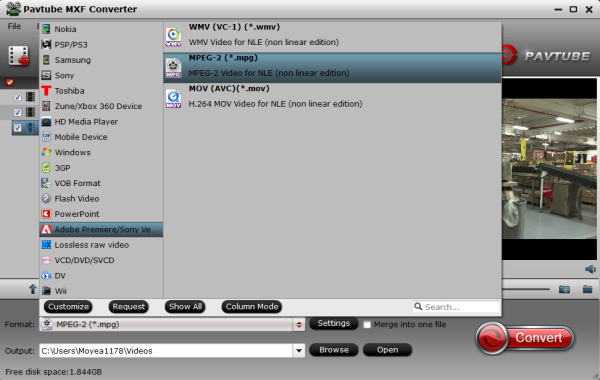
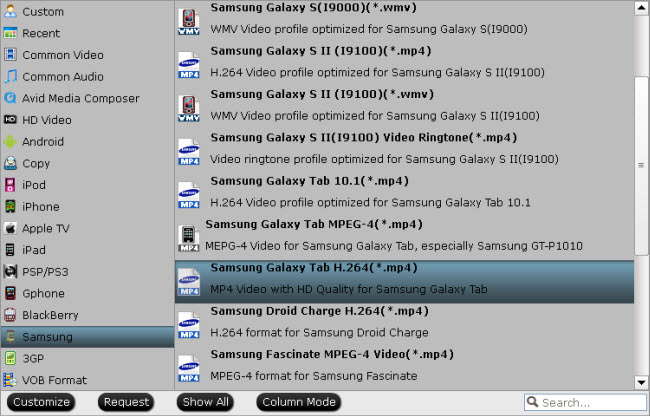
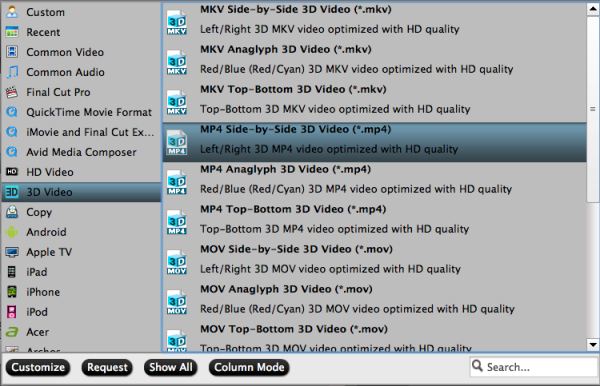
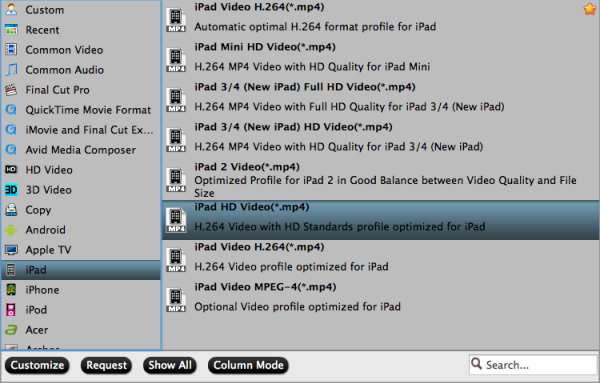
2. Choose H.264(*.mp4) as iPad Air, iPad Mini 2, iPad Mini most compatible format.

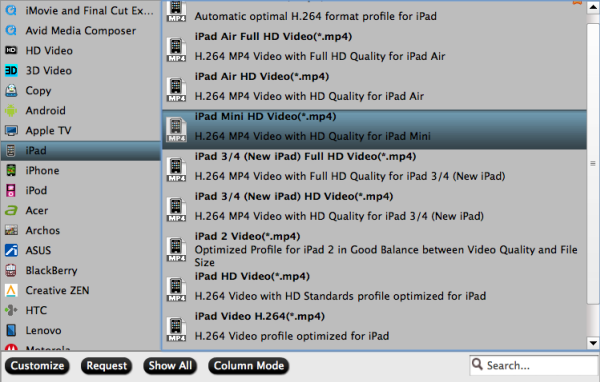
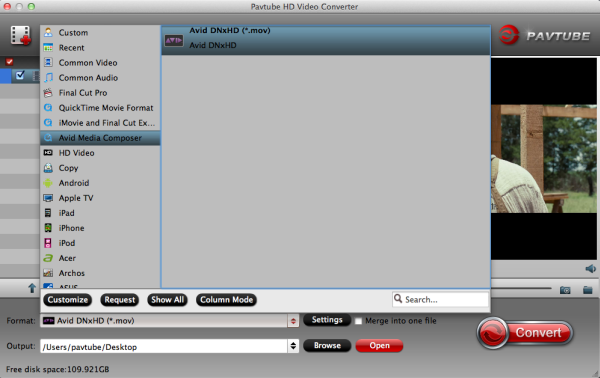
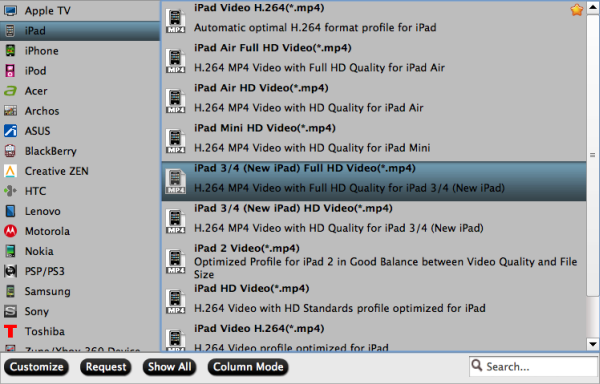
Click "Format" bar and you can easily find the optimized videos for iPad Series.

For iPad Air, choose " iPad > iPad HD Video(*.mp4)".

For iPad Mini 2, iPad Mini, select "iPad Mini HD Video(*.mp4)".


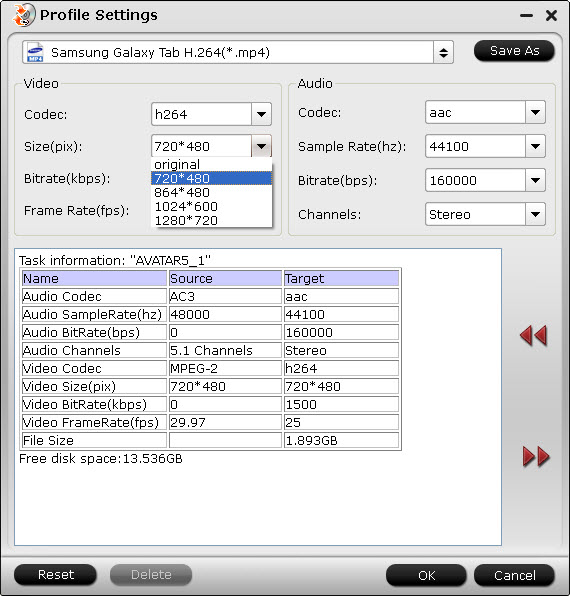
Tip:
If you like, you can click "Settings" to change the video encoder, resolution, frame rate, etc. as you wish. According to my experience, the file size and video quality is based more on bitrate than resolution which means bitrate higher results in big file size, and lower visible quality loss, and vice versa.

For watching HD videos on iPad Air, iPad Mini 2, iPad Mini, 720p with 2000~2500kbps is just all right. When the above mentioned steps finished you can click the big red "Convert" to start converting MKV, AVI, VOB, MPG, Tivo, WMV, MTS, M4V, FLV/F4V to iPad Air, iPad Mini 2, iPad Mini MP4 at fast speed on Mac.

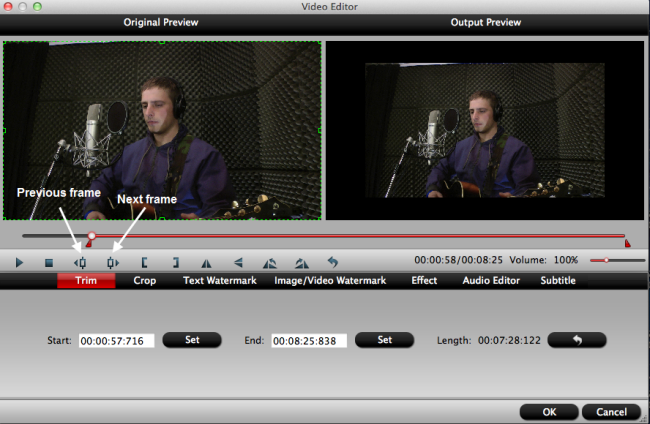
Note: Before the conversion, you can edit your videos by trimming, cropping, adding watermarks, inserting subtitles and more to get the exact effect and feel you want. (Click the "Edit" button to open the video editing window, where you can perform the operations.)

After the conversion, click "Open output folder" in conversion window or "Open" in main interface to get the generated mp4 files and transfer them to your iPad Air, iPad Mini 2, iPad Mini for joy. Enjoy!

To enjoy all the HD videos, Blu-ray movies and DVDs on your  iPad Air, iPad Mini 2, iPad Mini, a professional all-in-one program is the key. iMedia Converter Mac is highly recommended here with its easy, clear and impressive features. If you are running a Windows computer, Pavtube Video Converter Ultimate is the definite option. (Both are 20% off now)

Related Articles:

Transfer Blu-ray movies to iPad Air
Convert MKV on iPad Air,iPad 3 and new iPad 3 on Mac
Convert DVD to iPad Air, iPad Mini 2, iPad 4 on Mavericks

Convert 5D Mark III h.264 footage to ProRes 422 for FCP 7

In this guide, you will learn how to convert Canon EOS 5D Mark III mov to Apple ProRes on Mac OS X so that you can smoothly import/edit 5D Mark III videos in Final Cut Pro 7 without rendering time.

As the latest in its enthusiast full-frame 5D series and successor to the popular EOS 5D Mark II, Canon EOS 5D Mark III has been tested to be a great camcorder by a number of truly brilliant photographers across the globe who prefer to use it daily in all sorts of disciplines and locations, and attracted much attention even since it has not came out to the market. Based around a 22MP full-frame sensor, it can shoot 6 frames per second and features a 61-point AF system much like the 5D Mark III. It can capture 1080p movies at 24, 25 or 30 fps and offers high quality intraframe (All-I) video compression amongst a host of movie-related improvements.


Everything is good but the only problem, as many Canon DSLRs users may have, is the incompatibility which will jump out when you want to ingest Canon EOS 5D Mark III 1080p MOV files to Final Cut Pro 7 for editing on Mac. They will hit a snag in the form of a “contains unsupported media… invalid directory” error. You can import your files with Log and Transfer but you have to back up the ENTIRE CARD STRUCTURE from the beginning.

Obviously, what matters is not the MOV fomat, since it is fine while playing with QT player on Mac, but the H.264 codec. It is a highly compressed codec, great for playing/streaming videos. But as for editing H.264 MOV in FCP, it is not such a suitable choice. In order to make Canon 5D Mark III footages editable in FCP 7, you have to convert H.264 MOV to ProRes 422, the codec which is proved to be the most compatible one with FCP 7.

You are provided with five options, including Apple ProRes 422 HQ (*.mov), Apple ProRes 422 (*.mov), Apple ProRes 422 (LT) (*.mov), Apple ProRes 422 (Proxy) (*.mov) and ProRes 4444 (*.mov). Here listed the main difference of the five ProRes codecs.

a. ProRes 422 (HQ): offers the utmost possible quality for 4:2:2 or 4:2:0 sources and provides target data rate of approximately 220 Mbps and higher quality than Apple ProRes 422;

b. ProRes 422: provides target data rate of approximately 145 Mbps and higher quality than Apple ProRes 422 (LT);

c. ProRes 422 (LT): provides roughly 70 percent of the data rate of Apple ProRes 422 (thus, smaller file sizes than Apple ProRes 422) and higher quality than ProRes 422 (Proxy);

d. ProRes 422 (Proxy): provides roughly 30 percent of the data rate of Apple ProRes 422 and high-quality offline editing at the original frame size, frame rate, and aspect ratio;

e. ProRes 4444: offers the utmost possible quality for 4:4:4 sources and roughly 50 percent higher than the data rate of Apple ProRes 422 (HQ).

A top Video Converter for Canon 5DM3 and FCP 7 users should be developed with all the five options. Here recommended the best H.264 MOV to ProRes Converter for Mac in that it is not only capable of converting H.264 MOV files to Apple ProRes codecs, all 5 ProRes codecs included, but also able to rip your BD/DVD disc for editing.

What's more, you can make your work easier with some useful editing functions, including joining imported clips together for easy importing, trimming section of your file, adding text/image/video watermarks to your original files, replacing audio tracks, etc. Follow the Three-step conversion and you are capable of importing/editing Canon EOS 5D Mark III files in Final Cut Pro 7.

Three-step Guide for transcoding Canon EOS 5D Mark III H.264 MOV to Apple ProRes for FCP 7

Step 1: Free download and run the best Mac Canon MOV to ProRes Converter for FCP, and drag Canon EOS 5D Mark III H.264 MOV files to the software.

Step 2: Select output format for Final Cut Pro. You are advised to choose “Apple ProRes 422 (*.mov)”or “Apple ProRes 422 HQ (*.mov)” format.


Due to the difference in the compresstion standard of AVCHD and ProRes 422, the converted files are significantly larger than the original ones. If you prefer smaller file size, please choose “Apple ProRes 422 (LT) (*.mov)” instead.

Since ProRes 422 (LT), ProRes 422 (Proxy), and ProRes 4444 have not been added to FCP 6, you’d better not set one of them as output if you happen to edit your H.264 files in FCP 6 before upgrading FCP 7.

Tips:

1. Settings- click to set video resolution(1920×1080/1440×1080/1280×720/720×480), bitrate(from 1Mbps to 20Mbps), frame rate (24p/30p)

2. Editor (next to “Add” icon)- click to set deinterlace, denoise, mute, volume up, trim, crop, etc.

Step 3. Click the “Convert” button to start converting H.264 MOV files to Apple ProRes on Mac immedaitely.

After converting the Canon DSLR EOS MOV video to ProRes format, you can easily import/edit Canon EOS 5D Mark III MOV files in Final Cut Pro 7 smoothly on Mac.

When the conversion is completed, please run the FCP 7 and click File –> Import –> Files for editing Canon EOS M files in FCP 7 without any rendersing and quality loss.

Besides the ability to transfter the EOS 5D Mark II files to FCP 7, the versatile Canon Video Converter for Mac can help you ingest/edit H.264 MOV files into FCP X, iMovie, FCEAdobe Premiere Pro, Adobe Premiere Elements, Adobe After Effects, Avid Media Composer, etc.

Hope you enjoy it!

Read Related Articles:

Wednesday, November 27, 2013

Pavtube Black Friday Deal - Play to Win! Earn $30 Amazon gift card and Free products

2013 Black Friday & Christmas shopping season starts on November 29, 2013. At Black Friday & Cyber Monday shopping season, how to prepare and make shopping plans? Come to play Sudoku and earn $30 Amazon gift card and extra coupons for any Pavtube products now.


Any plans lined up for the special day? With so many ads posted all over online and offline, are you tried of waiting in front of stores or browsing the Black Friday ads? How about having some fun: come and play Sudoku to earn $30 Amazon gift card, Free or Up to 50% OFF for any Pavtube Blu-ray/DVD/Video/iTunes programs.

Do you Sudoku?

Take"Evil level" to go~

https://www.facebook.com/pavtubefans/app_192602997444667

Difficult?
Take it easy
Click "Medium level" or "Easy level"to go!

Good luck~

* All participants will get 30% discount at least!
* Share this poster on Facebook to get 40% discount for any Pavtube product.
* Write movie review for your favorite movie to get 50% discount for any Pavtube product, or even free if your movie review is confirmed to be excellent by us.

For Sudoku players:

Losers: 30% discount for any Pavtube BD/DVD/video converter series if they send us answer by Message only via Facebook.

Lucky winners will be automatically chosen from replied persons and get bonus below:


Easy level: 100 lucky winners are allowed for 40% off for any Pavtube product
Medium level: 2 lucky winners are allowed for 50% off for any Pavtube product or USD 10.00 Amazon coupon.
Evil level: Only 1 lucky winner is allowed for any Pavtube product for free or USD 30.00 Amazon coupon.

Rules: Fill the grid so that every row, every column and every 3x3 box contains the numbers 1 to 9.

Send answer by MESSAGE only via Facebook.
***DO NOT reveal your answer by replying directly***

Lucky Winners will get the for Pavtube discount product or Amazon Coupon after the exact need is confirmed in their message.

It will be expired on 2-Dec,2013

Come on! Click here: https://www.facebook.com/pavtubefans/posts/659389654105474

Source: http://video-tips.jimdo.com/2013/11/27/2013-black-friday-deals/ 

Monday, November 25, 2013

Best way to import Sony Alpha NEX-5T MTS to iMovie & FCE

This article teaches you how to easily convert and import Sony Alpha NEX-5T MTS footage into iMovie or Final Cut Express for further editing on Mac (OS X 10.9 Mavericks included).

Sony brought its NEX mirrorless camera series into the hybrid autofocus age, with the debut of the NEX-5R. Just ten months later, that camera gets a more modest refresh, with the arrival of the Sony NEX-5T.


Sony Alpha NEX-5T can record Full HD (1920 x 1080 pixel; 1080p/1080i) movies at a rate of either 60 frames per second, 24 frames per second, or 60 interlaced fields per second. (In some markets, the 60p/60i rates are replaced with 50p/50i rates, and the 24p rate with 25p.) You can also opt for lower-res 1440 x 1080 and 640 x 480 movies, with a fixed rate of 30p (25p on overseas models).

At the maximum resolution, movies are saved using AVCHD version 2.0 (MPEG-4 AVC / H.264) compression with AC-3 stereo Dolby Digital audio. At lower resolutions, movies are saved with MP4 compression and MPEG-4 AAC-LC stereo audio. Most users would like to make some editing with MTS footage from Sony Alpha NEX-5T, but problems came up as AVCHD is not a friendly format for editing in iMovie and FCE.

To solve the problem, you'd better transcode Sony NEX-5T AVCHD mts footages to AIC MOV for iMovie and FCE first. And here you need some third-party program to help. Pavtube MTS/M2TS Converter for Mac is an ideal choice for me. It works very well in the past months and also you can choose to output the video as 1080p or other size. It can convert Sony NEX-5T AVCHD MTS video to AIC codec .mov format, and then you can edit Sony Alpha NEX-5T MTS files natively in iMovie and FCE on Mac (OS X 10.9 Mavericks included).

Step 1. Free Download the Converter, install and run. And then import Sony NEX-5T recorded mts videos to the MTS to AIC converter.


PS: It's an excellent Sony AVCHD Converter for Mac which can also transcode MTS to an editable format like ProRes for FCP, AIC for iMovie/FCE, MPEG-2 for Adobe; to a playable format for putting on portable devices or uploading to YouTube.

Step 2. Click the format bar, and move mouse cursor to "iMovie and Final Cut Express > Apple Intermediate Codec(AIC) (*.mov)" as output format.


Step 3. Click convert button in the main interface to start transcoding Sony Alpha NEX-5T mts files to AIC fro editing in iMovie and FCE on mac.

Some more helpful features of the Sony MTS to AIC Converter:

1. Settings- click to set video resolution(1920×1080/1440×1080/1280×720/720×480), bitrate(from 1Mbps to 20Mbps), frame rate (24p/30p)

2. Editor (next to "Add" icon)- click to set deinterlace, denoise, mute, volume up, trim, crop, etc.

After the workflow, you can go to the output folder to find the converted video files. Now you are free to import/edit Sony Alpha NEX-5T AVCHD files in iMovie and FCE under Mac (OS X 10.9 Mavericks included) without problems.

See also:
Load Canon VIXIA HF S100 MTS to FCP X

Read More:

Friday, November 22, 2013

Transcode Canon EOS 70D H.264 MOV to ProRes 422 for FCP

The article shows you the best workaround for editing Canon EOS 70D videos in FCP by transcoding Canon H.264 .mov to FCP native editing format - Apple Prores 422 Codec.


I'm working on a feature on my mac, shot on Canon 70D, and am in the process of converting all my MOV files to manageable ProRes files. But I am unsure how to do this. Can someone give me a basic rundown of the procedure? I would be most appreciative.

This question is from one of my client, if you have used Canon 70D camera and recorded many 1080p videos, then how to ingest Canon 70D mov video into FCP for editing without crashing problem and avoid rendering?

In fact, MOV video format came from Canon 70D is a long GOP format that is highly compressed, which means it is not convenient for editing on Mac with Final Cut Pro. To import Canon EOS 70D 1080P video to Final Cut Pro for editing, the best way is to convert Canon EOS 70D 1080p HD MOV video to Final Cut Pro native Apple Prores .mov video on Mac.

Mac Canon h.264 MOV Converter is a professional HD video converter for you to easily convert Canon 70D 1080P video to Apple ProRes 422 so that you can easily import the Canon h.264 recordings to Final Cut Pro X, Final Cut Pro 6, Final Cut Pro 7 for editing on Mac. This will help you import the file correctly and saving the rendering time.

Below is a brief guide for you.

How to import Canon EOS 70D H.264 MOV footage to Final Cut Pro on Mac?

1. Free Download and run the best Canon H.264 MOV converter and drag 70D MOV files to the software.


2. Click format bar to choose output format for use in FCP 6/7 or FCP X. For editing Nikon MOV on Mac, you can choose Apple ProRes 422 for FCP.


Tips:

Here listed the main difference of the five ProRes codecs.

a. ProRes 422 (HQ): offers the utmost possible quality for 4:2:2 or 4:2:0 sources and provides target data rate of approximately 220 Mbps and higher quality than Apple ProRes 422;

b. ProRes 422: provides target data rate of approximately 145 Mbps and higher quality than Apple ProRes 422 (LT);

c. ProRes 422 (LT): provides roughly 70 percent of the data rate of Apple ProRes 422 (thus, smaller file sizes than Apple ProRes 422) and higher quality than ProRes 422 (Proxy);

d. ProRes 422 (Proxy): provides roughly 30 percent of the data rate of Apple ProRes 422 and high-quality offline editing at the original frame size, frame rate, and aspect ratio;

e. ProRes 4444: offers the utmost possible quality for 4:4:4 sources and roughly 50 percent higher than the data rate of Apple ProRes 422 (HQ).
Step 4. You can click “settings” to customize the output parameters, adjust the resolution, bitrate as you want.

Note 1: You are allowed to adjust output video and video parameters. However, if you have no idea about profile setting, keep it as original recordings will provide you the files with less quality loss, and keep default settings is also a good choice for your to get a high quality files.

Note 2: In order to get customized videos, you can add subtitles to your own videos.

3. Click convert button in the main interface to start converting Canon 70D H.264 MOV videos to Prores for FCP.

Some more helpful features of the app:

1. Settings- Click to adjust the output parameters, such as resolution, frame rate, etc, customize the parameters as you want.

2. Editor (next to "Add" icon)- click to set deinterlace, denoise, mute, volume up, trim, crop, etc.

After converting the MOV to ProRes format, you can easily import/edit Canon EOS 70D h.264 mov files in Final Cut Pro 6/7 or FCP X smoothly on Mac.

Tips:

1. Before you try to do the conversion, if you are also a FCP X user, please make sure that you have installed the Apple ProRes Codec manually since the FCP X asks users to install it by themselves.

2. This Mac Canon MOV Video Converter can convert mov video to Prores with retaining timecode for FCP.

Refer to the picture below to see how this cool mac H.264 converting tool keep the timecode for FCP. It is not difficult to find that the timecode is kept.


3. Pavtube HD Video Converter can also convert Canon 70D mov videos to iMovie and FCE, Premiere Pro, Avid Media Composer, DaVinci Resolve, Apple Aperture 3 and After Effects CS6 with good quality, just download the and have a try.

Read Related Articles:

Thursday, November 21, 2013

Canon EOS Movie Plugin-E1 for Final Cut Pro 1.5 for Mac OS X

Editing Canon EOS footage in FCP? Follow our tips about Canon EOS Movie Plugin-E1 for Final Cut Pro 1.5 for Mac OS X. Any question with the plugin, you can refer to this article.


Canon EOS Movie Plugin-E1 for Final Cut Pro 1.5 for Mac OS X
  • Date Added: August 25, 2013 
  • Publisher:Canon
  • File Size: 5.87 MB
  • OS: Mac OS X v10.8, Mac OS X v10.7, Mac OS X v10.6
  • Download here.
  • Release Date: August 01, 2013.
This plugin application is for Final Cut Pro, which was released for users of EOS DIGITAL and Final Cut Pro. This plugin allows you to use the Log and Transfer function to edit movies captured with the EOS cameras.

Changes in EOS MOVIE Plugin-E1 for Final Cut Pro 1.5:
  • Supports EOS 70D.
The following software must be installed on the PC
  • Final Cut Pro 6.0.6
  • Final Cut Pro 7.0.3 and later
Supported Models:

EOS 5D Mark II *1,*2 :
  • 1920x1080(1080p) / 30.0fps, 29.97fps/23.976fps(NTSC), 25.0fps(PAL) / IPP
EOS 7D *2, EOS-1D Mark IV *2, EOS 60D:
  • 1920x1080(1080p) / 29.97fps (NTSC), 25.0fps (PAL), 23.976fps / IPP
  • 1280x720(720p) / 59.94fps(NTSC), 50.0fps(PAL) / IPP
EOS-1D X, EOS 5D Mark III, EOS 6D *3:
  • 1920x1080(1080p) / 29.97fps (NTSC) (Drop frame is selectable.), 25.0fps (PAL), 23.976fps / Selectable from IPB and ALL-I.
  • 1280x720(720p) / 59.94fps(NTSC) (Drop frame is selectable.), 50.0fps(PAL) / Selectable from IPB and ALL-I.
EOS-1D C :
  • 1920x1080(1080p) / 29.97fps/59.94fps(NTSC) (Drop frame is selectable.), 25.0fps/50.0fps(PAL), 23.976fps / Selectable from IPB and ALL-I *5
  • Super 35 mm Crop (1920x1080) *4 / 29.97fps(NTSC) (Drop frame is selectable.), 25.0fps(PAL), 23.976fps / Selectable from IPB and ALL-I *5
  • 1280x720(720p) / 59.94fps(NTSC) (Drop frame is selectable.), 50.0fps(PAL) / Selectable from IPB and ALL-I *5
EOS 70D *3 :
  • 1920x1080(1080p) / 29.97fps (NTSC) (Drop frame is selectable.), 25.0fps (PAL), 23.976fps / Selectable from IPB and ALL-I.
  • 1280x720(720p) / 59.94fps(NTSC) (Drop frame is selectable.), 50.0fps(PAL) / Selectable from IPB and ALL-I.
* 1. Video files recorded using EOS 5D Mark II with the firmware version 1.x.x requires THM file.
*2. If THM file does not exist, "Shooting Information" does not appear.
*3. Video snapshot is not supported.
*4. The video size of Super 35mm Crop is 1920 x 1080 and the video format is the same as 1920 x 1080 (1080p).
*5. Only ALL-I is selectable when recording video in 1920 x 1080 (1080p) at 59.94 fps or 50 fps.

Recent Drivers

Canon Digital Camera Software 2.3 for Windows XP/Vista/7/8 x86/x64
Canon EOS Movie Plugin-E1 for Final Cut Pro 1.5 for Mac OS X
Canon EOS Digital Solution Disk Software 28.2A for Mac OS X
Canon EOS Digital Solution Disk Software 28.2A for Windows XP/Vista/7/8 x86/x64
Canon Digital Camera Software 2.1 for Mac OS X

Tip: 

FCP needs a native editing codec, if you work on Mac OS X Mavericks 10.9 or use FCP X or have any issues with Canon EOS Movie Plugin-E1 for FCP, then transcoding in a 3rd party app is a feasible workaround.

Apps For Converting Canon EOS MOV Files

Pavtube H.264 MOV to ProRes Converter for FCP can help you to make it possible, it can not only transcode Canon EOS H.264 MOV to suitable video format for FCP, but also do some little editing some simple editing features, such as merging several videos into one file, deinterlacing the original footages, cropping video size, trimming video clips, adding special effects and text/image/video watermarks to output videos.

With it, you can batch transcode as many of them as you like and it works pretty quickly. The files look great and with high quality. I've used it for a long time and I've never had a problem with it. Thus it will be on the top of your list. 

Canon EOS MOV Conversion Tutorials:

Ingest Canon T4i/650D into Avid Media Composer
Convert Canon 1D H.264 MOV to FCP X with Apple ProRes
Does Sony Vegas like handling the Canon EOS-5D h.264 MOV files well

Tuesday, November 19, 2013

Mac Compatibility: Canon HF R20 AVCHD footage to Adobe Premiere Pro CS5

With this guide, you can smoothly import and edit Canon HF R20 AVCHD footage in Adobe Premiere Pro CS5 by transcoding Canon .mts to Premiere Pro most compatible MOV or MPEG-2 video.

Canon's VIXIA HF R20 Flash Memory Camcorder is a mid-range high definition camera that's packed with useful features and functions. Record 1920 x 1080 video to the R20's 8GB internal flash memory or to SD/SDHC or SDXC cards using the dual memory card slots. The VIXIA HF R20 allows you to record up to 3 hours of crisp high definition video to an 8GB internal flash drive or to two removable SD memory cards.


With 24Mbps recording, video is captured from Canon HF R20 at the highest bit rate in AVCHD. You get exceptionally lifelike tone and exacting detail. However, if you've got some of those MTS files from Canon HF R20 camcorder, you may find you can' open the mts files in Adobe Premiere Pro CS5. Although Adobe claimed that Premiere Pro CS5 and above offer much better native AVCHD support than its predecessor, there are still some video, audio codec problems while importing/editing AVCHD MTS clips in Premiere Pro. Plus, even the Adobe program can ingest your MTS files directly, it takes a long time for rendering.

As Canon HF G20 mts footage can't be supported well by Adobe Premiere Pro CS5, the best method to avoid the importing problems is to transcode Canon HF G20 MTS footage into a Premiere Pro most compatible format like MOV or MPEG-2. Here's a way to convert Canon HF G20 MTS to Adobe Premiere Pro CS5 without losing the quality.

At first, a 3rd party converter is needed. Pavtube MTS/M2TS Converter for Mac (Only $29) is the one I choose.Easy convert AVCHD .mts from Canon HF R20 1080/60p MTS to mov files, which will fast import into Premiere Pro for editing. As for video quality, at least I cannot distinguish any loss by naked eyes.

Steps to transcode Canon HF R20 MTS for Adobe Premiere Pro CS5

1. Free download Pavtube AVCHD Converter for Mac. Install and launch. Click "Add" or "Add from folder" to import your mts files from Canon HF R20.


2.Click format bar to choose the output format, you can click and choose "MOV (AVC) (*.mov)"  or "MPEG-2(*.mpg)" as output format under Adobe Premiere/Sony Vegas catalogue for Adobe Premiere Pro CS5:


Tip – Profile Settings:

In case the default settings do not fit your requirement, you can click “Settings” button and enter “Profile Settings” panel to adjust video size, bit rate, frame rate, sample rate and audio channels.

In order to get customized videos, you can add subtitles to your own videos.

The free Subtitle Edit will help you to edit your own subtitles then put it into videos.

3.Click convert button to start to transcode Canon HF R20 MTS files to Adobe Premiere CS5.

After conversion completes, you can import your converted media files to Adobe Premiere Pro on Mac for editing. In this way, you can easily and fast ingest your Canon HF R20 MTS videos in Adobe Premiere Pro CS5 on Mac.

Related guides:

Friday, November 15, 2013

Convert DVD to iPad series (iPad Air, iPad Mini 2, iPad 4, iPad 3, iPad 2, iPad) on Mavericks

With the excellent DVD Ripper for iOS device, you can easily convert and sync DVD movies to your iPad Air, iPad Mini 2, iPad 4, iPad 3, iPad 2, iPad for smoothly playback with your Mac OS X Mavericks 10.9. 


iPad Air, the 5th generation of Apple iPad tablet, is one of the most popular tablets in the market. IOS Tablet is often used to playbak video and listen to music. But the Apple iOS devices like iPad Air, iPad Mini 2, iPad 4, iPad 3, iPad 2, iPad only support only supports H.264, MPEG-4 video in .m4v, .mp4, and .mov file formats and Motion JPEG (M-JPEG) in .avi format. If your movie is in a DVD or it isn't already in one of the supported formats, you'll need to convert your DVD movies to iPad series friendly video formats first. Below is how and here we provide the Mac solution.

Free Download the App


Pavtube BDMagic for Mac is highly recommended. - An excellent Mac Blu-ray/DVD converter for iOS device which can help you decrypt and compress Blu-ray/DVD to iPad Air, iPad Mini 2, iPad 4, iPad 3, iPad 2, iPad optimized formats at ease on Mac OS X (Mavericks 10.9 included).


If you are a Windows user, you can use its equivalent Windows version -  BDMagic to finish your work on Windows PC (Windows Blue PC 8.1 included).

Good News! Pavtube Release a New Site - multipelife.com with Product Migration and Name Change.

To thanks for your continued support all along our previous site and the new www.multipelife.com, we are holding a 'New Site Special' with fantastic discounts up to 40% off. You can get 20% off BDMagic, 30% off ByteCopy, 40% off DVDAid and 20% off Video Converter Ultimate on Windows/Mac platform:

https://www.facebook.com/pavtubefans/app_209569249055691

Read more: http://pc-mac-compatibility-issues.blogspot.com/2014/05/pavtube-new-site-release.html

To be honest, I've had success using the software to convert my huge Blu-Ray and DVDs to a format playable by my iPad Mini 2 and iPad. I've found the quality to be excellent, and see no difference when compared to playing the discs themselves. Now just get the right 30% Discount DVD converter for iPad series to encode and transfer DVD movies to your iPad Air, iPad Mini 2, iPad 4, iPad 3, iPad 2, iPad for smoothly playback in just a few clicks on Mac.

Convert, Rip and copy DVD movies to iPad Air, iPad Mini 2, iPad 4, iPad 3, iPad 2, iPad on Mac OS X Mavericks 10.9

Step 1: Once run the Mac DVD to iOS Converter software, click on "BD/DVD disc" icon to load movie from DVD and Blu-ray source(Disc, folder, ISO).


Step 2: Click on "Format > iPad", you will find many profiles for iPad including all iPad models. The output videos could fit on iPad Air, iPad Mini 2, iPad 4, iPad 3, iPad 2, iPad perfectly.


Tips: If you like, you can click "Settings" to change the video encoder, resolution, frame rate, etc. as you wish. Remember the file size and video quality is based more on bitrate than resolution which means bitrate higher results in big file size, and lower visible quality loss.

Step 3: Start to rip DVD to iPad Air, iPad Mini 2, iPad 4, iPad 3, iPad 2, iPad on Mac

When you are satisfied with all the settings, you can click "Convert" and let the software do the DVD to MP4 conversion for your Apple iOS devices.

Step 4: Transfer Converted Videos to iPad Air, iPad Mini 2, iPad 4, iPad 3, iPad 2, iPad

When the conversion completes, you can transfer the result videos to your iPad via iTunes, here's the way to go:

1) Launch the iTunes and connect iPad series to PC.
2) Choose "File – > Add File to Library…"
3) Drag the .mp4 file you want to the iPad icon.

In this way, you can watch DVD movies on iPad Air, iPad Mini 2, iPad 4, iPad 3, iPad 2, iPad on the go as you like.

P.S. If you have any problems about enjoying movies on iPad Air, iPad Mini 2, iPad 4, iPad 3, iPad 2, iPad, just check out the iPad Video Specials to find solutions.

You can also get the 20% Off discount All-in-one Video Converter Ultimate tool to encode Blu-ray/DVD and various formats of 1080p/720p HD videos to your IOS devices for watching.

See also:

Tuesday, November 12, 2013

ISO to AVI - How to Convert Backup ISO to AVI to read it on PS3

If you want to convert Backup ISO to AVI to read it on PS3, using Pavtube BDMagic is a good choice for you to store you Bluray/DVD favourite ISO files as AVI format.

Blu-ray, DVD and kinds of video files boost your multimedia life, if you have a large Blu-ray/DVD ISO files collection, it should be such a cool thing to enjoy them on portable devices anytime and anywhere. You may meet problems when transferring BD/DVD ISO image files for playback.


Now I have backup an ISO file from my blu-ray disc, but how to get my PS3 to read the ISO files? My friends recommended me to convert my Backup ISO to AVI for streaming my PS3 via PS3 Media server. Then I can play them with my iPhone5? But how to make it? Which is the best software for my ISO converting?

AVI is a popular video format that supported by most portable media player devices such as iPod, iPhone, iPad, Xbox, Zune, PSP, smart phones and so on. For people who gather lots of Blu-ray or DVD movies at home, you can convert your Backup Blu-ray/DVD ISO image into AVI format for playback as well as editing. Here we mainly talk about how to convert Blu-ray/DVD ISO to AVI.

After testing several Blu-ray protection removing programs, we choose the Pavtube BDMagic for its simple interface, easy workflow and reliable video quality. It is your best tool to rip and convert Blu-ray movies and DVD ISO files to AVI container format with fast speed and high video quality.  Surprisingly we found it's on 30% off atm; are you still waiting?  Just have a try, if you are Mac users, try Pavtube BDMagic for Mac. Now download it and then follow the steps below.

Step 1.
Run Pavtube BDMagic, click “Load file” to choose Load IFO/ISO file. It will recognize the ISO image file automatically so that you will not have to run virtual drive to mount the ISO any more.


Step 2.
Choose MP4 format as output, here “Format > HD Video > AVI HD Video(*.avi)” is recomended for you.


Note: If you want to combine .avi files into one, please check the "Merge into one file" option.

Step 3. Click the “Convert” button to start Blu-ray/DVD ISO image to AVI format conversion. It will not take much time. Just wait for the conversion process to get done.

Note: Keep in mind that some of the settings can be tweaked to improve the video quality but it's a balance between quality and size. Using the settings we suggested, a 120-minute Blu-ray encoded to about a 1.3GB AVI file.

After the conversion, you can click “Open output folder” to quick locate the converted video.

Additional Tips:

If you are looking for a powerful all-in-one ultimate video converter software to convert various 1080p/720p videos, Blu-ray and DVD movies to your tablet or phone for enjoying, simultaneously saving time and effort, the Video Converter Ultimate program will be a nice choice for you. If you are running a Mac OS X computer, iMedia Converter Mac is the alternative.

This Blu-ray to AVI Converter is really easy to use for blu-ray/dvd iso to avi converting. Then you can easily stream the converted AVI format on PS3 for enjoying. Hope it also works well for you.

Read more:

How do I make MKV files playing on my PS3?
Convert DVD to PS3 Compatible AVI Video with AC3 5.1 channel
Play Blu-ray with your PS3 using Dolby True HD audio

Get your Movie Studio Platinum 12 working beautifully with MXF from Panasonic AG-HPX171E

The Sony Movie Studio Platinum 12 won't import P2 MXF files from Panasonic AG-HPX171E. The easy workaround is to transcode MXF to Movie Studio friendly format.

Sony Movie Studio Platinum 12 is a powerful 64-bit video editor at a reasonable price. Among consumer-level video-editin applications, it is one of the most capable, offering more features than most of its competitors do. Even with a user-friendly interface,  Sony's Movie Studio Platinum offers many features customizable options. However, users find it's difficult to import P2 MXF clips from HPX171E to Movie Studio.


My camera is 171e-Panasonic (p2 cards). Actually I am new one in all this story about video .I have a material and before I start to make editing in Movie Studio Platinum 12.00 (sony) and I would like to give to my friend to have “first look" on my computer or TV. I ask some friends and they told me to make P2 MXF to MPEG-2 conversion. What i can do? Thank you.
In fact, MXF is a self-container format which is unacceptable by various non-linear editing systems (NLE), like Pinnacle Studio, Sony Vegas, Avid Media Composer, Premiere, Movie Studio Platinum 12 etc. So to import the MXF files from Panasonic AG-HPX171E P2 camera to Movie Studio Platinum 12 for editing, the easy workaround is to transcode MXF files to Movie Studio compatible video formats.

For converting Panasonic AG-HPX171E MXF video into Movie Studio editing friendly format, the best recommendation is Pavtube MXF Converter. This is a smart tool specially designed for MXF users to preview and convert MXF recordings to your wanted video and audio formats, so as to smoothly add them into Movie Studio Platinum 12, Sony Vegas, Adobe Premiere, Windows Movie Maker, Magix Movie Edit Pro, Ulead DVD MovieFactory, Pinnacle Studio and more other video editing software to do further editing. It naturally support converting MXF recordings shot by a Panasonic P2 camcorders and Canon XF camcorders.

To help those who wanna edit Panasonic AG-HPX171E MXF files in Movie Studio Platinum 12 without problems, here I share with you a simple guide on how to convert MXF files from HPX171E to edit in Movie Studio Platinum 12.

Part I: Transcode AG-HPX171E MXF to MPEG-2 – native editing format for Movie Studio Platinum 12

1. Backup Panasonic AG-HPX171E camcorder MXF videos from P2 HD card to local HDD with full P2 directory preserved, as both the video and audio are saved separately as .mxf files.

Notes:  If your are a P2 MXF camcorder user, you will find from the P2 MXF recording, video audio files are separated in different folders. Also, it’s no difficult to find one video will have four audio tracks. For archiving, you need to keep the whole structure of video and audio.   

2. Run Pavtube MXF Converter. Click "Add Video" or "Add from folder" icon to load MXF files from AG-HPX171E.


3. Choose "MPEG-2 (*.mpg)" as target format from "Adobe Premiere/Sony Vegas" option. 


4. Click "Settings" button and enter "Profile Settings" panel to adjust video and audio settings if necessary. Users are free to reset codec, bit rate, frame rate, sample rate, and audio channels.

5. Click the big button "Convert" to start Converting AG-HPX171E to MPEG-2 for Sony Movie Studio Platinum 12.

6. Locate converted P2 recordings (in .mpg format) by clicking on "Open" button.

Part 2: Import converted .MPG to Movie Studio Platinum 12 for editing.

Now your Panasonic  AG-HPX171E .MXF footage are converted into Movie Studio Platinum 12 natively supported format. Launch Movie Studio Platinum 12, and follow "Import" > "IMPORT FROM" > "Other devices" > "the folder stored the converted .mpg files" > "Start Import" to get P2 footage into Movie Studio Platinum 12.


Personally I am very pleased with the product. As I have only used the product a few times so far it is difficult to give any constructive comments at this stage but all my conversions were done successfully with stunning image quality – I can hardly tell any quality difference.

Read More:

Sunday, November 10, 2013

Ingesting Canon Vixia HF G30 footage to Avid Media Composer/Premiere Pro

Canon HF G30 Avid MC/Premiere Pro solution: Step by step guide showing you how to importCanon Vixia HF G30 AVCHD/MP4 to Avid MC/Premiere Pro for further editing.

The Canon VIXIA HF G30 is a prosumer camera?that shoots 1920 x 1080 Full HD video in either AVCHD or web-friendly MP4 format. It also supports Native 24p Progressive Mode recording, which will give your footage a more cinematic look.?Videos are shot in AVCHD up to 35 Mbps and recorded in full HD 1080 60p, which is not supported by most editing programs. Hence it could be a problem when Mac users need to ingest the Canon Vixia HF G30 AVCHD/MP4 video in Adobe Premiere Pro, Avid Media Composer smoothly. 


To edit Canon Vixia HF G30 AVCHD in Adobe Premiere Pro, Avid Media Composer on Mac, you are suggested to convert the AVCHD MTS to Adobe preferred H.264 MOV or DNxHD for Avid. To accomplish this, I recommend this Mac Canon Video Converter, a powerful and professional AVCHD converting program which support outputting various videos formats for different usage.. 

Now follow these steps to quick convert Canon Vixia HF G30 AVCHD into DNxHD or AVC MOV

Free download Pavtube HD Video Converter for Mac, get it installed. 


Step 1: Connect your camcorder to Mac and Load recorded files. 

Connect your camcorder to Mac, and you can see all recorded AVCHD/MP4 files as soon as this program has detected the device. Now, you can untick the files you don't want, and then click the "Add" button to load the files you want to this AVCHD/MP4 to MOV Converter for Mac, or drag and drop your videos into it directly. Batch conversion is offered. 


For Windows user: Connect an HD video camera/camcorders to your PC with a USB cable. Once connected and powered on, the camcorder should appear on the desktop as a new disk. It is desirable that you copy the videos to your PC's hard-drive before converting or editing them. 

Step 2. Choose proper video format. 

Open the "Format" list then choose "MOV" under "Avid Media Composer" section as output format for editing Canon Vixia HF G30 AVCHD/MP4 files in Avid Media Composer. 


choose "MOV"/"MPEG-2" under "Adobe Premiere/Sony Vegas" section or "Apple ProRes 422(*.mov)" under "Final Cut Pro" section as output format for editing Canon Vixia HF G30 AVCHD/MP4 files in Adobe Premiere Pro.  

In fact, if you are about to play the AVCHD/MP4 video files on iPhone, iPod, iPad, Android, Windows 8 devices or edit in iMovie, Final Cut Pro X, FCE etc., you can choose the optimized preset for the device or app offered. 

Step 3. Customize video size, bitrate, frame rate, and other settings. 

Tips: 

* For 1080 50p AVCHD files, you can set the video size as 1920*1080, and set the video frame rate as 25fps. 
* For 1080 60p AVCHD videos, set the video size as 1920*1080; while, set the video frame rate as 30fps. 

FYI: Tf you want to trim, crop the videos before transcoding, you can click Edit like this: 


Pavtube AVCHD Converter for Mac also support deinterlacing, editing audio and adding sutitles. 

Step 4. Start conversion. 

Click the "Convert" button to start converting Canon Vixia HF G30 AVCHD/MP4 to MOV for Avid MC, converting to MOV/MPEG-2/Apple ProRes for Adobe Premiere Pro. 

After this Top HD Video Converter for Mac finishes the conversion process, you can click "Open Folder" to find out where you saved the converted files. 

Now let's click the "Convert" to start this conversion easily. Wait for a while and you can click the "Open" to locate the converted video easily. 

Learn more:

2013 Thanksgiving Promo Discount: Free, Only $9.9, Buy 1 Get 1 Free

Description: Great News, Pavtube Studio is now offering FREE apps, Buy one Get one free and UP to 66% off promotion on 2013 Thanksgiving Day Software Promotion for you to celebrate the coming Thanksgiving Day from November 7, 2013 to December 10, 2013. 

The yearly Thanksgiving is coming. To express our thankfulness and gratitude for all our customers, we come with 2013 Thanksgiving Promo Discount for you now!  Before December 10, 2013, you can get any Pavtube best sellers you see from the official site with its freebies,  Buy 1 Get 1 Free  and UP to 66% off promotion. Some featured products with Only $9.9!!!


Part 1. Thanksgiving Best Sellers - 20% ~ 30% off 

1. Pavtube Blu-ray Ripper - $34.3 (original $49) 
Highlights: full disc copy; Directly Copy only main movie; rip any Blu-ray/DVD to various formats 

2. Pavtube DVD Ripper - $24.5 (original $35) 
Highlights: convert standard DVDs to MP4, MKV, AVI, MPEG, MOV, M4V for smartphones, tablets, HD media players and more 

3. Pavtube Video Converter - $28 (original $35) 
Highlights: transcode videos to virtually any video/audio format for editing and playback 

4. Pavtube Video Converter Ultimate - $52 (original $65) 
Highlights: combination of a Blu-ray ripper, a DVD ripper and a Video converter to meet your needs for Blu-ray, DVD and video conversion 

Part 2. Thanksgiving Giveaway - Free Softwares 

1. Pavtube Free DVD Ripper - a fun, easy and fabulous way to rip DVDs to various video formats with fast speed. Support adding SRT, ASS, SSA subtitles. 

2. Pavtube Free Video DVD Converter Ultimate - provides with full Blu-ray, DVD and video solutions for your ultimate multimedia entertainment needs. 

Part 3. Buy One Get One Free 

1. Buy MTS/M2TS Converter – handle AVCHD MTS/M2TS footages in an easy way 
Free Get FLV/F4V Converter - convert any YouTube or Hulu videos (FLV/F4V) for portable devices 

2. Bug MXF Converter - encode MXF clips for editing and playback 
Free Get MKV Converter – convert MKV media contents to Android, Windows and iOS devices 

3. Bug HD Video Converter - get your camera videos and TiVo recordings onto editors and players 
Free Get DVD Creator - burn any kind of video sources to playable DVD 

Part 4. Thanksgiving Hot Deals - Only $9.9 

1. Pavtube MKV Converter - select wanted subs/audio/video track from MKV to be kept in the output files 
2. Pavtube FLV/F4V Converter – convert, trim, crop FLV or F4V to other formats 
3. Pavtube TOD Converter - fast convert, compress, and edit TODs from JVC camcorders for any portable devices 
4. Pavtube MOD Converter – stream, convert and edit MOD recordings shot by camcorders(JVC, Panasonic, Sony) 

Part 5. Sharing at your Facebook page - Get more discount 

1. 20% off ByteCopy (Windows/Mac) 
2. 20% off MXF MultiMixer 
3. 20% off iMixMXF 

Click "Share on Facebook" button, insert "#PavtubeThanks2013", choose "Public", and click "Share Link". You will get another 20% coupon. The discounted link will be sent to your Facebook "Inbox" or "Other" within 24 hours on work days. 

If don't receive message from strangers, please don't forget to contact us for the discounted link via faq@pavtube.com. 


More Pavtube Thanksgiving Special Deals are available on Pavtube Thanksgiving page. Share this activity at your Facebook page and more discounts you can get. 

Part 6. Hot Bundle Deals - Save Up to $35 

1. ByteCopy($42) + Blu-ray Video Converter Ultimate($65) = Only $80, Save $27 
2. ChewTune ($29) + Blu-ray Video Converter Ultimate($65) = Only $75, Save $19 
3. ChewTune($29) + ByteCopy($42) = Only $54, Save $17 
4. ByteCopy($42) + DVD Creator($35) = Only $60, Save $17 
5. ByteCopy($42) + MXF MultiMixer($45) = Only $70, Save $17 
6. ByteCopy($42) + Video Converter($35) = Only $60, Save $17 
7. Blu-ray Video Converter Ultimate($65) + DVD Creator($35) = Only 65$, Save $35 

Friday, November 8, 2013

Download/Put DVD movies onto Galaxy Tab Pro, Galaxy Tab 4/3, Galaxy Tab series

The article shows you the easiest way to convert DVDs to Galaxy Tab Pro/4/3 and other Galaxy series highly supported video formats on Windows and Mac so that you can watch DVD movies on Galaxy Tablets anywhere.

Samsung Galaxy Tab, understandable literally, refers to Tablet computer produced by Samsung Electronics. It also adopts Android OS. Being a 'lean-back entertainment' tab, it supports 1080p HD video while being equipped with 3-Mp rear camera and a 2-Mp front camera.The versions are 7.7, 8.9 and 10.1 generally. Specifically, Galaxy Tab is endowed with HD display with a dual-core Nvidia Tegra 2 SoC, Android 3.1, and Music Hub.


Undoubtedly, Samsung Galaxy Tab gives users outstanding audiovisual enjoyment with amazing configuration and convenient use. Anyway, it will be an amazing experience for multimedia lover to watch movies better on their new Galaxy Tab Pro, Galaxy Tab 4/3, Galaxy Tab series, with perfect visual effect.

However, the gadget does not have a built-in DVD-ROM or DVD player. If you want to watch DVD movies on Galaxy Tab Pro, Galaxy Tab 4/3, Galaxy Tab series, you may feel frustrated. That's why many people are seaking for ways to watch DVD movies on it.

In fact, it's easy to transfer DVD videos onto Galaxy Tab Pro, Galaxy Tab 4/3, Galaxy Tab series as long as you got a DVD Ripper in hand. This article will tell you how to convert DVD to Samsung Galaxy Tab supported video formats so that you can enjoy your favorite DVD movies on the go.

At first, you need to use a 3rd party tool to rip and rip DVD movies to Galaxy Tab compatible formats such as mp4. DVD Ripping Software varies. You may confused about choosing a most suitable tool. If so, i recommend you try Pavtube DVDAid (Read review). It is easy to use for editing and conversion and makes great quality copies of my DVDs. What’s more, you do not need to worry about the ripping and converting speed. It is excellent for it and it supports CUDA acceleration technology, which will provide you 6 x faster speeds.

Go to get it and freely enjoy your favorite DVD movies on Galaxy Tab 3, Galaxy Tab 2, Galaxy Tab series


How to convert DVD movies to Galaxy Tab Pro, Galaxy Tab 4/3, Galaxy Tab series?

Firstly get your DVD in your DVD drive and then launch the software to get things ready.

1. Load DVD (ISO/IFO image file) to Pavtube DVD to Galaxy Tab Ripper.

Click “Import DVD” button on the top left to load the DVD from DVD-ROM, you can also “Load ISO/IFO” or “Load from folder”. It will only take few seconds for ripping and importing DVD and you will be kept informed of timely state with a progress dialogue box.

When it has been imported successfully, you can preview the whole movie and select the subtitle and audio you want.


2. Choose Galaxy Tab friendly format.

Click “Format” menu to find the “Samsung” option in the dropdown list, choose “Samsung Galaxy Tab 3 Video (*.mp4)” for output. It is the most compatible format, which is especially made for Galaxy Tab 3. You can also choose other presets for you Galaxy Tab 2 and Galaxy Tab series.


Besides, click “Settings” button on the interface, you will be able to check and adjust the video and audio parameters like bitrate, size, channels, etc. Just do it when you need.


3. Convert DVD movies to Galaxy Tab MP4.

You can “Browse” your computer to choose a new folder for output file before conversion. When everything is ready, click “Convert” button to start converting DVDs to MP4 for Galaxy Tab Pro, Galaxy Tab 4/3, Galaxy Tab series, then “Open” button will show you the location of output files for video transferring.

Pavtube DVDAid More Features:
  • Edit the videos before conversion, such as trim, crop, add subtitles, video effect, etc.
  • Convert DVD to many other mobile devices and editing software like iPad Air 2, iPad Mini 3, ATV 3, Nexus 6/9, Galaxy Tab Pro, S6, S6 Edge, Note 4, Note Pro, Sony Vegas and more.
  • Add srt, ass, ssa subtitles to your movies.
  • Backup DVD main movie to VOB format with original quality.
Now you can watch DVD movies on Galaxy Tab Pro, Galaxy Tab 4/3, Galaxy Tab series anytime and anywhere. Hope it will help you.

Related Articles:

Wednesday, November 6, 2013

Streaming 2D/3D Blu-ray movies to iPad Mini 2, iPad Air, iPad series on Mac

After you got the iPad series, you may have some questions when you want to put 2D/3D Blu-ray movies on iPad Mini 2, iPad Air and iPad series on Mac. Get the easy-to-use Mac 2D/3D Blu-ray Ripper here.


The iPad Mini 2, which Apple wants to call the iPad Mini with Retina Display, hasn’t changed visually at all. It has given its design tweaks to the larger iPad, rather than the other way round. It’s also 7.5mm thick, but is lighter at 331 grams for the Wi-Fi tablet or 341 grams for the cellular tablet. Finally, both tablets now come in Apple’s Space Gray color scheme. Moving on to the iPad Mini with Retina Display (or iPad Mini 2), it’s also powered by the A7 and M7 processors, and benefits from MIMO Wi-Fi, the same camera setup, and all the other hardware features seen on the iPad Air. The other major alteration is the screen, which now has the same Retina resolution of 2048 x 1536 pixels as the larger tablet, making the size of the display the only real difference between them: 9.7-inches plays 7.9-inches.

Ultrafast wireless that makes browsing, downloading, and streaming content at blazing speed, and iOS7 the latest IOS operating system. However, as saying goes, nothing is perfect, so does iPad Mini 2, iPad Air, iPad series. You may meet the problems when copy/put 2D/3D Blu-ray movies to iPad Mini 2, iPad Air and iPad series on Mac. However, in fact, it’s not hard work if you get this excellent Mac 2D/3D Blu-ray to iPad Converter to do you a favor.

Applying this Mac Blu-ray ripping tool, you can easily convert your 2D/3D Blu-ray movies to iPad common videos that supported by iPad Mini 2, iPad Air, iPad series on Mac. It also has added 3D effect in Analygph, T/P and SBS which means you can make 3D movies portable on your iPad Mini 2, iPad Air, iPad series on Mac. Below is the step-by-step guide for you.

Tips:

1. For Windows users, get this 2D/3D Blu-ray to iPad Converter;

2. 3D effect on converted video is added by program; it may not be exactly the same as your original 3D blu-ray disc.

3. If you want to backup your blu-ray movies with keeping multiple audio tracks and subtitle streams on Mac, try to use Pavtube ByteCopy for Mac.

4. A BD drive is needed before converting.

Tutorials: Rip 2D/3D Blu-rays to iPad Mini 2, iPad Air, iPad series on Mac for playback

(Tips: If you want to rip 2D/3D Blu-ray to side-by-side 3D MKV for playing on 3D devices, please refer to this guide: Rip 2D/3D Blu-rays to side-by-side 3D MKV for playing on a 3D Device

Step 1: Load 3D/2D Blu-ray Disc. 

Open Pavtube BDMagic for Mac and load your source Blu-ray movie. 


Step 2: Choose suitable profile. 

From the "Format" drop-down list, you are suggested to follow the path "3D Video > MP4 Side-by-Side 3D Video(*.mp4)" for ripping 2D/3D Blu-ray to side-by-side 3D MP4 video. 


Tips: If you just want to convert 2D/3D Blu-ray to 2D video, just choose the optimize profile for your iPad Mini 2, iPad Air, iPad series from iPad option.

Step 3: Adjust profile presets (Optional). 

If you like, you could set profile parameters to get better video quality, such as video codec, file size, video bitrate, frame rate, etc.  

Step 4: Start ripping 2D/3D Blu-ray to MP4 video on Mac. 

Double check above steps and you could click the "Convert" button on program interface to start ripping 2D/3D Blu-ray to MP4 for iPad Mini 2, iPad Air, iPad series with Mac OS X. After it finished, open output file destination, locate the created 2D/3D MP4 video and you could watch it on your IOS devices. 
More topics: