Showing posts with label iMovie. Show all posts

Monday, March 28, 2016

Convert WMV to iMovie to Import WMV to iMovie

Many of us may have the need to export iMovie to WMV for sharing with Windows-based friends like play iMovie in Windows Media Player, or edit iMovie in Windows Movie Maker etc. Having some interesting WMV videos, either downloaded from the Internet or shared by friends who own PCs, and want to edit them on iMovie? You might have tried to, but in reality iMovie can not directly export WMV. Let's face it, Windows and Mac will never fully get along. Fortunately, there are always solutions out there. That means if you want to open and edit WMV video in iMovie smoothly, you need to firstly convert WMV to iMovie friendly videos on Mac. 

Hot Search: iMovie Tips | Share iMovie Videos | Get iMovie for free | iMovie VS FCP | iMovie Alternatives | Exporting iMovie projects 

Since iMovie work best with clips in the Apple Intermediate Codec encoded MOV format, the easy workaround to transfer your local WMV files or WMV files from websites to iMovie is to convert WMV to iMovie compatible AIC MOV with a WMV converter software

To use WMV files in iMovie, you just need a video converter program to convert WMV to iMovie compatible format. Here, Pavtube WMV to iMovie Converter can give you easy but effective solution for importing WMV footages into iMovie for editing on Mac (including Mac OS X 10.11 El Capitan) as an alternative to MediaCoder. With the assistance of the WMV to iMovie Converter, you can effortlessly transcode WMV file to iMovie acceptable AIC .mov. Then, what you need is just to import the converted file into iMovie for editing. Just follow the steps below to transcode WMV to AIC for importing to imovie for editing on Mac OS X El Capitan. 

Preparation: Free Download Top WMV to iMovie Converter


Other Download:

- Pavtube old official address: http://www.pavtube.cn/imedia-converter-mac/
- Cnet Download: http://download.cnet.com/Pavtube-iMedia-Converter/3000-2194_4-76177788.html

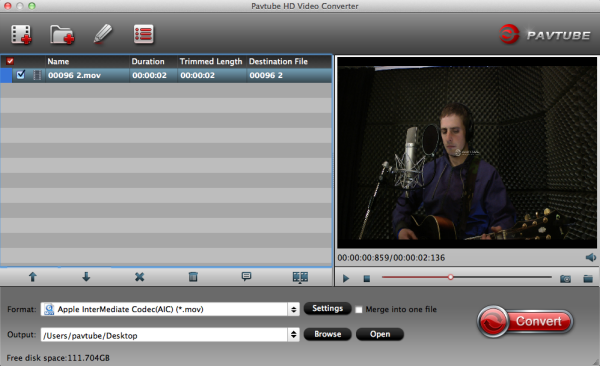
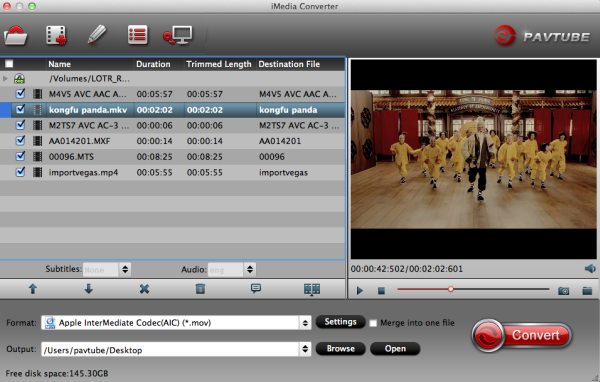
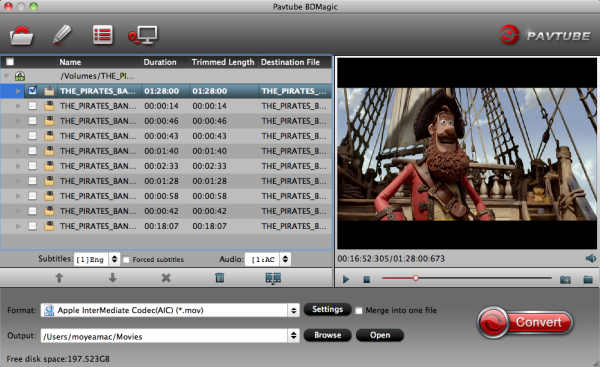
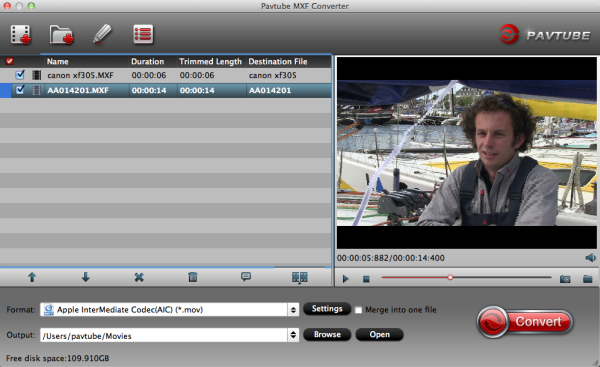
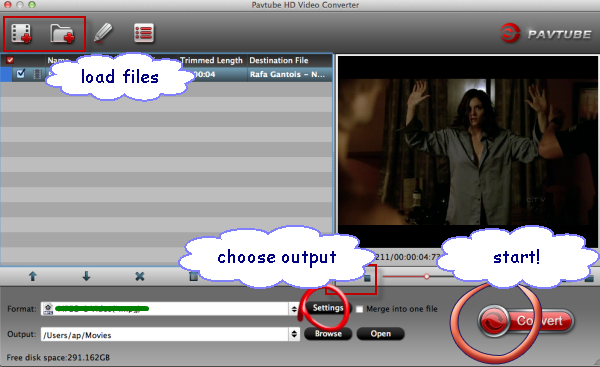
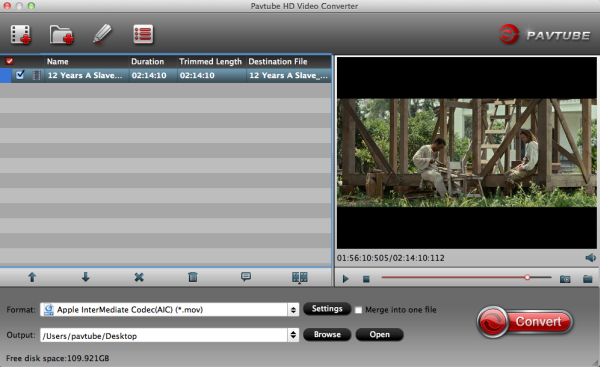
Step 1: Install and launch Pavtube iMedia Converter for Mac. You can directly drag and drop mp4 video files to this software. 


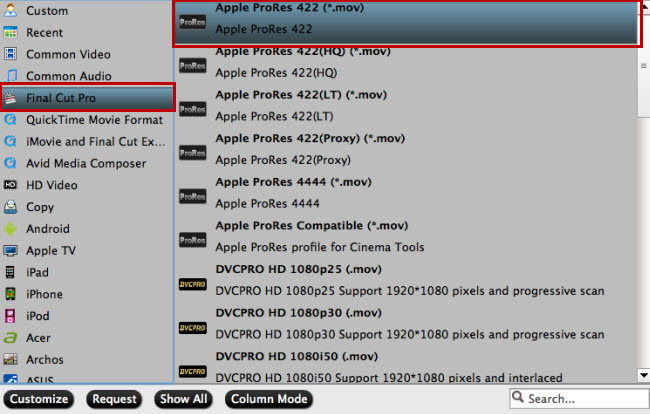
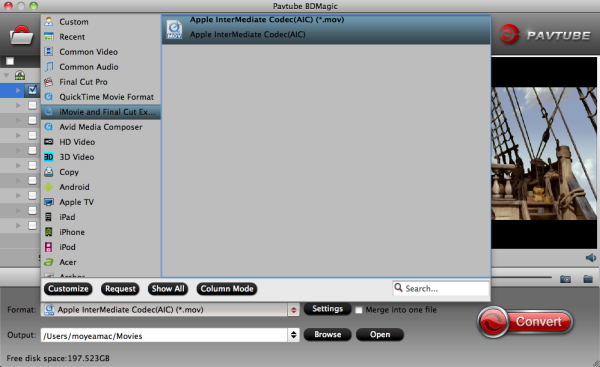
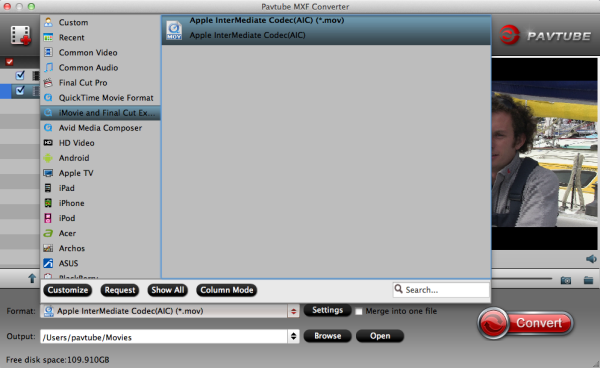
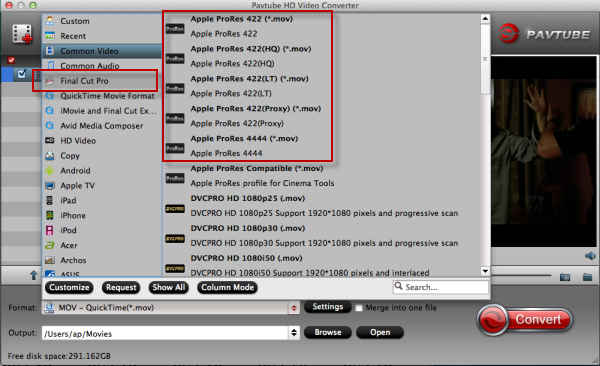
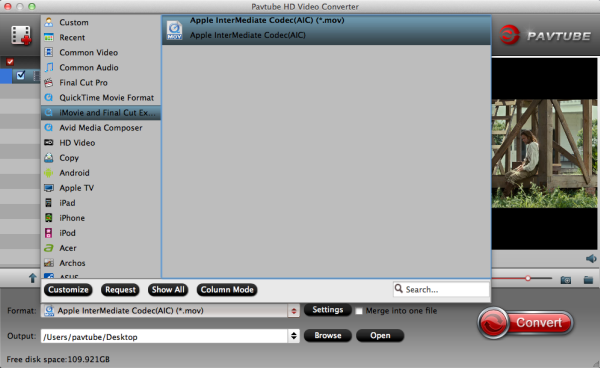
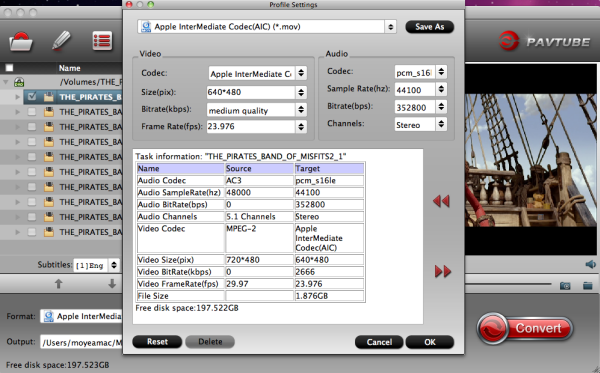
Step 2: Choose an output format for iMovie. Click the Format icon to open the format list. Then select iMovie and Final Cut Express -> Apple InterMediate Codec (AIC)(*.mov), as the output format to get videos with optimized settings for iMovie


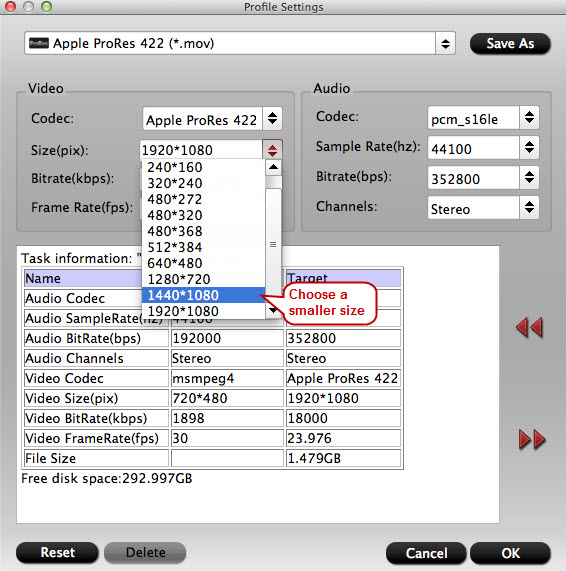
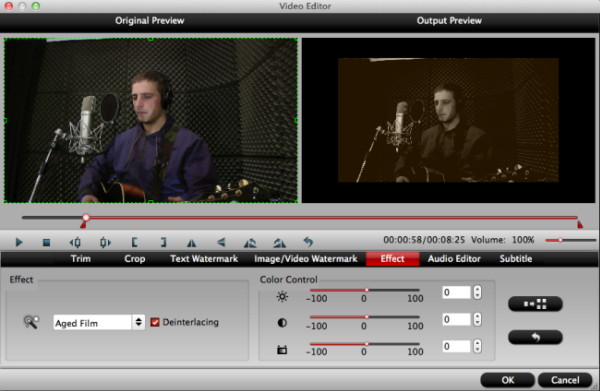
Tip: If you like, you can click “Settings" to change the video encoder, resolution, frame rate, etc. Remember bitrate higher results in big file size, and lower visible quality loss. 


Step 3: When all the settings are fine, click the “Convert” button to start converting your WMV files to optimized AIC .mov video files for iMovie. When then conversion completes, click the Open button to get the ripped video files. Launch iMovie and click File > Import > Movies to import the converted videos to iMovie for further editing. Just create your masterpiece with joy! 

Read More:

Monday, November 30, 2015

Which is better for editing HD videos, FCP or iMovie?

Summary: You have both FCP and iMovie, you are confused with which is better for editing HD videos? If so, here give you the solution what you should choose. 

Q: Which is better for editing HD videos, FCP or iMovie?

I recommend experimenting with both to see which best fits your needs. iMovie may be sufficient and Final Cut overkill, or the reverse may be true, iMovie too simplistic and the tools in Final Cut are needed. It also depends on what is "small videos" (I'm deducing you mean "shorts" of some sort). If: videos of family gatherings to share, iMovie will likely work for you. If: a short film for mass distribution, Final Cut.

Something you may not know about Final Cut Pro/iMovie:

As a non-linear video editing software which provides non-destructive editing of any QuickTime-compatible video format including DV, HDV, P2 MXF (DVCProHD), XDCAM (via plug-in), and 2K film formats, Final Cut Pro/iMovie made up 49% of the United States professional editing market according to a 2007 SCRI study. Such strong user group still leads to some video format incompatibility issues with Final Cut Pro/iMovie. This is why many people wonder the best video format for Final Cut Pro/iMovie so as to edit video in it at liberty. However, there are still some incompatible video formats that cannot be imported to FCP/iMovie, such like some 4K videos or high definition XAVC videos, etc.

Best Video/Audio Settings for Final Cut Pro/iMovie

Final Cut Pro/iMovie uses QuickTime technology, which means you can import and export almost any almost any QuickTime-compatible file format. But for other formats like WMV, RM, MKV, MPG, etc. Fortunately we here have thePavtube HD Video Converter for Mac(read the review) that can easily convert our original videos to ProRes codec files for FCP. Through this HD Video Converter review, we will know more about this professional video converter for FCP on Mac. What’s more, with the suggestions below, we can also set the files nicely with video and audios.

In order to receive a better effect after editing in FCP/iMovie, here we would like to introduce you some additional useful tips on how to adjust your video and audios which is the best for Final Cut Pro/iMovie.

Best Video Format for Final Cut Pro/iMovie: MP4, MOV

Aspect Ratio: Native aspect ratio without letterboxing (examples: 4:3, 16:9)

Resolution: You can choose different resolutions, all the way to 5K. The lowest resolution supported is 640 x 480. You cannot choose custom resolutions or aspect ratios. This is a huge negative.

Frame Rate: The lowest frame rate possible is 23.976p, and the maximum is 60p. No 12 or 18 fps options.

Audio Settings: Generally, audio only has ‘Surround’ or ‘Stereo’, and the maximum audio bit depth isn’t specified. Sequenced audio is always mixed using 32-bit floating-point values. Tips: Final Cut Pro/iMovie allows you to directly import any audio file format compatible with QuickTime. However, only uncompressed file formats should be used for editing.


Other Download:

How can we deal with those files which are not suitable for FCP/iMovie?

Step 1. Import source video to HD converter

Download and launch this Mac HD video converter, and click “File” and “Add Video/Audio” to add source videos.


Step 2. Choose FCP/iMovie supported video format

To make it easy and smooth to import source videos to these professional editing systems, you’d better choose an output format fully compatible with Final Cut Pro,iMovie.

Click the format bar to follow “Final Cut Pro” > “Apple ProRes 422 (*.mov)”, “iMovie and Final Cut Ex…” > “Apple Intermediate Codec (AIC) (*.mov)”.


Step 3. Compress source videos (Optional)

If you want to reduce the size of the recorded source videos not only for smooth editing but for other purposes like uploading to Youtube, this HD video converter can definitely meet your demand. In addition to high definition videos, large FLV files can also be compressed.

Hit the button “Settings” near the format bar, and you’ll brought to the “Profile Settings” interface where you can compress source videos by choosing a smaller video size from the “Size” dropdown list.


Step 4. Convert source video to FCP/iMovie

Once everything is settled for conversion, click “Convert” on main interface to make your source videos converted. After conversion, you’ll get the expected and desired video format well accepted by Final Cut Pro,iMovie.

Step 5. Import converted videos to FCP/iMovie. 

Run the editing software installed on your Mac, and import the converted videos to FCP,iMovie you usually do.

Related program

Pavtube Media Magician / Mac Version: A nice camcorder assistant manager, lossless camcorder video joiner, MTS/ M2TS/ MXF/ MOV/ MKV/ TiVo/ WMV/ AVI/ MPG converter and editor. Meamwhile it supported upload edited video to YouTube directly.

Read More:

Friday, October 24, 2014

Downscaling Panasonic GH4 UHD 4K to 1080p mov video for editing in iMovie

Here is a tutorial shows you how to downscale Panasonic GH4 UHD 4K to 1080p mov format for easier editing in iMovie on Mac.

The GH4 is powerful 4k camera in a small package. It features a 16.05-megapixel Digital Live MOS sensor and a 4-CPU Venus Engine, capable of capturing high-resolution JPEG and RAW stills, as well as UHD 4K 3840x2160 30p/24p and cinematic DCI 4K 4096x2160 video at 24p. The GH4 delivers video quality surpassing many professional video cameras, but for some reason, the HD or super HD 4K experience also brings import issues while importing or ingesting Lumix DMC-GH4 4K files to iMovie for basic editing.
Import Panasonic GH4 UHD 4K to iMovie

The majority of editing work is still being finished in 1080p. In most cases, we still need to downscale most of the Ultra HD 4K to 1080p or 2K properly with a more a more editing-friendly format, such an iMovie's Apple InterMediate Codec. Now with this HD Video Converter for Mac from Pavtube, the editing process with Panasonic GH4 UHD 4K video in iMovie can be surprisingly easy and smooth.

Somtimes, it is necessary for us to downsize our videos as suitable, no matter for editing or watching, right? For example, from 1080p to 1080i? All these changes can bring us the nice effect.

Overall, this lets you downscale and convert GH4 4K AVCHD/MP4/MOV to 1080p AIC encoded MOV for working with iMovie 8/9/11 seamlessly with fast speed. Besides, the program also adds many other various professinal encoders ProRes, DNxHD, MPEG-2, etc. allowing you to convert video to seamlessly fit Final Cut Pro, Avid, Adobe Premiere Pro, etc. If you want to trim or crop your Ultra HD 4K video, this Video Converter for mac can give you a hand. And for Windows users, you can convert GH4 video to Premiere Pro, Sony Vegas Pro, Windows Movie Maker supported video with Pavtube HD Video Converter.

Guide: Downscaling Panasonic GH4 UHD 4K to 1080p mov video for editing in iMovie

Step 1: Run Pavtube 4K Video Converter for Mac and load 4K AVCHD/MP4/MOV video clips from GH4 to it. You can click either "Add Video" button or "Add from folder" button to load source 4K files.

4K Video Converter for Mac 

Tips:
If you want to combine the loaded 4K footage into one file, simply tick off the checkbox before "Merge into one file".

Step 2: Select "Apple InterMediate Codec (AIC) (*.mov)" as target format

In order to convert Panasonic GH4 4K recordings to AIC for use in iMovie, simply hit "Format" menu and follow "iMovie and Final Cut Express" > "Apple InterMediate Codec (AIC) (*.mov)".

Want to convert some 4K XAVC S files to ProRes MOV for FCP X? Choose "Apple Prores 422 (*.mov)" files under "Final Cut Pro".

iMovie best format

Profile Settings:
Before conversion, you can click the "Settings" icon to customize the video/audio settings including the Bitrate of Video and Audio, Audio, Video Size, Sample Rate, Frame Rate, Audio Channels, etc for iMovie 8/9/11. To down-convert ultra HD 4K to 1080p, do remember adjusting video size to 1920*1080. That is the exact 1080p.

iMovie AIC video settings

Step 3: Start 4K video to AIC Conversion.

Click the big button "Convert" to start GH4 4K to AIC MOV for iMovie immediately. As soon as the conversion is completed, you are able to click "Open" button to get the generated AIC MOV files. Check the generated 1080p video, you will certainly be satisfied with its final video quality.

Step 4: Import converted Panasonic GH4 4K shootings to iMovie

Launch iMovie 8/9/11, and then choose File > Import > Movies to import the converted Panasonic GH4 UHD 4K to iMovie for further editing.

Then it would be easier for you to edit your Panasonic GH4 4K clips in iMovie 8/9/11. Enjoy your editing workflow. And get more solutions for editing and playing 4K video on Mac.

Wednesday, July 23, 2014

AVI to iMovie: An easy way to import AVI to iMovie on Mac

This article will explain why we often failed to import AVI to iMovie, and I will introduce a step by step guide on how to successfully import all kinds of AVI files to iMovie.

Why We often Encounter Problem in Importing AVI to iMovie?

AVI (Audio Video Interleaved) is common video file format which might be one of the most used file formats for saving video files online and offline. And most of AVI videos is either downloaded from the Internet or taken by your cameras. All in all, iMovie only reads AVI that both the audio and the video were compressed by using a codec that iMovie can recognize. If your AVI video files are not imported, it's because of the codec used to create the AVI file is not supported by iMovie.

import AVI to iMovie on Mac

So if your source AVI files can't be accepted by iMovie on Mac, you need to convert AVI to iMovie compatible code AIC. I know a program that named HD Video converter for Mac, is just the ideal AVI to AIC conversion software.

It can not only easily transcode any kind of AVI video to AIC .mov for iMovie editing, but also provides simple video editing functions for you. Besides, the Mac video converter ca nconvert HD videos from HD camcorders or DVs (like JVC, Panasonic, Sony and Cannon) for editing in Final Cut Pro, Final Cut Express, iMovie, Avid MC, Adobe PremierePro etc. Just download it and follow the tutorial below to convert AVI to AIC for iMovie on Mac.

An easy way to import AVI to iMovie on Mac

1. Load AVI files to the Mac Converter

Install Pavtube AVI to iMovie Converter on your Mac, and launch it when installation complete. Drag & drop AVI files to the Mac app directly, or click "Add Video" or "Add from folder" button to locate the AVI files you want to add. Batch conversion is available here, so you are allowed to import several files at one time.


2. Choose the optimized preset for iMovie

Select "iMovie and Final Cut Express>Apple InterMediate Codec(AIC) (*mov)" as output format for editing in iMovie. The program has already optimized the video settings for iMovie. The output videos will keep the original quality of AVI video.

iMovie best format

Tip: You can click "Settings" to customize the output parameters, adjust the resolution, bitrate as you want.  (Optional) 

AIC Settings

3. Start AVI to iMovie conversion

Hit the "Convert" button and Pavtube HD Video Converter for Mac will convert your AVI rapidly.

 4. Import converted file to iMovie (Mavericks 10.9 supported)

After the conversion, you can import the output files to iMovie. Launch iMovie, from the File menu, choose Import > Movies, navigate to the folder that output AVI videos are saved. Select the files and click "Import".

Bingo! You did it! With this AVI to iMovie Converter you can now import any AVI from your video camera to iMovie, easily and rapidly. All AVI videos can be edited with your favorite iMovie now!

What's more, here is Blu-ray iMovie editing solution, and the way to convert MKV to iMovie on Mac.

Sunday, June 15, 2014

How to edit 2014 FIFA World Cup MP4 recordings from GoPro Hero 3 in iMovie/FCE

If you have any issue when importing 2014 World Cup GoPro Hero 3 MP4 recordings to iMovie/FCE, just follow this simple guide, which offers you a quick fix for the problems. 

With everyone's expectations, the 2014 FIFA World Cup Brazil games have entered the countdown stage. But because of the time zone difference, you may miss your favorite team’s match. In such cases, you may choose your GoPro Hero 3 to record the game competition and edit in your iMovie or FCE as long as someone can help you do the editing workflow.

Because Mac (iMovie/FCE) does not seem to like the videos that come right out of my GoPro Hero 3, you need to convert World Cup mp4 videos from my Gopro Hero 3 to use these converted files in iMovie/FCE. Keep reading a brief how-to on the simple process, which guaranteed to edit your 2014 FIFA World Cup GoPro Hero 3 MP4 clips in iMovie/FCE smoothly.

To get the work done, a third-party software is needed. Here Pavtube iMedia Converter for Mac is highly recommended. It's a professional and powerful high-quality Mac video converter and editor. With it, you can effortlessly transcode World Cup GoPro Hero 3 HD MP4 files to AIC encoded MOV for iMovie/FCE.

Meanwhile, the Mac Video Conversion tool can create files compatible with various non-linear editing systems like Avid, iMovie, FCE, FCP, and Adobe Premiere (Pro) etc. Just download it and follow the tutorials below to transfer and import World Cup GoPro Hero 3 HD footage to for smoothly editing in  iMovie/FCE. 

Guide: Transcoding 2014 FIFA World Cup GoPro Hero 3 HD MP4 to AIC codec for Final Cut Pro

Step 1. Download, install and run the Mac MP4 to AIC Converter, click "Add Video" to load your World Cup GoPro Hero 3 mp4 footage.


Step 2. Click the format bar, and move mouse cursor to ""iMovie and Final Cut Express > Apple InterMediate Codec(*.mov)" as output format.


Some more helpful features of the app:

1. Settings- click to set video resolution(1920×1080/1440×1080/1280×720/720×480), bitrate(from 1Mbps to 20Mbps), frame rate (24p/30p)

2. Editor (next to "Add" icon)- click to set deinterlace, denoise, mute, volume up, trim, crop, etc.

Step 3. Click "Convert" button to start World Cup GoPro Hero 3 MP4 to AIC MOV conversion.

As soon as the encoding process finished, you can get the final output .mov files via clicking "Open" button effortlessly. The transcoded files now are ready for editing in iMovie/FCE.

Additional Tips:

If you want to edit GoPro video in Final Cut Pro X or FCP 7/6, you just need to choose the "Final Cut Pro > Apple ProRes 422 (*.mov)" as output format in the second step; For Avid Media Composer, choose "Avid Media Composer > Avid DNxHD(*.mov)" as output; For Adobe Premiere Pro, choose Adobe Premiere/Sony Vegas> MPEG-2(*.mpg) as output.

Read More:

Best workaround for editing GoPro Hero 3 videos on PC/Mac
Converting 2014 FIFA World Cup Brazil video to MP4 and burning to DVD
Edit your GoPro Hero 3 footage in iMovie and share on Instagram with friends

Friday, April 11, 2014

Ingest and Edit Blu-ray in iMovie/FCE to make your own masterpiece

What is the best Way to work with Blu-ray in iMovie/FCE on Mac? This article will give you the best answer. 

It's a great fun if you have a pretty large Blu-ray collection for sharing with your friends or familiars. When you have the digital copies of these movies saved on your hard drive or personal server, you may also like to edit Blu-rays in iMovie/FCE to make your own masterpiece.


However, Apple might not be ready to add Blu-ray to its computers yet, so you can't directly ingest Blu-ray files in iMovie/FCE. As iMovie/FCE best supported video formats is AIC (Advanced Intermediate codec), so it's the best way to convert Blu-ray to AIC codec for editing in iMovie/FCE. Nowadays there are seldom Blu-ray applications developed for Mac users, not to mention a program that can rip Blu-ray to AIC codec for iMovie/FCE Editing. 

However, a professional Mac Blu-ray to iMovie/FCE Converter from Pavtube can realize it. It can help you rip/convert Blu-ray movie to AIC for iMovie/FCE without quality loss in a fast speed on Mac OS (os x lion included). Also with this tool, you can rip and import a Blu-ray clip to FCP for editing. Here is an easy guide to show you how to convert Blu-ray to iMovie/FCE with Pavtube iMedia Converter for Mac for your reference. 

Step 1. Insert the Blu-ray disc you want to convert into your BD drive. Install and run the blu-ray to AIC Converter for iMovie/FCE on your Mac, then load your Blu-ray files into it. You can also add Blu-ray ISO/IFO, Blu-ray folders to it. 


Step 2. Click "Format" bar and select "iMovie and Final Cut Express--> Apple Intermediate Codec(AIC)(*.mov)" as best codec for iMovie/FCE. 


Step 3. Click on "Settings" button to adjust audio and video parameters, bitrate, aspect ratio, frame rate, sample rate, and channels are all changeable in the following interface, so you can adjust them according to your own requirements.


Step 4. Click "Convert" button to start ripping Blu-ray to iMovie/FCE AIC.mov.

Once get the converted ProRes files from BD, you can import AIC.mov files to iMovie/FCE for editing freely.

Very simple? If any of you have figured out a straight way to convert Blu-ray to AIC codec for iMovie/FCE, please let me know, and any suggestion is appreciated. Thanks in advance. 

Refer to here to learn how to import video files into iMovie

Extra Tips:

Convert DVD to Multi-track Apple ProRes for FCP with Timecode
How to edit DVDs in FCP, FCP X, FCE on Mac?
Import DVD to iMovie 8/9/11 on Mac Mountain Lion 10.8

Monday, February 10, 2014

JVC 60p AVCHD Editing Tips- Transcode GZ-R70 mts clips to iMovie/FCE

If you want to edit 60p AVCHD .mts files shot by JVC GZ-R70 smoothly in iMovie/FCE, here is right for you. Go to following article to get the instruction.

JVCs two new cameras GZ-R70 and GZ-R10 bring action-camera-durability to the traditional camera form factor. Like the aging action star, these show promise of no excuse good video. The two models both are dust-proof, water resistant to 5 m (16.4 ft), drop-proof from a height of 1.5 m (4.9 ft) and freeze-proof to temperatures as low as -10° C (14° F), which are designed for professional photographer.


For the GZ-R70 is capable of recording 1920x1080/60p high definition recording, which is hard for iMovie/FCE to recognize or read well. In order to make the AVCHD videos from JVC GZ-R70 compatible with Mac, the easy workaround is to convert the 60p mts files. For this purpose, this article mainly shows you how to transcode JVC GZ-R70 60p MTS videos for editing in iMovie/FCE in detail. Mac Mavericks 10.9 supported.

At first, we recommend you to choose a top MTS to AIC Converter for mac that is specific on converting 1080/60p mts/m2ts files from JVC GZ-R70 for iMovie or FCE editing. Pavtube MTS/M2TS Converter for Mac works as the companion for your camcorder AVCHD videos to convert any kinds of .mts/.m2t videos to your Mac Editor, like FCP, iMovie, FCE, Avid Media Composer, Premiere Pro, etc for editing. Just try Mac JVC MTS converter and follow the guide below.

Steps for transcoding JVC GZ-R70 1080/60p MTS clips to iMovie/FCE

Step 1: Install the top MTS/M2TS Converter for Mac on your Mac OS X, and run it to import your JVC GZ-R70 1080/60p MTS footages to it.


Tip: If you want to combine the files together, please tick the box "Merge into one" on the main interface.

Step 2: Click the Format box and select best output format on the dropdown list. You are advised to choose Apple Intermediate Codec(AIC)(*.mov) as the export.


Step 3: Click the “Settings” icon on the main interface and you’d better set the video size as 1920*1080, video frame rate as 30fps(or 25fps PAL) for importing JVC GZ-R70 1080/60p MTS to iMovie/FCE with the best quality.

Step 4: Click the "Convert" button on main interface to start converting JVC GZ-R70 1080/60p MTS clips to AIC video immediately.

After the JVC MTS to AIC Converter finished transcoding, you can run the iMovie/FCE to import the converted files and you can edit JVC GZ-R70 1080/60p MTS in iMovie/FCE without any rendering or incompatibility problem.

Related articles:
Quickly Edit JVC GZ-R70 60P AVCHD Progressive in Avid MC
Import Panasonic HC-X900 3D AVCHD to Final Cut Pro (X)

Thursday, January 9, 2014

How to import AVCHD video from Panasonic HDC-MDH1 to iMovie 11 on Mavericks 10.9

Follow this article to learn how to edit Panasonic HDC-MDH1 AVCHD in iMovie 11 on Mac. The latest Mavericks is also supported!

Panasonic's HDC-MDH1 AVCHD Camcorder (PAL) is a shoulder-mount HD camera with a pro-style form factor that gives you added comfort and stability during long handheld shoots. Capable of capturing full HD 1920 x 1080 or downconverted standard-definition 576i video, the camera provides the versatility and convenience necessary for getting your shots the way you want them.


I bought this camera for using it with 2 other professional cameras to edit a life recording of a concert, musical or theatre performance. Regarding the camcorder Panasonic HDC-MDH1 AVCHD Camcorder PAL, I wonder if it allows me import mts video from my my camcorder easily into iMovie 11 on Mavericks 10.9 to do editing for post-productionnly. Can anyone to answer this please, because I plan to buy it. Thanks for your answer!
Best Answer:
AVCHD format is not well supported by iMovie 11 on Mac OS X 10.9. As we all know, iMovie favorable video format is Apple Intermediate Code(AIC). If you want to edit Panasonic HDC-MDH1 AVCHD in iMovie 11, you need to convert MTS to iMovie best supported AIC .mov format.

In that case, a third party AVCHD to AIC Converter is needed. And Pavtube MTS to AIC Converter for Mac comes to help you out. You can follow the steps below and learn how to transcode Panasonic HDC-MDH1 MTS videos to AIC codec for iMovie 11 on Mac OS X 10.9 for editing smoothly.

How to handle your Panasonic HDC-MDH1 AVCHD in iMovie 11 effortlessly

Free download a free version before purchase and let’e move on!

1. Keep your HDC-MDH1 on and connect it to Mac, your camcorder will show as a hard drive on desktop which means your mac recognized it now.

Launch this MTS to iMovie Converter.

Click top left icon “Add videos” to load individual mts files, or try the second one “Add from folder” to load the entire folder.


2. You can find many presets in “Format” drop-down list. Choose “iMovie and Final Cut Express > Apple InterMediate Codec(AIC)(*.mov)” as the output video format.


3. Click “Settings”, you can find some other settings such as Size, Bitrate, Frame Rate and son on. The video quality is corresponding to bitrate, the higher bitrate you choose the better video quality you will get. You can check the file size easily here.

4. Start converting Panasonic HDC-MDH1 AVCHD to AIC for iMovie 11

Click the red convert icon at right bottom and start to convert Panasonic HDC-MDH1 AVCHD to AIC MOV for iMovie 11. You can check Shut down computer after conversion if you are doing a batch conversion and do not want to wait on the front of computer.

Wait for some time, now you get the converted videos for importing/editing in iMovie.

More details can be found here

Importing Panasonic HC-X900M MTS to FCP X
Convert Panasonic records for upload to YouTube
Workflow for Panasonic HX-WA03 MP4 and Premiere Pro

Monday, January 6, 2014

XDCAM Converter-How Can I Convert PMW-500 XDCAM HD422 MXF to iMovie/FCE?

If you have any problem when importing and editing Sony PMW-500 XDCAM MXF recordings in iMovie or FCE, you can just follow this tutorial to transcode XDCAM MXF to AIC MOV for iMovie/FCE.

The PMW-500 is a new XDCAM EX model that’s capable of 50 mb/s acquisition, making it the first of Sony’s cameras recording to solid-state memory to fulfill broadcasters’ minimum HD requirements.


With the PMW-500, you can record full-HD 422 50-Mbps MXF based on highly developed MPEG-2 Long GOP compression technology.While, if you want to edit the MXF videos Sony PMW-500 recorded, you may find the high quality MXF files are not recognized by most editing software like iMovie or Final Cut Express.

To get a good visual effect and smooth workflow for editing PMW-500 XDCAM HD422 MXF in iMovie/FCE, here is an easy workaround to fix this problem. That is to convert XDCAM files to AIC.mov for iMovie/FCE.

Now give a shot to this powerful Sony PMW-500 XDCAM Converter for Mac. With intuitive interface, you can easily and fast convert your MXF footages to AIC for iMovie/FCE on mac with the help of this professional MXF to AIC Converter. And the latest Mac OS X Mountain Lion 10.8 and Mavericks 10.9 is supported; just feel free to try it!

How to convert Sony PMW-500 XDCAM MXF footage to AIC for iMovie/FCE on mac 

Step 1. Connect your Sony PMW-500 camera to Mac with USB cable or use card reader to transfer the MXF files to Apple hard drive disk.

Step 2. Install and launch this Mac XDCAM MXF Converter, import MXF footages from PMW-500 to the software.


Step 2. Click the "Format" option, select "iMovie and Final Cut Express > Apple InterMediate Codec(AIC)(*mov)" for editing Sony PMW-500 XDCAM MXF in iMovie/FCE.


Step 3. When above steps finished, you can click "Convert" button to start converting Sony PMW-500 XDCAM MXF to AIC MOV for iMovie/FCE with a super fast speed.

With the excellent MXF to AIC Converter, you can also deal with Sony PMW-500 XDCAM MXF footage in iMovie/FCE on Mac with best video and audio quality as you want.

Tips: 

1. This Pavtube MXF Converter for Mac could also convert Sony MXF footages to various formats for nonlinear editing programs such as FCP, iMovie/FCE, Premiere Pro, Avid Media Composer, etc.

2. Get more step-by-step guide of how to work with Sony footages, MXF videos on Mac and FCP.

3. Futhermore, if your MXF files have 2 audio tracks or more, here is a new program named iMixMXF with multi-track preserving and mixing features. You can download the trial version for evaluation!

More Tricks for Editing MXF files on Mac:
Transfer Sony XDCAM to QuickTime MOV on Mac

Thursday, December 26, 2013

Canon MXF Workflow - How to import Canon MXF footage to iMovie

Learn from this article, you can easily convert and import Canon MXF footage into iMovie for further editing on Mac (OS X 10.9 Mavericks included).

Specially designed for video hobbyists and independent filmmakers, iMovie is a proprietary video editing software application which allows Mac, iPod Touch 4th generation, iPhone 4, iPhone 4S, and iPad 2 users to edit their own home movies. iMovie makes it easy to turn your home videos into your all-time favorite films. Here it mainly talks about how to get Canon XF footages to iMovie for editing smoothly.


As you see, iMovie supports importing directly from a large amount of popular camcorders or digital still cameras. But as for Canon XF footages, this becomes a bit tacky that you can not natively import and edit .mxf wrapped footage from the XF100, XF105, XF300 and XF305 cameras in iMovie without rendering time.
A newbie may feel disappinted when the iMovie failed to import recordings from Canon XF105 or XF300 while experienced users will convert the Canon MXF to something iMovie can edit natively, say Apple Intermediate Codec (AIC) encoded MOV format. Along with some help from the third-party software. Video Converter Varies, a recommended one is Pavtube MXF to iMovie Converter for Mac.

The program can not only convert MXF to AIC codec videos for Mac editing, but also provide simple video editing functions for you. After conversion, you can import the output files in iMovie directly without rendering, but you should make sure you select the right codec and parameters to encode. Below is how.

Free Download the Canon MXF Converter for Mac


Guide -Transcode Canon XF MXF footage to AIC for iMovie importing/editing under Mac OS X Mavericks

Step 1. Install and run this Canon MXF to iMovie Converter to your Mac Mavericks 10.9, add you video files.


Step 2. Click on Format, select iMovie and Final Cut Express category, then choose Apple InterMediate(AIC) (*.MOV).


Step 3. Start converting Canon mxf footage to iMovie AIC by clicking "Convert".

Some more helpful features of the app:

1. Settings- click to set video resolution(1920×1080/1440×1080/1280×720/720×480), bitrate(from 1Mbps to 20Mbps), frame rate (24p/30p)

2. Editor (next to “Add” icon)- click to set deinterlace, denoise, mute, volume up, trim, crop, etc.

Tips:

If your videos files have more than two audio channels, and you want to convert to MOV file with all multiple audio tracks preservation, Pavtube iMixMXF can help you to get it done. With it you are allowed to preserve all or any audio tracks for output MOV and mix the multiple audio tracks into one if you need.

Once the conversion completes, you can can import Canon MXF footage to iMovie successfully and get down to video editing.

Read more:

Panasonic GM1 and iMovie - Convert Lumix GM1 MTS for Editing in iMovie 11/9/8

Summary: Encountered problems when importing Panasonic Lumix GM1 AVCHD mts clips in iMovie 11, iMovie 9 & iMovie 8 for further editing? Just follow this article to find the best solution here.

The Panasonic Lumix DMC-GM1 is the company's latest Micro Four Thirds interchangeable lens camera (ILC), and the first in its new GM series. This new range of ILCs focuses on cameras that are compact, and sure enough, the GM1 is the company's smallest yet, measuring just 98.5 x 54.9 x 23.5mm.

I like the high quality video in AVCHD recorded with GM1. I'm a Mac user and shoot many 60i AVCHD videos with my Panasonic Lumix GM1, I find that the AVCHD is a wonderful codec for playback but not so good for editing in iMovie, no matter the version 11/9/8.


I googled and find the reason that I can’t successfully ingest those recorded AVCHD footages to iMovie is limited by the iMovie itself. Currently AVCHD is a very non-standard format and it’s unsupported in iMovie even the lastest iMovie 11. In order to import Panasonic Lumix GM1 AVCHD footage into iMovie 11, iMovie 9 & iMovie 8 for smoothly editing, you can use 3rd-party software to re-wrap and convert MTS to Apple Intermediate Codec first, which is a native format for iMovie. It’s a great way to achieve your goal smoothly. For this purose, this article will show you how to transcode Panasonic Lumix GM1 MTS to AIC MOV in detail.

At first, here suggest you to try Panasonic AVCHD to AIC Converter for Mac. It is an ideal tool which can be used as a Panasonic AVCHD MTS Converter under Mac OS X 10.9 Mavericks, 10.8 Mountain Lion, 10.7 Lion, Snow Leopard 10.6, Leopard 10.5. It is free, clean and safe to install and use. With it, you can effortlessly transcode MTS to Apple Intermediate Codec, ProRes and DNxHD with ease and high video quality kept for working with iMovie, Final Cut Pro, Adobe Premiere, Avid Media Composer etc. non-linear editing systems. Below are the steps.

Guide on how to convert Panasonic Lumix GM1 AVCHD mts videos to iMovie 11, iMovie 9 & iMovie 8 

Step 1. Download Pavtube iMedia Converter for Mac. This professional MTS to AIC Converter can help you convert Panasonic AVCHD MTS files to rich formats for use on Mac (Mountain Lion 10.8 and Mavericks 10.9 included).

Step 2. Install and launch this Panasonic AVCHD MTS Converter. Import Lumix GM1 MTS footage to the Mac converter.


Step 3. Click "Format" bar to choose the output format. If you want to edit Panasonic Lumix GM1 MTS in iMovie/FCE, please choose iMovie and Final Cut Express -> Apple InterMediate Codec(AIC) (*.mov). This is best format for iMovie 11, iMovie 9 & iMovie 8 editing on Mac, once converted, you won't need to render.


Step 4. You can click “settings” to customize the output parameters, adjust the resolution, bitrate as you want.

Step 5. Click convert button to start converting Panasonic Lumix GM1 AVCHD MTS to AIC MOV for iMovie 11, iMovie 9 & iMovie 8 editing.

When the conversion finished, you can directly import the output AIC MOV files to iMovie or Final Cut Express for editing and make your movies. The importing needn’t any rendering because the AIC MOV isone of the compatible video formats in iMovie 11, iMovie 9 & iMovie 8 on Mac OS X (Mavericks 10.9 included).

More related:

Thursday, December 12, 2013

Convert .mts files from JVC Everio GZ-HM330SAA in iMovie/FCE/FCP/Avid MC

Here is the quick tutorial for you that will show you the simplicity of JVC Everio GZ-HM330SAA workflow for importing MTS files in FCP, iMovie, Premiere Pro, Avid for editing by transcoding JVC MTS to Mac editable format (Mavericks 10.9 included).

I work at at CyberNet Evolution, and below is a question from one of my friends: 


I purchased a JVC Video recorder, the model is GZ-HM330SAA and I shot some footage about my kids basketball games. I am not sure I just converted the video and gave it to my daughter who edited it on her Apple Mac for me. Just keeping the videos as a record. But I find I couldn’t convert the software to copy to a DVD. I made a mistake purchasing this camera not realisied how difficult it was. I contacted JVC and they were no help at all. 


So I took his camera to my local Tech guy and I couldn’t help much at all either but I start to surf the net and see if I could find something. While searching for solutions, I find some plug-in for Mac can do some work. But the importing way is a tedious process, which needs you patience. Fortunately, I found Pavtube web site and its software, and there is an alternative easy way to fix the issue. 

The easy workaround is to convert JVC Everio GZ-HM330SAA mts files to Mac native editable format along with some help from a third-party tool. Well, if you make the recordings editable before taking to the program, the incompatible error won’t happen any more. Keep reading for a brief how-to below. 

Convert JVC Everio GZ-HM330SAA MTS files for editing in Avid, FCP (X), iMovie, Premiere 

Now go to find Pavtube HD Video Converter for Mac. Lots of users are impressed by this converter since it is powerful enough to convert camcorder videos to multiple video formats for iOS/Android/Windows Tablets & Phones and HD Media Players as well as video editing software including Avid Media Composer, Final Cut Pro (X), iMovie, Premiere and more. And you can enjoy the powerful edit function, like trim, crop, watermark for text, image and video, subtitles and so on. 

The following guide will show you how to transcode/convert JVC HM330SAA mts files for editing on Mac. Download it and follow below steps. 

Step 1. Load HM330SAA MTS files. 

You can choose "add video" directly to add the mts files. 


Step 2. Select output format for video editing software. 

Click "Format" menu you will find various video formats listed by different devices. Choosing the editing software option directly will help you to take less time to find a more preferable video format. 

You can choose Final Cut Pro -> Apple ProRes 422 (*.mov), this codec is optimized for FCP editing; 


For Avid Media Composer, choose "Avid Media Composer -> Avid DNxHD 1080p (*.mov)"; 

For iMovie, choose "iMovie and Final Cut Express > Apple intermediate Codec (AIC) (*.mov)"; 

For Adobe Premiere, just choose "Adobe Premiere/Sony Vegas > WMV (VC-1) (*.wmv)". 

Step 3. Edit loaded JVC HM330SAA MTS video files. 

Click "Edit" button and you are allowed to trim, crop, add text/image/video watermark or some effect to your output video for making it perfect. Here the function of adding subtitles to output files will contribute to make your own videos. You can use free software Subtitle Edit to edit your subtitle content then add it to output videos. 

Tips: Click "Settings" on the interface and you can adjust the parameters including size, bitrate, frame rate, etc. to get a high quality of output files. And keep the settings the same as original video recordings will provide you the least loss of video quality. 

Step 4. Start conversion. 

Click the "Convert" button to start conversion. When it completed, click the "Open" button to get the generated videos for your editing software. 

More features about it: 

1. Rip and convert Blu-ray and DVD including 1:1 backup Blu-ray/DVD movies to Mac hard device for future needs. 

2. Directly Copy feature will save 100% intact .M2TS main movie from original BD disc. 

It is an integration of BDMagic for MacDVDAidfor Mac and Video Converter for Mac and it will meet almost all your requirements about converting videos. 

Now get ready for importing and editing JVC Everio GZ-HM330SAA AVCHD mts videos in FCP/iMovie/Avid MC for editing easily without any problem. Enjoy your editing workflow! 

Learn more JVC video tips: 

Get mts Videos from JVC Everio GZ-HM330SAA into FCP
Transcode GZ-R70 mts clips to iMovie/FCE
How to edit JVC GY-HM650U MXF, MOV, AVCHD, MP4 on Mac?

Monday, November 25, 2013

Best way to import Sony Alpha NEX-5T MTS to iMovie & FCE

This article teaches you how to easily convert and import Sony Alpha NEX-5T MTS footage into iMovie or Final Cut Express for further editing on Mac (OS X 10.9 Mavericks included).

Sony brought its NEX mirrorless camera series into the hybrid autofocus age, with the debut of the NEX-5R. Just ten months later, that camera gets a more modest refresh, with the arrival of the Sony NEX-5T.


Sony Alpha NEX-5T can record Full HD (1920 x 1080 pixel; 1080p/1080i) movies at a rate of either 60 frames per second, 24 frames per second, or 60 interlaced fields per second. (In some markets, the 60p/60i rates are replaced with 50p/50i rates, and the 24p rate with 25p.) You can also opt for lower-res 1440 x 1080 and 640 x 480 movies, with a fixed rate of 30p (25p on overseas models).

At the maximum resolution, movies are saved using AVCHD version 2.0 (MPEG-4 AVC / H.264) compression with AC-3 stereo Dolby Digital audio. At lower resolutions, movies are saved with MP4 compression and MPEG-4 AAC-LC stereo audio. Most users would like to make some editing with MTS footage from Sony Alpha NEX-5T, but problems came up as AVCHD is not a friendly format for editing in iMovie and FCE.

To solve the problem, you'd better transcode Sony NEX-5T AVCHD mts footages to AIC MOV for iMovie and FCE first. And here you need some third-party program to help. Pavtube MTS/M2TS Converter for Mac is an ideal choice for me. It works very well in the past months and also you can choose to output the video as 1080p or other size. It can convert Sony NEX-5T AVCHD MTS video to AIC codec .mov format, and then you can edit Sony Alpha NEX-5T MTS files natively in iMovie and FCE on Mac (OS X 10.9 Mavericks included).

Step 1. Free Download the Converter, install and run. And then import Sony NEX-5T recorded mts videos to the MTS to AIC converter.


PS: It's an excellent Sony AVCHD Converter for Mac which can also transcode MTS to an editable format like ProRes for FCP, AIC for iMovie/FCE, MPEG-2 for Adobe; to a playable format for putting on portable devices or uploading to YouTube.

Step 2. Click the format bar, and move mouse cursor to "iMovie and Final Cut Express > Apple Intermediate Codec(AIC) (*.mov)" as output format.


Step 3. Click convert button in the main interface to start transcoding Sony Alpha NEX-5T mts files to AIC fro editing in iMovie and FCE on mac.

Some more helpful features of the Sony MTS to AIC Converter:

1. Settings- click to set video resolution(1920×1080/1440×1080/1280×720/720×480), bitrate(from 1Mbps to 20Mbps), frame rate (24p/30p)

2. Editor (next to "Add" icon)- click to set deinterlace, denoise, mute, volume up, trim, crop, etc.

After the workflow, you can go to the output folder to find the converted video files. Now you are free to import/edit Sony Alpha NEX-5T AVCHD files in iMovie and FCE under Mac (OS X 10.9 Mavericks included) without problems.

See also:
Load Canon VIXIA HF S100 MTS to FCP X

Read More:

Tuesday, September 17, 2013

Get iMovie/FCE to recognize or import Nikon D4 1080p mov videos

Having got a Nikon D4, and tried importing some raw video footage shot with it into iMovie or FCE but with no luck. If you have the same issues, check out the easy solution here.

Nikon's new flagship professional digital SLR, the D4, the successor to the Nikon D3s, features a newly-developed a 16.2-megapixel FX-format CMOS sensor, as well as the powerful Expeed 3 image processing engine. Nikon D4 has been developed through continuous dialogue with professional photographers. It is wonderful to be taken to take photos and record HD videos when you travel or commute.


If you have got the Nikon D4 camera and often use it to shoot 1080P video, you may have the need to edit Nikon D4 h.264 mov footages in iMovie/FCE on Mac, but you will encounter some editing problems with D4 full hd videos, like importing slowly, and couldn't edit videos smoothly as iMovie/FCE doesn't support h.264 footages well. 

As far as I am concerned, it will be the best choice to convert Nikon H.264 MOV to iMovie/FCE best native supported video format - AIC codec .MOV, then you can edit Nikon D4 1080p mov video well in iMovie/FCE on Mac. Check out Pavtube HD Video Converter for Mac, a top Nikon H.264 MOV to AIC Converter. It supports transcoding all Nikon 1080p MOV files to AIC so that you can easily import the Nikon h.264 recordings to iMovie, FCE for editing on Mac. Plus, it also supports converting H.264 MOV to Final Cut Pro, Avid Media Composer, Adobe and more.

Now free download it 
here and follow the steps below to convert Nikon D4 MOV to iMovie/FCE on Mac.

1. Transfer h.264 encoded .mov files from Nikon D4 camera to your Mac HDD via USB cable. Install and run the top Nikon H.264 MOV Converter for Mac , click “Add video” to load the Nikon D4 recorded MOV video or directly drag the files to this Mac HD Video Converter.


Tip: If you have multiple MOV clips, you can select the “Merge into one file” box to merge your multiple MOV files into one file.

2. Click “Format” bar and choose “iMovie/Final Cut Express -> Apple Intermediate Codec(AIC) (.mov)” as export format. This is iMovie/FCE preferred video format.


3. Click the “Settings” button and customize proper video/audio parameters if necessary. Video size, bitrate and frame rate are flexible and can be adjusted as you like. E.g. Set video size to 1920*1080 when you feel like to keep 1080p as the source file features.

Before start the conversion, edit function is useful and convenient for you to use. You can deinterlace, trim, crop, adjust effects or add watermark to the video.


4. Click “Convert” button and transform Nikon H.264 MOV to AIC MOV for using in iMovie/FCE on Mac.

Once the conversion is finished, you can click “Open” button to get the output files effortlessly. Now you have got it right and them import the AIC .mov to iMovie/FCE for editing.

Launch the iMovie or Final Cut Express, choose from File menu > Import > Files…

Read More: