Monday, September 28, 2015

Log and Transfer Sony PXW-FS5 4K XAVC videos to FCP 6/7 for editing on Mac


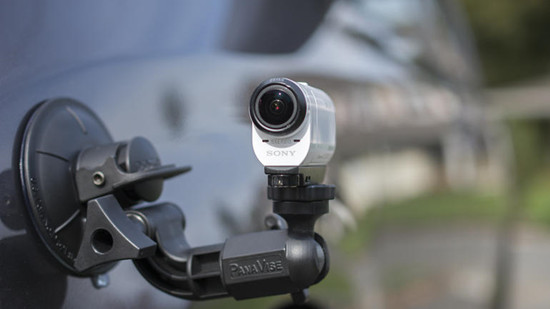
Sony is pleased to introduce the PXW-FS5, a small size XDCAM Super35mm camcorder with extraordinary capabilities. When quality is everything, make the most of the FS5s Super 35 Exmor sensor and shoot 100Mbps 4K (3840 x 2160) using Sony’s advanced XAVC (Long GOP) recording system. If you need a fast turnaround, switch to Full-HD (1920×1080) recording at up to 60p XAVC 10bit 4:2:2 50Mbps. When you got a PXW-FS5 4K camera, you will wanna know the 4K workflow. So, what is currently the best and most efficient way to work with Sony PXW-FS5 4K XDCAM XAVC in FCP 6/7 on Mac?

Generally, we can use Log and Transfer or Log and Capture to import videos to FCP 6/7 for editing. But the new XAVC codec is not supported well by Final Cut Pro. Since, Apple ProRes is the most compatible codec for FCP, so if we want to edit Sony FS5 XAVC in FCP 6/7, it is necessary to convert those already shot XAVC files to ProRes .mov using third-party software. Here, you can depend on Pavtube HD Video Converter for Mac. With this best 4K XAVC converter, you can deal with 4K videos regardless in .MP4, .MXF, .MOV format to Prores for Final Cut Pro editing without much quality loss.


Log and Transfer Sony PXW-FS5 4K XAVC to FCP 6/7 for editing on Mac

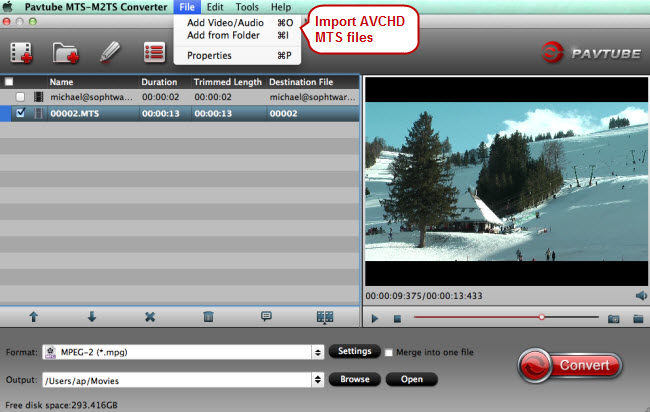
Step 1. Download, install and run the 4K XAVC to FCP Converter; click "Add Videos" icon to load your source XAVC files.

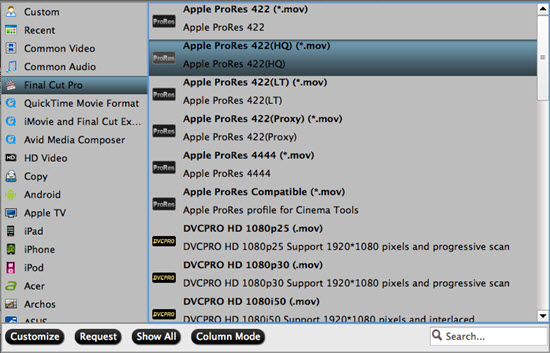
Step 2. Choose Apple ProRes 422 codec for Final Cut Pro 6/7.
Click the “Profile” option, and move mouse cursor to Final Cut Pro > Apple ProRes 422 HQ (*.mov) as output format. To get 1080 videos, we need to click the “Settings” button and choose 1920*1080 as output video resolution.

Step 3. Click the Settings icon if you’d like to customize advanced audio and video parameters like Video Codec, aspect ratio, bit rate, frame rate, Audio codec, sample rate, audio channels.

Step 4. Convert Sony PXW-FS5 4K XAVC files for FCP 6/7. Click the read button Convert to start transcoding Sony XAVC files to MOV for FCP 6/7. When the conversion is completed, click “Open” button to locate the converted Apple ProRes 422 MOV files for editing with Final Cut Pro easily.


Further Reading:

Thursday, September 24, 2015

Import Canon HF R600 1080/60p AVCHD to FCP X/7/6 on Mac

Canon VIXIA HF R600 lets you capture sharp and steady Full HD video by combining a 57x Advanced Zoom range and SuperRange Optical Image Stabilizer. It features a 3.28MP CMOS image sensor and a DIGIC DV 4 Image Processor that delivers up to 1080/60p video. Video is recorded to SD/SDHC/SDXC memory cards in either MP4 (up to 35 Mbps) or AVCHD (up to 28 Mbps) formats. A 3'' capacitive LCD touch panel is provided for easy framing, quick playback, and intuitive operation.


You may have bought Canon HF R600 camcorder and recorded some videos with Canon VIXIA HF R600 in AVCHD MTS format; you find it is not so easy to use the AVCHD recordings? The AVCHD format is good for recording but not convenient for editing, because many video editing programs like FCPX/7/6 can't support AVCHD format well. In this case, how can we import Canon VIXIA HF R600 to FCP X/7/6 and editing smoothly?

Here recommend you this Pavtube HD Video Converter for Mac, which regards as the easiest AVCHD to Apple ProRes converter in the market. You can load your Canon VIXIA HF R600 AVCHD into this converter directly, thanks to the inner codec, easy loading as you can see. Multiple presets in the format list for you to choose, especially for FCP newbie, to save setting time and ease the conversion. (You can also read about 2015 Top 5 Best Mac HD Video Converter Review for Camcorder Lovers)

Tip: the Windows version is renamed as Pavtube HD Video Converter (Read review).

First, we shall transfer the AVCHD .mts files from Canon HF R600 AVCHD camcorder to Mac computer hard drive. Download Pavtube MTS/M2TS Converter for Mac as the best AVCHD to Final Cut Pro converter.


Other Download:

How to transcode Canon HF R600 1080/60p AVCHD to ProRes for FCP X/7/6 on Mac?

Step 1. Launch this converter on your Mac

Free download this converter on your Mac and even on the Yosemite, it can run smoothly. The only difference between retail version and the trail version is the watermark "Pavtube" in the generated files.
After the installation, click this "File" >"Add Video/Audio" to load Canon VIXIA HF R600 AVCHD files into this app.


Step 2. Choose ProRes 422 for Canon VIXIA HF R600 AVCHD to load into FCP X/7/6

After successfully loading your Canon VIXIA HF R600 AVCHD  files, then click the "Format" bar to choose "Final Cut Pro">"Apple ProRes  422 (*.mov)" as your output format, which turns out the native format for FCP  X/7/6.


Some new users of FCP X/7/6 will wonder, as there are so many ProRes codec to choose, which one is the best. Actually, this depends on your aims of your converted files. If you can't decide which one to choose, then you can go to this "Differences among Apple ProRes codec" article to make sure before doing the decision.

Step 3. Adjust A/V parameters for loading Canon VIXIA HF R600 AVCHD to FCP X/7/6 as ProRes

If you want to make some parameters adjustment, click this "Settings" to do this job. Honestly, the default settings are already the most suitable for loading into FCP X/7/6. But Bit rate, Frame rate, Size (pix), etc, can be adjusted. And also you can see the detailed generated file information in the below table.


Step 4. Start to convert Canon HF R600 AVCHD for FCP X/7/6 as ProRes 422 (*.mov)

After setting the file location, click this "Convert" in the main UI and start to transcode Canon HF R600 AVCHD to ProRes for FCP X/7/6 editing. If you have multiple clips to convert, batch conversion is possible, but the maximum conversion number at one time is four.

For newbie, how to transfer media files into FCP X/7/6 can be learned here for them to master FCP X/7/6 better.

Further Reading:

Tuesday, September 22, 2015

Play Zenmuse X5 and X5R 4K videos on Mac/iMac

DJI has officially launched the Zenmuse X5 and X5R, two new cameras for DJI’s Inspire One that are the world’s first commercial Micro Four Thirds (MFT) cameras designed specifically for aerial use. The two cameras feature the MFT same sensor, which DJI claims is capable of capturing 16-megapixel stills and 4K video at 24fps and 30fps with an impressive 13 stops of dynamic range.


When you have recorded many 4K videos from ZENMUSE X5R or ZENMUSE X5, you maybe want to play/watch them on Mac with QuickTime player easily.

In fact, many 4K videos are recorded in H.265/MXF/RAW/XAVC format, which QuickTime Player couldn’t recognize well. It’s a common situation that when putting your 4K video files to QuickTime for playback, you’ll be informed 4K is not in a format that QuickTime Player understands, in this case you need to convert your 4K videos to QuickTime friendly format. Here you can depend on Pavtube HD Video Converter for Mac, which is an all-in-one tool that can help you convert 4K videos to QuickTime playable MOV format quickly and easily. Besides, this top 4K excellent converter also has the ability to change your any 4K videos to various TVs, players, smartphones, tablets, and more. It is also available to customize the output resolutions to any size the users want, which is so convenient.

How to Open Zenmuse X5 and X5R 4K videos on Mac for playback?

Step 1. Load 4K video files

Launch the 4K Video Converter Mac. Drag & drop 4K files to the program directly and your files would be added instantaneously. Or you can head to the “Add” button to locate the 4K videos you want to add.


Step 2. Select output format
Click format you choose MOV as target format. This video app offers the QuickTime Movie Format for you. Or, you can also choose “Common Video -> MOV - QuickTime (*.mov)” as the output format.

Step 3. Adjust video/audio settings
Click “Settings” button; you can adjust video and audio settings, including codec, aspect ratio, bit rate, frame rate, sample rate, and audio channel.

Step 4. Start 4K video conversion on Mac
Hit the big green “Convert” button to let this smart converter start encoding 4K to mov on Mac. After the conversion, you can get the encoded files under “Open” panel. Import the converted MOV files to play in QuickTime. Now you can enjoy your Zenmuse X5 and X5R 4K videos on Mac/iMac freely.

Wednesday, September 16, 2015

Import XAVC S Files from Sony A7R II to Premiere Pro CC/CS6/CS5

Summary: Run into some problems when importing XAVC S files from Sony A7R II to Premiere Pro CC/CS6/CS5? This post displays the detailed steps required to convert Sony XAVC S to MPEG-2 with lossless quality.


The Sony A7R II is the second generation of a series that set out to prove how serious a compact system camera can be. With a full-frame sensor, the range has offered image quality similar to some of the very best DSLRs, such as the Nikon D810 and Canon 5DS R.

If you’ve got a Sony Full Frame Mirrorless Camera like A7R II, the 4K XAVC S format will not be an unfamiliar for you. The only problem usually occurred during the editing process. 4K XAVC S still cannot fully supported by some video editors like Premiere Pro can't ingest MP4 video from Sony A7R II directly.

As we all know, MPEG-2 is the codec that Premiere natively recognizes. So the problem can easily turn to be how to convert Sony A7R II 4K XAVC S footage to MPEG-2 for edting in Premiere Pro CC/CS6/CS5. After the XAVC S to MPEG-2 conversion, you can directly import and edit the 100Mbps XAVC S files in Premiere without any importing problems and need not to search for the latest Sony XAVC S Plug-ins or wait for the release of the suitable one.

Here Pavtube Video Converter, a solid tool to help users convert 4K XAVC S to MPEG-2, which ensures the best results when using in Premiere Pro CC/CS6/CS5. With this professional XAVC S to Premiere converter, you can effortlessly encode/re-encode 4K or 1080p XAVC S from Sony A7R II for smoothly importing and editing in various non-linear editing systems (NLEs), including Final Cut Pro X, FCP 6/7, iMovie, Final Cut Express, Adobe Premiere Pro, Avid Media Composer, etc.


Other Download:
- Pavtube old official address: http://www.pavtube.com/video_converter/
- Amazon Download: http://download.cnet.com/Pavtube-Video-Converter/3000-2194_4-75734821.html
- Cnet Download: http://download.cnet.com/Pavtube-Video-Converter/3000-2194_4-75734821.html

How to import Sony A7R II 4K XAVC S files to Premiere Pro CC/CS6/CS5?

Step 1: Download and have a quick installation. The trial version will have a watermark on your converted files. Except for that, there are no time limitation, no virus, and no unnecessary bundle apps while downloading. After that, click “Add Video” button to load your Sony XAVC S videos. You can load several files at once thanks to “Add from folder” button.


Step 2: Click the drop-down list in the format line to get the format box. Then choose “Adobe Premiere/Sony Vegas>>MPEG-2 (*.mpg)” as output format.


Step 3: Click the “Settings” button and set proper video/ audio parameters. My advice is to set the video size, bit rate and fame rate to be exactly as the footages so that you will suffer least quality degradation. If you would like to use default settings, simply skip this step.

Step 4: After all necessary settings, hit the “Convert” button to start the XAVC S to Premiere best supported MPEG-2 conversion.

Conclusion: After conversion, you can get the generated files by clicking “Open” button. Now, you’ll get no troubles in editing Sony A7R II XAVC S in Premiere Pro CC/CS6/CS5. Follow the steps and have a try!

Further Reading:

Monday, September 14, 2015

Edit and Play AS200V XAVC S Videos on Mac El Capitan

Summary: It’s not strange that you are trapped in editing and playing XAVC S on Mac El Capitan. Especially, if you got a Sony HDR-AS200V camcorder, you may probably on the way to find the best solution to encode and decode XAVC S videos captured by it.


Hot search: XAVC S to PremiereXAVC S to 4K TVMXF to iMovie

As the successor of HDR-AS100V, the new model HDR-AS200V enhanced HD video performance with upgraded stabilization and image quality. Scope of movie shooting is expanded through newly added manual settings and Loop Recording. This in-camera feature Highlight Movie Maker added post shooting enjoyment by producing a short highlight movie with background music immediately at the shooting venue. What a fantastic thing that we can edit and play AS200V XAVC S videos on Mac El Capitan!

Sony announced that it had expanded XAVC to the consumer market with the release of XAVC S. XAVC S supports resolutions up to 3840*2160, uses MP4 as the container format, and uses either AAC or LPCM for the audio. As example used in Sony HDR-AS200V, it’s wonderful to catch beautiful and high definition scenes with this incredible camcorder! When we want to edit and play attractive XAVC S videos shoot by AS200V, how to? How to encode XAVC S videos? What about decoding XAVC S videos?

Having a lot of XAVC S videos at hand, there are various usages for you. For instance, you can edit XAVC S in FCP X/7/6, iMovie/FCE, Premiere, Avid and so on. On the other hand, you can play XAVC S videos on media player like QuickTime on Mac El Capitan, too. No matter for what, first of all, you need to depend on a Mac XAVC S Video Converter so that you can use to work the conversion job well. Pavtube Video Converter for Mac, being specially developed to convert AS200V XAVC S videos to common video format for NLEs and players with no quality loss, is highly recommended here.


Other Download:
- Pavtube old official address: http://www.pavtube.com/video-converter-mac/
- Amazon Store Download: http://www.amazon.com/Pavtube-Video-Converter-Mac-Download/dp/B00QIBK0TQ
- Cnet Download: http://download.cnet.com/Pavtube-Video-Converter/3000-2194_4-76179460.html

Steps on how to edit and play AS200V XAVC S videos on Mac El Capitan:

Step 1: Download and install the program from the website or click the free trial icon. Then, launch the best Mac XAVC S Video Converter and load your original XAVC S files in with “Add video” or “Add from folder”. Directly drag files in is available.


Step 2: Choose the right output format for editing and playing XAVC S videos on Mac El Capitan. As we mentioned above, taking edit XVAC S in FCP as an example, we would like to introduce you to select the “Final Cut Pro>>Apple ProRes 422 (*.mov)” as your best choice. Apple ProRes 422 (*.mov) and Apple ProRes 422 (HQ) (*.mov) have higher qualities. Apple ProRes 422 (LT) (*.mov) and Apple ProRes 422 (Proxy) (*.mov) have smaller sizes. For other editing software and media player, you can choose the corresponding output format thanks to the preset.


Step 3: The built-in editing function provided by Mac XAVC S Video Converter is something worth trying. To trim the video, add artistic effects, adjust audio, add watermark, customize video parameters and so on. You can get the work done splendidly. Of course, if you don’t think it’s a necessary to do, you can skip it and move onto the next step directly.

Step 4: Click the “Convert” button on the main interface if you have done all the preparation work and this is the last step to encode and decode XAVC S videos.

Conclusion: OK, everything is ready, and you can instantly edit and play AS200V XAVC S videos on Mac El Capitan. By the way, we have promoted money saving bundles & deals activity. It really saves a lot! Why not take a look and have a try about high quality products with attractive price?

Further Reading:

Wednesday, September 9, 2015

Importing H.264 Files to Pinnacle Studio 14/15/16 for Editing

Summary: Problems occurred when importing H.264 files to Pinnacle Studio. You can fix importing issues by reading the following guide.


H.264 is not a stranger to most people, essentially all of the electronic digital products now support this encoding format. And various extensions of its capabilities have been added in subsequent. The intent of the H.264 project was to create a standard capable of providing good video quality at substantially lower bit rate than previous standards, without increasing the complexity of design so much that it would be impractical or excessively expensive to implement.

Pinnacle Studio supports a wide rang video formats although. It is pretty picky with the codec of what it’ll accept. As far as I know Pinnacle Studio doesn’t like H.264 files. If you want to import H.264 to Pinnacle Studio flawlessly, I recommend you to convert H.264 to a more editable format for Pinnacle.

The video format that Pinnacle Studio support:
AVI File–(.avi)
MPEG Files–MPEG-1, MPEG-2 SD & HD, and MPEG-4 – (.mpg, .mpeg, .mod, .mp2, .mp4, .m2ts, .mts, .m1v, m2v. mpv)
WMV Files- (.wmv)
DIVX–(.avi)
MOD (JVC Everio cameras)–(.mod)
3GPP Files–(.3gp)
TOD Files–(*.tod)
AVCHD–(.m2ts, .mts)–Requires Ultimate or Ultimate Collection

Comparing with others, Pavtube Video Converter has the strong ability of transcoding all different videos. With a faster conversion speed and easy operation, it can support most hot media devices and editing programs. Also, I’m sure you’ll be satisfied with some other functional items there.


Other Download:
- Pavtube old official address: http://www.pavtube.com/video_converter/
- Amazon Download: http://download.cnet.com/Pavtube-Video-Converter/3000-2194_4-75734821.html
- Cnet Download: http://download.cnet.com/Pavtube-Video-Converter/3000-2194_4-75734821.html

How to import H.264 files to Pinnacle Studio 14/15/16 for editing?

Step 1: Download and install the program. Click “Add video” on the main interface to load H.264 files to the program. You can also drag the files to the program’s window list directly. This program can also support the batch video clips.


Step 2: Select the right formats for editing in Pinnacle Studio. Here we suggest you to go to the “HD Video” list, you will get the “AVI HD Video (*.avi)”as the best output.


Step 3: Click “Settings” button to customize the output video and audio settings by yourself. But if you are not good at it, you’d better use the default parameters, they will ensure you a good balance between file size and image quality basically. You can change the resolution, bit rate, frame rate as you need.

Step 4: With all the preparations work done? Why not go back to the main interface to click the “Convert” button to get the work started?

Conclusion: Once the conversion is finished, click “Open” to quickly find the converted files. Then, Pinnacle Studio 14/15/16 will recognize, catalog, play and stream them just fine.

Further Reading:

Sunday, September 6, 2015

Convert Sony ActionCam XAVC S to Aperture 3 for Editing

Summary: Want to convert Sony XAVC S to Aperture 3? Let this useful XAVC S converter help to solve it for you, and begin to free download XAVC S to Aperture 3 Converter now.


This Cam can records video in XAVC S Codec, which is intended as a more economic and simpler consumer codec, and more appropriate to simpler editing and Internet streaming applications. Whereas, you will find it is a painful experience to import Sony ActionCam XAVC S to Aperture 3. 

The basic reason is that XAVC S, the highest picture resolution and frame rate video compression codec is much more than a video format that Aperture can support. In this situation, maybe an upgrade of the Aperture version could help. Still stuck with unsuccessful attempts? Perhaps you need to convert Sony XAVC S to ProRes, which is best accepted by Aperture 3.

Actually, it's not so hard to do the trick. With a professional XAVC S converter- Pavtube HD Video Converter for Mac, you can get the work done easily. This software is able to convert XAVC S files from Sony ActionCam to Aperture 3 fully compatible format and keep original quality at the mean while. It can also export ProRes for Final Cut ProApple InterMedaite Codec (AIC) for iMovie/FCEDNxHD for Avid Media Composer and more for native editing.


Other Download:
- Pavtube old official address: http://www.pavtube.com/hd-video-converter-mac/
- Amazon Store Download: http://www.amazon.com/Pavtube-Video-Converter-Mac-Download/dp/B00QI9GNZS
- AppStore Download: https://itunes.apple.com/de/app/pavtube-hd-video-converter/id502792488?mt=12
- Cnet Download: http://download.cnet.com/Pavtube-HD-Video-Converter/3000-2194_4-76177786.html

How to convert Sony ActionCam XAVC S to Aperture 3 for editing?

Step 1: Backup your XAVC S files from Sony ActionCam to hard drive. Install and launch this program. Drag and drop XAVC S files to the software. You can import multiple files at once thanks to “Add from folder” button.


Step 2: Click “Format” bar to determine output format. For best image quality, click the format bar and choose “Final Cut Pro>>Apple ProRes 422 (*.mov)” as output format for editing Sony ActionCam XAVC S in Aperture 3.


Step 3: Click “Settings” button to customize the output video and audio settings by yourself. But if you are not good at it, you’d better use the default parameters, they will ensure you a good balance between file size and image quality basically. You can change the resolution, bit rate, frame rate as you need.

Step 4: You can preview to check the final result. Once you are satisfied with it, click the “Convert” button to start converting XAVC S to ProRes MOV format. It will take you a little while.

Conclusion:
 Once the conversion process is complete, you can click “Open Folder” button to get the generated files for editing Sony ActionCam XAVC S in Aperture 3 with optimum performance. Let’s have a try!

Further Reading:

Wednesday, September 2, 2015

Play H.265/HEVC 4K Video on Ultra HDTV

Summary: Fond of enjoying 4K video on Ultra HDTV with the high resolution? I wonder how did you play H.265/HEVC 4K video on Ultra HDTV, is that realizable?


Ultra HD TV sets are now available from most of the major TV manufacturers - i.e. Sony's impossibly slim Android TV, LG's OLED or Samsung's SUHD series of TVs. Although these 4K Ultra HDTVs can bring us the new standard of high definition, most of them still lack the support for H.265/HEVC codec. What a delightful thing if we can play H.265/HEVC 4K video on Ultra HDTV!

H.265/HEVC (High Efficiency Video Coding) is a video compression standard, a solid foundation for the future 4K time. The H.265/HEVC used by those HD camcorder or camera would be the best solution to compress those high resolution video into small size while maintain the sharp quality. As the newest codec, H.265 has not been accepted by those Ultra HDTVs yet. So, it is necessary for us to transcode H.265/HEVC for playback on Ultra HDTV with a professional H.265/HEVC encoder/decoder.

Having tested so many third-party programs, Pavtube Video Converter, which is a professional H.265 encoding/decoding tool, is highly recommended for the easy of use and lossless quality. This program offers quite effective solution for you to convert almost all the videos H.265/HEVC as well as MKV, MOV, MTS, TiVo, VOB, etc. It also allows you to adjust the video, audio parameter to get a decent output video that you want. Barely several steps are enough.


Other Download:
- Pavtube old official address: http://www.pavtube.com/video_converter/
- Amazon Download: http://download.cnet.com/Pavtube-Video-Converter/3000-2194_4-75734821.html
- Cnet Download: http://download.cnet.com/Pavtube-Video-Converter/3000-2194_4-75734821.html

How to convert H.265/HEVC 4K video to Ultra HDTV?

Step 1: Download and have a quick installation. The trial version will have a watermark on your converted files. Except for that, there are no time limitation, no virus, and no unnecessary bundle apps while downloading. After that, click “Add Video” button to load your H.265/HEVC 4K files. You can load several files at once thanks to “Add from folder” button.


Step 2: Here, you need to choose what you want the output to be. Click “Format” drop-down list, and then select output video format from the powerful H.265/HEVC converter. For playing H.265/HEVC 4K video on Ultra HDTV, we suggest you to choose suitable formats from “TVs”.


Step 3: Adjust video and audio parameters, including the bit rate of video and audio, the codec of video and audio, video size, sample rate, frame rate, audio channels, etc., in the Profile Settings by hitting “Settings” button.

Step 4: Click “Convert” button to start the conversion for Ultra HDTV playing. You can get the generated files by clicking “Open” button.

Conclusion: If you don’t want to wait for the entire conversion process, you can tick off “Showdown computer when conversion completed” and go away to do other things. Good News! During 2015 Label Day, Pavtube provides big sale with up to 50% off for some products.

Further Reading: