Wednesday, June 25, 2014

How to make a copy of your Blu-ray movie to KDLinks media player for watching

This article introduces how to backup or copy Blu-ray disc into m2ts files or BDMV folder for viewing on KDLinks media player without format problems.


I had been using an XBox 360 for streaming media content to our hdtv, but the file type limitations have been a real bother, so this is the reason I choose KDLinks media player. The way I use my KDLinks is to run my hard drive off of it to watch movies and shows and I have to say I'm very impressed with the KDLINKS. It's played every format i've tried, including MP4, MKV, AVI, TSO, M2TS.

However, the problem I ran into is that I don't know the way playing my Blu-ray movie direcly on my WDTV steaming from KDLinks media player. As I already know KDLinks media player supports BDMV and M2TS fils, I was trying to copy a Blu-ray disc to m2ts file or BDMV folder at first.

For copying your Blu-ray discs for enjoying with KDLinks media player, you need to remove the Blu-ray copy protection first. I just recently purchased Pavtube BDMagic to replace my method of using MakeMKV/Handbrake to rip my Blu-ray/DVD movies since Pavtube was advertised as being quicker. Now with this tool, I can easily backup 1:1 copying BD/DVD Disc content to local computer or directly copy only BD/DVD main movie and leave out extras. Really simple interface and powerful function. Needless to say I was excited to see this product under the tree!

The mac version is Pavtube BDMagic for Mac.

Now download the program and follow the steps below to backup Blu-ray movie to KDLinks media player for watching.

How to Rip, Convert and Backup Blu-ray movie for KDLinks media player Effortlessly

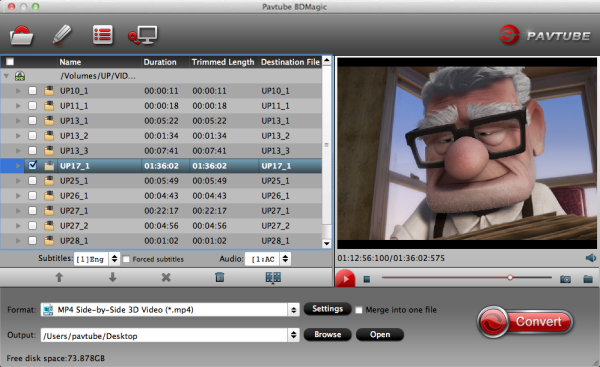
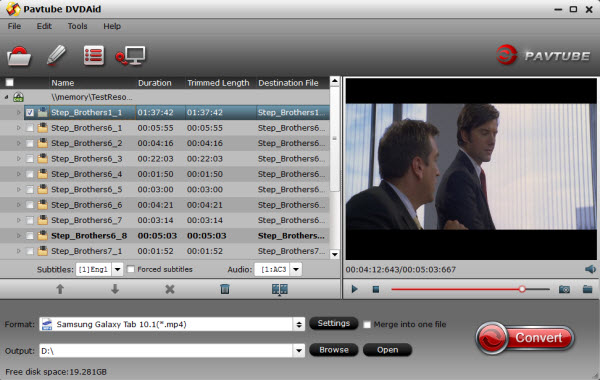
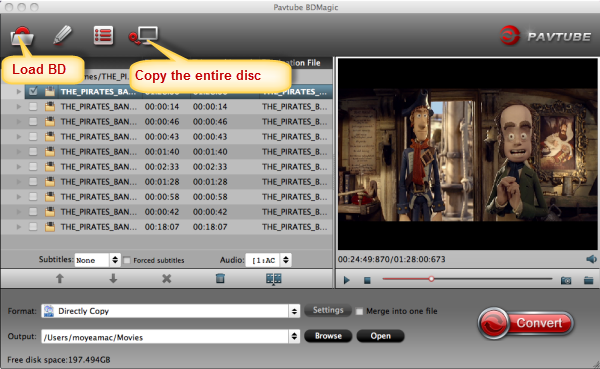
Step 1: Load Blu-ray movies into the program

Once you run the top Blu-ray Ripper, click BD disc button to load Blu-ray movie up into the Blu ray ripping program.

Note: A BD drive is needed for Blu-ray ripping & copying


Step 2. Set format

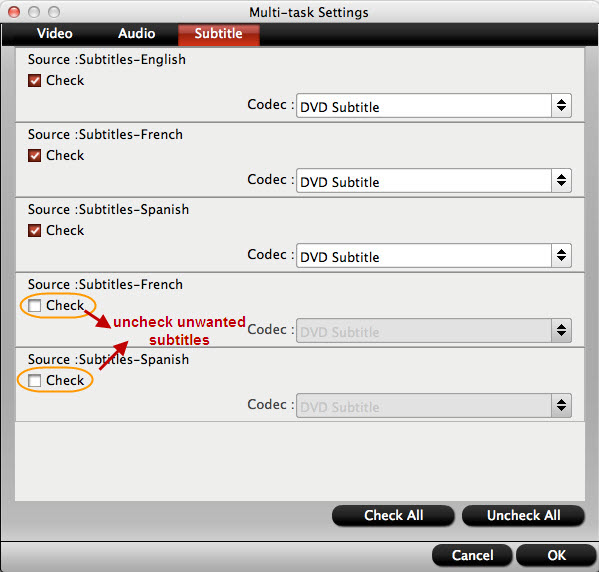
Decide Blu-ray Copy Mode (Option 1)


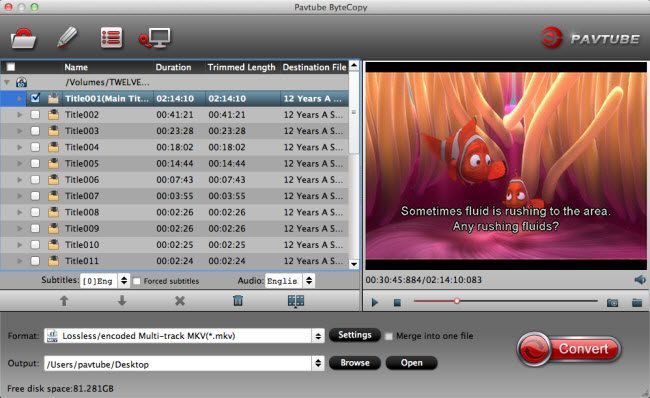
A. Full Disc Copy Mode: Copy Blu-ray Disc to a full BDMV folder containing all the content in original BD.

B. Directly Copy Mode: Backup Blu-ray Disc to a file with M2TS as filename extension. This mode enables copy movie only from Blu-ray discs, compared with former mode, save time in copying Blu-ray Disc and space to store the output M2TS file to make reasonable and practical use.


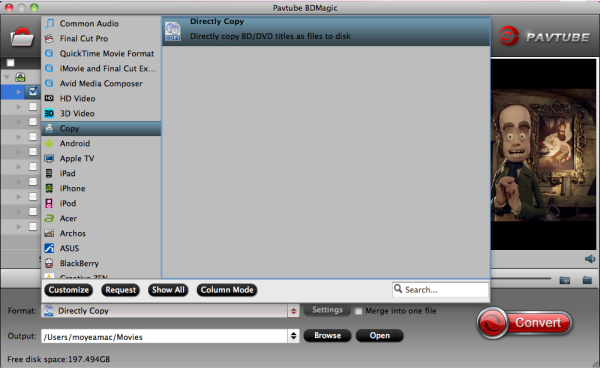
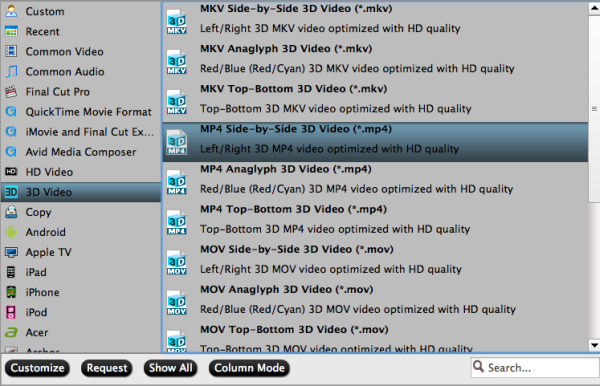
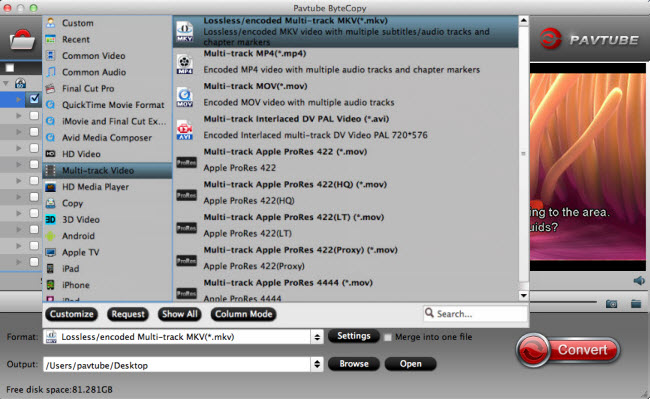
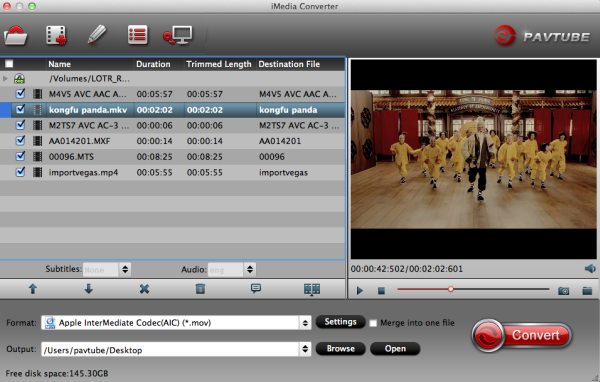
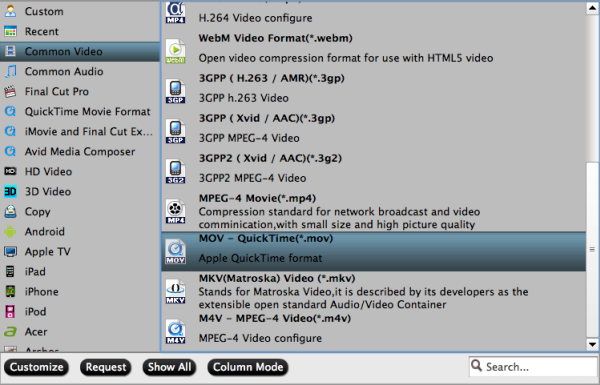
Choose an output video format  (Option 2)

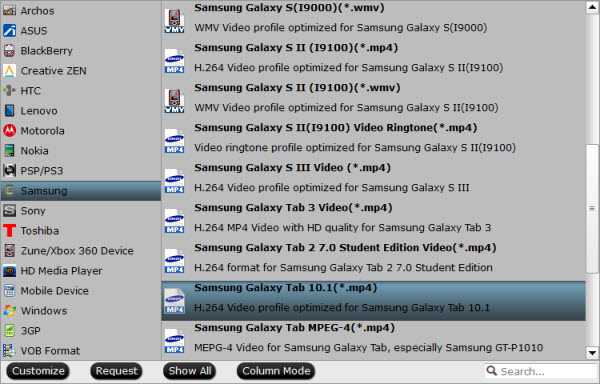
If you wanna rip Blu-ray to your needed file types, you need specify a format as output format. Click on the dropdown menu of "Format", and then choose your needed one from the multiple output format presets. You can rip Blu-ray to MKV, MP4, MOV, WMV, or rip Blu-ray for playback on KDLinks media player or other portable devices.

Tip: Click "Settings" button, then you are able to adjust all the settings in the following window to customize the output file quality, including codec, size, bit rate, frame rate, sample rate and audio channel.

Step 4: Rip and copy Blu-ray movie

Once the above mentioned steps are finished, you can click "Convert" button to copy Blu-ray movie to the hard drive of your PC.

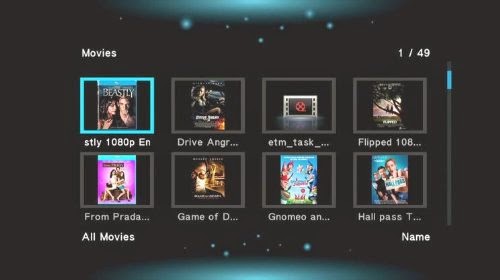
When the copying/ripping task is completed, you can click "Open" button to get the ripped files of Blu-ray movie. Now add your ripped or copied files in KDLinks media player, and kdlinks will play the movie smoothly in order.

Begin your money-saving Trip here:

BDMagic($49) + Vidpie($29) = Only $49.9, Save $28.1
BDMagic($49) + DVD Creator($35) = Only $49.9, Save $28.1

Friday, June 20, 2014

Rip 3D Blu-ray to 3D MP4 format with subtitle you like

Looking for a way to convert 3D Blu-ray to 3D MP4 with subtitle you like? This article will give you the best solution.

With 3D videos came into our digital life, the world you see becomes real and stereoscopic. And is it possible to get truetheater 3D entertainment at home, instead of experiencing the new-rising 3D movies in cinema? Imaging that you have some 3D Blu-ray discs in hand, how to rip them into MP4 format with keeping 3D effect?


In this case, a 3D Blu-ray to MP4 Converter for Mac is needed to help you convert 3D Blu-ray to 3D MP4 on Mac with subtitle supposing that you use a Mac computer. Here Pavtube BDMagic for Mac is such a extremely powerful tool to assist you with ripping 3D Blu-ray to side-by-side 3D MP4 for watching on 3D devices.

I like its simplicity in gui and reasonable price. I have googled the best software to convert 3D blu-ray to side by side video, and I will take Pavtube as a cheaper and simpler alternative to DVDFab. Using 3 portable device for browser and mail, but I find it's really a perfect experience for viewing the converted video with great video quality.

Windows users could use Pavtube BDMagic to create 3D SBS MP4 video out of 3D Blu-ray movies. Here is the windows workflow- Create 3D MP4 Video from 3D Blu-ray with subtitles and Watch on 3D Devices.

How to Backup, Rip 3D Blu-ray to SBS MP4 for watching with subtitles on Mac

Step 1. Insert your Blu-ray disc into your BD drive, run the best Blu-ray Ripper and click "BD/DVD disc" icon to load movie from 3D Blu-ray source (Disc, folder, ISO).


From the drop-down list of “Subtitles” tab, choose the desired language you want to show in converted MP4 movie. You are allowed to choose audio track as well.

Step 2. From the “Format” drop-down list, you are suggested to follow the path “3D Video > MP4 Side-by-Side 3D Video (*.mp4)” for ripping Blu-ray to side-by-side 3D MP4 video.


Tip:

If you like, you can click "Settings" which is next to “Format”, free change your target video size, bitrate, frame rate and 3D depth. If you want to get best video quality, pls switch them to “original”.

Step 3: Click the convert button under the preview window, and the Blu-ray ripper will start the conversion from 3D Blu-ray movies to SBS MP4.

After conversion, open output file destination, locate the created SBS 3D MP4 video and you could watch it on your 3D mp4-compatible players with subtitles you like. Becides SBS MP4 format, you can also choose other format with 3D effect.

Read more: 

Copy Jack the Giant Slayer 3D Blu-ray Disc to Hard Drive for enjoying
How to View Blu-ray movies (ISO image files) on projector via WDTV with 3D effect
How to Enjoy 2D Blu-ray movies on 3D Device to get comfortable 3D entertainment

Tuesday, June 17, 2014

Lossless Backup DVD to MKV format with all audio tracks, subtitles and chapter markers keeping

If you are wondering how to rip DVD to MKV format with all audio tracks, subtitles and chapter markers keeping on Mac, this article shows you exactly how to make it work.

As a DVD lover, you may collected many DVD discs. With hundreds of DVDs in hand, you may want to make a lossless copy of those DVD and then you can easily search and play it with a remote control.


Generally, there are multiple audio tracks in the DVD movies, and you can choose the audio track to play with the DVD player as you want. If you want to keep the multiple subtitles and audio tracks when ripping a DVD movie, MKV is actually a pretty good output format choice as the MKV format can store multiple video/audio tracks with all meta-information and preserve chapters.

To help him to solve the problem, I tested some softwares and did comparison. Here we recommended this Pavtube ByteCopy for Mac which does a great job in quick decrypting the protected discs within a few clicks. Best of all, it can handle the latest Blu-ray/DVD and is capable of backup BD/DVD to lossless MKV preserving all the multiple audio and subtitle tracks as well as chapter markers. In this way, I can freely watch Anime on my VLC Player.

Money-saving Trip:

ByteCopy for Mac($42) + iMedia Converter for Mac($65) = Only $79.9, Save $27.1
ByteCopy for Mac($42) + DVD Creator for Mac($35) = Only $44.9, Save $32.1
ByteCopy for Mac($42) + Vidpie for Mac($29) = Only $54.9, Save $16.1
ByteCopy for Mac($42) + iMixMXF($45) = Only $69.9, Save $16.1
BDMagic for Mac($49) + Vidpie for for Mac($29) = Only $49.9, Save $28.1
BDMagic for Mac($49) + DVD Creator for Mac($35) = Only $49.9, Save $28.1

Convert and Rip DVD movies to lossless mkv format for watching on Mac

Step 1. Load DVD movie.

Get ready to insert your DVD disc, click this "Load Disc" button to browser to disc drive and import the disc. Or you could load DVD folder and DVD ISO from computer hard drive to this best DVD to MKV Converter for Mac.


Step 2. Choose suitable output format.

Pavtubr ByteCopy for Mac offers an special category for users who would like to keep multiple audio tracks including Dolby Digital 5.1 and subtitles in saved Lossless MKV file.

To pass-through original TrueHD/Dolby Digital/DTS/PCM audio, just select Multi-track Video > Lossless/encoded Multi-track MKV(*.MKV) for output. In this way the original audio tracks are streamed without transcoding from source DVD Disc to saved MKV file.


Step 3. Adjust profile presets (Optional).

You are allowed to customize profile presets as you like, you could remove unwanted audio track in Audio tab under Settings menu, and uncheck subtitles you do not need in Subtitles tab.


Step 4. Start ripping DVD to multi-track mkv on Mac.

Save all your settings, and back to ByteCopy for Mac main interface, hit the "Convert" button to start converting. When the lossless backup completes, you would get a single large MKV file saved in output file destination. And you could play copied DVD MKV movie on Mac with Dolby Digital 5.1 audio preserved.

Read more:

Convert DVD ISO/IFO to Multi-track MP4 for watch on iPad Air
Rip Blu-ray to Multi-track MKV/MP4/MOV on Mac Mavericks & Mountain Lion
2014 Best Blu-ray/DVD Multi-track Movie Converter Review

Sunday, June 15, 2014

Up to 50% OFF Father's Day Sales & Deals 2014 at Pavtube

Now it’s time to celebrate that all-important guy in your life—dad. Dad is notoriously the toughest family member to shop for. If you've waited until now to pick up this year's Father's Day Gift, then you're going to need a great idea — fast.

Luckily, to celebrate Father's Day with you, Pavtube Studio launch a huge Coupon Code as the 2014 Father's Day Special Offer. Up to 50% off for your beloved dad! Backup your dad's favorite Blu-ray/DVD movie to iOS/Android gadgets, HD TV, home theatre or game console. Even better you can make a father's day video for your beloved dad on your own! It’s more precious than just picking up something on store casually!

Her are Pavtube Great Deals and Specials at Father's Day 2014 weekend

1. 50% OFF Pavtube DVDAid (Win/Mac) as Father's Day Gift 2014

With this professional DVD ripping tool, playing DVD movies on DVD player at home has never been a problem for you. And you can now freely enjoy your favorite DVD movies on the road without worrying about the issues they jump on the most crucial scenes and are prone to scratches.

2. 30% OFF Pavtube Video Converter Ultimate/iMedia Converter for Mac as Father's Day Gift 2014

An all-in-one solution to fast convert Blu-ray/DVD and various videos to virtually any video/audio format for watching on any Android/iOS/Windows devices. Save a 100% intact BD M2TS/ DVD VOB movie without extras.Backup 3D Blu-ray movies to 3D video for watching on 3D devices with pleasant quality. 

3. 20% OFF Pavtube ByteCopy (Win/Mac) as Father's Day Gift 2014

An easy to use Blu-ray and DVD movie ripping program is capable of ripping 3D Blu-ray discs, 2D Blu-ray Discs and standard DVDs to required video formats. Most important, it can lossless BD/DVD to MKV backup with multiple audio/subtitle tracks and convert BD/DVD to Multi-track MP4, MOV, AVI for watching on Plex, Roku 3, WDTV Live, Popcorn and more HD media players.

Like our Facbook page to get it Now! Expires on June 21, 2014. Never miss it!


More money saving bundles can be found here: 


How to edit 2014 FIFA World Cup MP4 recordings from GoPro Hero 3 in iMovie/FCE

If you have any issue when importing 2014 World Cup GoPro Hero 3 MP4 recordings to iMovie/FCE, just follow this simple guide, which offers you a quick fix for the problems. 

With everyone's expectations, the 2014 FIFA World Cup Brazil games have entered the countdown stage. But because of the time zone difference, you may miss your favorite team’s match. In such cases, you may choose your GoPro Hero 3 to record the game competition and edit in your iMovie or FCE as long as someone can help you do the editing workflow.

Because Mac (iMovie/FCE) does not seem to like the videos that come right out of my GoPro Hero 3, you need to convert World Cup mp4 videos from my Gopro Hero 3 to use these converted files in iMovie/FCE. Keep reading a brief how-to on the simple process, which guaranteed to edit your 2014 FIFA World Cup GoPro Hero 3 MP4 clips in iMovie/FCE smoothly.

To get the work done, a third-party software is needed. Here Pavtube iMedia Converter for Mac is highly recommended. It's a professional and powerful high-quality Mac video converter and editor. With it, you can effortlessly transcode World Cup GoPro Hero 3 HD MP4 files to AIC encoded MOV for iMovie/FCE.

Meanwhile, the Mac Video Conversion tool can create files compatible with various non-linear editing systems like Avid, iMovie, FCE, FCP, and Adobe Premiere (Pro) etc. Just download it and follow the tutorials below to transfer and import World Cup GoPro Hero 3 HD footage to for smoothly editing in  iMovie/FCE. 

Guide: Transcoding 2014 FIFA World Cup GoPro Hero 3 HD MP4 to AIC codec for Final Cut Pro

Step 1. Download, install and run the Mac MP4 to AIC Converter, click "Add Video" to load your World Cup GoPro Hero 3 mp4 footage.


Step 2. Click the format bar, and move mouse cursor to ""iMovie and Final Cut Express > Apple InterMediate Codec(*.mov)" as output format.


Some more helpful features of the app:

1. Settings- click to set video resolution(1920×1080/1440×1080/1280×720/720×480), bitrate(from 1Mbps to 20Mbps), frame rate (24p/30p)

2. Editor (next to "Add" icon)- click to set deinterlace, denoise, mute, volume up, trim, crop, etc.

Step 3. Click "Convert" button to start World Cup GoPro Hero 3 MP4 to AIC MOV conversion.

As soon as the encoding process finished, you can get the final output .mov files via clicking "Open" button effortlessly. The transcoded files now are ready for editing in iMovie/FCE.

Additional Tips:

If you want to edit GoPro video in Final Cut Pro X or FCP 7/6, you just need to choose the "Final Cut Pro > Apple ProRes 422 (*.mov)" as output format in the second step; For Avid Media Composer, choose "Avid Media Composer > Avid DNxHD(*.mov)" as output; For Adobe Premiere Pro, choose Adobe Premiere/Sony Vegas> MPEG-2(*.mpg) as output.

Read More:

Best workaround for editing GoPro Hero 3 videos on PC/Mac
Converting 2014 FIFA World Cup Brazil video to MP4 and burning to DVD
Edit your GoPro Hero 3 footage in iMovie and share on Instagram with friends

Thursday, June 12, 2014

How to Rip and Backup DVD Godzilla for Playback on Galaxy TabPro 10.1 with Ease

In this tutorial, you can get a brief guide which shows you an easy way to load movies from DVD Godzilla and onto your Samsung Galaxy Tab Pro 10.1 for playback with ease.

Samsung announced a new range of Android tablets at CES 2014 in Las Vegas dubbed the Samsung Galaxy Tab Pro. Ideal for watching HD movies, the Samsung Galaxy Tab Pro 10.1 features a 10.1-inch, 2560x1600 resolution screen with more than 4 million pixels, so you experience rich HD graphics, vivid colors, and crisp text.


For movie fans, it is an ideal mobile device tool to enjoy latest DVD movies when they are on the way to office or under a travel with Galaxy Tab Pro 10.1. This article will show you how to rip and backup the latest DVD Godzilla for playback on your Galaxy Tab Pro 10.1 with high quality and fast speed.

Godzilla is a giant monster or daikaiju originating from a series of tokusatsu films of the same name from Japan. To rip and convert DVD Godzilla to Galaxy Tab Pro 10.1, you need a professional DVD to Tab Pro 10.1 ripper. To accomplish this goal, a professional powerful ripping program will help you a lot.

Pavtube DVD to Galaxy Converter
is such a tool with the easiest workflow to help you rip off DVD disc/ISO/folder protection, then convert the decrypted movie to MP4 format with best video settings for Galaxy TabPro 10.1. Get DVD to Galaxy Converter for Mac here; well support Mac Mavericks! Dowload the right version and follow the steps below:

How to convert DVD Godzilla movies to Samsung Galaxy TabPro 10.1

Step 1. After the installtion of Pavtube DVDAid, Click the “Load DVD” button to choose and import DVD movies from your computer's DVD-ROM.


Step 2. Click “Format” bar, follow “ Samsung >Samsung Galaxy Tab 10.1(*.mp4)”. The output videos fits Galaxy TabPro 10.1 tablet just right.


Tip: You can also click “Settings” to manually change the video encoder, resolution, frame rate, etc. as you wish. (Optional)

Tip: If you want to convert blu-ray/dvd to 3D videos or transcode Blu-ray/DVD to MP4 with multiple audio and subtitle tracks, try Pavtube ByteCopy and ByteCopy for Mac.

Step 3. When all is OK, click “Start” to rip DVD for Galaxy Tab Pro 10.1. After the ripping, you can click “Open” to locate the converted MP4 video files and just transfer them to your Galaxy TabPro 10.1 for watching anywhere! You may also interested in Money-saving bundles from Pavtube Special Offer page:

DVDAid($35) + Vidpie($29) = Only $49.9, Save $14.1
DVDAid($35) + DVD Creator($35) = Only $35.9, Save $34.1

Read more: 

Rip & convert DVD ISO/IFO files to Galaxy TabPro 10.1 for playback?
Convert 1080p/720p SD/HD Videos to Galaxy TabPro 10.1/8.4
Copy and Backup Blu-ray to Galaxy - Create Digital Copy of Bluray to Galaxy Tab 4

Tuesday, June 3, 2014

Why Can't I Export My Final Cut Files to iDVD

Drag or import movie files from Final Cut into iDVD and find problems? In this guide, you will learn the best solution to export your Final Cut files to iDVD on Mac.

iDVD is a discontinued DVD-creation application for OS X produced by Apple Inc. iDVD’s job is to integrate and present assets from other programs. The assets you’re most likely to add to your DVDs are movies you’ve created in iMovie or another video-editing program, such as Apple’s Final Cut Express or Final Cut Pro.


Question: I exported a movie for DVD authoring and now have two files. A .ac3 file for the audio and a .m2v for the video. I want to make that into a DVD in iDVD, but it won't allow me to use those files. Says it doesn't recognise them. So what should I be doing to make a file for iDVD? It seems that since iDVD is no longer supported, it's now unclear how to do it because Final Cut no longer has "export to media browser". Hope someone can help. Thanks.                                                                                              

                                                                                                                      - From discussions apple

iDVD supported formats:

As we know, iDVD accepts movies in QuickTime format, which is supported by most video editing and creation tools and the best way to export Final Cut mov to iDVD is to convert Final Cut mov files to quicktime mov on a Mac using Pavtube iMedia Converter for Mac.

Overall, it is just the ideal final cut mov to qt mov conversion software. It can easily transcode any kind of mov video to quicktime mov for adding to iDVD for playing. Becide, it allows you to trim, crop, rotate, merge files, very simple to use. Here is how it works.

Preparation: Run Pavtube Final Cut to iDVD Converter for Mac

Download and install the Mac Final Cut to iDVD converter on your Mac computer, it works on Mac OS 10.5 or above.

Step 1. Run the program and load your Final Cut video files into it.


Step 2. Choose MOV- QuickTime(*.mov) as output. You can easily find it in "Common Video" category.


Step 3. Start transcoding Final Cut mov to QuickTime mov by clicking on "Convert" button.

Of course, the process will take some time, please wait patiently. When it's finished, you can easily get the converted media file exported to iDVD for playing.

Except help you handling Final Cut mov video files, this iMedia converter for Mac can convert Blu-ray, DVD and a wide range of video formats for your tablets or smartphones with optimized presets. Overall, it's really a good helper that worth having.

Read more:

Convert DVD to QuickTime MOV on Mac 10.9 Mavericks
How to Rip/Convert Blu-ray to QuickTime on Mac
10 Methods to Convert QuickTime MOV to WMV/AVI/MPG/MP4/FLV, etc.