Showing posts with label Adobe Premiere. Show all posts

Wednesday, October 22, 2014

Export MP4 Video from Sony HX50V to Premiere Elements 13 or 12

This tutorial will teach you how to convert Sony Cyber-Shot DSC-HX50V MP4 to Premiere Elements 13 or 12 for editing without no sound/video problem.

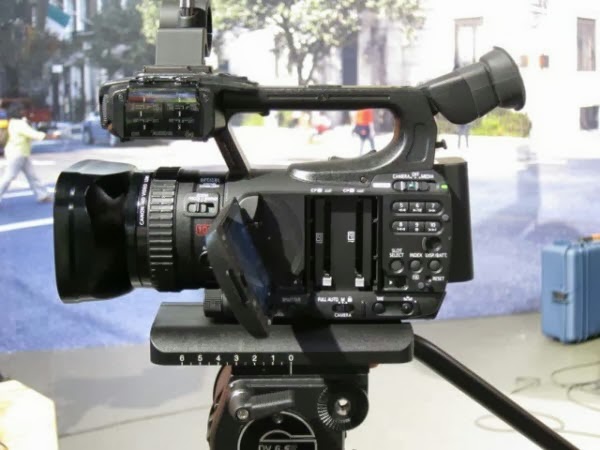
The Sony Cyber-shot HX50V is the World's smallest and lightest compact camera with a 30x optical zoom range. It has four movie quality modes encoded using the AVCHD format. If you switch from AVCHD to MP4 encoding the options become 1440x1080, 720x1080 and 640x480 all at 25fps (or 30fps in NTSC regions).

Sony Cyber-shot HX50V

Have you import your MP4 files from Sony HX50V in Premiere Elements 13 or 12, but it says it’s a video file and the audio is the only information available for editing? Is this a codec problem? If you don’t want to spend time and effort to understand these complicated codecs and download them for video editing in Adobe PE, the effective solution is to transcode Sony Cyber-Shot DSC-HX50V MP4 to the codec that compatible well with Premiere Elements 13 or 12 at first.

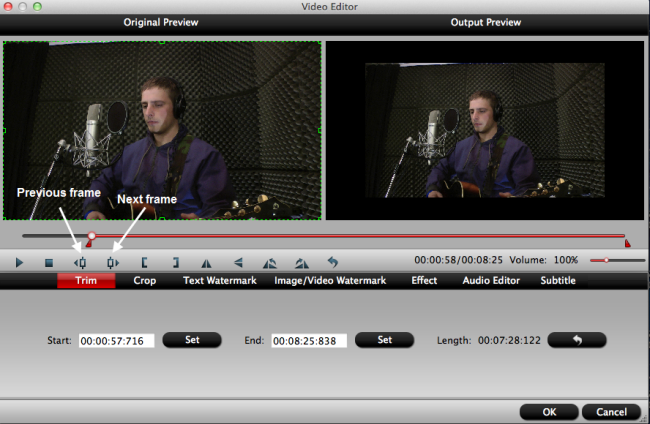
Here Mac MP4 Converter for Premiere Elements provides customers with several simple editing functions, including cropping, trimming, deinterlacing, watermarking, adding special effects, and audio replacing, which help you do a fast and necessary editing on your footage before importing them to Premiere Elements 13 or 12. It also supports versatile output options for iPad, Android tablets and main stream editing software.

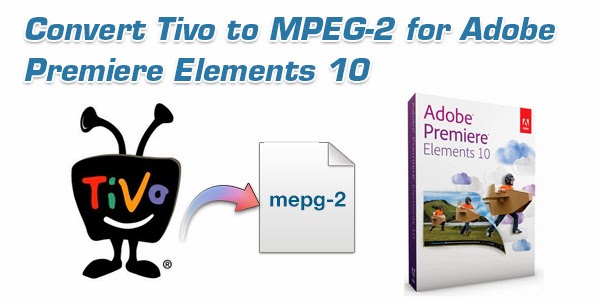
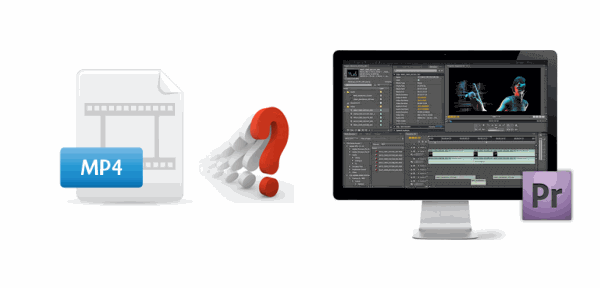
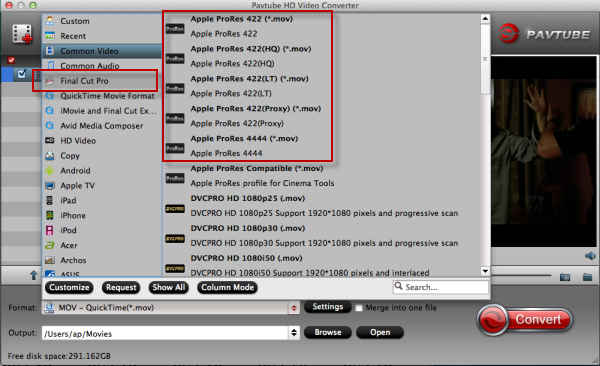
How to Convert Sony Cyber-Shot DSC-HX50V MP4 to Premiere Elements 13 or 12

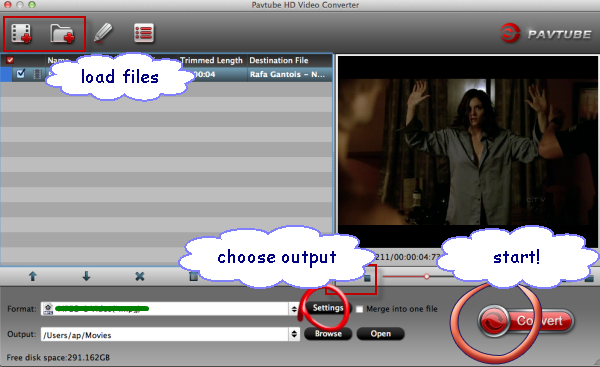
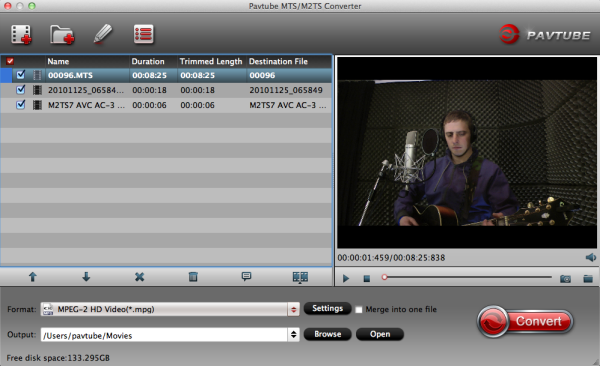
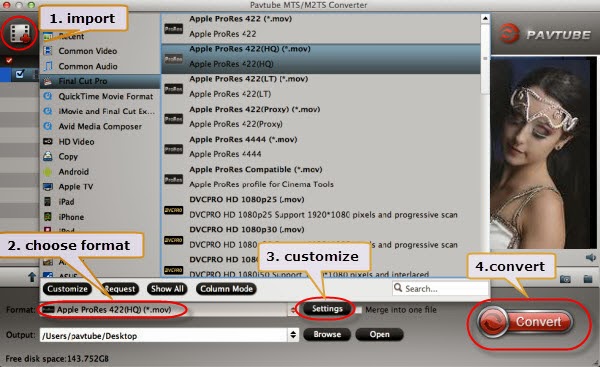
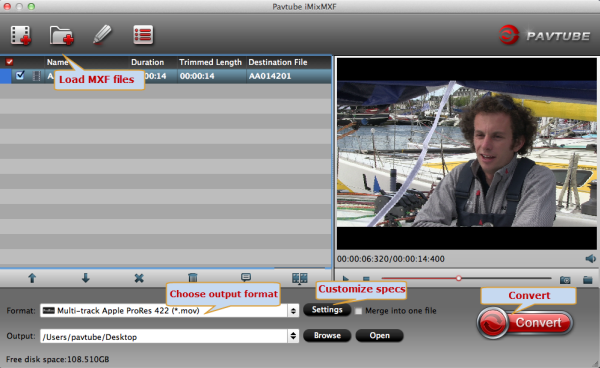
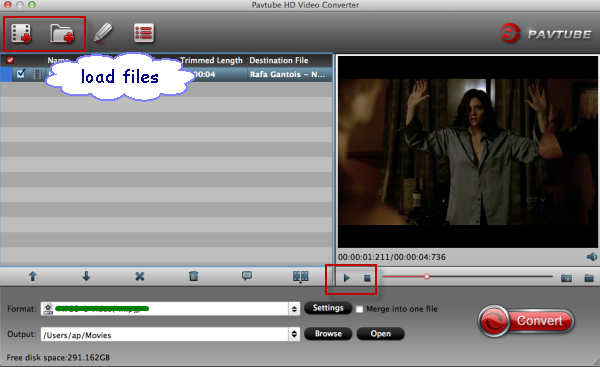
Step 1. Run the MP4 to Premiere Elements Converter, and add your MP4 footage from Sony HX50V into this program.

MP4 to Premiere Elements Converter

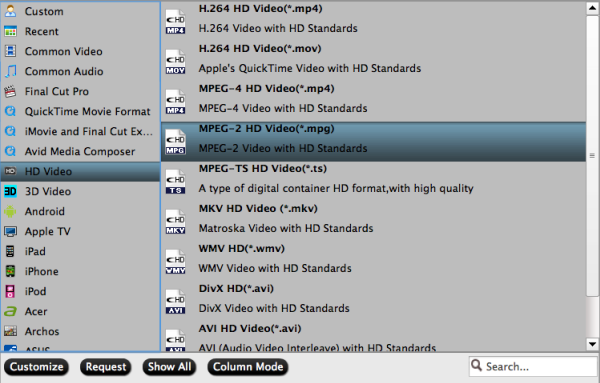
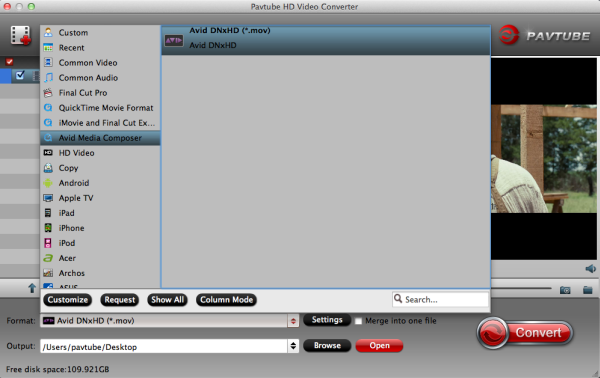
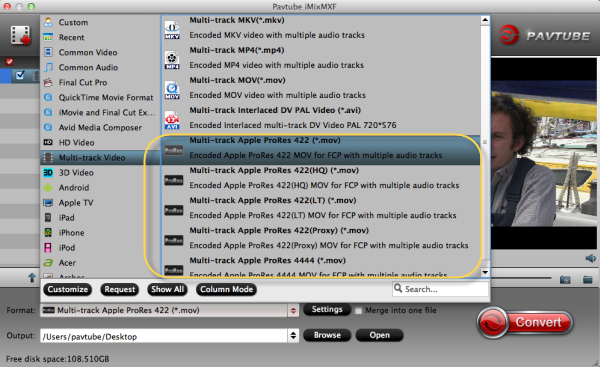
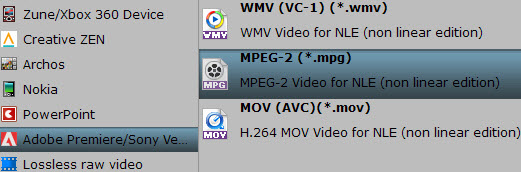
Step 2. Click on "Format" bar and select output format from drop-down list. Here I suggest you follow "Adobe Premiere Pro/Sony Vegas" to select "MPEG-2 (*.mpg)" or "WMV (VC-1) (*.wmv)" format.

You can also choose "Format -> HD Video -> MPEG-2 HD Video(*.mpg)" as out format for Premiere Elements 13 or 12.

It is so easy to render HD MP4 video to AVI format, edit MP4 in Premiere Pro CS3/CS4/CS5/CS6 and insert MP4 into PowerPoint for playing.

Premiere Elements 13 or 12 format

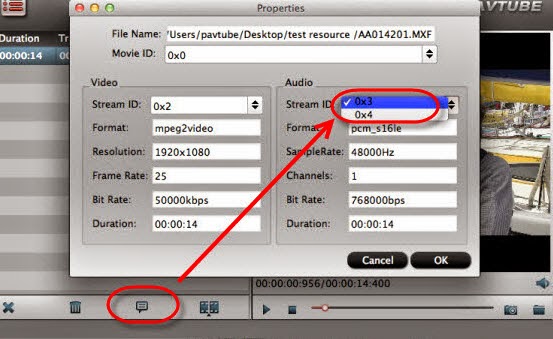
Step 3. You can control output video quality by setting resolution, bitrate and frame rate in "Settings". For preserving 5.1 channels surround sound, set audio channels to "5.1 channels" instead of Stereo. To keep 1080p full HD high quality, you can set video bitrate up and Size to 1920x1080.

Step 4. Click on the "Convert" button to start converting Sony HX50V mp4 video files to Premiere Elements supported MPEG-2 format. By ticking off the checkbox before "Merge into one file" option, you can combine all the checked videos into one file.

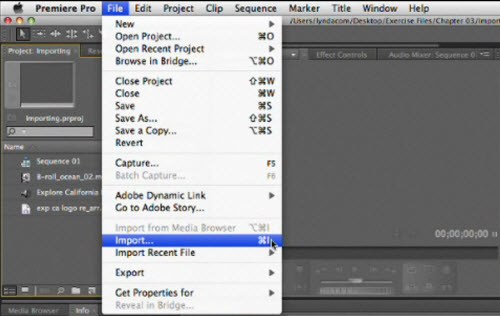
When conversion is completed, you can click "Open" to get the Premiere Elements MPEG files from its default output folder. Now open up Premiere Elements 13 or 12 and you're ready to import to Premiere for post-production~

Sunday, August 17, 2014

Importing Sony Alpha a7S XAVC-S files to Premiere Pro and After Effects for editing smoothly

If you have issues with importing Sony Alpha a7S XAVC-S to Premiere Pro and After Effects, just follow this article to solve.  

Sony Alpha a7S is amazing! Great camera, overall. I'm primarily using this camera for film, but love taking stills with it. It takes wonderful stills, so don't let a 12.2 megapixel camera fool you. The wide shots are amazing and the video quality is wonderful. The only problem I encountered was the file format. The XAVC S codec it shoots in wraps its files into MP4s. These files are extremely difficult to import into all my major film editing softwares, like Premiere Pro and After Effects.

According to our experience and other user's feedback, to make your Sony Alpha a7S XAVC-S workflow in Premiere Pro and After Effects smoothly, it’s highly recommended converting a7S XAVC-S clips to MPEG-2 for Premiere/AE editing use.

Here comes Pavtube HD Video Converter for Mac to do so. It is the best Mac a7S XAVC-S Converter or compressor to help you edit the XAVC-S clips from a7S you shoot in Premiere Pro and After Effects without rending, you can go to download it and have a free try! Below I will outline how to convert Sony Alpha a7S XAVC-S footage to Premiere Pro and After Effects compatible format for editing on Mac.

Step 1: Copy Sony Alpha a7S media on to the Storage Drive in a folder.

Step 2: Launch the best Mac XAVC-S Video Converter. Click the "Add" button for adding to import the xavc-s files from a7S.

Mac XAVC-S Video Converter

Step 3: Click on the dropdown menu of "Format", and then move your pointer to Adobe Premiere/Sony Vegas> MPEG-2 (*.mpg) which is the perfect video format for you to transfer Sony Alpha a7S XAVC-S to Premiere Pro and After Effects. Then you can set the output folder by clicking "Browse" icon as you prefer.

Premiere Pro and After Effects Format

Step 4: Click "Settings" icon to adjust audio and video parameter. You can change the default codec, bit rate, frame rate, sample rate and audio channel according to your needs and optimize the output file quality.

Note: To get original(best) video quality, you can keep original video size and bitrate.

Step 5: Click the "Convert" button and it will convert Sony Alpha a7S XAVC-S files to MPG video for editing in Premiere Pro and After Effects immediately.

Step 6: Once the Mac MTS to Premiere/AE conversion is done, you will be able to get the output files for Premiere Pro and After Effects via clicking on "Open" button effortlessly.

Now you can easily import the converted mpg footage in Premiere Pro and After Effects for editing keeping high quality effortlessly.

If you are windows users, try Pavtube HD Video Converter.

Read more:

Friday, January 31, 2014

Workaround for converting Canon 60D/70D H.264 MOV to ProRes 422 MOV for Adobe Premiere Pro

The article shows you the best workaround for editing Canon 60D/70D mov videos in Adobe Premiere Pro by transcoding Canon H.264 .mov to Premiere native editing format - Apple Prores 422 Codec.

The EOS 70D is a middle range SLR for the photographer. It appears to be a good upgrade for the EOS 60D, but it basically has the same design and build. On the video mode, you can record in full HD 1920 x 1080 (29.97, 25, 23.976, or 60 and 50fps in 720p) with 60D and 70D. Both are all great for us to take high quality images and record vivid full HD videos.


If you have got the Canon 60D and 70D and often use it to record full HD video in H.264 MOV format, you may find this format can't be well accepted by Adobe Premiere Pro. This is because the HD MOV clips are encoded in H.264 codec, a most advanced codec that compresses video in highest compression ratio which is not fit for editing. In this case, the following passage will guide you how to convert Canon EOS 60D/70D MOV footages to Premiere Pro MOV for editing.

Software Requirement 

Mac Canon MOV Video Converter from Pavtube

The software does a good job in converting Canon EOS H.264 .mov files to Prores, MOV formats for editing in Premiere Pro and not loose much quality. Also supports MOV to AIC transcoding for iMovie and FCE. Becides, it allows you to join the Canon 60D/70D clips together, and add audio track to the video as background music.

Step 1. Load Canon EOS 60D/70D .mov footage to Canon H.264 MOV Converter.

Transfer h.264 encoded .mov files from Canon 60D/70D to computer via USB cable.

Download HD Video Converter for Mac from Pavtube and run the software as the best Canon MOV converter. Click the "Add Video" icon to load .mov videos from 60D/70D.


Step 2. Set MOV format as output format for editing.

Click format bar to choose the format for output. Select "Final Cut Pro >Apple ProRes 422 (*.mov)" for MOV to Premiere importingIf you prefer smaller file size, choose "Apple ProRes 422 (LT) (*.mov)" instead. 


Learn more Apple ProRes, please refer to Types of Apple ProRes Codecs 
You can also choose "MOV (AVC)(*.mov)" under Adobe Premiere/Sony Vegas for editing in Adobe Premiere Pro.

Step 3. Adjust video and audio settings to keep 1080p HD quality

Click "Settings" button, then you will be able to adjust audio and video parameters on the popup window to customize the output file quality, these adjustable parameters include codec name, aspect ratio, bit rate, frame rate, sample rate, and audio channel.

To maintain original HD quality, you may set "original" in the fields of "Size", "Bitrate" and "Frame rate".

To downsize the Canon 60D/70D .mov files, just set a smaller bitrate.

Step 4. Click "Convert" button to convert Canon 60D/70D MOV files to Premiere Pro.

Once the conversion is finished by Canon MOV to Premiere Converter, you can click "Open" button to get the output files effortlessly. Now you have got it right, just import and edit Canon 60D/70D MOV files in Adobe Premiere Pro without rending time.

FYI:

1. To get Canon 60D/70D MOV work for FCP, pls refer to the guide transcoding Canon 60D/70D MOV files to FCP.

2. Click here to learn: How to import Media Files to Premiere Pro on Mac

3. This iMedia Converter for Mac is not only able to convert Canon MOV files to Premiere, but also able to convert various camcorder footage to compatible formats for iPad/iPhone, Android devices, editing program such as FCP, iMovie, Avid MC other Adobe editing software and so on. 

See also:

Wednesday, January 29, 2014

Batch transcode Tivo shows to Adobe Premiere Elements 10 without commercials

A guide to show how to remove Tivo TV show commercials and batch convert them to MPEG-2, so that we can edit in Adobe Premiere Elements 10.


Q: I have TIVO and I have downloaded some programs, using TIVO Desktop, onto my computer. The thing is, I want to be able to import these programs onto my Adobe Premiere Elements 10, but always got an error said file format not supported. I have the Media Access key and can play them on Tivo box. So what's the next step?

Yes Tivo files cannot be playback unless you have the Media Access Key which should be on the back of your Tivo box; but it's not all. Tivo recordings are embedded in unique codecs so that you cannot load them into editing programs like Adobe Premiere as the latter doesn't include a proper decoder to unblock this.

Moreover, it's so annoying to have the commercials in Tivo recordings while most popular TV show or TV play have many episodes, like The Big Bang Theory, Grey's Anatomy, Revenge, Teen Wolf, etc. so we have many ads in TV head and end.

I was so confused with all the tasks but finally found out a workflow to finish all of them: the Pavtube Tivo Video Converter. (Mac version is available here: Tivo Video Converter for Mac)

Pavtube Video Converter, which works as a prefect Tivo to Premiere Elements 10 Converter, can help you batch convert Tivo recordings to Adobe Premiere Elements 10 acceptable format without commercials, so that you can edit the trimmed videos smoothly.

How to batch convert Tivo to MPEG-2 for Adobe Premiere Elements 10?

Step 1. Load TiVo files.

You can directly drag and drop the TiVo files to the software, or click "Add" button to locate and import the TiVo files into the TiVo converter.


Tip: When first loading, this TiVo Converter will ask you to input your Media Access Key. Enter your Media Access Key, and click "OK" to confirm.


Step 2. Choose Premiere preferred format

Click "Format" pull down list to select Adobe Premiere/Sony Vegas> MPEG-2(*.mpg) as the best video format for Adobe Premiere Elements 10. WMV, MOV formats are the good choice as well.


Tips: If the default settings do not fit you requirement, you can click "Settings" icon to and enter "Profile Settings" panel to adjust video size, bit rate, frame rate, sample rate and audio channels.

Step 3. Remove Tivo commercials

Click "Edit" on the top to enter video editor window. Follow the "Trim" tab to choose the i/o point; click OK to confirm the trimming.

Step 4. Start Conversion

Click "Convert" button to start encoding TiVo to MPEG-2 for Premiere Elements 10; it will convert all the files in queue. When the conversion task is completed, click "Open" button to get the exported files quickly. Now load these videos to Premiere Elements 10 for editing.

Tuesday, December 17, 2013

Import MP4 Video into Adobe Premiere Pro CS3/CS4/CS5/CS6

Read this article and you will learn the best and easiest way editing MP4 files in Premiere Pro CS3/CS4/CS5/CS6 by transcoding mp4 to Premiere Pro compatible videos.

Q1: Hi I'm Hayley, I was just wondering, I have footage in a strange format; .mp4, and it wont import into Premiere CS3. Someone asked me if I had all the updates, etc, I do, and still no luck with it...I was thinking of doing a reinstall of it, but if i do that, I will likely have to download all my updates and stuff all over again, and in the end, the mp4 thing still may not work. Before I try the reinstall, I was just wondering if anything else can be done about the format.
Any ideas, friends? Thanks in advance!


Q2: I recorded using camera app in Windows 8. It names the files as mp4 but Adobe Premier Pro CS4 wasn't able to import it. Try rename to mpg, m4v doesn't work, converting using Free Make Video Converter to WMV, MP4, MPG also doesn't work.

Q3: When I attempt to import XDCAM EX clips or MP4 files into Adobe Premiere Pro CS5, I receive the error message "Unsupported format or damaged file." Every time I try, all I get are codes/words and I'm having trouble. Please help?

MP4 files are compressed using h.264 codec which is a final delivery codec not use for editing, while Adobe Premiere Pro CS3/CS4/CS5/CS6 lets you edit faster with true native format support. Therefore you may have problems when importing MP4 footage into Premiere Pro. For smoothly editing .MP4 files in Premiere Pro CS3/CS4/CS5/CS6, you first need to convert MP4 to a more editing-friendly format with Premiere Pro, such MPEG-2/WMV.

To get the work done, a third-party software is needed. Here HD Video Converter for Mac and Pavtube HD Video Converter is highly recommended. They are professional and powerful high-quality Windows/Mac video converter and editor. With it, you can effortlessly transcode 720p/1080p MP4 files to MPEG-2/WMV format for Premiere Pro  CS3/CS4/CS5/CS6 editing. Just download it and follow the tutorials.

Guide: Transcoding MP4 to Premiere Pro CS3/CS4/CS5/CS6 for editing and importing

Step 1: Add mp4 footage from MP4 file folder to MP4 Converter for Premiere Pro. You can directly drag and drop .mp4 video files to this software.


Step 2: Choose Premiere Pro CS3/CS4/CS5/CS6 best editing codec.

Select to rewrap your mp4 files to" Adobe Premiere/Sony Vegas --> MPEG-2 (*.mpg) or WMV (VC-1) (*.wmv)." which work fine with Premiere Pro.


Step 3: Hit "Convert" button to carry out the MP4 to Premiere Conversion process.

When the conversion ends, you can run the Premiere Pro CS3/CS4/CS5/CS6 and click File --> Import --> Files to import the resulted files in Premiere Pro.

From the steps above, I think you got the point to convert MP4 files to MPEG-2/WMV for Premiere Pro editing, please have a try, this software will solve you MP4 files conversion and editing problems, and then you can easily import and use your MP4 files in Premiere Pro  CS3/CS4/CS5/CS6 without any problems.

Read More:

Thursday, December 12, 2013

Convert .mts files from JVC Everio GZ-HM330SAA in iMovie/FCE/FCP/Avid MC

Here is the quick tutorial for you that will show you the simplicity of JVC Everio GZ-HM330SAA workflow for importing MTS files in FCP, iMovie, Premiere Pro, Avid for editing by transcoding JVC MTS to Mac editable format (Mavericks 10.9 included).

I work at at CyberNet Evolution, and below is a question from one of my friends: 


I purchased a JVC Video recorder, the model is GZ-HM330SAA and I shot some footage about my kids basketball games. I am not sure I just converted the video and gave it to my daughter who edited it on her Apple Mac for me. Just keeping the videos as a record. But I find I couldn’t convert the software to copy to a DVD. I made a mistake purchasing this camera not realisied how difficult it was. I contacted JVC and they were no help at all. 


So I took his camera to my local Tech guy and I couldn’t help much at all either but I start to surf the net and see if I could find something. While searching for solutions, I find some plug-in for Mac can do some work. But the importing way is a tedious process, which needs you patience. Fortunately, I found Pavtube web site and its software, and there is an alternative easy way to fix the issue. 

The easy workaround is to convert JVC Everio GZ-HM330SAA mts files to Mac native editable format along with some help from a third-party tool. Well, if you make the recordings editable before taking to the program, the incompatible error won’t happen any more. Keep reading for a brief how-to below. 

Convert JVC Everio GZ-HM330SAA MTS files for editing in Avid, FCP (X), iMovie, Premiere 

Now go to find Pavtube HD Video Converter for Mac. Lots of users are impressed by this converter since it is powerful enough to convert camcorder videos to multiple video formats for iOS/Android/Windows Tablets & Phones and HD Media Players as well as video editing software including Avid Media Composer, Final Cut Pro (X), iMovie, Premiere and more. And you can enjoy the powerful edit function, like trim, crop, watermark for text, image and video, subtitles and so on. 

The following guide will show you how to transcode/convert JVC HM330SAA mts files for editing on Mac. Download it and follow below steps. 

Step 1. Load HM330SAA MTS files. 

You can choose "add video" directly to add the mts files. 


Step 2. Select output format for video editing software. 

Click "Format" menu you will find various video formats listed by different devices. Choosing the editing software option directly will help you to take less time to find a more preferable video format. 

You can choose Final Cut Pro -> Apple ProRes 422 (*.mov), this codec is optimized for FCP editing; 


For Avid Media Composer, choose "Avid Media Composer -> Avid DNxHD 1080p (*.mov)"; 

For iMovie, choose "iMovie and Final Cut Express > Apple intermediate Codec (AIC) (*.mov)"; 

For Adobe Premiere, just choose "Adobe Premiere/Sony Vegas > WMV (VC-1) (*.wmv)". 

Step 3. Edit loaded JVC HM330SAA MTS video files. 

Click "Edit" button and you are allowed to trim, crop, add text/image/video watermark or some effect to your output video for making it perfect. Here the function of adding subtitles to output files will contribute to make your own videos. You can use free software Subtitle Edit to edit your subtitle content then add it to output videos. 

Tips: Click "Settings" on the interface and you can adjust the parameters including size, bitrate, frame rate, etc. to get a high quality of output files. And keep the settings the same as original video recordings will provide you the least loss of video quality. 

Step 4. Start conversion. 

Click the "Convert" button to start conversion. When it completed, click the "Open" button to get the generated videos for your editing software. 

More features about it: 

1. Rip and convert Blu-ray and DVD including 1:1 backup Blu-ray/DVD movies to Mac hard device for future needs. 

2. Directly Copy feature will save 100% intact .M2TS main movie from original BD disc. 

It is an integration of BDMagic for MacDVDAidfor Mac and Video Converter for Mac and it will meet almost all your requirements about converting videos. 

Now get ready for importing and editing JVC Everio GZ-HM330SAA AVCHD mts videos in FCP/iMovie/Avid MC for editing easily without any problem. Enjoy your editing workflow! 

Learn more JVC video tips: 

Get mts Videos from JVC Everio GZ-HM330SAA into FCP
Transcode GZ-R70 mts clips to iMovie/FCE
How to edit JVC GY-HM650U MXF, MOV, AVCHD, MP4 on Mac?

Tuesday, November 19, 2013

Mac Compatibility: Canon HF R20 AVCHD footage to Adobe Premiere Pro CS5

With this guide, you can smoothly import and edit Canon HF R20 AVCHD footage in Adobe Premiere Pro CS5 by transcoding Canon .mts to Premiere Pro most compatible MOV or MPEG-2 video.

Canon's VIXIA HF R20 Flash Memory Camcorder is a mid-range high definition camera that's packed with useful features and functions. Record 1920 x 1080 video to the R20's 8GB internal flash memory or to SD/SDHC or SDXC cards using the dual memory card slots. The VIXIA HF R20 allows you to record up to 3 hours of crisp high definition video to an 8GB internal flash drive or to two removable SD memory cards.


With 24Mbps recording, video is captured from Canon HF R20 at the highest bit rate in AVCHD. You get exceptionally lifelike tone and exacting detail. However, if you've got some of those MTS files from Canon HF R20 camcorder, you may find you can' open the mts files in Adobe Premiere Pro CS5. Although Adobe claimed that Premiere Pro CS5 and above offer much better native AVCHD support than its predecessor, there are still some video, audio codec problems while importing/editing AVCHD MTS clips in Premiere Pro. Plus, even the Adobe program can ingest your MTS files directly, it takes a long time for rendering.

As Canon HF G20 mts footage can't be supported well by Adobe Premiere Pro CS5, the best method to avoid the importing problems is to transcode Canon HF G20 MTS footage into a Premiere Pro most compatible format like MOV or MPEG-2. Here's a way to convert Canon HF G20 MTS to Adobe Premiere Pro CS5 without losing the quality.

At first, a 3rd party converter is needed. Pavtube MTS/M2TS Converter for Mac (Only $29) is the one I choose.Easy convert AVCHD .mts from Canon HF R20 1080/60p MTS to mov files, which will fast import into Premiere Pro for editing. As for video quality, at least I cannot distinguish any loss by naked eyes.

Steps to transcode Canon HF R20 MTS for Adobe Premiere Pro CS5

1. Free download Pavtube AVCHD Converter for Mac. Install and launch. Click "Add" or "Add from folder" to import your mts files from Canon HF R20.


2.Click format bar to choose the output format, you can click and choose "MOV (AVC) (*.mov)"  or "MPEG-2(*.mpg)" as output format under Adobe Premiere/Sony Vegas catalogue for Adobe Premiere Pro CS5:


Tip – Profile Settings:

In case the default settings do not fit your requirement, you can click “Settings” button and enter “Profile Settings” panel to adjust video size, bit rate, frame rate, sample rate and audio channels.

In order to get customized videos, you can add subtitles to your own videos.

The free Subtitle Edit will help you to edit your own subtitles then put it into videos.

3.Click convert button to start to transcode Canon HF R20 MTS files to Adobe Premiere CS5.

After conversion completes, you can import your converted media files to Adobe Premiere Pro on Mac for editing. In this way, you can easily and fast ingest your Canon HF R20 MTS videos in Adobe Premiere Pro CS5 on Mac.

Related guides:

Sunday, November 10, 2013

Ingesting Canon Vixia HF G30 footage to Avid Media Composer/Premiere Pro

Canon HF G30 Avid MC/Premiere Pro solution: Step by step guide showing you how to importCanon Vixia HF G30 AVCHD/MP4 to Avid MC/Premiere Pro for further editing.

The Canon VIXIA HF G30 is a prosumer camera?that shoots 1920 x 1080 Full HD video in either AVCHD or web-friendly MP4 format. It also supports Native 24p Progressive Mode recording, which will give your footage a more cinematic look.?Videos are shot in AVCHD up to 35 Mbps and recorded in full HD 1080 60p, which is not supported by most editing programs. Hence it could be a problem when Mac users need to ingest the Canon Vixia HF G30 AVCHD/MP4 video in Adobe Premiere Pro, Avid Media Composer smoothly. 


To edit Canon Vixia HF G30 AVCHD in Adobe Premiere Pro, Avid Media Composer on Mac, you are suggested to convert the AVCHD MTS to Adobe preferred H.264 MOV or DNxHD for Avid. To accomplish this, I recommend this Mac Canon Video Converter, a powerful and professional AVCHD converting program which support outputting various videos formats for different usage.. 

Now follow these steps to quick convert Canon Vixia HF G30 AVCHD into DNxHD or AVC MOV

Free download Pavtube HD Video Converter for Mac, get it installed. 


Step 1: Connect your camcorder to Mac and Load recorded files. 

Connect your camcorder to Mac, and you can see all recorded AVCHD/MP4 files as soon as this program has detected the device. Now, you can untick the files you don't want, and then click the "Add" button to load the files you want to this AVCHD/MP4 to MOV Converter for Mac, or drag and drop your videos into it directly. Batch conversion is offered. 


For Windows user: Connect an HD video camera/camcorders to your PC with a USB cable. Once connected and powered on, the camcorder should appear on the desktop as a new disk. It is desirable that you copy the videos to your PC's hard-drive before converting or editing them. 

Step 2. Choose proper video format. 

Open the "Format" list then choose "MOV" under "Avid Media Composer" section as output format for editing Canon Vixia HF G30 AVCHD/MP4 files in Avid Media Composer. 


choose "MOV"/"MPEG-2" under "Adobe Premiere/Sony Vegas" section or "Apple ProRes 422(*.mov)" under "Final Cut Pro" section as output format for editing Canon Vixia HF G30 AVCHD/MP4 files in Adobe Premiere Pro.  

In fact, if you are about to play the AVCHD/MP4 video files on iPhone, iPod, iPad, Android, Windows 8 devices or edit in iMovie, Final Cut Pro X, FCE etc., you can choose the optimized preset for the device or app offered. 

Step 3. Customize video size, bitrate, frame rate, and other settings. 

Tips: 

* For 1080 50p AVCHD files, you can set the video size as 1920*1080, and set the video frame rate as 25fps. 
* For 1080 60p AVCHD videos, set the video size as 1920*1080; while, set the video frame rate as 30fps. 

FYI: Tf you want to trim, crop the videos before transcoding, you can click Edit like this: 


Pavtube AVCHD Converter for Mac also support deinterlacing, editing audio and adding sutitles. 

Step 4. Start conversion. 

Click the "Convert" button to start converting Canon Vixia HF G30 AVCHD/MP4 to MOV for Avid MC, converting to MOV/MPEG-2/Apple ProRes for Adobe Premiere Pro. 

After this Top HD Video Converter for Mac finishes the conversion process, you can click "Open Folder" to find out where you saved the converted files. 

Now let's click the "Convert" to start this conversion easily. Wait for a while and you can click the "Open" to locate the converted video easily. 

Learn more:

Saturday, September 28, 2013

Fluid Workflow For Editing Sony HDR-TD10 3D mts/m2ts footage in Premiere Pro and FCP X

This article will talk about how to import Sony HDR-TD10 AVCHD MTS/M2TS files in FCP and Premiere Pro for editing smoothly on Mac with the best 3D AVCHD Converter for Mac. 


I'm working on a Mac but have a Sony HDR-TD10 camera that can shoot .mts/.m2ts 3D videos. I'm trying to figure out how to get this 3D footage onto my Mac so I can edit using either Premiere Pro or FCP X in 3D. Does any software support this directly on the Mac or do I have to use some converting program on the Mac to do this?

Sony HDR-TD10 camcorder allows you to easily switch between recording in 3D and 2D,1920x1080 Full HD 60p/24p recording. If you shoot 3D AVCHD video in .mts or .m2ts format with TD10, you will find the 3D AVCHD is not easy to use on Mac as it's not well supported by many editing software, such as the Premiere Pro and FCP X, you may encounter many problems as above.

In order to edit your Sony HDR-TD10 3D MTS in Premiere Pro and FCP X natively and to keep the HD video quality and avoid rendering, you'd better use the Apple ProRes codec which is best accepted by Premiere Pro and FCP X to convert Sony TD10 3D AVCHD mts/m2ts files for importing.

To accomplish you goal, Pavtube MTS/M2TS converter for Mac can do this with ease. It is the tool that I have used for about one year, I rewrap and transcode Sony TD10 3D AVCHD mts/m2ts files footage to Prores .mov for editing in Premiere Pro and FCP X on Mac, this software can deal nearly all kinds of MTS videos. Free downlad it and  take a look at the brief guide below.

Convert Sony TD10 3D MTS/M2TS to Prores .MOV for editing in Premiere Pro and FCP X

Step 1: Install and launch the best 3D AVCHD Converter for Mac. Once its main interface appears, you can import 3d .mts or .m2ts media into the program from "Add video" or "Add from folder" icon.


Step 2: Click format column and choose the output format. You are recommended to choose  Final Cut Pro -> Apple ProRes 422(HQ) (*.mov) as the best codec for editing Sony TD10 3D AVCHD in Premiere Pro and FCP X.

Notes: If you want to output 3D video, you can also chooce “MOV Side-by-Side 3D Video/MOV Anaglyph 3D Video/MOV Top-Bottom 3D Video (*.mov)” format from “3D Video” option, this H.264 MOV format is also supported by Premiere Pro and FCP X.


Step 3: Click settings button to adjust the output video's parameters, such as bitrate, resolution, etc.

Step 4: Start converting Sony HDR-TD10 3D AVCHD videos to Apple ProRes .MOV for  Premiere Pro and Final Cut Pro X .

As soon as the conversion process finished, you can click "Open" button to get the generated file that is ready for editing with Premiere Pro/Final Cut Pro X.
  • Start up Premiere Pro, choose File > Import…, and navigate to the source folder to import files. 


  • Launch Final Cut Pro X, choose File > Import > Files…, and browse to where you save the converted AVCHD clips to. Choose the videos that you’d like to add. 
 

Read More:

Wednesday, September 25, 2013

Convert Canon XF105 multi-track MXF to ProRes 422 MOV to edit in Premiere Pro CS6

If you encountered problems with importing XF105 multi-track MXF to PPro on Mac, please follow this post to effortlessly convert Canon XF105 MXF to Prores MOV for Premiere Pro CS6 with keeping multi audio channels.


The XF105 utilizes Canon's XF Codec – a file-based MPEG-2 compression with an MXF File Wrapper. The XF105 supports the highest HD quality with Full HD 1920*1080 resolution, up to a 50Mbps bit rate and 4:2:2 color sampling. However, some Canon users find that it is hard to import Canon XF105 HD MXF files into Premiere Pro CS6?

My Canon XF105 .mxf files won't import into Adobe Premier Pro 6.0.3...  Keep getting a "generic error".... and I've tried everything! I've downloaded the Canon utilitiy, tried merging the clips, tried isolating the .mxf files, tried not touching the clip structure at all..... 

Now I want convert them into any format that Premiere Pro adopts. The key point is I don't want to loss any of the audio channels that I recorded with two microphones. Is that any work flow for this?

The Adobe Premiere Pro CS6 isn't well compatible with the tough ""MXF"" file format. In the case, convert MXF file from XF105 to Premiere Pro well compatible file format like Prores .mov can be an effective way, and it will make the editing work much smooth and easier. But how to keep the original multi audio channels?

Here, Pavtube iMixMXF can exactly do this for you. It is a great MXF Mixer and Converter that enables you to convert multi-track MXF from Canon XF105 to Prores for Premiere Pro preserving all the audio channels without quality loss, but also can make it easy for merging multiple video clips.  

Overall, it is a wonderful tool to preserve all the audio and subtitle tracks from original MXF file when converting multi-track MXF files to multi-track MKV, MP4, MOV for playing back on iDevices and Android tablets; as well as multi-track Apple ProRes for FCP, Premiere Pro and Apple Aperture 3 editing. Besides selecting multiple tracks you need, you can also mix the multiple audio tracks into one for output. Below is a brief guide:

Preparation for XF105 to Premiere Pro CS6 Conversion:

Free download this Multi-track MXF Converter for Mac and follow these steps to easily convert multiple audio channel MXF to ProRes for Premiere Pro CS6.

1. Connect your XF105 to Mac and keep it on; get this multi-track MXF to Premiere Converter installed. Now follow the top left two icons to load individual mxf or in batch.


2. Click "Format" and choose Multi-track Video>Multi-track Apple ProRes 422(*.mov) as the most compatible codec for Premiere Pro CS6 editing.


3. Click "Settings" to free select needed video/audio tracks.

Check the tracks you need and left others unchecked, thus you can get Multi-track MOV with your needed audio streams. Note there’s a mix into one track icon on the bottom, it will combine all your checked audio tracks into single one.


With this Pavtube iMixMXF program, you can also add some personal subtitles in it like this which makes the play backing much easier:


4. Click the red "Convert" to start to convert Canon XF105 multi-track MXF to ProRes 422 MOV.

After the conversion is finished, just run Premiere Pro CS6 and import the .mov files for editing. You will find the output video work perfectly on Adobe Premiere Pro CS6.

P.S.

Pavtube also have a Mac MXF to FCP converter program for users that do not need to deal with multi-track video/audio files; only $29 is needed atm. Refer to here to quick look this MXF Converter for Mac.

Read More:

Sunday, September 1, 2013

How to import Sony AVCHD mts video files dans premiere pro cs5

Have some .mts files from Sony camcorder and want to import/edit AVCHD .mts footages in Adobe Premiere CS5 without rendering; check out the guide to learn how to convert Sony AVCDH MTS to Adobe Premiere Pro CS5 compatible MOV/MPEG-2 video format.


Recently, we have a France client who has the question that "How to importer video mts sony dans premiere pro cs5". So I searched Sony MTS and Adobe Premiere Pro on Google, and found there are other users who are also facing the importing problems:

Q1: The videos are from Sony NEX-5N and the format shows AVCHD Video (.MTS) - into Adobe Premiere. Can someone explain the best way to get my video into the editing software?

Q2: I have a Sony FS700, when I wanna edit those AVCHD MTS footage in Adobe Premiere, I met problems: the Premiere handled with the mts files so slowly, and I couldn't edit my videos smoothly. What's the problem?

Q3: I'm getting a failure error "... unsupported compression format" when importing video from Sony NX5U AVCHD camera (which has MTS files) into CS5.5 Adobe Premiere Pro. Never had this problem with CS5. The video was shot at 1080i/24fps. I tried to convert it into AVI format but lost image quality. I will appreciate assistance from anyone with solution. Thanks.

In fact, we have used many AVCHD camcorders but only met the similar trouble many times. I know the main reason is that AVCHD is a compressed format, and not fit for editing. The best method to solve those problems is to transcode Sony AVCHD .mts to Adobe Premiere Pro CS5 most compatible format, like MOV or MPEG-2 format.

At this time, you need a Mac Sony MTS to Premiere Pro Converter, Pavtube MTS/M2TS Converter for Mac can help you, it can transcode Sony MTS to MPG/MOV for Premiere Pro CS5 native editing on Mac with maintaining the original effect, below is a brief guide for you to convert Sony AVCHD mts video to Premiere CS5 on Mac.

Steps to transcode Sony MTS video files for importing into Adobe Premiere Pro CS5

1. Download and install Pavtube Mac AVCHD to Premiere Converter. It's an excellent software which can convert Sony AVCHD for Premiere Pro, more output formats are also supported, such as MKV, AVI, MP4, MOV, WMV, FLV, etc.

2. Import the Sony AVCHD MTS video to the best MTS/M2TS Converter for Mac.


3. Click "Format" column to choose the best video format for editing in Adobe Premiere Pro CS5 on Mac. Click and choose Adobe Premiere/Sony Vegas -> MOV or MPEG-2 for output. You can also choose Final Cut Pro  -> Apple ProRes 422 MOV for editing in Premiere Pro CS5.


4. You can customize output parameters as you want. Adjust the resolution, bitrate, etc according to your need; you can also keep the parameters as original.

After these steps above, click convert button to start converting Sony AVCHD MTS to MOV/MPEG-2 for Premiere Pro CS5.

With this best Sony MTS/M2TS Converter for Premiere Pro CS5, you can convert you mts videos with best quality, supported devices include Sony HDR-CX160, CX130, TD10, PJ760V, HDR-CX11E, CX155, CX150, CX100, SR1, etc. Now just have a try, and then you can get quick and smooth Sony AVCHD editing workflow in Adobe Premiere Pro CS5 as you want with no codec problems.

If you want to import or edit your Sony camera video files on FCP 6/7, FCP X, iMovie, FCE, Avid, Song Vegas, Pinnacle, Windows Movie Maker, etc., you can check out "Sony Camcorder/Camera Video Tips or MTS Tools" to get your solutions.

Read More:

Monday, August 5, 2013

Tricks for editing Sony 4K XAVC Codec in Aodbe Premiere Pro

Follow the article below you can get the info on tips and tricks for importing Sony XAVC files into Adobe Premiere Pro on Mac (Mavericks included). 

With the successful sale of new CineAlta 4K cameras like Sony PMW-F55 and Sony PMW-F5, the XAVC format has been widely adopted in the marketplace. According to Wikipedia, XAVC is a recording format that was introduced by Sony on October 30, 2012. It is an open format that will be licensed to companies that want to make XAVC products. However, in order to edit or play in other media devices, you 'd better convert XAVC to other common formats, do you think so?

Although Adobe recently released update to its Premiere Pro for adding XAVC support, still some users meet issues about how to import Sony XAVC videos into Adobe Premiere:

I'm going into post-production in the next couple of weeks and I need to figure out my editing system and workflow. I'm going to try to avoid an offline edit workflow in Premiere and just stay in XAVC from beginning to end. Does anyone have any experience yet working in the XAVC codec in Premiere Pro and if so, do you have any advice on XAVC workflow on Premiere? Thanks for reading and any replies.

The new 4K XAVC format is not supported by many editing software, especially the older versions. As above, without install Plug-in, you can't directly import your Sony 4K XAVC or XAVC S footage to Adobe Premiere Pro CS3, CS4, CS5 or CS6 for further editing.

In the end, you may have to complete the job by XAVC to Adobe Premiere Conversion. And this can be done by an easy-to-use program XAVC Video Converter for Mac for Premiere Pro which adopts the latest encoding and decoding technologies to help you convert/transcode Sony 4K XAVC footage to MPEG-2AVI, WMV, Prores mov, etc which supported by Adobe Premiere Pro. Then you can easily import the generated XAVC to Adobe Premiere Pro for editing.

The windows version is XAVC Video Converter.

Now follow the steps below.

Step 1. Launch the Mac XAVC to Adobe Converter. Click “Add Video” and browse to a Sony XAVC clips from PMW-F5/PMW-F55 and the software will add it to file list. Or you may click the “Add Folder” button to import all the XAVC files in the file structure.


Step 2. Click on “Format” and choose “MPEG-2 (*.mpg)” from ” Adobe Premiere/Sony Vegas> ” as the best codec for editing Sony XAVC file in Adobe Premiere Pro.


Step 3. Click on “Settings” to redefine output quality. You can also set a different video resolution, frame rate, bitrate, audio channels, etc. For users who would like to retain exactly the same settings (without any quality loss), set target settings the same to source video.

Step 4. Click “Convert” to start transcoding XAVC to MPEG-2 for Adobe Premiere Pro editing on Mac (Mavericks included). 

Once you get the converted ..MPG file, you can import it to Adobe Premiere Pro.

This XAVC Converter for Premiere will help you convert videos with best quality, and then you can edit  XAVC videos in Adobe Premiere Pro on Mac as you want with no codec problems.

Learn more:

Thursday, August 1, 2013

Easily import Sony XDCAM EX Footage to Avid, Premiere, Sony Vegas, Pinnacle, CyberLink, Windows Movie Maker

Summary: This article offers a brief guide about how to transcode and transfer Sony XDCAM EX footages to Windows editing programs like Avid, Premiere, Sony Vegas, Pinnacle, CyberLink, Windows Movie Maker for editing. 

Sony XDCAM EX series camcorders, like like PMW-EX3, PMW-200, PMW-EX1, PMW 150, etc, are high-end professional camcorders which can capture high definition shootings, they can offer very high quality HD recording at a data rate of up to 50Mbps wrapped with MP4 format. While enjoying the stunning videos recorded of HD image quality, many users are having problems when trying to edit Sony XDCAM EX videos on Windows editing software, like Avid, Premiere, Sony Vegas, Pinnacle, CyberLink and Windows Movie Maker,etc. 

Hot search: Sony XDCAM to MPEG-2 for Sony Vegas Pro | Sony XDCAM HD IMX Files on Mac NLEs | Sony XDCAM HD422 to Final Cut Pro X | Sony XDCAM in MOV on Mac Yosemite | Sony XDCAM EX for Avid, FCP, DaVinci Resolve, etc 
 

The reason that we can't successfully import Sony XDCAM EX MP4 recordings to Windows Platform for editing is because of the format compatibility. Since the XDCAM EX MP4 footage is a peripheral non-standard format which is not supported by editors on Windows PC. 

In order to import Sony XDCAM MP4 footage into Avid, Premiere, Sony Vegas, Pinnacle, CyberLink and Windows Movie Maker for smoothly editing, we can render to the third-party software to help convert XDCAM EX MP4 to AVI/MOV/WMV/MPG– native format for Avid, Premiere, Sony Vegas, Pinnacle, CyberLink and Windows Movie Maker. This is the best way to help XDCAM users to edit Sony XDCAM EX MP4 on Window PC smoothly..To achieve our goal, the quickest and easiest way is to use the easy-to-use yet professional software called Pavtube Video Converter , with which, we can effortlessly and flawlessly transcode Sony EX MP4 footage to AVI/MOV/WMV/MPG for Avid, Premiere, Sony Vegas, Pinnacle, CyberLink and Windows Movie Maker editing. It is safe to install and easy to use. And you can enjoy the powerful edit function, like trim, crop, watermark for text, image and video, 3D effect, subtitles and so on. Below will show you how to 


Other Download: 
- Pavtube old official address: http://www.pavtube.com/video_converter/ 
- Amazon Download: http://download.cnet.com/Pavtube-Video-Converter/3000-2194_4-75734821.html 
- Cnet Download: http://download.cnet.com/Pavtube-Video-Converter/3000-2194_4-75734821.html 


Free download and follow below step to convert Sony XDCAM EX MP4 for Windows . 

Step 1. Load Sony XDCAM EX MP4 files.You can choose "add video" directly to add the whole folder. 


Step 2. Select output format for video editing software. 

Click "Format" menu and choose "Adobe Premiere/Sony Vegas -> MPEG-2 HD Video (*.mpg)",or select WMV/MOV/MPEG-2, you can also choose "HD Video -> AVI HD Video (*.avi)". Finally, click the file icon beside output bar, and choose a destination folder for saving output files. 


Step 3. Edit loaded Sony XDCAM EX MP4 files. 

Click "Edit" button and you are allowed to trim, crop, add text/image/video watermark or some effect to your output video for making it perfect. Here the function of adding subtitles to output files will contribute to make your own videos. 

Tips: Click "Settings" on the interface and you can adjust the parameters including size, bitrate, frame rate, etc. to get a high quality of output files. And keep the settings the same as original video recordings will provide you the least loss of video quality. 

Step 4. Start conversion. 

Click the "Convert" button to start transcoding Sony XDCAM EX MP4 footage for editing in Avid, Premiere, Sony Vegas, Pinnacle, CyberLink and Windows Movie Maker. When it completed, click the "Open" button to get the generated videos for your editing software. 

More related tips: 

Monday, July 22, 2013

Convert Canon XF300 MXF to ProRes for FCP/Premiere Pro on OS X Mavericks 10.9

Follow this article you will know how to solve Canon XF300 MXF editing problems with Final Cut Pro and Premiere Pro on Apple OS X Mavericks 10.9 as well as how to work out the "no audio issues".


The XF300 Professional Camcorder represents Canon's entry into professional solid state video acquisition. Following on the heels of its widely respected XH line of tape-based camcorders, the XF300 takes advantage of the latest HD technology--along with Canon's newly developed MPEG-2 4:2:2 codec--to record Full HD video to affordable Compact Flash cards.

While, when you want to import Canon XF300 XF MXF files in FCP/Premiere Pro on OS X Mavericks 10.9 for editing, you will get frustrated due to the video codec incompatibility problem as below.

I have some multi-stream mxf files from a normal Canon XF300 and want convert them into any format that FCP and Premirere Pro adopts. The key point is I don’t want to loss any of the audio channels that I recorded with two microphones. Is that any work flow for this? I hope this still fits for the OS X Mavericks 10.9 to be coming.

Here is the best solution for editing Canon XF300 MXF files in FCP and Premiere Pro on Mavericks 10.9, that is, to transcode Canon XF300 MXF to FCP/Premiere Pro compatible Apple Prores for editing.

To achieve this goal, you can use this professional iMedia Converter for Mac, which is a great help for Canon XF300 users to convert Canon XF300 1080i 50Mbps MXF to ProRes for FCP/Premiere on Mavericks 10.9, but also make it easy for you get the right audio track for the MXF files without losing sound. Plus, this Mac MXF Converter fully support other Canon XF camcorders like Canon XF105, XF100, XF305, Canon EOS C300, Canon EOS C500 etc.  

Guide: Convert Canon XF300 MXF files to FCP/Premiere Pro on OS X Mavericks 10.9  . 

Step 1: Add MXF video files.

Download and run Pavtube Mac OS X Mavericks MXF Converter. Connect Canon XF300 camcorder to your Mac computer hard drive via USB cable. Click the button "Add Video" to add Canon XF300 MXF files, or directly drag and drop your HD MXF files.

Step 2: Select an output format for FCP and Premiere Pro and set the output folder.

Click on the "Format" and get the dropdown menu, then move you pointer to Final Cut Pro -> Apple ProRes 422 (*.mov), it’s the best format for editing in FCP, if you need to edit in Premiere, you can also choose Prores code.

Or you can select MOV format from "Adobe Premiere/Sony Vegas" option, this format is best for Premiere Pro native editing.


Step 3: Click "Settings" icon to adjust audio and video parameters.

Click the "Settings" icon and you will go into a new interface named "Profile Settings". You can adjust codec, bit rate, frame rate, sample rate and audio channel in the interface according to your needs and optimize the output file quality.

Tips:
If your default audio track is in mute when recording, you may get only video without audio. So you can switch to the audio stream ID option to choose the right audio track.


Step 4: Start Converting. 

Click the "Convert" button; it will convert Canon XF300 MXF files to Apple ProRes for FCP X and Premiere Pro on Mavericks 10.9 immediately.

After the MXF to ProRes conversion, you will be able to get the output files for FCPand Premiere Pro via clicking on "Open" button effortlessly. Afterwards, you can import the converted videos to FCP or Premiere Pro freely for further editing without any trouble. 

Futhermore, if your MXF files have 2 audio tracks or more, here is a new program named iMixMXF with multi-track preserving and mixing features. You can download the trial version for evaluation!
 

Read More: