Summary: Chromecast makes the way of watching movies on TV more convenient. What if you have some videos Chromecast doesn’t support? Well, this article is exactly about how to play any kind of videos from the computer and other devices to TV via Chromecast.Chromecast is developed by Google. And from Google official document, we can see that Chromecast only supports very limited file types. So some video formats, such as MKV, AVI, part of MP4, FLV, WMV, MPG, MOV, won’t be recognized by Chromecast and it will cause you can’t play them from the computer and other devices to TV via Chromecast. Luckily, from the document mentioned above, we can know that the compatible format for Chromecast is H.264 MP4. So as long as we convert MKV, AVI, part of MP4, FLV, WMV, MPG, MOV videos to H.264 MP4 format, all the playback problem with Chromecast will be solved. As a result of so many unsupported formats by Chromecast, if you get a professional video converter and that will be much helpful.Here I recommend a perfect converter app to you - Pavtube Video Converter for Mac. This app is able to converter MKV, AVI, MP4, FLV, WMV, MPG, MOV, etc. videos to H.264 MP4 format for playing to TV via Chromecast. There is also a Windows version for this video converter, if you need it, please turn to Pavtube Video Converter. Multi-platform support enable you to play MKV, AVI, MP4, FLV, WMV, MPG, MOV videos form whether MacBook or Windows PC to TV via Chromecast with no problem.
 How to Play Videos from Computer and other Devices to TV via ChromecastStep 1. First run this video converter, click "Add Video" or "Add from folder" button to browse and choose your MKV, AVI, MP4, FLV, WMV, MPG, MOV videos.
 Step 2. H.264 MP4 is built in this video converter. Just click on the format bar and follow "HD Video" to click "H.264 HD Video(*.mp4)".
 Step 3. After the setting work, click the "Convert" button in the main UI, this video converter will start to convert MKV, AVI, part of MP4, FLV, WMV, MPG, MOV videos to H.264 MP4 format. When the conversion is finished, you can feel free to play any video from computer and other devices to TV via Chromecast. Enjoy!Read More:
Summary: If you are still hesitate to buy an interchangeable lens camera or not, you are come to the right place, this article will be brief introduce you the the interchangeable lens camera and give the the solution on editing the video you recorded by an interchangeable lens camera in FCP, Premiere or Avid. What is an interchangeable lens camera?Literally just any digital camera where the lens can be (inter)changed. So we're not counting screw-on lens adapters here, we mean proper dedicated lenses. There are two types of ILC - Digital Single Lens Reflex (DSLRs) and mirrorless. Why buy an interchangeable lens camera?So you've decided to invest in a new digital camera and have made your mind up that you want to step up to a interchangeable lens model, but the huge range of camera on offer and endless flow of technical jargon have left you more confused than when you started? Fear not, this page will take the pain out of choosing the perfect camera for you, whether you're a seasoned shooter or a total novice.Before we get down to business it's worth stopping for a moment to ask the question: why would anyone want an interchangeable lens camera (ILC) when fixed-lens compacts are so much smaller, lighter and more affordable? The answer can be summed up in two words: versatility and image-quality.The versatility isn't just the fact you can change lenses and add a wide range of accessories - from basics such as flashguns and remote controls to the more specialized equipment that allow ILCs to capture anything from the tiniest bug to the most distant stars. It's also about the creative versatility offered by the more advanced controls and higher quality components.And this leads on to the second factor; image quality. In broad daylight the quality difference between a good compact and a ILC is minimal; both will produce sharp, colorful results with little effort. But when you start to push the boundaries a bit more; shooting in low light, attempting to capture fast moving sports action or wildlife, or when you want to experiment with shallow depth of field (to add a soft background to a portrait for example), the advantage of a ILC's larger sensor and higher sensitivity start to make a big difference. An ILC can't beat a compact camera for 'pop it in the purse or pocket' convenience but for serious photography the ILC wins hands down. With prices lower than ever it's not that surprising to discover that many people own one of each.Mirrorless ILC advantagesSmaller, lighter and usually quieter than equivalent SLRGenerally smaller and lighter lensesSuperior video operation and usually better video specification, tooEase of use with many compact camera features (such as face detection and wide AF areas)Electronic viewfinders often larger with greater coverage than entry-level SLR optical viewfindersFull shooting information and menus in the (electronic) viewfinderMirrorless ILC disadvantagesSome mirrorless ILCs only offer contrast-detection AFEven those mirrorless ILCs with hybrid phase-detection AF often can't quite keep up with equivalent DSLRs for subject trackingMany electronic viewfinders still cannot match the clarity of a good optical finder (and some people just prefer optical)Edit ILC video more smoothlyThere are very many apps in the market to consider using for video editing, such as Adobe Premiere, Final Cut Pro, Avid. They have their specific features, pros and cons as well as pricing that inform decision of any user. If you are not well informed on that, it might end up causing you confusion. Adobe Premiere is a software program for editing video and uses timeline to accomplish that. Its presence in the market has surely revolutionized the video editing industry thanks to its standout features. Its presence in the market has surely revolutionized the video editing industry thanks to its standout features. You can edit your videos smoothly with Final Cut Pro program and can handle more than one stream with maximum resolution. Its playback is very powerful and that adds to the easy editing experience. You will like the user-friendly interface because it comes with four windows for editing. AVID is the best software to help you connect with other people in a very efficient, powerful and collaborative manner. It has very many features to allow you customize your video during editing and you must get maximum value in return for that.No matter what kind of editor you are chosen for your editing job, you may encounter such many problems like no audios, no video images or can’t be imported issues. The thing you should make clear is that every editor has it’s best compatible format or codec, for Adobe Premiere, the best compatible format or codec is MPEG-2, for Final Cut Pro, the best compatible format or codec is Apple ProRes(Apple ProRes Codec Types), for Avid, the best compatible format or codec is Avid DNxHD(*.mov). There if you make the video you recorded into the best compatible format or codec for the editor you have chosen, the edit job will be easier or more smoothly. Pavtube Video Converter / Mac Version are high recommend here for you. It is a professional video tool can be convert all the camera video into the editor best compatible format or codec.
 Key Features of Pavtube Video Converter.
- Convert almost all HD/SD audio/video formats: All types of audios and videos (e.g. SD/HD/Tivo/DRV/Camcorder HD footages, etc) to almost any audio and video formats.
- hange default settings: You can change the parameters such as video size, bitrate, frame rate, and channels for your video file according to your need to get the best output effect.
- Batch conversion: Handle multiple videos and realize batch conversion to save your time and energy.
- Merging & splitting: Merge several video clips into one bigger file and splitting one video file into several clips according to the clip quantity, duration time and file size.
- Create new output format: Adjust profile parameters, rename and save it for future use.
- Supported OS: Windows XP/2003/Vista/Windows 7/Windows 8/Windows 8.1/Windows 10
- Supported OS: Mac OS X 10.11 El Capitan, Mac OS X 10.10 Yosemite, 10.9 Mavericks, 10.8 Mountain Lion, 10.7 Lion, 10.6 Snow Leopard, 10.5 Leopard
How to Make Eidting Work More Smoothly?
First free download and install Pavtube Video Converter on your Mac or Windows, and then launch it. Now just follow the step by step guide to make editing work more smoothly.Step 1: Install and launch this program. Just drag and drop video files to the main interface of the program to add videos. If you have several video files that you want to convert in batch, just drag the folder where the sources are to the software.  Step 2: Click the “Format” drop-down menu to choose an output format that you prefer.From "Format" drop-down lists, you can select Avid Media Composer preferable editing codec from "Avid Media Composer" > "Avid DNxHD(*.mov)" as the output format.
 Click "Format" bar, from its drop-down options, move your mouse to "Final Cut Pro > Apple ProRes 422 (*.mov)" to select it as the output file format.
 From the "Format" drop-down list, go to select "Adobe Premiere Pro/Sony V..." >"MPEG-2" as the most suitable output format for Adobe Premiere Pro.
 Step 3: Before converting, you can edit the Canon footage to achieve a better overall effect. Simply highlight a video clip and click the “Edit” button beside it to enter the Video Edit window. You can then crop, trim, rotate videos, adjust Canon recordings effects, add text/image watermarks, etc. as you like. Or you can open "Profile Settings" window to adjust the output video codec, size, bit rate, frame rate, audio codec, sample rate, bit rate and channels. Here i just give a Apple ProRes as the example, others for Avid and Premiere are nearly the same.
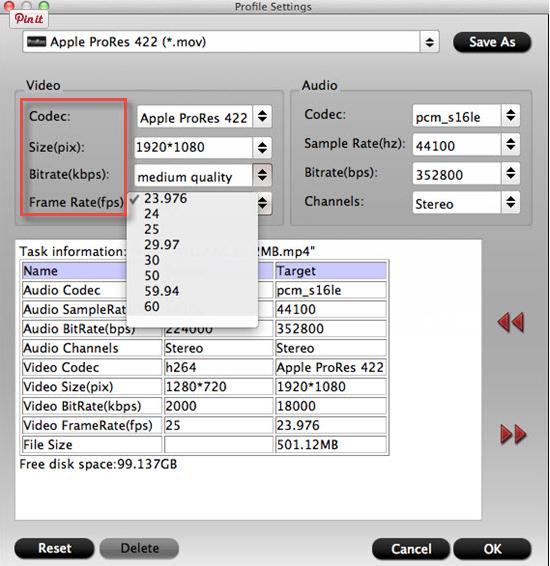 Step 4: Hit the convert button under the preview windows, the conversion will started immediately. When the conversion is completed, run the editor and import the converted footage with more smoothly editing.Read More:
Summary: The article will give you the best solution about Sony ActionCam XAVC S to Final Cut Pro X-edit XAVC S in FCP 7/X in an effective way.The splashproof HDR-AZ1 Action Cam Mini from Sony is designed for capturing POV footage of adventures of all kinds. It features 1080p60 recording in the lower-compression XAVC S format at 50 Mbps. Well, for Sony AZ1 users, here comes the Sony HDR-AZ1 XAVC S to Final Cut Pro incompatibility issues. Have you got XAVC S files from Sony HDR-AZ1, and found that it is unable to import the XAVC S to FCP X/7? Is it a Sony/Apple problem or more a problem of amateurs not understanding how to make it work?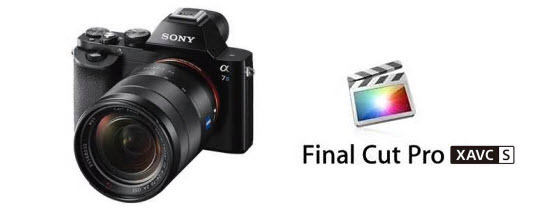 If the ActionCam XAVC S files grey out when you try to import them to FCP, you need to convert them to FCP friendly formats. Of course, to do the video conversion, you need a professional app. Here the professional MTS to FCP Video Converter for Mac--Pavtube Video Converter is strongly recommended. With it, just in a few clicks you could successfully upload ActionCam XAVC S videos to FCP.Hot Search: Import XAVC/XAVC-S/L to Edius Pro | XAVC S to Avid | XAVC S on 4K UHD TV Key Features of Pavtube Video Converter for Mac
- Three simple clicks to convert ActionCam XAVC S videos to Final Cut Pro compatible formats, such as AVCHD, H.264, DV, QuickTime MOV, etc.
- Aside from FCP, you can directly convert ActionCam XAVC S to iMovie, QuickTime, Windows Movie Maker and more video editors supported formats without additional settings.
- Edit your ActionCam XAVC S videos before converting them. With the built-in editor, you can trim or crop your videos. And you are able to add subtitles and watermarks to the videos as well.
- Perfectly compatible with Mac OS X 10.11 El Capitan, 10.10 Yosemite, 10.9 Mavericks, 10.8 Mountain Lion, 10.7 Lion and 10.6 Snow Leopard.
How to convert ActionCam XAVC S to FCP?Step 1: Backup your XAVC S files from ActionCam to hard drive. Install and launch this program. Drag and drop XAVC S files to the software. You can import multiple files at once thanks to “Add from folder” button. Step 2: Click the drop-down list in the format line to get the format box. Then choose “Final Cut Pro>>Apple ProRes 422 (*.mov)” as output format.
 Step 3: Click “Settings” button to customize the output video and audio settings by yourself. But if you are not good at it, you’d better use the default parameters, they will ensure you a good balance between file size and image quality basically. You can change the resolution, bit rate, frame rate as you need.Step 4: You can preview to check the final result. Once you are satisfied with it, click the “Convert” button to start converting XAVC S to ProRes format. It will take you a little while.Conclusion: After conversion, you can get the generated files by clicking “Open” button. Now, you’ll get no troubles in editing ActionCam XAVC S files in FCP.Source: http://lovecamcorder.tumblr.com/post/128171880912/edit-hdr-az1-xavc-s-in-fcpRead More:
Summary: You may want to watch the television shows you have recorded on your samsung tablet anytime and anywhere without any ads. There, in this article we will show you how make it come true.As we know, TiVo is a popular home setup box for recording favorite TV drama programs and movies for later playback. And you can transfer the TV recordings to your tablet by using the TiVo Desktop Software application. To use TiVo recordings anywhere you like, just like watching with laying in the bed. Of course, you can watch other movie or video on your samsung tablet too. Unfortunately, the tivo files are not supported by almost all the samsung tablet. In order to make it playable on it, you need to convert the tivo files into a samsung tablet supported format. In general, the H.264 mp4 is supported by all the samsung devices. Here you need to convert the tivo files into mp4 format for playing on samsung tablet. To do the task, a professional video tool--Pavtube HD Video Converter / Mac Version is highly recommended here. Key Features of Pavtube HD Video Converter
- Convert .tivo files to samsung best compatible .mp4 in high speed.
- Convert .tivo files to lots of common video/audio formats, including MP4, FLV, AVI, MOV, MP3, WMA, etc.
- Convert .tivo files to video editor (like iMovie and Final Cut Pro) supported format.
- Share .tivo videos into website FLV for YouTube, Vevo, Vimeo and more websites.
- Edit your .tivo videos with built-in video editor before converting them.
- Fully compatible with Mac OS X 10.6 or later, including the latest 10.11 El Capitan. Windows XP or later, including Windows 10.
Step-by-step guide on how to convert recorded .tivo in a mp4 for Samsung Tablet without any adsStep 1. Launch HD Converter for MacRun this HD Converter and click “Option” button to switch to “Options” window. Click on “Tivo” tab and enter the Media Access Key.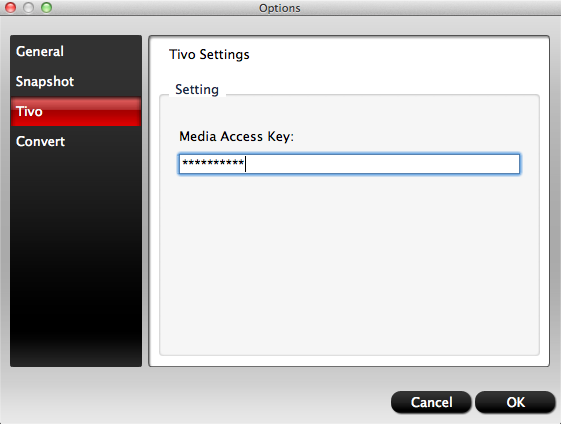 Tip: How to find your Tivo Media Access key? Just go to the 'Tivo Cetral 'menu>>'Message and Set up' Account and system information', your Media Access Key would be there.Step 2: Import .tivo files to the programYou should transfer your .tivo files to the MAC/PC (TivoDecode Manager will be helpful for transferring TiVo recordings), then you can easily drag .tivo files from the desktop or folder to the program or choose File > Add from folder to import files to the application. If you want to merge multiple video clips into a single one, you can select all the .tivo video clips and ensure you selected merge into one file option.
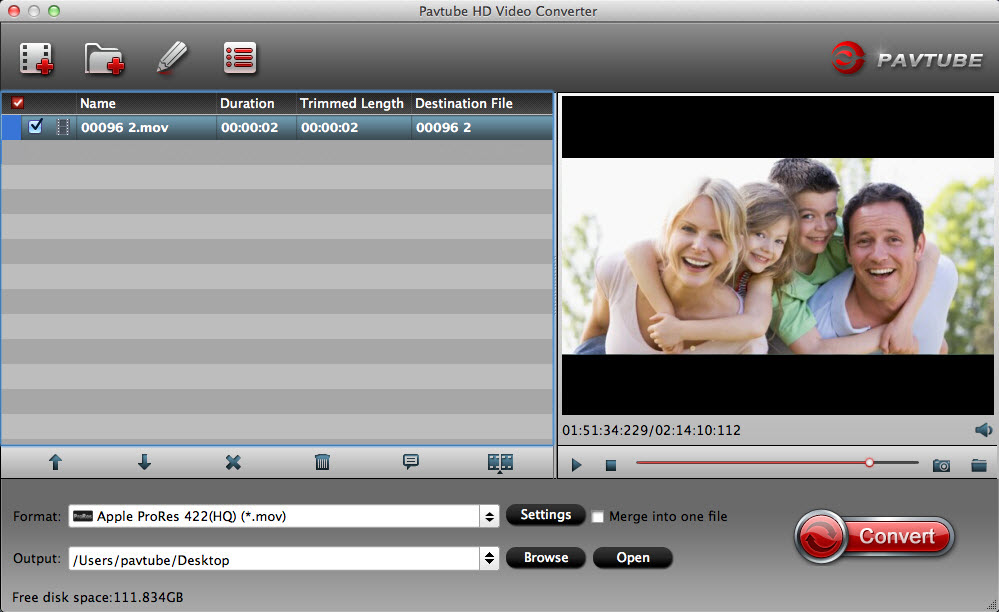 Step 2: Set the right output video formatClick on the format bar, and on format list follow “HD Video” > “H.264 HD Video (*.mp4).”
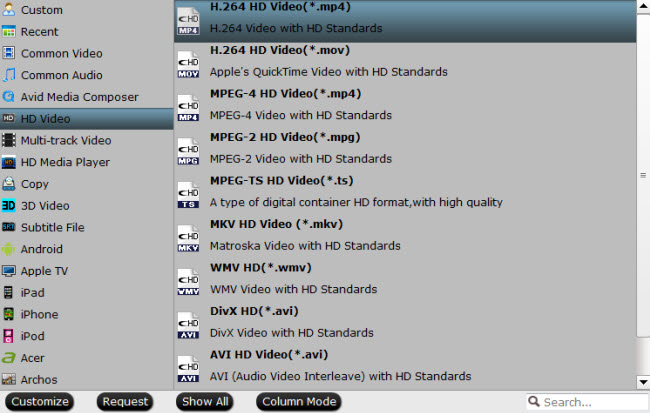 Tips:There are a lot of presets for a variety of devices and you can convert directly to a format that is the best fit for your specific device.Step 3: Trim and start conversionUnder "Trim"tab you are allowed to cut out unwanted part of selected clip. To trim the video, simply type in desired time value in "Start"and "End"box and click "Set"button. Or you can click left square bracket and right square bracket to set start and end time when playing the video.Then click the big red "Convert" to start converting Tivo files to mp4. After the Tivo to mp4 conversion, click "Open" to locate the converted video to your Samsung tablet and start enjoying the TV shows without ads.Read More:
Summary: As a smart video editor, GoPro Studio provide a simple way to edit GoPro, Canon and Nikon video, however, so many people are still confuses on how to get MOV footage export from GoPro Studio and then import to Premiere/Avid/FCP for further editing, here we give the solution, about the GoPro Studio itself and the best support video footage for GoPro Studio export MOV footage into Premiere/Avid/FCP.
 About GoPro Studio
Here I would like to show some more details on GoPro Studio, for the Canon, Nikon users, for whom interested in GoPro Studio.
GoPro Studio software makes it easier than ever to create professional-quality videos with your GoPro content. It would take taken your most popular videos and turned them into GoPro Edit Templates that help fast-track you to an incredible edit. The music, edit points, slow motion effects and more have been dialed—all you have to do is replace our video clips with yours. Or if you want to create your edits from scratch, you can do that too. Trim and mix clips. Adjust video playback speed for fast or slow motion. Add titles, music, audio tracks and more. It’s never been easier to make epic GoPro-style videos to share with your friends.
Exporting GoPro Cineform MOV files Premiere/Avid/FCP
Although powerful the GoPro Studio is, you have satisfied with the GoPro Studio, you would like to further edit the video clips in Premiere/Avid/FCP, now you just want to search for a professional video tool can help you import all the video exported from GoPro Studio into Premiere/Avid/FCP. We all know that every NLEs has the best compatible importing and editing format. For Avid, the best compatible format is DNxHD, if you want to edit the GoPro Studio exported MOV video in Avid smoothly, you just need to change the original video format into DNxHD. The same to FCP and Premiere, you need to change the original video format into Apple ProRes for FCP, or MPEG-2 for Premiere. Here you come to the right place, a professional video tools are recommended for you. Pavtube Video Converter for Mac(read the review), it can convert GoPro Studio exported MOV video into the right target format for each NLEs.
Hot Search: 4K Ultra HD with Premiere Pro CC | QuickTime Files to Avid | 4K Video with FCP X
In face, Pavtube Video Converter can convert almost all video and audio formats from one to another, including MOV, MP4, M4V, AVI, WMV, MKV, MPG, TiVo, MTS, M2TS, MXF, RM, RMVB, FLV, etc. With this Video Converter software, you can also enjoy your favorite video on almost all popular portable devices anywhere and anytime, like iPad, iPhone, iPod, Apple TV, Galaxy Tab, Samsung Galaxy S4, Kindle Fire, and more.
Exporting GoPro Cineform MOV files from GoPro Studio to Premiere/Avid/FCP
Step 1: Input video files.
From "File" drop-down menu, select "Add Video/Audio" to import files to the software for conversion.
Step 2: Select output file format.
Click "Format"bar, from its drop-down list, select "Final Cut Pro"> "Apple Prores 422(*.mov)"as your desired output file format.
Or from "Format" drop-down panel, select "Avid Media Composer" > "Avid DNxHD (*.mov)" as the output file format for editing with Avid editing programs.
Or click "Format" bar, from its drop-down list, select "Adobe Premiere Pro/Son..." > "MPEG-2 (*.mpg)" to output for editing with Premiere Pro CC.
Step 3: Transcode files to Premiere/Avid/FCP compatible format.
Carry out video to Premiere/Avid/FCP Conversion process by clicking the right-bottom "Convert" button.
When the conversion is over, click "Open" on the main interface to locate the converted files to transfer and import into the Premiere/Avid/FCP without any problem.
Related program:
Pavtube Media Magician / Mac Version: A nice camcorder assistant manager, lossless camcorder video joiner, MTS/ M2TS/ MXF/ MOV/ MKV/ TiVo/ WMV/ AVI/ MPG converter and editor. Meamwhile it supported upload edited video to YouTube directly.
Read More:
About GoPro Studio
Here I would like to show some more details on GoPro Studio, for the Canon, Nikon users, for whom interested in GoPro Studio.
GoPro Studio software makes it easier than ever to create professional-quality videos with your GoPro content. It would take taken your most popular videos and turned them into GoPro Edit Templates that help fast-track you to an incredible edit. The music, edit points, slow motion effects and more have been dialed—all you have to do is replace our video clips with yours. Or if you want to create your edits from scratch, you can do that too. Trim and mix clips. Adjust video playback speed for fast or slow motion. Add titles, music, audio tracks and more. It’s never been easier to make epic GoPro-style videos to share with your friends.
Exporting GoPro Cineform MOV files Premiere/Avid/FCP
Although powerful the GoPro Studio is, you have satisfied with the GoPro Studio, you would like to further edit the video clips in Premiere/Avid/FCP, now you just want to search for a professional video tool can help you import all the video exported from GoPro Studio into Premiere/Avid/FCP. We all know that every NLEs has the best compatible importing and editing format. For Avid, the best compatible format is DNxHD, if you want to edit the GoPro Studio exported MOV video in Avid smoothly, you just need to change the original video format into DNxHD. The same to FCP and Premiere, you need to change the original video format into Apple ProRes for FCP, or MPEG-2 for Premiere. Here you come to the right place, a professional video tools are recommended for you. Pavtube Video Converter for Mac(read the review), it can convert GoPro Studio exported MOV video into the right target format for each NLEs.
Hot Search: 4K Ultra HD with Premiere Pro CC | QuickTime Files to Avid | 4K Video with FCP X
In face, Pavtube Video Converter can convert almost all video and audio formats from one to another, including MOV, MP4, M4V, AVI, WMV, MKV, MPG, TiVo, MTS, M2TS, MXF, RM, RMVB, FLV, etc. With this Video Converter software, you can also enjoy your favorite video on almost all popular portable devices anywhere and anytime, like iPad, iPhone, iPod, Apple TV, Galaxy Tab, Samsung Galaxy S4, Kindle Fire, and more.
Exporting GoPro Cineform MOV files from GoPro Studio to Premiere/Avid/FCP
Step 1: Input video files.
From "File" drop-down menu, select "Add Video/Audio" to import files to the software for conversion.
Step 2: Select output file format.
Click "Format"bar, from its drop-down list, select "Final Cut Pro"> "Apple Prores 422(*.mov)"as your desired output file format.
Or from "Format" drop-down panel, select "Avid Media Composer" > "Avid DNxHD (*.mov)" as the output file format for editing with Avid editing programs.
Or click "Format" bar, from its drop-down list, select "Adobe Premiere Pro/Son..." > "MPEG-2 (*.mpg)" to output for editing with Premiere Pro CC.
Step 3: Transcode files to Premiere/Avid/FCP compatible format.
Carry out video to Premiere/Avid/FCP Conversion process by clicking the right-bottom "Convert" button.
When the conversion is over, click "Open" on the main interface to locate the converted files to transfer and import into the Premiere/Avid/FCP without any problem.
Related program:
Pavtube Media Magician / Mac Version: A nice camcorder assistant manager, lossless camcorder video joiner, MTS/ M2TS/ MXF/ MOV/ MKV/ TiVo/ WMV/ AVI/ MPG converter and editor. Meamwhile it supported upload edited video to YouTube directly.
Read More:
It didn’t take long for the newly formed HP Inc. to release its first product, the ZBook Studio, a feature-packed, 15.6-inch laptop with a 4K screen.The ZBook Studio is 18 millimeters thick and weighs 1.99 kilograms (4.6 pounds). It can be configured with Nvidia Quadro graphics cards, which are more for professional graphics and engineering applications.The laptop has up to 2TB storage capacity, but HP is selling a separate dock with a Thunderbolt 3 port, which will make it easy to add external storage drives.A 4K screen can be included in HP’s ZBook 15 and 17 laptops, which have 15.6-inch and 17.3-inch screens, respectively. The ZBook 15 has up to 3TB of storage, while the ZBook 17 offers up to 4TB of storage. For Sony Alpha 7S II users, it is can not be a better news for them to enjoy the the 4K video on the 4k display. However, the Alpha 7S II record video in XAVC-S MXF files, it can be play in some of the media player, some others may be import failed.It is essential for you to know the video format compatible with the device on which you want to play the recorded 4K XAVC-S MXF videos shot by Sony Alpha 7S II. Video formats for common devices are MP4, FLV, SWF, MOV, AVI, WMV, M4V, MPG and you can take advantage to rip 4K XAVC-S MXF recordings to MP4/FLV/SWF/MOV/AVI/WMV/M4V/MPG.Pavtube HD Video Converter / Mac Version will handle this work smoothly.How about XAVC-S MXF files to open them natively in NLE on HP 4K laptop?Since there are so many NLE in the market , let’s take this FCP for example. You may say that with the latest FCP, this MXF format can be supported without any rewrapping. But with this XAVC codec, it may still cause some problem when you import them into FCP. The best way to tackle this kind of problem is to find yourself a XAVC Converter and then convert to the native format like Appple ProRes HQ .See detailed workflow of this conversion below:
1.Load your Sony XAVC files:Download this Pavtube HD Video Converter for Mac and install it step by step. Then load your XAVC MXF files into this software by clicking “File”>”Add Video/Audio” or “Add from folder”. 2. Choose suitable ones individually for NELs:After importing them into this program, it’s time to select suitable output ones for different non-linear editing tools. Let me show you some examples below:a:Come to the output list, let’s choose the ‘Final Cut Pro’ to select the ‘Apple ProRes Codec 422(*.mov) as the best . Additionally, you can also choose several ProRes codec as your favorite.
 b: For Avid Media Composer: Drop down the output list, we suggest you to choose the ‘Avid Media Composer’>>’DNxHD mov’ as the best outputone.C: while for iMovie and FCE, here we have offered the ‘iMovie/Final Cut Express’>>’Apple InterMediate Codec (AIC) (*.mov)’ there. Do you wanna a try?Expand Knowledge:NLE is an acronym, it stands for non-linear editing system. This is a video or audio editing digital audio workstation system. No –linear editing is the most natural approach when all assets are available as files on video servers or hard disks. Rather than recordings on reels or tapes, while linear editing is what kind of system that need to sequentially view film or hear tape.Read More:
Summary: I have an Apple TV and I want to stream recorded Christmas videos into Apple TV 4- the new generation for playback but there seems to be some problem with it. Which is the best way?Apple TV 4--the new Apple TV is missing the thing important about the future of TV. Unlike other streaming boxes, from competitors like Amazon, Roku, and Nvidia, the new Apple TV, it can’t stream “ many camcorder video to it for playback. For you who have Apple TV 4, it is really a sad news.If you have searched the Apple TV official website, we will find that the biggest limitation of Apple TV is the lack of codec support (like Xvid, DivX, etc.) and not even having the ability to do basic surround sound like Dolby Digital 5.1. These issues were resolved almost immediately after the Apple TV was released, although the hacks were somewhat less than practical. Something as simple as getting your Apple TV to, say, sync and recognize your Christmas movie as playable was no simple feat.Apple TV is a hot media device for us watching movies. However, just like other Apple devices it can only supports stream the camcorder recorded XAVC/XAVC S, AVCHD, MP4, MOV, M4V videos. As you see, the most camcorder record format isn’t in the supported format list. If you wanna view camcorder recorded Christmas files on your Apple TV, the best solution is to encode/re-encode camcorder recorded Christmas files to Apple TV supported video format first.Hot Search: M3U8 to Apple TV | Tivo Recordings to Apple TV 4 | Best Video and Audio Format for Apple TVFirst of all, download and launch Pavtube Video Converter for Mac(read the review) which would do camcorder recorded Christmas files to ATV conversion which only a few clicks. Compared with others, we have found the Pavtube Video Converter has the strong ability of transcoding the camcorder recorded Christmas files well. This program offers quite effective solution for you to convert almost all thecamcorder recorded Christmas files as well as MKV, MOV, MTS, TiVo, VOB, etc. It also allows you to adjust the video, audio parameter to get a decent output video that you want. Barely several steps are enough. Just download it and follow the steps below to sync camcorder recorded Christmas files to Apple TV for playing smoothly. The equivalent Windows version is Pavtube Video Converter. Other Download:- Pavtube old official address: http://www.pavtube.com/video-converter-mac/- Amazon Store Download: http://www.amazon.com/Pavtube-Video-Converter-Mac-Download/dp/B00QIBK0TQ- Cnet Download: http://download.cnet.com/Pavtube-Video-Converter/3000-2194_4-76179460.htmlFollowing is the guide about how to convert camcorder recorded Christmas files to M4V for Apple TV:Here choose Mac version as example, Windows version has the same ability as Mac version. Please choose the right version for you.Step 1: Download and Install Video Converter. Select your movie. Click “Add Video” to import your camcorder recorded Christmas source files. Batch conversion is supported so that you can add multiple files. Step 2: Choose the output format. Click on Format > Apple TV. From the drop down menu, select the proper output format.a. For Apple TV 3 users, Apple TV 3 Dolby Digital Pass-through (*.m4v) is recommended.b. For Apple TV 2 users, please select the Apple TV 2 Dolby Digital Pass-through (*.m4v).c. For Apple TV users, Apple TV H.264 1280×720(*.m4v) will be better to keep the videos in HD.
 Step 3: Click the “Settings” icon and you will go into a new interface named “Profile Settings”. You can adjust codec, aspect ratio, bit rate, frame rate, sample rate and audio channel in the interface to optimize the output file quality.Find no 5.1 Surround Sound from Apple TV, here is the solution. Actually, Apple TV cannot support AC3 5.1 audio track. While, we usually have the demand to get the full AC3 5.1 surround sound to let Apple TV pass-through Dolby Digital to A/V receiver to take advantage of our surround sound system. This Apple TV Video Converter provides pre-set Apple TV profiles. The particular profiles are H.264 video files with AC3 5.1 pass through and AAC stereo. Both AC3 and AAC audio are retained so that you can either let Apple TV pass-through Dolby Digital to A/V receiver to take advantage of your surround sound system, or have Apple TV decodes AAC and exports stereo audio
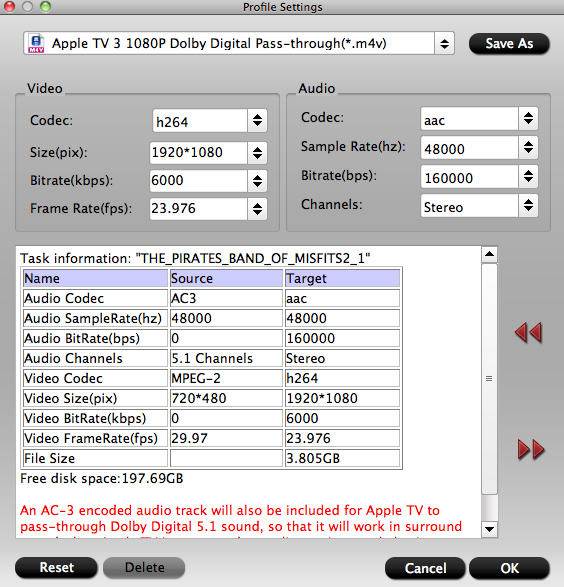 Step 4: After above settings, you can start the camcorder recorded Christmas files to Apple TV conversion. Once the process completes, locate the files and transfer and copy the converted .m4v videos to Apple TV. As you see, now you can effortlessly watch camcorder recorded Christmas files videos on Apple TV with the best quality. Besides camcorder recorded Christmas files, you can also rip Blu-ray/DVD or convert MKV and MTS to play on Apple TV.Read More:
Summary: Christmas is nearer and nearer, and you want to memory the moving part on your phone so that you can watch it any time when you missing a person at time. Here we show you how to memorize the moving video clips with your phone, especially transfer the camcorder video to your phone with high definition.Of course, the best and easiest way is to recording the Christmas video with your phone itself if your phone has a powerful digital camera such as iPhone 6s(plus) or Samsung Galaxy s6, and your phone has the enough storage to handle or keep the video.The second method is to transfer the camcorder recorded high definition video to your phone with playback smoothly. Here comes the question, not all the camcorder video codec are compatible with your phone and it always failed to transfer no matter how hard you try. In this case, you need to convert the camcorder video format such as XAVC/XAVC S, AVCHD, MXF,MOV, MTS,ect. to your phone, for example, the h.264 .mp4 for Samsung brand phones, the .mov format for Apple devices.Here the Pavtube Video Converter / Mac Version can make it easily. This program allows you to convert video types such as SD videos, HD footages from camcorders as well as TiVo/DVR recordings to almost any audio/video format for free entertainment on mobile devices, HD media players, as well as free access to video editing software. Steps of How to Convert Camcorder HD/4K video to Phones Step 1: Import Camcorder HD/4K video.Download and install the program on your computer. Get it running and click "File" > "Add Video/Audio" or "Add from folder" to import Camcorder HD/4K video files to the program.
 Step 2: Choose output file format.Click the format bar to follow “HD Video” > “H.264 HD Video (*.mp4)” or “MPEG-2 HD Video (*.mpg)”, or “MKV HD Video (*.mkv)”, or “WMV HD (*.wmv)” or “DivX HD (*.avi).” Or you can choose the format depends on your devices from the Android, Apple devices and other brand devices.
 Step 3. Adjust settings before converting.Click “Settings” near the format bar to go to “Profile Settings” interface where you’re allowed to change parameters like bitrate, frame rate, sample rate, and audio channels according to your requirements.
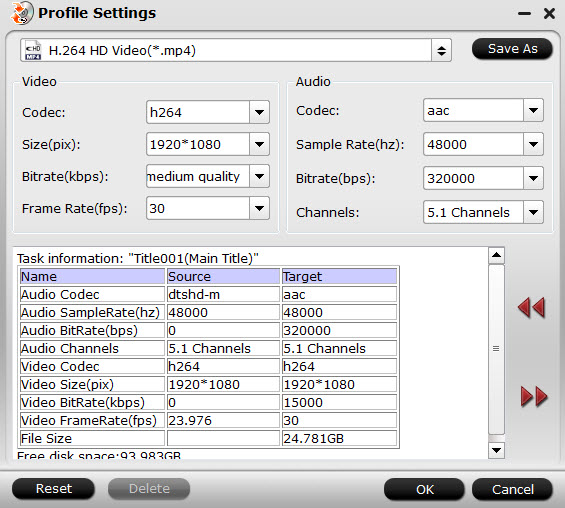 Step 4: Start Camcorder HD/4K video conversion process.Hit right-bottom "Convert" button to start to convert Camcorder HD/4K video phones supported format conversion process. When the conversion is completed, you can transfer the converted purchased or downloaded top Christmas movie to the portable device via USB or add the converted files to iTunes library, then sync files from iTunes to Apple Devices. Read More:
Summary: Christmas is coming, do you still worry about to choose a good present for her, here we give the gift for you to enjoy her.If you want to be a good (or better) influence in her life, I would recommend taking her on outings with you-- day trips to a library, a zoo (as mentioned), an activity centre (like the YMCA for example-- you could attend a class, go for a swim), and lastly a department store, to get an idea of what she likes and has interest in, as well as provide exposure to more things/people/ideas she could develop an interest in. You will get a better idea of what she wants for Christmas by asking her directly (and whether or not you decide to buy it for her will be up to you-- it may or may not be within your budget or appropriate-- that's a call only you can make), but you will get more clues about what she likes by going on these outings with her, and they will enhance both of your lives.I'd take a new look at her interests instead of dismissing them. For example:Someone who likes watching TV might have a desire and a talent for the performing arts. Maybe she could look into taking acting or singing or dancing lessons, and get involved in theatre productions. She could BE in shows instead of watching them. Learning how to get up in front of people and perform is a skill that translates into other fields as well. There are also other career avenues in the performing arts that are not performance related as well she could look at: cameraman, director, producer, sound production, makeup, etc.Depending on your budget, you could ask her what she would like to do together, encourage her to try doing something new, as your Christmas gift to her. Now that she was interested in movies and TV, why not give her a gift enable she can be watch the TV shows and movies in any time and anywhere?Here Pavtube give the special offer in the Christmas promotion, we pick Pavtube Video Converter / Mac Version as example, it is an easy-to use, functional video converter and video editor, enables you convert multiple audio and video sources to the desired audio/video format. This program allows you to convert video types such as SD videos, HD footages from camcorders and TiVo/DVR recordings to almost any audio/video format for free entertainment on mobile devices, HD media players, as well as free access to video editing software. You can also realize her movie director dream with the built-in video editor. Make personal video by trimming, cropping, adding text/image/video images, inserting SRT/ASS/SSA subtitle into source video, etc.Don’t hesitate to get it as the Christmas gift for her, once you purchase you will get upgrades free for lifetime. The only thing you should remember is choose the right version from Windows version or Mac version. If it is not the one you like please click and go to Pavtube Studio or the recommend list below to choose the one you want.Pavtube HD Video Converter / Mac Version: It is designed for converting HD videos from HD camcorders or DVs (like JVC, Panasonic, Sony and Cannon), non-protected HD or movies, DVR files (*.tivo) to other file types for playback on popular media devices like Apple TV, PS3, Xobx, Xobx360, WD TV HD Player.Pavtube Video Converter Ultimate /iMedia Converter(Mac Version): An all-inclusive converter to complete 2D/3D Blu-ray, DVD, ISO, SD/HD/4K Video to m3u8, H.265 MP4, do H.265 to non-H.265 conversion on Mac OS X El Capitan.Pavtube MXF Converter / Mac Version: can handle MXF/MXF footage produced by Canon, Sony and Panasonic camcorders and convert MXF video files to various video format supported by popular devices such as iPad Air/4/3, iPhone 5S/5C/5/4S/4, Apple TV 3, Google Nexus, Samsung Galaxy Tab S/3/2, Samsung Galaxy S5/S4/S3, Surface RT/Pro, PS4/PS3, WDTV, etc.Pavtube MTS/M2TS Converter / Mac Version:The best MTS converter on the market, which can convert MTS videos and other HD formats to FCP X Apple ProRes codec MOV format, or convert MTS to Avid Media Composer/Adobe Premiere Pro/iMovie native supported video format.Pavtube Media Magician / Mac Version: A nice camcorder assistant manager, lossless camcorder video joiner, MTS/ M2TS/ MXF/ MOV/ MKV/ TiVo/ WMV/ AVI/ MPG converter and editor. Meamwhile it supported upload edited video to YouTube directly.