Showing posts with label Android. Show all posts

Monday, April 21, 2014

Converting MKV, AVI, VOB, Tivo, M2TS, WMV, MPG, WebM, MVI, FLV to Android Tablet & Smartphone on Windows 8.1/8

Is it possible to transfer all kinds of Videos (MKV, AVI, VOB, Tivo, M2TS, WMV, MPG, WebM, MVI, FLV) to Android devices for viewing on the go? Get the best movie converter to convert these video files to Android Tablet & Smartphone on Windows 8.1/8 easily.

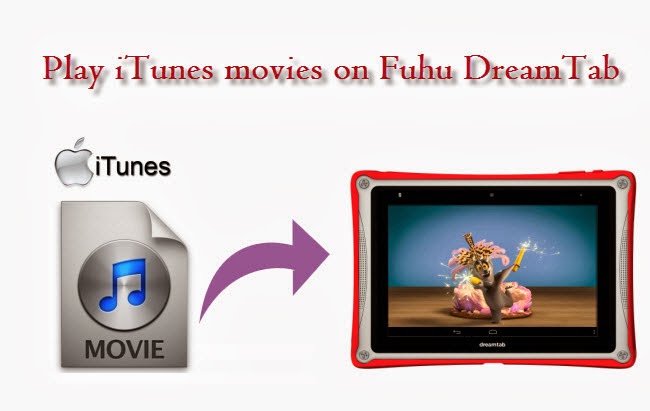
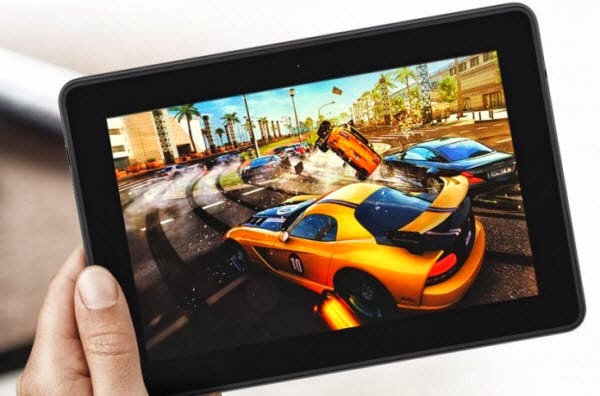
Android devcies are widely used around the world. World famous Manufacturers produced their own android tablets or smartphones. Such as Samsung, Asus, Acer, HTC, Amazon, Barnes & Noble… Thousands of applications and the user-friendly interface make Android became the most popular OS on portable device.


If you are a movie lover, and downloaded videos in MKV, AVI, VOB, Tivo, M2TS, WMV, MPG, WebM, MVI, FLV, you may want to transfer them to your Android smartphone or tablet. With all these videos on your portable Android device, you will be entertained for many hours. And the following article will give you a perfect solution to view our favorite MKV, AVI, VOB, Tivo, M2TS, WMV, MPG, WebM, MVI, FLV movies on android tablet or smartphone on Windows 8.1/8.

At first, a movie converter is needed to help you converting videos to Android supported format in a simplest way. After searching, I find more than one people suggest to rip Pavtube HD Video Converter. The lastest updated version can support new released BD and DVD and fixed some known bugs. To satisfy all users, the remarkable breakthrough is now it gives windows install package with digital signature. It is an all-in-one ideal app to help you to convert Blu-ray, DVD, and HD videos to almost any other common video format such as VOB, FLV, WMV, AVI, MKV or backup the BD, DVD keeping the whole movie structure as you need. With it, you can enjoy 2D/3D Blu-ray/DVD and HD videos on Android devices, like Galaxy NotePro, Galaxy TabPro, Kindle Fire HDX, Nabi 2, DreamTab, Xperia Z2Galaxy S5, etc.

The Mac version is HD Video Converter for Mac.

Now just download it and follow the tutorial below.

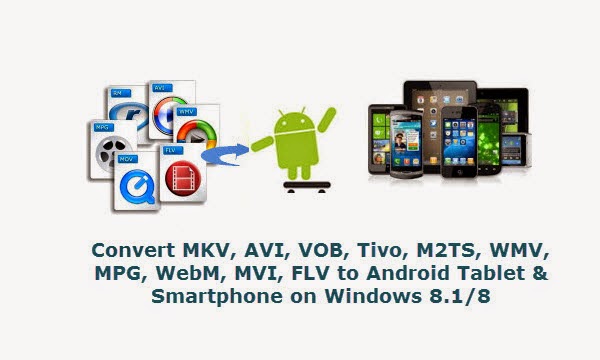
Convert MKV, AVI, VOB, Tivo, M2TS, WMV, MPG, WebM, MVI, FLV for playing on Android Devices on Windows 8.1/8

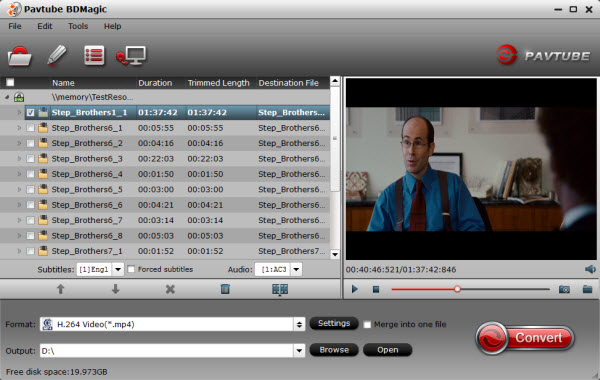
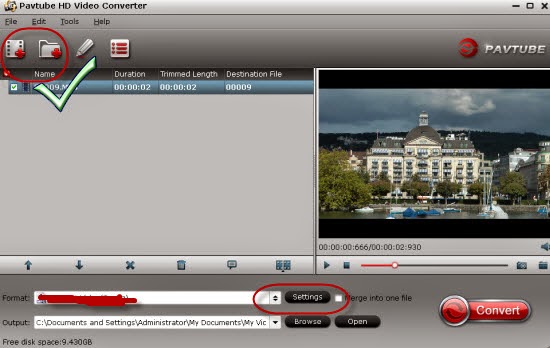
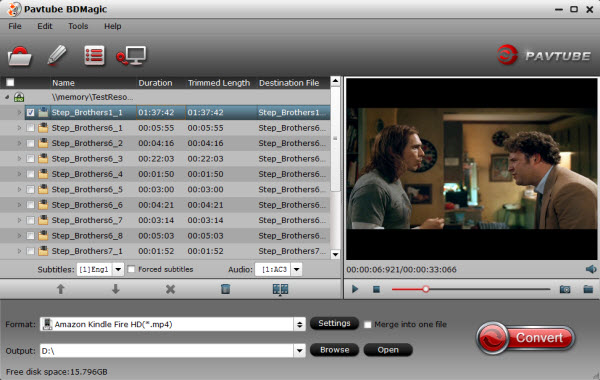
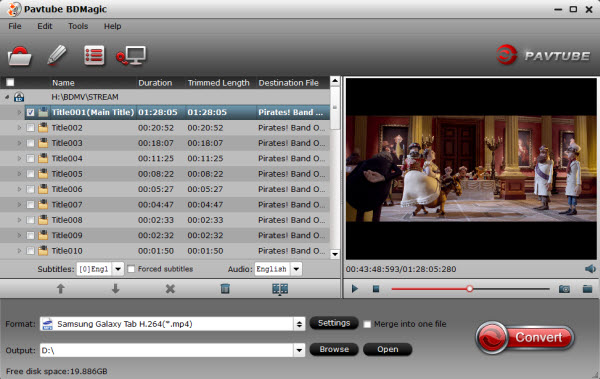
1. Click the "Add video" icon to import all kinds of movie files correspondingly.


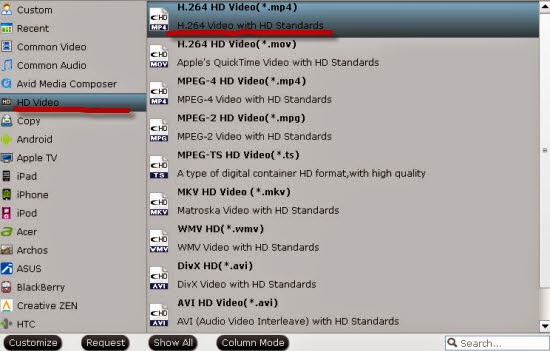
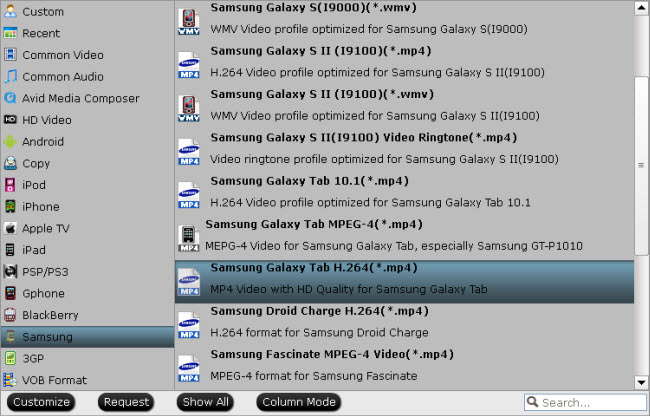
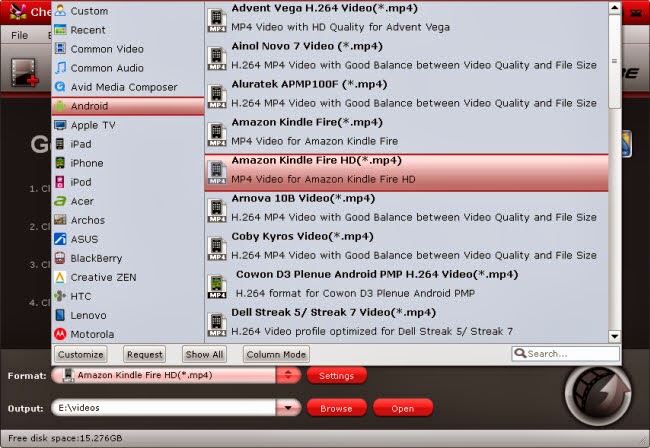
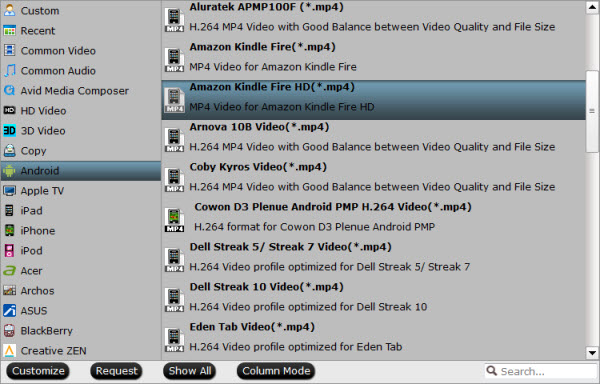
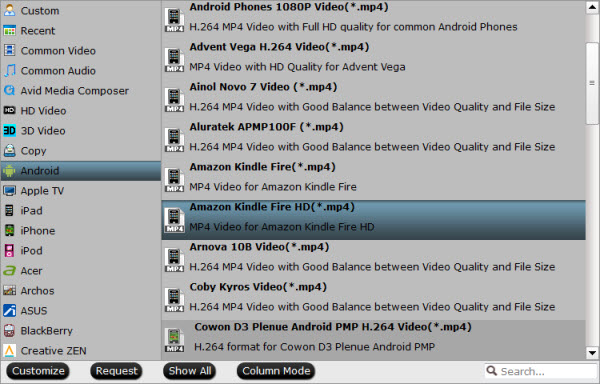
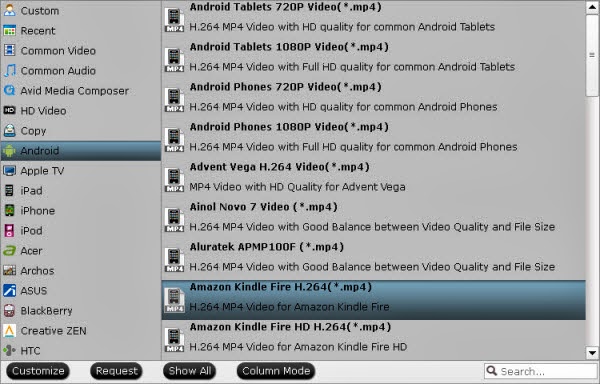
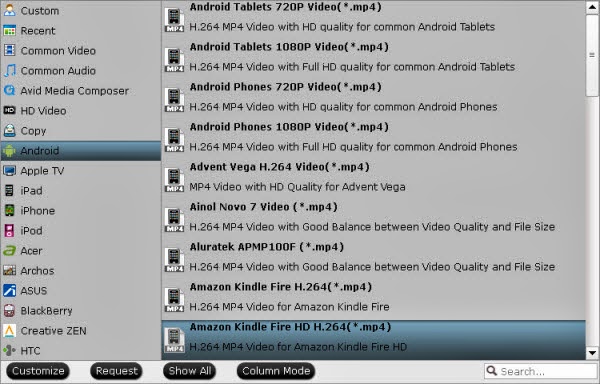
2. Click the drop-down list on the bottom; choose proper presets according to your device model. You can see columns for normal Android devices from Android catalogue, or you can use the small search box to locate your device quickly.

And basically the “H.264 Video(*.mp4)” is a universal format for your Android device.


3. Check the pencil-like icon to activate the editing function. Here you can trim video for your needed length, crop video to get rid of annoying black edges, join multiple video clips into one, add text/image watermark and add subtitles. For example, if the original movie has no subtitle or the subtitles you need, you can download it from website and then add the subtitles into the output videos for full enjoyment with this software.

Notice the small triangles under the progress bar? Click them to adjust frame by frame easily.

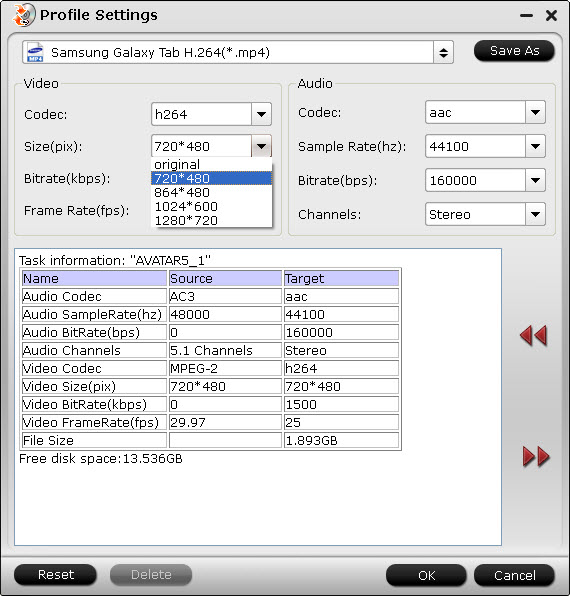
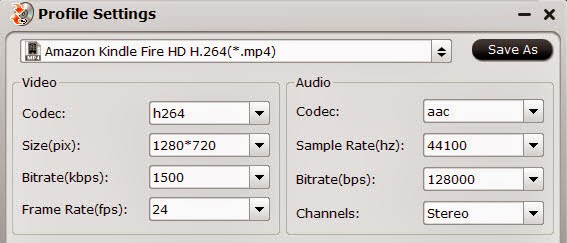
4. Click on "Settings" to modify the video size (resolution) as 1280*720. For watching videos on a tablet or smartphone running Android, 720p with 2000~2500kbps is just all right. Overall, the same bitrate in 1080p and 720p is almost the same.

Pls notes that the video quality improved with the bitrate, but not the higher the better. You need to consider your device configuration as the high bitrate required higher read&write speed.

4. Ok now click the “Convert” button to start converting/downsize 1080p to 720p for playing on Android device on Windows 8.1/8. It supports batch conversion, you can import and transcode multiple 1080p files at one time.

After conversion, click “Open” to locate the converted video directly. Transfer the result video file to your Android device. Now, you can watch  MKV, AVI, VOB, Tivo, M2TS, WMV, MPG, WebM, MVI, FLV videos on Android Tablet & Smartphone smoothly.

Don’t know how to transfer videos from PC/Mac to Android device? You can view the posts below:

How to transfer videos from PC to Android Phone/Tablet?

More tips:


Sunday, March 9, 2014

Apple and iOS Continue to Make Small Gains in U.S. Smartphone Market Share

Apple retained its crown as the number one handset manufacturer among consumers in the U.S., while Google's Android operating system remained the number one platform, according to comScore's latest MobiLens and Mobile Metrix reports. These figures measure smartphone ownership and cover the three months ending January 2014. 


Apple beat out rival Samsung with 41.6 percent market share as compared to Samsung's 26.7 percent. When comparing changes over the measured periods, Apple, Samsung and LG made small gains, while Motorola and HTC fell. Apple's market share continues to grow, but its rate of adoption is slowing. 

Apple may be the top handset maker, but iOS is outnumbered by the volume of Android phones on the market. Apple's iOS platform was number two with 41.6 percent of the smartphone market, while Google's Android OS was number one with 51.7 percent market share in the recently ended period. 


iOS was only the platform to gain ground in the three-month period, inching up from 40.6 percent in the period ending October 2013 to 41.6 percent in the most recent period. Android and BlackBerry lost ground, with each platform dropping 0.5 percentage points. 

comScore measures both ownership and usage across a customer's primary smartphone and tablet. It uses an intelligent online survey as well as both panel and census-based measurement methods to compile its data.

From: macrumors.com

Monday, March 3, 2014

Download Disney animated movies from iTunes library to Fuhu DreamTab

Description: Step by step directions of putting iTunes downloaded video on Fuhu DreamTab with detailed steps, so that your kids watch iTunes videos on Fuhu DreamTab freely.

"Hi I want to get a kid's tablet for my son on his birthday, more likely the coming Fuhu DreamTab. Can I download Disney animated movies on it directly? If not, how do I put purchased iTunes movie (under our home-share Apple ID) to it?"


Since Fuhu introduces its DreamTab for kids on CES 2014 last month, this 8-inch Android-based tablet has raised much concern for it's collaborated with DreamWorks. A great choice for your kids, as they can watch many animated movies like Kung Fu Panda, Monsters vs. Aliens, Shrek, Frozen, Planes, etc. on their own.

However, it's impossible if you want to stream iTunes downloaded movies to Fuhu DreamTab directly, because iTunes videos are protected by DRM that will not allow you to playback on out of IOS devices without an Apple ID.


But no biggie, I've got a simple workflow to help you roll off the DRM and transfer it to most compatible video format for your Fuhu DreamTab.

Basically, we need to get this Pavtube DRM Removal - a software can help you accomplish both the steps above in one go. Now Pavtube studio provides free trial without time limit; get one and let's start.

Tips:

The mac version is available here: Pavtube DRM Removal for Mac. (Not compatible with Mac 10.8/10.9 and iTunes 11 on Mac)

How to put iTunes downloaded movies on Fuhu Dream Tab

Install this program on your computer firstly; note to shut down your iTunes firstly.

Step 1. Import DRM files

Download your wanted movies from iTunes Store; click top left two plus icons to import them one by one or from the entire folder.


Step 2. Choose format

Click the Format drop-down list and choose Common Video > H.264 Video (*.mp4) as the most compatible with Fuhu DreamTab.


Step 3. Adjust settings (Optional)

If you want to turn up/down file size, bitrate, frame rate and other settings, click "Settings" besides "Format" to enter the profile settings windows.

You can also check both source and target video & audio specs there.

Step 4. Convert

Back to main interface, hit "Convert" to start converting iTunes movies to MP4 format. It will launch your iTunes automatically and start conversion simultaneously. After it completed, click "Open" to quick find the converted files.

Relates articles:

Get 1080p Blu-ray movies onto Nabi 2 for children
Sync iTunes movies and TV shows to nabi 2 tablet
Watch HD videos, DVD and Blu-ray movies on Fuhu DreamTab
Convert DRM protected iTunes and Amazon Instant Video to VTech InnoTab 3S

Friday, November 8, 2013

Download/Put DVD movies onto Galaxy Tab Pro, Galaxy Tab 4/3, Galaxy Tab series

The article shows you the easiest way to convert DVDs to Galaxy Tab Pro/4/3 and other Galaxy series highly supported video formats on Windows and Mac so that you can watch DVD movies on Galaxy Tablets anywhere.

Samsung Galaxy Tab, understandable literally, refers to Tablet computer produced by Samsung Electronics. It also adopts Android OS. Being a 'lean-back entertainment' tab, it supports 1080p HD video while being equipped with 3-Mp rear camera and a 2-Mp front camera.The versions are 7.7, 8.9 and 10.1 generally. Specifically, Galaxy Tab is endowed with HD display with a dual-core Nvidia Tegra 2 SoC, Android 3.1, and Music Hub.


Undoubtedly, Samsung Galaxy Tab gives users outstanding audiovisual enjoyment with amazing configuration and convenient use. Anyway, it will be an amazing experience for multimedia lover to watch movies better on their new Galaxy Tab Pro, Galaxy Tab 4/3, Galaxy Tab series, with perfect visual effect.

However, the gadget does not have a built-in DVD-ROM or DVD player. If you want to watch DVD movies on Galaxy Tab Pro, Galaxy Tab 4/3, Galaxy Tab series, you may feel frustrated. That's why many people are seaking for ways to watch DVD movies on it.

In fact, it's easy to transfer DVD videos onto Galaxy Tab Pro, Galaxy Tab 4/3, Galaxy Tab series as long as you got a DVD Ripper in hand. This article will tell you how to convert DVD to Samsung Galaxy Tab supported video formats so that you can enjoy your favorite DVD movies on the go.

At first, you need to use a 3rd party tool to rip and rip DVD movies to Galaxy Tab compatible formats such as mp4. DVD Ripping Software varies. You may confused about choosing a most suitable tool. If so, i recommend you try Pavtube DVDAid (Read review). It is easy to use for editing and conversion and makes great quality copies of my DVDs. What’s more, you do not need to worry about the ripping and converting speed. It is excellent for it and it supports CUDA acceleration technology, which will provide you 6 x faster speeds.

Go to get it and freely enjoy your favorite DVD movies on Galaxy Tab 3, Galaxy Tab 2, Galaxy Tab series


How to convert DVD movies to Galaxy Tab Pro, Galaxy Tab 4/3, Galaxy Tab series?

Firstly get your DVD in your DVD drive and then launch the software to get things ready.

1. Load DVD (ISO/IFO image file) to Pavtube DVD to Galaxy Tab Ripper.

Click “Import DVD” button on the top left to load the DVD from DVD-ROM, you can also “Load ISO/IFO” or “Load from folder”. It will only take few seconds for ripping and importing DVD and you will be kept informed of timely state with a progress dialogue box.

When it has been imported successfully, you can preview the whole movie and select the subtitle and audio you want.


2. Choose Galaxy Tab friendly format.

Click “Format” menu to find the “Samsung” option in the dropdown list, choose “Samsung Galaxy Tab 3 Video (*.mp4)” for output. It is the most compatible format, which is especially made for Galaxy Tab 3. You can also choose other presets for you Galaxy Tab 2 and Galaxy Tab series.


Besides, click “Settings” button on the interface, you will be able to check and adjust the video and audio parameters like bitrate, size, channels, etc. Just do it when you need.


3. Convert DVD movies to Galaxy Tab MP4.

You can “Browse” your computer to choose a new folder for output file before conversion. When everything is ready, click “Convert” button to start converting DVDs to MP4 for Galaxy Tab Pro, Galaxy Tab 4/3, Galaxy Tab series, then “Open” button will show you the location of output files for video transferring.

Pavtube DVDAid More Features:
  • Edit the videos before conversion, such as trim, crop, add subtitles, video effect, etc.
  • Convert DVD to many other mobile devices and editing software like iPad Air 2, iPad Mini 3, ATV 3, Nexus 6/9, Galaxy Tab Pro, S6, S6 Edge, Note 4, Note Pro, Sony Vegas and more.
  • Add srt, ass, ssa subtitles to your movies.
  • Backup DVD main movie to VOB format with original quality.
Now you can watch DVD movies on Galaxy Tab Pro, Galaxy Tab 4/3, Galaxy Tab series anytime and anywhere. Hope it will help you.

Related Articles:

Monday, October 28, 2013

DVD to Kindle Fire HDX-Rip and copy DVD to Kindle Fire HDX 7/8.9

How to rip and copy DVD to Kindle Fire HDX? Get the best DVD to Kindle Fire HDX ripper here to convert DVD disc, DVD ISO/IFO file to Kindle Fire HDX 7/8.9 for watching.

The newest Kindle Fire HDX range from Amazon and the new iPad Mini and iPad Air tablets from Apple are bound to be two of the most popular electronic devices of 2013/2014. With every new generation, the technology gap between them seems to get narrower and narrower making it harder and harder for the consumer to choose between the two. Is Amazon’s Kindle Fire HDX the better tablet or is Apple’s iPad Mini with Retina display/iPad Air the better of the two? You can read Amazon Kindle Fire HDX vs iPad Mini comparison from TabletXRay.com.


The large screen and superb resolution of the two HDX tablets make it ideal to watch videos, movies and other HD contents on them. With the much thinner and lighter tablets on hand, we can download and watch 1080p high definition videos freely on the 8.9" and 7" tablets.

However, if you are a DVD video lover and also want to view DVD movies on Kindle Fire HDX on the go, you may find a drawback of Kindle Fire HDX is that it can’t support DVD files play on it. To easily copy or put DVD video onto Kindle Fire HDX for watching, the first step is to convert DVDs to Kindle Fire HDX compatible video like H.264/MPEG-4 MP4.

In order to achieve it, you need a professional DVD Ripper software. The highly recommended one is Pavtube DVDAid-a professional DVD Converting program to help you easily remove commercial DVD protection and transfer the movie to MP4 with best settings for Kindle Fire HDX 7/8.9.

Tips:
1. If you are Mac users, get the Mac version here: DVD to Kindle Fire HDX Converter for Mac;

2. If you want to convert Blu-ray/DVD to multi-track MP4 and get multiple audio tracks and multi subtitles in the converted video, try this Pavtube ByteCopy, which also provides 3D video in MKV/MP4/MOV/WMV/AVI  format for output (Side-by-Side, Top-Bottom, or Anaglyph 3D three options).

System Requirements:

Windows:

Operating System: Windows XP/2003/Vista/Windows 7/Windows 8/Windows 8.1

DirectX Version: 9.0 or above
Memory: 64MB at least
Processor: 500MHz Intel or 500MHz AMD CPU
Hard Disc Space: 512MB or above
Optical Drive: DVD-ROM

Mac:

Operating System: Mac OS X Leopard (10.5), Snow Leopard (10.6), Lion (10.7), Mountain Lion (10.8), Mavericks (10.9)

Memory: 512 MB physical RAM (memory) or more.
Display: 1024*768 or higher resolution display.
Optical Drive: DVD-ROM

How to Convert DVD to Amazon Kindle Fire HDX 7/8.9

Step 1. Run this 30% off DVD to Kindle Fire HDX Converter; load DVD disc.

You can click the top left icon to load DVD from ROM, DVD IFO/ISO or DVD folder. Or you can simply drag and drop to the main interface.


Step 2. Choose Kindle Fire HDX MP4.

Click the Format drop-down list, choose "Android>Amazon Kindle Fire HD(*.mp4)" which works well for Kindle Fire HDX. Or you can submit "kindle" in search box at the bottom right corner to quick locate this preset.


Step 3. Customize video specs (Optional).

Your can click "Settings" to free change video size, bitrate, frame rate and others. If you own a 16GB version and do not want to keep videos in large size, you can lower the bitrate settings to get smaller files.

Step 4. Start Conversion.

Now hit the big red "Convert" to start converting DVD to MP4 for Kindle Fire HDX. After conversion, you can click "Open output folder" to quick locate the converted video.

See Also:


Sunday, October 27, 2013

Backup Blu-ray/DVD to external hard drive and watch on Lumia 920

This is a thorough hands-on review on the best Blu-ray Ripper of how to backup Blu-ray/DVD to external hard drive, or watch on Nokia Lumia 920 with 30% off.

Q: “Hi, I have a large collection of Blu-rays and DVDs, but need to back up all of them incase of fire/flood and prevent damage from my two kids. I was wondering whether there is a program could allow me do this? I’d prefer keeping them on hard drive; and it would be great if I can still watch them on Lumia 920 on board. Any insights?”

I’d love to share my experience with you guys. Last year, I was also looking for best Blu-ray backup workflow (painful) for quite a while until I met this Best Blu-ray Ripper. Surprisingly we found it's on 30% off; are you still waiting? Free download it and have a try!

According to its official website, this Blu-ray Ripper is designed as a professional Blu-ray/DVD converting program which works with 1:1 backup solution and convert Blu-ray/DVD to MKV/MP4/MOV/M4V/MPG/FLV/AVI/WMV, etc. Well I haven’t got the chance to try every profile, but it’s really the best Blu-ray/DVD backup tool I’ve met ever; I mean it’s ease of use, not fuss and simple to follow. This best Blu-ray Ripper can rolls off Blu-ray/DVD disc protection, supports loseless 1:1 Blu-ray backup and keeps all the disc titles and chapter structure perfectly.

Don’t you like to have a try?

They provide free trial (no time limitation) before purchase; and you can reach the Mac version here (Also 30% off now).

How to backup Blu-ray/DVD with best video quality


Step 1. Run Best Blu-ray Ripper and import disc.

Click this icon to load disc from ROM, IFO/ISO or folder. I also noticed if you have a ISO file to import, it will recognize the ISO file automatically with no need to run virtual driver and mount ISO files firstly. Good design.


Step 2. Choose format.

Click “Format” drop-down list and choose proper format for different using.

For instance, if you simply want to back up Blu-ray/DVD to external hard drive, here are two solutions:

1. Click the “computer” icon on the top to output 1:1 Blu-ray/DVD file exactly the same as original.

2. select “Copy>Directly Copy” in format list to output an intact m2ts file of the main title.


For people who want to watch Blu-ray/DVD on Nokia Lumia 920, you can choose “Nokia>Nokia Lumia 900 MPEG-4 Video (*.mp4)”, it’s well compatible with Lumia 900 series including Lumia 920.


Step 3. Change video specs. (Optional)
If you are not satisfied with default specs, then click “Settings” to enter Profiles Settings windows. You can customize video frame rate, bitrate, size and other settings freely.
(It does not work for directly copy)

Step 4. Start conversion.

Click the big red “Convert” to start backing up or converting your Blu-ray/DVDs. Usually backup will be quicker because it does not need to do trancoding.
After the conversion, click “Open output folder” to quick locate converted files. Connect your hard drive to computer and transfer them into it.


How to transfer videos to Nokia Lumia 920 phone:

Use a USB cable to sync music and videos between your phone and computer.
1. Connect your phone to a compatible computer with a USB cable.
2. Open your computer file manager, such as Windows Explorer or Finder, drag and drop your songs and videos to your phone.

See also:

Wednesday, October 23, 2013

How to transfer movies from iTunes to Kindle Fire HDX 7?

Description: In this article you would learn how to legally free iTunes videos from DRM protection and record your iTunes video to Kindle Fire HDX 7 for playing with high quality.

Spending the weekend with Amazon’s Kindle Fire HDX 7-inch tablet, it’s easy to see why Amazon has built a commanding lead in the Android tablet space. The Kindle Fire HDX 7-inch (which has a companion 8.9-inch version in the wings), is, for now, the reigning champ in power, performance and screen resolution. Yes, it only matches the Google Nexus 7 in pixels per inch, but no other consumer tablet offers the same mobile CPU: Amazon's tablet also has 2GB of RAM, double the 1GB found in the Nexus 7 and roughly quadruple the memory reportedly found in the iPad Mini.

Meanwhile, in a day of normal use that included reading, shopping, watching video, browsing the web, drawing, playing a console-level game, taking and editing photos, the Kindle Fire HDX 7-inch’s battery lasted throughout the day and night.


And one of the most significant updates to Amazon's ecosystem is the ability to download selected Prime instant videos to your device. I’m happy to report that you can download the videos and, instead of waiting for the download to complete, you can start watching them almost immediately. But when turns to video downloaded from iTunes store, you will find it is not so easy to transfer iTunes movies to Kindle Fire HDX 7 and other android devices as iTunes movies are all protected by DRM (Digital Rights Management). To get iTunes movies playback on Kindle Fire HDX 7, you need to remove DRM protection from iTunes m4v movies in advance, and then you can play them freely.

How to enable iTunes video/music DRM-free for Kindle Fire HDX 7?

Step 1: Install the DRM Removal program – Pavtube ChewTune or Pavtube ChewTune for Mac.

(Money-saving Tips:)

ChewTune ($29) + Blu-ray Video Converter Ultimate($65) = Only $75, Save $19
ChewTune for Mac($29) + iMedia Converter for Mac($65) = Only $75, Save $19
ChewTune($29) + ByteCopy($42) = Only $54, Save $17
ChewTune for Mac($29) + ByteCopy for Mac($42) = Only $54, Save $17

Pavtube ChewTune is developed as a professional DRM Removal tool and DRM Video Recorder to help users legally strip off DRM protection from iTunes M4V movies, Amazon Instant Videos and Digital Copy so that you are able to watch almost all DRM movies on multiple smartphones and tablets anywhere you like.


Step 2: Start the Top DRM removal software, hit the "Add video" button and browser the source iTunes videos location for loading.


Note: If you are running a trial version of Pavtube DRM Removal Tool, make sure you have turned off iTunes before running this app to ensure its stability.

Step 3. From the "Format" drop-down list, choose suitable profile for Kindle Fire HDX 7. Here I suggest you choose "Common Video -> H.264 Video (*.mp4)" as output format.


Optional - If you like, you could adjust profile settings including video codec, bitrate, frame rate, etc to get better video and audio quality for watching iTunes m4v movies on Kindle Fire HDX 7.

Step 4. Hit the "Convert" button to start recording iTunes movies. After it finishes, click the "Open" icon to locate the recorded iTunes movie, and you are ready to transfer it to your Kindle Fire HDX 7, it's very eary.

Tip 1: Because of 1:1 video recording, it takes as long as the source movie length to finish the whole ChewTune DRM-free process, so if your source iTunes movies is about 1 hour, ChewTune needs more than 1 hour to complete the iTunes to Kindle Fire HDX 7. So if you wanna get a test before fully purchasing, it's better to select a small sample video for testing.

Tip 2: Since Pavtube ChewTune supports batch processing facility, you could import more than one DRM videos and run overnight, and you would get all videos recorded the next morning. Don't forget to set up Windows power options to never turn off monitor or never let the computer system standby.

Related Articles:

Can't figure out how to view TiVo shows on Kindle Fire HDX 7/8.9?
Put and play new released Blu-ray/DVD movies on Kindle Fire HDX 7
Watch MKV, AVI, VOB, WMV, MPG, FLV, F4V on Kindle Fire HDX 7
Copy iTunes video to Kindle Fire HDX 7/8.9 for playback

Tuesday, October 22, 2013

How to play MKV, AVI, VOB, Tivo, WMV, MPG, FLV, F4V on Kindle Fire HDX 7

Description: The best and easiest Windows/Mac solution to play MKV, AVI, VOB, Tivo, WMV, MPG, FLV, F4V, etc. on Amazon Kindle Fire HDX 7-inch.

“Hi, I just ordered a Kindle Fire HDX 7-inch on Amazon; couldn’t be more excited for waiting it delivered LOL! But here is a question: I read that its supported video formats are very limited; can I still watch youtube videos on it?”

Amazon just released a new 7-inch tablet – Kindle Fire HDX 7. The new HDX tablets—the third generation of the Kindle Fire brand—carrying amazing display - 1,280 x 800 at 216 pixels per inch to 1,920 x 1,200 at 323 ppi, matching the Nexus 7's display pixel for pixel and leaving the iPad mini's 1,024 x 768, 163-ppi screen in the dust.


Similar to its ancestor Kindle Fire HD, the new HDX could only support very limited video formats which make playing videos painful; moreover, 16GB is fast becoming too small for storing HD content. So whether we can watch MKV/AVI/VOB/Tivo/WMV/MPG/FLV/F4V on Kindle Fire HDX 7?

The answer is YES!

All you need to do is to convert MKV/AVI/VOB/Tivo/WMV/MPG/FLV/F4V videos to Kindle Fire HDX 7 most compatible format – Xvid MP4.

To accomplish this goal, you are highly suggested to try this Video to Kindle Fire HDX Converter, a professional tool to help you quick convert various video formats to Kindle Fire HDX’s Xvid MP4 format with best video quality and simplest workflow.

FYI: You can reach the Mac version here: Video to Kindle Fire HDX Converter for Mac.
Good News! Pavtube Release a New Site - pavtube.com with Product Migration and Name Change.

To thanks for your continued support all along our previous site and the new www.multipelife.com, we are holding a 'New Site Special' with fantastic discounts up to 40% off. You can get 20% off BDMagic, 30% off ByteCopy, 40% off DVDAid and 20% off Video Converter Ultimate on Windows/Mac platform:

https://www.facebook.com/pavtubefans/app_209569249055691

Read more: http://pc-mac-compatibility-issues.blogspot.com/2014/05/pavtube-new-site-release.html
Tutorial: How to transfer MKV/AVI/VOB/Tivo/WMV/MPG/FLV/F4V to Kindle Fire HDX 7

Step 1. Run this Kindle Video Converter Ultimate; add videos.

You can click the top left two icons to choose import individual videos or the entire folder. Drag-and-drop is also supported


Step 2. Choose Kindle Fire HDX MP4.

Click the Format drop-down list, choose “Android>Amazon Kindle Fire HD(*.mp4)” which works well for Kindle Fire HDX 7-inch. Or you can submit “kindle” in search box at the bottom right corner.


Step 3. Customize video specs (Optional).

Your can click “Settings” to free change video size, bitrate, frame rate and others. If you own a 16GB tablet and do not want to keep videos in large size, you can lower the bitrate settings to get video in proper size.

Step 4. Start Conversion.
Now hit the big red “Convert” to start converting MKV/AVI/VOB/Tivo/WMV/MPG/FLV/F4V to Xvid MP4 for Kindle Fire HDX 7. After conversion, you can click “Open output folder” to quick locate the converted video.

More:


Sunday, October 20, 2013

Transfer and Watch Blu-ray movies on Kindle Fire HDX 7 tablet

Have you ever thought of copying some of your Blu-ray movies onto the 7-inch Kindle Fire to make full use of 1920x1200 7" HD display? Then how to play Blu-ray on Kindle Fire HDX 7 tablet? Here, Pavtube Blu-ray to Kindle Fire HDX Ripper will convert Blu-rays to Kindle Fire HDX 7 MP4 format for watching.


A few weeks ago, Amazon announced their new line up Kindle Fire tablets which are running on an Android fork known as FireOS 3.0 “Mojito” OS. These new Kindle Fire HDX’s have some pretty spectacular specs actually. The Kindle Fire HDX is packing a Snapdragon 800 processor with a 1920×1200 resolution 7-inch display. It’s also 9mm thin weighing in at about 303g. The Amazon Kindle Fire HDX is running their Android-based FireOS 3.0, which does have some changes, and the initial reviews all said that the devices were pretty fast and responsive. Right now, it’s a pretty good looking tablet that is probably suitable for most people. The Kindle Fire HDX will be hitting the UK on November 13th, and heading up North to Canada on November 26th. 

All of the above is good, but like many other tablets, Kindle Fire HDX 7 does not deliver native support for Blu-ray/DVD movies, so if you have the intension to watch Blu-ray movies on it, you need to convert the Blu-rays into a format compatible with your Kindle Fire HDX 7 in advance. 

Here, you are suggested to get a professional tool- 
Top Blu-ray Ripper, which can rip latest Blu-ray to Kindle Fire HDX supported format in few steps, and then you can freely and easily transfer the generated videos to your Fire HD 7.I’ve be using the program to convert all my Blu-ray discs to Kindle Fire HDX playable video files. I’ve found the quality to be excellent, and see no difference when compared to playing the discs themselves. Meanwhile the audio/video synchronization is very good, the size of the subtitles too. If you’re a Mac user, please turn to the equivalent Mac version – Blu-ray Ripper for Mac, which can transfer DVD movies to Kindle Fire HDX tablet on Mac OS X (Mavericks and Mountain Lion included).

Below is the detailed guide on the Blu-ray to Kindle Fire HDX 7 conversion process. 

Step 1. Load Blu-ray movies. 

Install and launch the best Blu-ray to Kindle Fire HDX converter


Note:
 An external Blu-ray drive is required for ripping Blu-ray disc. 

Load Blu-ray Disc or ISO image to the Kindle Fire HDX 7 movie Converter with one click. 

Step 2. Select preferred language from drop-down list of "Subtitles" and "Audio" box. 

Step 3. Click "Format" bar and select a MP4 format for Kindle Fire HDX 7 playback. "Android -> Amazon Kindle Fire HD H.264 (*.mp4)" format is recommended for faster conversion and best movie effect.


Step 5. Click "Convert" to start ripping 1080p Blu-ray to Kindle Fire HDX 7 compatible MP4 video. 

Click the "Open" button to find the converted files when conversion completes and then you can transfer movies to Kindle Fire HDX 7 easily, and bring your favorite Blu-ray movies when traveling. 

Custom Settings 

If you'd like to customize profile settings for better quality or higher resolution, proceed as follows before you start converting Blu-ray to Kindle Fire HD 7 video: 

Click on "Settings" button. The pop-up Profile Settings window shows you a/v settings you're using. 


To take advantage of your screen, set the video size exactly as the display resolution- i.e. 1920 x 1080 for Kindle Fire HD 7. 


For better quality, set higher bitrate. We find the best balance between 500 to 2500kbps is just all right on 7-inch screen. To shorten conversion time, set lower quality. Note that when you lower file size, you lower video quality. 

More related:

Wednesday, October 16, 2013

Get my DVDs I already own onto my Kindle Fire

This step-by-step guide reveals how to transfer DVD to Kinlde Fire for playback. This guide will show you how to convert DVD to Kindle Fire best video format via DVD to Kindle Converter.


The Kindle Fire is a tablet computer version of Amazon.com's Kindle e-book reader. I often  use it to read ebooks, listen to music, surf the internet and play movies from it. Now I have the videos on my kindle for my toddler to watch while I'm getting ready in the morning. And I wanted to get DVDs I already own onto my Kindle, but the issue is that I can't directly copy DVD movies from disc to Kindle Fire.

After some trying and testing I came up with a solution which I'd like to describe here so that all Kindle owners can benefit from the procedure. I find an online forum which introduces this Best DVD ripper- Pavtube DVD to Kindle Converter. With it, I can rip DVD to a format which Kindle Fire supports, then transfer the ripped video file to Kindle Fire for playback.

Overall, I have used the trial version of Handbrake, DVDFab, Aimersoft, but when I came to Pavtube DVDAid, I find it is really a nice DVD Ripper software which gives the best result. Ease of use and good reviews, sale price. How easy and fast it is! Here's a guide about how to rip DVD to Kindle Fire format with Ideal DVD to MP4 Converter and then playback it.

Download and get it installed. (Mac DVD to Kindle Fire Ripper is made for Mac users.) 

(Good news: Pavtube Studio release Free DVD Ripper and Free DVD Ripper for Mac

How to rip DVD to Kindle Fire? 

1. Load DVD to the DVD to Kindle Fire Ripper. 

Insert DVD movies into your DVD drive, then click "Load file" button to navigate to DVD movies you want to convert. And it is able to find and pick the actual main movie up automatically.

After importing successfully, you can go to select subtitle and audio track on the main interface for output. 


2. Select Kindle Fire compatible format. 


Click "Format" menu to find the optimized video format for Kindle Fire in the dropdown list, Choosing the built-in "Amazon Kindle Fire H.264(*.mp4)" under "Android" option is perfect for Kindle Fire. 


Tips:  

a. For Kindle Fire HD users, choose "Android">- "Amazon Kindle Fire HD H.264 (*.mp4)" for Fire HD playback.


b. If you want to convert DVD to Multi-track MP4 for Kindle, try this 
Pavtube ByteCopy. 

c. (Optional step) You can press "Settings" button on the interface to adjust the video and audio parameters like codec, size, bitrate, etc. The output videos quality is based on bitrate than resolution. The higher bitrate will result in lower picture quality loss but a larger file size. But there is a balance between quality and size. I think 1500kbps~2000kbps is all right for 720p movies on Kindle Fire. 


3. Start DVD to Kindle Fire conversion. 

It's time to click "Convert" button to start converting DVD to Kindle Fire compatible format. With the help of technology of CUDA acceleration, you can get 6X faster conversion speed. Just wait for a while, then you can click "Open" button to quickly get the generated files for Kindle Fire. 

Note: With great decrypting capability, high quality video output and specific format list for versatile portable devices including iPad 3, iPhone 5, Apple TV 3, Xbox, PS3, Android tablets and phones, etc,. Pavtube DVD Ripper ranks top on the list of DVD ripping application. And it also provides lifetime free upgrade of product and technical support. 
Now you can watch DVD on that gorgeous screen of Kindle Fire anywhere you like. Just enjoy it now. 

Related Article: 

Wednesday, October 9, 2013

Convert Blu-ray movie for watch on Samsung Galaxy Tab 10.1

If you want to copy Blu-ray to Galaxy Tab 3 10.1 for watching, refer to below article for brief instruction about how to transfer Blu-ray files to play on Samsung Galaxy Tab 3 10.1.


The Samsung Galaxy Tab 3 10.1 is the first Honeycomb tablet that is not only as thin as the iPad 2, but is actually lighter. It offers a superlative experience with the thinnest and lightest large screen tablet available! High definition 10.1'' display delivers excellent screen sharpness. With 1280 x 800 WXGA display boasting a pixel density of 149ppi (pixel per inch), you can enjoy better details. The dual speakers surrounding the screen create a surround sound effect that makes movie watching even more realistic. What's more, 7000mAh battery supports video playback up to 9 hours and musci playback for 72 hours.

For people who would like to play Blu-ray discs, it is great to watch their favourite movies on Samsung Galaxy Tab 3 10.1. However, due to uncompatible format with Blu-ray contents, you will face difficulty to play Blu-ray with your Galaxy Tab 3 10.1. In that case, you are supposed to convert Blu-ray to Galaxy Tab 3 10.1 optimized MP4 format  first so that you would easily watch these Blu-ray movies on Samsung Galaxy Tab 3 10.1 and feast your eyes.

Read More: Blu-ray Ripping Review for iOS, Android

Step-by-step instruction about transferring Blu-ray to Samsung Galaxy Tab 3 10.1
Step 1. Add Blu-ray files.

Click "Load Disc" icon to add your Blu-rays into this top Blu-ray to Samsung Galaxy Tab 3 converter.


Step 2. Choose output format.

Click "Format" bar and choose optimized profile for your Android Device.

In latest Pavtube Blu-ray Ripper, new devices including Nexus 10, Nexus 4 and Samsung Galaxy Tab 3 10.1 are added into profile list, do not worry that you cannot find perfect profile for your Android tablet or smartphone.

You are recommended to choose Samsung Galaxy Tab 3 under "Samsung> Samsung Galaxy Tab H.264(*.mp4)" for this Blu-ray to Galaxy Tab 3 10.1 conversion.


Tip: If you cannot find that particular profile preset for your own device, don't worry, there are several common presets for most Android devices, just select any of them for output.

Step 3. Customize profile settings. (Optional)

If you are not satisfied with profile presets for output, or you choose a common profile and would like to get better video quality, click "Settings" button next to Profile box to change output profile parameters like video codec, audio codec, video size, bit rate, framerate, etc.

Step 4. Start Blu-ray to Samsung Galaxy Tab 3 10.1 conversion.

Once finished, click "Open" icon on main UI to locate the generated MP4 files on your Mac and transfer converted Blu-ray to Samsung Galaxy Tab 3 10.1 for watching.

Learn More:

Tuesday, August 13, 2013

Sony QX10 and QX100 Lenses for Smartphones Leak Out

Sony has a pair of incredible new lenses coming out to work in tandem with smartphones for higher quality mobile photography. The Sony DSC-QX10 and DSC-Q100 are actually lenses with an image sensor built-in.

We’ve seen similar designs with the Ricoh GXR system; however, the novel approach of the Sony QX10 and QX100 is the use of a smartphone as the camera interface. The QX10 and QX100 are controlled by smartphones via WiFi or NFC connectivity.

While the leaked image above shows the unit connected to a Sony Xperia smartphone, rumors suggest it will also be compatible with iOS and Android devices.

It appears that the QX10 will feature a 10x zoom range – given the 4.45-44.5mm zoom range (probably about 25-250mm equivalent). The sensor is rumored to be a 1/2.3″ 18MP sensor – so it is definitely in the compact camera territory.

According to SonyAlphaRumors, the electronics giant is expected to release two models: the DSC-QX10 (pictured above) and the DSC-QX100. The latter will ship with the same 1-inch sensor used with the RX100 Mark II, while the other lens will include a larger 10x focal range and a 1/2.3-inch 18-megapixel CMOS sensor. There's no word on pricing or availability, but with Sony's IFA press conference right around the corner, we'll likely get the full scoop (and hopefully some hands-on time) come September 4th.

Alternatively, the QX100 is rumored to be a direct clone of the RX100 II – complete with a 20.2MP 1-inch sensor. Depending on the execution, this could be a big wow factor for smartphone photographers. That said, it’s a big chunk of lens to carry around in addition to one’s smartphone…

While it is nice to see innovation from Sony, this is just the first round of these devices. If there’s a future in this market, I would expect to see something much different and more compact over the next couple generations.

Saturday, June 22, 2013

The world's first Android-based mirrorless camera- Samsung Galaxy NX Hands-on

It's long been rumored, and it's finally happened: the interchangeable-lens camera has just stepped into the modern, connected world and become a smart device!

After last year's Galaxy Camera, Samsung split in two directions. It went closer to the phone with the Galaxy S 4 Zoom, shrinking the form factor (and some of the specs) for something that closer approximates a pocket-friendly device, and it got serious about interchangeable-lens cameras. 

Now Samsung has announced the Galaxy NX: the world's first mirrorless interchangeable lens camera running the Android operating system. The Galaxy NX takes a 20.3 megapixel, SLR-style mirrorless camera and adds 3G, 4G LTE and Wi-Fi, connectivity and Android 4.2 (Jelly Bean). The camera sports a gigantic 4.8" HD LCD touchscreen - with which you'll control nearly all camera functions. The Galaxy NX will be available sometime this summer for an undisclosed price.


Samsung NX, not surprisingly, draws much from the company's experience not only with smartphones -- a section of the market in which it has a dominant presence -- but also from 2012's fixed-lens Galaxy Camera. Like that model, the Galaxy NX is a quad-core device that runs Google's Linux-based Android 4.2 Jelly Bean operating system, along with built-in 3G / 4G LTE and Wi-Fi wireless connectivity.

Beneath the skin, the Samsung Galaxy NX is pretty similar to the Samsung NX300, in terms of its imaging hardware, using the same 20.3 megapixel image processor and DRIMe IV branded image processor. On the rear is a huge 4.8-inch high definition LCD panel and SVGA electronic viewfinder. Sensitivity ranges to ISO 25,600 equivalent, and the Samsung Galaxy NX is capable of swift 8.6 frames per second burst shooting.
 Samsung has yet to announce pricing or availability for the Galaxy NX, which the company has just revealed at a global press conference. Nor has it yet revealed which carriers will be offering the Samsung Galaxy NX in the US market, or overseas.

We've already been hands-on with this extremely interesting compact system camera, though -- so if you want to know more, you'll want to read our Samsung Galaxy NX review for first impressions.