Monday, August 25, 2014

Avid Everywhere—Delivering on Our Vision for the Media Industry

Avid Company shares “Avid Everywhere,” its strategic vision for creating the most fluid end-to-end, distributed media production environment in the industry.

At IBC, Avid shed some light on the its new strategic vision "Avid Everywhere" with a news conference and the release of a white paper.

Avid Everywhere

What is Avid Everywhere

At first glance, I assumed that Avid Everywhere was an Adobe Anywhere inspired rebranding of InterPlay Central and InterPlay Sphere. I was wrong, Avid Everywhere is about more than collaborative video editing.

Vision and strategy

Avid Technology is a company with a diverse range of hardware and software products, covering content creation (video, audio, graphics, news), asset management, audio/video hardware i/o, consoles and control surfaces, storage and servers.

The Avid Everywhere event was less about specific product details and more about defining the direction of the company. The centerpiece of the vision is a common services platform called Avid MediaCentral.

Avid MediaCentral

Most users who are editing and audio professionals will mainly associate Avid with the Artist Suite tier. This is the layer of content creation tools, including Media Composer, Pro Tools, Sibelius and the control surfaces that came out of Digidesign and Euphonix, including the Artist panels. If you are a single user of Media Composer, Pro Tools or Sibelius and own no other Avid infrastructure, like ISIS or Interplay, then the entire Avid Everywhere media platform doesn’t touch you very much for now.

The top layer of the platform chart is MediaCentral | UX, which was formerly known as Interplay Central. This is a web front-end that allows you to browse, log and notate Interplay assets from a desktop computer, laptop or mobile device.

Surrounding the entire structure are support services (tech support and professional integration services) plus a private and public marketplace. Media Composer software has included a Marketplace menu item for a few versions. Until now, this has been a web portal to buy plug-ins and stock footage. The updated vision for this is more along the lines of services like SoundCloud, Adobe’s Behance service or the files section of Creative Cloud.  To make this work, the Avid MediaCentral Platform includes things like proper security to enable such transactions.

All clouds are not the same

I started this post with the comment that I feel many editors confuse Adobe Anywhere and Avid Everywhere. I believe that’s because they mistakenly interpret Avid Everywhere as the specific version of the Media Composer product that enables remote-access editing. As I’ve explained above, Everywhere is a concept and vision, not a product. That specific Media Composer product (formerly Interplay Sphere) is now branded as Media Composer | Cloud. As a product, it most closely approximates Adobe Anywhere, but there are key differences.

Media Composer Cloud

Adobe Anywhere is a system that requires a centralized server and storage. Any computer with Premiere Pro CC or CC 2014 can remotely access the assets on this system, which streams proxy media back to that computer. All the “heavy lifting” is done at the central site and the editor’s Premiere Pro is effectively working only as a local front-end.

In contrast, Media Composer | Cloud is primarily a plug-in that works with an otherwise standard version of the Media Composer software. In order for it to function, the “home base” facility must have an appropriate Interplay/ISIS infrastructure so that Media Composer | Cloud can talk to it. In Avid marketing parlance “you’ve got to get on the platform” for some of these things to work.

Sphere Upload Settings

Media Composer | Cloud permits hybrid editing. For example, a news videographer in the field can be editing at the proverbial Starbucks using local assets. Maybe part of the story requires access to past b-roll footage that lives back at the station on its newsroom storage. Through Media Composer | Cloud and Interplay, the videographer can access those files as proxies and integrate them into the piece. Meanwhile, local assets can be uploaded back to the station.

While not everything about Avid Everywhere has been fully implemented, yet, it certainly is an aggressive strategy. It is an attempt to move the company as a whole into areas beyond just editing software, while still allowing users and owners to leverage their Avid assets into other opportunities.

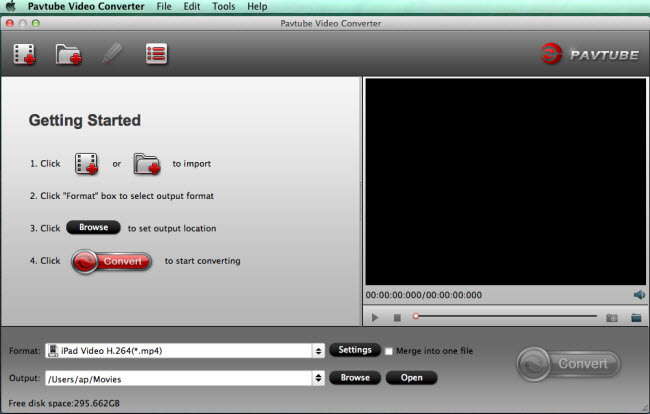
How to Import video into Avid Media Composer?

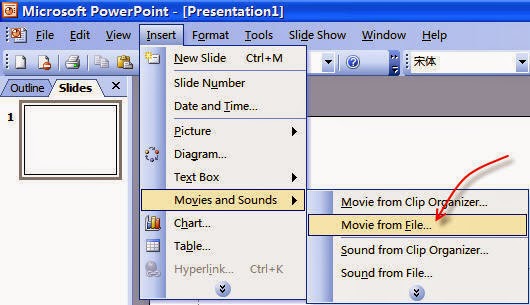
First, make sure the right bin or folder is selected, otherwise the ‘Import…’ option might be greyed out. Then, go to File > Import…. You will be prompted to select the video or stills you want to import.

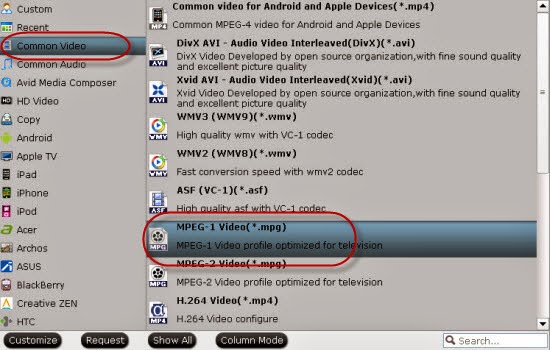
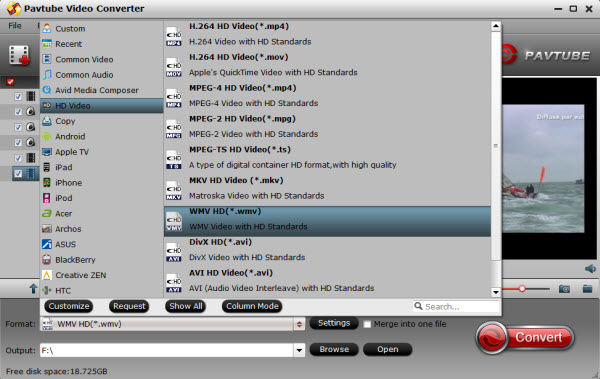
Important Note: You must choose a transcode format if you are using this method. I recommend DNxHD while you’re in Avid. That means if you want to transfer unsupported files into Avid Media Composer including 108060p AVCHD .MTS, MXF, Sony XDCAM, 4K XAVC, MPG, MKV, MP4 or VOB etc, you’d better transcode them to Avid most likely format DNxHD .mov. To get it done, Pavtube HD Video Converter (or the Mac) version is highly recommended to you.

More info:

Thursday, August 21, 2014

Transcode Sony TD30V/B 3D MTS to MOV, AVI, MPG, MP4, ASF, SWF, FLV for editing, sharing on Mac

Read this article if you are interested in transcode Sony TD30V/B 3D MTS to MOV, AVI, MPG, MP4, ASF, SWF, FLV for editing, sharing on Mac, it offers a possible solution for dealing with 3D AVCHD video.

First and foremost the most appealing aspect in any camcorder is that it produces high-quality video. The Sony HDR-TD30V/B provides you with video quality that, not long ago, would have been inconceivable out of even a high-end consumer-level camcorder. With gorgeous 1080i 3D video recording in a sleek, portable package, this camcorder warrants every penny charged.
Sony TD30V/B 3D


Recorded lots of amazing 3D mts videos with Sony HDR-TD30V/B? Wanna share this 3D AVCHD mts from TD30V/B with your friends or family, and do some editing work with them in mac programs?

Now with Pavtube MTS/M2TS Converter for Mac, you can make Sony HDR-TD30V/B recorded 3D AVCHD editable in FCP X, iMovie, FCE, Premiere Pro, Avid Media Composer, etc, playable on media players or portable devices and uploadable onto Youtube. What's more, this top 3D MTS Converter for Mac allows you to split one file into several, specify output file size, adjust various output parameters to get custom files, output 3D MKV/MP4/MOV/WMV/AVI with Side-by-Side, Top-Bottom, or Anaglyph (Red-Blue) video to satisfy multiple requirements.

Now just download the app and follow the step-by-step guide to transcode Sony TD30V/B 3D MTS to MOV, AVI, MPG, MP4, ASF, SWF, FLV for editing, sharing on Mac.

1. Connect your TD30V/B camera to Mac and keep it on. Launch the best Mac 3D MTS Converter app; click the top left two icons to load your footages individually or in batch correspondingly.

3D MTS Converter for Mac

2.
Click the Format bar to select output format. If you only want to get 2D video in MOV, AVI, MPG, MP4, ASF, SWF, FLV format, just choose the format you need.

MPEG-2 format

P.S. If you want to output 3D video for editing or playing, you can choose format from “3D Video” option.

3. Hit the Convert button to start transcoding Sony TD30V/B 3D AVCHD MTS files to MOV, AVI, MPG, MP4, ASF, SWF, FLV.

When the conversion task is finished, click “Open” button to get the exported files and then import the converted 3D MTS video for editing, sharing on Mac.

More features of this top 3D MTS Converter Mac:

a. In case the default settings do not fit your requirement, you can click “Settings” button and enter “Profile Settings” panel to adjust video size, bit rate, frame rate, sample rate and audio channels.

b. If you want to merge multiple MTS files into one for easy editing, please tick the box "Merge into one file" to merge all the imported clips.

c. In case the MTS footage is taken under interlacing mode, just click "Edit" to go to Video Editor, and hit Effect to select Deinterlacing and interlacing lines will be eliminated. (Checked by default)

d.  This app works for most professional 3D camcorders like Sony HDR-TD10, Sony DSC-WX30, Sony HDR-TD20, JVC Everio GS-TD1, Panasonic HDC-Z10000, Panasonic AG-3DA1 etc.

This top 3D MTS Converter Mac can help you convert Sony TD30V/B 3D MTS footage to any format you want standard 2D and 3D video. 


Read more:

Tuesday, August 19, 2014

Monday, August 18, 2014

MP4 in PowerPoint - How to Insert MP4 into PowerPoint for playing?

Do you want to insert MP4 Videos to PowerPoint for playing? This article mainly explains why can't we directly use MP4 in PowerPoint and introduces the easy solution to embed all kinds of mp4 files into PowerPoint for presentation. 

Some types of software take YouTube and other videos from video sharing sites and save them in file formats that you can watch without needing to be connected to the Internet. Many of these videos are saved in the MP4 file format. 

Hot search: MP4 to PowerDVD | MP4 to HTTP Live Stream | MP4 to Sony Movie Studio | H.264 MP4 to H.265 MP4 | MP4 Files with Adobe Premiere Pro 

Part I: While PowerPoint does not allow you to directly insert an MP4 file into a PowerPoint presentation? 


For PowerPoint 2007, 2003 or lower version: According to Microsoft PowerPoint official website, PowerPoint 2007, 2003 or lower version only supports WMV, AVI, ASF, and MPG/MPEG four video formats. If you import other video formats like MP4 to those version of PowerPoint, it will end in fail. 

For PowerPoint 2010: Though PowerPoint 2010 announced to embed and play MP4 files, it has some limitations: 

a: You need have the QuickTime player installed on your computer and you can only insert an Apple QuickTime movie (.mov, .mp4) file to PPT 2010. 

b: The PowerPoint 2010 64-bit version is not compatible with 32-bit versions of QuickTime. You must install a 64-bit version of QuickTime, or a 32-bit version of PowerPoint 2010. 

For PowerPoint 2013: In PowerPoint 2013, .mp4 videos encoded with H.264 video (a.k.a. MPEG-4 AVC) and AAC audio is recommended. However, even though your video file have the .mp4 file extension, it may not play correctly if the correct version of the codec is not installed, or if the file is not programmed in a format that is recognized by your version of Microsoft Windows. 

Therefore, we often meet difficulty in inserting MP4 to PowerPoint, let alone to play MP4 in PowerPoint successfully. Then how to get mp4 files easily embeded and played in PowerPoint? The answer is to convert mp4 to PowerPoint compatible AVI, WMV, ASF, MPG videos. Now let's go to learn how to do it. 


Part II: How to convert MP4 Videos for inserting and playing in PowerPoint 

Step 1. Run the Pavtube Video Converter, drag and drop source video to the program. 


Other Download: 
- Pavtube old official address: http://www.pavtube.com/video_converter/ 
- Amazon Download: http://download.cnet.com/Pavtube-Video-Converter/3000-2194_4-75734821.html 
- Cnet Download: http://download.cnet.com/Pavtube-Video-Converter/3000-2194_4-75734821.html 


Overall, the all-in-one program can easily convert Blu-ray DVD disc, DVD folder, DVD IFO/ISO file and various videos inluding the MP4 files to any video format like AVI, WMV, MPG, FLV, F4V, SWF, H.264, MKV, 3GP, RMVB, WebM, VOB and more for playing in any version of PowerPoint Presentation including PowerPoint 2010, 2007, 2003, 2000, 2002, 2005 or even PowerPoint 95, 97. If you are Mac users, try Pavtube Video Converter for Mac


Step 2. Click on "Format" bar, and Choose PowerPoint compatible format. 

Choose the PowerPoint supported formats in the "Format" dropdown list. You can go to "Common Video" and find "MPEG-1 Video (*.mpg)" which works well with both Windows and Mac version of PowerPoint. What's more, WMV is well supported by PowerPoint for Windows; MOV is well supported by PowerPoint for Mac. 


But, here you are recommended to choose the Apple devices like iPad, iPone, Apple TV, etc directly. Find a suitable format under these Apple devices options. 

Tips: For some advances users, you can go to adjust video and audio parameters like bitrate, resolution, channels, etc. Click "Settings" button you can go to check and change them as you like. 

Step 3. Press on "Convert" to start encoding MP4 Videos to Microsoft PowerPoint Presentation compatible video. 

Step 4. When conversion completes, press on "Open" to locate converted videos. 


Part III: Embed video in PowerPoint 

Before starting adding video to PowerPoint, you need to create a folder and put both your converted video and your PowerPoint presentation in this folder. Then open the PowerPoint in this folder to insert the converted video file which is just located in this folder. 

For PowerPoint2003: 

View the appropriate slide in normal view where you want to insert the converted video. 
Go to the Insert menu, point to Movies and Sounds, and then select Movie from File. An insert movie dialog will pop up where you need to search for and insert the converted file. 


Then an alert box pops up asking "How do you want the movie to start in the slid show?" To play the movie automatically, click automatically. To start your movie by clicking the mouse, click When Clicked. 


For PowerPoint 2007: 

View the appropriate slide in normal view where you want to insert the converted video. 
Click on Insert tab and select Movie to insert video into PowerPoint just as in PowerPoint 2003. 


In this way, you can insert and enjoy your favorite MP4 Videos on any version of PowerPoint including PowerPoint 2010, 2007, 2003, 2000, 2002, 2005 or even PowerPoint 95, 97.. 

Read More:

Sunday, August 17, 2014

Importing Sony Alpha a7S XAVC-S files to Premiere Pro and After Effects for editing smoothly

If you have issues with importing Sony Alpha a7S XAVC-S to Premiere Pro and After Effects, just follow this article to solve.  

Sony Alpha a7S is amazing! Great camera, overall. I'm primarily using this camera for film, but love taking stills with it. It takes wonderful stills, so don't let a 12.2 megapixel camera fool you. The wide shots are amazing and the video quality is wonderful. The only problem I encountered was the file format. The XAVC S codec it shoots in wraps its files into MP4s. These files are extremely difficult to import into all my major film editing softwares, like Premiere Pro and After Effects.

According to our experience and other user's feedback, to make your Sony Alpha a7S XAVC-S workflow in Premiere Pro and After Effects smoothly, it’s highly recommended converting a7S XAVC-S clips to MPEG-2 for Premiere/AE editing use.

Here comes Pavtube HD Video Converter for Mac to do so. It is the best Mac a7S XAVC-S Converter or compressor to help you edit the XAVC-S clips from a7S you shoot in Premiere Pro and After Effects without rending, you can go to download it and have a free try! Below I will outline how to convert Sony Alpha a7S XAVC-S footage to Premiere Pro and After Effects compatible format for editing on Mac.

Step 1: Copy Sony Alpha a7S media on to the Storage Drive in a folder.

Step 2: Launch the best Mac XAVC-S Video Converter. Click the "Add" button for adding to import the xavc-s files from a7S.

Mac XAVC-S Video Converter

Step 3: Click on the dropdown menu of "Format", and then move your pointer to Adobe Premiere/Sony Vegas> MPEG-2 (*.mpg) which is the perfect video format for you to transfer Sony Alpha a7S XAVC-S to Premiere Pro and After Effects. Then you can set the output folder by clicking "Browse" icon as you prefer.

Premiere Pro and After Effects Format

Step 4: Click "Settings" icon to adjust audio and video parameter. You can change the default codec, bit rate, frame rate, sample rate and audio channel according to your needs and optimize the output file quality.

Note: To get original(best) video quality, you can keep original video size and bitrate.

Step 5: Click the "Convert" button and it will convert Sony Alpha a7S XAVC-S files to MPG video for editing in Premiere Pro and After Effects immediately.

Step 6: Once the Mac MTS to Premiere/AE conversion is done, you will be able to get the output files for Premiere Pro and After Effects via clicking on "Open" button effortlessly.

Now you can easily import the converted mpg footage in Premiere Pro and After Effects for editing keeping high quality effortlessly.

If you are windows users, try Pavtube HD Video Converter.

Read more:

Friday, August 15, 2014

20% Off Best MTS/MXF/MOV Converter at 2014 Back-to-School Special Offer

Now it's almost time to back to school, have enjoyed a color and meaningful Summer break? Let's get ready and be excited for another great term! Meanwhile, after a long summer holiday, are you looking forwared to see everyone and prepare some cool gifts for your classmates or teachers?

2014 Back-to-School Special Offer

Welcome to the Pavtube 2014 Back to School Promotion Center where Up to AMAZING 35% OFF Back to School Specials are waiting for you. You be surely be entertained at your free time.

The giveaway includes Blu-rays, DVDs and HD Videos related software which will give you great experience when enjoying these videos and movies on Android/Apple/Windows devices. Besides that, you will have no worry about any compatibility issues when editing the MTS/MOV/MXF files in Mac editors(FCP, FCE, iMovie, Avid Media Composer, Adobe Premiere, etc.), and Windows editing programs (Sony Vegas, Premiere Pro, Movie Maker, etc.)!

Hurry to get- 20% OFF Video Converter now!

Best video converter and editor to handle SD and HD videos, Tivo and DVR recordings for free enjoyment and free importing to professional editing programs.

Video Converter

TERMS & CONDITIONS APPLIED:

The deal is valid from 15th Aug to 15th Sep, 2014

More details are here:


http://www.multipelife.com/back-to-school-specials-2014

Tuesday, August 12, 2014

Issues with importing PowerShot G1 X Mark II 1080p MP4 videos in FCP X, solved!

This guide is applied to solve the problem importing and editing Canon PowerShot G1 X Mark II 1080p MP4 videos in FCP X on Mac

With the 'Mark II' version of the PowerShot G1 X, Canon has addressed many of the shortcomings of its predecessor. For a start, the G1 X II has a faster lens that covers a wider focal range and can shoot much closer to a subject. With G1 X Mark II, you can get 1080/30p video recordings in MP4 format.

Import PowerShot G1 X Mark II MP4 in FCP X

If you like sharing your video on YouTube, Google, Facebook etc., maybe you need edit Canon PowerShot G1 X Mark II MP4 in FCP X on Mac in advance. This guide will share a Canon G1 X Mark II video solution with you which enable you import and edit Canon PowerShot G1 X Mark II MP4 video in FCP X without any problem.

In order to edit Canon G1 X II MP4 clips in FCP X without crashing problem and avoid rendering, you’d better transcode the Canon MP4 footages to FCP X native format, say, Proes codec mov format.

How to Convert Canon PowerShot G1 X Mark II MP4 to FCP X for editing


Best Software choice:

Pavtube’s HD Video Converter for Mac – a top Canon Video Converter for Mac.

The Mac Canon Video to FCP Converter is an easy to use yet professional which can not only transcode Canon PowerShot G1 X Mark II MP4 videos to Prores codec for Mac editing, but also provide simple video editing functions for you. Besides, the program can also convert HD videos from HD camcorders or DVs (like JVC, Panasonic, Sony and Cannon) for editing in Final Cut Pro 6/7, Final Cut Pro X, Final Cut Express, iMovie, Avid, Adobe Premiere, After Effects, etc. Below is how.

Steps for Editing Canon PowerShot G1 X Mark II mp4 footage in FCP X

Step 1. Import Canon PowerShot G1 X Mark II MP4 videos to the best Mac Canon Video Converter for FCP X.

Canon Video Converter for Mac

Step 2. Select to rewrap your mts files to "Apple Prores 422(*.mov)" or "Apple Prores 422(HQ)(*.mov)" to work fine with FCP X.

Format work fine with FCP X

Learn more Apple ProRes, please refer to Types of Apple ProRes Codecs

Tips: You can click on Settings to adjust audio and video parameters including video size, video frame rate, bitrate, sample rate, audio channel.

Step 3. Click “Convert” button to start transcoding Canon PowerShot G1 X Mark II MP4 files to Proes.mov for FCP X under Mac OS.

After a shot conversion, you will be able to get/transfer Canon PowerShot G1 X Mark II MP4 videos into FCP X for editing without rendering. Now issues with importing PowerShot G1 X Mark II 1080p MP4 videos in FCP X is solved!

Monday, August 11, 2014

Transcoding Canon PowerShot SX600 HS footages for editing on PC or Mac

The article shows you the best workaround for editing Canon PowerShot SX600 HS MP4 videos on PC/Mac by transcoding SX600 HS MP4 to PC/Mac native format.

The Canon PowerShot SX600 HS is an inexpensive point-and-shoot compact camera with impressive zoom capabilities and some useful extras. Record superb, FullHD (1080p) movies in MP4 format. Intelligent IS makes movies steadier even when you are walking or shooting from inside a moving car for truly spectacular footage.

Canon PowerShot SX600 HS


After recoreding some eye-catching clips of your holidays with Canon PowerShot SX600 HS, have you thought of reorganize your SX600 HS MP4 recordings for editing, you may have found the h.264 mp4 video can't be imported in many editors on PC/Mac successfully for some bizarre reason.

To natively import Canon PowerShot SX600 HS full hd mp4 video, the best method is convert them to PC/Mac with best codec for editing software. To get Canon PowerShot SX600 HS full hd mp4 format-shifted, here we'll use a program called Pavtube Video Converter for Win/Mac, which is a very flexible application to convert Canon PowerShot SX600 HS MP4 recordings to best format for Sony Vegas, Pinnacle, Premiere, Avid, Cyberlink, Windows Movie Maker, etc on Windows PC and FCP X, FCP 6/7, Avid, iMovie and Final Cut Express, etc on Mac.

Becides, it comes with lots of advanced options like batch conversion, file merging, and frame cropping to enhance the resulting file. If you would like to put the exported video on a portable device to watch on-the-go, you can also use its built-in device-targeted preset profiles.In this walk-through I'm going to tell you how to convert Canon PowerShot SX600 HS videos on PC/Mac for editing.

1.Install Canon Video Converter for Win/Mac, and then load the mp4 files from Canon PowerShot SX600 HS. You can drag several files to the program directly.


2. Choose output format.

Hit the Format box, on the dropdown menu

For Mac users:

For example, select "Final Cut Pro"->"Apple ProRes 422(*.mov)". for editing in FCP 6/7/X.


If you need to edit in iMovie, please choose iMovie and Final Cut Express -> Apple InterMediate Codec (AIC) (*.mov).

And for Avid MC, please choose Avid Media Composer -> Avid DNxHD (*.mov).

For Windows users:

you can choose "AVI/WMV/MPEG-2" as output format for editing with Sony Vegas/Pinnacle/Premiere/Avid/Cyberlink/Windows Movie Maker.


3. Do some settings as you want, like output resolution and bitrate.

4.Transcode Canon PowerShot SX600 HS videos to compatible format for editing.

At last, hit the "Convert" button to transcode SX600 full HD mp4 clip on PC/Mac.

With this Canon video converter, you can easily change Canon PowerShot SX600 HS mp4 video files to PC/Mac in Sony Vegas, Pinnacle, Premiere, Avid, Cyberlink, Windows Movie Maker, FCP X, iMovie or Avid MC for editing. This software runs fast, so you can convert your h.264 MP4 footages in less time, video and audio synchronization are perfectly guaranteed.

More related tips:

Transcoding Canon PowerShot SX600 HS footages for editing
Importing EOS Rebel T5 MOV files to Premiere Pro
Getting Canon EOS Rebel T5 mov files to work in After Effects

Thursday, August 7, 2014

Smoothly load Canon EOS C500 PL MXF recordings to Sony Vegas Pro 12

In this guide you will learn how to smoothly load Canon EOS C500 PL MXF recordings to Sony Vegas Pro 12 for editing by transcoding MXF to Vegas compatible WMV or MOV previously.

About the Canon C500 PL

Canon EOS C500 PL capitalizes on the groundbreaking ergonomic design of the EOS C300 PL camera, and offers a new Super 35mm, 8.85-megapixel CMOS image sensor, DIGIC DV III Image Processor and an expansive range of recording. The C500 offers 4K 10-bit RAW, 2K RGB (4:4:4, 10/12 bit) or Full HD RGB data output to a compatible third party external device at frame rates of up to 60P. Simultaneously record Full HD MXF files to CF cards for use as proxies in desktop editing.
canon c500 pl

As far as I know, many folks find it is not convenient for them to import MXF footages from Canon EOS C500 PL to Sony Vegas Pro 12 for editing. In fact, Sony Vegas announces that it can work with MXF on its official site, but some users still have troubles when transferring MXF files to Sony Vegas. Then what should we do to successfully load Canon EOS C500 PL MXF recordings to Sony Vegas Pro 12?

It's quite easy, the best way to let Vegas Pro work with MXF files is to convert these files to Vegas compatible formats like WMV and MOV previously. Actually, you just need a Canon MXF Converter which makes it possible to smoothly import EOS C500 PL MXF recordings to Sony Vegas Pro 12 for editing.

If you are interested in doing this, I recommend Pavtube Video Converter, which offers various output formats, and you can select the most suitable one for your Vegas Pro 12.

convert mxf to vegas pro 12

The software works like most other Video Converter I'v used and the process is straightforward. Assuming you have downloaded the Canon MXF Converter to your PC, the first step is to drag and drop your MXF files to the program.

Then choose output profile for Sony Vegas, you can click on the dropdown menu of "Format” and then move your pointer to "HD Video", under the sublist, you can easily find the "WMV HD(*.wmv)", which are both the compatible formats for you to edit Canon EOS C500 PL MXF files in Sony Vegas smoothly.


Finally start the conversion from Canon MXF to WMV/MOV for Sony Vegas.

PS: Pavtube Video Converter is more than a Canon C500 PL Video Converter; it allows all the MXF videos from all kinds of MXF HD camcorders like Sony XDCAM, Panasonic P2 series, Canon XF series, C300 and C500. For any other MXF camcorders, you can also use the software to do previous conversion for different video editing software.

After a short conversion, you will be able to import Canon EOS C500 PL MXF videos into Sony Vegas Pro 12 for editing without rendering. If you are mac users, learn how to load Canon C300 PL MXF files in FCP 6/7.

Tuesday, August 5, 2014

Super Easy Steps for Editing Sony F3 XDCAM video in Final Cut Pro 7

This guide shows you how to edit Sony F3 XDCAM file with Final Cut Pro 7 supported files in two ways.

Sony F3 XDCAM video in Final Cut Pro 7

Many of our customers have expressed concern about how to use the XDCAM EX footage that is recorded to SxS cards on the Sony PMW-F3 camera. After all, Final Cut Pro will not work with these files natively. However, Sony has provided an efficient and simple tool called “XDCAM Transfer” that addresses this exact problem.

Main Interface of Sony's XDCAM Transfer Utility:

xdcam transfer interface

XDCAM Transfer simply changes the file wrapper from the MP4 file that Final Cut Pro doesn’t understand to a Quicktime MOV file that Final Cut Pro can edit natively. And since there is no “transcoding”, XDCAM Transfer will process the video clips as fast as your system can copy the files. This means your videos will be ready to edit in minutes, not hours. Simply give this procedure to your editor, and their system will be ready to edit your Sony F3 footage in 10 minutes or less!

xdcam transfer preferences

XDCAM Transfer Preferences Menu

Disclaimer: This workflow is only for Intel based Macs (MacBook Pro Laptops and MacPro Towers) with OS X v10.5 or later and Final Cut Pro 7 installed. This procedure will not work for PowerMac systems or Final Cut Pro 6 users.

1. Install required software (listed below) and reboot as needed.
2. Open XDCAM Transfer.
3. From the XDCAM Transfer menu, select “Preferences”.
4. On the Import tab, set the folder that the transferred material will be saved to, and close the Preferences menu.
5. In the main XDCAM Transfer interface, click the Add button in the bottom-left corner.
6. Browse to either a mounted SxS card in a card reader, or a copy of the “BPAV” folder that was saved to a hard drive on-location.
7. Click on the new item in the left “Source” pane, then select “Import All Clips” from the File menu.
8. Open Final Cut Pro 7.
9. From the File menu, select “Import”.
10. Select the clips from the import folder you specified in your XDCAM Transfer Preferences menu. Now you’re ready to edit!

Mac Software Required All-In-One Mac Package (SxS Device Driver, SxS UDF Driver, XDCAM Clip Browser, and XDCAM Transfer)

Download – 71.9mb

The package above contains all four of the following pieces of software. Individual links provided as a courtesy.

Sony SxS Device Driver v1.0.5

Download – 1.1mb
Sony SxS UDF Driver v1.0.1 (File System Driver)

Download – 426kb

Sony XDCAM Clip Browser v2.6

Download – 69mb
Sony XDCAM Transfer v2.12

Download – 32.7mb

But as far as we know, XDCAM Transer always bring your crash issue, and the 
procedure above is complex for beginners, what's more, the workflow only works with FCP 7. T
o find an easier and effective way, you just need to get help of Pavtube HD Video Converter for Mac which can convert Sony F3 XDCAM videos to FCP 7 comptible Apple Prores codec for natively importing in Final Cut Pro 7(same in FCP X) on Mac. This will be a 
super simple way!

Monday, August 4, 2014

Re-encode Canon XF205 MXF to iMovie for editing and importing on Mac

Want to edit Canon XF205 MXF video in iMovie? Here we'll show you how to convert and import XF205 MXF to iMovie for smooth editing.

I am a professional musician. My work required me to rent a Canon XF205 camcorder for a music video project to edit in iMovie. But frustratingly, iMovie 11 can’t ingest the MXF at all. Any solution can suggest?


From above words of one XF205 camcorder user,  what’s a pity that these professional camcorders Canon XF205 record footage in MXF format cannot be recognized by iMovie on mac, even the latest version iMovie 11. So, how to import Canon XF205 MXF files to iMovie for editing with output video quality loseeless? Here we’d like to share the solution of importing Canon XF205 MXF to iMovie.

Our Best Answer

By using a third party MXF to iMovie Converter, you can easily make Canon XF205 footage  editable in iMovie including the later version iMovie 11. If you are looking for a fast, independent software application for converting MXF to iMovie supported MOV or to a variety of other formats, the Pavtube MXF Converter for Mac is what you need. And this program is fully compatible with the latest OS X 10.9 Mavericks. Download it and have a try.

Re-encode Canon 205 MXF to AIC for use in iMovie

Step 1: Run Pavtube MXF Converter for Mac as the best MXF to iMovie Converter. When its main interface comes up, click ‘Add Video’ to import your source files to the program.

mxf to imovie converter

Step 2: Select "iMovie and Final Cut Express > Apple Intermediate Codec(AIC) (*.mov)" as the best editing format for iMovie.

imovie best format

Step 3: Adjust video and audio settings (for advanced users)

If necessary, you can click ‘Settings’ button to modify video and audio settings like resolution, bit rate, frame rate, sample rate and audio channel.

Step 4: Click ‘Convert’ to start Canon 205 MXF footage to AIC conversion for iMovie.

Step 5: When the conversion complete, click ‘Open’ to get generated AIC.mov files for using in iMovie with optimum performance.

Tips:

1. If you want to do some editing like trim a certain MXF segment file to smaller ones, get rid of black edges of source file, add video effects, etc. this MXF Converter for Mac will be do these.

2. If your MXF files have 2 audio tracks or more, here is a new program specially designed for multi-track preserving and mixing features, named iMixMXF. Featured formats include: MOV/MP4/MPG/WMV/FLV/MKV and more.

3. You can also learn how to convert Canon MXF video in FCP and edit Canon MXF in Movie Maker, Sony Vegas, Pinnacle.

Read More:

Friday, August 1, 2014

Convert DVD movies to play on TV with a 16:9 widescreen display and burn into new DVD disc

If you have large collection of DVD movies, you may choose to watch with TV with a 16:9 widescreen display and then burn to DVD for playing, this article tells you how to.

There is nothing eye catching as enjoying a high definition DVD on TV with big screen with family and friends in the comfort of your home. Nevertheless, if you want to become one of those who are enjoying these incredible new TV experiences, then you will have to convert your video to a TV supported file. For this purpose, you will have to find a good DVD ripper or a converter.
Play DVD on TV


To complete the conversion, you need a DVD converter tool. Here Pavtube DVDAid is recommended to help you rip DVD to TV compatible video formats with easy operation and high output quality. Furthermore, you can even extract audio files from DVD for playing on TV.

Mac version is available here; well support Mac Mavericks: Pavtube DVDAid for Mac.

Download it right now and start enjoying your DVD movies with full HD quality on TV!

Step 1. Run Best DVD Converter and import DVD disc.

Click "Load disc" icon to load DVD disc from ROM, or DVD folder, ISO images files.

I also noticed if you have an ISO file to import, it will recognize the ISO automatically with no need to run virtual driver and mount ISO files firstly. Good design.

DVD to TV Converter

Step 2. Choose format.

Click“Format” drop-down list and choose "Common Video >H.264 Video(*.mp4)"; it's the most widely used format which will be supported by your TV.

TV suppported format

Step 3. Adjust video specs or change aspect ratio (Optional)

If you are not satisfied with default specs, then click "Settings" to enter Profiles Settings windows; here you can customize video frame rate, bitrate,size and other settings freely.

TV mp4 settings

If you want to trim, crop, editaudio/subtitles or adjust aspect ratio, click the pencil-like icon and switchto "Crop" tab. Choose Advanced mode, lock the "Keep Ratio" and you can free change aspect ratio.Usually it will be set to "Original"; it would be ok to playback on TV, or you can change it to 16:9.

watch on widescreen tv

Step 4. Start conversion.

Click the big red "Convert" to start converting your DVDs to H.264 MP4.

After the conversion, click "Open output folder" to quick locate converted files; transfer the files to the USB drive then plug the drive in the TV.

If you want to rip your DVD as well as burn all kinds of videos into playable DVD for watching, try the bundled software DVDAid($35) + DVD Creator($35) = Only $35.9, Save $34.1.

It is so easy to stream the DVD disc from PC to TV for enjoying on a 16:9 screen display and burn into DVD for watching with my family. Just enjoy!

Here is the way streaming Blu-ray to TV and how to watch all your movies on TV.