Friday, May 30, 2014

A Full Guide for converting 2014 FIFA World Cup Brazil video to MP4 and burning to DVD

This post will be divided into two parts to explain how to convert recorded 2014 FIFA World Cup videos to MP4 for playback, as well as how to burn them into DVD.

The 2014 FIFA World Cup is the 20th FIFA World Cup scheduled to take place in Brazil from 12 June to 13 July 2014. 2014 FIFA World Cup is a crazy party for football fans. They rock and roll, screaming, drinking, dancing, and singing to celebrate the days on which they can show their crazy fancy for football and their idols.


Actually, for most footaball fans, they prefer to watch live but not every fan can stay at home whole day for World Cup live. Instead, it may be a good choice to downloaded World Cup videos on computer and turn them to playable mp4 fomat or just burn them into watchable DVD video, then you can freely enjoy FIFA World Cup Brazil 2014 without missing awesome moments of this match.

Then how to get it done? Look no further? Never mind. Just follow the guide as follows and you will find an easy way to get full entertainment with 2014 FIFA World Cup videos.

Part I: Convert 2014 FIFA World Cup Games to MP4 format for playing

Software Required:

Free download the best Ultimate Converter which provides the easiest and fastest way to rip Blu-ray/DVD and convert all kinds of movies to MP4/AVI/MKV/WMV and many other video and audio formats, then enjoy 2014 World Cup Video on your portable device on the go for great fun. With clean and simple interface, fast conversion speed and perfect video quality, it will become your most reliable converting tool.

For Win: Pavtube Video Converter Ultimate
For Mac: Pavtube iMedia Converter for Mac

Below is how to convert 2014 Fifa World Cup Videos to MP4 format.

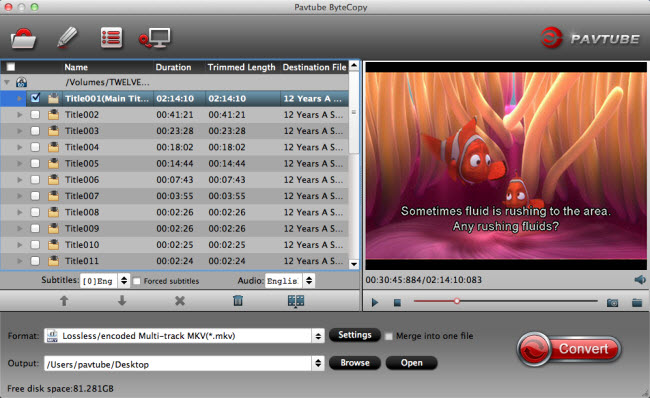
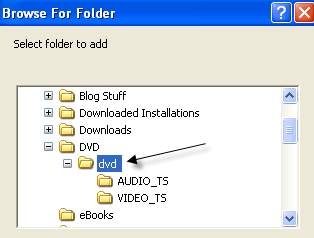
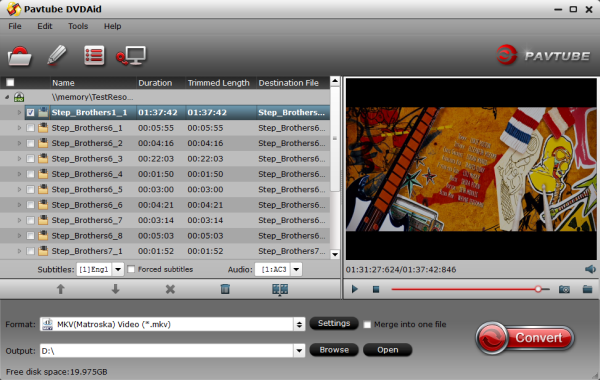
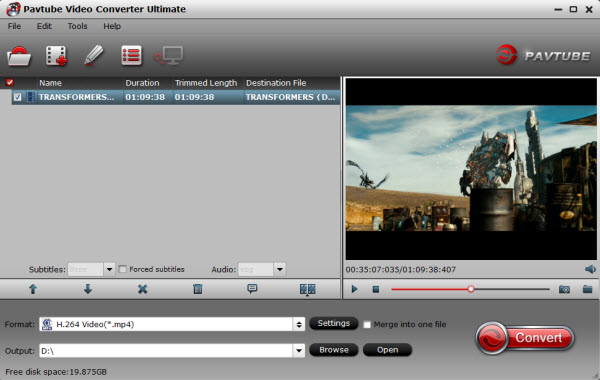
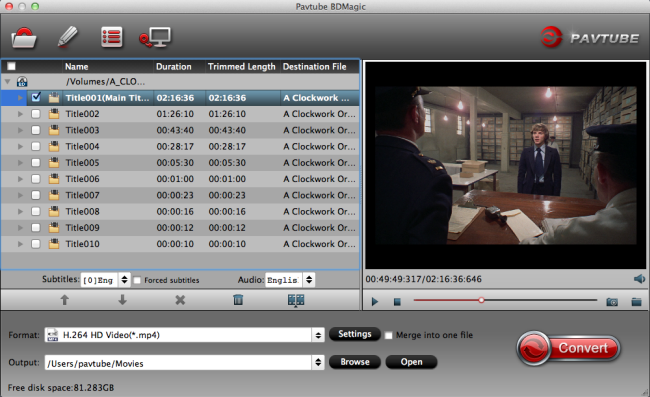
Step 1. Load the World Cup Video to the converter

Download and install the converter, run it and click the "Add Video" button to import the recorded World Cup videos to the program. Batch conversion supported.


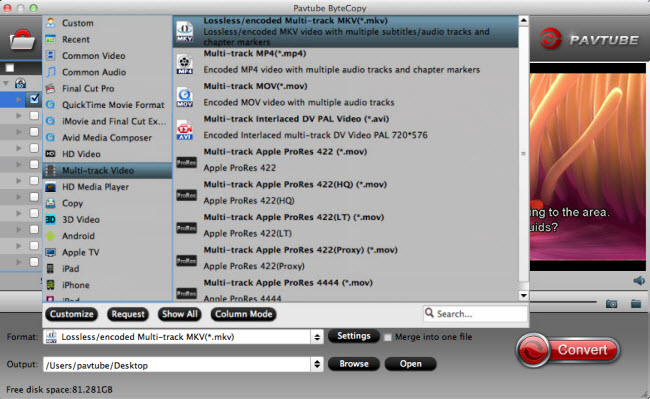
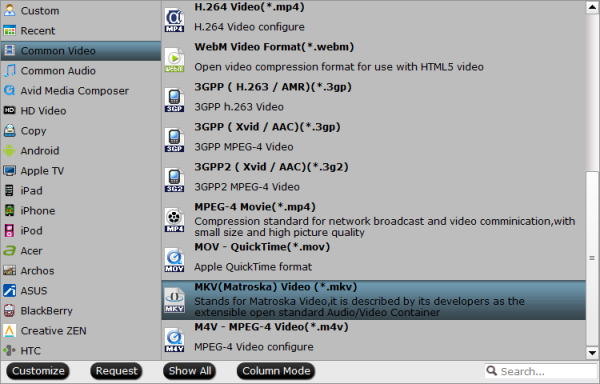
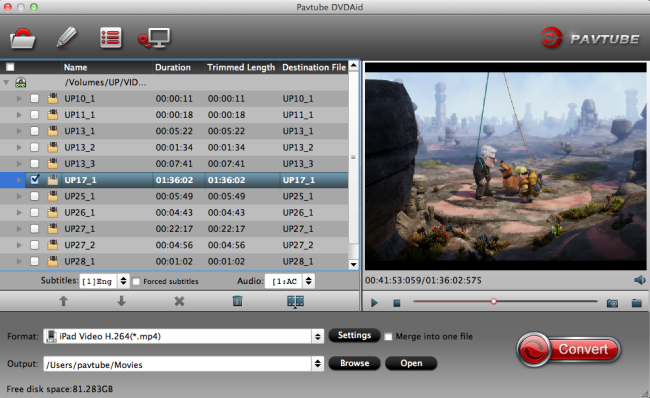
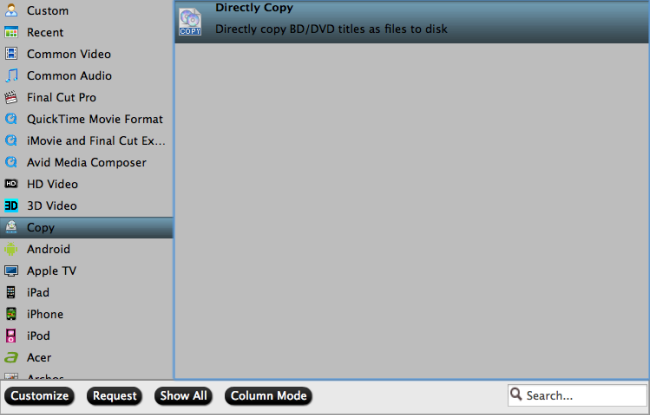
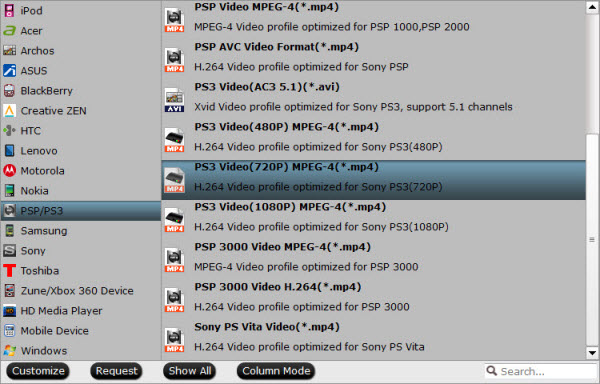
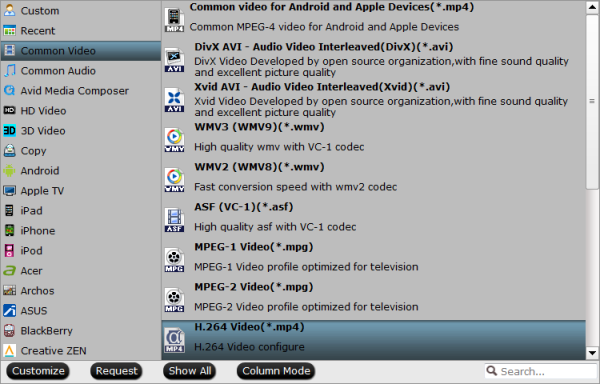
Step 2. Specify the output format as MP4

Choose suitable format by clicking "Format" drop-down menu. There are optimized format for Galaxy Tab, Galaxy Note, Google Nexus 7, Kindle Fire HDX, Galaxy S3, iPad, iPhone, Surface RT & Pro and more. Basically the "Common Video -> H.264 Video (*.mp4)" is a universal format for Android/IOS/Windows tablets and smartphones.


Meanwhile, specify a destination folder to save the converted video files.

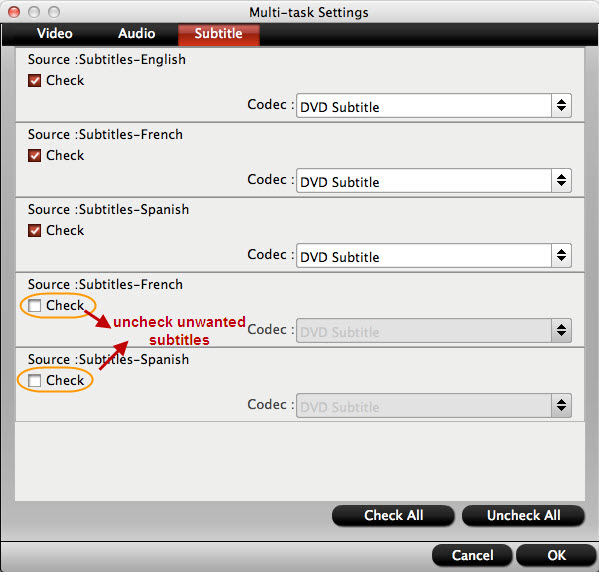
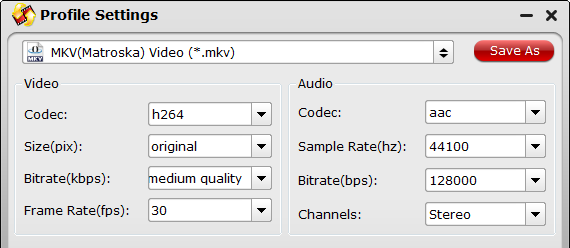
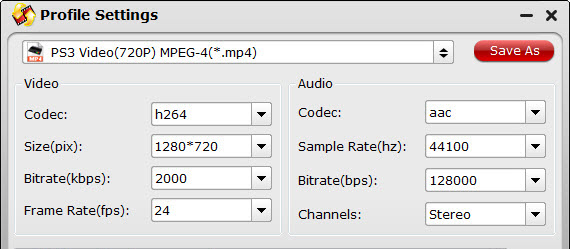
Tip: If you think the video size this not suitable for your portable Tablet or Phone, you can first choose any one of the provided type, then change the settings. Please remember the file size is based more on bitrate than resolution which means bitrate higher results in big file size, and lower visible quality loss.

Step 3. Start converting recorded World Cup Video to MP4

When all the settings are done, click the "Convert" button to begin converting recorded World Cup Video to MP4 format. When the conversion ends, you can enjoy the recorded 2014 FIFA World Cup videos on your MP4 compatible devices without any hassles.

Part 2: Burn World Cup Videos to playable DVD video

Software Required:

Here I recommend using Pavtube DVD Creator, it's on sale with half price, and can help you to easily and fastly burn videos to DVD ISO/Disc for backup or DVD Player.

For Win: Pavtube DVD Creator
For Mac: Pavtube DVD Creator for Mac

Below is how to burn 2014 FIFA World Cup Brazil video to DVD 

Step 1. Free download Pavtube DVD Creator, install and run, import the recorded World Cup Video to the software. Click to load and you click Add title button to add more titles.

Step 2. Switch to Menu pane. Double-click a DVD menu beneath the Menu Template to apply it to your DVD. You can customize the background video/image, background music, text, title thumbnail and more for your DVD menu.


Step 3. Click the Burn button to start burning videos to DVD/DVD ISO. You can choose to burn into DVD disc, save as ISO file, or Generate to DVD Folder.


When the World Cup Video Conversion and DVD Burnning Process is completed, you will be able to get the export files for editing, uploading or sharing with best video quality!

Breaking news: With Pavtube new site releasing, now we are offering some new money saving bundles. With either bundle package, not only can you save more money, you will get the most powerful combination from Pavtube to handle Blu-rays, DVDs, regular videos as well as DRM protected videos files at this Special Offer Page.

Video Converter Ultimate($65) + DVD Creater($35) = Only $64.9, Save $35.1
iMedia Converter for Mac($65) + DVD Creater for Mac($35) = Only $64.9, Save $35.1

More related: 

Fast and Easy way to Upload Recorded World Cup Video to YouTube
How to play MKV, AVI, VOB, Tivo, WMV, MPG, FLV, F4V on Kindle Fire HDX 7
How to Convert Video_TS to MKV Videos on Windows 8.1/8

Tuesday, May 27, 2014

Get my BD copied in lossless MKV format for easily controlling multiple audio sound tracks when watching

This guide provides a simple way to complete lossless backup Blu-ray Disc to lossless mkv format keeping multiple audio tracks, subtitle streams and chapter markers on Mac(Mavericks included).

My problems are I can't seem to create a mkv of the full blu ray (BD) with all the sound tracks. Each time I do it I only get one audio sound track. One time Japanese. I would like to choose English French and Spanish. Sound tracks and subtitles. I also see a problem when down converting the BD from HD to SD. Again I can't seem to control the audio sound tracks that get copied. Is there a way to go from blu ray direct to SD MKV multi track?


Every time you play blu-ray in blu-ray drive, the disc will suffer little quality loss. So a digital backup will help to save the storage space of blu-ray collection, and make it easier to access and carry with. As most Blu-ray Discs include multiple audio and subtitle tracks so that people from different countries who speaking different languages can enjoy same movies in their native languages, so this is reason why people choose to "go from blu ray direct to lossless MKV format" as above.

If you are a Mac use, here recommend you Pavtube Bytecopy for Mac which can help you to backup BD/DVD to mkv without any quality loss. It helps to convert to lossless mkv files with all multiple audio and subtitle tracks, and chapter markers from original BD/DVD. So you can enjoy your movies at any time just like watching BD/DVD and freely choose your desired language.

Let me show you how to do it and you will find the workflow is so easy.

Firstly, you should have download and installed the software. (PS: If you wanna a Windows version, please go to Pavtube Bytecopy. Both are 30% off now.)

Let's go!

Lossless Backup BD disc to MKV with Multi-track/stream on Mac

Note: Put Blu-ray onto Blu-ray drive before ripping Blu-rays.

1. Run the Pavtube ByteCopy for Mac. Press “Load Disc” icon to import Blu-ray movie.


2. Go to Format to find "Multi-track Video catalogue. Select "Loss/encoded Multi-track MKV(*.mkv) , which will provide lossless backup Blu-ray to MKV with multiple audio and subtitle tracks.


Tip: One special function that makes ByteCopy stands out is you can easily select you needed tracks, subtitles.


3. Click "Convert to start conversion. Conversion can be completed within a short time, then click "Open to find generated mkv files.

With a very easy operation, you get the lossless mkv files from Blu-ray, which make you to enjoy movies with high quality wherever you want. However, what Bytecopy for Mac can do is more than it, let's go to below tips to find more.
Tip 1: You may be confused about the other two options under "Multi-track Video" catalogue: Muti-track MP4(*.mp4) and Multi-track MOV(*.mov). They are used to transcode BD/DVD to .mp4 and .mov output files. The point is that they support saving encoded multiple audio tracks. So you could enjoy it in your iPhone or iPod.

Tip 2: Directly Copy will provide you another way to lossless output. It will provide you a 100% backup in original format without extracts. If you do not want to output mkv files or your player cannot play mkv files, directly copy is the best choice for you. It will save 100% intact .M2TS main movie from original BD disc, and allow all. subtitle and audio tracks preservation. You can see more details about it in backup blu-ray disc to M2TS streams flawlessly.

Good news for you: To save your money, Pavtube Special Offer offers various product bundles, save up to $35.1, such as:

ByteCopy($42) + Video Converter Ultimate($65) = Only $79.9, Save $27.1
ByteCopy($42) + DVD Creater($35) = Only $44.9, Save $32.1
ByteCopy($42) + Vidpie($29) = Only $54.9, Save $16.1
ByteCopy($42) + MXF MultiMixer($45) = Only $69.9, Save $16.1

Related articles:

Rip Blu-ray to multi-track MP4/MOV for iPad Air, iPad Mini 2, iPhone 5S/5C
Convert DVD ISO/IFO to Multi-track MP4 for watch on iPad Air
Fastest Digitize your Disney DVD collections to Mac Hard Drive keeping original structure

Monday, May 26, 2014

How to Convert Video_TS to MKV Videos on Windows 8.1/8

In this article, you will learn how to convert DVD VIDEO_TS folder to MKV for smoothly playback with your media player on Windows 8.1/8.

Video_TS folder is the folder on DVDs that contains the DVD's video data and playback information. It contains three kinds of formats, IFO, BUP and VOB. IFO is information file, which is the main factor to operate video playback. With IFO files you can forward or backward the video at will. If IFO files are damaged or can't be read, don't worry. BUP is the backup of IFO and they have the totally same function. But if you happen to lose them all, you will have big trouble in controlling video play, so be careful. VOB means video objects, which is the container of video files. No need to say how important it is.


However, Video_TS folders are not that widely supported. If you want to play play Video_TS folders on much more media players, you may need to convert DVD VIDEO_TS folder to playable MKV file in advance.

To achieve this goal, first of all, download and install Pavtube DVDAid, which is the best tool to accomplish your goal by converting DVD VIDEO_TS to MKV file, Windows 8.1/8 supported.

Overall, the program can easily convert DVD disc, DVD VIDEO_TS folder and DVD IFO/ISO file to any video format for different devices including iPad Air, iPhone 5S, iPhone 5C, Kindle Fire HDX, Apple TV 3, Samsung Galaxy Tab 3, Galaxy Note 3, Google Nexus 7/10, WD TV, WD TV Live, and more.
Good News! Pavtube Release a New Site - multipelife.com with Product Migration and Name Change.
To thanks for your continued support all along our previous site and the new www.multipelife.com, we are holding a 'New Site Special' with fantastic discounts up to 40% off. You can get DVDAid for Windows/Mac platform with 40% off now

https://www.facebook.com/pavtubefans/app_209569249055691
Meanwhile, there are another three programs that are on sale : BDMagic, ByteCopy and Video Converter Ultimate can do the same job for you.

Convert DVD VIDEO_TS folder to MKV file on Windows 8.1/8 easily and fastly

Step 1. Run the best VIDEO_TS Converter, click "Load from folder" to select and load the Video_TS files you want to convert. All the loaded files will be displayed on the left source pane and you can choose the titles to rip.


Step 2. Clicking the "Format" menu, here you are suggested to choose “MKV(Matroska) Video (*.mkv)” as output format from “Common Video” category under the drop-down list of “Format”. If you want to get better HD video quality, just select “MKV HD Video (*.mkv)” from “HD Video” category.


Step 3. If you like, modify profile settings such as video size, bitrate, frame rate, etc to get optimized video and audio playback.


Step 4. Return back to DVDAid main interface, and hit the "Convert" button to start encoding DVD VIDEO_TS to MKV format Windows 8.1/8.

Once it finishes, open output folder, locate the created mkv file and you can transfer DVD VIDEO_TS folder to your media player for watching and sharing anywhere you like.

Meanwhile, with Pavtube's new site releasing, there are many new Money Saving Software Bundles like:

DVDAid($35) + Vidpie($29) = Only $49.9, Save $14.1
DVDAid($35) + DVD Creator($35) = Only $35.9, Save $34.1

Go to find the one you need.

More related:

How to Rip DVD with Preferred Subtitles
How to digitize home DVD/BlueRay library for viewing on TV and Tablets
Rip BD/DVD to MP4 on Mac for iPad, Apple TV, PS 3, Xbox 360, Roku and other players

Wednesday, May 21, 2014

How to Save Pictures from a DVD to a Mac

Description: This guide will show you how to transfer pictures from a DVD to save on your Mac for storage or sharing.

Q: "Hi, I have a large collection of DVDs, when wathing my DVDs on my Mac, I find some pictures or scenes in DVD movies are beautiful. So I attempted to look for a way to save the image from my DVD while it's paused as a picture. Then I can print them out or just upload to share with my family and friends. I have tried using apple, shift, 4, but this function seems not work for my DVD player on Mac. Wanna find a way out..."


As for the quesion above, today I would like to share with you the tips about how to save picture from DVD on Mac. The app I use to capture pictures from DVD on My mac while I am watching DVD movie is Pavtube DVDAid for Mac
  
Features:

* It provide the easiest and fastest way to rip and convert DVD movies to MP4/AVI/MKV/WMV and many other video and audio formats with high quality.

* It largely accelerates conversion speed and saves users lots of time when converting DVD movies to video formats using H.264 codec.

* The video editing features makes you edit the DVD movies as you want such as the Trim function helps you select wanted DVD movie scenes and leave out unwanted part like commercial advertisement.

* You can preview & take Snapshots/thumbnails before ripping your DVD movies
  
Don't you like to have a try?

They provide free trial (no time limitation) before purchase; and you can reach the Windows version here (Surprisingly we found both are on 40% off now for celebrating Pavtube new official website releasing.)

How to Save Pictures from a DVD to a Mac 

Step 1. Load DVD movie from Mac.

Run Pavtube DVDAid for Mac, click "Load disc" icon to load disc from ROM, IFO/ISO or folder. I also noticed if you have a ISO file to import, it will recognize the ISO file automatically with no need to run virtual driver and mount ISO files firstly. Good design.


Step 2. Capture Pictures from DVDs on Mac OS.

After importing, all video files in your DVD will be listed in the program. You can preview the imported movie file by double clicking or checking one of them and click the play button under preview window.

By clicking the camera button under the preview window, you can take snapshot from the playing window as Thumbnail or for other use. By clicking the folder button, you can find the snapshots you took.


Step 3. Personalize your DVD movies(Optional)

If you want to personalize your DVD movies, this Pavtube DVDAid for Mac provides you amazing video editing functions as follows: 

Trim: You can trim off unwanted parts from start and end. You can either drag pointers on the process bar or set exact time point in Start and End boxes to set.

Crop: You can drag the edges on play window to specify or adjust parameters. You can also click the human button to switch to advanced mode. And then you can set display aspect ratio as well as output ratio and output mode.

Text Watermark: Check Enable, you can add text watermark to selected video clip. You can either set parameters or drag the text on preview screen to set its location.

Image/Video Watermark: Check Enable, you can add images or videos as watermark onto selected video file. The location can also be set by dragging on the preview screen.

Effect: Under Effect tab, you can add special effects like Simple Gauss Blur, Flip Color, Invert, Aged Film to your source video. In Color Control section, you can correct color by by adjusting brightness, contrast, and saturation. Deinterlacing is checked by default to keep good image quality.

Audio Editor: You can either replace/remove original audio, or set audio fade in/out effects.

More details, please refer to the user guide of DVDAid for Mac.

In fact, besides saving picture from DVD and editing the video clip, the most important function of DVDAid for Mac is to convert DVD to a proper formats for playing on all Android, iOS and Windows Tablets/Smartphones; or for watching on our TVs, PS3, Xbox 360, WDTV etc. HD Media Players on Mac. 

See also:

Mac Tips: How to Digitize Your Blu-ray Collection with BDMagic for Mac
How to Play DVD on Computer Effortlessly 
How to make free blu-ray ISO image file from commercial blu-ray discs?

Pavtube Release a New Site - multipelife.com with Product Migration and Name Change

Announcement:

Aiming to improve customers' experience and product improvements, Pavtube Studio recently launched its new official website - multipelife.com.

Along with the new website, Pavtube has migrated its all BD/DVD Copying & Ripping software products to the new site with some brand new names, fantastic discounts waiting for you:
  • DVD Ripper (Windows/Mac) -> DVDAid (Windows/Mac
  • Blu-ray Ripper (Windows/Mac) -> BDMagic (Windows/Mac)

Great News!

If you always fan our Facebook or will be a new fan, you might have a chance to get "New Site Special" with up to 40% off fantastic discounts now!

Seems wonderful? Take action now without hesitation!!! Start to experience more fresh enjoyment while exploring Pavtube new website- multipelife.com.

More detailed information is published on prweb.com.

Tuesday, May 20, 2014

Comparison between Pavtube Video Converter Ultimate and Handbrake

Read the full comparison between Pavtube Video Converter Ultimate and Handbrake. I test each product thoroughly and give high marks to only the best. All ideas expressed are my own, honest opionions.

Handbrake is a well-known video transcoder software application. And Pavtube Video Converter Ultimate is an all-in-one toolbox which I used for years. In the past several days, I've tested the similarities and differences between the two programs- Pavtube Video Converter Ultimate and Handbrake, now I'd like to share my summary here. This post is written without partiality, just be objective to show the truth, hope it will be of some help for you guys.


Pavtube Video Converter Ultimate (4.7.0) VS. Handbrake (0.9.9)


1. Input:

Pavtube Video Converter Ultimate: Able to load BD/DVD discs, a wide range of video files.

Commonly used H.264, MP4, MOV, MKV, VOB, WMV, MPG, Tivo, AVI, Divx, M4V, QT, FLV, F4V, ASF, 3GP, TS, MTS, M2TS, TP, TRP, MOV, MOD, TOD, MXF(partial), DV, M2V, 3G2, RM, RMVB, DAT, NUT, NSV, etc. etc.
3D Blu-ray movies, 2D Blu-ray movies, Blu-ray Folder, Blu-ray ISO Image File
DVD movies, DVD Folder, DVD IFO File, DVD ISO Image File.

Handbrake: Able to load a wide range of video files, including commonly used .mkv, .flv, .m2ts, .mp4, .wmv, avi, .mod, etc., and unprotected DVD .vob files, but unable to work with .tivo files.

2. Loading speed:

Pavtube Video Converter Ultimate: The speed of loading files is faster than Handbrake, especially when loading DVD files.

Handbrake: The speed of loading files is much slower than Pavtube Video Converter Ultimate, especially while importing DVD files.

3. Output

Pavtube Video Converter Ultimate: Output formats are various.

Common video formats:

AVI, WMV, MP4, MKV, MOV, M4V, VOB, DV, ASF, MPG, 3GP, 3G2, etc.

HD video formats:

MP4, MOV, MPG, MKV, WMV, TS, AVI, etc.

Lossless video stream:

VOB, MPG, TS, M2TS from DVDs, Tivo shows and Blu-ray Discs

Flash video:

FLV, F4V, SWF

Note: Video Converter Ultimate does not support ISO output.

Handbrake: Output format are limited, only MP4, MKV, and M4V.

4. Audio Pass Thru

Pavtube Video Converter Ultimate: No Audio Pass Thru option

Handbrake: Allow AC3 pass-through, or DTS pass-through

5. Preview

Pavtube Video Converter Ultimate: Preview videos in real time.

Handbrake: Need encoding firstly, and then preview with external media players, like QuickTime and VLC.

6. Batch conversion

Pavtube Video Converter Ultimate: Supports batch conversion and multiple files can be converted in the same time.

Handbrake: Supports batch conversion, but files can only be converted one by one.

7. Editing functionality

Pavtube Video Converter Ultimate: More Powerful editing functionality, including cropping, trimming, adding text, image and video watermarks, audio replacement, adjusting contrast, brightness, and saturation, as well as adding special effects, and deinterlacing.

Handbrake: Supports cropping, adding subtitles, adding multiple audio tracks, and video filters.

8. Subtitles

Pavtube Video Converter Ultimate: Support attaching SRT/ASS/SSA subtitles

Handbrake: Supports adding subtitles

9. Advanced settings

Pavtube Video Converter Ultimate: Allows adjusting audio and video parameters like codec, aspect ratio, bit rate, frame rate, sample rate, audio channel.

Handbrake: Allows adjusting video codec and frame rate only.

10. Conversion speed

Source file for testing:

MKV file, video codec:H.264;Resolution: 1280*536; Frame Rate: 24; Duration: 01:45:55; Audio Codec: DCA; Sample Rate: 48000Hz; Channels: 6

Pavtube Video Converter Ultimate:
Convert to MKV format, Video codec: h264, Size: original, Bit rate: High Quality; Audio Codec: aac; Sample rate (hz):44100; Bit rate (bps):128000; Channels: Stereo

Time expenditure: 1 hour and 23 minutes.

Handbrake:

Convert to MKV format, Video codec: h264, Frame Rate: Same as source, adding subtitles and using Audio Pass Thru.

Time expenditure: 5.5 hours

If you have interests to have a try about the two programs by yourself, you can download them here:

Pavtube Video Converter Ultimate
Handbrake 0.9.9

BTW, as Handbrake can't let users convert copyright protected DVDs and encrypted DVDs for backup, but just homemade DVDs. If you want to convert protected DVDs, I usually use Pavtube Video Converter Ultimate to rip my commercial DVDs.

See also:

Pavtube Video Converter Ultimate Review, Promotion and Guide
2014 Top 5 Best Audio and Video Converter Ultimate Reviewed
Pavtube Major Upgrade in BDMagic, DVDAid, ByteCopy and Video Converter Ultimate

Thursday, May 8, 2014

2014 Mother's Day Coupon Codes- 40% off DVD Ripper at Pavtube

Description: Haven't figured out a strategy or got any plan to show as well as tell your mom how much you love her at 2014 Mother's Day? Take a look at up to 40% off Specials and Deals from Pavtube Facebook!

Good news: 2014 Mother’s Day is just around the corner, have you got something unique and special for Mom? A bunch of flowers? It droops easily. A Mother & Baby Pendant, a bracelet, or a pair of earrings? Sounds nice but first you have to pick out the right style. LOL. Anyway, they can be easily lost too. So this Mother’s Day, let’s give mom a super surprise!

To thanks for your faithful support during the past years, Pavtube now offer 30% off ByteCopy, 40% off Ultimate Converter and 40% off DVD Ripper as 2014 Mother’s Day specials for your beloved Mom. It starts from May 8th to May 12th, five days in total. Time-limited! Never Miss these promotion items!

This is 2014 Mother's Day best Gift Idea from Pavtube Facebook


1. 30% off Pavtube ByteCopy Windows/Mac

A magic Blu-ray/DVD ripping software (Pro version), it’s not only capable of ripping Blu-ray/DVD to desire formats (MP4, MOV, M4V, TS, MKV, AVI, WMV, MPG, VOB, etc), but also offer a Multi-track preset to enable you backup movie to lossless MKV or MP4/MOV/ProRes with multiple audio tracks and subtitles, so that you can free choose wanted languages during playback. Now start watching your favorite BD/DVD discs with your deal mom.

2. 40% off Pavtube Video Converter Ultimate/iMedia Converter for Mac

The best deal of Ultimate Converter ever! With this tool at hand, you’re not only able to rip Blu-ry/DVD movies, but also convert footages of your Mom and make a easy-to-watch video to put on portable devices, computers, to video editing programs or uploading to your YouTube channel.

3. 40% off Pavtube DVD Ripper Windows/Mac

It has outputs for almost all the mobile devices, so you can start getting DVD movie library ready for your various Apple/Android/Windows Tablets and Smartphones like Kindle Fire HDX, iPad Air, Galaxy Tab Pro, Galaxy Note Pro, Galaxy S5, Google Nexus 7, Google Nexus 10, Nexus 4, Google Nexus 5, Sony Xperia Z2, Surface 2, Surface Pro 2, etc... This is definitely a good gift for frequent travelers. If you already bought a tablet or a smartphone for your mom, begin your journey with wonderful movie entertainment.

Like us at Facebook to get up to 40% OFF Mother's Day awesome Gifts (for fans only):

https://www.facebook.com/pavtubefans/app_201742856511228

More money saving bundles can be found here:

http://www.pavtube.cn/special-offer.html

From: http://video-tips.jimdo.com/2014/05/09/2014-mothers-day-special/

Move "The Lego Movie(2014)" Blu-ray onto Western Digital My Book Live for roku streaming with Mac OS X

This article introduces how to backup or copy "The Lego Movie(2014)" Blu-ray disc to Western Digital My Book Live on Mac, so that you can watch the movie on Roku without format problems.

Review: Everything About 'The Lego Movie"


It would have been so much easier, and so much safer, for directors Phil Lord and Christopher Miller to just make the kind of Lego Movie that you probably expected from the marketing. They could have crafted a simple hero’s journey, crammed with celebrity cameos and postmodern humor, and called it a day while watching the money roll in and the toy sales shoot through the roof.

And there are all of these elements in this particular Lego Movie, but there is also something more. The film goes in some wonderfully unexpected directions and takes real storytelling risks. I cannot say how everyone will respond to its narrative left turns and unexpected poignancy, but they elevate to the film far above a glorified toy commercial. The Lego Movie may in fact be brilliant. Expected release date for The Lego Movie DVD and Blu-ray discs is May-June, 2014.

How to bacup "The Lego Movie(2014)" Blu-ray onto Western Digital My Book Live" on Mac

With "The Lego Movie(2014)" to be released on Blu-ray, I have the question: how to digitize a blu-ray movie and put it on my western digital mybooklive device for streaming onto roku devices with Mac OS X?

To copy my Blu-ray on My Book Live with Mac, it may take a lot of energy. Although, MacX DVD Ripper Pro Wondershare Video Converter Ultimate and iDVD can do this, none of them can be easier to use that Pavtube.

The best BDMagic for Mac from Pavtube can help you back up Blu-ray and DVD movies to Mac hard drive, copy them to Home Server, NAS for storage and watching them on HDTV and HD Media player including PS3, PSP, Xbox, Dune HD Player, WD TV Live within few clicks. Really simple interface and powerful function. On the roku, I use the roksbox channel, configured to steam movies from the WD/apache server. Works really good on my home network.

Detailed steps to copy "The Lego Movie(2014)" Blu-ray to My Book Live on Mac

Before copying Blu-ray discs check what you need:

1. An external Blu-ray drive.

2. Top Mac Blu-ray Ripper software - Pavtube Blu-ray Ripper for Mac

3. Internet connection.

4. "The Lego Movie(2014)" Blu-ray disc.

You can also free download Pavtube Blu-ray Ripper for Mac and have a try.

Step 1. Install and run the Top Blu-ray Ripper for Mac and insert Blu-ray disc into the Blu-ray drive, the Ripper will automatically load the disc information.

Make sure you have enough space on your drive (depending on the disc, this could be up to 50 GB).


Step 2. To copy the M2TS/ VOB streams only without menus and ads, pls choose the "Directly copy" option in "Copy". (The main movie is selected by default.)


Or you can click on “Copy the entire disc” button to back up Blu-ray movie to Mac. A 90 min. Blu-ray takes about 40 min to copy to Mac hard drive. The ripped Blu-ray directory contains two folders, “BDMV” and “CERTIFICATE”. Then the ruku is able to play the M2TS files from Blu-ray directory.

Step 3. Specify an output folder to save Blu-ray movie.

Click “Browse” button and specify an output location. Make sure there is enough space for a whole BD movie (usually 25GB-50GB) when backing up Blu-ray disc to Mac HDD.

Step 4. Back up Blu-ray/DVD for My Book Live on Mac.

After the copying process completes, you can get the final output files by clicking “Open” button with ease, then copy resulting file to My Book Live and then stream onto your Roku.

Additional Tips

The Top Blu-ray Ripper for Mac can help you remove Blu-ray protection and rip "The Lego Movie(2014)" Blu-ray to common formats: MP4, AVI, MOV, MKV, WMV, SWF, FLV, F4V, etc. Most popular portable devices are also supported, so that you can enjoy Blu-ray movies on your iPhone 5S, iPhone 5C, iPad 4, iPad 3, Surface RT/Pro, Surface 2, Surface Pro 2, Sony Xperia Z1, Xperia Z2, Motorola Droid Mini, Moto X, Samsung Galaxy Tab Pro, Galaxy Note 3, Google new Nexus 7, Kindle Fire HDX...

Plus, Pavtube application takes advantage of the NVIDIA CUDA technology and AMD APP technology, and the conversion speed can be increased up to 6 times faster than ever before. Moreover, Pavtube programs support adding *.srt and *.ass subtitles into video and merge into one file for output.

Related Articles:


How to Watch Blu-ray on 50”Plasma Plasma TV via Plex Server?

Monday, May 5, 2014

Convert DVD to PS4 without quality loss for enjoying freely

This post will give you the easiest solution to rip DVD movies to PS4 for playing on HDTV or Home Theatre, especially for users who want to keep their DVD from scratched.

Sony PS4 is released in more and more countries, many fans have got this striking video game console, with it, we can play latest games on HDTV’s big screen and home theatre. If you happen to have a great DVD collection, you can play DVD on PS4 and enjoy a fantastic movie night with your family. But as we know, DVD Discs are easy to break after playing on PS4's drive over and over again.

To get hundreds of DVDs playable with a remote control on PS4, the best choice is make a digital copy of the DVD discs for permanent enjoying. To get it done, Pavtube DVD Ripper is the best tool for you. Overall, this program can help you extract DVD movies to PS4 playable format with fast speed and zero quality loss. The Mac version is Pavtube DVDAid for Mac. Below is guide for you to learn how to convert DVD to PS4 for watching or streaming.

Overall, in addition it is also a good tool for user making DVD enjoyment, and this powerful function is always be overlooked by consumers, it supports many media formats such as MP4, H.264, H.263, DivX, XviD, WMV, MPEG-2, and if you have some DVD movies at hand, you can use this Pavtube DVD Ripper ripping and converting them to store on PlayStation 4 (PS4), then you can take it everywhere for playing.

Tip:

If you also want to enjoy Blu-ray/DVD movies to 3D videos for playback, trying Pavtube Bytecopy (Win/Mac), which can help you to backup your BD/DVD keeping original subtitle streams and multi-track audios.

Step 1: Run Pavtube DVD to PS4 Converter, and load DVD files to it. You can click “DVD ROM” to load movie from DVD drive or “ISO/IFO” DVD ISO file.


Step 2: Select output format for PS4. Click on the drop-down list at the opposite side of “Format”, and then choose “PS3 Video(720P) MPEG-4(*.mp4)” format for streaming DVD rips to PS4.


Tip: This PS4 DVD Ripper let users control/customize output file quality. To improve video quality, simply click “Settings” and set video bitrate up.


Step 3: Start ripping DVD to mp4 video for PS4 streaming.

Click “Convert” button to rip DVD to PS4, once the ripping task is finished by Pavtube DVD to PS4 Converter, you can click “Open” button at the bottom of the main interface to get the output mp4 file for streaming to PS4.

You can use a PC with PS4 Media Server, TVersity, Windows Media Player 11, Vuse, Nero MediaHome or Mezzmo configured. (Learn how to set up Windows PC as a DLNA Media Server for PS4 streaming.)

More related: