Showing posts with label Sony Vegas. Show all posts

Thursday, August 7, 2014

Smoothly load Canon EOS C500 PL MXF recordings to Sony Vegas Pro 12

In this guide you will learn how to smoothly load Canon EOS C500 PL MXF recordings to Sony Vegas Pro 12 for editing by transcoding MXF to Vegas compatible WMV or MOV previously.

About the Canon C500 PL

Canon EOS C500 PL capitalizes on the groundbreaking ergonomic design of the EOS C300 PL camera, and offers a new Super 35mm, 8.85-megapixel CMOS image sensor, DIGIC DV III Image Processor and an expansive range of recording. The C500 offers 4K 10-bit RAW, 2K RGB (4:4:4, 10/12 bit) or Full HD RGB data output to a compatible third party external device at frame rates of up to 60P. Simultaneously record Full HD MXF files to CF cards for use as proxies in desktop editing.
canon c500 pl

As far as I know, many folks find it is not convenient for them to import MXF footages from Canon EOS C500 PL to Sony Vegas Pro 12 for editing. In fact, Sony Vegas announces that it can work with MXF on its official site, but some users still have troubles when transferring MXF files to Sony Vegas. Then what should we do to successfully load Canon EOS C500 PL MXF recordings to Sony Vegas Pro 12?

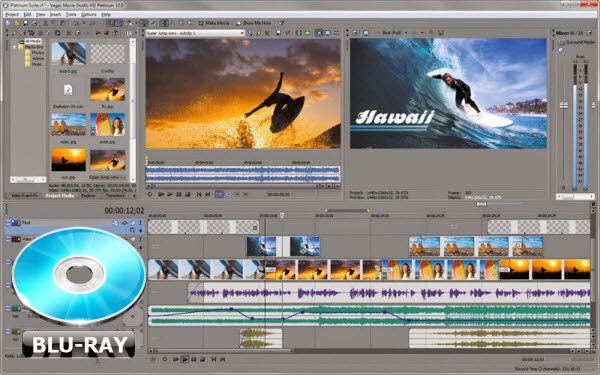
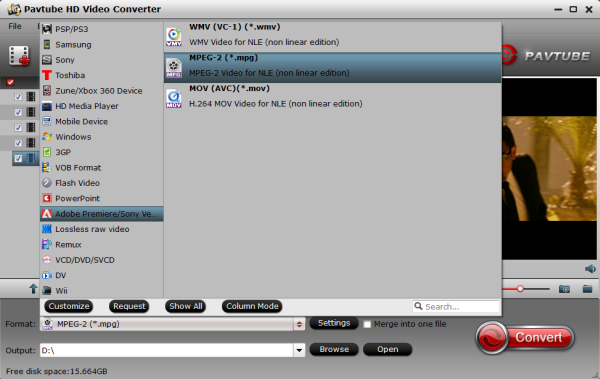
It's quite easy, the best way to let Vegas Pro work with MXF files is to convert these files to Vegas compatible formats like WMV and MOV previously. Actually, you just need a Canon MXF Converter which makes it possible to smoothly import EOS C500 PL MXF recordings to Sony Vegas Pro 12 for editing.

If you are interested in doing this, I recommend Pavtube Video Converter, which offers various output formats, and you can select the most suitable one for your Vegas Pro 12.

convert mxf to vegas pro 12

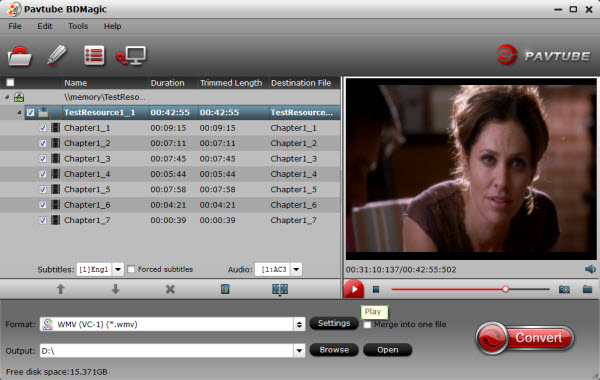
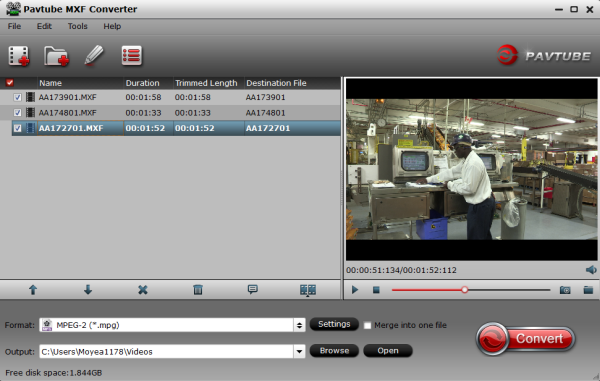
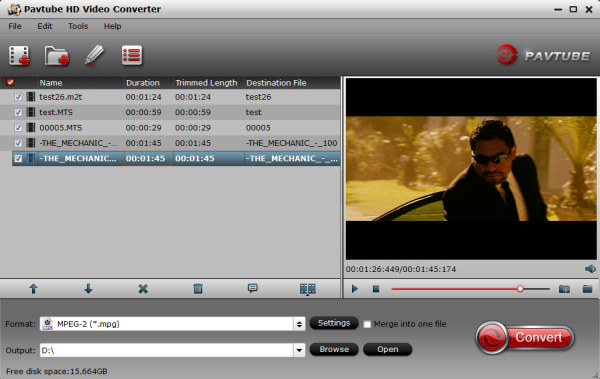
The software works like most other Video Converter I'v used and the process is straightforward. Assuming you have downloaded the Canon MXF Converter to your PC, the first step is to drag and drop your MXF files to the program.

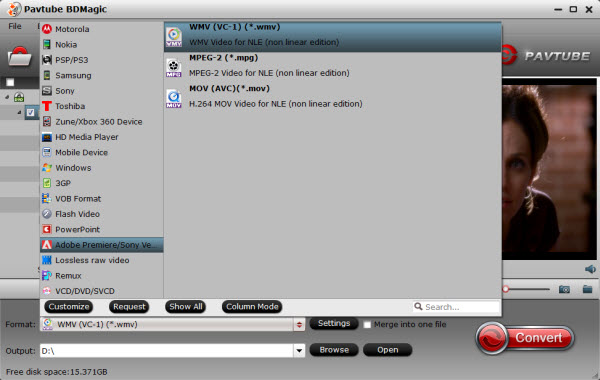
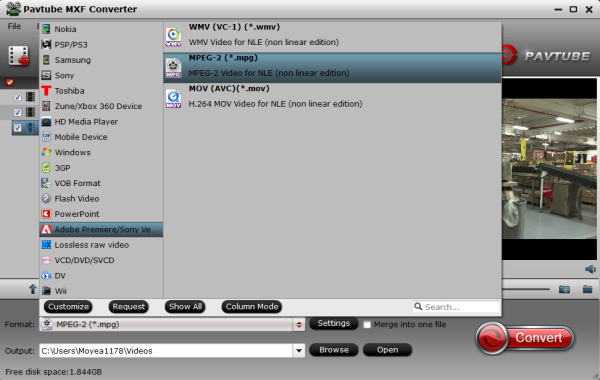
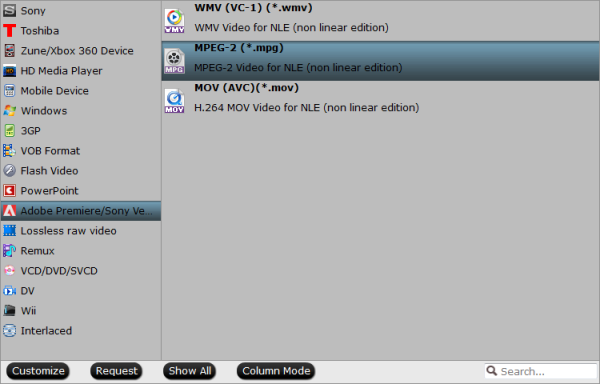
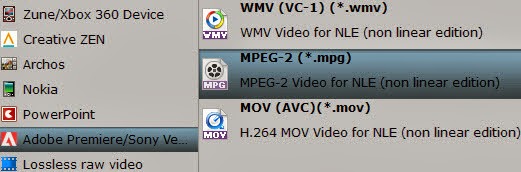
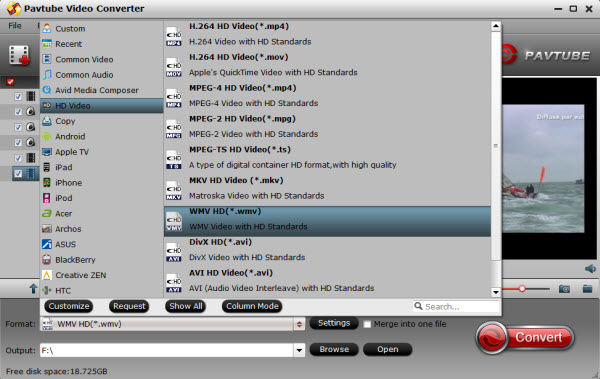
Then choose output profile for Sony Vegas, you can click on the dropdown menu of "Format” and then move your pointer to "HD Video", under the sublist, you can easily find the "WMV HD(*.wmv)", which are both the compatible formats for you to edit Canon EOS C500 PL MXF files in Sony Vegas smoothly.


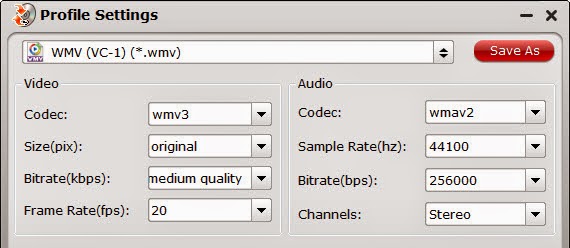
Finally start the conversion from Canon MXF to WMV/MOV for Sony Vegas.

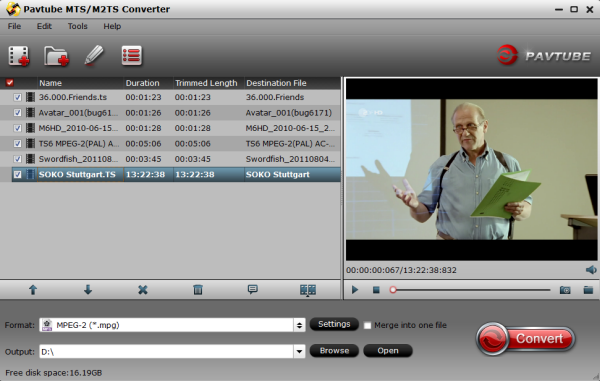
PS: Pavtube Video Converter is more than a Canon C500 PL Video Converter; it allows all the MXF videos from all kinds of MXF HD camcorders like Sony XDCAM, Panasonic P2 series, Canon XF series, C300 and C500. For any other MXF camcorders, you can also use the software to do previous conversion for different video editing software.

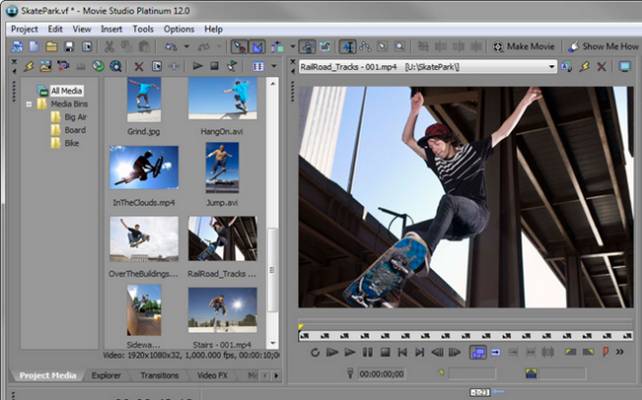
After a short conversion, you will be able to import Canon EOS C500 PL MXF videos into Sony Vegas Pro 12 for editing without rendering. If you are mac users, learn how to load Canon C300 PL MXF files in FCP 6/7.

Thursday, April 10, 2014

Best way editing a Blu-ray movie in Sony Vegas Pro

How to import your favorite Blu-ray movies to Sony Vegas Pro? Here, Pavtube Blu-ray Ripper is a practical app helping you transcode Blu-ray into to WMV/MPEG-2 for editing in Sony Vegas Pro.

"Hi all! I'm new and I am looking for help with ripping DVD content for editing in Sony Vegas Pro? What do you use that works?!"

"Hey there! I need to be able to edit clips from movies in Sony Vegas Pro. So I need to convert the movie into a file format that Sony Vegas Pro understands. what software is best for converting the movie?"

"Is it possible to import a movie from bluray to Sony Vegas Pro?"

Many Blu-ray lovers are looking for the way to edit their favorite BD in editing tools to create their masterpiece. However, the users found easily that they can not directly import the Blu-ray movie to Sony Vegas Pro for smoothly editing. Then how can they upload the Blu-rays to editing systems, such as Sony Vegas Pro for postproduction?

As we all know, the most compatible video format for Sony Vegas Pro editing is MPEG and WMV format. So we need to transcode the Blu-rays to Vegas editable format first before importing. In order to perform the task smoothly, I recommend you a powerful Blu-ray Ripper which has an exclusive function to support Blu-rays and DVDs to editing tools, such as Adobe Premiere Pro, Avid Media Composer and Sony Vegas Pro.

With it, you can rip/convert Blu-ray movies to Sony Vegas Pro without quality loss in a fast speed. Follow the guide below to get Blu-ray movies transferred to Sony Vegas smoothly.

What do you need in advance?

1. Get a PC
2. Connect Blu-ray Driver to your PC
3. Download Pavtube Blu-ray to Sony Vegas Converter

Guide: How to convert Blu-ray movies to WMV/MPEG-2 for Sony Vegas Pro?

Step 1. Load Blu-ray movie.

Download the best Blu-ray Ripper from Pavtube, install and run the app. Insert Blu-ray to disc drive, click the “Load disc” button to import source Blu-ray.


Pick one audio track and subtitles in the drop-down list of Audio and Subtitles. You are free to preview Blu-ray movie in the right preview window to check if you get the correct audio track and subtitles.

Step 2. Select output format.

Choose the suitable output format from the “Format” menu, and here choose "WMV (VC-1) (*.wmv)" from "Adobe Premiere/Sony Vegas" as output format.


Tip: If you like, click on the "Settings" icon to adjust audio and video parameters, such as Bitrate, Size, frame rate, etc to your own requirements.


Step 3. Start ripping Blu-ray movies to WMV/MPEG-2 for Sony Vegas Pro.

Double check all press and hit the “Convert” button to start ripping Blu-ray movies to Sony Vegas Pro compatible format. Once the conversion finishes, import the ripped video files to Sony Vegas Pro and edit them to get your own video clip with ease.

Read more:

Tuesday, November 12, 2013

Get your Movie Studio Platinum 12 working beautifully with MXF from Panasonic AG-HPX171E

The Sony Movie Studio Platinum 12 won't import P2 MXF files from Panasonic AG-HPX171E. The easy workaround is to transcode MXF to Movie Studio friendly format.

Sony Movie Studio Platinum 12 is a powerful 64-bit video editor at a reasonable price. Among consumer-level video-editin applications, it is one of the most capable, offering more features than most of its competitors do. Even with a user-friendly interface,  Sony's Movie Studio Platinum offers many features customizable options. However, users find it's difficult to import P2 MXF clips from HPX171E to Movie Studio.


My camera is 171e-Panasonic (p2 cards). Actually I am new one in all this story about video .I have a material and before I start to make editing in Movie Studio Platinum 12.00 (sony) and I would like to give to my friend to have “first look" on my computer or TV. I ask some friends and they told me to make P2 MXF to MPEG-2 conversion. What i can do? Thank you.
In fact, MXF is a self-container format which is unacceptable by various non-linear editing systems (NLE), like Pinnacle Studio, Sony Vegas, Avid Media Composer, Premiere, Movie Studio Platinum 12 etc. So to import the MXF files from Panasonic AG-HPX171E P2 camera to Movie Studio Platinum 12 for editing, the easy workaround is to transcode MXF files to Movie Studio compatible video formats.

For converting Panasonic AG-HPX171E MXF video into Movie Studio editing friendly format, the best recommendation is Pavtube MXF Converter. This is a smart tool specially designed for MXF users to preview and convert MXF recordings to your wanted video and audio formats, so as to smoothly add them into Movie Studio Platinum 12, Sony Vegas, Adobe Premiere, Windows Movie Maker, Magix Movie Edit Pro, Ulead DVD MovieFactory, Pinnacle Studio and more other video editing software to do further editing. It naturally support converting MXF recordings shot by a Panasonic P2 camcorders and Canon XF camcorders.

To help those who wanna edit Panasonic AG-HPX171E MXF files in Movie Studio Platinum 12 without problems, here I share with you a simple guide on how to convert MXF files from HPX171E to edit in Movie Studio Platinum 12.

Part I: Transcode AG-HPX171E MXF to MPEG-2 – native editing format for Movie Studio Platinum 12

1. Backup Panasonic AG-HPX171E camcorder MXF videos from P2 HD card to local HDD with full P2 directory preserved, as both the video and audio are saved separately as .mxf files.

Notes:  If your are a P2 MXF camcorder user, you will find from the P2 MXF recording, video audio files are separated in different folders. Also, it’s no difficult to find one video will have four audio tracks. For archiving, you need to keep the whole structure of video and audio.   

2. Run Pavtube MXF Converter. Click "Add Video" or "Add from folder" icon to load MXF files from AG-HPX171E.


3. Choose "MPEG-2 (*.mpg)" as target format from "Adobe Premiere/Sony Vegas" option. 


4. Click "Settings" button and enter "Profile Settings" panel to adjust video and audio settings if necessary. Users are free to reset codec, bit rate, frame rate, sample rate, and audio channels.

5. Click the big button "Convert" to start Converting AG-HPX171E to MPEG-2 for Sony Movie Studio Platinum 12.

6. Locate converted P2 recordings (in .mpg format) by clicking on "Open" button.

Part 2: Import converted .MPG to Movie Studio Platinum 12 for editing.

Now your Panasonic  AG-HPX171E .MXF footage are converted into Movie Studio Platinum 12 natively supported format. Launch Movie Studio Platinum 12, and follow "Import" > "IMPORT FROM" > "Other devices" > "the folder stored the converted .mpg files" > "Start Import" to get P2 footage into Movie Studio Platinum 12.


Personally I am very pleased with the product. As I have only used the product a few times so far it is difficult to give any constructive comments at this stage but all my conversions were done successfully with stunning image quality – I can hardly tell any quality difference.

Read More:

Thursday, August 1, 2013

Easily import Sony XDCAM EX Footage to Avid, Premiere, Sony Vegas, Pinnacle, CyberLink, Windows Movie Maker

Summary: This article offers a brief guide about how to transcode and transfer Sony XDCAM EX footages to Windows editing programs like Avid, Premiere, Sony Vegas, Pinnacle, CyberLink, Windows Movie Maker for editing. 

Sony XDCAM EX series camcorders, like like PMW-EX3, PMW-200, PMW-EX1, PMW 150, etc, are high-end professional camcorders which can capture high definition shootings, they can offer very high quality HD recording at a data rate of up to 50Mbps wrapped with MP4 format. While enjoying the stunning videos recorded of HD image quality, many users are having problems when trying to edit Sony XDCAM EX videos on Windows editing software, like Avid, Premiere, Sony Vegas, Pinnacle, CyberLink and Windows Movie Maker,etc. 

Hot search: Sony XDCAM to MPEG-2 for Sony Vegas Pro | Sony XDCAM HD IMX Files on Mac NLEs | Sony XDCAM HD422 to Final Cut Pro X | Sony XDCAM in MOV on Mac Yosemite | Sony XDCAM EX for Avid, FCP, DaVinci Resolve, etc 
 

The reason that we can't successfully import Sony XDCAM EX MP4 recordings to Windows Platform for editing is because of the format compatibility. Since the XDCAM EX MP4 footage is a peripheral non-standard format which is not supported by editors on Windows PC. 

In order to import Sony XDCAM MP4 footage into Avid, Premiere, Sony Vegas, Pinnacle, CyberLink and Windows Movie Maker for smoothly editing, we can render to the third-party software to help convert XDCAM EX MP4 to AVI/MOV/WMV/MPG– native format for Avid, Premiere, Sony Vegas, Pinnacle, CyberLink and Windows Movie Maker. This is the best way to help XDCAM users to edit Sony XDCAM EX MP4 on Window PC smoothly..To achieve our goal, the quickest and easiest way is to use the easy-to-use yet professional software called Pavtube Video Converter , with which, we can effortlessly and flawlessly transcode Sony EX MP4 footage to AVI/MOV/WMV/MPG for Avid, Premiere, Sony Vegas, Pinnacle, CyberLink and Windows Movie Maker editing. It is safe to install and easy to use. And you can enjoy the powerful edit function, like trim, crop, watermark for text, image and video, 3D effect, subtitles and so on. Below will show you how to 


Other Download: 
- Pavtube old official address: http://www.pavtube.com/video_converter/ 
- Amazon Download: http://download.cnet.com/Pavtube-Video-Converter/3000-2194_4-75734821.html 
- Cnet Download: http://download.cnet.com/Pavtube-Video-Converter/3000-2194_4-75734821.html 


Free download and follow below step to convert Sony XDCAM EX MP4 for Windows . 

Step 1. Load Sony XDCAM EX MP4 files.You can choose "add video" directly to add the whole folder. 


Step 2. Select output format for video editing software. 

Click "Format" menu and choose "Adobe Premiere/Sony Vegas -> MPEG-2 HD Video (*.mpg)",or select WMV/MOV/MPEG-2, you can also choose "HD Video -> AVI HD Video (*.avi)". Finally, click the file icon beside output bar, and choose a destination folder for saving output files. 


Step 3. Edit loaded Sony XDCAM EX MP4 files. 

Click "Edit" button and you are allowed to trim, crop, add text/image/video watermark or some effect to your output video for making it perfect. Here the function of adding subtitles to output files will contribute to make your own videos. 

Tips: Click "Settings" on the interface and you can adjust the parameters including size, bitrate, frame rate, etc. to get a high quality of output files. And keep the settings the same as original video recordings will provide you the least loss of video quality. 

Step 4. Start conversion. 

Click the "Convert" button to start transcoding Sony XDCAM EX MP4 footage for editing in Avid, Premiere, Sony Vegas, Pinnacle, CyberLink and Windows Movie Maker. When it completed, click the "Open" button to get the generated videos for your editing software. 

More related tips: 

Wednesday, June 5, 2013

Make Sony CX550V AVCHD video workable with Avid, Premiere, Sony Vegas Pro, Windows Movie Maker, Pinnacle

If you are Facing the problem with importing Sony CX550V MTS to Windows PC in Avid, Premiere, Sony Vegas Pro, Windows Movie Maker, Pinnacle, you can fix the issues via transcoding AVCHD video to Windows compatible format first.


Sony's flagship 2010 model, the HDR-CX550V, is a larger camcorder than its predecessor. With a $1049 price tag, the CX550 is also one of the cheaper high-end models on the market and it marks the first instance of Sony offering a 24Mbps bitrate for recording AVCHD video on a consumer camcorder.

Sony CX550V Windows solutions:

"I have just bought a CX550V camcorder, this device records AVCHD.MTS video format, now I would like to import these projects to my computer. What I want is to edit my 1920 * 1080, 24Mbps AVCHD video files smoothly without codec problems, what video codec should I use on Windows platform? Can you recommend some software which can help me import and convert Sony CX550V AVCHD videos for editing smoothly?"

As above, editing Sony CX550V MTS files on Windows PC is not an easy job as we thought. As Windows editing software like Avid, Premiere, Sony Vegas Pro, Windows Movie Maker and Pinnacle are not friendly with AVCHD format and did not handle large AVCHD videos with great stability. Plus, there are so many limits you are facing like the System Requirements: Intel Core 2 Quad 2.66 gHz or higher required for 1920x1080 AVCHD editing, 2GB system memory required for AVCHD and more.

To make Sony CX550V AVCHD MTS/M2TS video workable with  Avid, Premiere, Sony Vegas Pro, Windows Movie Maker and Pinnacle, you only need to convert MTS to AVI/WMV/MPEG-2, the most suitable video format for editing.

Software Requirement:

Sony AVCHD MTS Converter
 is mainly used to transcode Sony CX550V AVCHD MTS/M2TS files for editing in Avid, Premiere, Sony Vegas Pro, Windows Movie Maker and Pinnacle.


Features: 

  • Helping you to convert Sony AVCHD MTS files to AVI/WMV/MPEG-2 with original quality. Also it supports other popular used format like MP4, DV, FLV, 3GP etc for playing back.
  • Thanks to its adoption of NVIDIA CUDA & AMD APP(ATI Stream) acceleration technology, the conversion process has been accelerated up to 5 times the speed of other converters.
  • With this MTS Converter, you can edit the video clips with trimming videos, deinterlacing 1080i videos, adding text/image/video as watermarks to your original files, replacing audios, adjusting brightness/contast/saturation of the imported files, etc. 

Guide to edit Sony CX550V MTS files in Pinnacle Studio, Sony Vegas and Adobe Premiere

Step 1: Free download the best MTS to Windows PC Converter and run it to add the AVCHD footages from Sony CX550V.


Step 2: Hit the Format box and select “HD Video” option on the dropdown menu and you can choose “AVI/WMV/MPEG-2” as output format for editing with Avid, Premiere, Sony Vegas Pro, Windows Movie Maker and Pinnacle . Besides, you can also choose “H.264 HD Video (*.mp4) “for playing back.


Step 3: Adjust video and audio parameters, including the Bitrate of Video and Audio, the Codec of Video and Audio, Video Size, Sample Rate, Frame Rate, Audio Channels, etc., by clicking the “Settings” button on the main interface for getting the best quality.

Step 4: Click the “Convert” button on the main interface to start transcoding Sony AVCHD footages to AVI/WMV/MPEG-2 for editing in Avid, Premiere, Sony Vegas Pro, Windows Movie Maker and Pinnacle.

When the conversion is completed, click “Open” in the main interface and get the converted files for importing and further editing.

With this Pavtube Sony MTS Converter, it becomes easy for you to convert Sony CX550V MTS video to Windows editing software compatible file formats. Now transferring and editing Sony CX550V AVCHD in  Avid, Premiere, Sony Vegas Pro, Windows Movie Maker and Pinnacle is smooth and without any problem.

Wednesday, May 8, 2013

Does Sony Vegas like handling the Canon EOS-5D h.264 MOV files well

This article will show the best way to convert Canon 5D HD MOV to WMV for Sony Vegas editing. 

The Canon EOS 5D is a digital sngle lens reflex (DSLR) camera that can capture high definition stills and movie clips. It saves movie clips in-camera using a Compact Flash (CF) memory card. Canon bundles a simple free software package with the camera. Canon's supplied software applications are named ZoomBrowser for Windows and ImageBrowser for Mac which can play movie clips, and also perform rudimentary movie editing, but it not for windows, and some people have been asking importing issues about Canon 5D into Sony Vegas on Windows. 

I'm new to DSLR editing and have a bunch of 5D footage for a music video I just shot, and now need to edit it. I use Sony Vegas and have a relatively not that high performance laptop (about 4 years old) that has seen me through other editing projects, but I always feel theres a bit of a loss in quality in the finished product. I thought I'd ask, or if anyone can point me in the direction of places to find information, on 5D workflow for editing in Sony Vegas. If theres no hope for Vegas and my slow computer I will look into other options such as getting new editing software or borrowing someones mac or something. 

I've been annoyed that sony vegas and most other apps on my PC can't play the 5D full HD .mov files smooth. I was so excited about not having to transcode any files from shooting to editing. I have settled to transcode. But failed many times. Hope this helps anyone out there. I guess PC doesn't like handling the h.264 codec very well. 

How to edit 5D H.264 MOV files in Sony Vegas smoothly? The best way is to convert 5D H.264 MOV to Sony Vegas supported format, like MEPG-2/WMV format, which is best for Sony Vegas, and then you can edit the converted videos in Sony Vegas without problems. 

Software you need: Pavtube Video Converter Ultimate.

This software will help you to get  t 5D H.264 MOV files working well in Sony Vegas. It is capable of converting a variety of hd video, blu-ray, and dvd movies to another format. And meanwhile it supports to convert to many mobile devices and editing software, like After Effects, Avid Media Composer, Adobe Premiere Pro, and more. CUDA acceleration will give you faster conversion speed. Below is a guide for you.

1. Free download and install this 5D MOV to Sony Vegas Converter, just copy the HD MOV files from the CF cards right to your hard drive, import the files to the program.


2.Click format bar to choose the output format. Click and choose  Adobe Premiere/Sony Vegas --> MPEG-2 (*.mpg) or WMV (VC-1) (*.wmv). This format is best for Sony Vegas editing.


3.You can click "Settings" button to adjust the parameters, such as resolution, bitrate, etc.

4.Click convert button to start converting 5D H.264 MOV to Sony Vegas.

This Ultimate Caon H.264 MOV Converter from Pavtube can convert Canon 5D H.264 MOV files to Sony Vegas with best quality and fast speed. 

Once the conversion completes, you can click "Open" button to get the output files effortlessly.

Now you have got it right, just to import and edit Canon EOS 5D H.264 MOV files within Sony Vegas Pro 8/9/10/11/12 at ease.  

P.S.

If you want to burn Canon 5D mov to a DVD or a DVD iso file, you can get the bundled software- Video Converter Ultimate($65) + DVD Creater($35) = Only $64.9, Save $35.1. Never miss!

More info for you:

Transcode Canon EOS 6D 1080p MOV to FCP
Import Canon EOS DSLR H.264 MOV to Avid MC
Does Canon EOS 5D mark 3 1080p mov Capable with iMovie

Sunday, April 28, 2013

Convert PWM-F55/F5 XAVC to Sony Vegas without Quality Loss

So far, there are two cameras Sony PMW-F55/F5, save files in XAVC format, some users are in trouble editing XAVC videos in Sony Vegas, this article will show you the solution to import XAVC footages to Sony Vegas for editing using a XAVC Converter.

With emergence of PMW-F55/F5 two cameras, the PMW-F3 and F65 CineAlta 4K, Sony Super35mm, among item lines blank to become filled to ensure that the qualified video production individual carrying HD, 2K or 4K shooting, production With much more versatile and inventive alternatives.


Great news to photographers, however the Sony F55/F5 make editing job tough. They record videos in XAVC format, which can be seldom supported by apps, Sony Vegas, having said that, will not accept such HD videos. To edit XAVC in Sony Vegas(Pro 12 will not be integrated), you need to convert XAVC videos to SV compatible formats, and to execute the conversion, an expert XAVC to Sony Vegas Converter is important.

Have recorded some XAVC files and want to edit them in Sony Vegas? Want to share them on YouTube to show you creativeness to your friends? Pavtube XAVC video converter is your perfect tool to load XAVC Videos towards the converter.

Step 1: Free download the best XAVC to AVI/WMV/MPEG-2 Converter and run it to add the F55/F5 footages.


Step 2: Hit the Format box and select "HD Video" option on the dropdown menu and you can choose "AVI/WMV/MPEG-2" as output format for editing with Sony Vegas. Besides, you can also choose "H.264 HD Video (*.mp4) " for playing back.

Step 3: Adjust video and audio parameters, including the Bitrate of Video and Audio, the Codec of Video and Audio, Video Size, Sample Rate, Frame Rate, Audio Channels, etc., by clicking the "Settings" button on the main interface for getting the best quality.


Step 4: Click the "Convert" button on the main interface to start transcoding F55/F5 XAVC footages to AVI/WMV/MPEG-2 for editing in Sony Vegas on PC.

When the conversion is completed, click "Open" in the main interface and get the converted files for importing and further editing. Now transferring and editing XAVC files in Sony Vegas is smooth and without any problem.

Other video tips: