Sunday, April 28, 2013

Convert PWM-F55/F5 XAVC to Sony Vegas without Quality Loss

So far, there are two cameras Sony PMW-F55/F5, save files in XAVC format, some users are in trouble editing XAVC videos in Sony Vegas, this article will show you the solution to import XAVC footages to Sony Vegas for editing using a XAVC Converter.

With emergence of PMW-F55/F5 two cameras, the PMW-F3 and F65 CineAlta 4K, Sony Super35mm, among item lines blank to become filled to ensure that the qualified video production individual carrying HD, 2K or 4K shooting, production With much more versatile and inventive alternatives.


Great news to photographers, however the Sony F55/F5 make editing job tough. They record videos in XAVC format, which can be seldom supported by apps, Sony Vegas, having said that, will not accept such HD videos. To edit XAVC in Sony Vegas(Pro 12 will not be integrated), you need to convert XAVC videos to SV compatible formats, and to execute the conversion, an expert XAVC to Sony Vegas Converter is important.

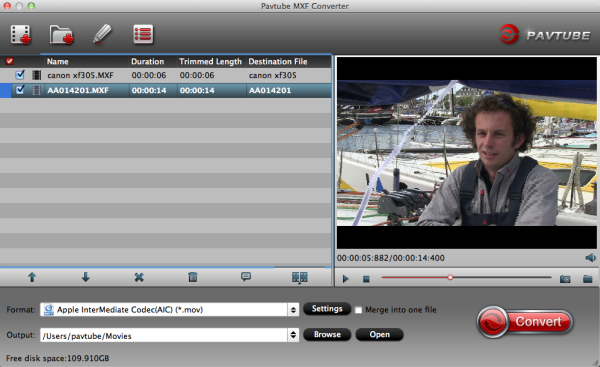
Have recorded some XAVC files and want to edit them in Sony Vegas? Want to share them on YouTube to show you creativeness to your friends? Pavtube XAVC video converter is your perfect tool to load XAVC Videos towards the converter.

Step 1: Free download the best XAVC to AVI/WMV/MPEG-2 Converter and run it to add the F55/F5 footages.


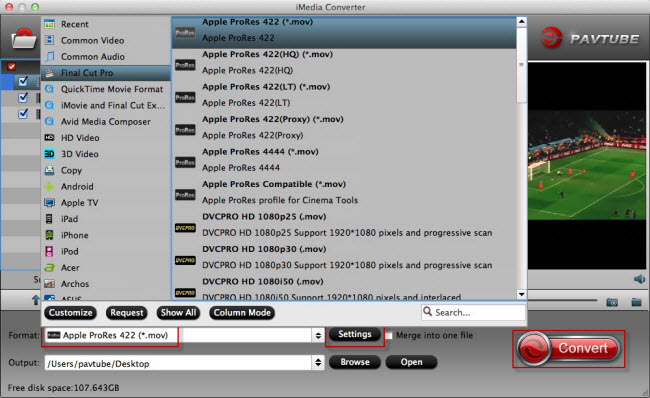
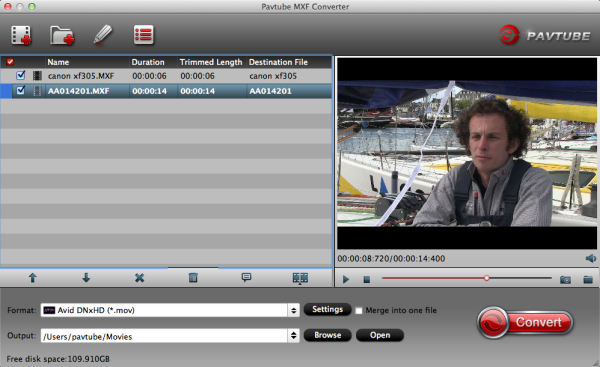
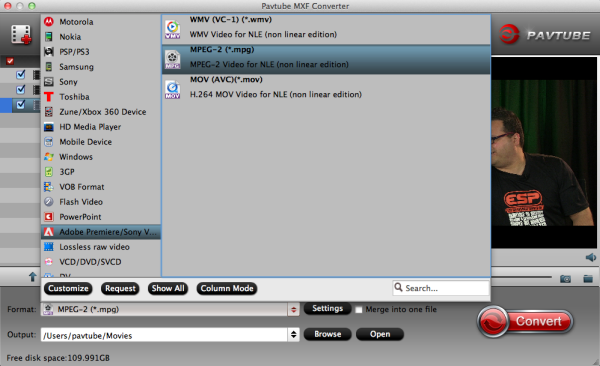
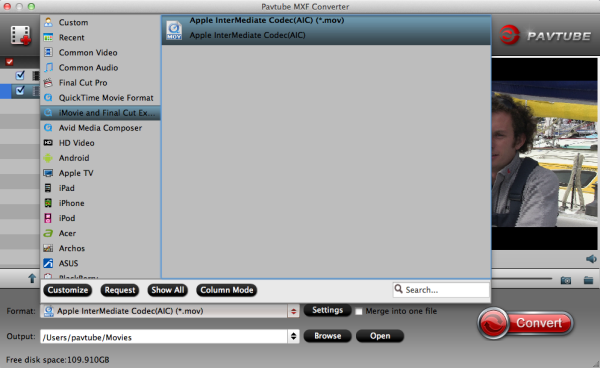
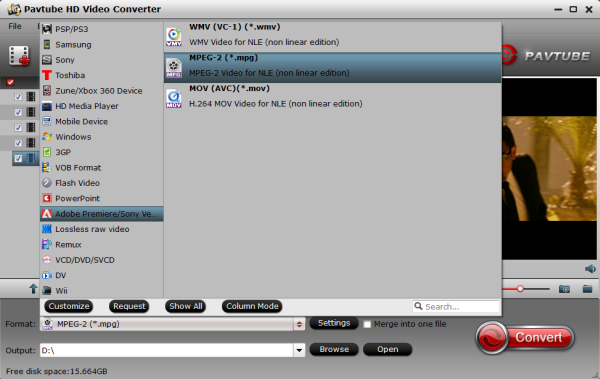
Step 2: Hit the Format box and select "HD Video" option on the dropdown menu and you can choose "AVI/WMV/MPEG-2" as output format for editing with Sony Vegas. Besides, you can also choose "H.264 HD Video (*.mp4) " for playing back.

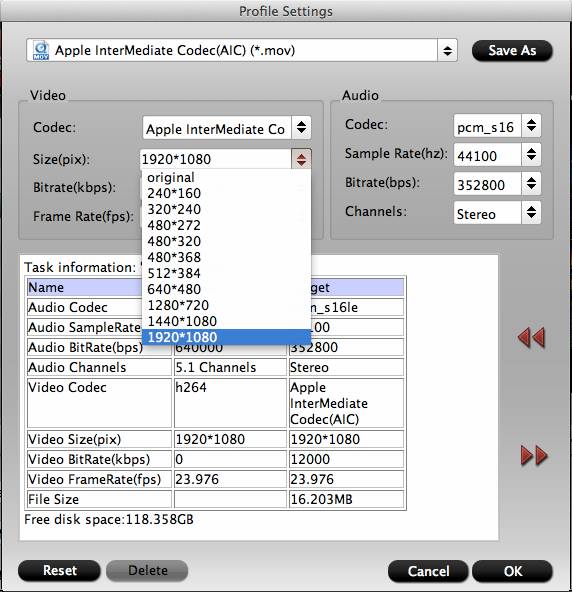
Step 3: Adjust video and audio parameters, including the Bitrate of Video and Audio, the Codec of Video and Audio, Video Size, Sample Rate, Frame Rate, Audio Channels, etc., by clicking the "Settings" button on the main interface for getting the best quality.


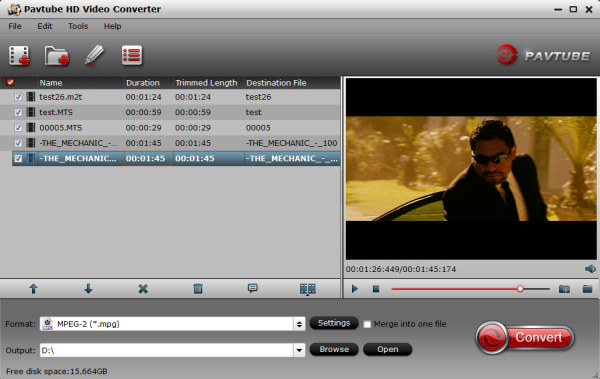
Step 4: Click the "Convert" button on the main interface to start transcoding F55/F5 XAVC footages to AVI/WMV/MPEG-2 for editing in Sony Vegas on PC.

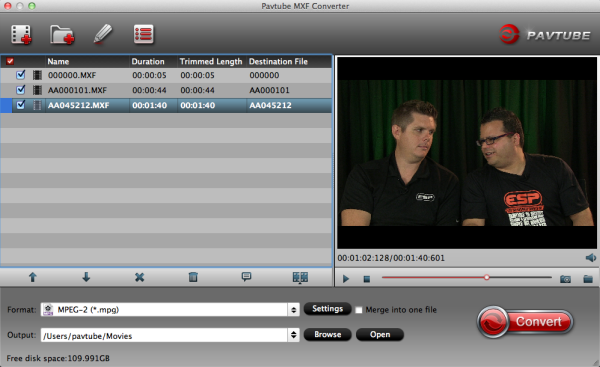
When the conversion is completed, click "Open" in the main interface and get the converted files for importing and further editing. Now transferring and editing XAVC files in Sony Vegas is smooth and without any problem.

Other video tips: 

Thursday, April 25, 2013

Canon C100 and FCP WorkFlow- How to Import and Edit Canon C100 AVCHD in FCP(X)

This guide will teach you the best way we tested to import Canon C100  MTS to FCP X natively with Apple ProRes codec.


Canon already gave those looking for a full-frame DSLR plenty to think about, and now it's stirring up the movie-maker's pot. It's just announced a new member to its EOS digital cinema collection -- the EOS C100 -- and given us a better idea of when we can expect that C500 to land.

For the record, my C100 is easily the best camera I own. Its images always blow me away and its handling and form factor are just superb. But the most terrible thing is that when I imput these cilps to Final Cut Pro, I got the error message directly, no matter FCP 7 or FCP X. Why? I am eager to editing in FCP further. Is there anyone here can help me? Thanks in advance.


In my opinion, the key problem lies in the different codec. The most compatible Codec for FCP is Apple Prores Codec, but for Canon EOS C100 recordings, they are compressed by MPEG-4 AVC/H.264. That's the reason why the person mentioned above got the error while imputing Canon EOS C100 cilps to FCP 7/X. So the fastest and safest way to solve this problem is to convert Canon C100 AVCHD to Prores .MOV before editing in FCP (X). To do the job, Pavtube MTS/M2TS Converter for Mac is a good tool.

How to import Canon C100 AVCHD 1080p MTS to Final Cut Pro (X) for editing without rendering for beginners?

FCP (X) best supported video format is Apple ProRes 422 codec MOV format, so FCP X doesn't support Canon C100 AVCHD footages well. The best method to solve this problem is to convert Canon C100 AVCHD MTS footage to ProRes for editing in Final Cut Pro X, you can follow the steps below to transcode Canon C100 AVCHD MTS to FCP X for editing without rendering.

1.Load AVCHD files.

After install and launch the Pavtube Canon C100 Converter for Mac, drag and drop Canon C100 AVCHD MTS file. You can drag several files to the program directly.


2.Choose output format.

Apple ProRes MOV is the best format for Final Cut Pro (X), here you just need to choose the target application as output format, for example, "Final Cut Pro"->"Apple ProRes 422(*.mov)".


3. Do some settings as you want.


4.Transcode Canon C100 AVCHD to FCP (X).

At last, hit the "Convert" button to transcode Canon C100 AVCHD MTS to FCP (X).

With this Pavtube Canon C100 Video Converter for Mac, you can easily change Canon C100 AVCHD files to FCP (X) compatible codec for editing, this software runs fast, so you can convert your Canon C100 AVCHD footages to ProRes 422 MOV for importing to FCP (X) in less time, video and audio synchronization are perfectly guaranteed.

After converting you can follow this guide Final Cut Pro X files Transferring to import the converted Canon C100 AVCHD videos to FCP (X) for editing.

Realted Canon AVCHD solutions:

Wednesday, April 24, 2013

TS to Final Cut Express - Convert TS video to FCE on Mac with AIC codec

Pavtube TS to FCE Converter is the best chosice for you to easily and fast convert/import/bring your TS video into FCE on Mac.

MPEG transport stream (TS) is a standard format for transmission and storage of audio, video, and data, and is used in broadcast systems such as DVB and ATSC. Maybe you have some .ts videos or TS files and want to editing them on iMovie on Mac.


Final Cut Express, non-linear video editing application created by Apple Inc, is the relatively inexpensive consumer version of a professional video editng suite. Final Cut Express gives you the capability to synchronize images and sound, add special effects, and export projects as standalone videos in a variety of formats. Final Cut Express accepted video: MOV (*.MOV), DV Format (*.DV) and MPEG-4 Movie (*.MP4) , but no support for .ts files.


If you got a bunch of files end with .ts extension and want to edit TS with Final Cut Express, the best way to edit your TS files on FCE will be converting them to formats that are perfectly supported by FCE. TS to FCE Converter is the perfectly right tool for users who cannot import TS to FCE on Mac.

Pavtube MTS/M2TS Converter for Mac is an easy to use tool for you to encode TS files to FCE editable AIC .mov format. It features optimal format presets for these editing apps, resulting files with great image and sound quality without audio delay issues. Best of all, the 5.1 channels in your original TS files can be remained as well.

Easy steps: TS to Final Cut Express converting tutorial

Step 1: Add TS video

Go to download and install the best  to make the transcoding task without quality loss. Then launch the software to import your .ts clips to Mac TS to AIC Converter.


Step 2: Select the right output format

Click on the Format box to choose iMovie and Final Cut Express-> Apple InterMediate Codec (AIC) (*.mov) for FCE.


Step 3: Convert TS to FCE MOV

Hit the Convert button; it will convert TS to FCE on Mac immediately.

When the conversion finished, you can directly import the output AIC MOV files to Final Cut Express for editing and make your movies. The importing needn't any rendering because the AIC MOV is one of the compatible video formats on Mac OS X Lion.


Tip: 

Pavtube iMedia Converter for Mac can convert 1080p camcorders footages to editable HD video formats for non-linear editing software like iMovie, Final Cut Express, Final Cut Pro, Final Cut Studio, Avid, Adobe Premiere etc. The HD footage can be compressed to SD video clips for storage when you wanna save storage space. The Mac iMedia Converter is also able to extract audios from Blu-ray discs, DVDs and videos for media players with high quality and fast conversion speed.

Related points:

Tuesday, April 23, 2013

Edit Sony PMW-F55 XAVC in Final Cut Pro smoothly

Summary: This article outlines how to transfer Sony PMW-F55 XAVC footage to hard drive and import into Final Cut Pro for smooth editing.

Sony PMW-F55 is exceptionally small, light and modular, letting you build up the right configuration for each job-or each shot. PMWF55 CineAlta camera shoots spectacular images with its 8.9 megapixels (effective) Sony 4K image sensor. You get superb dynamic range, the widest colour gamut, and pristine image quality, whether you shoot in HD, 2K or 4K. The camera incorporates high-speed SxS PRO+memory card recording that allows the choice of: 8-bit MPEG-2 HD422, 50Mbps; 10-bit XAVC 2K*/HD 100Mbps; SR Codec 10-bit MPEG4 SStP 220, 440 and 880Mbps*; and XAVC 4K/QFHD* 300Mbps. All formats can be recorded at a range of interlace and progressive frame rates (see camera specifications for precise details).


XAVC has been created as an open format, supplying a license plan for other makers inside the broadcast and production market to create their very own good quality and higher frame price solutions. While enjoying the stunning videos recorded of HD image quality, many users are having problems when trying to edit PMW-f55 footage in FCP (includes FCP 6/7). Like edit your Sony PMW-F55 camers XAVC video in FCP with a simple way?

Since the XAVC footage is a peripheral non-standard format which is not supported by FCP 6/7. In order to import Sony PMW-F55 XAVC footage into FCP for smoothly editing, we can render to the third-party software to help convert XAVC to Apple ProRes 422 MOV– native format for Final Cut Pro 6/7. Besides, it is also a best way to help the users of PMW-F55 to edit Sony PMW-F55 XAVC in FCP smoothly.

To achieve our goal, the quickest and easiest way is to use the easy-to-use yet professional software called Pavtube XAVC Converter for Mac, with which we can effortlessly and flawlessly transcode Sony XAVC footage to ProRes MOV for Final Cut Pro 6/7 or iMovie. It is safe to install and easy to use.  A professional program in ripping Blu-ray/DVD/HD video  for playback, storage or editing. Below will show you how to transcode Sony PMW-F55 XAVC footage to ProRes MOV in details.

Convert/Import Sony PMW-F55 AVCHD to Final Cut Pro for editing smoothly with Apple ProRes Codec on Mac

Step 1. Free Download the Mac Sony XAVC Transcoder for FCP to your PC. Install and run it. It's excellent Sony video converter which can convert nearly all canon cameras' videos to any formats you need, such as Apple Prores 422 MOV, Apple InterMediate Codec MOV, QuickTime MOV, etc.


Step 2. Click format bar to choose output format for use in FCP 6/7 or FCP X. Choose Final Cut Pro -> Apple ProRes 422 (*.mov).

Here we recommend the Apple ProRes 422.


Step 3.
Click "Convert" button to start the conversion from Sony XAVC footage to FCP Apple ProRes MOV on Mac OS.

After the workflow, you can go to the output folder to find the converted video files. Now you are free to log and transfer or import/edit Sony PMW-F55 XAVC videos in Final Cut Pro 6/7 or FCP X under Mac without problems.

Tips: Before you try to do the conversion, if you are also a FCP X user, please make sure that you have installed the Apple ProRes Codec manually since the FCP X asks users to install it by themselves.

Read Related Articles:

Edit Canon XF100 MXF video with Avid Media Composer 6.5, 6 or 5.5 on Mac

To get Avid Media Composer work perfectly with MXF files from Canon XF100, a best way is to convert MXF to DNxHD MOV at first.


"I have got a Canon XF100 camcorder, I recorded many 1080p clips with Canon XF100 in .MXF format. now I would like to import these projects to Avid media composer for editing. What I want is to edit Canon MXF files natively in Avid on Macbook, what video codec should I use? Can you recommend some software which can do MXF to Avid conversion natively?"

Many Canon high-end camcorder users have the need to edit recorded MXF files in Avid Media Composer, but sometime it is not easy to import MXF files to Avid, because the MXF video codec is not native for Avid Media Composer 6.5, 6 or 5.5. In order to edit Canon XF100 MXF video natively, the best way is to convert Canon XF100 MXF to DNxHD codec MOV format, and then you can edit Canon XF100 in Avid natively without rendering.

Pavtube MXF Converter for Mac is the best choice, I have use this tools for some time, and I also rewrap Canon C300 MXF files to Avid Media Composer natively on Mac, this software can deal nearly all kinds of MXF videos, it can convert Canon XF100 MXF files natively for Avid Media Composer on Mac, that is to convert XF100 MXF video to XDCAM codec MOV format, and then you can edit Canon XF100 MXF files natively in Avid. Just take a look at the brief guide below.

1. Download Pavtube MXF to Avid converter for Mac, and follow the prompts to install the program. Click "Finish" when the installation is complete, and Pavtube MXF to Avid converter will launch automatically.

2. Click "Add" to load XF100 MXF video files or directly drag the files into file list. By default, the files are selected. If you would like to join all the selected files together, check the box of Merge into one. You could view the files in preview window, simply highlight the file and click play button.


3. Click "Format" bar to determine output format. The program offers particular output formats for Avid. Just click the format bar and choose Avid Media Composer -> Avid DNxHD 1080p (*.mov).


4. You can click "Settings" if you’d like to customize advanced audio and video parameters like ideo Codec, aspect ratio, bit rate, frame rate, Audio codec, sampling rate, bit rate, channels. Do not forget to click "OK" to confirm your settings. Then type in a desired output location in the "Output" box.

5. Click "Convert" to start to transcode Canon XF100 MXF to Avid DNxHD MOV video. You can set auto shutdown in progress window or leave it there and come back later.

After conversion you could edit the converted Canon MXF videos in Avid smoothly.

P.S.

Pavtube iMedia Converter for Mac is an all-in-one bluray ripper for Mac, Mac DVD Ripper, and Video Converter for Mac. can convert 1080p cameras/camcorders footages to editable HD video formats for non-linear editing software like iMovie, Final Cut Express, Final Cut Pro, Final Cut Studio, Avid, Adobe Premiere etc. The HD footage can be compressed to SD video clips for storage when you wanna save storage space. The Mac iMedia Converter is also able to extract audios from Blu-ray discs, DVDs and videos for media players with high quality and fast conversion speed.

Read More:

Sunday, April 21, 2013

Convert/import Panasonic GF3 and GF2 AVCHD to iMovie

This is a guide assisting you to import AVCHD MTS files from Panasonic GF3 and GF2 to iMovie for editing.


Recently Panasonic GF3 and GF2 are two kinds of popular cameras among so many cameras.GF Series are choosen by many photographers due to its high quality images, and GF3/GF2 is convenient for you to take when you commute or travel.

Although Panasonic has been trying to ensure the widest compatibility with existing industry infrastructure and non-linear editing (NLE) systems, you will still meet the incompatibility when you want to get the GF3/GF2 footage off this sd card into iMovie. What does the problem lie in? After googling, you will get the reason. It is because that the iMovie can not support .MTS files while AIC is the perfect codec for it. So the solution is clear now. You need to convert Panasonic MTS files to AIC. After the MTS to AIC conversion, you can easily import Panasonic GF3/GF2 AVCHD to iMovie for further editing.


All you need is Pavtube MTS/M2TS Converter for Mac, this software can transcode Panasonic AVCHD to iMovie best codec AIC with the best quality and make the converted files more smooth in iMovie.


Now please follow the steps below to convert Panasonic GF3/GF2 AVCHD to AIC for iMovie.

1. Go to download and install the best Mac Panasonic MTS Converter to make the transcoding AVCHD to AIC task without quality loss, which offers you particular not only AIC for iMovie/FCE, but also Apple ProRes profiles for Final Cut Pro and DNxHD for Avid. Then launch the software to import your GF3/GF2 AVCHD clips to it.


2. Click on the Format box to choose iMovie and Final Cut Express-> Apple InterMediate Codec (AIC) (*.mov) for iMovie.


3. You can click the Settings icon to do some audio/video settings. We recommend 1920*1080 as video size and 30fps as video bitrate for easier editing on Mac. If you are in PAL(50p) area, you are recommended 25fps as video bitrate.

4. Hit the Convert button; it will convert Panasonic GF3/GF2 1080p AVCHD to iMovie immediately.

When the conversion process shows in 100% with the top AVCHD to MOV Converter Mac, you can get the resulted videos from output folder easily for loading into iMovie on Mac.

See also: 

Natively Work with Canon HF R50/R500/R52 MTS/MP4 with FCP X

Friday, April 19, 2013

Canon C300 Workflow-Solve Canon C300 MXF to Adobe Premiere Pro CS6 issue

This guide will tell you how to effortlessly convert Canon C300 MXF to H.264 MOV for Premiere Pro on OS X Mountain Lion. Please Free try to edit MXF from Canon C300 in Adobe Premiere Pro CS6.

Canon C300 camcorders are very excellent and also top in  the photography market. You may have bought a Canon C300 camcorder and need to edit C300 files in Premiere Pro CS6, but C300 MXF files are not well supported by Premiere Pro CS6, as you may encounter many audio and video problems, such as bitrate unsupported, and synchronization program.


How to edit C300 MXF files in Premiere Pro CS6 smoothly? The best way is to convert Canon C300 MXF to Premiere Pro compatible codec, like MOV. MOV format is best for Premiere Pro editing on Mac, you can edit MOV videos in Premiere Pro CS6 without problems, so Pavtube MXF Converter for Mac(a professional MXF to Premiere Pro Converter tool) is the best choice for you. Below is a guide for you.


Step 1. After downloading, install and run this MXF to Premiere Pro Converter, just copy the MXF files from the CF cards right to your hard drive, import the files to the software.


Step 2. Click "Format" bar to choose the output format. Click and choose "Format > Adobe Premiere/Sony Vegas > MOV (AVC)(*.mov) or MPEG-2 Video (*.mpg)" as output format.

The MXF to Premiere Converter for Mac will convert Canon C300 MXF videos to MOV/MPG with the original video resolution.


Step 3. You can click "Settings" button to adjust the parameters, such as resolution, bitrate, etc.

Step 4. Click "Convert" button to start converting Canon C300 MXF to MOV/MPG for importing to Premiere Pro CS6 on Mac.

After the conversion is finished, just run Adobe Premiere Pro CS6 and import the .mpg or .mov files for editing. You will find the output video work perfectly on Adobe Premiere Pro CS6.

Why choose Pavtube MXF Converter for Mac?

Pavtube MXF Converter for Mac is an easy-to-use and intuitive Mac tool for camcorder users. It is good at converting MXF recordings shot by Panasonic P2 camcorders, Canon XF series camcorders, Sony XDCAM camcorders etc. to formats compatible with your video editing software like Final Cut Pro (X), iMovie, FCE, Avid Media Composer, Adobe Premiere Pro, and more. It can convert (P2) MXF files to Premiere Pro CS6 supported format with best audio & video quality and the conversion speed is very fast.

Canon MXF related guides:

Thursday, April 18, 2013

GH1 and Final Cut Pro- No Native GH1 AVCHD support in Final Cut Pro

The article offers you a darn easy GH1 and FCP solution for importing your GH1 AVCHD MTS to Final Cut Pro.

The major difference between the Lumix G1 and Lumix GH1 is the latter's ability to record HD video. Panasonic is of course an established player in the HD camcorder market, so it's not surprising to find the GH1's capabilities ticking most of the boxes of demanding videophiles, while also addressing many of the issues facing existing models. In terms of raw specifications, the Lumix GH1's video is certainly an impressive proposition. Unlike most cameras which only offer either 720p or 1080p recording, the GH1 gives you the choice of both, encoded using the highly efficient AVCHD compression system; alternatively you can record in 720p or standard definition modes in the Motion JPEG format.

Through Google search, I also found that many people have the same problem – about "how to import Panasonic AVCHD files to FCP Editing without quality loss?" So I want to write a solution based on this problem, look forward to helping more people. The following is the detailed steps:

Step 1: Load Panasonic GH1 AVCHD files to converter.

Go to download and install the best Mac Panasonic MTS Converter to make the transcoding task without quality loss, which offers you particular Apple ProRes profiles for Final Cut Pro, AIC for iMovie/FCE, and DNxHD for Avid. Then launch the software to import your AVCHD clips to it.


Step 2: Choose Apple ProRes 422 as Output video format.

Click and Choose Format > Final Cut Pro> Apple ProRes 422 (*.mov) as output format to convert AVCHD to ProRes. It's the best GH1 video format for editing in Final Cut Pro.


Step 3: Convert Panasonic GH1 footage to ProRes 422 for FCP

Click "Convert" button, start Transcode GH1 AVCHD to ProRes 422 and keep high quality.

After conversion, you can import and Edit Panasonic GH1 AVCHD files in FCP without rendering on Mac.

Tips:

Pavtube iMedia Converter for Mac can also Convert AVCHD clips to ProRes 422 and then you can edit the converted AVCHD files in Final Cut Pro(X), iMovie, Avid etc. it can also convert DVD, Blu-ray discs and videos, the most powerful converter.

Wednesday, April 17, 2013

How to Use Sony Alpha DSLR AVCHD MTS recordings in Final Cut Pro X/7

To get Final Cut Pro working perfectly with Sony Alpha AVCHD .mts files, a best way is to convert MTS to ProRes MOV at first. 

As Sony Alpha DSLR cameras are becoming more and more popular in the market, many Sony camera and camcorder users are wondering how to import Sony Alpha DSLR AVCHD MTS/M2TS files to FCP X/7 for editing on Mac. Most users have the issue to import Sony Alpha camera AVCHD MTS/M2TS files, the main problems are: 1. FCP doesn’t support 1080 50/60P AVCHD import; 2. Sony AVCHD codec is not well to FCP X or FCP 7.

You may like shooting video with Sony Alpha DSLR, after recording, you may need to import the Sony AVCHD footages to Final Cut Pro for editing, but, Sony Alpha DSLR AVCHD MTS/M2TS format is not compatible with many editing software, such as Final Cut Pro X/7, the FCP doesn’t supports AVCHD MTS/M2TS 60P/50P.


What's the best solution to import Sony Alpha DSLR AVCHD files to FCP X/7 for editing? How to edit Sony AVCHD smoothly without rendering? The best way is to convert Sony recorded AVCHD to ProRes codec MOV format, Apple ProRes 422 MOV format is best supported by FCP, below is a brief guide for you.

1. Download Mac Sony Alpha MTS Converter, it's an professional Sony DSLR AVCHD converter on Mac which can convert Sony Alpha DSLR AVCHD files to different formats.


2. Install and launch this Sony Alpha DSLR MTS/M2TS Converter. Import the 1080p footages to the converter.

3. Click format bar to choose output format, you can click and choose Final Cut Pro -> Apple ProRes 422 (*.mov) or Apple Prores 422(HQ) (*.mov).


4. If you want to customize the output parameters, you can click settings button. Adjust the resolution and others as you need.

5. Click convert button to start the Sony Alpha DSLR AVCHD to ProRes 422 conversion.

With Pavtube MTS/M2TS converter for Mac, you can easily transcode Sony Alpha DSLR AVCHD files to Final Cut Pro X/7 for editing with Prores 422 codec MOV format, just try and have a good time.

Tuesday, April 16, 2013

Rewrap P2 MXF to MOV-Import Panasonic AVC-Intra P2 MXF to Avid Media Composer

This article shows you the best way to convert Panasonic recorded P2 MXF files to MOV for editing in Avid Media Composer.
 
As we know, P2 media is recorded in MXF format, it offers a variety of formats to choose from (DV, DVCPRO, DVCPRO 50, DVCPRO HD, and AVC-Intra 50 and AVC-Intra 100), differing in bit depth (8 or 10 bits), scanning mode (Progressive or Interlaced) and also frame rate. The Panasonic's 10-bit AVC-Intra codecs (AVC-Intra 50 and AVC-Intra 100) are very demanding on your computer's processor.The AVC-intra codec is a very processor heavy codec. It's possible the computer doesn't have enough horse power to play the clips.

I would like to edit the recorded P2.mxf video on iMac with Avid Media Composer, which is a professinal and popular editor works on Mac. While looking for solutions to import Panasonic P2 MXF to Avid Media Composeron iMac, I downloaded and tried several converters. Only Panasonic AVC-Intra MXF Converter for Mac from Pavtube works for me. I like the batch processing and joining of multiple mxf videos into one file. The editing feature to trim the recorded videos is great, as I can control the content for conversion.

For guys who may find it difficult to import and edit Panasonic AVC-Intra P2 MXF files on Mac, here is the fast guide to merge and convert Panasonic MXF to DNxHD MOV for Avid Media Composer. The DNxHD files it output works great in our Media Composer, hope it helps you too.

1. Load P2 AVC-Intra 50/100 MXF videos into Pavtube MXF to Avid Converter for Mac via clicking "Add video" icon.


2. Click "Format" bar to determine output format. For natively editing in Avid, you are recommended to choose Avid Media Composer -> Avid DNxHD (*.mov), this format is best for Avid Media Composer native editing.


3. If you would like to customize the video and audio parameters, you can click "Settings", adjust the parameters as you want, like Video Codec, aspect ratio, bit rate, frame rate, Audio codec, sampling rate, bit rate, channels.

4. Click "Convert" to start to convert Panasonic P2 to Avid Media Composer DNxHD codec for native editing.

For some Mac users, with P2 MXF Converter for Mac, editing the P2 AVC Intra MXF videos in Avid Media Composer is very easy and you will have no problem with MXF and Avid importing and A/V syncing.

Read more MXF editing solutions and how to import Panasonic P2 files.

Read More:

Monday, April 15, 2013

Does Canon EOS 5D mark 3 1080p mov Capable with iMovie

When you find out some of MOV files from Canon 5D Mark 3 you can't import into iMovie, you can use a professional MOV to iMovie Video Converter for Mac to help you.
 
Canon EOS 5D Mark III,
as the next generation of Canon EOS 5D Mark II, has attracted much attention even since it has not came out to the market. Based around a 22MP full-frame sensor, it can shoot 6 frames per second and features a 61-point AF system much like the EOS-1D X. It can capture 1080p movies at 24, 25 or 30 fps and offers high quality intraframe (All-I) video compression amongst a host of movie-related improvements.

All of these are great, till you ingest Canon EOS 5D Mark III 1080p MOV files to iMovie. As we know, 5D3 recorded videos are in MOV format, this format is not compatible well with iMovie, iMovie best video format is Apple InterMediate Codec (AIC) MOV format, so if you want to edit 5D3 MOV video in iMovie smoothly, you'd better convert 5D3 MOV to AIC MOV for iMovie, you can follow the steps below to transcode 5D3 to iMovie.


1. Download and install Nikon H.264 MOV Converter from Pavtube, this software can help you convert 5D Mark III MOV to AIC for iMovie, more output formats are also supported, such as AVI/WMV/ProRes.


2. Click and choose the best output format, for editing 5D3 MOV video in iMovie, you are recommended to choose iMovie and Final Cut Express -> Apple InterMediate Codec(AIC) (*.mov), it's the best format for iMovie and FCE.


3. You can click settings button to adjust output parameters as you want, such as codec, resolution, etc.


5. Edit function is useful and convenient; you can do easy editing to the 5D3 MOV video.

6. Click convert button to start, 5D Mark III MOV to AIC iMovie converter will help you convert videos easily, then you can import and edit 5D3 video in iMovie freely. And you can get more info about how to import/edit Nikon HD video to iMovie on pavtube website.

Read more:

Sunday, April 14, 2013

How to convert Canon Vixia video AVCHD (.mts) to iMovie

This guide shows users how to convert Canon Vixia AVCHD files to AIC with Mac MTS to iMovie Converter on Mac.

Canon are very popular in the market, it's a great competitor to sony and Panasonic. And Canon Vixia camcorder can give us high quality images, the HD Video Lens make every scene clear and steady, and new built-in features make it easy to give your videos added creativity, so it's a good choice if you have got one.


If you have used Canon vixia camcorders to recorded many HD videos, you may need to import Canon Vixia AVCHD files to iMovie for editing. But, you may encounter many problems when you want to load and edit Canon MTS/M2TS in iMovie, the reason is that AVCHD format is not well supported by iMovie on Mac, iMovie best format is Apple InterMediate Codec (AIC) MOV format, so if you want to import and edit Canon AVCHD videos in iMovie smoothly, the best way is to convert AVCHD to AIC format. Below is a guide for you.

1. Free download Canon Vixia Converter for Mac, it's an excellent Canon Vixia AVCHD converter which can help you convert Canon Vixia recorded files to FCP, iMovie, etc.

2. Install and run this Vixia MTS converter. Import the files you want to convert.


3. Click format bar to choose the format for output, you can choose iMovie and Final Cut Express -> Apple InterMediate Codec (AIC) (*.mov). It's the best format for iMovie - to import Canon Vixia MTS clips to iMovie or FCE.


4. You can click settings button to adjust output parameters, such as resolution, bitrate, etc.

5. Click "Convert" button to start.

This Canon Vixia AVCHD converter can help you transcode Canon Vixia AVCDH files to rich formats for use, and Vixia series camcorders are well supported, you can convert Canon XA10 to iMovie, convert Vixia HF M300 to iMovie, convert Vixia HF M500 to iMovie, convert Canon Vixia HF S10 to iMovie, convert Canon Vixia HF S100 to iMovie, etc. just follow the steps above and import Canon Vixia video to iMovie for further use.

More Related Guide:

Thursday, April 11, 2013

How to get Sony Alpha NEX-F3 AVCHD Video (.MTS) into Adobe Premiere

Does Sony MTS just go straight into Adobe Premiere Pro? In this article, we will give you the tips how to import and edit Sony Alpha NEX-F3 AVCHD MTS files in Adobe Premiere Pro without problems.

The Sony Alpha NEX-F3 Mirrorless Digital Camera with 18-55mm f/3.5-5.6 and 55-210mm f/4.5-6.3 Lenses Bundle contains a mirrorless digital camera and two zoom lenses that cover a wide spectrum of focal lengths from wide-angle to telephoto.


Sony NEX-F3 can record AVCHD video, you may have recorded many vivid clips when you travel. AVCHD format is not a widely used video format, so edit Sony NEX-F3 AVCHD in Adobe Premiere is not so easy. To edit Sony NEX-F3 video in Premiere smoothly without any problems, the best way is to convert Sony NEX-F3 AVCHD to Adobe Premiere best supported WMV format. Below is a brief guide for you, and you will know how to convert SONY NEX-F3 AVCHD to WMV format for Adobe Premiere.

1. Download Pavtube Video Converter Ultimate. This is professional SONY NEX-F3 MTS/M2TS Converter, it can convert SONY NEX-F3 AVCHD files between rich formats, such as convert SONY AVCHD to WMV format.


2. Install and launch this NEX-F3 AVCHD to WMV converter.

3. Click format bar to choose the output format, you can click and choose Adobe Premiere/Sony Vegas > WMV (VC-1) (*.wmv), this is the best format for editing in Adobe Premiere.


4. You can click settings button to adjust the resolution, bitrate, etc.

5. Click convert button to start.

With this Sony NEX AVCHD Converter, you can transcode SONY NEX-F3 MTS/M2TS files to Premiere easily, just follow the steps above and have a try.

Read More:

Wednesday, April 10, 2013

Import/Load Canon VIXIA HF S100 MTS to FCP X on Mac OS X

Have got a Canon VIXIA HF S100 and have issues with importing movies from HF S100 into FCP X? Is there any solution? Just convert MTS video to Prores for FCP editing on Mac.

Canon Vixia HF S100 goes beyond home movies with features specially included for the aspiring film-maker. The camera has microphone and headphone terminals and a Mini Advanced Accessory shoe for holding external lights and mics. Not only that, but 24p Cinema mode gives your video a film-look while 30p Progressive mode is ideal for action or sports footage. The VIXIA HF S100 allows you to record at up to 24Mbps, the highest bit rate in AVCHD format, for the highest quality image.

My Sister Jane is a user of Canon VIXIA HF S100, she likes it very much as it can shot 1080p 60p HD movies smoothly for her , which make her gain a stanout experience of hdcamcorder, and currently she uses the FCP X for editing, she told me while she is trying to drag and import the avchd files from S100 to FCP X timeline, they immediately need rendering, and the timeline becomes extremely sluggish for scan or preview.


Actually, as we all know, AVCHD is not the favorable format for all the non-linear editing software like Final Cut Pro, FCE, iMovie, including Adobe Premiere Pro.
So if we want to import AVCHD files to FCP X with less quality loss, we need to google and download an excellent MTS Converter for FCP to transcode Canon Vixia AVCHD to Prores MOV(compatible format for FCP 6/7X) without rendering.

As far as I know, Pavtube MTS/M2TS Converter for Mac is the best Mac AVCHD to FCP Converter, you can go to download it and have a free try! Below is a simple guide for importing Canon Vixia HF S100 AVCHD MTS/M2TS to FCP X for editing on Mac OS X, take a look at it and take as a reference.

Step 1. Load Canon HF S100 AVCHD videos to Mac AVCHD to Prores Converter.

Just connect Canon HF S100 to iMac with USB cable, and copy the files to hard drive. Run Pavtube Canon AVCHD Video Converter for Mac as the best Canon AVCHD to FCP Converter, and click the "Add" button to load 1920×1080 .mts videos.


Step 2. Choose the best output video format for editing in FCP X.

Clock the format column and choose the Final Cut Pro > Apple ProRes 422 (*.mov). It’s the best video format for FCP.


Step 3. If you want to adjust the output videos’ parameters, you can click settings button to change the Size, the Bitrate, and the Codec for getting the perfect effects.

Step 4. If you want to edit the video before converting Canon HF S100 AVCHD to FCP MOV format, Pavtube iMedia for Mac offers easy but useful edit function as shows below.

Step 5.Click "Convert" button to transcode Canon HF S100 AVCHD to ProRes 422 for FCP X editing on Mac OS X Lion.

P.S.

Pavtube MTS/M2TS Converter for Mac can convert 1080p cameras/camcorders footages to editable HD video formats for non-linear editing software like iMovie, Final Cut Express, Final Cut Pro, Final Cut Studio, Avid, Adobe Premiere etc. The HD footage can be compressed to SD video clips for storage when you wanna save storage space.

Read More:

Tuesday, April 9, 2013

Convert/Import/Edit MXF/P2 MXF recordings in iMovie '11

Shot footage in MXF format? This article tells you how import your .mxf files to edit in iMovie 11 by converting MXF to AIC codec.
 
Nowadays, the professional camcorders such as Canon XF series camcorders and Panasonic P2 card camcorders are becoming more and more popular. While, what's a pity that these professional camcorders shooting footage in MXF format cannot be recognized by the popular video editor iMovie, even the latest version iMovie '11. So, how to import MXF/P2 MXF files to iMovie '11 for editing without any trouble?


You need a MXF Converter to convert MXF to iMovie supported video format, iMovie best video format is Apple Intermediate Codec (AIC) MOV format, so it’s great choice to transcode MXF to iMovie AIC MOV format, you can follow the guide below.


1. Download Pavtube MXF Converter for Mac, this software supports MXF conversion well; you can choose many formats for output.


2. Install and launch the MXF to iMovie converter.

3. Click format bar to choose best output format. For editing MXF files in iMovie on Mac OS, you can click and choose “iMovie > Apple Intermediate Codec (*.mov)”.


4. You can click settings button to adjust output parameters.

5. Click convert button to start. Pavtube MXF Converter will help you import/edit MXF to iMovie on Mac easily. Then you can use converted MXF files in iMovie on Mac as you want.

Tips:

The MXF/P2 MXF to iMovie Converter is the best application for you to convert/transcode MXF files to iMovie'11. Besides, if you want to convert/import MXF to FCP X, iDVD, etc for editing, this MXF/P2 MXF to iMovie Converter can also do you a favor.

Read more:

Convert Canon C500 (PL) 4K MXF to FCP X
Transcode MXF/P2 MXF to Apple ProRes for FCP X