Wednesday, March 29, 2017

Copy .mts/.m2ts to USB sticks (USB Flash Drive)

USB flash drives are often used for the same purposes for which floppy disks or CDs were once used, i.e., for storage, data back-up and transfer of computer files. They are smaller, faster, have thousands of times more capacity, and are more durable and reliable because they have no moving parts. Some camcorder lovers want to copy MTS or M2TS video files to USB sticks. But USB does not accept MTS/M2TS video files. Luckily, you can get the solution from this guide.

How to Copy MTS/M2TS to USB sticks (USB Flash Drive)

Now is a digital life. With advanced tecnoloy, Pavtube Video Converter can copy your MTS/M2TS to USB sticks (USB Flash Drive) by converting MTS/M2TS from various camcorders to USB sticks (USB Flash Drive) supported video file like MP4 format.

Besides, this program also can convert other videos like MKV, MOV, XAVC, MXF, H.265, MP4 etc and FLAC, AAC, AC3, DTS etc to USB supported video and audio. What’s more, the program also beneficially offer fully optimized presets format settings for mainstream devices or apps such as iPhone, iPad, Android/Samsung phone and tablet, TV, game consoles, VR, editors, online websites, etc. so it's extremely easy for you to recognize the one to fit your requirement. There is no need for you to know which parameters are suitable, even if you’re a complete newbie for technical parameters towards media formats.

Mac user can get Pavtube Video Converter for Mac to copy MTS/M2TS to USB on Mac.

Free download this MTS/M2TS video converter for USB (Windows)

  • Convert MTS/M2TS to USB supported video file
  • Convert MTS/M2TS to Windows Movie Maker, Premiere Pro, Sony Vegas Pro, Avid MC, Resolve, GoPro Studio etc supported video
  • Convert MTS/M2TS to MP4, MOV, MKV, AVI, FLV, WMV, H.265 and more.
  • Edit MTS/M2TS with editing functions: split, merge, trim, crop, add watermark, adjust video effect, edit audio and insert subtitles.
  • Converts videos faster than any other video convert software programs.
  • Convers any video files without the risk of losing its original quality.
  • Compatible with Windows 10, Windows 8.1, Windows 8, Windows 7, Windows XP

Start converting MTS/M2TS to USB sticks (USB Flash Drive) format with Pavtube Video Converter

Step 1: Launch Pavtube Video Converter

The very first step is to install Pavtube Video Converter on computer. Then double click on installation file to launch it.

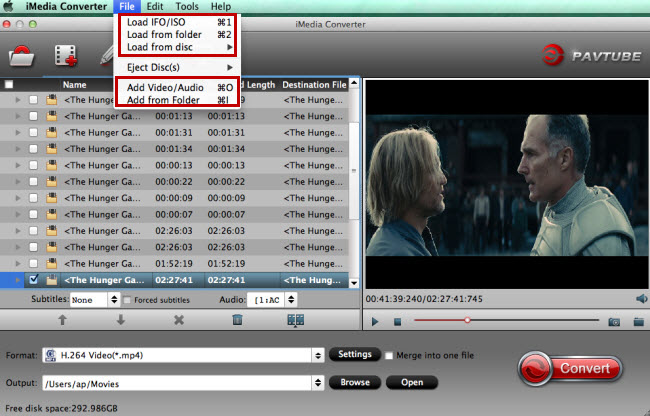
Step 2: Add mts/m2ts video files to be converted

Now, it is time to add your MTS/M2TS video files you want to convert. You can simple drag and drop video files into the interface or click "Add File" button located on the top, it will open a file explorer from where you can choose the video file for conversion.

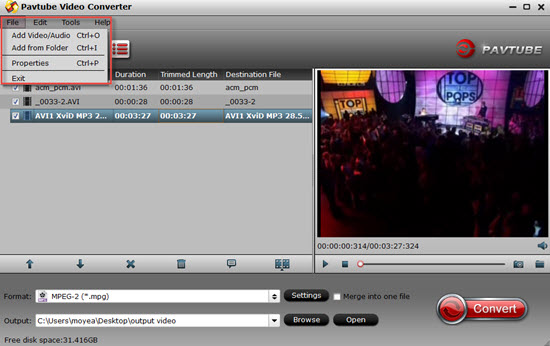
Step 3: Choose MP4 video as output format

After imported source video to Pavtube Video Converter, open "Format" drop-down list to choose MP4 from "Common Video" or "HD Video" category under "Format".

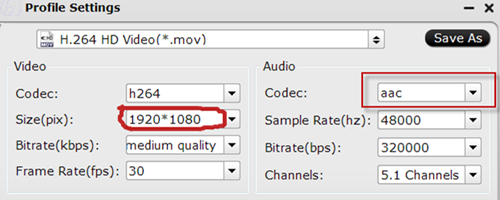
Tips: By clicking "Settings" button, you can adjust the output video/audio resolution, frame rate, bit rate, etc. to customize the output files to get the best quality you want.

Step 4: Specify output folder

After all the settings is completed, define an output folder on your computer to save the generated files.

Step 5: Start conversion process

Click "Convert" button to start MTS/M2TS to USB video conversion process. It will take a few minutes (depending on file size) for the conversion to complete. Once the conversion is completed, click on "Open" or "Open Output Folder" button to view the generated video file.

Free download this MTS/M2TS video converter for USB (Mac)

Read More:


Thursday, March 23, 2017

Import MOV to Windows Movie Maker for editing

Windows Movie Maker is a popular editing software for Windows user. You can import your MOV videos, camera, camcorder, drone MOV recordings etc to Windows Movie Maker for professional editing. But when you import MOV to Windows Movie Maker or Windows Live Movie Maker, it may stops working. Windows Movie Maker even can't recognize your MOV files? What’s the matter? That’s because Windows Movie Maker does not support MOV natively. So you need to convert MOV to Windows Movie Maker compatible format like WMV before importing.

Hot search:

To get MOV files work with Windows Movie Maker perfectly, you need to transcode MOV to Windows Movie Maker more edit-friendly format like WMV. Pavtube Video Converter can be of great help in this task.

With it, you can effortlessly transcode 720p/1080p/2k/4k MOV files to WMV for Windows Movie Maker on Windows (Win10 included) without losing quality. Besides MOV, this video convert program can also help to convert between any popular video and audio formats like MP4, MKV, MTS, MXF, H.265, MKV, VOB, AVI etc. as you need. Plus, with the built-in video editing feature of the program, you can trim, crop, add watermark, adjust effect and more to your video files. Now just download the program and achieve your goal smoothly.

Free download this MOV to Windows Movie Maker video converter

Other Download:
- Pavtube old official address: http://www.pavtube.com/video_converter/
- Cnet Download: http://download.cnet.com/Pavtube-Video-Converter/3000-2194_4-75734821.html
- Softonic Download: http://pavtube-video-converter.en.softonic.com/

How to Convert and Import MOV into Windows Movie Maker

Step 1. Add MOVfiles

Run the best MOV to Windows Movie Maker Converter, and click the "Add" button to load MOV videos. If you want to merge multiple clips just need to check the "Merge into one" box.

Step 2. Choose output format

This video converter offers optimized format preset for Windows Movie Maker. Just click "Format" menu firstly and then follow "HD Video" to set WMV HD(*.wmv) format

Tip: If the default settings do not fit you requirement, you can click "Settings" icon to and enter "Profile Settings" panel to adjust video size, bit rate, frame rate, sample rate and audio channels.

Step 3. Start converting MOV to Windows Movie Maker

Click "Convert" button to start converting MOV to WMV/AVI for Windows Movie Maker program.

Once the conversion is finished you can click "Open" button to get the output files effortlessly, and now you are ready to import and edit MOV files with Windows Movie Maker. Just import the converted files to WMM for editing via its "Import video" option.

Read More:

Wednesday, March 15, 2017

Upload DJI Mavic Pro 4K video to Youtube, Vimeo, Instagram on Mac

The DJI Mavic Pro is a small yet powerful drone that turns the sky into your creative canvas easily and without worry, helping you make every moment an aerial moment. Its compact size hides a high degree of complexity that makes it one of DJI’s most sophisticated flying cameras ever. 24 high-performance computing cores, an all-new transmission system with a 4.3mi (7km) *range, 5 vision sensors, and a 4K camera stabilized by a 3-axis mechanical gimbal, are at your command with just a push of your thumb or a tap of your finger.

After recording 4K video from DJI Mavic Pro, you may want to upload them to online websites like YouTube/Instagram/Vimeo/Facebook for sharing with the world. But the DJI Mavic Pro 4K videos (Apple ProRes, H.265 etc) are not supported well with YouTube/Instagram/Vimeo/Facebook. Why? That’s because YouTube/Instagram/Vimeo/Facebook geneally support 720p or 1080p video in some common video format like H.264 MP4. So if you want to Upload DJI Mavic Pro 4K video to YouTube/Instagram/Vimeo/Facebook smoothly, you can change your DJI Mavic Pro 4K video format.

That’s easy. In the following parts, I am going to introduce to you how to carry out the converting exactly. What you need is one professional 4K video converter for YouTube/Instagram/Vimeo/Facebook etc. Pavtube iMedia Converter for Mac is your smart choice. With it, you can fast convert DJI Mavic Pro 4K videos to YouTube/Instagram/Vimeo/Facebook compatible format like H.264 MP4 without quality loss. What's more, with the built-in video editor, it's freely for you to trim the DJI Mavic Pro 4K videos into multiple segments with short duration. The most important is that, it allows you to modify the video bitrate, frame rate, video size, audio channel, etc for your original DJI Mavic Pro 4K clips for easier uploading.

Hot search:

Free download the DJI Mavic Pro video converter for Youtube, Vimeo, Instagram

PS: If you're using a Windows, simply turn to Pavtube Video Converter Ultimate to convert and transfer DJI Mavic Pro 4K to Youtube, Vimeo, Instagrame on Windows.

How to Convert DJI Mavic Pro 4K video to Youtube, Vimeo, Instagram on Mac

Step 1. Click "File" button to load the video ready for upload your DJI Mavic Pro 4K video..

Step 2. Convert video to best video format and video dimension for YouTube/Instagram/Vimeo/Facebook. Click: Format > “Common Video” or “HD Video” > HD H.264 MP4.

Tip. Click "Settings" button > Video Size to adjust DJI Mavic Pro 4K video to 1080p/720p according to your needs.

Step 3. Tap "Convert" to start converting DJI Mavic Pro videos to best YouTube/Instagram/Vimeo/Facebook video dimensions for uploading.

Read More:


Wednesday, March 8, 2017

Edit Canon EOS 77D 1080p footage in FCP 7/X

The Canon EOS 77D (EOS 9000D in Japan) is a midrange DSLR that sits between the Rebel T7i and EOS 80D. It features Canon's familiar 24MP CMOS sensor and uses the company's newest DIGIC 7 processor. Dual Pixel AF is built-in for responsive AF and good subject tracking in live video and movie mode and, for shooting with the optical viewfinder, there's a 45-point all cross-type system. The camera has a fully articulating 3" touchscreen LCD along with an OVF with 95% coverage. You get Full HD capture up to 60p, while the EOS 77D also sports Canon's new 5-axis image stabilization system for shooting hand-held footage.

Final Cut Pro can only import some video file may also contain any number of audio, video, and even subtitle streams. If you can't open and edit Canon EOS 77D 1080p video files on Final Cut Pro, it might be the format codec issue. To solve the problem, you need to change the Canon EOS 77D video to "a codec" that FCP X/7 can read more easily (without rendering basically). The codec is Apple ProRes, which ensures maximum editing quality and efficiency when working with Final Cut Pro.

To convert Canon EOS 77D video files to ProRes MOV, Pavtube HD Video Converter for Mac is an easy-to-use yet professional app to achieve your goal smoothly. Overall, the Canon to FCP Converter is clean and safe to install and use. And only with barely several mouse clicks, you can get the whole job done. Besides Canon EOS 77D, it can also change more Canon video file formats like Canon 5D Mark video, Canon XC15 video, to Final Cut Pro most compatible Apple ProRes .mov without any quality loss.

Now download it and follow below steps to transcode Canon EOS 77D files to Final Cut Pro X/7.

How to maker FCP 7/X accept Canon EOS 77D video on Mac?

Step 1: Add Canon EOS 77D videos

Install the Final Cut Pro converter program on Mac and run it. Drag the Canon EOS 77D clips to the software. Or you can also click "Add video" button on the top of the main interface to import video to the program.

Step 2: Choose FCP compatible format

Go to "Format" bar and choose "Final Cut Pro > Apple ProRes 422 (*.mov)" as output format for Final Cut Pro X/7/6.

Tips: Adjust video, audio settings

Click the "Settings" button and customize proper video/audio parameters including Video size, bitrate and fame rate and more.

Step 3: Start Canon EOS 77D to ProRes conversion

Click the "Convert" button at the bottom right corner to start transcoding Canon EOS 77D files for FCP. It does Canon EOS 77D to FCP video conversion like a charm and the output files will maximally preserve the quality of your original Canon EOS 77D clips. After conversion, you can import converted Canon EOS 77D clips into Final Cut Pro X/7/6 to create the end results that you want.

Read More

Wednesday, March 1, 2017

Edit Canon EOS 800D/Rebel T7i MP4 files in FCP X

The Canon EOS Rebel T7i (800D in Europe, Kiss X9i in Japan) is the top-end camera in Canon's compact DSLR lineup. It features the same 24MP APS-C CMOS sensor and Dual Pixel AF system as the pricier EOS 77D and 80D, along with a 45-point all cross-type AF for shooting with the viewfinder, which is assisted by a 7650-pixel RGB+IR metering sensor. The T7i has a 3" fully articulating LCD with a touchscreen and a redesigned user interface for those not ready for a full-on DSLR experience. The camera captures 1080/60p video in MP4 format and has Wi-FI, NFC and Bluetooth.

If you want to edit Canon EOS 800D/Rebel T7i video in .mp4 for playing, sharing, you can import them to FCP X for editing. But you may can’t edit Canon EOS 800D/Rebel T7i MP4 video in FCP X due to the MP4 video codec. If you also has the same problem, you can read on to get the solution.

Donwnload a FCP X video converter for Mac

In fact the best way is transcoding Canon EOS 800D/Rebel T7i MP4 video file to FCP X editable format for smooth editing. You can adopt Pavtube Video Converter for Mac to help you done. This converter can easily convert Canon EOS 800D/Rebel T7i MP4 video to FCP X supported Apple ProRes MOV video for perfect editing on Mac. This MP4 to FCP X converter has many preset codec/formats for output, such as Apple ProRes 422/4444/LT/HQ codec.(Read review)

Besides, it can help you convert Canon EOS 800D/Rebel T7i MP4 for smoothly importing and editing in other non-linear editing systems (NLE), including Adobe Premiere Pro, Premiere Elements, After Effects, Avid Media Composer and more with preset profile for th. If you're using a PC, turn to the Windows version here which also create Apple prores code for you.

Now free download this best FCP X Video Converter for Mac

How to Convert Canon EOS 800D/Rebel T7i MP4 to FCP X supported editing-format

Note: If you are FCP X users, before you try to do the conversion, don't forget to make sure that you have installed the Apple ProRes Codec manually since the FCP X asks users to install it by themselves.

Step 1. Import Canon EOS 800D/Rebel T7i files

Launch the MP4 to FCP X converter. Here you can directly drag and drop the MP4 files to the converter, or go to Add button to load the MP4 videos.

Step 2. Choose FCP X as the output format

Click "Format" bar to choose the format for output. For editing Canon EOS 800D/Rebel T7i MP4 in Final Cut Pro X, you can choose "Format -> Editor -> Final Cut Pro X or Final Cut Pro 7"; it's best for FCP editing.

Tip: Click the Settings icon to adjust video and audio parameters on the Profile Setting as you need to get the best quality video. You can set video resolution, bitrate, frame rate (24p/30p) as you want.

Step 3. Start Canon EOS 800D/Rebel T7i to FCP X conversion on Mac

Now click the "Convert" button, and then leave the Mac MP4 encoder to do the rest automatically for you. After the MP4 to FCP Mac conversion, go to "File" > "Import" > and then you can freely use your MP4 files in FCP X (10.3).

Read More: