Wednesday, November 29, 2017

Edit/Play XiaoMi Yi 4K Video

The new Xiaomi Yi 4K action camera is main designed for photographers and travelers. The camera uses the world's leading 1400 mAh lithium-ion battery by Ampetrex Technology (iPhone supplier) with a high voltage of 4.4 V. Thus, the Yi 4K action camera is able to operate up to 8 hours in standby mode and up to 120 minutes when shooting the high-quality 4K / 30 fps video without WiFi and with the LCD screen turned off. After the shooting stage, you may wish to play the Xiaomi Yi 4K video on computer with media player software, transfer to view on smartphone, tablets or stream to large screen TV via media servers. For editors, you may want to do either some basic or professional post editing work of the Xiaomi Yi 4K video with either professional or prosumer editing software. The following article will share you some beneficial tips for better playing and editing Xiaomi Yi 4K video.

Recording specification for Xiaomi Yi 4K Video

Video Resolution & Frame Rate

4K - (3840 x 2160) - 30 / 25 fps (60 mbps)
2.7K - (2704 x 1520) - 60 / 30 / 50 / 25 fps
1440p - (1920 x 1440) - 60 / 50 / 30 / 25 fps
1080p - (1920 x 1080) - 120 / 100 / 60 / 50 / 30 / 25 fps
960p - (1280 x 960) - 120 / 100 / 60 / 50 fps
720p - (1280 x 720) - 240 /200 fps
480p - (848 x 480) - 240 / 200 fps

Video Format

.mp4 format, .H.264

Transcode and compress Xiaomi Yi 4K video for better playing/editing

The 4K H.264 video recorded by Xiaomi Yi is a good delivery codec but not a good editing format since it is very CPU intensive when decoding. Therefore, you won't get a smooth editing workflow when you try to directly work the Xiaomi Yi 4K video with professional or prosumer editing software such as Windows Movie Maker, iMovie, Sony Vegas Pro, Final Cut Pro X, Adobe Premiere Pro CC, Davinci Resolve, Avid Media Composer, etc. To get a high quality and high performance workflow, it would be much ideal for you to transcode the H.264 to your editing software favorable editing codec.

Although the H.264 codec used by Xiaomi Yi camera is widely supported by most media player software or portable devices, however, you may be disappointed to find most processor on your computer or portable devices lacks the ability to handle 4K resolution video, in addition, the 4K video will take a lot of space of your computer hard drive or device internal memory. To get a smooth playback experience, it would be a good option for you to compress 4K to 1080p with smaller file resolution.

Here, you can easily transcode and compress Xiaomi Yi 4K video to 1080p by downloading Pavtube Video Converter for Mac. The program has perfect importing support for the 4K H.264 MP4 video shot with Xiaomi Yi camera. Thanks to its batch conversion mode, you can load multiple video into the program at one time for conversion to save your precious time. With the program, you can not only transcode Xiaomi Yi 4K video to NLE editing software compatible file formats or specially optimized editing codec such as Apple Prores, Apple Intermediate Codec, DNxHD, MPEG-2, etc, but also compressing 4K to 1080p fix the video choppy, buggy or stuttering issue when playing or editing 4K video on editing software or devices/applications.

For Windows users, please go to download Pavtube Video Converter to perform the conversion on macOS High Sierra, macOS Sierra, Mac OS X El Capitan, Mac OS X Yosemite, Mac OS X Mavericks, etc.

How to Transcode and Compress Xiaomi Yi 4K Video to 1080p for Better Playing and Editing?

Step 1:Load Xiaomi YI 4K Video.

Download the free trial version of the program. Launch it on your computer. Click "File" menu and select "Add Video/Audio" or click the "Add Video" button on the top tool bar to import Load Xiaomi YI 4K video files into the program.

Load Xiaomi YI 4K Video

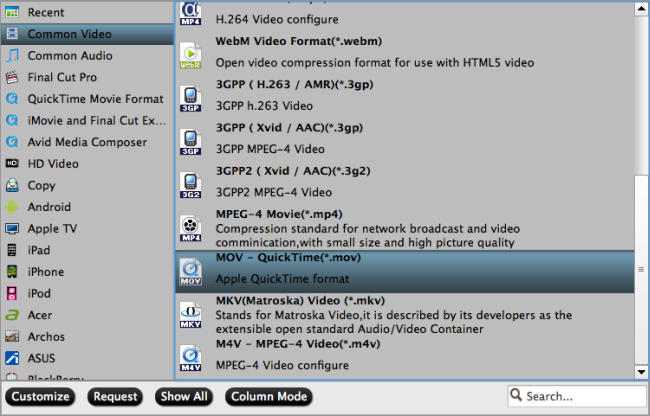
Step 2. Define the output file format.

Click the "Format" bar, from its drop down list, select one of the popular file format such as "H.264 HD Video(*.mp4)" under "HD Video" main category that's supported by most devices and applications. 

Output device widely compatible file formats

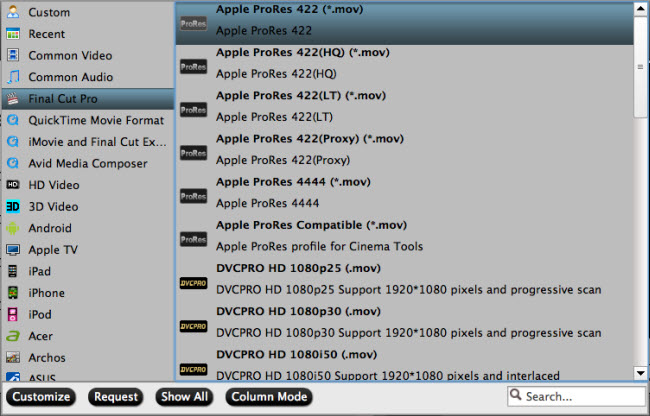
For people try to load the Xiaomi Yi 4K video into video editing software, you can try to direct output video editing software preset profile format such as "Apple Prores 422 (*.mov)" under "Final Cut Pro" main category.

Output video editing software preset profile formats

Step 3: Compress 4K to 1080p.

Click "Settings" on the main interface to open "Profile Settings" window, in video section, from "Size(pix)" drop-down list, choose "1980*1020" to compress 4K to 1080p.

Step 4: Start Xiaomi YI 4K to 1080p Conversion process.

Hit "Convert" button to begin Xiaomi Yi 4K to 1080p transcoding and compression process. When the conversion finished, check the generated 1080p video, then you get a smooth playing and editing experience with Xiaomi Yi 4K video on any devices or applications.

Tuesday, November 21, 2017

Import and Edit Canon EOS 6D Mark II MP4 with iMovie

Canon has certainly made the EOS 6D Mark II a more well-rounded and better specified camera than the EOS 6D. The main update comes in the form of a 26.2MP CMOS sensor and the use of the DIGIC 7 Image Processor to deliver sharper, more vivid imagery in a variety of shooting situations. This setup offers an improved native sensitivity range of ISO 100-40000, which can then be expanded to ISO 50-102400, as well as speedy shooting rates of up to 6.5 fps.

Video recording format of Canon EOS 6D Mark II

For multimedia creation, the 6D Mark II comes equipped with powerful Full HD video recording options. You can record both full HD 1080p video and HD 720p video with a maximum frame rate of 60p in MP4 container file format with the MPEG-4 AVC/H.264 compression codec.

Related article: Import XC10 MXF to iMovie | Convert XAVC MXF to iMovie | Edit 4K Video with iMovie

Import and Edit Canon EOS 6D Mark II with iMovie

Obviously, you'll have no problem to import the Canon EOS 6D Mark II MP4 video into iMovie since H.264 is a supported editing codec by iMovie. However, the inter-frame formats H.264 is better for final delivery but should not been used to edit with, when you try to import the H.264 directly into iMove for editing, you will encounter the following problems:
- Slow searching for and decoding of frames
- Frame-accuracy problems
- Crashing or freezing
- Strange artifacts or blocking on your video
- Error messages or displaying black video

Best editing workflow of EOS 6D Mark II with iMovie

For those people who wish to get a high quality and high performance editing workflow of EOS 6D Mark II MP4 with iMovie, we highly recommend you to convert the inter-frame H.264 codec to iMovie compatible HD intra-frame editing codec - Apple Intermediate Codec.

Here, you can perform the codec transcoding process by downloading Pavtube Video Converter for Mac, the program has perfect importing support for both the 1080p and 720p H.264 MP4 video shot with Canon EOS 6D Mark II. Thanks to its batch conversion mode, you can load multiple video at one time for conversion to save your precious time.

With the program, you can easily encode EOS 6D Mark II MP4 to iMovie most favorable AIC codec with best quality and super fast encoding speed. Apart from iMovie, the program also assists you to produce other NLE software native workable editing codec such as Apple Prores for Final Cut Pro X or Premiere Pro CC, DNxHD for Avid Media Composer or Davinci Resolve, etc.

Pavtube Video Converter for Mac is pretty simple to use, any one can learn to use it in minutes. In addition, it keeps constant update with perfect support for the new Mac OS including macOS High Sierra, macOS Sierra, Mac OS X El Capitan, Mac OS X Yosemite and Mac OS X Mavericks, etc.

Step by Step to Transcode Canon EOS 6D Mark II MP4 to AIC for iMovie Editing

Step 1: Load Canon EOS 6D Mark II MP4 video.

Download the free trial version of the program. Launch it on your computer. Click "File" menu and select "Add Video/Audio" or click the "Add Video" button on the top tool bar to import Canon EOS 6D Mark II MP4 files into the program.

Load Canon EOS 6D Mark II MP4 video

Step 2: Choose output file format.

From "Format" drop-down option, choose iMovie best editing codec by selecting "iMovie and Final Cut Ex..." > "Apple Intermediate Codec (AIC)(*.mov).

Output iMovie AIC format

Step 3: Edit Canon EOS 6D Mark II MP4 video.

By default the Edit icon is grayed out. To activate the Edit menu, you have to select an item first. When a video or movie is selected, click the pencil like Edit icon on the left top tool bar to open the video editor window, here, you can play and preview the original video and output effects. Also you can flip or rotate video, trim, crop, add watermark, apply special effect, edit audio or insert external subtitle.

Edit Canon EOS 6D Mark II MP4 video

Step 4: Start the conversion process.

After all the settings is over, go back to the main interface and hit right-bottom "Convert" button to start to convert EOS 6D Mark II MP4 video to iMovie best compatible Apple Intermediate Codec editing format.

When the conversion is completed, launch iMovie on your Mac computer to import converted video to iMovie for smooth editing workflow on either fast or slow Mac computer.

Tuesday, November 14, 2017

Work GoPro Hero 6 4K H.265 with iMovie

The new GoPro Hero 6 now supports to capture HEVC (High Efficient Video Codec) encoded UHD video at 79Mbps in 60fps mode. For Mac users who are looking for a free but professional video editing software to perform some professional editing with the GoPro Hero 6 4K video, iMovie can be your best choice. How about the workflow of GoPro Hero 6 4K H.265 with iMovie.

Can iMovie native import GoPro Hero 6 4K H.265?

Following the release of macOS 10.13 High Sierra, Apple has updated its consumer level video editing tool, iMovie, with support for High Efficiency Video Encoding, a tentpole video feature introduced alongside the company's latest hardware and software releases.  However, you may find that you can only import 4K HEVC/H.265 files captured on iPhone 7/7 Plus/8/8 Plus directly into iMovie, but get no luck to get 4K H.265 files downloaded from online sites or shot with cameras/camcorders including the GoPro Hero 6 into iMovie.

Related article: iMovie Supported Video Formats | iMovie Editing 4K Video | Edit H.265 with iMovie

Transcode GoPro Hero 6 4K H.265 for iMovie

Therefore, to work GoPro Hero 6 4K H.265 with iMovie, you would definitely need to perform a codec transcoding process. Here, you can complete the conversion by downloading our best Mac 4K H.265 Converter - Pavtube Video Converter for Mac. If you own a powerful Mac computer that can perfectly handle 4K resolution video, it would be ideal for you to use the program to transcode GoPro Hero 6 4K H.265 to iMovie supported 4K file formats such as 4K MPEG-4 MP4, 4K QuickTime MOV, etc. If your computer is not powerful enough to deal with 4K resolution video, then just use our application to compress GoPro Hero 6 4K H.265 to iMovie readable HD file formats such as HD MPEG-4, HD H.264, etc. For those people who wish to get a high quality and high performance of HD video workflow with iMovie, you can use our program to directly export iMovie best favorable Apple Intermediate Codec - AIC, a less processor intensive editing codec specially designed by Apple for high quality and high performance workflow with iMovie.

Edit GoPro Hero 6 4K H.265 with iMovie

Before loading GoPro Hero 4K H.265 into iMovie, you can complete some basic editing task with the built-in editing options offered by the program. You can trim or cut video to remove the unwanted parts or segments, crop video to remove the black edges or unwanted size area, add video/image/transparent text watermark, apply special rendering effect, change video brightness, contrast, saturation or add external srt/ass/ssa subtitle to video, etc.

Pavtube Video Converter for Mac is very simple to use, any one can learn to use it in minutes. In addition, it has perfect compatibility with the new macOS High Sierra, macOS Sierra, Mac OS X El Capitan, Mac OS X Yosemite, Mac OS X Mavericks, etc.

Step by Step to Import and Edit GoPro Hero 6 4K H.265 with iMovie

Step 1: Load GoPro Hero 6 4K H.265 video.

Download the free trial version of the program. Launch it on your computer. Click "File" menu and select "Add Video/Audio" or click the "Add Video" button on the top tool bar to import GoPro Hero 6 4K H.265 video files into the program.

Load GoPro Hero 6 4K H.265 video

Step 2: Output iMovie supported 4K or 1080p formats.

Clicking the Format bar, from its drop-down list, if your Mac computer is powerful enough, you have direct choose to produce iMovie supported 4K editing formats such as "MOV - QuickTime(*.mov)" under "Common Video" main category.

Output

If your Mac computer is a little old or slow, then it is ideal to compress GoPro Hero 6 4K to 1080p to produce iMovie smoothly workable HD H.264 file formats.

Output iMovie smoothly playable HD file formats

Step 3: Edit GoPro Hero 6 4K H.265 files.

To activate the Edit menu, you have to select an item first. When a video or movie is selected, click the pencil like Edit icon on the left top tool bar to open the video editor window, here, you can play and preview the original video and output effects. Also you can flip or rotate video, trim, crop, add watermark, apply special effect, edit audio or insert external.

Edit GoPro Hero 6 4K H.265 video

Step 4: Start the final conversion process.

After all setting is completed, hit the "Convert" button at the right bottom of the main interface to begin GoPro Hero 6 4K H.265 to iMovie preferable 4K or 1080p editing formats conversion or compression process.

When the conversion is finished, click "Open Output Folder" icon on the main interface to open the folder with generated files. Then you can smoothly import converted video to iMovie for smooth post editing workflow.

Wednesday, November 8, 2017

Edit Canon EOS M100 MP4 with iMovie

The EOS M100 is Canon's newest entry-level mirrorless ILC model. Despite being appreciably smaller (and cheaper) than its higher-end M5 and M6 siblings, it comes with the same 24MP APS-C sensor equipped with excellent Dual Pixel autofocus. It also has Canon's latest DIGIC 7 processor, as well as Wi-Fi with NFC and Bluetooth for connectivity.

The camera can shot 1080p, 720p and 480p video in MP4 format with H.264 compression codec. When the shooting is completed, for Mac users who are looking for a professional but simple to use editing software to turn your camera video into great work, iMovie can be your first choice. How about the workflow of Canon EOS M100 MP4 video with iMovie?

Media compatibility of Canon EOS M100 MP4 with iMovie

From iMovie supported file formats, we can see that iMovie can native import the H.264 video shot with Canon EOS M100 camera. However, if you try to direct edit H.264 with iMovie, you won't get a good editing performance. The main reason is that H.264 is a distribution-oriented formats, it is very CPU intensive to work with. If you wish to get a high quality and high performance editing workflow, we highly recommend you to encode H.264 to iMovie's most favorable editing codec - Apple Intermediate Codec. It was used because it was less processor intensive as the compression scheme did not need the next frame to be displayed.

Encode Canon EOS M100 MP4 to iMovie

If you are looking for a simple to use application to get the job completed, we highly recommend Pavtube Video Converter for Mac to you. The program has full importing support for the 1080p, 720p and 480p H.264 MP4 video recorded with Canon EOS M100. Thanks to its batch conversion mode, you can load multiple EOS M100 MP4 video into the application at one time for conversion to save your precious time.

Just load the camera video into the application, set iMovie most preferable Apple Intermediate Codec to output, then hit right-bottom convert button to begin the conversion process.

Edit Canon EOS M100 MP4 video

Before loading Canon EOS M100 MP4 video into the iMovie, you can also complete some basic video editing work with the program's built-in editing options. You can trim unwanted video segments from the video, crop video to remove the black bars, add transparent text watermark, apply special rendering effects, insert external srt/ass/ssa subtitles, etc.

Step by Step to Transcode Canon EOS M100 MP4 to AIC for iMovie Editing

Step 1: Load Canon EOS M100 MP4 video.

Download the free trial version of the program. Launch it on your computer. Click "File" menu and select "Add Video/Audio" or click the "Add Video" button on the top tool bar to import Canon EOS M100 MP4 video files into the program.

Load Canon EOS M100 MP4 video

Step 2: Choose output file format.

From "Format" drop-down option, choose iMovie best editing codec by selecting "iMovie and Final Cut Ex..." > "Apple Intermediate Codec (AIC)(*.mov).

Output iMovie supported AIC format

Step 3: Edit Canon EOS M100 MP4 videos.

By default the Edit icon is grayed out. To activate the Edit menu, you have to select an item first. When a video or movie is selected, click the pencil like Edit icon on the left top tool bar to open the video editor window, here, you can play and preview the original video and output effects. Also you can flip or rotate video, trim, crop, add watermark, apply special effect, edit audio or insert external subtitle.

Edit Canon EOS M100 MP4 video

Step 4: Start the conversion process.

After all the settings is over, go back to the main interface and hit right-bottom "Convert" button to start to convert Canon EOS M100 MP4 to iMovie best compatible Apple Intermediate Codec editing format.

When the conversion is completed, launch iMovie on your Mac computer to import converted video to iMovie for smooth editing workflow on either fast or slow Mac computer.