Thursday, January 28, 2016

How to edit Sony A7S II XAVC S 4K files in Windows Movie Maker?

“Hi, guys, I’m shooting with a new Sony A7s II camera. It records 4K footage in XAVC S codec using MP4 container. I would like to edit these XAVC S files in Windows Movie Maker but couldn’t figure out an available way to import them. Does Movie Maker have native support for A7s II XAVC S files? If not, is there any workaround to make WMM work with Sony A7s II XAVC S 4k files? Any suggestions? I would really appreciate any help. Thanks.”

Sony A7s II can shoot 4K videos internally (3,840 x 2,160) at 24 or 30fps in the XAVC S format. XAVC S is intended as a more economic and simpler consumer codec, which is widely used in Sony's hottest 4K cameras like the A7s, FDR-AX100, HDR-AS100V/AS200V, A7II, etc. 

You may have got such a 4K camera and shoot lots of XAVC S videos and now want to make a home movie in Windows Movie Maker. However, Movie Maker will not recognize your XAVC S files imported. The reason is simple: XAVC S is not in the supported video format of Windows Movie Maker. To achieve your goal, the easy workaround is to convert XAVC S to Windows Movie Maker compatible video format first. 

To be able to import and edit A7s II 4K footage in Windows Movie Maker fluidly, we would recommend transcoding the A7s II XAVC-S footage to Movie Maker preferred WMV/DV AVI format first. This requires third party software like Pavtube Video Converter.

It supports creating high quality WMV video for your Windows Movie Maker on Windows 10/8/7/XP/Vista, no matter what's the format of your source video files. It can convert almost any video to WMV so you can import your XAVC S video to Windows Movie Maker for editing. Plus, it comes with all regular video editing tools like Trim, Crop, Effect, Watermark. For basic video editing tasks, you can even replace your Windows Movie Maker with it. What's more, the program also provides optimized presets for Adobe PremiereAvid, Sony Vegas and many more.

First free download and install Pavtube Video Converter on your PC, here’s a quick guide explaining how to process A7s II XAVC-S 4K to WMV/DV AVI conversion for Windows Movie Maker via using this converter app.


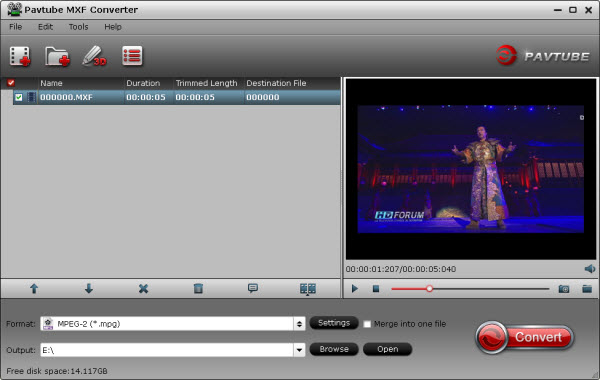
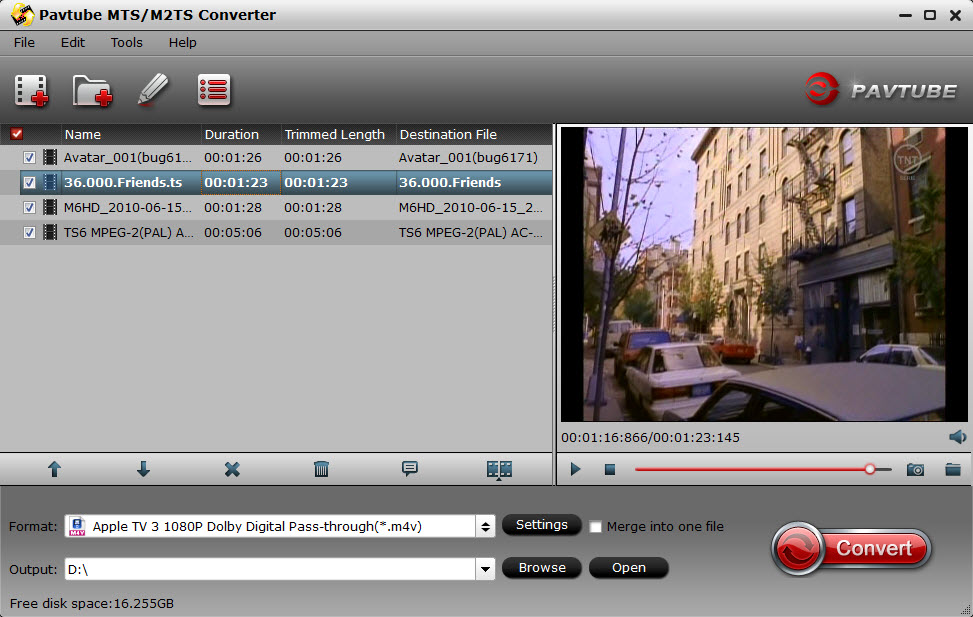
1.Run this program, you will find the interface is very brief, this program is very easy to use, now please click add files button to import the video files that you want to convert, you can add batch files at one time.


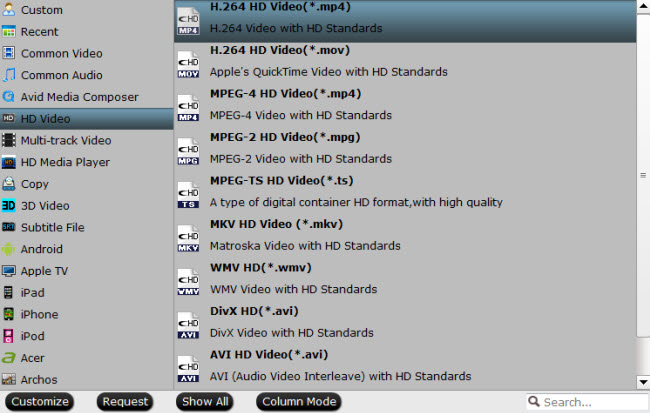
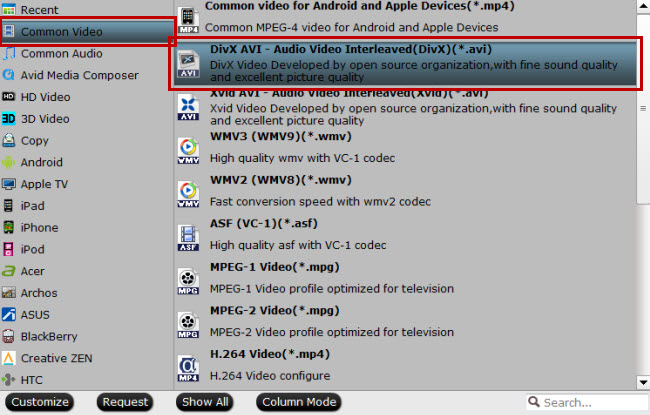
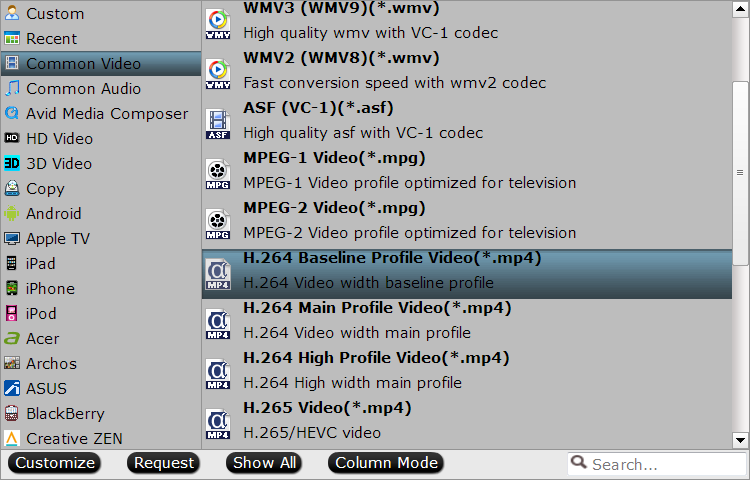
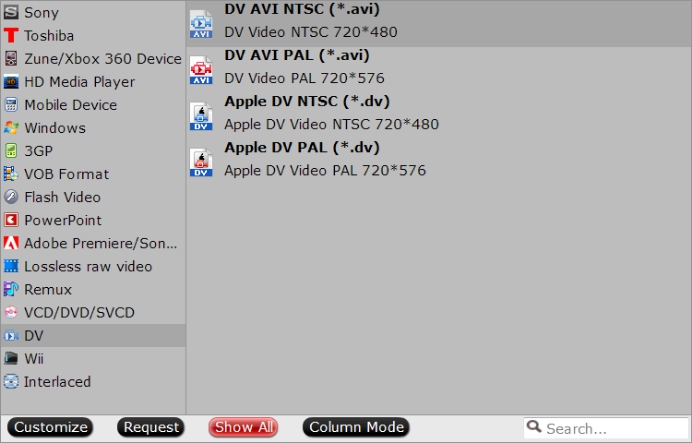
2.After you imported the Sony A7S II files, please choose a video format for output. To edit Sony A7S II files with Windows Movie Maker smoothly, you will need to choose Windows Movie Maker native supported video format, just click the format bar and choose "HD Video">"WMV HD (*.wmv)" as your output format.


To edit torrent movies with Windows Movie Maker, select to output WMM supported DV AVI file format from "DV" > "DV AVI NTSC (*.avi)" or "DV AVI PAL(*.avi)".


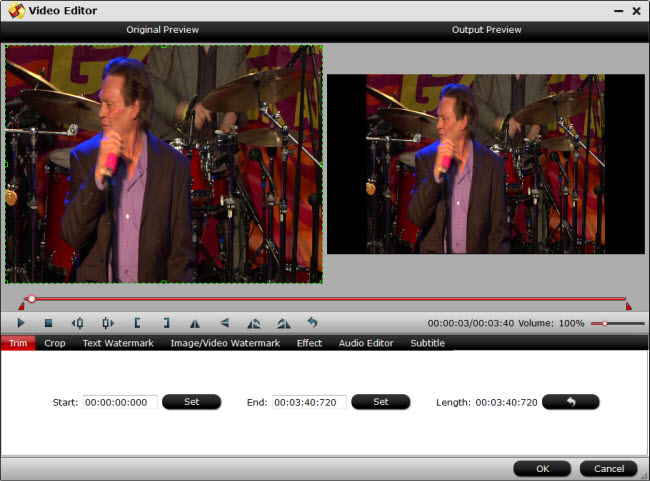
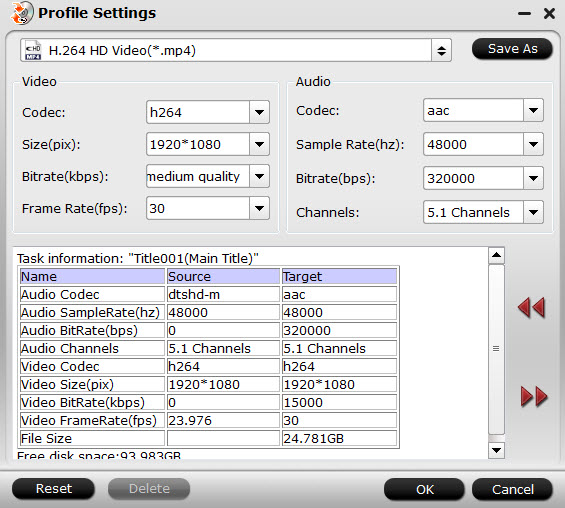
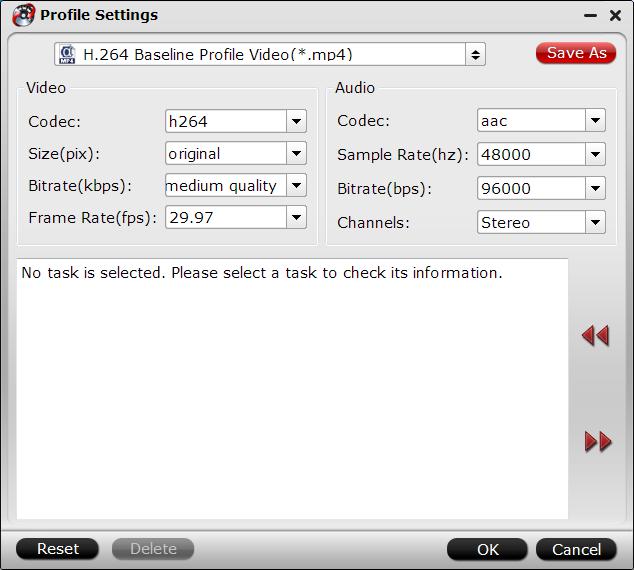
3.Click "Settings" button, then you will be able to adjust audio and video parameters on the popup window to customize the output file quality, these adjustable parameters include codec name, aspect ratio, bit rate, frame rate, sample rate, and audio channel.


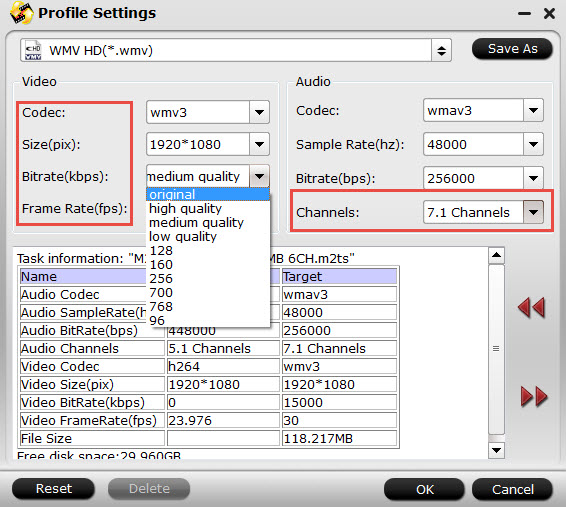
Tips: In the "Audio">"Channels" drop-down menu, you can select 7.1 audio channels to keep the original audio tracks.

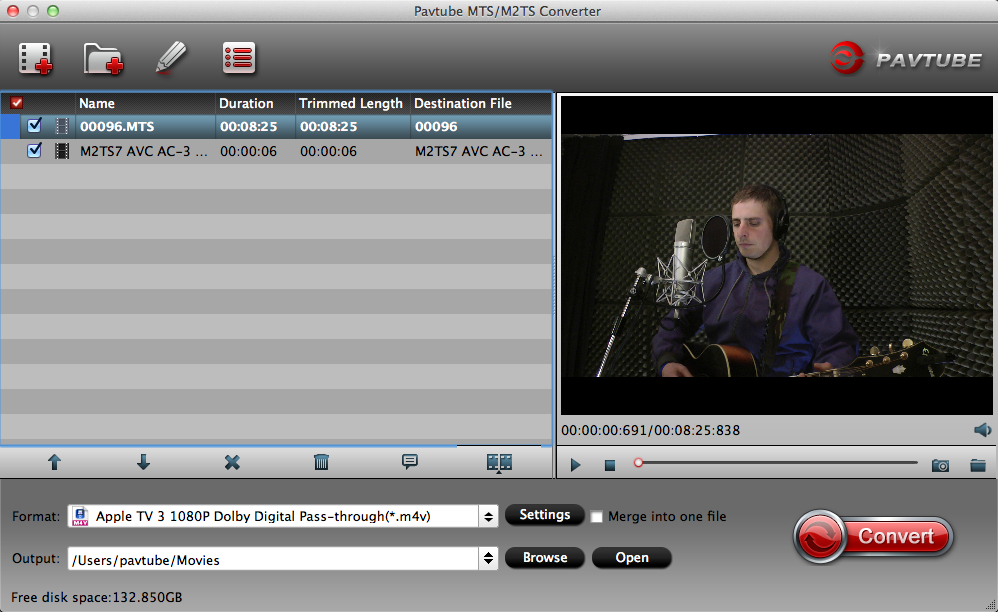
4. When everything is done, you can take a preview by hitting “Play” button. If you are satisfied with the final result, you can click “Convert” button to finish the conversion work.

When the conversion is done, you can click “Open” to get your generated files. Now, you can import and edit Sony A7S II XAVC S 4K files in Windows Movie Maker smoothly.

Read More:

Sunday, January 24, 2016

How to Convert Canon MXF for smoothly playback on Mac/Windows?

“Anyone know a good mxf batch converter? Want to convert a whole bunch of mxf files shot on the Canon C300 to mov files so that I can open them in QuickTime player. Anyone got any suggestions?

“Hi, all, I got a couple of mxf video files which I want to play with Windows Media Player. My issue is that the mxf format is not compatible with WMP. Do I need to convert these mxf files to another format or how do I import them into Windows Media Player so I can watch them?”

MXF is a container format for professional digital video and audio media defined by a set of SMPTE standards. It is not compatible with many media players and portable devices, thus you can't import your MXF file to Windows Media Player and Mac QuickTime naturally. 

There are a lot of users have the need to play MXF files on Mac or Windows computer, you may also have the same need, in this case, you need a MXF Video Converter to convert MXF video files to your media player supported video format, it can help you to play Canon MXF videos smoothly on Mac and Windows.

Pavtube MXF Converter / Mac Version are high recommended for you--convert MXF video format to any formats you need, such as convert MXF to AVI, convert MXF to MOV, convert MXF to MP4, etc. No matter they are recorded by Canon, Sony, Panasonic, JVC, or Blackmagic devices. What’s more, it has powerful MXF video editing function, you can easily trim, crop, add watermark, remove/replace audio, or adjust effect to the video.(Here is the top review)

Free Download:


Convert MXF files on Mac or Windows Playable Format

Step 1. Download, install and run MXF Video Converter, then click Add or Add from folder button to load the MXF files.


Step 2. To convert MXF files, please click format bar to choose the output format that you need, such as WMV for Windows meida player, MOV for QuickTime, MP4 for portable devices, etc. just select as you want.


Step 3. (Optional)After choosing the format, you can click settings button to adjust the output parameters, like resolution, bitrate, frame rate, etc. this MXF converter offers powerful customization feature.

Edit function is also available to use in this best MXF player/converter software, you can trim MXF video, crop MXF video, add watermark, add subtitle, remove/replace audio of MXF video, etc.


Step 4. The final step is to click convert button to start the MXF video conversion. This MXF player/converter will convert MXF files at fast speed with top quality.

After conversion, you can freely watch your MXF file on Windows and Mac without any problem.

Read More:

Wednesday, January 20, 2016

How to play/edit H.265/HEVC on Windows 10?

If you are unable to play or edit H.265/HEVC files on Windows 10 smoothly, you may wish to read this post.

What is H.265/HEVC?

HEVC stands for high-efficiencyvideocoding. Also known as H.265, this new video codec will compress video files to half the size possible using the most-efficient current encoding format, MPEG-4, aka H.264 (used on Blu-ray discs and some satellite TV broadcasts). That will be one-quarter the size of files compressed using the MPEG 2 codec that most cable-TV companies still employ. More importantly, HEVC is used to compress video with 4K resolution — and possibly even 8K resolution in the future — so it can be efficiently delivered.

Present Situation of H.265/HEVC on Win 10.

Support for H.265/HEVC is now a part of Windows 10. You needn’t to install any codec or drivers to make H.265/HEVC files play on Windows 10. The default Windows media player plays the H265 clips natively. However, this support doesn’t guarantee that the H.265/HEVC videos will play smoothly on Windows 10 – that depends on your hardware. If you are running a computer with weak hardware, you may experience choppy and blocky playback.

How to Play/Edit H.265/HEVC on Win 10.

For whatever reason you are having problems playing/editing H.265/HEVC video files under Windows 10, we would recommend transcoding them to a format that is best suitable for Windows 10. Play H.265/HEVC video files on Windows 10, you need to transcode them to MP4, AVI, WMV, MOV, MPEG, etc suitable format, for edit H.265/HEVC video files under Windows 10, you need to convert them to the editor original supported codec, like DNxHD for Avid Medic Composer, MPEG-2 for Adobe Premiere Pro, MPEG-4 Movie for Edius Pro, etc.

Software Requirement for Smoothly Play/Edit H.265/HEVC 

There are few third-party programs on the market that supports H.265 video decoding. Pavtube Video Converter(best H.265/HEVC Converter review)is arguably your ideal H.265 Video encoding and decoding application. It not only enables you to convert H.265 to Windows 10 supportable MP4, AVI, WMV, MOV, MPEG, etc and importing and editing with Edius ProPremiere Pro or transferring and playing with UHD TV. It also has the capabilities to encoding other videos to H.265 format to stream HD content with perfect quality and less bandwidth on multiple HD devices.


Step-by-step Guide of Converting H.265 Video to Play and Edit on Windows 10?

Step 1: Load files to the program.

Start the program on your computer and click"Add Video/Audio" from"File"drop-down list to add the files you desire to convert to the application.


Step 2: Choose output file format.
  • Converting to Windows 10 and portable devices

    From the"Format" drop-down option, you can select a format that's widely support by many portable devices such as"H.264(*MP4)"video as the otuput profile format.

  • Converting to Adobe Premiere Pro

    Click the "Format" bar and switch to "Adobe Premiere/Sony.." option and select "MPEG-2(*.mpg)" as the output format for non-linear post work-flows in Premiere Pro CC.

  • Converting to Avid

    Click "Format" drop-down option, choose Avid Medic Composer best editing codec from "Avid Media Composer" > "Avid DNxHD(*.mov)

  • Converting to Edius Pro

    From "Format" bar drop-down option, choose one of Edius Pro 4/5/6/7/8 supported file formats such as "Common Video" > "MPEG-4 Movie (*.mp4)" to output.

Step 3: Set output profile parameters.

For better playback quality on your devices, you can customzie the output profile paramerters such as video codec, size, bitrate, frame rates and audio codec, sample rate, bitrate and channels.


Step 4: Convert H.265 video to Windows 10.

Hit the right-bottom"Convert"button to start H.265 video to Windows 10 conversion process.

When the conversion is done, you can play H.265 video on Windows 10 with its default media players or import the converted video files to the Avid Medic Composer, Adobe Premiere Pro, Edius Pro with ease.

Read More:

Monday, January 18, 2016

Downsize Large Files from GoPro for Playing Smoothly on Mac

If you are experiencing choppy or broken up playback when viewing your GoPro(HERO4, HERO4 Session, HERO+ LCD, HERO, HERO3+, HERO3, HD HERO2, HD HERO Original) videos, this will usually come down to the computer not being able to process the data of the large HD video files fast enough.  

We have a few things for you to try that should help clear up the choppy playback issue you’re seeing on your Mac:

1.Make sure you copy your videos to your computer’s hard drive from your camera’s SD card before you play them back.  

Playing back videos from your SD card can result in choppy playback.

2.Play back your videos with VLC Media Player. 

This is a free program that doesn’t take up a lot of resources to run on your Mac.  This means that your Mac can focus more on playing back your videos smoothly.   We've found that it's common for Quick Time to give you choppy playback, so we recommend against using it. You can download VLC Media Player here: www.videolan.org.

3. Make sure that your Mac meets the minimum system requirements to play back videos from your GoPro camera.

For higher resolution videos (1080p 60fps and higher): We recommend at least 3.0 – 3.7 GHz Ivy Bridge processors (third-generation Core-based processors or AMD equivalent), 4 GB RAM, and a graphics card comparable to an NVIDIA GeForce GT 650M. The graphics card and processor speed is important particulary for 4K and 2.7K resolution video playback.

Here’s how you can check if your computer meets the minimum system requirements:

Click the “apple” icon in the top left corner of your screen, and then click “About this Mac”.  Next, click “More Info…”

4. Record in a lower video resolution & turn off Protune. 

If your computer can’t play higher than 1080p resolution smoothly, try recording videos at 1080p or lower instead. The lower resolution means that your computer will have less work to do when playing back the video, so it’ll have an easier time giving you smooth playback. If your camera is equipped with Protune, turn off this feature to make playback easier for your computer. 

For those who wanna take 4K GoPro videos and preview on the camera and then can playback on old Mac, we suggest you to convert all GoPro Hero 4K videos to 1080p then play in 1080p and smart-render.

Hot SearchGoPro Hero+ LCD to iMovie/FCE | Play GoPro Videos for TV | Best Edit GoPro Media Files

Although there are numbered tools and utilities can convert and compress the ultra HD videos, few of them can process at a fast speed. Well, Pavtube Video Converter for Mac is considered to be the best 4K to 1080p converter. It is surely in the support of compressing GoPro Hero4 4K videos to 1080p faultlessly.


How to play GoPro Hero 4K videos smoothly on Mac?

Step 1: Download and have a quick installation. The trial version will have a watermark on your converted files. Except for that, there are no time limitation, no virus, and no unnecessary bundle apps while downloading. After that, click “Add Video” button to load your GoPro Hero 4K videos. You can load several files at once thanks to “Add from folder” button.


Step 2: Click the “Format” drop down list to select output format. If you want to play GoPro Hero 4K videos on decent media player, you’d better set a preset profile that best meets your needs. For instance, if you want to play GoPro Hero 4K videos on VLC smoothly, “HD Video>>H.264 HD Video (*.mp4)” would be the best choice.


Step 3: Click “Settings” button; you can adjust video and audio settings, including codec, aspect ratio, bit rate, frame rate, sample rate, and audio channel. To down-convert ultra HD 4K to 1080p, do remember adjusting video size to 1920*1080. That is the exact 1080p.


Step 4: After all the settings, you can preview the final result of movie. If you are happy with the effect, you can then press the big “Convert” button on the lower right to launch the conversion.

Conclusion: Wait a moment, and then the conversion will be done flawlessly. After conversion, click “Open Folder” button to locate the converted video files. It would be easier for you to playback GoPro Hero 4K videos smoothly on Mac.

Read More:

Friday, January 15, 2016

Why you have AVI and WMV Incompatible Issues on Win 10?

As a Windows user, I am sure you have either seen AVI or WMV format. AVI format stands for Audio Video Interleave file format while WMV stands for Windows Media Video format. AVI format is a popular file format that contains both audio and video format. It is also compatible with majority of media players. These two file formats are popular and important to use. 

However, it still have the incompatible issues on windows, include Win 10.

It is important to learn AVI and WMV differences.

File Extension
AVI format
WMV format
File NameAudio Video InterleaveWindows Media Video
DeveloperMicrosoftMicrosoft
DescriptionThis file format consists of both audio and video file containers. This makes it possible to playback audio with video synchronously.This format only contains a video file.
File sizeIt has a large file size.It has a smaller file size as compared to AVI video format.
PurposeIt is used for high quality playbacks and editing.It is used in streaming videos online.
ComponentsIt has several codecs and files extensions.It is proprietary standard.
Supported Media playersKM player
Divx Player
Microsoft Windows Media player.
VLC media player

Then let's take a look at the full list of video/audio formats supported by Windows 10.


Windows 10 Video Formats
• Advanced Systems Formats (.ASF)
• Windows Media Video (.WMV, .WM)
• Audio Visual Interleave (.AVI)
• MPEG -1 (.MPEG, .MPG, .M1V)
• QuickTime Movie File (.MOV)
• MP4 Video File (.MP4, .M4V, .MP4V, .3G2, .3GP2, .3GP, .3GPP)
• MPEG -2 TS Video File (.M2TS)
• Matroska Video File (.MKV)


Windows 10 Audio Formats
• Windows Media Audio (.WMA)
• MPEG Audio Layer III (.MP3)
• MPEG Audio Layer II (.MP2, .MPA)
• Audio for Windows (.WAV)
• CD Audio Track (.CDA)
• MP4 Audio File (.M4A)
• Windows Audio File (.AAC, .ADT, .ADTS)
• Free Lossless Audio Codec (.FLAC)

Why we still have incompatible issues on Win 10?

As we know that the AVI and WMV are both supported by Windows 10, What calls for special attention is that there are more than one codec for AVI and WMV files.

AVI files can hold different types of video and audio streams inside, and with the help of DivX video compression technology, they can display incredible video quality while maintaining a small file size. .divx files are also based on the AVI container, but can contain additional features like XSUB subtitles and chapters.

A WMV file uses the Advanced Systems Format (ASF) container format to encapsulate the encoded multimedia content. Although WMV is generally packed into the ASF container format, it can also be put into the Matroska or AVI container format.

As to the different type of codec in AVI and WMV, we sometimes really meet the incompatible issue with AVI and WMV on Win 10.

How to solve the AVI and WMV compatible issues on Win 10

The easy and smoothly way is to make the incompatible AVI and WMV format be the one that supported on Win 10. When you think of file conversion, Pavtube Video Converter is highly recommended to you. This software is one of the reliable software that converts both audio and video files to any popular format. Moreover, when converting files, the quality of video files will always be retained. This easy to use software is compatible with different devices.

Key Feature of Pavtube Video Converter:
  • It support audio and file formats of different formats like WMV, AVI, MP3, MP4, WAV, OGG, FLV, MOV and others.
  • Enable you to download videos and audio online of any file format from YouTube, Facebook, Hulu, Meatacafe, Vimeo, Vevo and others.
  • Edit files, customize, and personalize them by using its basic editing tools.
  • Direct conversion of files to iOS devices, android generic phones, Samsung models, HTC, LG, Blackberry and much more.
  • Perfectly compatible with Windows 10/8/7/XP/Vista, Mac OS X 10.11 El Capitan, 10.10 Yosemite, 10.9 Mavericks, 10.8 Mountain Lion, 10.7 Lion and 10.6 Snow Leopard.
First free download and install Pavtube Video Converter on your  Win 10, and then launch it. Now just follow the step by step guide demonstrate how to solve the AVI and WMV compatible issues on Win 10.


Step 1. Launch the application on your computer, click "File" > "Load Video/Audio" or "Load from Folder" to import incompatible AVI or WMV or other else files to the program.


Step 2. Choose proper format for replacing incompatible AVI or WMV format. There are up to 170 kinds of format assign in the category. You can choose the ideal one from the common video or HD video category, or other special format you want.


Step 3. (Optional) You can click the “Edit” button and the “Video Editor” will appear. You can trim the favorite clip, get rid of black bars, add text, image and video watermark, add special effects, insert subtitles, etc.

Step 4. Return to the main UI and hit the “Convert” button to start conversion. 

When the conversion finished, you will be have no problems with AVI and WMV playback on Win 10.

Read More:

Wednesday, January 13, 2016

Make All Recorded MTS/M2TS Files Can be Played on HP Desktop on Win 10

When AVCHD video is copied to my HP desktop running with Win 10, the file is saved as an .M2TS or .MTS file format and can not opened with Windows movie player, can anyone help me?

Unlike other general video formats, such as AVI, MP4, MOV, WMV, FLV, etc, which are accepted by major video players on Win 10, it has nit-picking rules for AVCHD/MTS. There are two methods to solve the problem, one is to play AVCHD(.mts/.m2ts) videos with a powerful AVCHD video player, the other is to convert the AVCHD(.mts/.m2ts) into a more compatible format on Win 10

Play “.mts/.m2ts” Video Files on HP Desktop Win 10 via VLC

VLC Media Player is a free cross-platform multimedia player that plays .mts files as well as DVD, Audio CD and VCD, available for Windows10. 

You can download the software absolutely free! 

When the downloading and installation is done, simply launch the software and click Media button at the upper left side of the window, a menu option will appear from there choose Open File.

A file folder will then appear. Find the location of the MTS file you want to play on the VLC media player. 

Take note that you can only play one video in a window at a time.

Simple as that! You can now enjoy the movie you want to watch whenever you want!

Convert the “.mts/.m2ts” into Win 10 Compatible Format 

Windows 10 supports .mts/.m2ts videos that are MPEG-2 TS Video Files(click to see Windows 10 playable media formats), that is to say, some of the .mts/.m2ts video can not be played directly on Windows PC, include Win 10.

That's a hint for you to get a more professional Windows 10 MTS/M2TS video converter to convert and play your MTS/M2TS files on Windows 10 fast and well. Here just recommend you one well-received MTS/M2TS converter--
Pavtube MTS/M2TS Converter.

No matter you want to convert between HD MTS files and regular videos or convert MTS movies on Windows 10 for playback on your HP desktop, this fast and easy MTS/M2TS converting tool will make you satisfied. Meanwhile, you can merge all the recorded MTS/M2TS video clips into a big one files automatic. Plus, with the built-in video editing feature of the program, you can trim, crop, add watermark, add subtitle and more to your video files.


How to Convert and Play MTS Files on Windows 10

Step 1: Load files to the program.

Start the program on your computer and click"Add Video/Audio" from"File"drop-down list to add the files you desire to convert to the application.


Step 2: Choose output file format.

From the"Format" drop-down option, you can select a format that's widely support by many portable devices such as"H.264(*MP4)"video as the otuput profile format.


Step 3: Set output profile parameters.

For better playback quality on your devices, you can customzie the output profile paramerters such as video codec, size, bitrate, frame rates and audio codec, sample rate, bitrate and channels.


Step 4: Convert MTS/M2TS video to Windows 10.

Hit the right-bottom"Convert"button to start mts/m2ts video to Windows 10 conversion process.

When the conversion is done, you can play mts/m2ts video on Windows 10 with its default media players with ease.

Read More:

Monday, January 11, 2016

Does MTS/M2TS files Supported by Apple Devices with El Capitan?

Maybe your camcorder records videos in AVCHD MTS or M2TS formats. In this case, if you want to put them to your Apple devices like iPhone, iPad or iPod to share with your friends and family, you would get a headache.

MTS format is a file extension of AVCHD video, which generally supports 720P, 1080I, 4K video or even higher resolution. When converting MTS to MOV online, the online video converter might loss the original high quality video taken by your camera.

One more important thing is the different applications and devices of Apple. When you convert MTS to MOV for free you just find the files do not work for all the devices.

That's because AVCHD MTS or M2TS is incompatible with most of the applications and devices, including iTunes and Apple devices. So if you want to use iTunes to manage MTS or M2TS files or sync to Apple devices, you have to convert MTS or M2TS to iTunes supported formats first.


To experience camera videos in MTS format on aniTunes/iPad/iPhone/Apple TV is realizable. An MTS to MOV converter is what you’ll need to transcode and convert HD MTS/M2TS camera videos to MOV, which is the perfect video format for iTunes/iPad/iPhone/Apple TV. How to choose the right MTS video converter? Pavtube MTS/M2TS Converter /Mac Version(read the review) plays a leading role in ripping camera MTS video files to video formats natively supported by Apple devices.


Key Feature of Pavtube of MTS/M2TS Converter
  • Professional video converter: This MTS/M2TS converter supports converting 150+ video formats. You can use it to convert M2TS/MTS to all the formats supported by iTunes like MP4, MOV, M4V.
  • High output video quality: The converted videos are in high quality. It will keep 100% orginal video quality.
  • Fastest Conversion Speed: It can batch convert videos at 30X fastest speed than almost all the competitors.
  • Great video editing tool: You can use it to enhance your video by adding effects, or edit your video by merging, rotating, trimming, etc.
How to Converter and Import MTS/M2TS to Apple Devices

Download, install and run this software, import M2TS or MTS source video by clicking “Add File” button. You can also add more than one video files and convert them at one time.


To keep the original high quality down; let’s go to the ‘HD Video’ to seek the’H.264 HD Video(*.mp4)’as the best one for iTunes. Or the find the ‘M4V’ is also available. You can take the following picture as reference.


For different devices, no matter for tablets or smart phones, you can adjust your personal needs in ‘Settings’ button. To keep the video size as 1920*1080, bitrates as high? Frame rate as 30 or 29.97. Here, you can set all on your own. 


For a final step, just go back to the main interface to press on the ‘Convert’ button to get started. Don’t know how totransfer files into iTunes? In a word, we can enjoy our MTS/M2TS movies on Apple devices through iTunes smoothly. What are you waiting for?

Read More:

Friday, January 8, 2016

Free Way to Add SRT Subtitles to MP4 Video

Movies or videos in MP4 are universal nowadays. We can easily watch movies or videos online. However, we may meet language trouble due to the differences of languages. In this case, subtitles of the native language will be badly needed. If there are no subtitles of the videos, how to add subtitles to MP4 files? The following article will introduce a nice MP4 Subtitle Adder as well as a step by step guide to add subs to MP4 files.

As for SRT subtitles, you can Download External SRT Subtitles or Create Your Own Subtitles. Here we give some suggestions in details below:

Download SRT subtitles: You can put "movie title" + "your preferred language" + "subtitles" as the search strings and select the subtitle file saved in .srt for an effective SRT subtitle file searching. Alternatively, finding the needed subtitles in .srt format from those popular subtitle download sites like Moviesubtitles.org is also a practical way.

Edit or make your own .srt file: Here we take Notepad as an example. Just open Notepad, create the subtitles you like in the text editor, click menu File->Save As; change the subtitle file name based on your name of video file and save it in .srt format.

Tips: The SRT subtitles need to contain the following parts while creating subtitles:

  1. The number showing which subtitle it is in the sequence.
  2. The time that the subtitle should appear and disappear on the screen.
  3. The subtitle itself.
  4. A blank line indicating the begin of a new subtitle.
How to Add Subtitles to MP4 Video File

Pavtube Video Converter / Mac Version is the professional MP4 Subtitle Adder that can easily add various .srt subtitles to MP4 files. In addition, it can also support adding subtitles to many other video formats including MKV, AVI, MPG, WMV, MOV, 3GP, VOB, FLV, MXF, AVCHD, VOB and etc.

Besides acting as the MP4 Subtitle Adder, Pavtube Video Converter is a powerful video converter. It can convert more than 150 video and audio formats with superb quality. What is more, it is a good video editing tool that can trim videos, crop videos, add watermark to videos, merge or join videos together, split videos by chapters, adjust audio channels, and remove black bars and more.

Hot SearchAdd SRT/ASS/SSA Subtitles to MP4 | Add Subtitles to Blu-ray Movies | Add Subtitles to DVD Movies


First free download and install Pavtube Video Converter on your Mac or Windows, and then launch it. Now just follow the step by step guide to to add .srt subtitles to MP4 video.

Step 1. Click the "Add File" button to load the MP4 files. You can also drag and drop MP4 files to the interface of the software.


Step 2. Add subtitles to MP4 videos

Click “Edit” or the pencil icon  to switch to the editing interface, where you can find multiple editing functions and “Subtitle” is just one of them. Click the “Subtitle” tab and check the “Enable” box to allow you to add SRT/ASS/SSA subtitles to MP4 videos. Then Click “Browse” to find and import the downloaded SRT/ASS/SSA subtitles.


Kindly note: Pavtube Video Converter only supports SRT/ASS/SSA subtitles, and make sure that the subtitle file and your MP4 video files are kept in the same folder sharing the same name.

Step 3. Start inserting subtitles to MP4 video

Go back to the main UI and click “Convert” to start inserting SRT/ASS/SSA subtitles to your MP4 videos. If you don’t want to keep the original MP4 format, just click the format bar to choose the output video format you want before conversion.

Read More:

Wednesday, January 6, 2016

How to Play WMV on Android Supported Devices

Summary: Normally, Android cell phones or tablets don't support WMV format files by default. That's why WMV files fail to play on Android phones or tablets. This article will show you the two ways to solve this problem

i just got an android phone that is samsung galaxy
while when i tried to transfer and play WMV files on my phone
i find my android phone can not support it
so is there any solution to solve it?


The first is to make use of an application that can support WMV files on your Android devices.


1.Video Player

Video Player is a free application for Android smart phones or tablets that can play any popular video formats like WMV, DivX, XviD, FLV, TS, RMVB, MKV, MOV, M4V, AVI, MP4, 3GP and more. It has the ability to detect all video files on your SD card and play them with intuitive and concise layout. Video Player can handle any TV shows, movies, music videos on your Android devices. It's a pretty good app for Android devices so you can download it on your Android phone or tablet.

2. iMPlayer – iFlux Movie Player

This iMPlayer – iFlux Movie Player is the one you should set your eyes on, a popular choice on the Android Market that is available for version 2.1 - devices with a newer version of the Android operating system are not supported. While restricting the app to a narrow selection of Android devices cuts out a large section of the user base, iMPlayer – iFlux Movie Player is free to use, thus, those that can take advantage of WMV playback with this software should be really content.

3. MoboPlayer

Using the MoboPlayer, I can play AVI, WMV, FLV, MPG, MOV, & MP4 files on my Android 2.2-based LG Optimus S, which only has a 600MHz ARM6 CPU and is far less powerful than the Galaxy. Android only natively supports these video file formats, but software developers are free to write software to decode whatever file format they like. You really just need good media player software. Try MoboPlayer or RockPlayer.

However, just because a particular format is supported by a media player, that doesn't mean that your phone has the horsepower to smoothly decode and display higher definition video files. For example, my lowly LG Optimus can play relatively low-resolution AVI files smoothly, but it can't smoothly play high-resolution AVI files.

Hot SearchWMV Players | WMV DRM Removal Tools | MOV to Windows Media Player

The second is to convert all of your WMV files on your PC to a format that will be played back natively on your Android without any additional software.

While there are numerous players with complete support for lots of formats, converting the video you want to the native format of these devices, which is MP4 is surely recommended, as this can bring you a better, more engaging experience. Then the best tool you can find on the market which can easily convert your WMV videos to an iOS or Android device format is surely Pavtube Video Converter / Mac Version. The most important thing is this WMV converter for Android mobile phones is extremely easy to use.

Key Features of iSkysoft iMedia Converter Deluxe

  • Convert WMV videos to Android devices in three simple steps.
  • Convert WMV videos to different video editing tools supported formats with ease.
  • Aside from WMV, it supports to convert lots of HD and standard video formats, such as AVI, FLV, VOB, MP4, MKV, etc.
  • It supports to convert audio formats as well.
  • Compatible with all Windows OS (including Win 10) and Mac OS X (including 10.11 El Capitan).
         

How to Convert WMV for Android Devices

First free download and install Pavtube Video Converter on your Mac/PC, and then launch it. Now just follow the step by step guide to make editing work more smoothly.

Step 1: Run it and click “File” > “Add Video/Audio” or “Add from Folder” to import files. You can also directly drag and drop the files.


Step 2: Clicking "Format" drop-down bar, select "HD Video" > "H.264 HD Video" as the final output file format.


Step 3: Specify output folder on your computer to save the output files. Click the "Browse" button to choose the path where you want to save the output files in. 

Click the "Convert" button at the lower right corner of the interface to begin to convert WMV for your Android devices.

After the conversion is finished, you can transfer the video to your desired output devices or editor for enjoyment.

Read More: