Wednesday, October 28, 2015

Export Videos from iMovie to FLV on Mac El Capitan

Summary: Failed to export videos from iMovie to FLV? Take it easy. To achieve that, you need a professional video converting program to convert iMovie videos to FLV as you need. Read this article, you will get the best solution to this problem.

I've edited some videos in iMovie and I need to export them to FLV (Flash Video) for a website. I've tried Share-Export video and Share-export using Quicktime, but iMovie (09) does not have "Export to FLV" as export options!

Actually, the Flash Video FLV file format is a container file format used to deliver video over the Internet. It has been accepted as the default online video format by many sites. Notable users of it include YouTube, Hulu, VEVO, Yahoo! Video, metacafe, Reuters.com, and many other news providers. iMovie does not natively support FLV output. A workaround is to share the iMovie other format video to YouTube and then download the video, which would be in FLV format. This method is time consuming and you'll need a YouTube Downloader in order to capture your video from YouTube. Alternatively, a professional Pavtube iMedia Converter for Mac gives you hassle free experience. You can output your iMovie videos in any format on Mac (Mac OS X El Capitan, Yosemite, Mavericks and Mountain Lion included) and than convert them to FLV (Flash Video) in 3 easy steps. Besides, it enable you convert any videos to any formats, including output the supported format for the editing softwares such as iMovie, iDVD, ProRes HQ, Final Cut Pro etc. If you are a windows user, please turn to Pavtube Video Converter Ultimate.


Other Download:
- Pavtube old official address: http://www.pavtube.cn/imedia-converter-mac/
- Cnet Download: http://download.cnet.com/Pavtube-iMedia-Converter/3000-2194_4-76177788.html


Other Download:
- Pavtube old official address: http://www.pavtube.cn/blu-ray-video-converter-ultimate/
- Cnet Download: http://download.cnet.com/Pavtube-Video-Converter-Ultimate/3000-2194_4-75938564.html

How to Export Videos from iMovie to FLV

Step 1. Import iMovie video to iMedia Converter

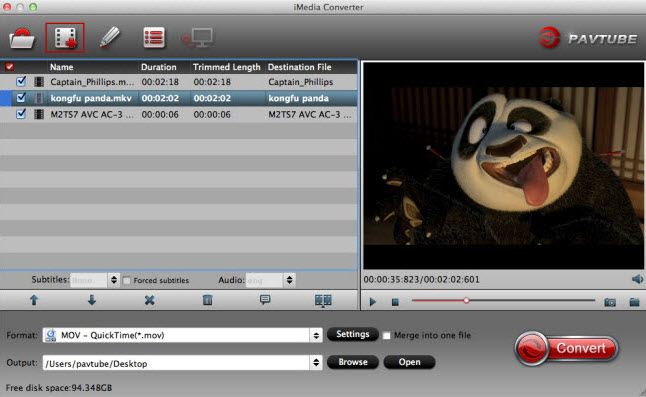
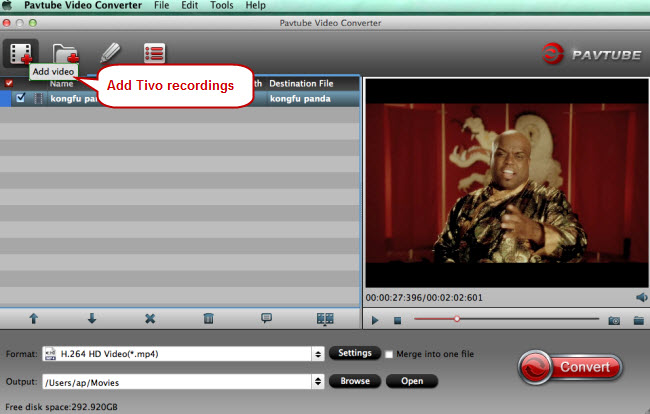
To add your iMovie videos to the iMedia Converter, you have two options: directly drag and drop the iMovie output video to the program, or head to "File" and choose "Add Video" or "Add folder" icon.


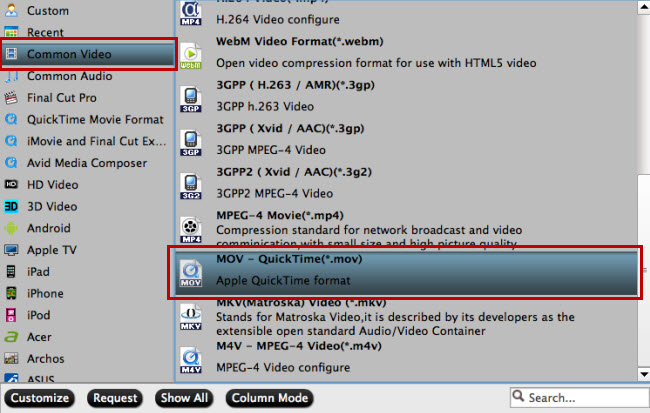
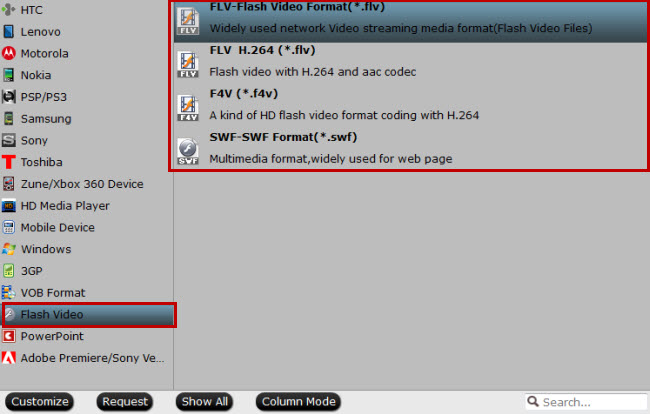
Step 2. Select output format.

This program supports various output formats. Go to "Format" bar,select "Common Video" > "MOV - QuickTime(*.mov)" as the output file format. You can also select to choose other output file formats according to your own needs.


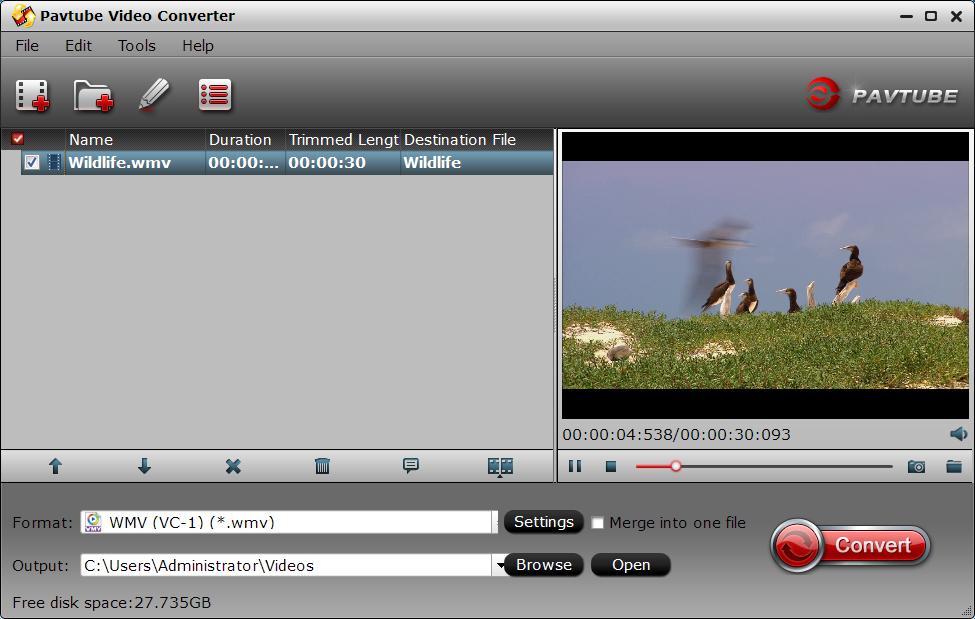
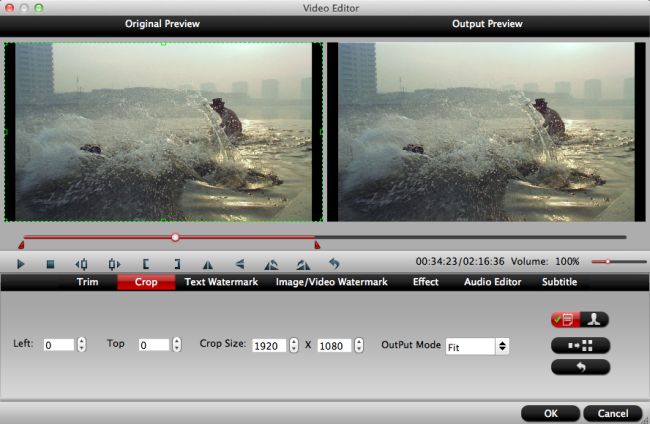
Step 3: Edit before final output video.

Click the pencil like icon on the top tool bar of the program to open "Video Editor" window, you can trim video length, crop video file size, apply special effect, add text/image watermark, insert subtitles, etc.


Step 4. Start the video conversion process.

All all setting is done, hit the "Convert" button at the bottom of the program. The conversion process will start immediately indicating the remaining time it will complete the action.

When the process is over, you can find the converted files by clicking the "Open output folder" on the main interface of the program.

Hot News: Happy Halloween and Hurry up!!! Pavtube's 2015 Halloweenn Promotion is on the road (Offer Valid from Oct. 23, 2015 to Nov. 6, 2015). This Time Pavtube offers up to 40% Off discount on its featured software apps. Never miss this chance to get what you need.

Read More:

Monday, October 26, 2015

Pavtube 2015 Halloween Special Offer - Up to 40% Discount


Festivals are always the best opportunities to purchase the goods you were not willing to buy or had no ability to afford in the past days. 2015 Halloween is coming. Are you ready to open your wallet? To make your Halloween celebration even greater, Pavtube Studio has prepared a great Halloween Promotion – we are offering you a generous 40% Discount on our Blu-ray & DVD Softwares (Windows 10 and El Capitan supported). 


Since Pavtube Studio offers many kinds of Blu-ray/DVD/Video softwares that you possibly don't know which one to choose, I can make a brief introduction and a recommendation to you. 

Recommendation 1: If you often do video conversion process, you can take Pavtube Video Converter Ultimate and Pavtube iMedia Converter for Mac into consideration. It can accept any Halloween movie source, like Blu-ray/DVD disc and 4K/SD/HD online/local video in any format and transform them to nearly any popular video format you have ever seen. 


Recommendation 2: For those who have plenty of Blu-ray discs, Pavtube BDMagic and Pavtube BDMagic for Mac will be the best choice. They are cheaper than the recommendation one but supply the same effect on Blu-ray/DVD Halloween movies. 


Recommendation 3: DVD owners who just need to rip and backup DVD disc or copy DVD folder, DVD ISO/IFO can focus on Pavtube DVDAid and Pavtube DVDAid for Mac. It only can deal with DVD movies but it is the cheapest item. 


Recommendation 4: Pavtube ByteCopy and Pavtube ByteCopy for Mac are for situation that your Halloween Blu-ray/DVD movies have several subtitles and audio tracks and you want to keep all the tracks and chapter markerswhile ripping and copying the discs. What's more, it enables you to extract FLAC/WAV audio from Blu-ray audio disc and extract SRT subtitle from Blu-ray movies. 


Think about which one is the best choice for you so that you can solve your video conversion problem with the least money. Don't waste the money-saving chance on Halloween. Just do it!

How to Convert QuickTime to DV on Mac OS X 10.6 or Later

Summary: You may need some QuickTime clips into DV for some special demand on Mac. What should you handle this issue? Take it easy, the following will show you the best guide to complete this task easy.

Hot Search:  QuickTime Alternative | DVD to QuickTime | H.265 to QuickTime

Abbreviation of QuickTime is not only refer to the hot player on Mac, but also refer to music, videos in several file formats such as MOV, MP4, 3GP, MP3 and all of these files used to play on QuickTime. Though QuickTime accepts these file formats, neither do other Apple products. Well, to explain this more exactly,it is like this: you can play 3GP videos on QuickTime, but you can't use them on Final Cut Pro for editing. And this article is the very one to show you how to solve this kind of problem by converting QuickTime to DV on Mac for using these files on Final Cut Pro, iMovie etc.

When comes to DV file format, it’s used for recording and playing back digital video with MiniDV. The DV video file is stored in a file on the user's computer, or stored on tape using a video tape recorder (VTR). You may need some QuickTime clips into DV for some special demand. What should you handle this issue? Take it easy, the following will show you the best guide to complete this task easy.

Here a professional video ripper recommend for you--Pavtube Video Converter for Mac (Mac OS X 10.6 or Later), it can convert the QuickTime to DV smoothly. Moreover, it enable Mac users to easily convert videos and TV shows straight to iPad (iPad Pro), iPod, iPhone (iPhone 6S/6S Plus supported) and other devices. It converts between a variety of video formats including MP4, AVI, WMV, MPG, MOV, FLV, MKV, etc. and fully supports camcorder video formats like AVCHD (MTS/M2TS), AVCHD Lite, MOD/TOD, etc.


Other Download:
- Pavtube old official address: http://www.pavtube.com/video-converter-mac/
- Amazon Store Download: http://www.amazon.com/Pavtube-Video-Converter-Mac-Download/dp/B00QIBK0TQ
- Cnet Download: http://download.cnet.com/Pavtube-Video-Converter/3000-2194_4-76179460.html


Other Download:
- Pavtube old official address: http://www.pavtube.com/video_converter/
- Amazon Download: http://download.cnet.com/Pavtube-Video-Converter/3000-2194_4-75734821.html
- Cnet Download: http://download.cnet.com/Pavtube-Video-Converter/3000-2194_4-75734821.html


    How to Convert QuickTime to DV on Mac

    Step 1: Input videos to the software.

    Click "Add Video" or "Add from folder" icon to import QuickTime source files to the program.


    Step 2: Define output file format.

    Click "Format" bar, from its extended list, select "DV" > "Apple DV NTSC (*.dv)" to output.


    Step 3: Start QuickTime Video to DV on Mac OS X El Capitan conversion.

    Carry out the video conversion process by hitting the right-bottom "Convert" button.

Hot News: Happy Halloween and Hurry up!!! Pavtube's 2015 Halloweenn Promotion is on the road (Offer Valid from Oct. 23, 2015 to Nov. 6, 2015). This Time Pavtube offers up to 40% Off discount on its featured software apps. Never miss this chance to get what you need.

Read More:

Sunday, October 25, 2015

Top Video Converters for Mac OS X 10.11 El Capitan Review

Summary: The newest system of Apple, Mac OS X 10.11 El Capitan is already generating a lot of interest online. There are a few additions and upgrades that this new OS upgrade will bring to users. After updating the Mac 10.11, you may facing the dilemma, installing and lots of movie files cannot work.

Hot Search: H.265 to Mac 10.11Different Regions DVD on Mac | Blu-rays on Mac El Capitan 

Well, you have to know that a number of video converters for Mac have stopped working after updating to the newest OS X 10.11 El Capitan. In this case, installing and using the best OS X 10.11 El Capitan Video Convertor to convert MKV, FLV, AVI, MOV, etc on Mac OS X 10.11 El Capitan is the thing you need to do.

Here let's talk about a suitable Video Converter that really works on Mac OS X 10.11 - Pavtube iMedia Converter for Mac. (Here is the review.)
  
What is clear is that iMedia Converter for Mac is compatible with all Mac OS, including 10.11 El Capitan, 10.10 Yosemite, 10.9 Mavericks, 10.8 Mountain Lion, 10.7 Lion, Snow Leopard 10.6, Leopard 10.5. This video converter for Mac OS X 10.11 is among those most likely to be capable of handling all SD, HD including H.265, MTS, MXF, MOV, MP4 and 4K videos, etc. It is much better capable of converting downloaded YouTube videos to MKV, WMV, MOV, MPEG, iPhone, iPad, Android, etc on Mac OS X El Capitan at one go. Aside from this, there are many accessible video editing tools that you can find this software for video editing. You can cut, add caption, add audio, and a lot of things to your video.
   
Free Download this Best Video Converter for Mac OS X 10.11 El Capitan: 

   
Other Download:

- Pavtube old official address: http://www.pavtube.cn/imedia-converter-mac/
- Cnet Download: http://download.cnet.com/Pavtube-iMedia-Converter/3000-2194_4-76177788.html

Step-by-Step: Convert HD Videos on Mac OS X 10.11 El Capitan

Step 1. Load original Video files. Click “Add Video” button on the main interface to load your MKV, WMV, MOV, MPEG files to the program. (Drag&Drop function is included.) 


Step 2. Click on the dropdown menu of “Format” and then move your pointer to “HD video” > “H.264 HD Video (*.mp4)” which is the compatible format for Mac


Tips: With the right settings you can retain the quality of the original videos while also saving space. This is particularly helpful when streaming over your network, depending on your network quality. Simply click Settings bar and you can tweak the settings to your satisfaction and even save it as preset.

Step 3. Start Video to Mac Conversion. Finally, hit the “Convert” button at the bottom of the main interface to start the conversion.

When everything is OK, simply click the Convert button to begin the conversion from MKV to Mac OS X 10.11 El Capitan format. When the conversion is finished, you can import and play your videos to QuickTime Player, iTunes or transfer them to iPhoneiPad via iTunes with ease. 

Tip: For Windows users, Pavtube Video Converter Ultimate is also a helpful app to encode videos for further usage. A nice info is that Even for the latest codec H.265/HEVC, it can hold well. Besides, it also supports encoding to M3U8by the latest version. 

Read More:

Tuesday, October 20, 2015

Rip Tivo to MOV for Playback on Mac El Capitan, iPad, iPhone, Apple TV

Summary: You may have recoreded some TV shows and wanna enjoy and share the tivo files in QuickTime with family or friends at home. Howver, the Tivo files are saved by digital video recorders with copyright protection, which make it hard to play Tivo videos in QuickTime. In this article, you will learn the best way to import TiVo to playback smoothly on on Mac El Capitan, iPad, iPhone, Apple TV. Just follow it.

Hot search:Play TiVo on Android  | Tivo to H.265/HEVC | H.265 to QuickTime

Need a simple way to rip TiVo recordings to MOV? Care for play TiVo on QuickTime player? Eager to watch TiVo shows on your portable Apple devices like iPad, iPhone or stream to Apple TV?

But as we all know, TiVo videos (plain MPEG2 videos) are not accepted by QuickTime, Apple TV, iPad and iPhone. The best solution to handle this issue is rip the TiVo files to Mac OS X EL Capitan or Apple device accepted formats in advance like MOV.

To carry out this conversion, a powerful Video Converter is needed. Here Pavtube Video Converter for Mac is highly recommended, which is a professional TiVo converting program on Mac. It can run on Mac OS X 10.11 EL Capitan. And with it, you can convert your TiVo video to MOV on QuickTime based on Mac OS X El Capitan. It also provides output compatible formats for various Apple devices as well as Andriod devices and Windows devices. Moreover, Pavtube Video Converter for Mac also allows you to customize profile settings to get a desired and better output. Movie creation with this program is no big deal. You can edit your video files by trimming, cropping, attaching external subtitles, adding watermarks, change video effect, etc. If you are a Windows user, Pavtube Video Converter(Windows version) also available here.


Other Download:
- Pavtube old official address: http://www.pavtube.com/video-converter-mac/
- Amazon Store Download: http://www.amazon.com/Pavtube-Video-Converter-Mac-Download/dp/B00QIBK0TQ
- Cnet Download: http://download.cnet.com/Pavtube-Video-Converter/3000-2194_4-76179460.html


Other Download:
- Pavtube old official address: http://www.pavtube.com/video_converter/
- Amazon Download: http://download.cnet.com/Pavtube-Video-Converter/3000-2194_4-75734821.html
- Cnet Download: http://download.cnet.com/Pavtube-Video-Converter/3000-2194_4-75734821.html

Rip Tivo to MOV for Playback on Mac El Capitan, iPad, iPhone, Apple TV

Step 1. Launch HD Converter for Mac

Run this Mac HD converter and click “Option” button to switch to “Options” window. Click on “Tivo” tab and enter the Media Access Key.


Step 2. Import Tivo recordings

Transfer Tivo recordings to Mac with TivoDecode Manager (click to get the detail steps). Then click"Add video" icon to import recorded Tivo videos.


Step 3. Convert Tivo to MOV or other formats


Choose an output format according to the device you own. MOV is quite common and suitable for almost all Apple devices. However, you can still select other outputs as the target video format. As the Samsung Galaxy Note 4, you can view convert to mp4 videos for watching.

Step 4. Start converting Tivo recordings on Mac

Click on “Convert” button in then right corner to realize Tivo to MOV conversion.

Read More:

Friday, October 16, 2015

Import Sony CX405 XAVC-S/AVCHD/MP4 to Sony Vegas Pro for Editing

Summary: Have you ever captured some videos with your Sony CX405 but not able to upload to edit them on Sony Vegas Pro? This article will help you a lot to solve this issue.

“I have captured some videos clips about 20 or so with my new Sony CX405, the recordings are in XAVC-S/AVCHD format with 4K resolution. I would like to edit them on Sony Vegas Pro so that I can share these interesting videos with my friends through Internet or on YouTube. But the problem is, my Sony Vegas Pro has no ability to edit such high definition files, I want to find some apps can import the Sony CX405 XAVC-S/AVCHD to Sony Vegas Pro. Can anyone suggest something to help me out?”

Vegas Pro is a contemporary NLE designed for complete creative control. New features include advanced archival tools, sophisticated audio metering, and the Vegas Pro Connect mobile iPad companion app. Vegas Pro 13 comes complete with DVD Architect Pro 6, Dolby Digital Professional Encoder, and plug-in collections from FXHOME, NewBlueFX, and iZotope.

As it claimed, Sony Vegas Pro 12 is the first native 4K XAVC editor. Sony Vegas Pro 12 and the latest version Vegas Pro 13 support a complete 4K workflow when you're working with 4K XAVC and XAVC S. Of course, working with 4K files can be taxing on your computer, especially if you don't have the most powerful machine to edit on. From our tests it looks like Sony Vegas Pro 12/13 has to create a lower resolution proxy file to display in the NLE while you edit, so you have to wait for the proxy file to be created before you can edit any 4K footage. In this process, it will cost some time.

Well, if you don't like the way, or have the old version of Sony Vegas Pro that doesn't support Sony CX405’s 4K video, an alternative way is to convert 4K video with Pavtube Video Converter and then import to Sony Vegas Pro directly. This video converter perfectly works as the Sony CX405’s 4K to Vegas Pro Converter that helps you convert XAVC, XAVC S or any 4K files to MPEG-2, which is the best format for Vegas to edit with ease. No expensive add-ons or plug-ins are required. With it, you may also transcode 4K video to Avid Media Composer, Adobe Premiere Pro, Windows Movie Maker, Pinnacle Studio and more NLE programs highly compatible formats for editing. If you are a Mac user, please turn to Pavtube Video Converter for Mac.


Other Download:
- Pavtube old official address: http://www.pavtube.com/video_converter/
- Amazon Download: http://download.cnet.com/Pavtube-Video-Converter/3000-2194_4-75734821.html
- Cnet Download: http://download.cnet.com/Pavtube-Video-Converter/3000-2194_4-75734821.html


Other Download:
- Pavtube old official address: http://www.pavtube.com/video-converter-mac/
- Amazon Store Download: http://www.amazon.com/Pavtube-Video-Converter-Mac-Download/dp/B00QIBK0TQ
- Cnet Download: http://download.cnet.com/Pavtube-Video-Converter/3000-2194_4-76179460.html

Import Sony CX405 XAVC-S/AVCHD/MP4 to Sony Vegas Pro for Editing

Step 1: Load Sony CX405 XAVC/AVCHD/MP4 video footage.

Launch and start the program on the computer, import your source Sony CX405 XAVC/AVCHD/MP4 video footage to the program by clicking "File"> "Add Video/Audio".


Step 2: Specify output file format.

From "Format" drop-down list, select to out "Adobe Premiere/Sony... "> "MPEG-2 (*.mpg)" format for editing with Sony Vegas.


Step 3: Merge into one file.

On the main interface of the program, check "Merge into one file" option to combine all the separate video footage into single one.

Step 4: Carry out the conversion process.

Press right-bottom conversion button to start GoPro Hero MP4 footage to Sony Vegas Pro conversion process.

When the conversion is complete, you can easily import Sony CX405 XAVC/AVCHD/MP4 videos to Sony Vegas Pro for professional editing.

Read More:
Watch iTunes Movies on Sony XBR 4K Ultra HD TV via USB
Edit Sony PXW-X70 XDCAM XAVC footage in FCP & Avid 
Work Around : How to convert 1080p HD MKV on Sony TV 
How to Watch iTunes Movies on Sony Xperia Z4 
Can I play MKV videos on my new Sony Bravia HDTV? 

Tuesday, October 13, 2015

How to Edit Sony A7R II 4K XAVC S in Avid Media Composer on Mac

Watching Sony 4k video is highly intriguing and gives real life experience to the viewers. But editing those super smooth and high definition videos is a Herculean task and can transform into an agony when you a lack a super computer. When you got a Sony Alpha a7 II, you can easily shot some 4k XAVC S footage. Then you would wanna know how to use the Sony A7R II XAVC S footage in Avid Media Composer or other NELs. Since there are users complained that Avid Media Composer doesn’t natively import or AMA link A7R II XAVC S files, I will show a workaround in this page. Just learn the Sony A7R II XAVC S to Avid MC workflow.

When importing and editing Sony A7R II 4K XAVC/XAVC S videos in Avid Media Composer, users always encounter video and audio problems, as XAVC (.mxf) or XAVC S (*.mp4) format is efficient, but simply isn’t engineered to maintain quality during complex post production effects processing. Uncompressed HD format delivers superior image quality, but data rates and file sizes can stop a workflow dead in its tracks. Well, Avid DNxHD format delivers both efficiency and quality without compromises. So, before transferring Sony XAVC/XAVC S to Avid MC, you’d better convert Sony XAVC/XAVC S to Avid DNxHD for smoothly editing.

Overall, UFUWare XAVC/XAVC-S Converter for Mac is just one of the best Avid XAVC Converter for you to transcode XAVC/XAVC-S files for Avid smooth editing on Mac (Yosemite/Mavericks included). The program is capable of converting Sony XAVC/XAVC-S to DNxHD, MPEG-2, Apple ProRes, AIC, etc on Mac OS X for smoothly importing and editing in various non-linear editing systems (NLE), including Avid Media Composer 5.5/6.0/6.5, Adobe Premiere Pro, Final Cut Pro, iMovie and more. If you’re using a Windows PC, please turn to its equivalent Windows version – XAVC/XAVC S Converter. Below is the workflow of Sony XAVC/XAVC S to DNxHD MOV conversion.


Other Download:
- Pavtube old official address: http://www.pavtube.com/hd-video-converter-mac/
- Amazon Store Download: http://www.amazon.com/Pavtube-Video-Converter-Mac-Download/dp/B00QI9GNZS
- AppStore Download: https://itunes.apple.com/de/app/pavtube-hd-video-converter/id502792488?mt=12
- Cnet Download: http://download.cnet.com/Pavtube-HD-Video-Converter/3000-2194_4-76177786.html

How to Edit Sony A7R II 4K XAVC S in Avid Media Composer on Mac

Step 1:Load Sony XAVC S files.

Click "File" drop-down "Add Video/Audio" or "Add from folder" option to add the Sony XAVC S files that have been transferred from your camera/camcorder to your Mac hard drive.


Step 2: Specify output file format.

From "Format" drop-down lists, you can select Avid Media Composer preferable editing codec from "Avid Media Composer" > "Avid DNxHD(*.mov)" as the output format.


Step 3: Merge into one file.

Check the merge into one file icon on the main interface to join your captured separate footage together into one single video.Step 4:Convert Sony XVAC S to Avid Media Composer.

After all the parameter setting is completed, you can start the conversion process by hitting the right-bottom convert button.

When the conversion is done, hit the "Open" button on the main interface to locate and locate and find the converted files. Then continue with your fast and fluid post workflow of Sony XVAC S footage with Avid Media Composer on Mac OS X.

Read More: