Showing posts with label Final Cut Pro. Show all posts

Thursday, September 24, 2015

Import Canon HF R600 1080/60p AVCHD to FCP X/7/6 on Mac

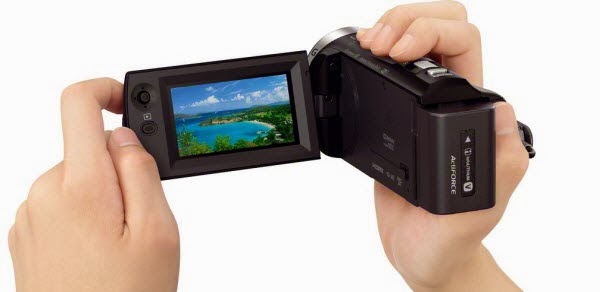
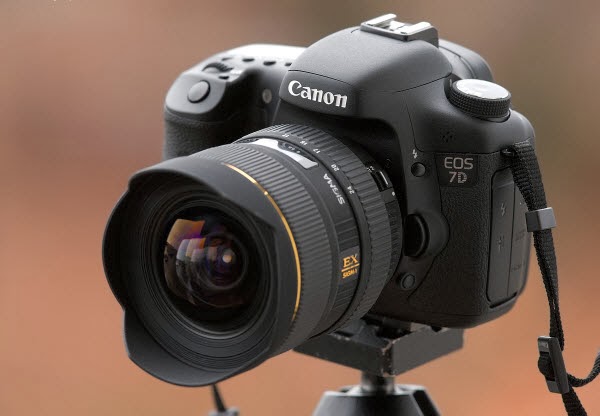
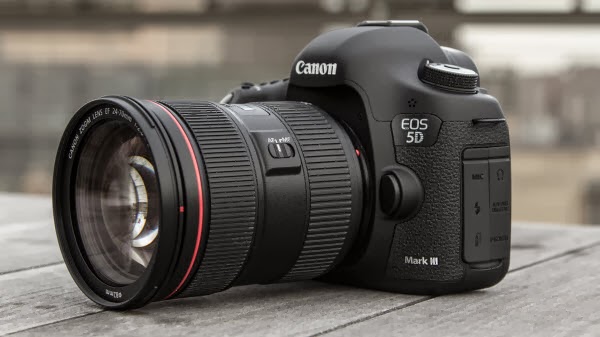
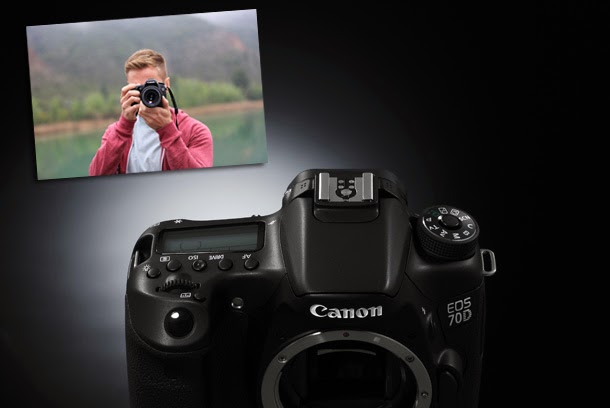
Canon VIXIA HF R600 lets you capture sharp and steady Full HD video by combining a 57x Advanced Zoom range and SuperRange Optical Image Stabilizer. It features a 3.28MP CMOS image sensor and a DIGIC DV 4 Image Processor that delivers up to 1080/60p video. Video is recorded to SD/SDHC/SDXC memory cards in either MP4 (up to 35 Mbps) or AVCHD (up to 28 Mbps) formats. A 3'' capacitive LCD touch panel is provided for easy framing, quick playback, and intuitive operation.


You may have bought Canon HF R600 camcorder and recorded some videos with Canon VIXIA HF R600 in AVCHD MTS format; you find it is not so easy to use the AVCHD recordings? The AVCHD format is good for recording but not convenient for editing, because many video editing programs like FCPX/7/6 can't support AVCHD format well. In this case, how can we import Canon VIXIA HF R600 to FCP X/7/6 and editing smoothly?

Here recommend you this Pavtube HD Video Converter for Mac, which regards as the easiest AVCHD to Apple ProRes converter in the market. You can load your Canon VIXIA HF R600 AVCHD into this converter directly, thanks to the inner codec, easy loading as you can see. Multiple presets in the format list for you to choose, especially for FCP newbie, to save setting time and ease the conversion. (You can also read about 2015 Top 5 Best Mac HD Video Converter Review for Camcorder Lovers)

Tip: the Windows version is renamed as Pavtube HD Video Converter (Read review).

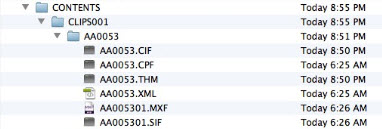
First, we shall transfer the AVCHD .mts files from Canon HF R600 AVCHD camcorder to Mac computer hard drive. Download Pavtube MTS/M2TS Converter for Mac as the best AVCHD to Final Cut Pro converter.


Other Download:

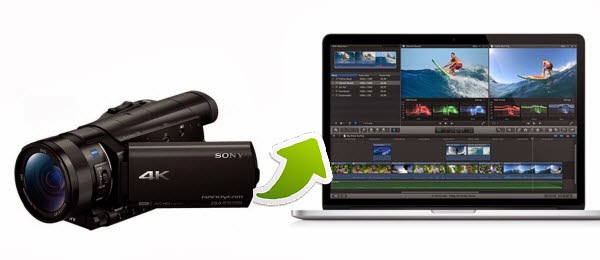
How to transcode Canon HF R600 1080/60p AVCHD to ProRes for FCP X/7/6 on Mac?

Step 1. Launch this converter on your Mac

Free download this converter on your Mac and even on the Yosemite, it can run smoothly. The only difference between retail version and the trail version is the watermark "Pavtube" in the generated files.
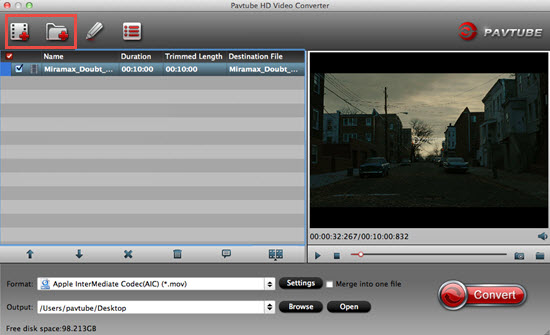
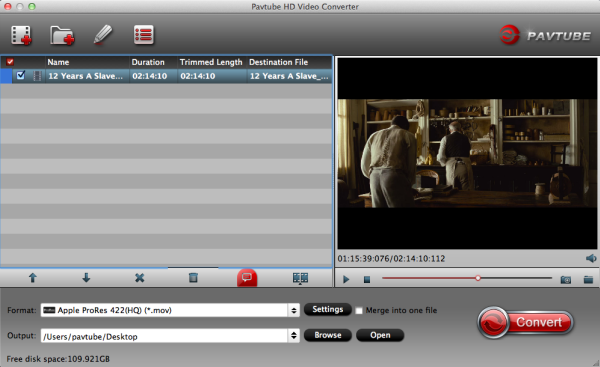
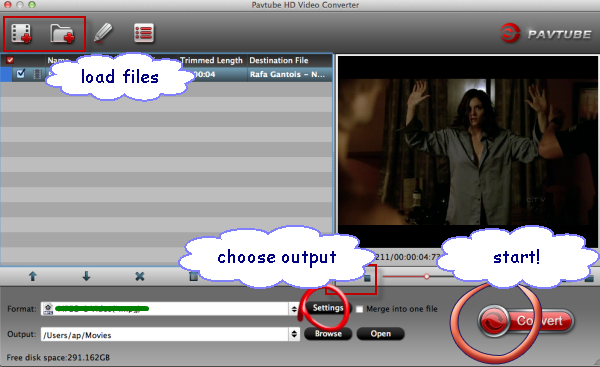
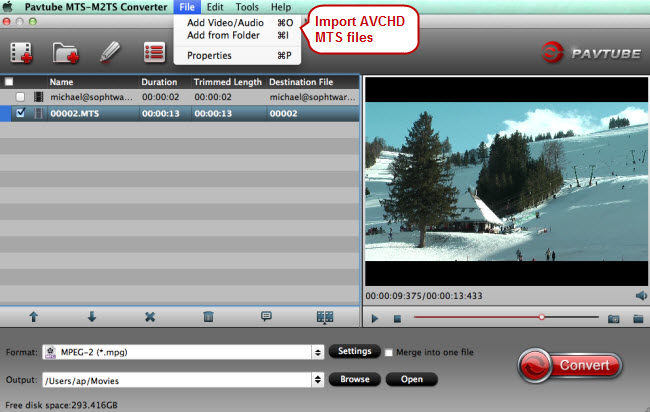
After the installation, click this "File" >"Add Video/Audio" to load Canon VIXIA HF R600 AVCHD files into this app.


Step 2. Choose ProRes 422 for Canon VIXIA HF R600 AVCHD to load into FCP X/7/6

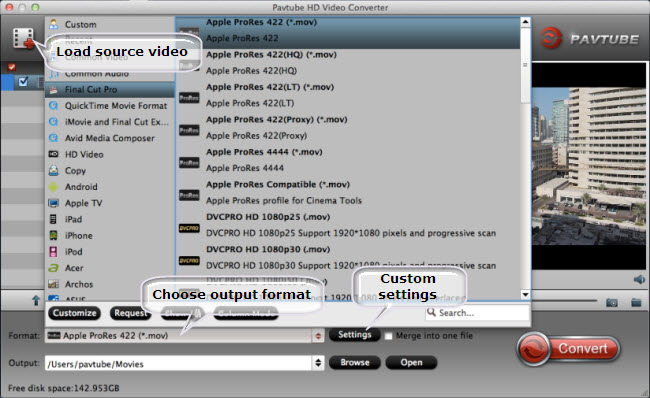
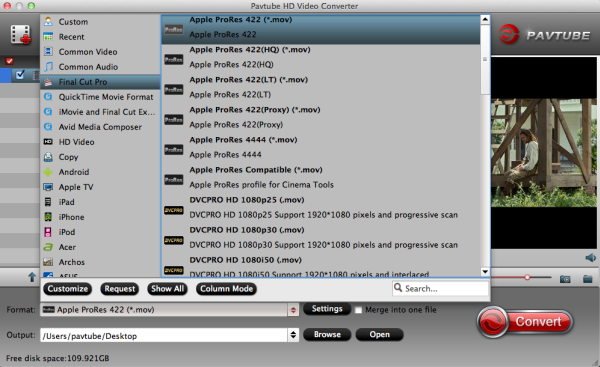
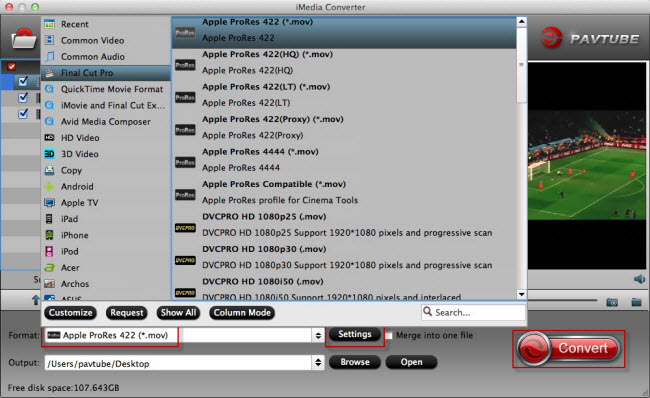
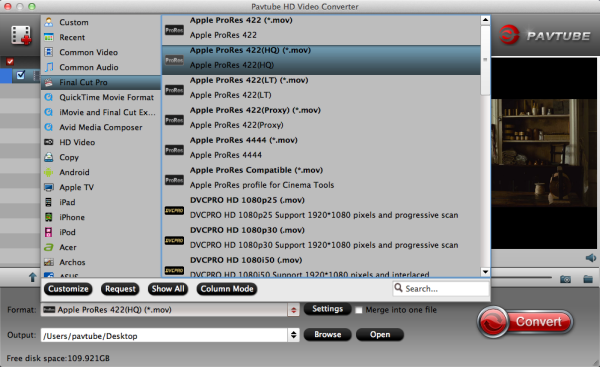
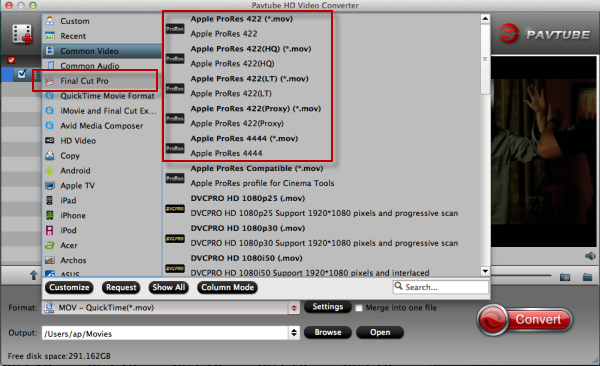
After successfully loading your Canon VIXIA HF R600 AVCHD  files, then click the "Format" bar to choose "Final Cut Pro">"Apple ProRes  422 (*.mov)" as your output format, which turns out the native format for FCP  X/7/6.


Some new users of FCP X/7/6 will wonder, as there are so many ProRes codec to choose, which one is the best. Actually, this depends on your aims of your converted files. If you can't decide which one to choose, then you can go to this "Differences among Apple ProRes codec" article to make sure before doing the decision.

Step 3. Adjust A/V parameters for loading Canon VIXIA HF R600 AVCHD to FCP X/7/6 as ProRes

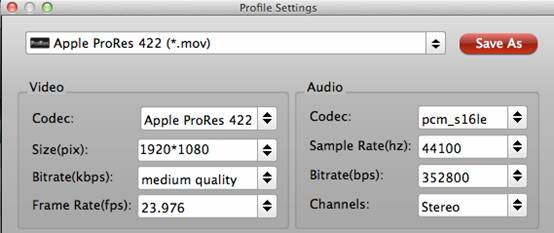
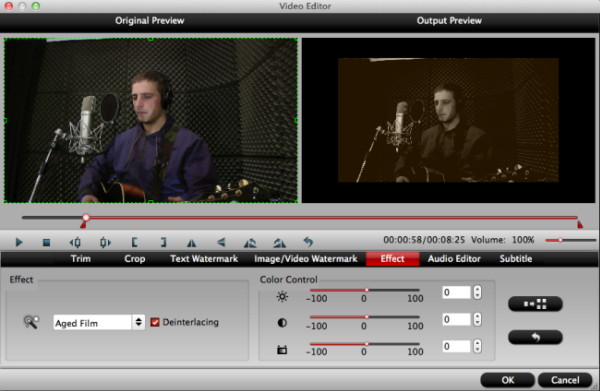
If you want to make some parameters adjustment, click this "Settings" to do this job. Honestly, the default settings are already the most suitable for loading into FCP X/7/6. But Bit rate, Frame rate, Size (pix), etc, can be adjusted. And also you can see the detailed generated file information in the below table.


Step 4. Start to convert Canon HF R600 AVCHD for FCP X/7/6 as ProRes 422 (*.mov)

After setting the file location, click this "Convert" in the main UI and start to transcode Canon HF R600 AVCHD to ProRes for FCP X/7/6 editing. If you have multiple clips to convert, batch conversion is possible, but the maximum conversion number at one time is four.

For newbie, how to transfer media files into FCP X/7/6 can be learned here for them to master FCP X/7/6 better.

Further Reading:

Wednesday, July 30, 2014

Successfully Import Various M4V files to FCP 6/7/X for editing

How can I import M4V video files to FCP 6/7/X on Mac? Here is the best workaround to convert M4V video files to FCP Prores MOV for editing.

If you are a Mac user, you may have encountered the problem that you can't import M4V to FCP for importing and editing successfully.

import m4v to fcp

So why can't you import M4V into FCP?

Reason 1: FCP will not import movies with extra tracks such as a chapter track, if your M4V files contain extra tracks, FCP will refuse to import.

Reason 2: M4V is a container video format which may encode with a variety of codecs like H.264, MPEG-4 and etc. If the M4V files are using the H.264 codec which is not meant for editing, your FCP will fail to import those kinds of M4V movies, let alone to edit M4V in FCP.

How to Successfully to Import M4V to FCP?

The best way is to convert M4V video to a format that is friendly for editing in FCP, the best supported video format is Apple Prores Codec MOV format, once you convert M4V to FCP Prores codec, you can edit the videos in FCP 6/7/X natively.

Which software can convert M4V to FCP supported Prores codec MOV format?

Here Pavtube HD Video Converter for Mac is the best software to transcode M4V to FCP native format, the output format has been optimized for FCP, iMovie, FCE, you can load many different video formats to convert, such as M4V, MKV, AVI, WMV, AVCHD, MTS, M2TS, MXF, etc.  What's more, it allows you edit videos like crop videos, merge videos, trim videos, add watermarks etc to make your videos more personalized. Now please free download this best M4V to FCP converter, and follow the easy steps below to convert M4V files to FCP on Mac with good quality.

Step 1. Import M4V files to Mac M4V to FCP Converter.

Click "Add file" to import videos to the program. You can import and convert several multimedia files at a time. Added videos can be previewed on the right.

convert m4v to fcp

Step 2. Select output format as FCP

Click the Format bottom of the program, and then choose "Final Cut Pro" > "Apple ProRes 422 (*.mov)" as the output format. The M4V to FCP Converter will optimize the output video for FCP.

fcp best format

Step 3: Adjust the output video's parameters as you want.

Click the Setting button after the Format to get the Profile Settings.

prores settings

Step 4: Start to convert M4V to FCP 6/7/X on Mac (OS X 10.9 and OS X 10.10 supported)

After all the settings, just click "Convert" to convert M4V to Prores .mov file for editing in Final Cut Pro on Mac OS X.

P.S.

If you have made a home movie using FCP on Mac, you can try converting these FCP home video to DVD for sharing as you like.

Monday, February 10, 2014

Can .mts file from Sony HDR-CX330 imported into Final Cut Pro 6/7 directly

In order to solve Sony HDR-CX330 compatability issues, the following guide will tell how to use FCP 6/7 to edit Sony CX330 AVCHD MTS files, which is not a Mac friendly format.

Sony Handycam HDR-CX330 Camcorder Full HD/60p quality and stabilization makes everything clear, shake-free and easy to share. Control, transfer and backup everything via Wi-Fi with NFC in just a touch and get even closer to the action with a 30x zoom, wide-angle Sony G lens. It's the camera that’s ready when you are.


It can record HD video in the AVCHD and MP4 formats for highest quality or easy transfer and sharing. AVCHD provides premium video that can be enjoyed on large screen HDTVs, and is ideal for capturing precious memories at special occasions, family vacations and other moments you want to treasure for a lifetime. MP4 is great for those moments that you want to quickly share on your social networks or store on the cloud.


My CX330 camera gave me videos as AVCHD file which I have not acknowledged with. I tried to work with both FCP 7 but it couldn't recognize it. Is there any step-by-step work flow for this? PS: the footages are on 1080 60p.

As AVCHD is not a Mac friendly format, you will meet the above problem in importing Sony HDR-CX330 1080/60p AVCHD MTS files into your FCP 6/7 for editing. It is known that Apple ProRes codec is compatible to FCP. So you need a program help you to transcode Sony CX330 AVCHD MTS to FCP 6/7 native Prores codec.

Here Pavtube MTS/M2TS Converter for Mac is recommended. It is an easy-to-use MTS to FCP X Converter for Mac program with clean interface. And it is good at converting Sony HDR-CX330 MTS files to various formats for editing on Mac OS X. You can try the free trial version to evaluate the functions at first.


Guide: How to transcode Sony HDR-CX330 1080/60p AVCHD to FCP 6/7

Part 1: Copy and transfer HDR-CX330 1080/60p AVCHD files to Mac.

Connect your Sony HDR-CX330 camcorder to Apple computer via USB cable, find the MTS files by following the camera folder AVCHD > BDMV > STREAM. Then copy and transfer the MTS files from camera to the Apple hard drive disk.

Part 2: Convert HDR-CX330 1080/60p AVCHD to FCP 6/7.

Step 1: Import HDR-CX330 1080/60p AVCHD to the best Sony AVCHD Converter for Mac.

Install and launch the program, and click the "Add video" or "Add from folder" button for adding to import HDR-CX330 1080/60p AVCHD files.


Step 2: Select an output format for FCP 6/7 and set the output folder.

Click on the dropdown menu of “Format” and then move you pointer to Final Cut Pro > Apple Prores 422 Codec (*.mov). It is the native format for FCP 6/7. Then you can set the output folder by clicking “Browse” icon as you need.


There are other four presets for ProRes: Apple ProRes 422 HQ, Apple ProRes 422 LT, Apple ProRes 422 Proxy and Apple ProRes 4444.

Learn more Apple ProRes, please refer to Types of Apple ProRes Codecs

Step 3: Start converting your HDR-CX330 1080/60P AVCHD to Prores MOV for FCP 6/7.

Click the “Convert” button; it will convert Sony HDR-CX330 1080/60P AVCHD to FCP 6/7 on Mac immediately.

After the MTS to AIC conversion, you will be able to get the output files for FCP via clicking on “Open” button effortlessly. Now you can easily import the converted .mov files for editing in FCP 6/7 with high quality without any trouble.

Tip 1: You are allowed to adjust output video and video parameters. However, if you have no idea about profile setting, keep it as original recordings will provide you the files with less quality loss, and keep default settings is also a good choice for your to get a high quality files.

Tip 2: In order to get customized videos, you can add subtitles to your own videos.

What's more, Pavtube MTS/M2TS Converter for Mac considered as best Mac Sony AVCHD MTS Converter, Mac Canon Vixia MTS Converter, Mac Panasonic AVCHD Converter, etc. It is specially developed for AVCHD camera/camcorder users to transcode all AVCHD MTS/MTS footage to various fotmats accepted by iMovie, Final Cut Express, Final Cut Pro X, Premiere Pro, Avid Media Composer, Apple Aperture 3, Kdenlive, Adobe After Effects CS6 and more similar Mac video editing software with least quality loss.

See also:
Get Sony HDR-CX330 fluent workflow in Final Cut Pro X

Sunday, February 9, 2014

Best Way to Convert Sony HDR-CX900 XAVC S to Prores HQ for Final Cut Pro

In this XAVC S to Prores conversion guide, you will learn the fast and best solution to convert CX900 XAVC S video to Prores 422 HQ codec with best XAVC S Video Converter.

The black Sony HDR-CX900 Full HD Handycam Camcorder brings broadcast-quality HD video to the palm of your hand. The 1" Exmor R CMOS sensor is approximately 8x larger than that of typical camcorders, allowing you to capture cinematic images with shallow depth-of-field for defocused backgrounds. The HDR-CX900 is a versatile camcorder that lets you capture Full HD 1920x1080 video in XAVC S (up to 50mpbs), AVCHD, or web-optimized MP4. You can also capture high-quality 20MP still images.


XAVC S has been created as an open format, supplying a license plan for other makers inside the broadcast and production market to create their very own good quality and higher frame price solutions. While enjoying the stunning videos recorded of HD image quality,users will have problems when trying to edit Sony HDR-CX900 XAVC S footage in FCP (includes FCP 6/7). Wanna edit your Sony CX900 XAVC S video in FCP with a simple way?

Since the XAVC S footage is a peripheral non-standard format which is not supported by FCP 6/7. In order to import Sony Sony HDR-CX900 XAVC footage into FCP for smoothly editing, we can render to the third-party software to help convert XAVC S to Apple ProRes 422 MOV– native format for Final Cut Pro. Besides, it is also a best way to help the users of Sony HDR-CX900 to edit XAVC X in FCP 6/7/X smoothly.

To achieve our goal, the quickest and easiest way is to use the easy-to-use yet professional software called Pavtube XAVC Converter for mac , with which we can effortlessly and flawlessly transcode Sony XAVC S footage to ProRes MOV for Final Cut Pro. It is safe to install and easy to use. Below will show you how to transcode Sony PMW-F55 XAVC footage to ProRes MOV in details.

Convert/Import Sony HDR-CX900 XAVC S to Final Cut Pro for editing smoothly with Apple ProRes Codec on Mac

Step 1. Free Download the Mac Sony XAVC S Transcoder for FCP. Install and run it. It's excellent Sony video converter which can convert nearly all canon cameras' videos to any formats you need, such as Apple Prores 422 MOV, Apple InterMediate Codec MOV, QuickTime MOV, etc.


Step 2. Click format bar to choose output format for use in FCP 6/7 or FCP X. Choose Final Cut Pro -> Apple ProRes 422(HQ) (*.mov) as best video format for editing Sony XAVC in Final Cut Pro as well as good video quality.


Tip: 
  • To keep original video quality for editing in FCP, select “Apple ProRes 422”; 
  • For SD levels – 480i/p and 576i/p and offline workflows, select “Apple ProRes 422 (Proxy)”; 
  • To edit and finish 4:4:4 material, choose “Apple ProRes 4444″. 
Step 3. Adjust output settings and edit the video. (Optional) 

Settings: You are allowed to change the parameters of video and audio, such as Size, Bitrate, Frame Rate, etc. 

Step 4. Click "Convert" button to start the conversion from Sony HDR-CX900 XAVC S footage to FCP Apple ProRes MOV on Mac OS.

After the workflow, you can go to the output folder to find the converted video files. Now you are free to log and transfer or import/edit Sony HDR-CX900 XAVC S videos in Final Cut Pro 6/7 or FCP X under Mac without problems.

Further Reading:

Thursday, February 6, 2014

Convert Sony FDR-AX100 4K XAVC S to ProRes MOV for FCP X

This article will guide you the way editing XVAC-S Footage from Sony FDR-AX100 in FCP X smoothly. Keep reading for a brief how-to instruction.

Sony FDR-AX10000:

At this year's CES, the Ultra-HD Sony FDR-AX100 Handycam has been announced. It will also shoot Full HD footage, with Sony claiming that it was supersample down from 4K to improve video quality, something we're interested to test for ourselves. Full HD footage can also be shot in the XAVC-S format at 60fps (as well as 30 and 24fps), or you can opt for more traditional AVCHD at this resolution.

Question: Sony AX10000 editing workflow in FCP X ——

I have just recieved a fully maxed out new Mac Pro 6.1 ordered on December 18th. My main use for the 12-core model will be editing and exporting 4K video productions. I plan to purchase the Sony FDR-AX100 4K camcorder that was just announced at the CES last week. Sony has had a consumer camcorder on the market since last September (the Sony FDR-AX1) which uses the same XAVC-S codec as the not yet released Sony FDR-AX100.

If anyone has had any experience editing this format in Final Cut Pro X, I would be pleased to learn of their experience and the specs of the computer they are using. I am hopeful that editing XVAC-S footage on the new Mac Pro will be possible without the large file sizes produced by transcoding. Thanks in advance for responding.

From: https://discussions.apple.com/thread/5786566?tstart=0

Final Cut Pro X allows users to log and transfer video onto a hard drive (internal or external), where it can be edited, processed, and output to a wide variety of formats. At this time I go to my Final Cut Pro X which does not support Sony AX100 XAVC/S files directly.

The solution is a $35 program called Pavtube HD Video Converter for Mac which can be used to convert the Sony AX100 XAVC/S files to FCP friendly Prores codec MOV format, which is intermediate format that features high performance and quality, being less processor-intensive to work with on Mac OS X. With it you are able to edit XAVC and XAVC/S files in FCP X smoothly and then share a better video with friends or post the edited videos to blog.

One hint – if you do convert to ProRes you can eventually delete your original camera files to save space, or better yet save them off to another drive as your field backups. The ProRes files lose nothing over the camera originals. They're just bigger because they're no longer Long GOP. Now follow me to learn how to convert Sony FDR-AX100 XAVC/S videos to Apple Prores 422 for FCP X editing on Mac OS X.

You are free to download the XAVC/S to FCP Converter and install on your Mac. Then go to the guide here:

1. Load XAVC/S to the Pavtube HD Video Converter for Mac.

Tips: You can joint multiple XAVC/S files on to one output file by checking Merge into one file on the interface.


2. Select Apple Prores MOV format for FCP X.

Many output format here and you are recommended to select "Apple Prores 422 (*.mov)" files under "Final Cut Pro" because it best compatible format for FCP X.

Tip:

  • To keep original video quality for editing in FCP, select “Apple ProRes 422”;
  • For SD levels – 480i/p and 576i/p and offline workflows, select “Apple ProRes 422 (Proxy)”;
  • To edit and finish 4:4:4 material, choose “Apple ProRes 4444″.

3. Adjust output settings and edit the video. (Optional)

Settings: You are allowed to change the parameters of video and audio, such as Size, Bitrate, Frame Rate, etc.


Edit: Here you are able to edit the video before conversion. You can cut off the unnecessary part of the video in Trim, crop the video, add watermark or 3D effect, attach subtitle and so on.

4. Convert Sony AX100 XAVC/S video to FCP X.

Click "Convert" button to start conversion and then click "Open" button to locate the generated files for FCP X.


Lanunch Final Cut Pro, choose File > Import > Files……, and browse to where you save the converted Sony FDR-AX100 XAVC-S video clips to. Choose the Apple Prores MOV file that you'd like to import.

What's more, this converter is capable of converting both various HD videos and latest DVD/Blu-ray. You are also allowed to 1:1 backup the whole discs for further playback or editing. Just give a try.

More topics:

Convert Panasonic HC-V707 1080/50p MTS to iMovie in a correct way
Get an effective way to edit XAVC file with Avid Media Composer

Monday, January 20, 2014

Workflow for Ingesting Canon 7D mov Media files Into FCP X

Here it mainly shows you an easy way to import and edit Canon EOS 7D mov files in Final Cut Pro X on Mac by transcoding mov to Apple ProRes Codec.

The 7D is a joy to shoot and never gets in the way. Images, as expected, look great. All of these are great, till you find it is a problem importing the recorded H.264 MOV footages to Final Cut Pro for X editing.


Q1: I'm hoping some folks can help me here as I'm stumped. I shot around 60 minutes of last evening with my Canon 7D. But FCPX doesn't like them, won't import them and, in fact, I delete them. Not sure what use they were but they are of no use in FCPX now. 

Q2: Hi, I know this is a pretty basic question, but I don't feel like spending a lot of time on google. The way I thought was set it to 60fps and shutter at 125 in camera...then slow it by 50% in FCPX, but I'm not real happy with the results. Also, I saw a tutorial that used "Retiming" in Final Cut but I didn't have any luck with that. Best way to get smooth 7d Slow-Motion in FCP X? Thanks!

Q3: I cant seem to figure out how to import converted h.264 files to prores 4444 using compressor into FCPX. It doesnt seem to read the files? or if i import the h.264 file straight into FCP X and make an optimized media copy so that its 422 it doesn't read it in FCPX?
Generally the H.264 is a delivery codec rather than editing code. To get those Canon 7D mov videos work flawlessly in Final Cut Pro X without rendering time, you need to transcode the video to a format more friendly for FCP, for instance, Apple ProRes codec.
If you’re looking for ease of use yet professional tool, I’ve had success using Pavtube’s HD Video Converter for Mac to convert Canon 7D mov to FCP X native Apple ProRes. If you’re interested in doing likewise, check out the Mac MOV to ProRes Transcoder for Final Cut Pro X.

In short, the program is an easy-to-use and intuitive Mac tool for camcorder users. It is good at converting *.tod, *.mod, *.mov, *.mts, *.m2t, *.m2ts, *.mxf recordings shot by Panasonic, Sony, and Canon camcorders and cameras to formats compatible with your video editing software like iMovie, Final Cut Pro (X), Final Cut Express, Avid Media Composer, Adobe Premiere, and more. Below is a brief guide for you.

If you have the same problem about importing Canon 7D mox video into FCP X for editing, you may follow the step-by-step guide.

Step 1. Assuming you have downloaded the Mac Canon H.264 Video Converter to your Mac, the first step is to load your recordings.


Click ‘Add’ button, browse to the footages and load them to the converter. The converter supports batch conversion, so you can add multiple files into it to convert at a time. If you wanna combine several 7D videos into a single file, you can put a checkmark in the checkbox “Merge into one file”.

Step 2. Click on ‘Format’ bar to set a FCP friendly format in Final Cut Pro template. Basically, “Apple ProRes 422 (*.mov)” is the best format for converting 7D footage to FCP. If you prefer smaller file size, choose “Apple ProRes 422 (LT) (*.mov)” instead.


Tips – You can click “settings” to customize the output parameters, adjust the resolution, bitrate as you want.

Step 3. Click convert button to start transcoding Canon 7D mov video to Apple ProRes for FCP X on Mac.

Once the conversion completes, you can transfer the result ProRes videos to FCP X. So there you have it. Now you may have gotta known how to convert/import Canon 7D  video to Final Cut Pro X for editing smoothly.

Canon related guide:
How do I import .mov file from Canon T4i/650D into Avid MC

Thursday, January 16, 2014

Solution to Import Sony Alpha 7R MTS to FCP X

Sony Alpha 7R users often meet the problem that they cannot edit AVCHD MTS files in FCP X. The following will tell how to use FCP X to edit Sony Alpha 7R AVCHD MTS, which is not a Mac friendly format.

Sony a7R Full-Frame Camera is the world's lightest interchangeable lens full-frame camera, and it can capture Full 1920 x 1080 HD uncompressed clean-screen video files to external recording devices via an HDMI connection in 60p and 60i frame-rates. Selectable in-camera AVCHD codec frames rates include super-smooth 60p, standard 60i or cinematic 24p.


But there is some problem in importing these AVCHD MTS files into your FCP X for editing because it is not a Mac friendly format for editing in FCP X. It is known that Apple ProRes codec is well compatible to FCP. Now you need a program help you to transcode Sony Alpha 7R AVCHD MTS to FCP X.

Here, Pavtube iMedia Converter for Mac is the best tool you need to help you convert Sony Alpha 7R MTS to ProRes 422 for FCP X editing. It does not only convert AVCHD to Apple ProRes for FCP X editing on Mac, but also convert AVCHD MTS to iMovie, FCE, Avid, Premiere Pro, Aperture 3, Kdenlive, After Effects CS6, DaVinci Resolve etc. compatible format/codec on Mac (Mavericks included).

What's more, with Pavtube MTS to FCP Converter, you can also add *.srt, *.ass, *.ssa subtitle to a video/movie files. Here I share a guide of how to add subtitles and some free subtitle files download website:
Here is the step-by-step guide for you to convert and import Sony Alpha 7R AVCHD MTS to Final Cut Pro X on iMac/MacBook Pro with Mac OS X like Mavericks, Lion, Snow Leopard.

Download Pavtube AVCHD MTS to ProRes Converter, install it on Mac.

Step 1. Load Sony a7R MTS files from SD card.

Connect your a7R to your Mac with USB2.0. Run Pavtube MTS to ProRes Converter and then click "Add video" button to load 1080p MTS files from Sony Alpha 7R AVCHD camcorder to the Mac program. You can tick the box in front of the file you want to convert.


Tip: If you have multiple MTS/M2TS files, you can select the "Merge into one file" box to merge/combine MTS files, so that you can import these files to FCP X without interruption.

Step 2. Set MOV as output format.

Click the "Format" option, and choose "Final Cut Pro -> Apple ProRes 422 (*.mov)" as output format, the output video will be kept as high definition 1920×1080.


Tip 1: You can also choose "Apple ProRes 422(HQ) (*.mov)" as output format for FCP X. The Apple ProRes 422 (HQ) codec offers the utmost possible quality for 4:2:2 or 4:2:0 sources (without an alpha channel) and provides the following:

  • Target data rate of approximately 220 Mbps (1920 x 1080 at 60i) 
  • Higher quality than Apple ProRes 422 
Tip 2: If you prefer smaller file size, please choose "Apple ProRes 422 (LT) (*.mov)" instead.

Tip 3: You can set the output folder by clicking "Browse" icon as you need.

Step 3: Add effect or Subtitle for your footage.

If necessary, click "Edit" icon to start video editing with your mts files, such as adding effect as well as adding watermark, trim your videos and so on.

You can also click "Subtitles" option, add srt, ass, ssa suntitle you want.

Step 4: Convert Sony a7R AVCHD MTS to Apple ProRes MOV for Final Cut Pro X.

Click the "Convert" button under the preview window, the Mac MTS to ProRes Converter starts converting Sony Alpha 7R AVCHD MTS to ProRes MOV, and joining the MTS files for editing in FCP X.

After converting and merging the MTS files, just import the output ProRes MOV files to FCP X and the video is in HD 1920×1080. You can also import the output ProRes videos to Final Cut Pro X, iMovie or Premiere Pro,etc for editing.

Read More:

Wednesday, January 8, 2014

Transcode Nikon D5300 to ProRes 422 LT for FCP 6/7 on Mac Mavericks

If you want to edit Nikon D5300 footage in Final Cut Pro 6/7, read the guide to learn the effective way to achieve it by converting Nikon H.264 MOV to FCP native ProRes 422 LT on Mac Mavericks.

As Nikon's advanced beginner'DSLR, the D5300 takes the D5200's place between the entry-level D3200 and the enthusiast-targeted D5300 in the company's APS-C lineup. The D5300 also offers a beefed-up video mode, which is now capable of true 1080/60p HD video, unlike Canon Rebel T5i's 1080 30p video. 
 

Is there any news about support of the new Nikon D5300 in FCP 6/7? I work on iMac, Mac OS X (Mavericks 10.9) 

MOV video format came from Nikon D5300 is a long GOP format that is highly compressed, it is not a good editing format.When you attempt to import Nikon D5300 videos to Final Cut Pro 6 or FCP 7 for some editing, you may find Final Cut Pro can not handle the H.264 MOV files natively.

To solve the problem, the key point is to convert Nikon D5300 MOV footage to FCP format- ProRes 422 for importing on Mac OS X. Well, here is the quick guide about how to transcode Nikon D5300 H.264 files to FCP 6/7 most compatible format Apple ProRes 422 in high quality. 


At first, a piece of third-party software is needed to do the job. For the sake of quality, Pavtube HD Video Converter for Mac is highly recommended. This program is known as the best Nikon H.264 MOV Converter for Mac which is good at encoding camera shootings in different formats (H.264 MOV, MTS/M2TS, MXF, etc.) to video editing software compatible file types, i.e. ProRes for FCP, AIC for iMoive, and DNxHD for Avid Media Composer, making the experience of editing Nikon D5300 HD Video footage with Final Cut Pro 6/7 on Mac Mavericks as fast and seamless as possible. Just download a free trial here and follow the guide below. 

Transcoding Nikon D5300 H.264 footage to Apple Prores for Final Cut Pro 6/7

Step 1: Install and launch this Mac Nikon H.264 MOV Converter and load D5300 H.264 MOV clips to the program. You can click either “Add Video” button or “Add from folder” button to load source MOV files. 

If you want to combine the loaded MOV clips into one file, simply tick off the checkbox before “Merge into one file”. 


Step 2:   Click the format bar, and move mouse cursor to “Final Cut Pro > Apple ProRes 422(LT) (*.mov)” as output format. 


The Apple ProRes 422 (LT) codec provides the following: 
  • Roughly 70 percent of the data rate of Apple ProRes 422 (thus, smaller file sizes than Apple ProRes 422) 
  • Higher quality than Apple ProRes 422 (Proxy) 
Tip: 

1. To get high quality, please choose “Apple ProRes 422 (HQ) (*.mov)” instead. The Apple ProRes 422 (HQ) codec offers the utmost possible quality for 4:2:2 or 4:2:0 sources (without an alpha channel) and provides the following: 
  • Target data rate of approximately 220 Mbps (1920 x 1080 at 60i) 
  • Higher quality than Apple ProRes 422 
2. By clicking “Settings” button, you are able to enter the “Profile Settings” panel to adjust video and audio parameters for your Nikon MOV source files, including video size, bit rate, frame rate and more. 

Step 3: Click “Convert” button to start transcoding Nikon D5300 mov footage to Apple ProRes Codec for Final Cut Pro 6/7. 

Once the process completes, you are able to ingest your Nikon D5300 mov footage to FCP 6/7 for further editing on Mac Mavericks without any incompatibility issues. 

Learn more: 

Two ways to ingest Nikon D5300 H.264 MOV to Adobe Premiere Pro on Mac
Best method to import Nikon DSLR H.264 MOV into Avid MC
Problem with loading Nikon D3100/D3200 H.264 MOV files to FCP 6/7

Friday, December 27, 2013

FAQs & Answers: Canon XF plugins and Final Cut Pro Problem Solved

If you are using a Canon camera and camcorder, and also want to edit on Final Cut Pro 6 or FCP 7/FCP X, you can choose Canon XF plugins. Having problems with plugins? This article will offers you the best solution.


I'm in the process of purchasing a Canon XF Professional camcorder which uses MXF format files. I want to make a short video for my daughter. Next month is her birthday. I am using Apple Final Cut Pro. I always have problems with Canon XF plugins. Is there a place for solving my problems?

Canon developed Canon XF Utility for exclusive use with movies captured with the XF camcorders (XF305/300/105/100) and Cinema EOS C300 camera. The Canon XF Utility offers various options for managing and playing back clips recorded with the camcorder with which the software was supplied. Mainly, Canon XF Utility lets you do the following:

* Checking and playing back clips – Display a list of all the clips recorded on a CF card, search the list and play back clips.

* Saving and writing back clips – Save clips that were recorded on a CF card to the computer, or write back preciously saved clips from the computer onto a CF card.

* Creating and editing User Memo profiles – Create, edit and save User Memo profiles on SD memory cards. Later, you can load a User Memo file from the SD memory card to the camcorder and embed this information with the clips you record.

Canon XF plugin helps users a lot while importing Canon .MXF footage to work with non-linear video editing programs. However, users still have problems one or another when utilizing the software, especially with Final Cut Pro on Mac OS X. We have a collection of frequently asked questions about Canon XF Plugin for Final Cut Pro here, and aim to provide available solutions to these issues.

Problem 1

"We are using FCP 7, and as far as I know it does not read Canon C300 files natively. We tried Canon XF utility, with very limited success, on few different machines. Main problem with that piece of software is that it expects to see compact flash cards straight from the camera and doesn't seem to work very well with folders on an HDD. Is there a recommended workflow for us to move MXF files from an HDD to FCP 7?"

Solution to Problem 1:

It is strongly suggested to convert MXF clips to Apple ProRes 422 using Pavtube Canon MXF Converter software, because FCP 7 needs to have all the footage on a timeline in the single codec, otherwise it needs to render everything and does not preview clips in realtime. The Canon Camera Video Converter tool is able to load MXF files directly from your camera, or read from a folder stored on your computer's HDD or an external hard drive, as well as separate .MXF clips out of the camera's original folder structure. Plus, this solution is particular helpful when you need combine footage coming from different cameras with different video modes. Best of all, it is capable of keeping multiple audio tracks in your source material.

Problem 2

"Hi, I am about to begin editing a film shot on Canon XF100. I have a hard-drive onto which all of the raw files were dumped, and am now trying to find a way of working with the files. As far as I can make out everything was copied as it should be (i.e. with the directory structure intact):


I have installed the Canon XF plugin for FCP. Problems arise when I try to use Log & Transfer to transcode the MXF material. I have tried Native/Pro Res 422/ ProRes LT/in fact all of the options from the drop down destination menu, and keep getting the same problem: namely, that about 80-90 percent of files are only transcoded in part. What I mean is that a 5 minute clip ends up as only 10 seconds. I have FCP 7.0.3 and the relevant Canon XF plugins...Now I'm at a loss as to what to do... Anyone have any suggestions as to how I can start editing this film on FCP?"

Solution to Problem 2:

It seems that Canon XF utility somehow messed up when rendering the MXF media for use in Final Cut Pro 7. We heard people have troubles with EOS plugin of similar nature. Can we L&T footage without utilizing Canon plugin? Actually, there are a large number of Canon MXF converter programs claiming to be good at transferring MXF media files to Apple ProRes 422 for FCP. The thing is that it's difficult to make audio and video always in sync in the generated ProRes MOV files. As for video and audio synchronization, Pavtube Canon MXF Converter does a good job. So, it's wise to use this software for MXF to FCP ProRes codec conversion.

Problem 3

"I especially get confused when I need to download the plug-ins from the Canon site, which is a real mess! I have MXF footage shot on the Canon C300 and I'm trying to convert it from true 24p to ProRes 422(HQ) 23.976. Does anyone know an easy-to-use converter to do this?"

Solution to Problem 3:

Pavtube Canon Video Converter
will shed you some light on this problem. More than encoding true 24p C300 MXF files to ProRes 422(HQ) 23.976, it can also rewrap MXF to PrpRes 422, ProRes LT, ProRes Proxy, and ProRes 4444 to fit different FCP use.

Problem 4
"I've run into a problem with a project. I copied the entire card file structure of XF305 onto a hard drive, installed all the right codecs...and it's telling me the file structure is invalid."

Solution to Problem 4:

Final Cut Pro users often meet unknown errors when editing Canon MXF clips. Fortunately, we always have workaround to deal with these incompatible issues. Simple convert MXF files recorded by a Canon camera to Apple ProRes 422 via using a Canon MXF Converter, this is the simplest solution.

Basically, with the versatile Canon Camera Video Converter, it will be possible to let Final Cut Pro touch MXF material shot on a Canon XF305/300/105/100 and C300 camera even without utilizing Canon XF plugin.

Read Related Articles:

Wednesday, December 18, 2013

Convert MP4 to ProRes 422 (HQ) from Panasonic HX-WA03 to work with FCP

Follow this guide you will know how to import Panasonic HX-WA03 1080P video to FCP 7/X for editing with the best Panasonic MP4 to Prores Converter.

Panasonic HX-WA03 is the perfect travel companion for your next outdoor adventure or journey. This active lifestyle camcorder will work as hard as you and is ready to go anywhere. The HX-WA03 is waterproof, freezeproof, dustproof and is designed to fit firmly in your hand to deliver exceptional performance. Capture the tiniest details in 16-megapixel high-resolution still pictures and even 2-megapixel still images while recording a video by simply pressing the Photo Shooting Button.


The HX-WA03 renders images in breathtaking Full-HD (1920 x 1080)* beauty, so you can save your memories in stunning image quality and watch them on a big screen TV. It can shoot MP4 video with 1920 x 1080 pixels refers to video recordings with 1920 pixels in the horizontal direction and 1080 pixels in the vertical direction. It's great for us to take high quality images and record vivid full HD videos.

If you have got the WA03 and use it to record 1080P video, you may have the need to edit WA03 MP4 in Final Cut Pro on Mac before sharing the videos with others. However, to tell you the truth, MP4 format is not easy to edit, many Mac users complained that they cannot load WA03 recorded MP4 videos in FCP smoothly, the main reason is the H.264 codec and MPEG-4 codec, which is not well accepted.

FCP best supported video format is Apple ProRes 422 codec MOV format. To solve the incompatibility problem, the best method is to convert Panasonic WA03 MP4 footage to ProRes for editing in Final Cut Pro, now you can follow the steps below to transcode WA20 MP4 to FCP X for editing.

To achieve this goal, Pavtube HD Video Converter for Mac is a program my friends recommended to me last year. I am working well with it, and you can try it yourself. With it, you are able to ingest Panasonic HX-WA03 mp4 videos into Final Cut Pro by encoding the MP4 to Apple ProRes 422 (HQ) codec, which is naturally supported by Final Cut Pro 6/7 and FCP X.

Step 1. Add Source Videos

Launch the professional MP4 to Prores Converter, and then click “Add video” button to browse and load your source files. If you need to import an entire file folder directly, simply click “Add from folder” tab.


Step 2. Choose Output format
Go to “Format” menu and choose “Apple ProRes 422 (*.mov)” or "Apple Prores 422(HQ)(*.mov)" as target format from “Final Cut Pro” option to work fine with FCP 7/X.


Learn more Apple ProRes, please refer to Types of Apple ProRes Codecs

Tip:
If you want to set some parameters for the output profile, you could click the “Settings” button to set the output bitrate, encode, frame rate, resolution, sample rate, channels, etc.

Step 3. Start Panasonic HX-WA03 MP4 to FCP Conversion


When the former steps finished, you can press “Convert” button to start rewrapping MP4 files from Panasonic WA03 to Apple ProRes MOV for FCP. Once the conversion process is done, click “Open” button to get the generated MOV files.

NOTE:
The FCP X does not install the QuickTime Codecs automatically, so you need download and install the codec manually from here.

Step 4. Import the converted footages to FCP project


In this way, you can effortlessly import and edit Panasonic WA03 MP4 files in Final Cut Pro smoothly.

P.S.

Need to convert more various formats besides MP4, or convert DVD and blu-ray movies for backup or further playback? Pavtube HD Video Converter for Mac can help you to accomplish both of them. It is integrated software for converting different videos, DVDs and blu-ray discs. 

Thursday, December 12, 2013

Convert .mts files from JVC Everio GZ-HM330SAA in iMovie/FCE/FCP/Avid MC

Here is the quick tutorial for you that will show you the simplicity of JVC Everio GZ-HM330SAA workflow for importing MTS files in FCP, iMovie, Premiere Pro, Avid for editing by transcoding JVC MTS to Mac editable format (Mavericks 10.9 included).

I work at at CyberNet Evolution, and below is a question from one of my friends: 


I purchased a JVC Video recorder, the model is GZ-HM330SAA and I shot some footage about my kids basketball games. I am not sure I just converted the video and gave it to my daughter who edited it on her Apple Mac for me. Just keeping the videos as a record. But I find I couldn’t convert the software to copy to a DVD. I made a mistake purchasing this camera not realisied how difficult it was. I contacted JVC and they were no help at all. 


So I took his camera to my local Tech guy and I couldn’t help much at all either but I start to surf the net and see if I could find something. While searching for solutions, I find some plug-in for Mac can do some work. But the importing way is a tedious process, which needs you patience. Fortunately, I found Pavtube web site and its software, and there is an alternative easy way to fix the issue. 

The easy workaround is to convert JVC Everio GZ-HM330SAA mts files to Mac native editable format along with some help from a third-party tool. Well, if you make the recordings editable before taking to the program, the incompatible error won’t happen any more. Keep reading for a brief how-to below. 

Convert JVC Everio GZ-HM330SAA MTS files for editing in Avid, FCP (X), iMovie, Premiere 

Now go to find Pavtube HD Video Converter for Mac. Lots of users are impressed by this converter since it is powerful enough to convert camcorder videos to multiple video formats for iOS/Android/Windows Tablets & Phones and HD Media Players as well as video editing software including Avid Media Composer, Final Cut Pro (X), iMovie, Premiere and more. And you can enjoy the powerful edit function, like trim, crop, watermark for text, image and video, subtitles and so on. 

The following guide will show you how to transcode/convert JVC HM330SAA mts files for editing on Mac. Download it and follow below steps. 

Step 1. Load HM330SAA MTS files. 

You can choose "add video" directly to add the mts files. 


Step 2. Select output format for video editing software. 

Click "Format" menu you will find various video formats listed by different devices. Choosing the editing software option directly will help you to take less time to find a more preferable video format. 

You can choose Final Cut Pro -> Apple ProRes 422 (*.mov), this codec is optimized for FCP editing; 


For Avid Media Composer, choose "Avid Media Composer -> Avid DNxHD 1080p (*.mov)"; 

For iMovie, choose "iMovie and Final Cut Express > Apple intermediate Codec (AIC) (*.mov)"; 

For Adobe Premiere, just choose "Adobe Premiere/Sony Vegas > WMV (VC-1) (*.wmv)". 

Step 3. Edit loaded JVC HM330SAA MTS video files. 

Click "Edit" button and you are allowed to trim, crop, add text/image/video watermark or some effect to your output video for making it perfect. Here the function of adding subtitles to output files will contribute to make your own videos. You can use free software Subtitle Edit to edit your subtitle content then add it to output videos. 

Tips: Click "Settings" on the interface and you can adjust the parameters including size, bitrate, frame rate, etc. to get a high quality of output files. And keep the settings the same as original video recordings will provide you the least loss of video quality. 

Step 4. Start conversion. 

Click the "Convert" button to start conversion. When it completed, click the "Open" button to get the generated videos for your editing software. 

More features about it: 

1. Rip and convert Blu-ray and DVD including 1:1 backup Blu-ray/DVD movies to Mac hard device for future needs. 

2. Directly Copy feature will save 100% intact .M2TS main movie from original BD disc. 

It is an integration of BDMagic for MacDVDAidfor Mac and Video Converter for Mac and it will meet almost all your requirements about converting videos. 

Now get ready for importing and editing JVC Everio GZ-HM330SAA AVCHD mts videos in FCP/iMovie/Avid MC for editing easily without any problem. Enjoy your editing workflow! 

Learn more JVC video tips: 

Get mts Videos from JVC Everio GZ-HM330SAA into FCP
Transcode GZ-R70 mts clips to iMovie/FCE
How to edit JVC GY-HM650U MXF, MOV, AVCHD, MP4 on Mac?

Wednesday, December 4, 2013

Problem with loading Nikon D3100/D3200 H.264 MOV files to FCP 6/7

This article offers a brief guide about how to transcode and transfer Nikon D3100/D3200 H.264 MOV footages to Mac editing program in FCP 6/7.

Qusstion:

I am using the older FCP 6.0.6 with a new Nikon D3200 DSLR that shoots "MOV" files.  I can't seem to find "settings" that enable "copying," "importing" "log and caputure," whatever process. FCP crashes every time I try to get the files. FYI:  I am shooting in 1920x1080 at 24p and mostly trying the Apple ProRes 422 (HQ) setting, but have tried DVCPRO also. Anybody got suggestions about what I need to do?

Best Answer:

You need to convert the native format that camera shoots Before you import. There is no plugin that allows FCP 6/7 to deal with that tapeless format, like it does with Canon DSLRs via Log and Transfer. You'll need to convert the H.264 mov files to ProRes 422(HQ), then import those files into FCP .

As a Nikon D3200 user, you may also have this question. Nikon D3200 shoot videos in h.264 mov format. Except D3200, most Nikon D series camcorders record videos with this format, like Nikon D800, Nikon D4, Nikon D3100, Nikon D3200, Nikon D5100,etc. As far as i know, h.264 is the maximum compression ratio codec. On one hand, it will give us resonable video size, on the other hand, it's not suitable for editing by most editing software. Final Cut Pro 6/7 also included.

To solve the importing problem loading Nikon D3100/D3200 H.264 MOV files in FCP 6/7, you’d better choice to convert Nikon H.264 MOV to ProRes 422 codec MOV format, then you can edit video well in FCP 6/7 on Mac.

Check out Pavtube HD Video Converter for Mac, a top H.264 MOV to ProRes MOV Converter. It supports transcoding all Nikon 1080p MOV files to Apple ProRes so that you can easily import the Nikon D3100/D3200 h.264 recordings to Final Cut Pro X, Final Cut Pro 6, Final Cut Pro 7 for editing on Mac (Mountain Lion and Mavericks 10.9 included). Plus, it also supports converting H.264 MOV to iMovie, FCE, Adobe, Avid and more.


Free Download and install the top Nikon H.264 Video Converter and follow the steps below to convert Nikon D3100/D3200 MOV to Final Cut Pro 6/7.

1. Transfer h.264 encoded .mov files from Nikon D3100/D3200 camera to your Mac HDD via USB cable. Run Pavtube HD Video Converter for Mac, click “Add video” to load the Nikon DSLR recorded MOV video or directly drag the files to this Mac HD Video Converter.


Tips: If you have multiple MOV clips, you can select the “Merge into one file” box to merge your multiple MOV files into one file.

2. Click “Format” bar and choose “Final Cut Pro -> Apple ProRes 422 HQ (*.mov)” as export format.


The Apple ProRes 422 (HQ) codec offers the utmost possible quality for 4:2:2 or 4:2:0 sources (without an alpha channel) and provides the following:
  • Target data rate of approximately 220 Mbps (1920 x 1080 at 60i)
  • Higher quality than Apple ProRes 422

Of course, Apple ProRes 422, Apple ProRes 422 LT, Apple ProRes 422 Proxy, Apple ProRes 4444, etc are all the proper format.

Learn more Apple ProRes, please refer to Types of Apple ProRes Codecs

3. Click the “Settings” button and customize proper video/audio parameters if necessary. Video size, bitrate and frame rate are flexible and can be adjusted as you like. E.g. Set video size to 1920*1080 when you feel like to keep 1080p as the source file features.

Before start the conversion, edit function is useful and convenient for you to use. You can deinterlace, trim, crop, adjust effects or add watermark to the video.


4. Click “Convert” button and transcode Nikon D3100/D3200 H.264 MOV to Apple ProRes MOV for using in Final Cut Pro 6/7 on Mac.

Once the conversion is finished, you can click “Open” button to get the output files effortlessly. Now you have got it right and them import the Apple ProRes .mov videos to FCP 6/7 for editing. Launch the Final Cut Pro, choose from File menu > Import > Files…

Read more:

Get iMovie/FCE to recognize or import Nikon D4 mov
Lossless edit best DSLR Cameras H.264 HD clips in FCP X
Compatibility of Nikon mov files with Mac

Friday, November 29, 2013

Convert 5D Mark III h.264 footage to ProRes 422 for FCP 7

In this guide, you will learn how to convert Canon EOS 5D Mark III mov to Apple ProRes on Mac OS X so that you can smoothly import/edit 5D Mark III videos in Final Cut Pro 7 without rendering time.

As the latest in its enthusiast full-frame 5D series and successor to the popular EOS 5D Mark II, Canon EOS 5D Mark III has been tested to be a great camcorder by a number of truly brilliant photographers across the globe who prefer to use it daily in all sorts of disciplines and locations, and attracted much attention even since it has not came out to the market. Based around a 22MP full-frame sensor, it can shoot 6 frames per second and features a 61-point AF system much like the 5D Mark III. It can capture 1080p movies at 24, 25 or 30 fps and offers high quality intraframe (All-I) video compression amongst a host of movie-related improvements.


Everything is good but the only problem, as many Canon DSLRs users may have, is the incompatibility which will jump out when you want to ingest Canon EOS 5D Mark III 1080p MOV files to Final Cut Pro 7 for editing on Mac. They will hit a snag in the form of a “contains unsupported media… invalid directory” error. You can import your files with Log and Transfer but you have to back up the ENTIRE CARD STRUCTURE from the beginning.

Obviously, what matters is not the MOV fomat, since it is fine while playing with QT player on Mac, but the H.264 codec. It is a highly compressed codec, great for playing/streaming videos. But as for editing H.264 MOV in FCP, it is not such a suitable choice. In order to make Canon 5D Mark III footages editable in FCP 7, you have to convert H.264 MOV to ProRes 422, the codec which is proved to be the most compatible one with FCP 7.

You are provided with five options, including Apple ProRes 422 HQ (*.mov), Apple ProRes 422 (*.mov), Apple ProRes 422 (LT) (*.mov), Apple ProRes 422 (Proxy) (*.mov) and ProRes 4444 (*.mov). Here listed the main difference of the five ProRes codecs.

a. ProRes 422 (HQ): offers the utmost possible quality for 4:2:2 or 4:2:0 sources and provides target data rate of approximately 220 Mbps and higher quality than Apple ProRes 422;

b. ProRes 422: provides target data rate of approximately 145 Mbps and higher quality than Apple ProRes 422 (LT);

c. ProRes 422 (LT): provides roughly 70 percent of the data rate of Apple ProRes 422 (thus, smaller file sizes than Apple ProRes 422) and higher quality than ProRes 422 (Proxy);

d. ProRes 422 (Proxy): provides roughly 30 percent of the data rate of Apple ProRes 422 and high-quality offline editing at the original frame size, frame rate, and aspect ratio;

e. ProRes 4444: offers the utmost possible quality for 4:4:4 sources and roughly 50 percent higher than the data rate of Apple ProRes 422 (HQ).

A top Video Converter for Canon 5DM3 and FCP 7 users should be developed with all the five options. Here recommended the best H.264 MOV to ProRes Converter for Mac in that it is not only capable of converting H.264 MOV files to Apple ProRes codecs, all 5 ProRes codecs included, but also able to rip your BD/DVD disc for editing.

What's more, you can make your work easier with some useful editing functions, including joining imported clips together for easy importing, trimming section of your file, adding text/image/video watermarks to your original files, replacing audio tracks, etc. Follow the Three-step conversion and you are capable of importing/editing Canon EOS 5D Mark III files in Final Cut Pro 7.

Three-step Guide for transcoding Canon EOS 5D Mark III H.264 MOV to Apple ProRes for FCP 7

Step 1: Free download and run the best Mac Canon MOV to ProRes Converter for FCP, and drag Canon EOS 5D Mark III H.264 MOV files to the software.

Step 2: Select output format for Final Cut Pro. You are advised to choose “Apple ProRes 422 (*.mov)”or “Apple ProRes 422 HQ (*.mov)” format.


Due to the difference in the compresstion standard of AVCHD and ProRes 422, the converted files are significantly larger than the original ones. If you prefer smaller file size, please choose “Apple ProRes 422 (LT) (*.mov)” instead.

Since ProRes 422 (LT), ProRes 422 (Proxy), and ProRes 4444 have not been added to FCP 6, you’d better not set one of them as output if you happen to edit your H.264 files in FCP 6 before upgrading FCP 7.

Tips:

1. Settings- click to set video resolution(1920×1080/1440×1080/1280×720/720×480), bitrate(from 1Mbps to 20Mbps), frame rate (24p/30p)

2. Editor (next to “Add” icon)- click to set deinterlace, denoise, mute, volume up, trim, crop, etc.

Step 3. Click the “Convert” button to start converting H.264 MOV files to Apple ProRes on Mac immedaitely.

After converting the Canon DSLR EOS MOV video to ProRes format, you can easily import/edit Canon EOS 5D Mark III MOV files in Final Cut Pro 7 smoothly on Mac.

When the conversion is completed, please run the FCP 7 and click File –> Import –> Files for editing Canon EOS M files in FCP 7 without any rendersing and quality loss.

Besides the ability to transfter the EOS 5D Mark II files to FCP 7, the versatile Canon Video Converter for Mac can help you ingest/edit H.264 MOV files into FCP X, iMovie, FCEAdobe Premiere Pro, Adobe Premiere Elements, Adobe After Effects, Avid Media Composer, etc.

Hope you enjoy it!

Read Related Articles:

Friday, November 22, 2013

Transcode Canon EOS 70D H.264 MOV to ProRes 422 for FCP

The article shows you the best workaround for editing Canon EOS 70D videos in FCP by transcoding Canon H.264 .mov to FCP native editing format - Apple Prores 422 Codec.


I'm working on a feature on my mac, shot on Canon 70D, and am in the process of converting all my MOV files to manageable ProRes files. But I am unsure how to do this. Can someone give me a basic rundown of the procedure? I would be most appreciative.

This question is from one of my client, if you have used Canon 70D camera and recorded many 1080p videos, then how to ingest Canon 70D mov video into FCP for editing without crashing problem and avoid rendering?

In fact, MOV video format came from Canon 70D is a long GOP format that is highly compressed, which means it is not convenient for editing on Mac with Final Cut Pro. To import Canon EOS 70D 1080P video to Final Cut Pro for editing, the best way is to convert Canon EOS 70D 1080p HD MOV video to Final Cut Pro native Apple Prores .mov video on Mac.

Mac Canon h.264 MOV Converter is a professional HD video converter for you to easily convert Canon 70D 1080P video to Apple ProRes 422 so that you can easily import the Canon h.264 recordings to Final Cut Pro X, Final Cut Pro 6, Final Cut Pro 7 for editing on Mac. This will help you import the file correctly and saving the rendering time.

Below is a brief guide for you.

How to import Canon EOS 70D H.264 MOV footage to Final Cut Pro on Mac?

1. Free Download and run the best Canon H.264 MOV converter and drag 70D MOV files to the software.


2. Click format bar to choose output format for use in FCP 6/7 or FCP X. For editing Nikon MOV on Mac, you can choose Apple ProRes 422 for FCP.


Tips:

Here listed the main difference of the five ProRes codecs.

a. ProRes 422 (HQ): offers the utmost possible quality for 4:2:2 or 4:2:0 sources and provides target data rate of approximately 220 Mbps and higher quality than Apple ProRes 422;

b. ProRes 422: provides target data rate of approximately 145 Mbps and higher quality than Apple ProRes 422 (LT);

c. ProRes 422 (LT): provides roughly 70 percent of the data rate of Apple ProRes 422 (thus, smaller file sizes than Apple ProRes 422) and higher quality than ProRes 422 (Proxy);

d. ProRes 422 (Proxy): provides roughly 30 percent of the data rate of Apple ProRes 422 and high-quality offline editing at the original frame size, frame rate, and aspect ratio;

e. ProRes 4444: offers the utmost possible quality for 4:4:4 sources and roughly 50 percent higher than the data rate of Apple ProRes 422 (HQ).
Step 4. You can click “settings” to customize the output parameters, adjust the resolution, bitrate as you want.

Note 1: You are allowed to adjust output video and video parameters. However, if you have no idea about profile setting, keep it as original recordings will provide you the files with less quality loss, and keep default settings is also a good choice for your to get a high quality files.

Note 2: In order to get customized videos, you can add subtitles to your own videos.

3. Click convert button in the main interface to start converting Canon 70D H.264 MOV videos to Prores for FCP.

Some more helpful features of the app:

1. Settings- Click to adjust the output parameters, such as resolution, frame rate, etc, customize the parameters as you want.

2. Editor (next to "Add" icon)- click to set deinterlace, denoise, mute, volume up, trim, crop, etc.

After converting the MOV to ProRes format, you can easily import/edit Canon EOS 70D h.264 mov files in Final Cut Pro 6/7 or FCP X smoothly on Mac.

Tips:

1. Before you try to do the conversion, if you are also a FCP X user, please make sure that you have installed the Apple ProRes Codec manually since the FCP X asks users to install it by themselves.

2. This Mac Canon MOV Video Converter can convert mov video to Prores with retaining timecode for FCP.

Refer to the picture below to see how this cool mac H.264 converting tool keep the timecode for FCP. It is not difficult to find that the timecode is kept.


3. Pavtube HD Video Converter can also convert Canon 70D mov videos to iMovie and FCE, Premiere Pro, Avid Media Composer, DaVinci Resolve, Apple Aperture 3 and After Effects CS6 with good quality, just download the and have a try.

Read Related Articles:

Thursday, November 21, 2013

Canon EOS Movie Plugin-E1 for Final Cut Pro 1.5 for Mac OS X

Editing Canon EOS footage in FCP? Follow our tips about Canon EOS Movie Plugin-E1 for Final Cut Pro 1.5 for Mac OS X. Any question with the plugin, you can refer to this article.


Canon EOS Movie Plugin-E1 for Final Cut Pro 1.5 for Mac OS X
  • Date Added: August 25, 2013 
  • Publisher:Canon
  • File Size: 5.87 MB
  • OS: Mac OS X v10.8, Mac OS X v10.7, Mac OS X v10.6
  • Download here.
  • Release Date: August 01, 2013.
This plugin application is for Final Cut Pro, which was released for users of EOS DIGITAL and Final Cut Pro. This plugin allows you to use the Log and Transfer function to edit movies captured with the EOS cameras.

Changes in EOS MOVIE Plugin-E1 for Final Cut Pro 1.5:
  • Supports EOS 70D.
The following software must be installed on the PC
  • Final Cut Pro 6.0.6
  • Final Cut Pro 7.0.3 and later
Supported Models:

EOS 5D Mark II *1,*2 :
  • 1920x1080(1080p) / 30.0fps, 29.97fps/23.976fps(NTSC), 25.0fps(PAL) / IPP
EOS 7D *2, EOS-1D Mark IV *2, EOS 60D:
  • 1920x1080(1080p) / 29.97fps (NTSC), 25.0fps (PAL), 23.976fps / IPP
  • 1280x720(720p) / 59.94fps(NTSC), 50.0fps(PAL) / IPP
EOS-1D X, EOS 5D Mark III, EOS 6D *3:
  • 1920x1080(1080p) / 29.97fps (NTSC) (Drop frame is selectable.), 25.0fps (PAL), 23.976fps / Selectable from IPB and ALL-I.
  • 1280x720(720p) / 59.94fps(NTSC) (Drop frame is selectable.), 50.0fps(PAL) / Selectable from IPB and ALL-I.
EOS-1D C :
  • 1920x1080(1080p) / 29.97fps/59.94fps(NTSC) (Drop frame is selectable.), 25.0fps/50.0fps(PAL), 23.976fps / Selectable from IPB and ALL-I *5
  • Super 35 mm Crop (1920x1080) *4 / 29.97fps(NTSC) (Drop frame is selectable.), 25.0fps(PAL), 23.976fps / Selectable from IPB and ALL-I *5
  • 1280x720(720p) / 59.94fps(NTSC) (Drop frame is selectable.), 50.0fps(PAL) / Selectable from IPB and ALL-I *5
EOS 70D *3 :
  • 1920x1080(1080p) / 29.97fps (NTSC) (Drop frame is selectable.), 25.0fps (PAL), 23.976fps / Selectable from IPB and ALL-I.
  • 1280x720(720p) / 59.94fps(NTSC) (Drop frame is selectable.), 50.0fps(PAL) / Selectable from IPB and ALL-I.
* 1. Video files recorded using EOS 5D Mark II with the firmware version 1.x.x requires THM file.
*2. If THM file does not exist, "Shooting Information" does not appear.
*3. Video snapshot is not supported.
*4. The video size of Super 35mm Crop is 1920 x 1080 and the video format is the same as 1920 x 1080 (1080p).
*5. Only ALL-I is selectable when recording video in 1920 x 1080 (1080p) at 59.94 fps or 50 fps.

Recent Drivers

Canon Digital Camera Software 2.3 for Windows XP/Vista/7/8 x86/x64
Canon EOS Movie Plugin-E1 for Final Cut Pro 1.5 for Mac OS X
Canon EOS Digital Solution Disk Software 28.2A for Mac OS X
Canon EOS Digital Solution Disk Software 28.2A for Windows XP/Vista/7/8 x86/x64
Canon Digital Camera Software 2.1 for Mac OS X

Tip: 

FCP needs a native editing codec, if you work on Mac OS X Mavericks 10.9 or use FCP X or have any issues with Canon EOS Movie Plugin-E1 for FCP, then transcoding in a 3rd party app is a feasible workaround.

Apps For Converting Canon EOS MOV Files

Pavtube H.264 MOV to ProRes Converter for FCP can help you to make it possible, it can not only transcode Canon EOS H.264 MOV to suitable video format for FCP, but also do some little editing some simple editing features, such as merging several videos into one file, deinterlacing the original footages, cropping video size, trimming video clips, adding special effects and text/image/video watermarks to output videos.

With it, you can batch transcode as many of them as you like and it works pretty quickly. The files look great and with high quality. I've used it for a long time and I've never had a problem with it. Thus it will be on the top of your list. 

Canon EOS MOV Conversion Tutorials:

Ingest Canon T4i/650D into Avid Media Composer
Convert Canon 1D H.264 MOV to FCP X with Apple ProRes
Does Sony Vegas like handling the Canon EOS-5D h.264 MOV files well