Showing posts with label Sony. Show all posts

Monday, July 1, 2013

4K workflow in FCP/iMovie-Edit Sony F65 MXF 4K video in Final Cut Pro and iMovie smoothly

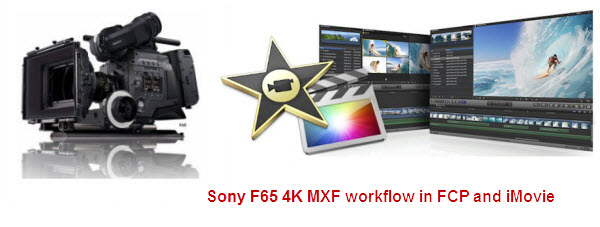
Do you have some trouble with the "4K camera Sony F65 MXF editing workflow in Final Cut Pro and iMovie"? If so, just follow this guide to learn about how to import and edit Sony F65 4K .MXF in FCP and iMovie on Mac smoothly.


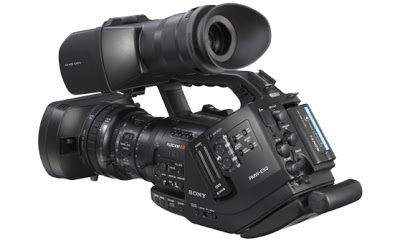
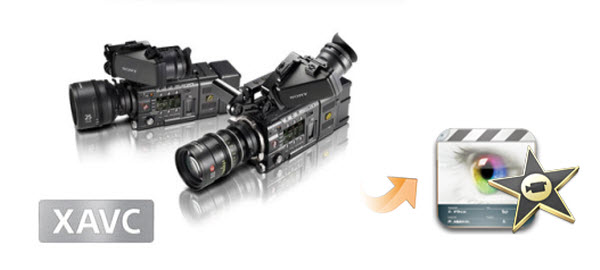
Sony F65 is a top-end motion picture camera. It features a true step-change in sensor technology, using a 20 Mega pixel 8K CMOS sensor. The F65 runs up to 120Fps, creates HD/2K or genuine 4K resolution images with a huge colour gamut, outstanding dynamic range, and high sensitivity.

Recording 4K(4096* 2160) video is very easy with this Sony F65, there is no need to talk much about the 4K video now. But one thing need to be mentioned, it is not so easy to edit raw 4K videos. for example , this Sony F65 records videos in MXF format, which is not friendly to Mac FCP, iMovie or other editing apps. If you get a F65 and want to edit the footage in FCP and iMovie, you need some third-party apps to convert the Sony F65 4K MXF files to Mac FCP and iMovie compatible formats first. Here is the solution.

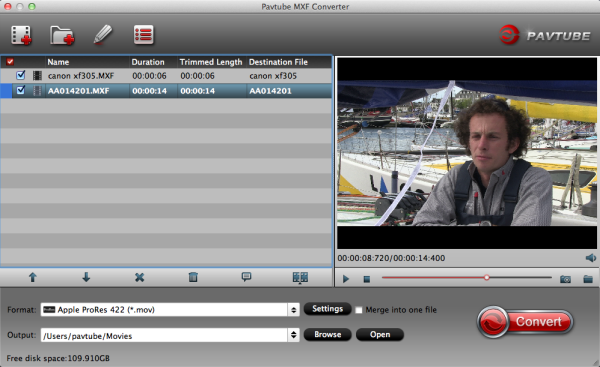
Mac 4K MXF Converter - a professional Pavtube MXF to Mac Converter, it can help you to convert Sony PMW F65 MXF to FCP friendly Prores codec and acceptable AIC codec for editing with no quality loss.

According to the specs of FCP X, the latest FCP supports 4K video, and this top MXF Converter introduced here can output 4K videos with ease, that means, it can remain the original 4K resolution after conversion. Now get your program installed and let’s begin!

Convert Sony F65 4K MXF to Prores/AIC MOV for editing in FCP and iMovie on Mac?

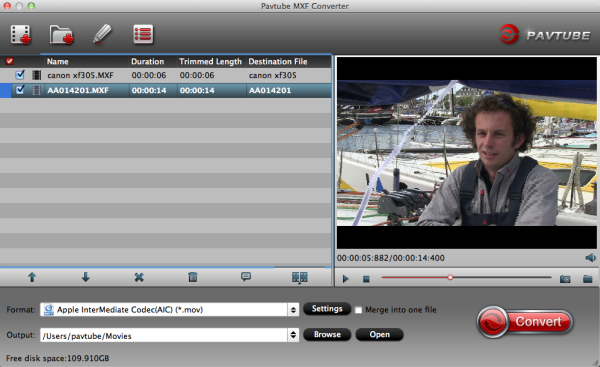
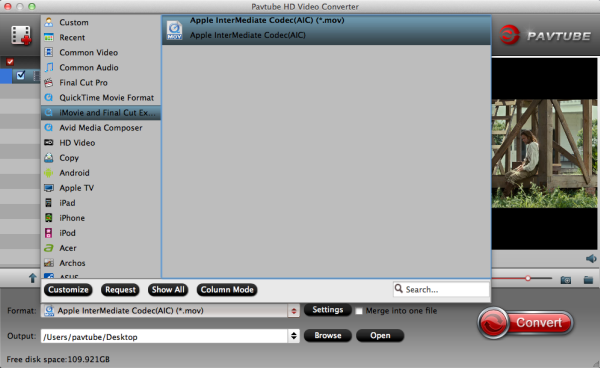
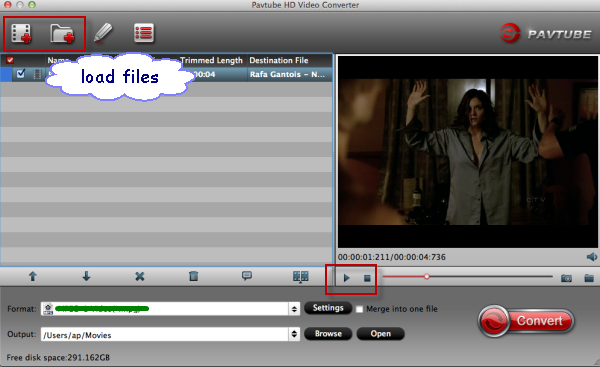
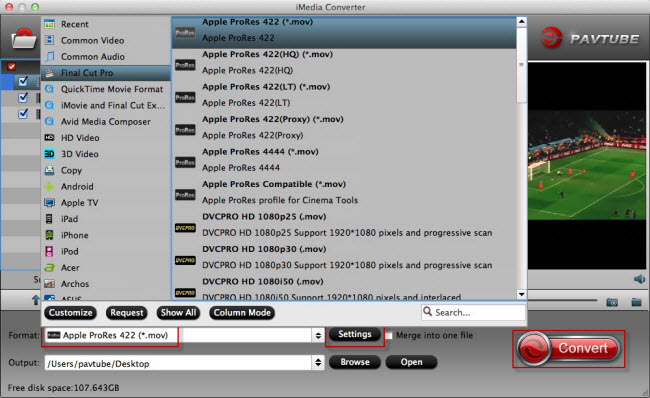
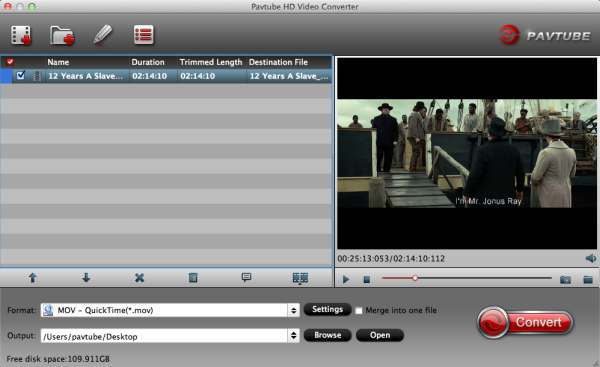
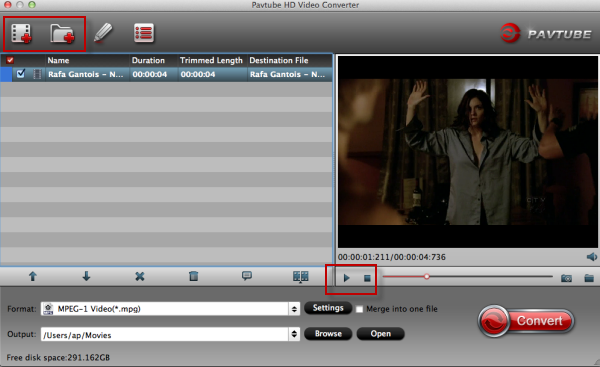
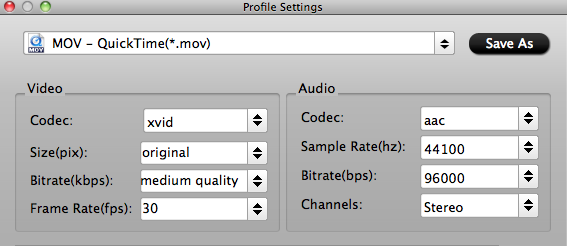
Step 1. Install and launch the 4K MXF to Prores/AIC Converter, click ‘add videos’ to load individual videos, or click ‘add from folder’ to load the entire folder.


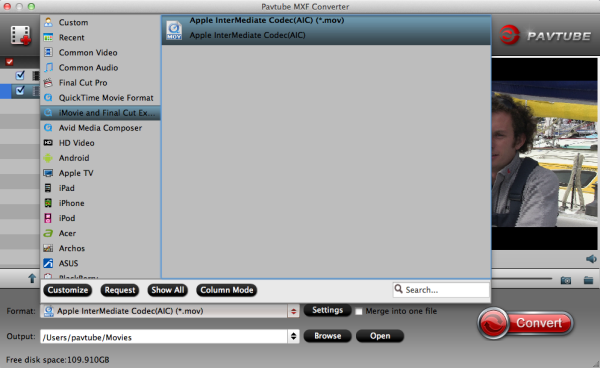
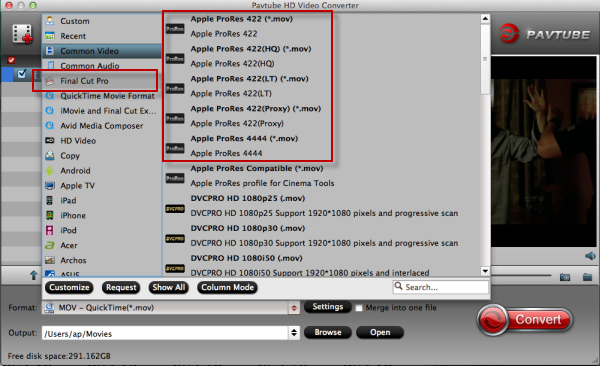
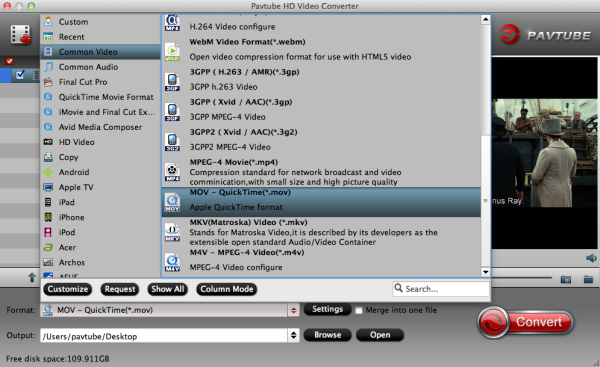
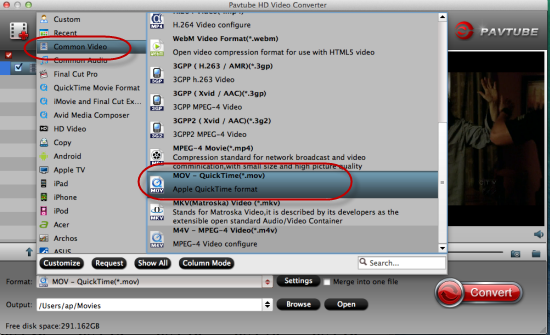
Step 2. Click "Format" bar to choose the output format.

If you want to edit video in FCP, click and choose Final Cut Pro -> Apple ProRes 422 (*.mov);


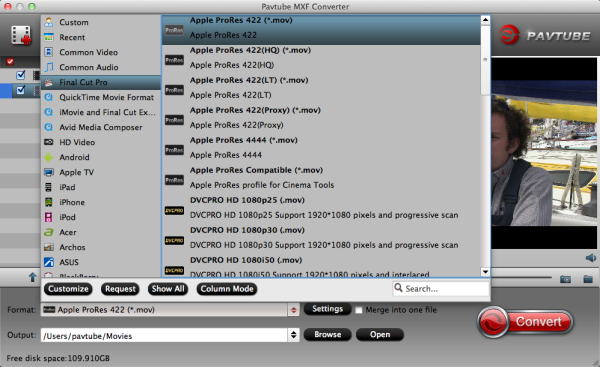
For editing in FCE, iMovie, you can choose iMovie/Final Cut Express -> Apple InterMediate Codec (AIC) (*.mov).

OptionalYou can click “settings” to customize the output parameters, adjust the resolution, bitrate as you want. 

Step 3. Click “Convert” and let it go!

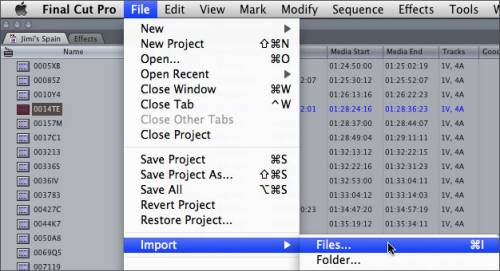
After the Sony F65 SR 4K MXF footage into FCP and iMovie conversion, you will be able to get the output files via clicking on Open button effortlessly. Afterwards, you can transfer Sony F65 footages to Final Cut Pro and iMovie freely for further editing without any trouble.


Read More:

Tuesday, June 25, 2013

Sony PMW-300, the EX3 replacement has finally arrived! With XDCAM 422 and XAVC!


Ever since the launch of the PMW-200 people have been asking about whether the EX3 would also be replaced. With the EX3 being such a popular camera it wasn’t really a case of “if” but more of a case of “when”.

So here it is, the PMW-300. Like the PMW-200 this is an evolution of the EX1R/EX3 cameras with many similarities but with that all important 50Mb/s 422 broadcast XDCAM codec. Like the EX3 it has 1/2″ sensors and it uses the same EX3 type lens mount, so can use the same lenses as the EX3. As well as the 14x 1/2″ zoom there is also now a new 16x zoom. In addition via adapters you can use both 1/2″ hot-shoe lenses and 2/3″ B4 lenses (1.4x magnification). You can also use an adapter to use Nikon DSLR lenses (5x magnification) for long focal length shots, so it’s sure to be popular with wildlife and natural history shooters. This is almost certainly the smallest self contained broadcast quality camcorder that can take interchangeable lenses.

The shape and design of the camera is different to the upward curving EX3. The body is a very functional rectangular shape that sits up against your shoulder like the EX3. It incorporates extending flip down shoulder/chest pad for added stability. The viewfinder design is new, it has a higher resolution panel than the one in the original EX3 and is closer in design to the PMW-350 or PMW-F5 LCD viewfinder. It’s mounted to the body with a rotating arm, that allows about 4″ of forward, backward and height adjustment so adapting the camera for use with a full shoulder mount should be quite straightforward.

As this camera uses essentially the same sensors as the EX3, sensitivity and dynamic range will be little different. But a new noise reduction system that Sony are calling 3DNR which should offer lower noise especially in low light situations.

At launch the camera will have the Sony XDCAM codec built in, offering 50Mb/s 422, 35Mb/s 420 as well as both IMX and DVCAM in standard definition. So a great range of codec choices out of the box. Next year you’ll be able to add the new XAVC codec as an option. This will be the Long GoP version of the codec announced at NAB and also coming as an option to the PMW-400. Throw in features like Genlock, RCP remote control and not only is this a great camera for use in the field but it also becomes an interesting option for small or low cost studio applications.

For hooking up to external devices you have the usual HDSDI and HDMI outputs as well as Firewire/ILink for the HDV and DVCAM modes.

I’m quite sure this camera will be as successful as the EX3, maybe more so thanks to the out-of-the-box broadcast codec and ability to add the 10 bit XAVC codec next year. I hope to get hold of one very soon for a full review, as soon as I do I’ll let you know more about it.

More details here:

http://www.sony.co.uk/pro/product/xdcamcamcorders/pmw-300k1/overview#overview

Related guides:

Import Sony PMW-500 XDCAM to Premiere Pro CS5
Work Natively with Sony PDW-700 XDCAM HD MXF in FCP X
Transfer Sony XDCAM footage to QuickTime MOV on Mac

How to import XDCAM MXF files from Sony PMW-320 to iMovie 11/8/9

Encounter problems when import Sony PMW-320 MXF into iMovie 11/8/9 on Mac? Just follow this article to get the best tools and methods to edit PMW-320 MXF in iMovie.

Sony is pleased to announce the introduction of the new PMW-320 XDCAM EX Camcorder. This new shoulder mount camcorder joins the award-winning XDCAM EX product family of professional Solid State Recording acquisition tools. This new camcorder inherits all of the advanced creative recording features of the successful PMW-EX1, PMW-EX1R, PMW-EX3 and the PMW-350 camcorders, and also offers several enhancements such as improved low light capability as well as SD recording as a standard feature. Similar to the PMW-350, the PMW-320 supports multiple frame rate recording such as 59.94i, 50i, and native 23.98P and 25P as well as being 1080i/720P switchable.


When shooting some footage on the Sony PMW 320 and want to edit them in iMovie 11/8/9, you will meet the incompatiblity problem as below, since iMovie (including iMovie '11, iMovie '8 and iMovie '9) can not support the .mxf video files.

Just received some SD footage from a two camera shoot with PMW-320s, one camera had 4 audio lines and both cameras timecodes were synched. Is there a way to properly import the files to iMovie? since just moving them from the card gives me no timecodes and only 2 audio lines. plus the quality seems lower than i expected. Thanks.

How can the PMW-320 XDCAM EX Rewarapped MXF files be editable with the lossless quality? It is easy, as we know, the most compatible format for iMovie 11/8/9 is Apple Intermediate Codec(AIC)(*.mov). So to get your Sony PMW-320 MXF files and iMovie to play nicely, the quicker and easier way is to transcode those MXF to AIC MOV videos.Thus, the third party component is vital in achieving your goal.

Here we recommend you to choose a top MXF to AIC Converter for Mac to transfer Sony PMW-320 recordings for iMovie 11/8/9 editing. 

Steps for deinterlace Sony PMW-320 MXF clips to iMovie 118/9.

Step 1: Install the top Sony XDCAM MXF Converter for Mac on your Mac OS X, and run it to import your Sony PMW-3201080i/1080p MXF footages to it. Tip: If you want to combine the files together, please tick the box "Merge into one" on the main interface.


Step 2: Click the Format box and select best output format on the dropdown list. You are advised to choose Apple Intermediate Codec(AIC)(*.mov) as the export.


Step 3: Click the "Settings" icon on the main interface and you’d better set the video size as 1920*1080, video frame rate as 30fps(or 25fps PAL) for importing Sony PMW-320 MXF to iMovie 11/8/9 with the best quality.

Step 4: Click the Arrow button on main interface to start converting/deinterlace Sony PMW-320 MXF clips to AIC video immediately.

After the Sony PMW-320 MXF to AIC converter finished transcoding, you can run the iMovie 118/9 to import the converted files and edit Sony PMW-320 XDCAM MXF in iMovie 11/8/9 without any rendering or incompatibility problem.

Read More:

Monday, June 24, 2013

XAVC to AIC -Solution for Importing & Editing Sony PMW400 XAVC videos in iMovie11/FCE 4

Maybe you have come across Sony PMW-400 XAVC to iMovie/FCE imprting questions and here offers you the best solution for editing PMW-400 XAVC in iMovie 11 and FCE 4.

After the successful sale of PMW-F55 and PMW-F5 all over the world, Sony keeps on developing more new models so as to gain more market share and to solidify its position in the already-full HD cameras market. To our excitement, Sony is planning to launch another new shoulder-mount camcorder which’s likely to be called Sony PMW-400 in August, 2013.

According to Sony’s official website, PMW-400 is an “affordable” broadcast camera with three 2/3-inch high quality Exmor CMOS sensors – boasting good low-light sensitivity of F12 at 59.94Hz and F13 at 50Hz. It is said that it will be shipped with a a 16x zoom HD lens and a 960×540 color LCD viewfinder with high resolution. Just like PMW-55 and PMW-F5, this PMW-400 adapts and supports Sony’s peripheral XAVC codec to offer 10-bit HD422 recordings, including XAVC Intra frame 10-bit HD422 100Mbps and XAVC Long GOP 10-bit HD422 (low bit rate).

Speaking of XAVC, perhaps it is still new to some people. XAVC is a high-efficiency codec version designed to be used in a broader content production market. For mac users, iMovie and FCE are two kinds of easy-use tool to edit videos, however, you will find some XAVC footage from Sony PMW400 is not editable with iMovie11/FCE 4, such files will not be shown when you try to import. Keep reading and below is a quick and easy solution for solving the problem. 

To import Sony PMW400 XAVC files to iMovie 11 and FCE 4, the best way is to convert PMW400 XAVC to iMovie/FCE compatible AIC codec. To finish this job, a professional XAVC to AIC Converter for iMovie/FCE is necessary, and here, Pavtube XAVC Video Converter for Mac is highly recommended here.

How to convert Sony PMW400 XAVC/XAVCS media to AIC for iMovie11/FCE 4

Step 1. Install and launch the Pavtube HD Video for Mac, click "add videos" to load individual videos, or click "add from folder" to load the whole folder.


Step 2. Click "Format" preset and choose "iMovie and Final Cut Express-> Apple InterMediate Codec (AIC) (*.mov)" as best video format for editing Sony XAVC in iMovie and FCE as well as good video quality.


Step 3. now click "Convert" and let it go. The XAVC to AIC Converter for Mac supports batch conversion, so if you have lots of xavc videos to convert, check 'Shut down computer after conversion', and you can go away without keeping an eye on it.

Tips: When the conversion is finished, you can import the converted XAVC file to iMovie 11/FCE 4.

Now you are free to import/edit Sony PMW400 XAVC videos in iMovie 11 and FCE 4 under Mac without problems.

Related articles:

Edit F55/F5 XAVC in Sony Vegas
Burn XAVC to DVD

Wednesday, June 19, 2013

Effortlessly import Sony PMW-500 XDCAM MXF to Adobe Premiere Pro CS5

Summary: If you want to edit Sony PMW-500 MXF footages to Adobe Premiere Pro 5 on Mac, and have PMW-500 XDCAM MXF to Premiere importing issue, you can follow this article to convert Sony XDCAM MXF to Premiere best prores codec and edit without rendering.

As Sony's first XDCAM HD422 camcorder, PMW-500 comes with solid state recording and features three 2/3”-type 2.2-megapixel full-HD progressive CCDs. In addition, it records high-definition video with 1920×1080 and 1280×720 resolutions up to 50Mbps using MPEG-2 4:2:2P HL compression technology.

While, for some Adobe users, they may be frustrated by importing PMW-500 XDCAM HD422 MXF files to Adobe Premiere Pro CS5, some error messages during the editing process as the XDCAM MXF still cannot fully supported by some video editors like Adobe Premiere Pro.

So if you are using Adobe Premiere Pro for editing just like that, the best workaround for us is to convert Sony PMW-500 MXF to Adobe Premiere Pro CS5 MOV, which is the most compatible format for Premiere Pro CS5, and it will make the editing work much smooth and easier.

To do this job, Pavtube iMedia Converter for Mac is a good choice. It is capable of converting Sony XDCAM, Canon XF, Panasonic P2 MXF files as well as Blu-ray and DVD discs to Adobe Premiere Pro CS5 for editing smoothly. The process is easy and quick, and you can join of multiple mxf videos into one file. What's more, the editing feature to trim the recorded videos is great, as you can control the content for conversion.

Supported cameras include:

Sony PMW-500, PMW-320,PMW-150...
Canon XF100,XF105, XF300, C300,C500 ...
All Panasonic cameras with P2 cards...

Now please follow the steps below to know detail conversion steps.

Guide to import Sony PMW-500 XDCAM MXF to Adobe Premiere Pro CS5 with ease

1.Download Sony XDCAM MXF Converter for Mac. It's an excellent software which can convert Sony PMW-500 XDCAM MXF to MOV for Adobe Premiere Pro CS5 on Mac, more output formats are also supported, such as MOV, AVI, etc.
  

2.Install and launch the top Sony XDCAM MXF to Premiere Converter Mac, import the Sony PMW-500 MXF video you want to convert.


3. Click format column and choose Adobe Premiere/Sony Vegas > MOV (AVC)(*.mov) or MPEG-2 Video (*.mpg)” as the best video format for editing in Adobe Premiere Pro CS5 on Mac .


4. You can customize output parameters as you want. Adjust the resolution, bitrate, etc according to your need; you can also keep the parameters as original.

5. After these steps above, click convert button to start transcoding Sony PMW-500 MXF to MOV for Adobe Premiere Pro CS5 on Mac.

As soon as the conversion process finished, you can click “Open” button to get the generated file that is ready for editing with Premiere Pro.

  • Start up Premiere Pro, choose File > Import…, and navigate to the source folder to import files. 

This Sony XDCAM to Premiere Pro converter will help you convert videos with best quality, and then you can edit Sony PMW-500 MXF in Adobe Premiere Pro CS5 on Mac as you want with no codec problems.

Read More:

Tuesday, June 18, 2013

Easy way for Editing Sony PMW-EX3 XDCAM MP4 clips with Mac

In this post, you can learn the easy way to import .mp4 recorded from Sony PMW-EX3 to Mac in FCP, Avid, iMovie, Premiere Pro, FCE etc.


Sony PMW-EX3 follows on from the successful launch of the new PMW-EX1 and offers all the great features of the PMW-EX1 in a new semi-shoulder design. In addition to this new design the camcorder also features an interchangeable lens system, genlock, timecode and remote control capability for real added flexibility, offering a low-cost HD studio solution. It combines a state-of-the-art, non-linear XDCAM workflow with simply the best HD quality yet seen in a semi-shoulder camcorder.

PMW-EX3 camcorder records 1920 x 1080 HD images using the "MPEG-2 Long GOP" codec, which conforms to the MPEG-2 MP@HL compression standard, and the recordings are made as data files in the "MP4" format. "MPEG-2 Long GOP" is a mature codec which enables users to record stunning-quality HD video and audio with highly efficient, reliable data compression, but it is not an editing codec, so it is a big problem when loading or importing Sony PMW-EX3 mp4 clips into your Mac system.

Question: I recently purchased the Sony PMW EX3 and am loving it. My problem is this. I want to edit my footage. I have Final Cut Studio 1 which is apparently incompatible with the EX3 mp4 clips. I'm looking to make the jump to Avid Media Composer, iMovie and Adobe Premiere, but it doesn't works. Can anybody enlighten me?

The easy Solution: To make it easier for editing Sony PMW-EX3 MP4 videos on Mac, you can need to convert Sony EX3 mp4 clips to FCP, Avid, iMovie, Premiere Pro, FCE preferable format before importing to avoid crashing problem and waiting time. Mac Sony XDCAM EX Video converter is the best choice to do this. It can not only convert Sony PMW EX3 .mp4 videos to Mac compatible codec, but also make iteasy for merge videos.Below is a guide for you.

1. Download and install Pavtube iMedia Converter for Mac. This converter can help you transcode Sony PMW-EX3 mp4 video to FCP, Avid, iMovie, Premiere Pro, FCE.


2. Launch this Sony MP4 to Mac Converter, and import the EX3 recorded mp4 footages.


3. Click format bar to choose the format for output.

For editing EX-3 MP4 video on Mac, you can choose Apple ProRes 422 for FCP, DNxHD for Avid, AIC codec for iMovie, FCE, ProRes/MOVfor Premiere, etc.


4. You can click settings button in the main interface to adjust the output parameters, such as resolution, frame rate, etc, customize the parameters as you want.

5. Click convert button to start.

After Sony MP4 to Mac conversion, Optimize your workflow and save time with the Apple ProRes compression for Final Cut Pro. You can also import the output videos to Final Cut Express (FCE) 4, iMovie 11, Avid Media Composer or Premiere Pro for editing in full HD.

This Sony XDCAM EX Converter for Mac can not only convert Sony PMW-EX3 MP4 clips for FCP,  iMovie, Avid, Premiere Pro, FCE, but also rip your Blu-ray and DVD contents for editing with good quality.

Monday, June 17, 2013

Working Natively with Sony PDW-700 XDCAM HD MXF in Final Cut Pro X

This article shows you the best solution for convertting XDCAM HD MXF files from Sony PDW-700 to a file format that is editable/supported by FCP X.
 
PDW-700 camcorder is a popular member of Sony's XDCAM family, equipped with three 2/3-inch type CCDs – a newly developed "Power HAD FX" progressive CCD with 1920 x 1080 effective pixels. It also offers very high quality HD recording at a data rate of up to 50Mbps using the MPEG-2 4:2:2P@HL compression, and provides multi-format recording flexibility including 1080i, 720P and SD, with HD/SD conversion and cross conversion between 1080i and 720P.


The XDCAM series takes recording to the next level, utilizing non-linear single and dual-layer optical Blue Laser technology. Less time logging, capturing and digitizing footage allows videographers to move seamlessly between acquisition and post-production. However, Sony PDW700 XDCAM camcorders' video format is MXF, using this MXF footage on Mac is a big problem. If you try to import PDW-700 HD MXF footages to Final Cut Pro X for further editing, you may meet some incompatible issues.

Sony has recently released version 2.9 of the XDCAM Transfer Software, which adds additional features including the ability to write back MXF files to the Clips folder with the PDW-U1. You can learn how to import XDCAM Disc footage directly into the Final Cut Pro editing system with XDCAM Transfer here.

Anyway, this MXF file with MPEG HD422 codec is a not standard editing format for FCP X. In case that you have more unexpected problem, you are suggested to convert Sony PDW700 MXF video to FCP X compatible format like ProRes 422 codec. As ProRes codec is a common format developed by Apple, ProRes 422 is intended for non-linear editing with Apple Final Cut Pro. They retain higher quality when you convert Sony PDW700 MXF to FCP X using Apple Prores codec. Below is an easy way for you to import Sony PDW700 XDCAM HD MXF to Final Cut Pro X on Mac.

1.Download Pavtube MXF Converter for Mac. This is excellent software which can help you convert Sony PDW700 XDCAM MXF video to ProRes for FCP X. Besides, it supports many other formats for output.

2.Install and launch this Sony XDCAM MXF to FCP Converter, import the MXF video you want to convert.


3.Choose the best output format for Final Cut Pro . Click on "Format" and choose "Final Cut Pro >>Apple ProRes 422 (*.mov)". It is the best codec and format for editing XDCAM MXF in FCP X.


4.You can click settings to adjust the output parameters, such as resolution, bitrate and frame rate.


5.You can click edit button to edit MXF video, such as deinterlace, denoise, mute, volume up and crop.

6.Click convert button to start transcoding MXF to Apple ProRes for Final Cut Pro X and import the converted video file into FCP X. 

Now you can load and edit Sony PDW700 XDCAM HD MXF footage in FCP X instantly without rendering.

Read Related Articles:

Friday, June 14, 2013

4K Video Converter – Convert 4K Video for editing with Mac in FCP, Avid, iMovie, Premiere Pro, FCE

Follow the guide below and you will know how to import 4K Video to FCP, Avid, iMovie, Premiere Pro, FCE without rendering or any other problems on Mac OS X(Mavericks included).

At CES 2013, Panasonic and Sony is unveiled their 4K camcorder, they witness the power of science and technology again. For consumers, this is a good thing, but the 4K camcorder is so expensive. Sony calls it a consumer model, but it definitely looks more like a prosumer piece of gear.

Videomaker's Best Camcorder of NAB 2013 is the Blackmagic Production Camera 4K, and there are other video camcorders can record videos in 4K, such as Canon C500, Sony NEX-FS700, Sony PMW-F55/F5, etc. the videos formats include MXF, XAVC mainly. But the 4K video doesn't have good compatibility. Especially edit 4K video on Mac. Here I'll share the Mac 4K editing solution, that is, how to edit such 4K high definition videos on Mac in FCP, Avid, iMovie, Premiere Pro, FCE.


What's the 4K video format?

Different 4K camcorders record different formats, the formats including MXF, MOV, MP4, AVCHD, MTS, M2TS etc. To make 4K videos editable on Mac in FCP, Avid, iMovie, Premiere Pro, FCE, we need to know Mac compatible formats first and then do conversion with a professional 4K to Mac Converter software tool.

Find below a step-by-step tutorial on how to ingest 4K formatted footage through Mac in FCP, Avid, iMovie, Premiere Pro, FCE.

Recommended Software

Pavtube HD Video Converter for Mac supports three professional encoders, Apple Intermediate Codec, ProRes and DNxHD – ensuring maximum editing quality and efficiency when working with iMovie, Final Cut Pro, Adobe Premiere, Final Cut Express or Avid Media Composer, respectively. With 4K Video Converter Ultimate for Mac, you can edit Canon, Sony, JVC and Panasonic 4K video on Mac easily.


4K Video Converter supported devices and formats:

Support Devices:
  • Sony 4K camcorder: FS 700 
  • Canon EOS C500 4K camcorder: EOS C500, EOS-1D C 
  • Panasonic 4K camcorder
  • JVC 4K camcorder
Support 4K formats:

4K MOV, 4K AVCHD, 4K MXF(P2), 4K MP4, 4K MTS, 4K M2TS etc.

How to transcode 4K video on Mac via 4K Video Converter?

Step 1: Install and run this Mac 4K Video Eocoder on your Mac.

Click "Add Video" and import the 4K video into this software. 4K Video to Mac converter Mac can help you transcode 4K video to FCP, Avid, iMovie, Premiere Pro, FCE for 4K to Mac importing natively.


Step 2: Choose output format

Click on "Format" bar and locate the appropriate output profile. To import 4K files to Mac, you need to convert to Mac supported formats.

  • Final Cut Pro 7/X
Move mouse cursor to “Final Cut Pro > Apple ProRes 422 (*.mov)” to set a FCP 7/X best codec.


Apple ProRes 422 – Higher quality than Apple ProRes 422 (LT)

Apple ProRes 422 (HQ) – Keep original video quality for editing in FCP

Apple ProRes 422 (LT) – Get a smaller file sizes than Apple ProRes 422

Apple ProRes 422 (Proxy) – SD levels – 480i/p and 576i/p. Used in offline workflows.

Apple ProRes 4444 – Edit and finish 4:4:4 material

  • Final Cut Express and iMovie
Choose FCE and iMovie friendly format- “iMovie and Final Cut Express > Apple Intermediate Codec (AIC) (*.mov)


  • Avid Media Composer 5.5/6 
In order to take advantage of the plugin AMA, you have to make sure that you still keep the structure of the file folder recorded by your camera. If not, here you can set Avid DNxHD (*.mov) for natively editing in Avid MC.


Step 3: Just hit the Convert button on the bottom right to kick off 4K to Mac Conversion.

Step 4: Import 4K video into Mac through FCP, Avid, iMovie, Premiere Pro, FCE

After conversion, locate and select the file you want to import, then click Import for further editing in Final Cut Pro 7/X, Final Cut Express/iMovie, Avid Media Composer.

Now, you can edit 4K video on Mac in FCP, Avid, iMovie, Premiere Pro, FCE natively, smoothly without any problem. Video and audio quality and synchronization are perfectly guaranteed.

Related posts:
Edit Blackmagic Production Camera 4K in FCP 

Wednesday, June 5, 2013

Make Sony CX550V AVCHD video workable with Avid, Premiere, Sony Vegas Pro, Windows Movie Maker, Pinnacle

If you are Facing the problem with importing Sony CX550V MTS to Windows PC in Avid, Premiere, Sony Vegas Pro, Windows Movie Maker, Pinnacle, you can fix the issues via transcoding AVCHD video to Windows compatible format first.


Sony's flagship 2010 model, the HDR-CX550V, is a larger camcorder than its predecessor. With a $1049 price tag, the CX550 is also one of the cheaper high-end models on the market and it marks the first instance of Sony offering a 24Mbps bitrate for recording AVCHD video on a consumer camcorder.

Sony CX550V Windows solutions:

"I have just bought a CX550V camcorder, this device records AVCHD.MTS video format, now I would like to import these projects to my computer. What I want is to edit my 1920 * 1080, 24Mbps AVCHD video files smoothly without codec problems, what video codec should I use on Windows platform? Can you recommend some software which can help me import and convert Sony CX550V AVCHD videos for editing smoothly?"

As above, editing Sony CX550V MTS files on Windows PC is not an easy job as we thought. As Windows editing software like Avid, Premiere, Sony Vegas Pro, Windows Movie Maker and Pinnacle are not friendly with AVCHD format and did not handle large AVCHD videos with great stability. Plus, there are so many limits you are facing like the System Requirements: Intel Core 2 Quad 2.66 gHz or higher required for 1920x1080 AVCHD editing, 2GB system memory required for AVCHD and more.

To make Sony CX550V AVCHD MTS/M2TS video workable with  Avid, Premiere, Sony Vegas Pro, Windows Movie Maker and Pinnacle, you only need to convert MTS to AVI/WMV/MPEG-2, the most suitable video format for editing.

Software Requirement:

Sony AVCHD MTS Converter
 is mainly used to transcode Sony CX550V AVCHD MTS/M2TS files for editing in Avid, Premiere, Sony Vegas Pro, Windows Movie Maker and Pinnacle.


Features: 

  • Helping you to convert Sony AVCHD MTS files to AVI/WMV/MPEG-2 with original quality. Also it supports other popular used format like MP4, DV, FLV, 3GP etc for playing back.
  • Thanks to its adoption of NVIDIA CUDA & AMD APP(ATI Stream) acceleration technology, the conversion process has been accelerated up to 5 times the speed of other converters.
  • With this MTS Converter, you can edit the video clips with trimming videos, deinterlacing 1080i videos, adding text/image/video as watermarks to your original files, replacing audios, adjusting brightness/contast/saturation of the imported files, etc. 

Guide to edit Sony CX550V MTS files in Pinnacle Studio, Sony Vegas and Adobe Premiere

Step 1: Free download the best MTS to Windows PC Converter and run it to add the AVCHD footages from Sony CX550V.


Step 2: Hit the Format box and select “HD Video” option on the dropdown menu and you can choose “AVI/WMV/MPEG-2” as output format for editing with Avid, Premiere, Sony Vegas Pro, Windows Movie Maker and Pinnacle . Besides, you can also choose “H.264 HD Video (*.mp4) “for playing back.


Step 3: Adjust video and audio parameters, including the Bitrate of Video and Audio, the Codec of Video and Audio, Video Size, Sample Rate, Frame Rate, Audio Channels, etc., by clicking the “Settings” button on the main interface for getting the best quality.

Step 4: Click the “Convert” button on the main interface to start transcoding Sony AVCHD footages to AVI/WMV/MPEG-2 for editing in Avid, Premiere, Sony Vegas Pro, Windows Movie Maker and Pinnacle.

When the conversion is completed, click “Open” in the main interface and get the converted files for importing and further editing.

With this Pavtube Sony MTS Converter, it becomes easy for you to convert Sony CX550V MTS video to Windows editing software compatible file formats. Now transferring and editing Sony CX550V AVCHD in  Avid, Premiere, Sony Vegas Pro, Windows Movie Maker and Pinnacle is smooth and without any problem.

Tuesday, June 4, 2013

Best XAVC Video Converter-Make Sony F55/F5 4K XAVC Video editable in iMovie and FCE

In this guide, I will show you some useful tips for importing Sony PMW-F55/F5 4K Digital Camera XAVC Footages to iMovie/FCE for smoothly editing.


Sony has announced that cameras that will support XAVC include two CineAlta cameras which are the Sony PMW-F55 and Sony PMW-F5. Both cameras record XAVC with a color depth of 10-bits and 4:2:2 chroma subsampling. The Sony PMW-F55 can record XAVC with 4K resolution at 30 fps at 300 Mbit/s and 2K resolution at 30 fps at 100 Mbit/s. The Sony PMW-F5 can record XAVC with 2K resolution at 30 fps at 100 Mbits/s.

XAVC can record 4K resolution at 60 fps with 4:2:2 chroma subsampling at 600 Mbit/s.A 128 Gigabyte SxS PRO+ media card can record up to 20 minutes of 4K resolution XAVC video at 60 fps, up to 40 minutes of 4K resolution XAVC video at 30 fps, and up to 120 minutes of 2K resolution XAVC video at 30 fps. As the lasted HD recording formats introduced by Sony, XAVC format is seldom used now, when you are planning to conduct post production to the PMW-F55 (or PMW-F5) XAVC footages with your Mac editor like iMovie and FCE, you may encounter with the problem like "the file cannot be imported/opened".

So how to solve the problem with loading Sony F55/F5 4K XAVC to iMovie/FCE? At first, you need to convert XAVC to AIC .mov which is best editing format for iMovie and Final Cut Express. Now please get the help of a professional 4K XAVC Video Converter for Mac and follow the guide below to transcode Sony F55/F5 4K XAVC to iMovie/FCE step by step:

How to make Sony F55/F5 4K XAVC Video editable in iMovie and FCE?

Step 1. Add XAVC MXF files

Install and launch Pavtube HD Video Converter for Mac, and click "Add File" to import your Sony PMW-F5/F55 XAVC files; or click "Add from folder" to load videos in batch.

This is a powerful XAVC video converting software which can not only easily convert XAVC footages to FCE/iMovie preferred formats smoothly, but also import Sony PMW XAVC into FCP without any problem.


Step 2. Choose AIC codec for iMovie and Final Cut Express.

Choose output video format from the 'Format' preset, and click 'Output' to change converted video path. Then pls click iMovie and FCE>Apple InterMediate Codec(AIC)(*.mov) to get Sony XAVC to FCE/iMovie preferred codec.


Step 3. Adjust output settings

If you want to locate your videos quickly, click Browse. The "Settings" icon will meet your requirements of adjusting video bitrate, frame rate and so on.

To get 1080 videos, we need to click the "Settings" button and choose 1920*1080 as output video resolution.

Moreover, you can edit your Sony XAVC videos before converting. By clicking the pencil icon on the top of Mac XAVC Video Converter, you can trim/crop the video clips, add or adjust video effect, or take snapshots from video as you like.

Step 3. Start converting Sony XAVC to AIC MOV for iMovie/FCE.

Click the big red circle to convert Sony PMW-F5/F55 XAVC videos to iMovie/FCE on Mac.

After conversion finished, you then are able to edit or share your XAVC HD videos on the go.

See more:

XAVC and Premiere Pro workflow
Convert XAVC to AVI/WMV/MOV/MP4/FLV

Wednesday, May 29, 2013

XDCAM EX to FCP-Transform Sony XDCAM EX MP4 to FCP 6/7 with highest quality

Summary: This article aims to guide you how to transfer Sony PMW-EX HD Camcorder  MP4 clips to FCP 6/7 for editing on Mac OS 10.8 by convert Sony XDCAM MP4 to Prores with Pavtube Video Converter Ultimate.

Sony XDCAM EX camcorders like PMW-EX3, PMW-200, PMW-EX1, PMW 150, etc are great for us to take high quality full HD videos. If you have got one and often use it to record 1080p video, you may have the need to edit the generated XDCAM EX MP4 files in Final Cut Pro 6/7 on Mac.

Final Cut Pro 7 is claimed to work with the Sony XDCAM footages by using the third-party Sony XDCAM Transfer plug-in. In order to make .mp4 files from Sony XDCAM EX be editable in FCP, you also need to enable the "Log and Transfer" function. It really does work for some XDCAM owners. However, others are still fighting against incompatibility between Sony XDCAM and FCP, due to its lower version of FCP or missing some procedures. So Is there any way to guarantee you to import XDCAM EX MP4 file into FCP without any hassle? Yes. Here I would like to an easy way out.

In order to edit Sony XDCAM EX MP4 file in FCP, you need a third-party program- Sony XDCAM Converter which helps you to convert the mp4 footage from Sony XDCAM to ProRes natively supported by Final Cut Pro (FCP 6 and FCP 7) without quality loss.

1. Download Pavtube HD Video for Mac. This professional HD Video Converter can help you convert Sony XDCAM EX to ProRes 422 MOV format for Final Cut Pro, more output formats are also supported.


2. Install and launch this XDCAM EX to ProRes Converter. Import Sony XDCAM EX MP4 footages to the converter.


3.Click format bar to choose the output format. Click and choose Final Cut Pro -> Apple ProRes 422 (*.mov).


4.You can click “settings” to customize the output parameters, adjust the resolution, bitrate as you want.

5.Start convert Sony XDCAM EX to ProRes for FCP editing on Mac.

When you get ready to convert the added MP4 videos on Mac, Click the “Convert” button to start conversion. The conversion processes will transcode MP4 to ProRes MOV videos to be compatible with FCP editing.

After conversion, launch Final Cut Pro 6/FCP 7, choose File > Import > Files…, and browse to where you saved the converted MXF clips with multiple audio tracks to. Choose the files that you’d like to add.


Congratulations! You have successfully taken the first step to make your own masterpiece.

This Sony XDCAM EX to ProRes Converterruns fast, so you can convert your XDCAM footages to FCP in less time, video and audio synchronization are perfectly guaranteed. It can also easily change XDCAM EX files to iMovie, import XDCAM MXF to After Effects CS4/5/6, play XDCAM EX with QuickTime and learn how to edit XDCAM EX files in FCP X.

Monday, May 27, 2013

Sony brings 4K RAW to NEX-FS700 camcorder courtesy of IFR5 add-on


FS700 has plenty going for it regardless of its 4K potential, not least in terms of its super slow motion shooting up to 240fps at 1080p. Nevertheless, if 4K it has to be, then a new NEX-IFR5 interface unit will be out in June to make full use of the camera's big sensor and 3G-SDI output. A couple of things to bear in mind: in addition to this $2,500 interface, you'll need a recorder like the AXS-R5 (around $6,300 plus extra for cards) to store your weighty 4K rushes on, plus you'll find that shooting in this mode will limit slow-mo to a four-second bust at 120 fps. Read the PR for further detail on using 2K with the IFR5, as that format allows continuous slow-mo and ought to be less brutal on the budget.

XAVC to MOV Converter- Play Sony XAVC video with QuickTime on Mac

Follow the guide you can Convert Sony XAVC files to QuickTime MOV on Mac easily via XAVC Video Converter.

Model: F55, F5

The camera PMW-F55, F5 which used XAVC format was recently unveiled by Sony. XAVC is a new recording format which can support 4K resolution (4096 * 2160 and 3840 * 2160) at up to 60 fps, introduced by the famous Japanese camera manufacturer Sony on October 30, 2012. However, .xavc is still not as popular as other kinds of video formats such as AVCHD and MXF, so when you deal with the XAVC/XAVC-S footages, for example, importing Sony XAVC/XAVC-S to Mac applications like QuickTime for playing, you may encounter some format compatibility or video/audio synchronization problems.


This article is written to help XAVC users to solve such kind of problems by using XAVC Converter for Mac. It can help users fix all kinds of XAVC problems without losing the video quality. It offers an easy way to convert XAVC to MOV for playback on Mac. With it, you will be able to import XAVC videos to your QuickTime for playback with ease. Besides, by converting XAVC to MOV, you can transfer the generated files to your iPhone, iPad, Apple TV 3, etc to play with ease. If you are a Windows user, you can turn to XAVC Video Converter, which share similar functions with the Mac Version.

How to LosslesslyConvert Sony XAVC to QuickTime .MOV on Mac

Step 1: Load XAVC footages to the XAVC Video Converter

Run Pavtube Mac Sony XAVC to MOV Converter. Click "Add file" or "Add from folder" button, browse to the XAVC footages and load them to the converter.


Step 2. Choose QuickTime MOV as the output format

To transfer Sony XAVC/XAVC-S to QuickTime on Mac, the best way is to convert XAVC to MOV.

Click on the drop-down list of "Format", and follow  "Common Video"> "MOV-QuickTime (*.mov)" or "Common Video" > "H.264 Video (*.mp4)".

To retain the HD video quality, you can select "HD Video"> "H.264 HD Video (*.mp4)".


Tips: Click the "Settings" button and set proper video/ audio parameters. You can reset set the video size, bitrate and fame rate. If you would like to use default settings, simply skip this step.

Step 3: Start converting XAVC to MOV

After the options above, press the "Convert" button to launch the conversion from XAVC/XAVC-S to MOV on Mac.

After converting XAVC to MOV, you can view XAVC on the Mac QuickTime and do whatever you want with the XAVC footages on Mac.

See also:

Thursday, May 23, 2013

Convert and Transfer Sony XDCAM footage to QuickTime MOV on Mac

This article will show you how to convert XDCAM EX HD files to QuickTime MOV on Mac.  

XDCAM EX 

The Sony XDCAM EX is a high-quality video camcorder, capable of shooting in either standard definition or high definition. XDCAM EX video and audio content is stored on Sony SxS solid-state Express Card 3/4 media within MP4 container files. You can record video either 1920 x 1080 or 1280 x 720 modes.

XDCAM EX HD MP4 video is recorded from Sony XDCAM EX. But after test, we find that this MP4 format by Sony can't even be played on Mac OS 10.8. Many fresh users don't know what to do. But don't worry. Just follow me to learn how to play and view .mp4 files from Sony XDCAM EX.
Soutions:
  1. With running XDCAM Browser you can preview the MP4 files or export as a mxf file, but can't transfer to a .mov file and this rewapped .mxf file may not be viewing.
  2. Of course You can play this video file on the camcorder and through the Sony software, but if you use QuickTime as your media player, you will have to convert Sony XDCAM HD file to a compatible format with QuickTime MOV for playback. So how to convert a XDCam EX MP4 file into a mac-compatible .mov file for enjoying which retain the same size and quality? 
  • Calibrated{Q} MP4-EX Import component ($149.95) supports tranferring MP4 to QuickTime MOV. (Not supported FCP X)
  • Calibrated{Q} XD Decode codec ($89.95) to encode MP4 files for playback. (Not for use when any version of Final Cut Pro, Final Cut Studio or Final Cut Server is installed, and at least a Intel Core 2 Duo with two physical cores is highly recommended)
  • As the solution above takes too much money, and you may may have reliability and incompatiblity issues. Here comes the third solution, using Pavtube HD Video Converter for mac can helps you to tranfer Sony XDCAM MP4 to QuickTime mov easily and fastly. (Easy and Helpful)
As you see, the last solution is the esaiest and effective way. Below are step to step guide for Converting and Transferring an XDCAM EX to QuickTime on Mac.

Step 1. Download Sony XDCAM MP4 to MOV Converter for mac, and install it. Click the "Add Video"  button to import Sony XDCAM EX seperate MP4 files or press on"Add from Folder" button to add MP4 folder.


Step 2. Select output format.

Click on the dropdown menu of "Format" and select "Common Video -> MOV – QuickTime (*.mov)" as target format. This format is specially designed for QuickTime playback. You can also choose format as you need in the format column, such as AVI, MKV, MP4, etc.

         
Step 3.Adjust video and audio parameters.

Click "Settings" button to customize the output video and audio settings by yourself. You can also use the default parameters, they will ensure you a good balance between file size and image quality basically. You can change the resolution, bitrate, frame rate as you need.


Step 4. Click "Convert" button and this Sony XDCAM EX MP4 Converter for Mac will start transcoding Sony XDCAM MP4 to QuickTime MOV.

After you converting Sony XDCAM  HD Video to MOV for QuickTime, you can play the converted footages smoothly on Mac.

Further Reading:


Monday, May 20, 2013

Convert Sony PMW-F55/F5 XAVC Footages for DVD burning

This article mainly teaches you how to burn Sony PMW-F55/F5 XAVC files to DVDs with a professional and easy-to-use XDCAM to DVD burner.

Sony's newest recording format the XAVC can record footages in superb video quality at up to 4K (4096 × 2160 and 3840 × 2160) resolution. When you have such great quality well-done videos after shooting, you might wanna save them in DVDs. Because in that way, you can keep your videos well and watch them conveniently, and even lend it to friends. But as XAVC is a rare software, not many software can support converting XAVC footages to DVD disc, then burn XAVC to DVD for home watching will be a difficulty, especially for the Mac users.


Luckily, here is a third-party professional XAVC to DVD Creator from Pavtube which can burn XAVC files to DVD for saving or sent for sharing. With this efficient DVD burner, you can easily burn your XAVC files without any loss, quick in time, and output in amazing high quality for watching. Below is the simple steps for you to easy burn your HD XAVC files to DVD.

Step 1. Download DVD Creater.


Free download this Sony XAVC to DVD burner. Follow the steps to install and run the free program. You can see the main interface.
canon mov to dvd maker run How to Convert and Burn Canon Video to DVD

Step 2. Load video files.

1. Drag and drop Sony XAVC video files to source area (details in Source Screen)

2. Select “Add Files” from the drop-down list of Quick Start menu.
add files How to Convert and Burn Canon Video to DVD

Each file is recognized as a chapter after being imported to DVD Creator. Press on “Add title” button to add more titles. And you can do some arrangement for titles or chapters.

Tip: You can enter Video Editor to Trim, Crop, Text Watermark, add Image/Video Watermark, set Effect, and Replace audio if necessary before burnning.

Step 3. Customize DVD menu.

Turn to Menu pane and double-click a DVD menu beneath the Menu Template to apply it to your DVD. You can change the background video/image, background music, text, title thumbnail and more for your DVD menu.
dvd creator menu How to Convert and Burn Canon Video to DVD

Step 4. Preview created DVD video.

Once the DVD menu has been decided, click on “Preview” tab and your DVD video will be played just like on a DVD player. The control buttons here are corresponded with the keys on remote control.
preview created dvd video How to Convert and Burn Canon Video to DVD

Step 5. Start burning Sony XAVC to DVD.

Click the “Burn” button to start fast making DVD from Sony F5/F55 Camera – video to a writable DVD (or ISO image) that will plays on standard DVD player after burning. Now you are able to watch the DVD on your home DVD player or TV.
dvd creator burn How to Convert and Burn Canon Video to DVD

With this professional Sony XAVC to DVD Maker, you will find it pretty easy to convert Sony F5/F55 XAVC videos to DVD for you to enjoy a quality time watching movies with your family at home. If you are Mac users, you can try convert XAVC to DVD on mac.

PS: For beginners, please switch to the online guide about how to use dvd creator