Wednesday, June 14, 2017

Convert Cyberlink PowerDirector Video to MP4, MKV, MOV, AVI

Cyberlink PowerDirector video editing software provides easy-to-use and powerful tools for high quality video productions. Once you have finished editing your video production, you can save it as a video file so that you can conveniently upload and share your great editing work on social networking web sites, transfer and play on portable devices, stream to TV via home media servers or burn to a disc. Cyberlink PowerDirector allows you to export video in both 2D or 3D in various different file formats listed below.

Supported exported file formats by Cyberlink PowerDirector

Video Formats

2D Video: 3GPP2, AVI, MPEG-2, H.264 AVC, Windows Media Video (WMV), MPEG-4, QuickTime(MOV), Matroska (MKV), XAVC-S (MP4), H.265/HEVC (MP4/MKV/M2TS)
3D Video: Windows Media Video (WMV), MPEG-4, MPEG-2, H.264 AVC,QuickTime(MOV), Matroska (MKV)

Audio Formats

WMA, WAV, M4A

From above lists, we can see that the exported file formats by Cyberlink PowerDirector is limited to few container file formats or file codec. If you wish to export other popular video file formats such as MPEG-1, FLV, M4V, ASF, etc or audio file formats like MP3, AAC, AC3, AIFF, FLAC, MKA, etc, for YouTube sharing, iTunes playback or music players listening, then you will need the assistance of a third-party Cyberlink PowerDirector video converter.

Convert Cyberlink PowerDirector video to more digital formats

Export Cyberlink PowerDirector projector to digital video

Before converting Cyberlink PowerDirector projector to other digital file formats, you will first need to export Cyberlink PowerDirector projector to a digital video with the following steps:
1. In PowerDirector, navigate to the Produce Tab.
2. Select your preferred video format, and then select the Profile name/ Quality for the created video file.
3. Click the ellipsis button (marked in red) to set the output folder, i.e. where the created 2D video will be located.
4. Enter a file name and then click Save.
5. Click the start button to output your video production.

Then feel free to download Pavtube Video Converter, which can assist you to batch load multiple Cyberlink PowerDirector video and then convert any of your desired SD/HD/2K/SD file formats with the container file format of AVI/WMV/MP4/MOV/MKV/FLV/3GP/3GPP/3GPP2/ASF or codec like H.264, H.265, Xvid, Divx, DV, Apple Prores, MPEG-1, MPEG-2, MPEG-4, MPEG-TS, etc.

Besides the plain digital file formats, you can also use this program to convert Cyberlink PowerDirector video to hot devices and program preset profile formats or other editing program like Vegas Pro, Movie Studio Platinum, Premiere Pro, After Effects, Davinci Resolve, Avid Media Composer specially optimized editing codec.

Pavtube Video Converter is available on both Windows 10/8.1/8/7, it is also accompanied by an up-to-date Mac version - Pavtube Video Converter for Mac for macOS Sierra or macOS Sierra
The program is very easy to use, no matter experienced user or fresh could handle it very well. What's more, the results produced by the program are pretty high quality, you can't tell the difference between the converted video and the original Cyberlink PowerDirector video.

Get Pavtube Video Converter with 20% off discount, coupon codec: 45K2D47GJH

Step by Step to Cyberlink PowerDirector Video to MP4, MKV, MOV, AVI

Step 1: Load Cyberlink PowerDirector Video.

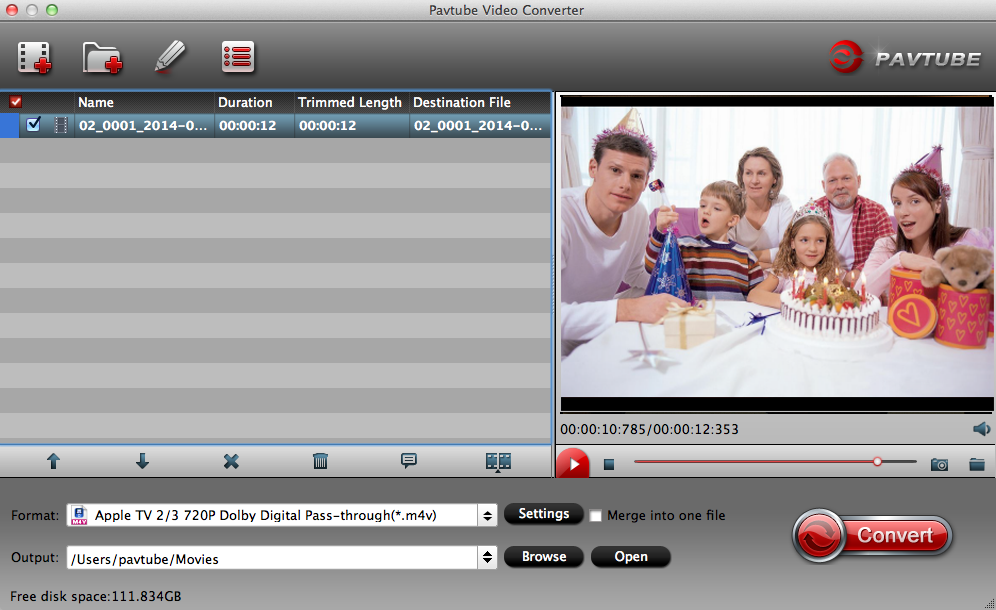
Download the free trial version of the program. Launch it on your computer. Click "File" menu and select "Add Video/Audio" or click the "Add Video" button on the top tool bar to import Cyberlink PowerDirector video into the program.

Load Cyberlink PowerDirector Video

Step 2: Define the output format.

Clicking the Format bar, from its drop-down list, select one of your desired digital file format or devices and program preset profile formats that can't be exported from Cyberlink PowerDirector.
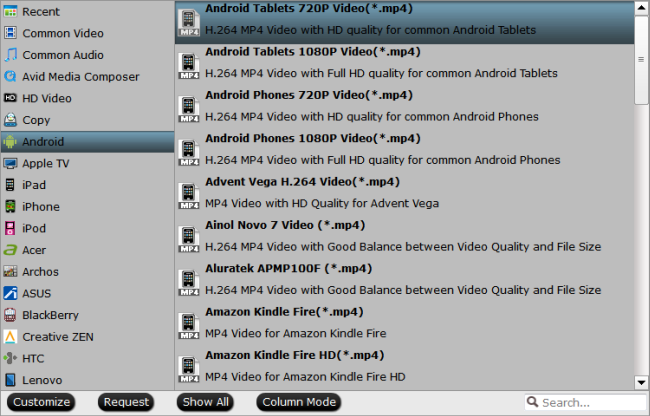
Output Android tablet preset profile format

Step 3: Start the conversion process.

Clicking the Convert button on main interface to pop out a PowerDirect video to MP4, AVI, MOV Conversion window with conversion information such as Time elapsed, Time left, Generated size, and Estimated size.

After the conversion, you can click "Open output folder" to popup output directory with the converted files. Then feel free to play, share and edit the PowerDirector video as you like.

Wednesday, June 7, 2017

Free Convert MP4 to WAV on Windows 10/8.1/8/7

MP4 is the most popular video file formats that has widely compatibility with various media player apps, portable devices, game consoles, TVs, etc. While WAV is a Waveform Audio file format that's mainly used on Windows computer. Sometimes, you may come the need to extract a WAV file from MP4 file for viewing on Windows Media Player, VLC, iTunes, QuickTime, etc. The following article will show you a free workaroud to convert MP4 to WAV.

Free convert MP4 to WAV with Pavtube Free DVDAid

Although there are many free online video sites that can assist you to get the job completed. However, you may find them almost all of them have the file size uploading limitation, in addition, the slow uploading and downloading speed will run out of your patience. What's more, some may even fail to upload your MP4 files if is encoded with some uncommon codec. If you are looking for a free, powerful yet fast program with no file size importing limitation, then we highly recommend Pavtube Free Video DVD Converter Ultimate to you.

The program has full support for MP4 files with various different video and audio codec, you can easily and efficiently extract WAV from all MP4 files with perfect quality. Besides WAV, you can also save MP4 files to other audio file formats such as MP3, WMA, AAC, AC3, M4A, OGG, AIFF, FLAC, MKA according to your own needs.

Trim/Merge output WAV audio

If you don't want to extract the whole audio out from mp4 video, you can use the trim function to cut off unwanted audio clips. The "Merge" function can assist you to combine separate WAV audio clips into one single file.

How to Free Convert MP4 to WAV with Pavtube Free DVDAid?

Step 1: Load MP4 video.

Download the free trial version of the program. Launch it on your computer. Click "File" menu and select "Add Video/Audio" or click the "Add Video" button on the top tool bar to import source MP4 video files into the program.

Load MP4 video

Tips: If you want to batch load multiple files, make sure to store all your files in the same folder, then click "File" > "Add from folder" or press the "Add from Folder" button on the top tool bar to batch importing them into the program.

Step 2: Define the output format.

Clicking the Format bar, from its drop-down list, you can output "WAV - Waveform Audio(*.wav)" under "Common Audio" main category.

Define the output format

Step 3: Trim or merge output audio files.

Trim off unwanted audio clips

In the video editor window, choose the "Trim" tab and this tab is selected by default when the editing window appears. You can use the trim function to cut off unwanted parts from start and end. You can either drag pointers on the process bar or set exact time point in Start and End boxes to set to leave only your wanted audio parts.

Merge audio files

By ticking off "Merge into one file" option behind "Settings" button, you can merge the ticked audio files in list into one single file.

Step 4: Begin the conversion process.

After all setting is completed, hit the "Convert" button at the right bottom of the main interface to begin the conversion process from MP4 to WAV.

When the conversion is finished, click "Open Output Folder" icon on the main interface to open the folder with generated files. Then feel free to play the extracted WAV files from MP4 on Windows Media Player, VLC, iTunes, QuickTime, etc.

Wednesday, May 31, 2017

Downscale Canon 5D Mark IV 4K to 1080p on Mac

The Canon 5D Mark IV supports DCI 4K (4096 x 2160) resolution recording at up to 30 fps at 500 Mbps with M-JPEG compression codec. Although 4K video offers higher resolution, more details and better quality than 1080p video, however, sometimes, we may even have the needs to compress Canon 5D Mark IV 4K to 1080p if we wish to transfer and play the 4K footage on smartphone, tablets, HD TVs or have some workflow of the 4K video with some non-4k capable video editing software or some 4K-capable editing software on a slow computer. The following article will show you how to compress 5D Mark IV to 1080p with a specific 4K video compressor software.

Best tool to compress 5D Mark IV to 1080p

If you are looking for a powerful yet simple to use program to downscale Canon 5D Mark IV to 1080p on Mac, we highly recommend Pavtube Video Converter for Mac to you. The program has perfect input support for the M-JPEG 4K video recorded with Canon 5D Mark IV or other 4K format and codec like 4K Prores, 4K H.264, 4K H.265 or 4K AVI/WMV/MP4/MOV/MKV/MXF/XAVC/XAVC S, etc. The program supports batch conversion mode, so that you can batch load multiple M-JPEG 4K video into the program to save your precious time.

As for the core compression function, you can use the program to compress Canon 5D Mark IV 4K M-JPEG to 1080p or 720p in various different file formats including H.264 HD MP4, H.264 HD MOV, H.265 HD MP4, MPEG-4 HD MP4, MPEG-2 HD, MPEG-TS HD, MKV HD, WMV HD, Divx HD, AVI HD and BDAV HD for smoothly playing and viewing on computer, smartphones, tablets, HDTVs, etc.

Apart from that, if you plan to load the Canon 5D Mark IV 4K video into professional video editing software like iMovie, Final Cut Pro 7/X, Avid Media Composer, Davinci Resolve or Premiere Pro installed on slow Mac computer, you can use our program to beneficially output video editing software specially optimized file formats with 1080p resolution or 720p resolution for high performance editing workflow.

For Windows users, you can download Pavtube Video Converter to compress 5D Mark IV 4K to 1080p on Windows 10/8.1/8/7 with best output quality.

Split/Trim/Crop Canon 5D Mark IV

If you wish to compress Canon 5D Mark IV to small file size with no quality loss, you can use the program's built-in trimming function to cut off unwanted parts or segments, split large 4K video into small parts by file size, count or length or crop the 4K video to remove the unwanted black bars or areas from the 4K video.

How to Compress Canon 5D Mark IV 4K to 1080p on Mac?

Step 1: Load Canon 5D Mark IV 4K video.

Download the free trial version of the program. Launch it on your computer. Click "File" menu and select "Add Video/Audio" or click the "Add Video" button on the top tool bar to import Canon 5D Mark IV 4K video into the program.

Load Canon 5D Mark IV 4K video

Step 2: Choose output file format.

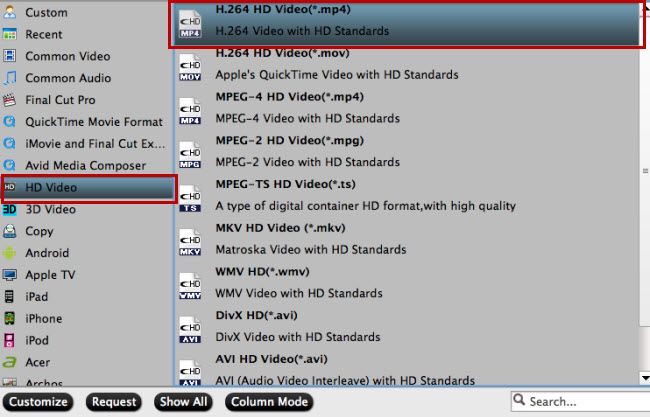
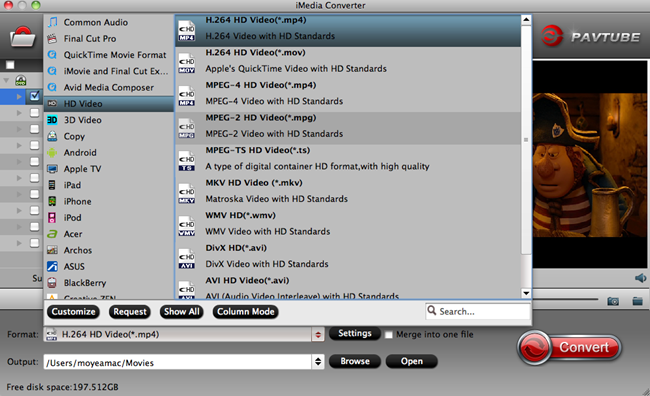
To compress 5D Mark IV 4K to 1080p, it would be ideal for you to choose one of your desired HD file format under "HD Video" main category.

 Compress 4K to HD file formats

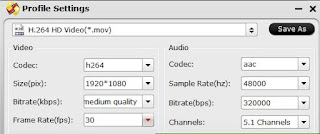
Tips: Click "Settings" on the main interface to open the "Profile Settings" window, to compress 4K to 1080p, make sure to change the output file resolution as "1920*1080" or "1080*720" from "Size(pix)" drop-down list. You can also do other tweaking according to your own needs.

Step 3: Trim/Split/Crop Canon 5D Mark IV video.

Trim video length

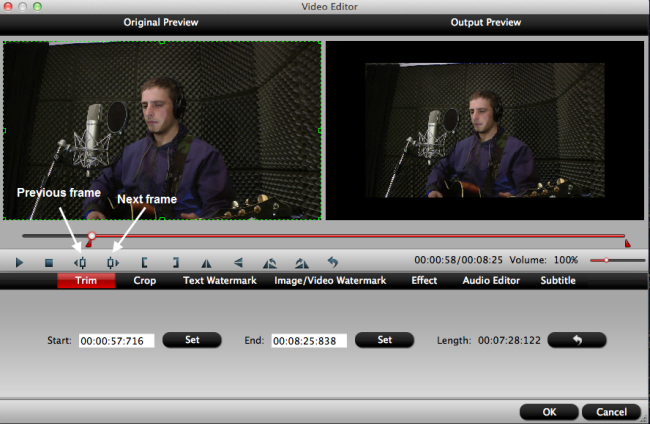
In the video editor window, choose the "Trim" tab and this tab is selected by default when the editing window appears. You can use the trim function to cut off unwanted parts from start and end. You can either drag pointers on the process bar or set exact time point in Start and End boxes to set.

Trim video length

Split large video

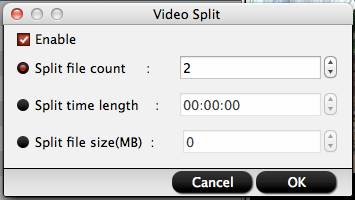
Click the split button on the file list to launch the Video Split window. Ticking "Enable" option, you can split the file by file count, time length, or file size.

Split large video

Crop video area

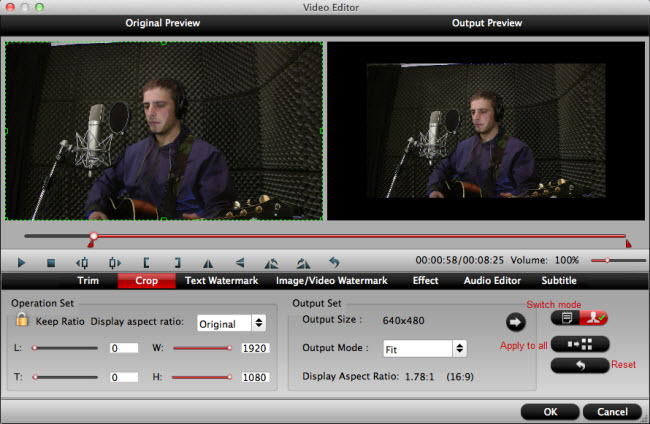
The "Crop" facility enables users to get rid of the black edges and unwanted area of the image. In the video editor window, navigate to the "Crop" tab. Follow the below methods to crop selected video:
A: Crop video by dragging and dropping the crop frame. Simply move your mouse cursor to drag and adjust the green frame to desired position.
B: Crop video by setting values. There are "Simple Mode" and "Advanced Mode" under Crop feature.

Crop video area

Step 4: Begin the conversion process.

After all setting is completed, hit the "Convert" button at the right bottom of the main interface to begin the compression or downscaling process from Canon 5D Mark IV to 1080p or 720p resolution with your desired HD file formats.

When the conversion is finished, click "Open Output Folder" icon on the main interface to open the folder with generated files. Then you can smoothly view, play the compressed files on Mac with video players, transfer to iPhone, iPad, stream to HD TV or load into Mac editing program like iMovie, Premiere Pro, Final Cut Pro X, Davinci Resolve, Avid Media Composer, etc.

Downscale Canon 5D Mark IV 4K to 1080p on Mac

The Canon 5D Mark IV supports DCI 4K (4096 x 2160) resolution recording at up to 30 fps at 500 Mbps with M-JPEG compression codec. Although 4K video offers higher resolution, more details and better quality than 1080p video, however, sometimes, we may even have the needs to compress Canon 5D Mark IV 4K to 1080p if we wish to transfer and play the 4K footage on smartphone, tablets, HD TVs or have some workflow of the 4K video with some non-4k capable video editing software or some 4K-capable editing software on a slow computer. The following article will show you how to compress 5D Mark IV to 1080p with a specific 4K video compressor software.

Best tool to compress 5D Mark IV to 1080p

If you are looking for a powerful yet simple to use program to downscale Canon 5D Mark IV to 1080p on Mac, we highly recommend Pavtube Video Converter for Mac to you. The program has perfect input support for the M-JPEG 4K video recorded with Canon 5D Mark IV or other 4K format and codec like 4K Prores, 4K H.264, 4K H.265 or 4K AVI/WMV/MP4/MOV/MKV/MXF/XAVC/XAVC S, etc. The program supports batch conversion mode, so that you can batch load multiple M-JPEG 4K video into the program to save your precious time.

As for the core compression function, you can use the program to compress Canon 5D Mark IV 4K M-JPEG to 1080p or 720p in various different file formats including H.264 HD MP4, H.264 HD MOV, H.265 HD MP4, MPEG-4 HD MP4, MPEG-2 HD, MPEG-TS HD, MKV HD, WMV HD, Divx HD, AVI HD and BDAV HD for smoothly playing and viewing on computer, smartphones, tablets, HDTVs, etc.

Apart from that, if you plan to load the Canon 5D Mark IV 4K video into professional video editing software like iMovie, Final Cut Pro 7/X, Avid Media Composer, Davinci Resolve or Premiere Pro installed on slow Mac computer, you can use our program to beneficially output video editing software specially optimized file formats with 1080p resolution or 720p resolution for high performance editing workflow.

For Windows users, you can download Pavtube Video Converter to compress 5D Mark IV 4K to 1080p on Windows 10/8.1/8/7 with best output quality.

Split/Trim/Crop Canon 5D Mark IV

If you wish to compress Canon 5D Mark IV to small file size with no quality loss, you can use the program's built-in trimming function to cut off unwanted parts or segments, split large 4K video into small parts by file size, count or length or crop the 4K video to remove the unwanted black bars or areas from the 4K video.

How to Compress Canon 5D Mark IV 4K to 1080p on Mac?

Step 1: Load Canon 5D Mark IV 4K video.

Download the free trial version of the program. Launch it on your computer. Click "File" menu and select "Add Video/Audio" or click the "Add Video" button on the top tool bar to import Canon 5D Mark IV 4K video into the program.

Load Canon 5D Mark IV 4K video

Step 2: Choose output file format.

To compress 5D Mark IV 4K to 1080p, it would be ideal for you to choose one of your desired HD file format under "HD Video" main category.

Compress 4K to HD file formats

Tips: Click "Settings" on the main interface to open the "Profile Settings" window, to compress 4K to 1080p, make sure to change the output file resolution as "1920*1080" or "1080*720" from "Size(pix)" drop-down list. You can also do other tweaking according to your own needs.

Step 3: Trim/Split/Crop Canon 5D Mark IV video.

Trim video length

In the video editor window, choose the "Trim" tab and this tab is selected by default when the editing window appears. You can use the trim function to cut off unwanted parts from start and end. You can either drag pointers on the process bar or set exact time point in Start and End boxes to set.

Trim video length

Split large video

Click the split button on the file list to launch the Video Split window. Ticking "Enable" option, you can split the file by file count, time length, or file size.

Split large video

Crop video area

The "Crop" facility enables users to get rid of the black edges and unwanted area of the image. In the video editor window, navigate to the "Crop" tab. Follow the below methods to crop selected video:
A: Crop video by dragging and dropping the crop frame. Simply move your mouse cursor to drag and adjust the green frame to desired position.
B: Crop video by setting values. There are "Simple Mode" and "Advanced Mode" under Crop feature.

Crop video area

Step 4: Begin the conversion process.

After all setting is completed, hit the "Convert" button at the right bottom of the main interface to begin the compression or downscaling process from Canon 5D Mark IV to 1080p or 720p resolution with your desired HD file formats.

When the conversion is finished, click "Open Output Folder" icon on the main interface to open the folder with generated files. Then you can smoothly view, play the compressed files on Mac with video players, transfer to iPhone, iPad, stream to HD TV or load into Mac editin

Wednesday, May 24, 2017

Edit Gameplay videos on PC (WMM, Vegas, Premiere, Edius)

Gameplay is the specific way in which players interact with a game, and in particular with video games. Gameplay is the pattern defined through the game rules, connection between player and the game,challenges and overcoming them, plot and player's connection with it. If you want to edit Gameplay videos on Mac but don’t know what program you need to use, you are the in the right place. Here we share some top Gameplay video converter for Windows for you and share one solution for you.

Top Gameplay Video Editor for Windows

  • Windows Movie Maker
  • Sony Vegas Pro
  • Premiere Pro
  • Edius Pro

Get a Gameplay Video Converter for Smooth Editing, Playing.....

Generally you can import your Gameplay videos to Windows Movie Maker, Sony Vegas Pro, Premiere Pro, Edius Pro on Windows without problems. But sometimes you may find difficult to import and edit Gameplay video with editors on Windows. Because your video is not the best format for editing in thses editors. So in this case, you can prepare a video converter for editors.

Using Pavtube Video Converter Ultimate , After downloading it, you only need to load your video file and then choose the format for your edito, at last start the convertion. Besides, you can also use it to convert Gameplay video to any formats like MP4, MOV, MKV, AVI, MPEG, FLV, WMV, MP3 etc for your Samsung, Android, TV, Windows Media Player, PS3, PS4 and other devices for smooth playback without any issues. What’s more, if you have any requirements of ripping DVD, Blu-ray, ISO etc, you can also use this program to get that done. Becasue it also is a good DVD/Blu-ray ripper for Windows. If you want to convert Gameplay to other formats for editing in Windows Movie Maker and other editor, devices supported formats on Mac, you can free download the Mac version - Pavtube iMedia Converter for Mac. You can easily use this Mac version to convert your Gameplay video to iPhone, iPad, iTunes, Apple TV, QuickTime, iMovie, FCP X, Premiere, Avid, Resolve.. Supported best video format for editing, such as Apple ProRes for FCP, DNxHD for Avid MC and more.

Now free download the best video converter

Using Pavtube Video Converter to convert Gameplay video on Windows (10)

Step 1: Load Gameplay video files into the program

You can directly drag and drop the Gameplay video files with audio into the program or click "File" > "Add Video/Audio" or "Add from Folder" to load Gameplay video files into the program.

Step 2: Choose output file format

For editing Gameplay video with professional editing program, you can choose those program preset profile editing formats, for example, for editing with Windows Movie Maker, just output "HD Video" > "HD WMV", you can also choose other editing formats or codec according to the editing software you are using.

Tip: Trim/Merge/Split/Crop Gameplay video

To activate the "Edit" menu, you have to select an item first. When a video file is selected, you can click the "Edit" icon on the tool bar of main interface to edit selected file.

Step 3. Click the "Convert" button on the main interface and the software will start to convert  Gameplay videos to your desire video formats immediately. When the conversion finishes, click "Open" to find the converted video files. Then you can effortless transfer the video files to NLEs  for easy editing. Have a try!

Thursday, May 18, 2017

How to Convert and Edit Screenium 3 4K recording on Mac?

Screenium is a software program that is used to do a screen capture of a page. It creates a “what you see is what you get” type of copying process so you can have a picture of everything that is on the computer screen. Now you can record 4K videos by Screenium 3. But after recording 4K videos by Screenium 3, you may need to handle your 4K videos. Because there are some minimum system requirements for PC and Mac for 4K edit/playback based on processor and graphics chip manufacturer's websites.

Integrated Graphics solutions that support 4K external displays (8GB RAM recommended with integrated graphics solutions):

4th generation Intel® Core™ processor family (Intel Haswell based CPUs) - (Intel® Iris™ Pro Graphics 5200 / Intel® Iris™ Graphics 5100, Intel® HD Graphics 5000 / 4600 / 4400 / 4200)
AMD A10-7800 APU
Discrete Graphics cards that support 4K external displays:

Nvidia GeForce
GeForce® GTX™ 970
GeForce® GTX™ 980
GeForce® GTX™ TITAN Z
GeForce® GTX™ TITAN Black
GeForce® GTX™ TITAN
GeForce® GTX™ 780 & 780 Ti
GeForce® GTX™ 770
GeForce® GTX™ 760 & 760 Ti
GeForce® GTX™ 750 & 750 Ti
GeForce® GTX™ 690, 680, 670, 660, 660 Ti, 650, 650 Ti BOOST, 650 Ti
AMD Radeon™ HD 7000 Series or better

So if your Screenium 3 4K videos can’t meet the above requirements, you can’t play, edit Screenium 3 4K videos on Mac smoothly. Then how to handle with “can’t play Screenium 3 4K videos on Mac” Any way to solve that? In fact, what you need to do is find a 4K video compressor to downscale Screenium 3 4K video to HD 1080p video for nice playback with player, portable devices, smooth editing in NLEs like iMovie, Avid MC, Davinci Resolve, FCP X and more.

What is the best Program for Compressing Screenium 3 4K to 1080p

To convert and reduce Screenium 3 4K video to 1080P, you need a 4K video converter at the first place. Here according to the feedbacks of dozens of users, they unanimously recommend the award-winning 4K video compressor - Pavtube iMedia Converter for Mac. Why this video converter for 4K wins so many users' favor? That's because:

Pavtube iMedia Converter for Mac provides you with all the bells and whistles you are looking for in a 4K video converter program. See, it can perform well as a video converter to convert 4K to 1080P video, 4K to HD 720P video, 1080P to 720P, 1080p to 4K video with 98% quality reserved with world's fastest speed. And besides, this converter for Mac also can convert your Screenium 3 4K video to other video formats like MP4, MOV, MKV, MPEG, FLV, WMV, H.265 MP4, H.265 MKV, M3U8 and 160+ formats as you have any needs. What’s more, you can also use this program to edit your 4K video with popular video editing functions like split, merge, trim, crop, add watermark, adjust video effect, edit audio and insert subtitles. Windows user can get Pavtube Video Converter Ultimate to start the Screenium 3 4K to 1080pconversion on Windows (10).

Free download the Screenium 3 4K video compressor for Mac

How to Downscale Screenium 3 4K video to 1080p on Mac?

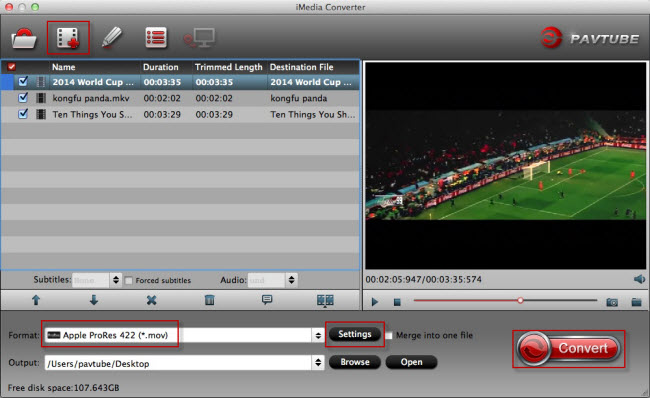
Step 1. Click "Add video" button to add your Screenium 3 4K video files to the program. Or directly drag the video you want to convert to the left item bar.

load 4K video

Step 2. Click "Format" bar, and select .mp4, .mov, .mkv etc from "Common video", "HD video" etc or directly choose the format from “ Final Cut Pro”, “QuickTime”, “iPhone”, “iPad”, “Apple TV” and more according to your needs.

HD MP4

Step 3. Edit your video

By clicking "Edit selected task" button, you can trim, crop the video, or add watermark, adjust effect, attaching subtitles for pre-editing your video file.
Trim - Choose to reserve the part you need. Just choose the chapter which you need to trim, to set "start time" or "end time", type the portion which you want to save.
Crop - Remove black edges of your video or just get the scale of this video you want.
Effect - Adjust the effects by adjusting the parameters.

Step 4. Start the conversion

Click the "Convert" button on the main interface and the software will start to convert Screenium 3 4K video to your desire video formats immediately. When the conversion finishes, click "Open" to find the converted video files. Then you can effortless transfer the video files to your any devices, players, PS4, PS3, Xbox, projector, NLEs for playback and editing with ease.

Thursday, May 11, 2017

Pavtube Video Converter Ultimate 50% OFF on 2017 Mother’s Day

Have ideals celebrating the coming Mother’s Day with your Mum? You can rip your DVD, Blu-ray and convert any videos, movies to any formats for playing on TV, portable devices etc with your mother. That’s great. Pavtube Video Converter Ultimate, the industry leader in the field of DVD, Blu-ray and video backup solutions, today kicks off its Mother’s Day Promotion, offering the bigest 50% discounts. You can also get the Pavtube Video Converter Ultimate 50% OFF on 2017 Mother’s Day from Pavtubes facebook website.

Save 50 percent off on Pavtube Video Converter Ultimate for DVD/Blu-ray/Video Conversions

Part 1. What is Pavtube Video Converter Ultimate?

Pavtube Video Converter Ultimate

Pavtube Video Converter Ultimate is a popular video conveter, DVD ripper, Blu-ray ripper. It can convert videos, rip DVD to formats, rip Blu-ray to formats on Windows. It is a popular product from Pavtube Studio. You can free download it and buy it with only $32.5 on 2017 Mother’s Day promotion.

Part 2. What Pavtube Video Converter Ultimate Can Help Us?

1. Convert to Various Format Files
Input for more than 200+ format videos Converting a variety of media formats including AVI, WMV, MP4, MOV, FLV, MPEG, 3GP, VOB, Xvid to your desired format files.
Convert HD videos and 4K videos Perfectly convert HD Video including Tivo, MXF, MTS, etc and even 4K video and 4K source files to various common video formats.
Perfectly support for H.265 video Encode video with H.265/HEVC codec, then you can stream media files in perfect quality with small file size and less bandwidth.
Convert DVD Blu-ray to any formats Pavtube Video Converter Ultimate also can rip your DVDs, Blu-rays to any formats like MP4, MOV, MKV, MPEG etc.

2. Enjoy Media Files Anywhere Anytime

Output videos for all popular devices: optimized file for all your desired devices including iPad, iPhone, Android, Xbox, PSP, PS3, Nexus, Kindle Fire, etc.

3. Make 3D Movies for Grand Visual Experience

Convert 2D/3D resources to 3D movies in 3D MKV, 3D MP4, 3D MOV, 3D WMV and 3D AVI format to watch on 3D devices with Side by Side, Red/Blue and Top/Bottom 3D effects.

4. Enhance and personalize your media files

Professional editing functions are provided to you: split, merge, trim, crop, add watermark, adjust video effect, edit audio and insert subtitles.

5. Customize video and audio parameters

Change output video codec, size, frame rate, bitrate and audio codec, sample rate, bitrates and channels for better display quality.

6. Super faster conversion speed

Do not want to wait an eternity to convert a single clip? Pavtube Video Converter Ultimate surpasses other tradition video conversion application with 6x faster conversion speed. It is capable of accelerating the video encoding and decoding speed with the advanced NVIDIA CUDA technology and AMD Accelerated Parallel Processing (APP). Now it has Improve H.265, H.264 Encoding Speed With NVIDIA GPU Acceleration. Just save your precious time and energy for most important and amusing things in life.

Note:

For Mac user, please get its Mac version - Pavtube iMedia Converter for Mac to convert video/DVD/Blu-ray on Mac (macOS Sierra, El Capitan Yosemite, Mavericks, Lion included). You can free download it or buy it with only $32.5.

2017 Mother's Day Pavtube Other Products Big Promotion

A. 50% ~ 55% Discount Products

Windows Products Mac products
Pavtube ByteCopy
Pavtube BDMagic
Pavtube DVDAid
Pavtube Media Magician
Pavtube ByteCopy for Mac
Pavtube BDMagic for Mac
Pavtube DVDAid for Mac
Pavtube Media Magician for Mac

B. Only $9.9 Crazy Promotion Products

Windows Products Mac Products
DVD Creator
Video Converter
MXF Converter
MKV Converter
MTS/M2TS Converter
HD Video Converter
MXF MultiMixer
FLV/F4V Converter
DVD Creator for Mac
Video Converter for Mac
MXF Converter for Mac
MKV Converter for Mac
MTS/M2TS Converter for Mac
HD Video Converter for Mac
iMixMXF for Mac
FLV/F4V Converter for Mac

OK, I guess you will master this fast. And get started to give your motherr a big surprise on Mother’s Day 2017. And wish you a happy time!!!

Source: http://i-freepedia.com/pavtube-video-converter-ultimate-mothers-day-deals/