Wednesday, January 10, 2018

Play M2TS on DVD Player

The M2TS files are generally used with Sony formats and hardware, particularly Blu-ray Disc and AVCHD. The M2TS files can be played with many desktop software players such as VLC, SMPlayer, 5KPlayer or hardware Blu-ray players or game consoles Sony PlayStation 3/4/Pro. For those standard DVD owners, you may be disappointed to find that you can't get M2TS files played on DVD Player or DVD Player connected TV. The following article will share you 2 workable ways to fix this issue.

Solution 1: Convert M2TS to DVD Player supported digital file formats
Solution 2: Burn M2TS to DVD disc for DVD Player viewing

Solution 1: Convert M2TS to DVD Player supported digital formats

Today, most high-end DVD Player models features USB inputs that can be used to house USB flash drives filled with movies. You can then access the files through your DVD player's main menu and watch them on your TV screen. First, look in the instruction manual for your DVD player to see what types of video files it supports. DVD players won't just support any file format--most support .MKV or .AVI files, among a few other popular formats. Be sure to look in the "Technical Specifications" listing in your DVD player's instruction manual to see what formats it will support before potentially wasting your time.

Obviously, M2TS is not the supported file format by DVD Player. The good news is that you can use a third-party M2TS Converter such as Pavtube Video Converter (get Mac version) to easily transcode M2TS to DVD Player most compatible MPEG-2 file format.

Simple steps to convert M2TS to DVD Player MPEG-2 format

Step 1: Load M2TS files into the application.
Step 2: Output DVD Player most compatible MPEG-2 format.
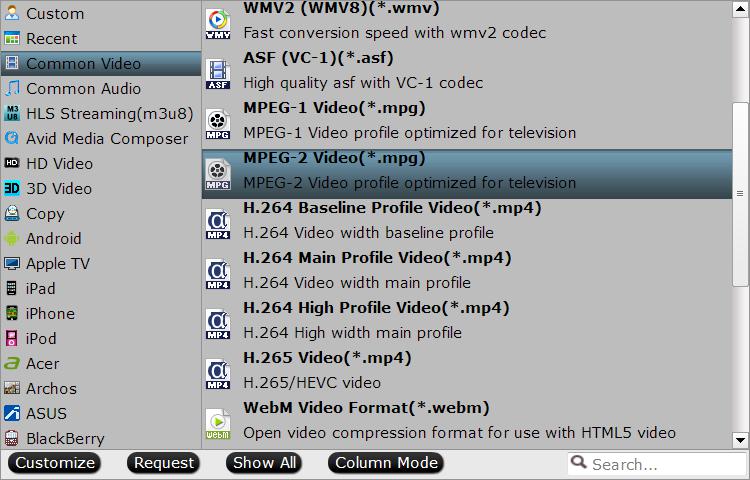
Output DVD Player best supported MPEG-2 format

Step 3: Begin the conversion by hitting right-bottom convert button.

After the conversion, you can then following the steps below to play converted M2TS files on DVD Player.

Step 1: Put your USB flash drive into a USB port on your computer.
Step 2: Open your USB flash drive by clicking on "My Computer" and then clicking on the icon for your flash drive.
Step 3: Drag the appropriately formatted video files into this window. They will now be transferred to your USB flash drive.
Step 4: Remove the USB flash drive from your computer.
Step 5: Put your USB flash drive into an open USB port on your DVD player.
Step 6: Use your DVD player's remote control to navigate to the "USB Flash Drive" menu. Select the file you want to play from the list by highlighting it and pressing the "Enter" or "Play" buttons on the remote. The file will now play on your TV screen.

Solution 2: Burn M2TS to DVD disc for DVD Player viewing

Although there are many DVD disc burning software on the market, however, if you are looking for a simple to use application that can assist you to directly burn DVD disc from M2TS files, we highly recommend Pavtube DVD Creator (get Mac version) to you. The program not only assists you to burn M2TS files to DVD disc but also offers beneficial DVD menu editing features for you to change DVD menu template/style, menu text, display aspect ratio and background, you can also set chapter marker and playback mode.

Apart from M2TS files, you can also use this powerful DVD authoring tool to create DVD disc from other types of digital file formats such as AVI, WMV, MP4, MOV, MKV, Tivo, etc.

Step by Step to Burn M2TS Files to DVD Disc

Step 1: Insert a blank DVD disc into your computer optical drive.

Insert a blank DVD-R (DVD+R, DVD+RW, DVD-RW) into the DVD-ROM drive of your computer.

Step 2: Add M2TS video into the program.

Run the DVD Creator software, import M2TS files into it for burning DVD disc project.

Add M2TS video

Step 3: Customize DVD menu.

Switch to the menu pane, double click a DVD menu beneath the Menu Template to apply it to your DVD. You can customize the background video/image, background music, text, title thumbnail and more for your DVD menu. You can also choose the DVD quality at the bottom of the software, higher quality requires bigger DVD disc volume.
Customize DVD menu

Step 4: Start M2TS video to DVD disc burning process.

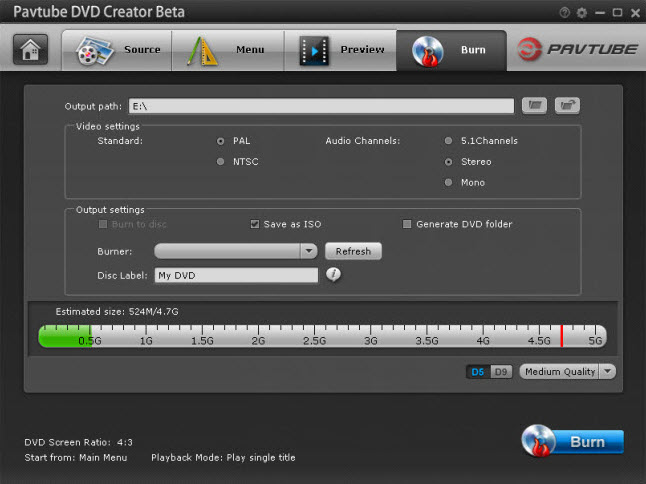
Click the "Burn" button to start burning Halloween videos to DVD. You can burn M2TS video to DVD disc, save as ISO file or Generate to DVD Folder.

Burn M2TS files to DVD disc

Tuesday, January 2, 2018

Edit Mavic Pro Platinum 4K Video with Davinci Resolve

DJI's new drone - Mavic Pro Platinum, which is released back in August of this year, comes with a set of redesigned rotor blades that the company claims make the unit 60 percent quieter than the previous model - DJI Mavic Pro. What different change is the video recording capability, the new DJI Mavic Pro Platinum also enables you to shot both DCI (4096x2160) and UHD 4K (3840x2160) wrapper in either MOV or MP4 container with MPEG-4 AVC/H.264 compression codec. After the shooting stage, if you are looking for a great tool for editing, color correction and professional audio post production all in a single application, Davinci Resolve can be best choice. What really matters is how to get the best workflow of Mavic Pro Platinum Pro 4K with Davinci Resolve.

Work Mavic Pro Platimum 4K H.264 native with Davinci Resolve

From Davinci Resolve supported file formats, we can see that this professional non-linear editing software has perfect compatibility with various file types and formats. H.264 is also included. However, although H.264 is a good delivery file format, it is not a good editing format. The main reason is that H.264 is an 8-bit video format. If you edit it natively, you start to lose image quality as you do color correction or composite gradients to create greenscreen keys. There just isn't a lot of room to work. Transcoding to a higher bit-rate format solves these image quality issues.

Related article: Play DJI Phantom 4K on VLC | Compress Mavic Pro 4K to 1080p | Upload DJI Phantom Video to YouTube

Best editing workflow of Mavic Pro 4K with Davinci Resolve

Prores files are larger, but they render faster and have more room, so you can create great looking effects without losing any quality when working with Davinci Resolve. Here, you can easily transcode Mavic Pro 4K Platinum 4K to Apple Prores codec with best our best Prores Converter - Pavtube Video Converter for Mac. The program has perfect importing support for the DJI Mavic Pro 4K H.264 MP4/MOV video. Thanks to its batch conversion mode, you can load multiple video into the application for conversion at one time.

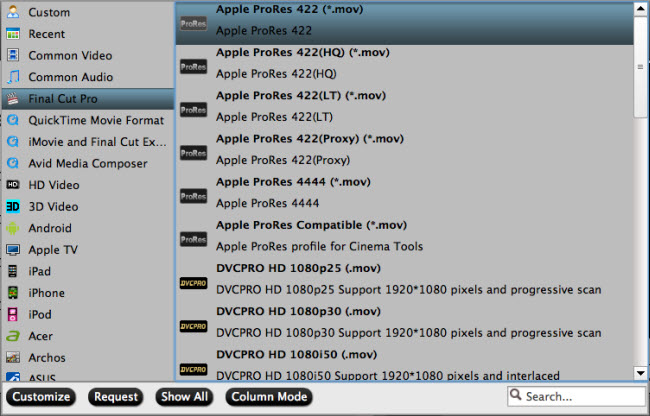
The program can assist you to convert Mavic Pro 4K video into Davinci Resolve most favorable color correction editing codec - Apple Prores in different types. If your Mac computer are powerful enough and you wish to apply more effects editing, just choose the "Apple Prores 422" or "Apple Prores 422 HQ" format. If your computer lacks the ability to handle 4K resolution video, you just want to do some rough editing or offline editing, "Apple Prores 422 Proxy" or "Apple Prores LT" can better satisfy your great demand.

For Windows users, you can also download and install Pavtube Video Converter to export Apple Prores codec from Mavic Pro Platinum 4K on Windows 10/8.1/8/7.

Step by Step to Transcode and Edit DJI Mavic Pro Platinum 4K with Davinci Resolve

Step 1: Input DJI Mavic Pro Platinum 4K video.

Download the free trial version of the program. Launch it on your computer. Click "File" menu and select "Add Video/Audio" or click the "Add Video" button on the top tool bar to import source DJI Mavic Pro Platinum 4K video into the program.

Load DJI Mavic Pro Platinum 4K video

Step 2: Define the output format.

Clicking the Format bar, from its drop-down list, select Davinci Resolve most favorable color editing codec "Apple Prores 422(*.mov)" as the output file format.

Output Davinci Resolve favorable Prores format

Tips: If your computer is slow to handle 4K resolution video, just output a smaller file resolution "Apple Prores 422 (Proxy) (*.mov)" for smooth editing workflow.

Output Prores 422 Proxy format

Step 3: Edit DJI Mavic Pro Platinum 4K video.

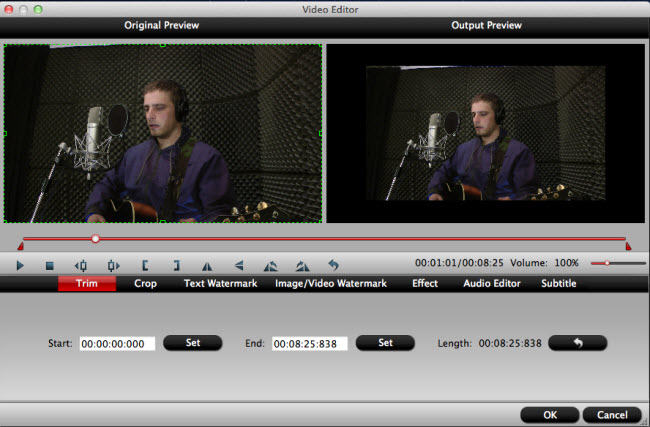
On the top tool bar on the main interface, click the pencil like icon to open "Video Editor" window, you can trim Blu-ray movies to remove the unwanted parts by setting the start and end time, crop to remove the black borders or unwanted area by dragging the dash line around the video frame, flip video, add text/image/video watermark, change video picture effect, replace/remove audio in video, add external subtitles, etc.

Edit Mavic Pro Platinum 4K video

Step 4: Begin the conversion process.

After all setting is completed, hit the "Convert" button at the right bottom of the main interface to begin the conversion process from Mavic Pro Platinum 4K to Davinci Resolve most preferable Apple Prores editing format.

When the conversion is finished, click "Open Output Folder" icon on the main interface to open the folder with generated files. Then feel free to load the compatible Mavic Pro Platinum 4K video into Davinci Resolve professional post editing workflow.

Wednesday, December 27, 2017

Import Canon Vixia HF G21 AVCHD/MP4 to iMovie

The VIXIA HF G21 from Canon offers Full HD 1080p60 recording in both MP4 and AVCHD file formats, with maximum bit rates of 35 Mbps in MP4, and 28 Mbps in AVCHD. For Mac users who wish to turn your Canon Vixia HF G21 footage into stunning movies or trailers, iMovie can be your best choices. How about the native workflow of Canon Vixia HF G21 AVCHD/MP4 with iMovie?

Can iMovie direct import Vixia HF G21 AVCHD/MP4 format?

From iMovie supported file formats, we can see that both AVCHD and MP4 are included in iMovie editable file formats list. However, the 60p AVCHD MTS file is not an acceptable file format by iMovie. Although iMovie can native import 60p MP4. However, you won't get a high quality editing workflow since the MPEG-4 files is highly compressed.

Related article: Import XC10 MXF to iMovie | Convert XAVC MXF to iMovie | Edit 4K Video with iMovie

Best workflow of Vixia HF G21 AVCHD/MP4 with iMovie

To get the best workflow of Canon Vixia HF G21 AVCHD/MP4 with iMovie, it would be ideal for you to transcode Vixia HF G21 AVCHD/MP4 to iMovie most favorable high quality and high performance editing codec Apple Intermediate Codec - AIC. To generate AIC codec, you can download Pavtube Video Converter for Mac, which has perfect importing support for both the AVCHD and MP4 format shot with Canon Vixia HF G21. Thanks to its batch conversion mode, you can import multiple video into the application at one time to save your precious time.

The application can assist you to easily convert Canon Vixia HF G21 AVCHD/MP4 to iMovie AIC codec with best quality and super fast conversion speed. To get better output quality, you can flexibly adjust output profile parameters such as video codec, bit rate, frame rate, resolution and audio codec, bit rate, sample rate and channels, etc in the "Profile Settings" window offered by the application.

Pavtube Video Converter for Mac is available on macOS High Sierra, macOS Sierra, Mac OS X El Capitan, Mac OS X Yosemite and Mac OS X Mavericks, etc. It is very simple to use, no matter experienced user or fresh could handle it very well. What's more, it helps to produce high quality conversion results with better video/audio quality.

Step by Step to Transcode Canon Vixia HF G21 AVCHD/MP4 to AIC for iMovie Editing

Step 1: Import Canon Vixia HF G21 AVCHD/MP4 video.

Download the free trial version of the program. Launch it on your computer. Click "File" menu and select "Add Video/Audio" or click the "Add Video" button on the top tool bar to import Canon Vixia HF G21 AVCHD/MP4 video into the program.

Import Canon Vixia HF G21 AVCHD/MP4

Step 2: Choose output file format.

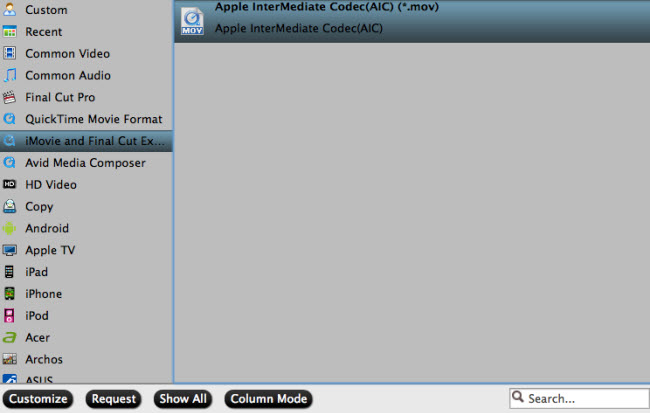
From "Format" drop-down option, choose iMovie best editing codec by selecting "iMovie and Final Cut Ex..." > "Apple Intermediate Codec (AIC)(*.mov).

Output iMovie best favorable AIC editing format

Step 3: Edit Canon Vixia HF G21 AVCHD/MP4 videos.

By default the Edit icon is grayed out. To activate the Edit menu, you have to select an item first. When a video or movie is selected, click the pencil like Edit icon on the left top tool bar to open the video editor window, here, you can play and preview the original video and output effects. Also you can flip or rotate video, trim, crop, add watermark, apply special effect, edit audio or insert external subtitle.

Edit Canon Vixia HF G21 AVCHD/MP4 video

Step 4: Start the conversion process.

After all the settings is over, go back to the main interface and hit right-bottom "Convert" button to start to convert Canon Vixia HF G21 AVCHD/MP4 to iMovie best compatible Apple Intermediate Codec editing format.

When the conversion is completed, launch iMovie on your Mac computer to import converted video to iMovie for smooth editing workflow on either fast or slow Mac computer.

Wednesday, December 20, 2017

Import Sony A7R III 4K XAVC S to iMovie

The Sony a7R Mark III is the company's latest high-resolution full frame mirrorless camera. Much like Nikon's recent D850, it's one that combines this resolution with high speed and fast autofocus capabilities to a degree we've not previously seen. The camera can record up to 100 Mbps UHD 4K video in XAVC S format within an MP4 wrapper at a frame rate of 23.98, 25 and 29.97fps. When the shooting is completed, for Mac users, if you are looking for a free and professional video editing software to edit the Sony A7R III 4K XAVC S footage, iMovie can be your best choice. The following article will show you how to get a smooth workflow of Sony A7R III 4K XAVC S with iMovie.

Can iMovie native import Sony A7R III 4K XAVC S video?

From iMovie supported file formats, we can see that iMovie lacks the ability to handle XAVC S footage. Therefore, you will need to perform a format transcoding process to edit A7R III 4K XAVC S with iMovie.

Transcode A7R III 4K XAVC S for iMovie editing

To get a high quality and high performance editing workflow of A7R III 4K XAVC S with iMovie, it would be much ideal for you to encode 4K XAVC S to iMovie most favorable Apple Intermediate Codec. It was used because it was less processor intensive as the compression scheme did not need the next frame to be displayed.

Looking for a simple to use application to get the job completed, we highly recommend Pavtube Video Converter for Mac to you. The program has perfect importing support for A7R III 4K XAVC S video into the application. Thanks to its batch conversion mode, you can load multiple A7R III 4K XAVC S video into the application at one time for conversion to save your precious time.

Edit A7R III 4K XAVC S

Before loading A7R III 4K XAVC S video into the iMovie, you can also complete some basic video editing work with the program's built-in editing options. You can trim unwanted video segments from the video, crop video to remove the black bars, add transparent text watermark, apply special rendering effects, insert external srt/ass/ssa subtitles, etc.

How to Import and Edit Sony A7R III 4K XAVC S with iMovie?

Step 1: Import Sony A7R III 4K XAVC S video.

Download the free trial version of the program. Launch it on your computer. Click "File" menu and select "Add Video/Audio" or click the "Add Video" button on the top tool bar to import Sony A7R III 4K XAVC S video into the program.

Import Sony A7R III 4K XAVC S video

Step 2: Choose output file format.

From "Format" drop-down option, choose iMovie best editing codec by selecting "iMovie and Final Cut Ex..." > "Apple Intermediate Codec (AIC)(*.mov).

Output iMovie supported editing codec

Step 3: Edit Sony A7R III 4K XAVC S videos.

By default the Edit icon is grayed out. To activate the Edit menu, you have to select an item first. When a video or movie is selected, click the pencil like Edit icon on the left top tool bar to open the video editor window, here, you can play and preview the original video and output effects. Also you can flip or rotate video, trim, crop, add watermark, apply special effect, edit audio or insert external subtitle.

Edit Sony A7R III 4K XAVC S videos

Step 4: Start the conversion process.

After all the settings is over, go back to the main interface and hit right-bottom "Convert" button to start to convert Sony A7R III 4K XAVC S to iMovie best compatible Apple Intermediate Codec editing format.

When the conversion is completed, launch iMovie on your Mac computer to import converted video to iMovie for smooth editing workflow on either fast or slow Mac computer.

Tuesday, December 12, 2017

Edit 4K Video with Pinnacle Studio 21/21 Plus/21 Ultimate

The newly released Pinnacle Studio 21/21 Plus/21 Ultimate offers powerful and creative video editing by applying special effects, adding titles and templates or also multi-track, HD, 3D and 4K video editing. Have some 4K footage shot with your 4K device recorders and also wish to load them Pinnacle Studio 21/21 Plus/21 Ultimate. How about the workflow of 4K video with Pinnacle Studio 21/21 Plus/21 Ultimate?

Media compatibility of Pinnacle Studio 21/21 Plus/21 Ultimate

To answer this question, we should be clear of what file formats can be played on Pinnacle Studio 21/21 Plus/21 Ultimate:

Pinnacle Studio 21 Version Standard Plus Ultimate
HEVC (H.265)**
Import
Import
Import and Export
Dolby Digital
2CH
5.1CH
5.1CH
XAVC S support
-
New

XAVC and DVCPRO HD decoding
-
-
4K Ultra HD video support
-
-
Import MXF files

Tips: HEVC (H.265) support requires supporting PC hardware or graphics card.

From above information, we can see that currently only Pinnacle Studio 21 Ultimate has editing support for 4K Ultra HD video. Neither Pinnacle Studio 21 Standard nor 21 Plus offers 4K video editing capability. Therefore, before importing 4K video to Pinnacle Studio 21 Standard/21 Plus, it is essential to compress 4K to 1080p.

Although the Pinnacle Studio 21 Ultimate provides 4K Ultra HD video editing function, however, it doesn't mean that you can import 4K video with any file formats into it. Currently, it only supports to handle 4K video with the format of XAVC S, MXF, H.265/HEVC, etc. Therefore, if you try to load other 4K video such as 4K AVI, 4K WMV, 4K MOV, 4K MKV, 4K TS, 4K H.264, 4K Prores, etc, you will fail to add them to Pinnacle Studio 21 Ultimate. When in that condition, you will need to perform a format or codec transcoding process.

Related article: Import MTS to Pinnacle Studio | Pinnacle Studio Supported Formats | Import MP4 to Pinnacle Studio

Best tool to transcode and compress 4K Video for Pinnacle Studio editing

For those people who are looking for a comprehensive solution to fix Pinnacle Studio 21 4K video editing issues, we highly recommend Pavtube Video Converter to you. The program has full importing support for all 4K video wrapped with different container file formats such as AVI, WMV, MP4, MOV, MKV, TS, XAVC, XAVC S, MXF and compression codec such as H.264, H.265 and Prores.

Here, you can not only transcode unsupported 4K video to Pinnacle Studio 21 Ultimate editable 4K file formats such as 4K H.265/HEVC, but also downscale 4K video to Pinnacle Studio 21 Standard/21 Plus compatible HD AVI/WMV/MPEG-1/MPEG-2/MPEG-4, etc.

Edit 4K video with built-in editing functions

Before loading 4K video into Pinnacle Studio 21 Standard/21 Plus/21 Ultimate, you can first complete some simple video editing task with the built-in editing options offered by the application. You can trim or cut video to remove unwanted parts or segments from the beginning or end, crop video to remove the black edges, apply special rendering effect, change video picture effect, add video/image/transparent text watermark, insert external subtitle, etc.

For Mac users, you can switch to download Pavtube Video Converter for Mac to complete the format and codec transcoding and compression process on macOS High Sierra, macOS Sierra, Mac OS X El Capitan, Mac OS X Yosemite, Mac OS X Mavericks, etc.

How to Transcode and Compress 4K Video for Pinnacle Studio 21/21 Plus/21 Ultimate Editing?

Step 1: Load 4K video files into the program.

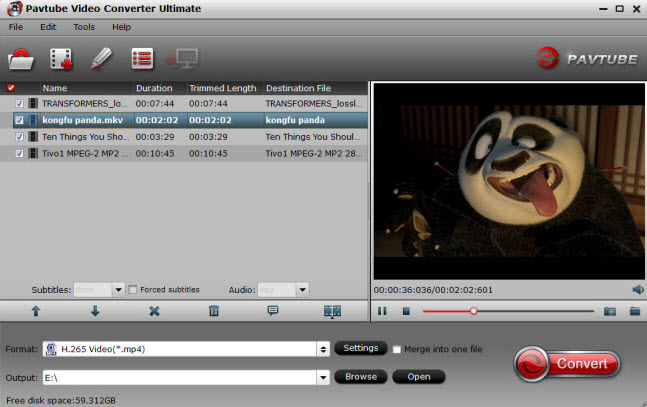
Run the program on your computer click "File" > "Add Video/Audio" or "Add from folder" to add unsupported 4K video files into the program.

Load unsupported 4K video

Step 2: Set output file format.

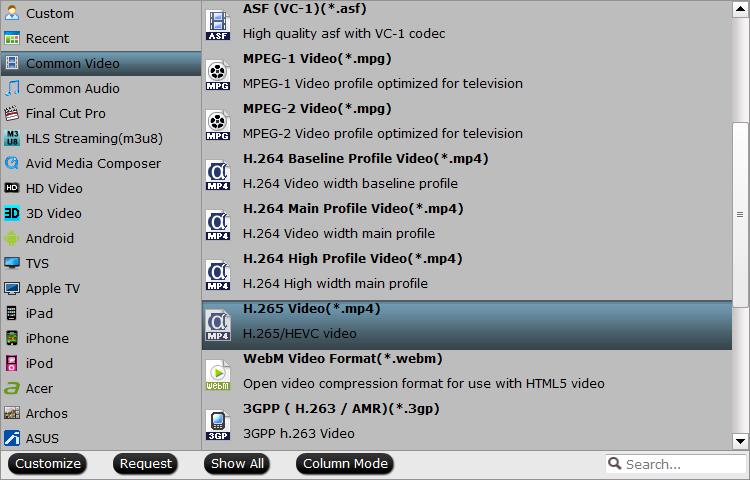
Click the pull down menu of "Format", from its drop-down list, choose one of Pinnacle Studio 21 Ultimate supported 4K file formats "H.265 Video(*.mp4)" under "Common Video" main category.

Output Pinnacle Studio 21 Ultimate supported 4K formats

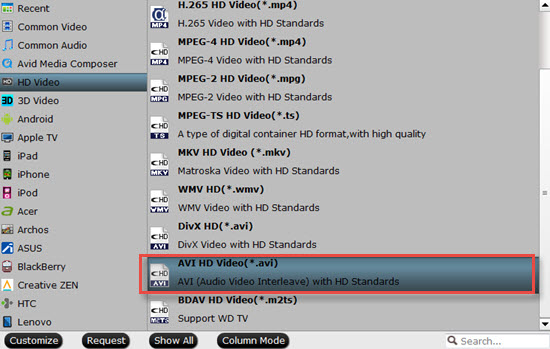
To choose Pinnacle Studio 21 Standard/Plus supported editing formats, choose "AVI HD Video(*.avi)" under "HD Video" main category.

Output Pinnacle Studio 21 Standard or Plus supported HD formats

Step 3: Compress 4K to 1080p.

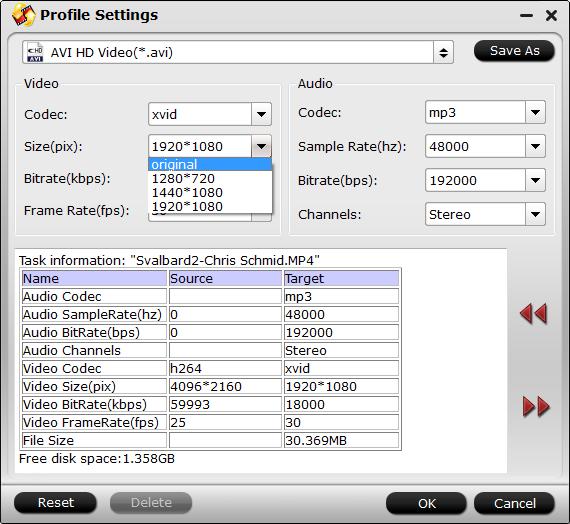
To deal 4K video with Pinnacle Studio 20 Standard or Plus, it would be much ideal for you to compress 4K to 1080p by outputting a HD file format and then changing the output file resolution as "1920*1080" or "1080*720" in the program's "Profile Settings" window.

Compress 4K to 1080p

Step 3: Edit 4K video.

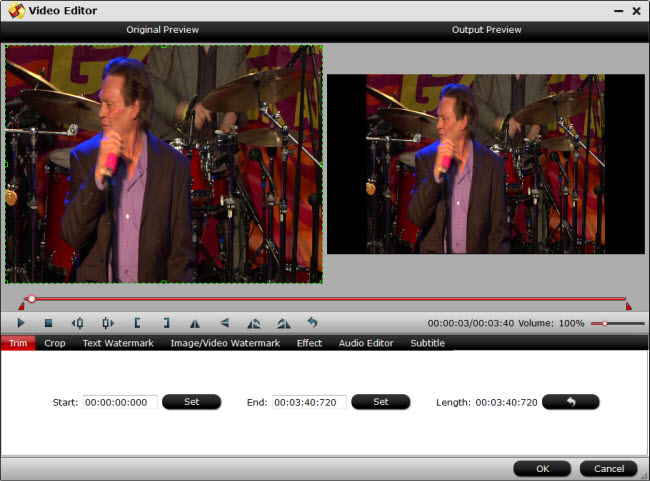
Check an item to active the "Video Editor" function, then click the pencil like icon on the top tool bar to open the "Video Editor" window, you can trim video length, crop video black bars, add watermark, apply special rendering effect, remove/replace audio in video, etc.

Edit 4K video

Step 4: Start the final conversion process.

After all setting is completed, hit the "Convert" button at the right bottom of the main interface to begin the conversion process from 4K video to Pinnacle Studio 21/21 Plus/21 Ultimate transcoding and compression process.

When the conversion is finished, click "Open Output Folder" icon on the main interface to open the folder with generated files. Then you will have no problem to import and edit 4K video with Pinnacle Studio 21/21 Plus/21 Ultimate.

Tuesday, December 5, 2017

Trim Movies/Videos for Taking Extra Scenes

There are many times that we will need to trim or cut a video/movie for taking extra scenes:
- Remove a few seconds of dead time at the beginning of your video, or an unintentional camera droop at the end.
- Pull out all your favorite segments and save as new clips so you can and use them however you want.

Best tools to trim or cut extra scenes from video/movie

Although there are many video cutter or trimmer tools even including some free ones on the market, however, you may be disappointed to find that some is too complicated to use, others only support to import very limited file formats, there are still some programs can do the video cutting or trimming job accurately or force you to re-encoding the original video or movie to another file format without obvious quality loss.

For those people who are looking for a simple to use tool to accurately trim or cut any video you have in hand with no quality loss, we highly recommend Pavtube Video Converter Ultimate (get Mac version) to you. The program has full importing support for not only 4K/2K/HD/SD digital video in virtually any file formats (including H.265/HEVC, MXF, XAVC/XAVC S) but also commercial 3D/2D Blu-ray disc and DVD disc.  

Ways to trim or cut video for taking out extra scenes

As for the core trimming function, the program allows you to easily trim or cut unwanted scenes from the beginning or end easily and accurately in various different ways:
1. Drag the control sliders to include the segment you want to remain.
2. Click the left square bracket to set start point, and click the right square bracket to set end point when previewing the video.
3. Input specific values to "Start" and "End" box.

Trim or cut video in original formats or various other file formats

For those people who don't want to suffer any quality loss, you can just choose to output the same file format as the original file format, also make sure to keep other profile parameters unchanged in the "Profile Settings" window. Alternatively, you can also select to trim or cut the video to other digital file formats as you like.

Crop/Merge/Split/Watermark/Apply Effect/Insert subtitle to video

Apart from trimming out the extra scenes from the video, you can also use this program to do other simple video editing task. You can crop the video to remove the black bars or unwanted size area around the video frame, add video/image/transparent text watermark to video, apply special rendering effect such as gray, flip color, aged film, etc, add external subtitle to video, merge separate video clips into one single file or split a large video into small clips by file size, count or length.

Get Pavtube Video Converter Ultimate with 20% off discount, coupon codec: 45K2D47GJH

Step by Step to Trim Video/Movie to Take Out Extra Scenes

Step 1: Add source video or movie to the app.

Click "File" menu, and select "Add Video/Audio" or "Add from folder" to import source video or movie files.

Add source video or movie

Step 2: Select output format.

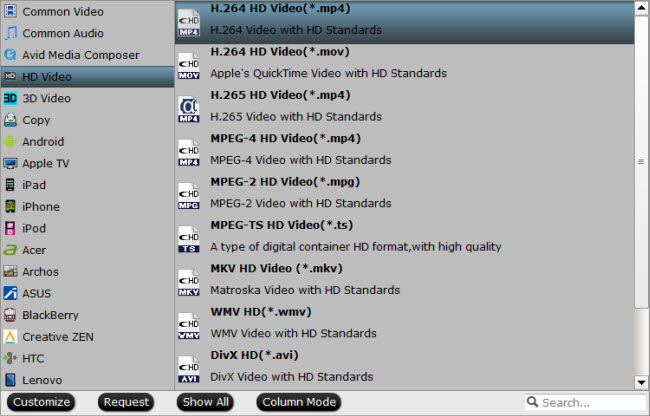
Clicking the Format bar, from its drop-down list, select one of your desired digital file format to output, here, we choose to output a popular devices and applications widely accepted file formats such as "H.264 HD Video(*.mp4)" under "HD Video" main category.

Choose output file format

Here, you can also select to output the same file format the original file format and keep all other profile parameters unchanged so that you won't suffer any quality loss.

Step 3: Trim movies to take out extra scenes

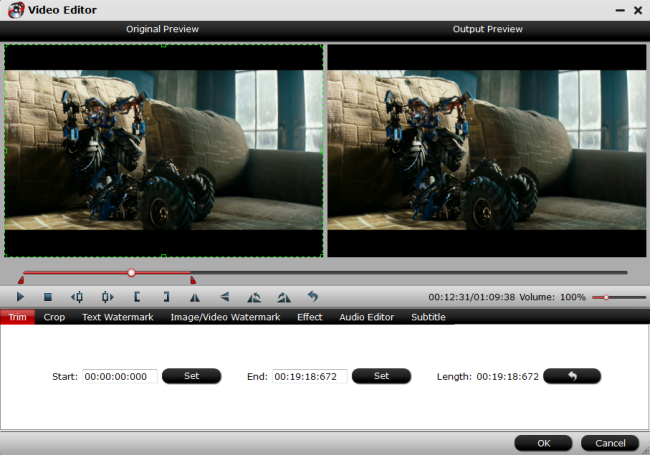
In the video editor window, choose the "Trim" tab and this tab is selected by default when the editing window appears. You can use the trim function to cut off unwanted parts from start and end. You can either drag pointers on the process bar or set exact time point in Start and End boxes to set.

Trim or cut video to take out extra scenes

Step 4: Start the video or movie trimming process.

After all setting is completed, hit the "Convert" button at the right bottom of the main interface to begin to trim or cut video/move to take out extra scenes.

When the conversion is finished, click "Open Output Folder" icon on the main interface to open the folder with generated files. Then you can get a video clip with only your unwanted parts or scenes.

Wednesday, November 29, 2017

Edit/Play XiaoMi Yi 4K Video

The new Xiaomi Yi 4K action camera is main designed for photographers and travelers. The camera uses the world's leading 1400 mAh lithium-ion battery by Ampetrex Technology (iPhone supplier) with a high voltage of 4.4 V. Thus, the Yi 4K action camera is able to operate up to 8 hours in standby mode and up to 120 minutes when shooting the high-quality 4K / 30 fps video without WiFi and with the LCD screen turned off. After the shooting stage, you may wish to play the Xiaomi Yi 4K video on computer with media player software, transfer to view on smartphone, tablets or stream to large screen TV via media servers. For editors, you may want to do either some basic or professional post editing work of the Xiaomi Yi 4K video with either professional or prosumer editing software. The following article will share you some beneficial tips for better playing and editing Xiaomi Yi 4K video.

Recording specification for Xiaomi Yi 4K Video

Video Resolution & Frame Rate

4K - (3840 x 2160) - 30 / 25 fps (60 mbps)
2.7K - (2704 x 1520) - 60 / 30 / 50 / 25 fps
1440p - (1920 x 1440) - 60 / 50 / 30 / 25 fps
1080p - (1920 x 1080) - 120 / 100 / 60 / 50 / 30 / 25 fps
960p - (1280 x 960) - 120 / 100 / 60 / 50 fps
720p - (1280 x 720) - 240 /200 fps
480p - (848 x 480) - 240 / 200 fps

Video Format

.mp4 format, .H.264

Transcode and compress Xiaomi Yi 4K video for better playing/editing

The 4K H.264 video recorded by Xiaomi Yi is a good delivery codec but not a good editing format since it is very CPU intensive when decoding. Therefore, you won't get a smooth editing workflow when you try to directly work the Xiaomi Yi 4K video with professional or prosumer editing software such as Windows Movie Maker, iMovie, Sony Vegas Pro, Final Cut Pro X, Adobe Premiere Pro CC, Davinci Resolve, Avid Media Composer, etc. To get a high quality and high performance workflow, it would be much ideal for you to transcode the H.264 to your editing software favorable editing codec.

Although the H.264 codec used by Xiaomi Yi camera is widely supported by most media player software or portable devices, however, you may be disappointed to find most processor on your computer or portable devices lacks the ability to handle 4K resolution video, in addition, the 4K video will take a lot of space of your computer hard drive or device internal memory. To get a smooth playback experience, it would be a good option for you to compress 4K to 1080p with smaller file resolution.

Here, you can easily transcode and compress Xiaomi Yi 4K video to 1080p by downloading Pavtube Video Converter for Mac. The program has perfect importing support for the 4K H.264 MP4 video shot with Xiaomi Yi camera. Thanks to its batch conversion mode, you can load multiple video into the program at one time for conversion to save your precious time. With the program, you can not only transcode Xiaomi Yi 4K video to NLE editing software compatible file formats or specially optimized editing codec such as Apple Prores, Apple Intermediate Codec, DNxHD, MPEG-2, etc, but also compressing 4K to 1080p fix the video choppy, buggy or stuttering issue when playing or editing 4K video on editing software or devices/applications.

For Windows users, please go to download Pavtube Video Converter to perform the conversion on macOS High Sierra, macOS Sierra, Mac OS X El Capitan, Mac OS X Yosemite, Mac OS X Mavericks, etc.

How to Transcode and Compress Xiaomi Yi 4K Video to 1080p for Better Playing and Editing?

Step 1:Load Xiaomi YI 4K Video.

Download the free trial version of the program. Launch it on your computer. Click "File" menu and select "Add Video/Audio" or click the "Add Video" button on the top tool bar to import Load Xiaomi YI 4K video files into the program.

Load Xiaomi YI 4K Video

Step 2. Define the output file format.

Click the "Format" bar, from its drop down list, select one of the popular file format such as "H.264 HD Video(*.mp4)" under "HD Video" main category that's supported by most devices and applications. 

Output device widely compatible file formats

For people try to load the Xiaomi Yi 4K video into video editing software, you can try to direct output video editing software preset profile format such as "Apple Prores 422 (*.mov)" under "Final Cut Pro" main category.

Output video editing software preset profile formats

Step 3: Compress 4K to 1080p.

Click "Settings" on the main interface to open "Profile Settings" window, in video section, from "Size(pix)" drop-down list, choose "1980*1020" to compress 4K to 1080p.

Step 4: Start Xiaomi YI 4K to 1080p Conversion process.

Hit "Convert" button to begin Xiaomi Yi 4K to 1080p transcoding and compression process. When the conversion finished, check the generated 1080p video, then you get a smooth playing and editing experience with Xiaomi Yi 4K video on any devices or applications.