Sunday, October 20, 2013

Transfer and Watch Blu-ray movies on Kindle Fire HDX 7 tablet

Have you ever thought of copying some of your Blu-ray movies onto the 7-inch Kindle Fire to make full use of 1920x1200 7" HD display? Then how to play Blu-ray on Kindle Fire HDX 7 tablet? Here, Pavtube Blu-ray to Kindle Fire HDX Ripper will convert Blu-rays to Kindle Fire HDX 7 MP4 format for watching.


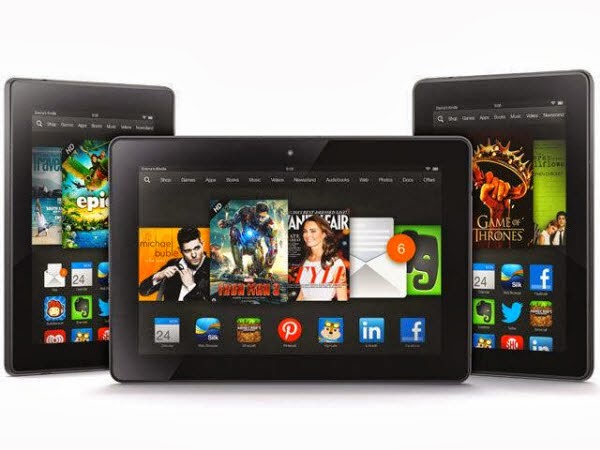
A few weeks ago, Amazon announced their new line up Kindle Fire tablets which are running on an Android fork known as FireOS 3.0 “Mojito” OS. These new Kindle Fire HDX’s have some pretty spectacular specs actually. The Kindle Fire HDX is packing a Snapdragon 800 processor with a 1920×1200 resolution 7-inch display. It’s also 9mm thin weighing in at about 303g. The Amazon Kindle Fire HDX is running their Android-based FireOS 3.0, which does have some changes, and the initial reviews all said that the devices were pretty fast and responsive. Right now, it’s a pretty good looking tablet that is probably suitable for most people. The Kindle Fire HDX will be hitting the UK on November 13th, and heading up North to Canada on November 26th. 

All of the above is good, but like many other tablets, Kindle Fire HDX 7 does not deliver native support for Blu-ray/DVD movies, so if you have the intension to watch Blu-ray movies on it, you need to convert the Blu-rays into a format compatible with your Kindle Fire HDX 7 in advance. 

Here, you are suggested to get a professional tool- 
Top Blu-ray Ripper, which can rip latest Blu-ray to Kindle Fire HDX supported format in few steps, and then you can freely and easily transfer the generated videos to your Fire HD 7.I’ve be using the program to convert all my Blu-ray discs to Kindle Fire HDX playable video files. I’ve found the quality to be excellent, and see no difference when compared to playing the discs themselves. Meanwhile the audio/video synchronization is very good, the size of the subtitles too. If you’re a Mac user, please turn to the equivalent Mac version – Blu-ray Ripper for Mac, which can transfer DVD movies to Kindle Fire HDX tablet on Mac OS X (Mavericks and Mountain Lion included).

Below is the detailed guide on the Blu-ray to Kindle Fire HDX 7 conversion process. 

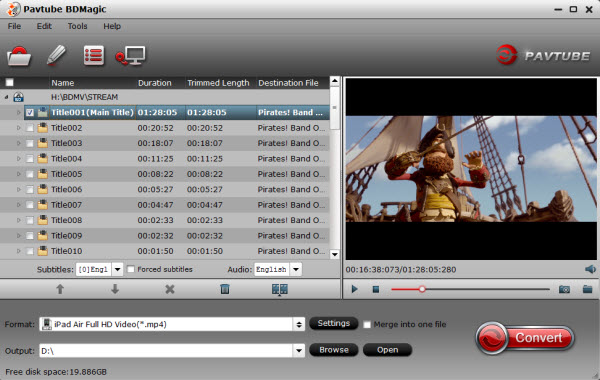
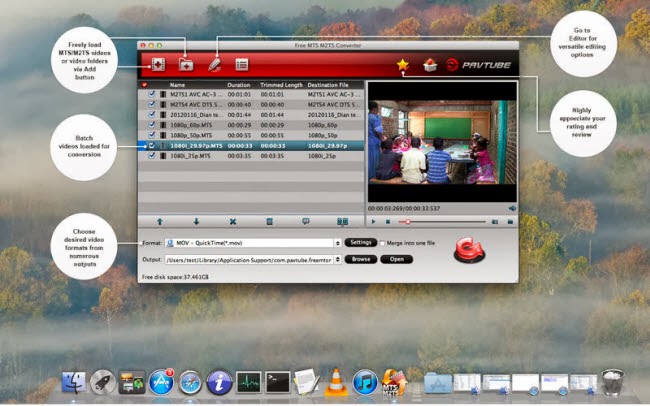
Step 1. Load Blu-ray movies. 

Install and launch the best Blu-ray to Kindle Fire HDX converter


Note:
 An external Blu-ray drive is required for ripping Blu-ray disc. 

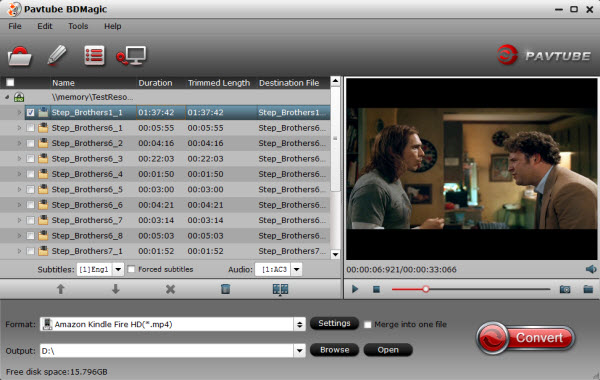
Load Blu-ray Disc or ISO image to the Kindle Fire HDX 7 movie Converter with one click. 

Step 2. Select preferred language from drop-down list of "Subtitles" and "Audio" box. 

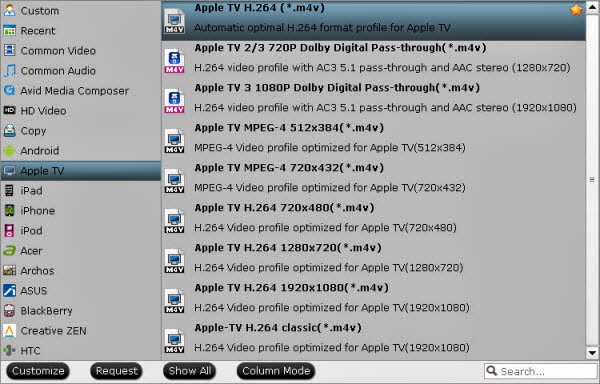
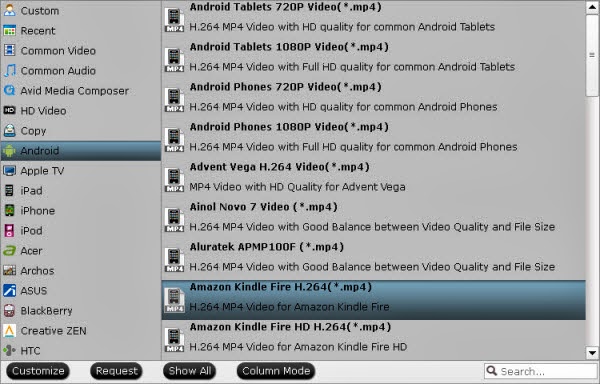
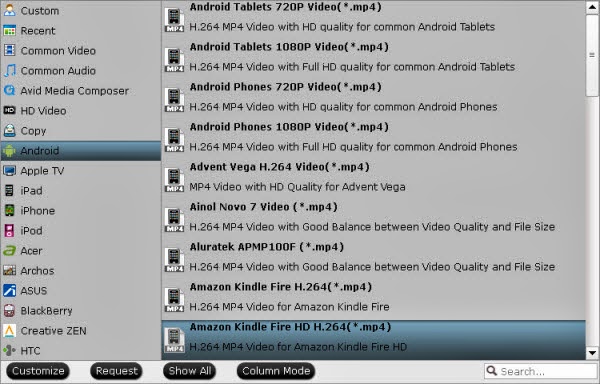
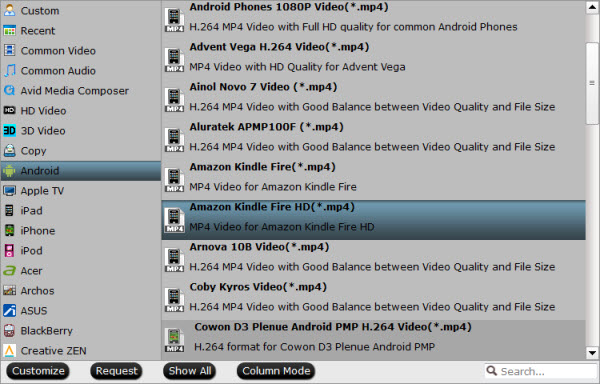
Step 3. Click "Format" bar and select a MP4 format for Kindle Fire HDX 7 playback. "Android -> Amazon Kindle Fire HD H.264 (*.mp4)" format is recommended for faster conversion and best movie effect.


Step 5. Click "Convert" to start ripping 1080p Blu-ray to Kindle Fire HDX 7 compatible MP4 video. 

Click the "Open" button to find the converted files when conversion completes and then you can transfer movies to Kindle Fire HDX 7 easily, and bring your favorite Blu-ray movies when traveling. 

Custom Settings 

If you'd like to customize profile settings for better quality or higher resolution, proceed as follows before you start converting Blu-ray to Kindle Fire HD 7 video: 

Click on "Settings" button. The pop-up Profile Settings window shows you a/v settings you're using. 


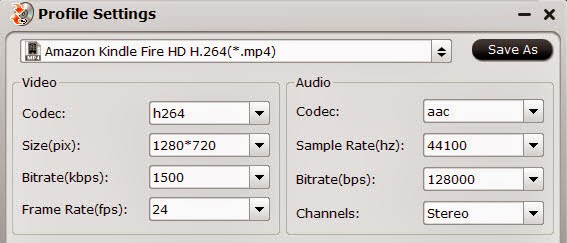
To take advantage of your screen, set the video size exactly as the display resolution- i.e. 1920 x 1080 for Kindle Fire HD 7. 


For better quality, set higher bitrate. We find the best balance between 500 to 2500kbps is just all right on 7-inch screen. To shorten conversion time, set lower quality. Note that when you lower file size, you lower video quality. 

More related:

Friday, October 18, 2013

Only two Days! Get 30% off ByteCopy to rip blu-ray/dvd on Windows or Mac

Now it is time for another Facebook Weekend Special Offer! Good news for Blu-ray/DVD fans, on this weekend (2013, Oct 12~13th), only these two days! Pavtube Studio put 30% discount for its ByteCopy and Byte Copy for Mac. Hurry up! Like us on our facebook and get the Coupon Code! Never miss to get it!


Now click the links below to get 30% off to backup BD/ DVD with subtitle and multi audio tracks in lossless MKV. And rip BD/ DVD to any format for iOS/Android tablets & phones.

Pavtube Bytecopy for Windows or Mac (Both Only $29.4! You can save $12.6)

Get ByteCopy for Windows 30% off

Get ByteCopy for Mac 30% off

Key features:

- Backup BD/DVD with subtitle and multi audio tracks in lossless MKV
- Watch 3D movies in various 3D effect.
Side by side(left/right), top-bottom and anaglyph(red/blue) effect
- Rip Blu-ray/DVD movies retaining multiple audio and subtitle tracks in .mkv/.mp4/.mov. output format
- Retain chapter marker in lossless .mkv&.mp4
- Rip Blu-ray and DVD movies to a proper format for playing on your Android/Apple/Windows 8 tablets & smartphones, HD Media Players, etc.
- Extract subtitle files in separate .srt

Learn more about the product:


http://www.multipelife.com/bytecopy

http://www.multipelife.com/bytecopy-mac


Sounds great?

Come on and tell you friends as well!

Only 2 days left and to be expired on Oct 12, 2013

If you have any problem to buy or use Pavtube, pls feel free to contact support@pavtube.com (for Windows user), macsupport@pavtube.com (for Mac users).

Source: http://1080p-video-tool.blogspot.com/2013/10/pavtube-facebook-weekend-special-offer.html

Thursday, October 17, 2013

Convert Blu-ray to Apple TV for viewing with Pavtube Blu-ray Ripper

If you want to figure out the easy way to rip and convert Blu-ray movie to Apple TV, just read this article to how to get Blu-rays to your Apple TV.


"I recently got an Apple TV, and I need to rip some blu rays in that I own so I can have them on my appletv for wathing when I'm at college and travelling. Is there any program can do this?" 

To make Blu-ray portable with Apple TV, the most important is to rip Blu-rays to Apple TV compatible videos like H.264 M4V files for smoothly playback. This guide will clarify you with the detailed steps for know about how to rip and convert bluray to Apple TV.

What you need is a professional and easy-to-use Blu-ray Ripper. Here Pavtube BDMagic is the ideal software that can help you to remove the protection of Blu-ray and then convert to Apple TV supported videos formats like H.264 m4v  with outstanding video quality and fast speed. Moreover, you can choose the desired subtitle for output and select forced subtitles for some unknown languages. Now let's go to learn how to do it.

Step-by-step guide for ripping Blu-ray movies for Apple TV 3 with 1080p HD qualityGet your Blu-ray drive ready and insert Blu-ray you need to the drive. And keep networked when ripping Blu-ray.

Step 1. Load Blu-ray to Blu-ray to Pavtube Blu-ray Ripper.

Run the best Blu-ray to Apple TV Converter, click "Load file" button to select the inserted Blu-ray and import it. It will take only few seconds to rip Blu-ray. Then the software will recognize the actual main title of Blu-ray and pick it automatically. You do not need to look for the main title manually.


Press the selected main title you can preview the whole Blu-ray movies on the preview window on the right, which works like a media player.


4. Select main movie from file list, and set subtitles and audio language for export.

5. Set Apple TV compatible format from the drop-down list of "Format". Select "Apple TV >- Apple TV H.264 (*.m4v)" which works well for Apple TV.


6. Press "Convert" to get Blu-ray Ripper start compressing Blu-ray to Apple TV friendly videos.

7. When conversion completes, press "Open" to find compressed m4v movie and add it to your Apple TV. Now you can enjoy the Blu-ray movie freely and stream the 1080p Blu-ray movie to Apple TV.

Apple TV Related Articles:

Get MKV videos to play on Apple TV 3 with Dolby Digital 5.1
Rip Blu-ray to Apple TV 3 and Backup Blu-ray to iTunes for watching on iDevice
Backup DVD to iTunes library for Apple TV 3 streaming with with Dobly Digital 5.1 audio  

Wednesday, October 16, 2013

Get my DVDs I already own onto my Kindle Fire

This step-by-step guide reveals how to transfer DVD to Kinlde Fire for playback. This guide will show you how to convert DVD to Kindle Fire best video format via DVD to Kindle Converter.


The Kindle Fire is a tablet computer version of Amazon.com's Kindle e-book reader. I often  use it to read ebooks, listen to music, surf the internet and play movies from it. Now I have the videos on my kindle for my toddler to watch while I'm getting ready in the morning. And I wanted to get DVDs I already own onto my Kindle, but the issue is that I can't directly copy DVD movies from disc to Kindle Fire.

After some trying and testing I came up with a solution which I'd like to describe here so that all Kindle owners can benefit from the procedure. I find an online forum which introduces this Best DVD ripper- Pavtube DVD to Kindle Converter. With it, I can rip DVD to a format which Kindle Fire supports, then transfer the ripped video file to Kindle Fire for playback.

Overall, I have used the trial version of Handbrake, DVDFab, Aimersoft, but when I came to Pavtube DVDAid, I find it is really a nice DVD Ripper software which gives the best result. Ease of use and good reviews, sale price. How easy and fast it is! Here's a guide about how to rip DVD to Kindle Fire format with Ideal DVD to MP4 Converter and then playback it.

Download and get it installed. (Mac DVD to Kindle Fire Ripper is made for Mac users.) 

(Good news: Pavtube Studio release Free DVD Ripper and Free DVD Ripper for Mac

How to rip DVD to Kindle Fire? 

1. Load DVD to the DVD to Kindle Fire Ripper. 

Insert DVD movies into your DVD drive, then click "Load file" button to navigate to DVD movies you want to convert. And it is able to find and pick the actual main movie up automatically.

After importing successfully, you can go to select subtitle and audio track on the main interface for output. 


2. Select Kindle Fire compatible format. 


Click "Format" menu to find the optimized video format for Kindle Fire in the dropdown list, Choosing the built-in "Amazon Kindle Fire H.264(*.mp4)" under "Android" option is perfect for Kindle Fire. 


Tips:  

a. For Kindle Fire HD users, choose "Android">- "Amazon Kindle Fire HD H.264 (*.mp4)" for Fire HD playback.


b. If you want to convert DVD to Multi-track MP4 for Kindle, try this 
Pavtube ByteCopy. 

c. (Optional step) You can press "Settings" button on the interface to adjust the video and audio parameters like codec, size, bitrate, etc. The output videos quality is based on bitrate than resolution. The higher bitrate will result in lower picture quality loss but a larger file size. But there is a balance between quality and size. I think 1500kbps~2000kbps is all right for 720p movies on Kindle Fire. 


3. Start DVD to Kindle Fire conversion. 

It's time to click "Convert" button to start converting DVD to Kindle Fire compatible format. With the help of technology of CUDA acceleration, you can get 6X faster conversion speed. Just wait for a while, then you can click "Open" button to quickly get the generated files for Kindle Fire. 

Note: With great decrypting capability, high quality video output and specific format list for versatile portable devices including iPad 3, iPhone 5, Apple TV 3, Xbox, PS3, Android tablets and phones, etc,. Pavtube DVD Ripper ranks top on the list of DVD ripping application. And it also provides lifetime free upgrade of product and technical support. 
Now you can watch DVD on that gorgeous screen of Kindle Fire anywhere you like. Just enjoy it now. 

Related Article: 

Monday, October 14, 2013

Rip my Blu-rays to Plex Media Server for streaming

This article offers a brief instruction about how to get Blu-ray movie disc free on  Plex Media Server to play with iPhone 6 Plus, Samsung Galaxy S6, HTC One M9, etc.

Here I would like to introduce Plex Media Server – a solution for your local and online media, which seamlessly connects your Plex clients. Well you can watch movies with the client – Plex Media Center on Windows & Mac, and more importantly, on iPad, iPhone and Android devices with the paid app.


This time, I own a plex mediaserver at home and need content to watch, I have tons of Blu-ray movies and wanted a good program to rip them with. I tried AnyDvD which is supposed to be a faster ripper and it was. 

At last, I found Pavtube Blu-ray to Plex Converter which aims to solve this problem by giving us the ability to store our purchased physical Blu-ray and DVD discs or downloaded media to local computer, hard drive then stream over a home network for Plex Media Server and iPhone 6 Plus, Samsung Galaxy S6, HTC One M9 playback. It's professional in ripping and converting Blu-ray/DVD discs, Blu-ray/DVD ISO image, Blu-ray/DVD copies and more. It will help you backup your Blu-ray disk and save the time looking for them from the cardboard with ease.

I read tests and tons of reviews give this program as No. 1 Blu-Ripper 2013. Well I mostly use it to transcode blu-ray to mkv because it supports good sound options and most devices support the format. As for the device I use is plex media server (PMS) and basicly any device (like my wiiu, htc onex, samsung gs2, 2 computers, xbox 360) that supports DLNA can play converted mkv video from the pms.
Below is a simple guide about how to convert/ backup your Blu-rays to Plex Media Server

First of all, you need to download and install the Best Blu-ray Ripper for Plex Media Server. There is a Mac version for you if you use Mac OS X computer. Then, just follow the steps to operate it.

Step 1: Insert your Blu-ray disc into your BD drive, run Pavtube BDMagic and click "BD/DVD disc" icon to load movie from Blu-ray source(Disc, folder, ISO).


Step 2: Click the "Format" option, and choose Common Video > MKV(Matroska) Video (*.mkv) as output format. You can also select H.264 Video (*.mp4) for Plex Media Server.


Tip:


If you like, you can click "Settings" to change the video encoder, resolution, frame rate, etc. as you wish. Keep in mind the file size and video quality is based more on bitrate than resolution which means bitrate higher results in big file size, and lower visible quality loss, and vice versa.

Step 3: Click the convert button under the preview window, and the Blu-ray ripper will start the conversion from Blu-ray movies to MKV for Plex Media Server. After conversion, you can stream Blu-ray movies through Plex Media Server to HDTV, iPhone 6 Plus, Samsung Galaxy S6, HTC One M9or other DLNA-compliant devices.


Now watching blu-ray movies on portable devices becomes easy and I can really lie back, relax and enjoy my favorite blu-ray movies.

Related posts:

Sunday, October 13, 2013

Free Software to change Tivo files to MPEG format without losing quality

This article mainly introduces free software for converting Tivo to MPEG. If you are looking for software for free, here is right for you.

TiVo is a popular home setup box for recording television programs and movies for later playback. It has the capability to transfer the recordings to your personal computer by using the TiVo Desktop Software application. An issue with the files is that they are not always compatible with other multi-media programs or editing softwares like Adobe Premiere, Sony Vegas, Pinnacle Studio, etc.


Q1: I have recently exporting a TV show from my TiVo to my PC using my TiVo home network, but the file is in .TiVo format. Does anyone know the best way to convert this to a avi file or mpeg for editing?

Q2: I need software that will change tivo files to mpeg files for viewing on my computer. I have tried Tivo Decoder, VisualHub, iTivo, and ffMpegX all with not so good results. So is there any program or a method for conversion?

Have you got the similar question when you want to use to view and edit TiVo files? As a result, it is required to convert the TiVo files to a common format that widely supported by media players and editors. e.g. MPEG format. The guide shares with you how to convert TiVo file to MPEG step-by-step. 

Part 1: Transfer TV shows from TiVo to PC

To transfer TV shows on any PC, you need to download TiVo Desktop software. When your TiVo is connected to your home network, TiVo Desktop provides you with a list of available shows for transferring to your PC.

You can play TiVo video files using Windows Media Player.

Hints: TiVoToGo Transfers system requirements: TiVo Series2 DVR, TiVo software version 7.1 or later, TiVo Series2 box must be connected to your home network using a wired or wireless USB network adapter.

Part 2: Guide to Converting TiVo to MPEG

At first,  for converting .tivo to .mpg, you may have search a lot and find that there are many software with cost, which can help you. If you want free software, Pavtube Free Video DVD Converter Ultimate is right for you. Becides supporting Tivo to MPEG conversion, it is integrated software combined with converting both DVD and videos. And it will support converting them to MKV, AVI, WMV, MOV, MPG, etc.

(P.S If you are a Mac user, you can try Pavtube iMedia Converter for Mac)

Go to download Free Video DVD Converter Ultimate and install it. Then follow me to learn how it works.  

Step 1. Import source files.

Click "Add Video" icon to load video, or you can drag and drop it to the software directly. "Load files" icon will allow you to load DVD disc, ISO/IFO and DVD folder.


Note: If you want to import Tivo video, you should import the Media Access Key first.


Step 2. Select output format.

Many video formats in the Format dropdown list, you can choose the one you need. Here, you can choose "MPEG-2 Video (*.mpg)" from "Common Video" Option.


Step 3. Video Editing (optional).

Powerful edit function including Trim, Crop, Add subtitles, etc will give you great experience for conversion. For example, you can use Trim to cut off the prevue of DVD that you don’t want to retain in output videos.

Step 4. Start conversion.

Click "Convert" button to start TiVo to MPEG conversion conversion. Click "Open" button you can find the generated files.

And with the help of CUDA Acceleration and full use of cores, you will have a fast speed.


If you want to convert to more popular portable devices and editing software, Updrade version will give you more great features. You can 1:1 backup DVD or 100% backup the main movie of DVD. Also you can choose to output MP4/M4V files for all portable devices to enjoy videos anywhere.

I'm glad to tell that you can get 20% OFF upgrade discount now. Do not miss it. Hurry up to try the upgrade now.

With the upgraded Video DVD Converter Ultimate, you can not only encode TiVo to MPEG, but also convert tivo to MKV, WMV,MP4 etc files while keeping perfect quality for enjoying your favorite TV shows recorded by TiVo box on Pocket PC, iPod, iPad, iPhone, Android, Windows RT/8, PSP etc device any time and any where or freely edit TV shows on most editing programs, like Adobe Premiere, Sony Vegas, Pinnacle Studio, etc.

Related articles:

Saturday, October 12, 2013

40% Off: Upgrade Pavtube Free MTS/M2TS Converter for Mac to official retail version (Only 2 Days)

Good news on this weekend (2013, Oct 12~13th)! Pavtube now offer 40% OFF to upgrade your Free MTS/M2TS Converter for Mac to Paid MTS/M2TS Converter for Mac, the official retail version, which is just updated several days ago and perfect support more latest cameras from Sony, JVC, Panasonic and Canon.
The Pavtube Free MTS/M2TS Converter for Mac, a powerful free Mac MTS/M2TS Converter software to help convert your 2D/3D MTS/M2TS/M2T/AVCHD file at 1080i/1080p/720i/720p to MKV/MP4/MPG/WMV/MOV/FLV/F4V for editing in NLEs such as Avid Media Composer, Adobe Premiere Pro, After Effects, Apple Aperture 3, Kdenlive, Keynote, Avid Xpress Pro, Adobe Creative Suite 6, DaVinci Resolve, iPhoto, or playback on iPad 4, iPhone 5S, iPhone 5C, iPhone 5, iPod 3, Samsung Galaxy Tab 3 10.1/8.0, Galaxy Note 3, Google new Nexus 7, Asus Fonepad 7, Motorola Droid Mini, Moto X, Asus Transformer Book T100, Asus Transformer Pad TF701T, Kindle Fire HD, Surface RT/Pro, Surface 2, Surface Pro 2; it well supports Apple TV and other HDTV videos outputting and other devices like XBox 360, PS3, WD TV, Wii, TVs, etc.

As we can see, it has a simple and straightforward interface to enable quick conversion within a few clicks. As long as your camera is recognized by Mac directly, it could detect your MTS/M2TS/M2T/MOD/TOD/AVCHD footage automatically without risky of losing intact file structure.

And the most important thing is your can download it totally Free in App Store with 100% safety.


See this specification:


This Free MTS/M2TS Converter for Mac comes with bellowing features:

Full Support to AVCHD footage
Support interlaced and progressive AVCHD 1920*1080, 1440*1080, 1280*720 videos shot with Sony, Panasonic, Canon, JVC, etc.

Simple gauss blur effect
Simple gauss blur effect is very useful to recorded file formats, since it can eliminate the recorded videos noise. If you like, you can also add other special effects including simple laplacian sharpen, gray, flip color, invert, aged film and deinterlacing. What is worth mentioning is the deinterlacing, which can convert interlaced video into a non-interlaced form so that you can enjoy a better and clearer video effect.

Accurate trim and crop your AVCHD (*.m2ts or *.mts)
The accurate trim and crop function allows you to trim the proper time length for MTS/M2TS videos, as well as cut off any unwanted area. Its original video and output video preview windows will also be convenient for you to edit.

Replace original audio
To replace the original audio is easy to be realized under the Editor sections.

Split selected video file
Using the Split function, you can split the selected video file into required video clips by specifying the clip quantity, duration time and file size.

Audio and video sync technology
The program adopted advanced audio and video sync technology; never let you troubled by the audio and video issues.

Built-in codec
Its built-in codec will not install any codec on your computer, so as to avoid the unexpected codec problem.

Note: Comparing with Pavtube MTS/M2TS Converter for Mac, the Free MTS/M2TS Converter for Mac removed Apple ProRes codec for Final Cut Pro and Apple Intermediate Codec(AIC) codec for iMovie & Final Cut Express.

Learn more Free products from Pavtube: https://www.facebook.com/pavtubefans/app_193168050721272

Wondering how to do the conversion?

The Correct Way to Ingest and Import AVCHD to Final Cut Pro 7
Import Canon XA25 AVCHD footage to iMovie or Final Cut Express
Transcode Panasonic AVCHD MTS to Avid Media Composer
How to Import MTS Clips to Aperture editavle files?

More step-by-step guide of how to start the conversion:
Start Using Pavtube MTS/M2TS Converter for Mac | MTS/M2TS Converter for Mac Guides

Source: http://mediaconverting.blogspot.com/2013/10/40-off-upgrade-pavtube-free-mts-m2ts-converter-for-mac.html