Tuesday, October 20, 2015

Rip Tivo to MOV for Playback on Mac El Capitan, iPad, iPhone, Apple TV

Summary: You may have recoreded some TV shows and wanna enjoy and share the tivo files in QuickTime with family or friends at home. Howver, the Tivo files are saved by digital video recorders with copyright protection, which make it hard to play Tivo videos in QuickTime. In this article, you will learn the best way to import TiVo to playback smoothly on on Mac El Capitan, iPad, iPhone, Apple TV. Just follow it.

Hot search:Play TiVo on Android  | Tivo to H.265/HEVC | H.265 to QuickTime

Need a simple way to rip TiVo recordings to MOV? Care for play TiVo on QuickTime player? Eager to watch TiVo shows on your portable Apple devices like iPad, iPhone or stream to Apple TV?

But as we all know, TiVo videos (plain MPEG2 videos) are not accepted by QuickTime, Apple TV, iPad and iPhone. The best solution to handle this issue is rip the TiVo files to Mac OS X EL Capitan or Apple device accepted formats in advance like MOV.

To carry out this conversion, a powerful Video Converter is needed. Here Pavtube Video Converter for Mac is highly recommended, which is a professional TiVo converting program on Mac. It can run on Mac OS X 10.11 EL Capitan. And with it, you can convert your TiVo video to MOV on QuickTime based on Mac OS X El Capitan. It also provides output compatible formats for various Apple devices as well as Andriod devices and Windows devices. Moreover, Pavtube Video Converter for Mac also allows you to customize profile settings to get a desired and better output. Movie creation with this program is no big deal. You can edit your video files by trimming, cropping, attaching external subtitles, adding watermarks, change video effect, etc. If you are a Windows user, Pavtube Video Converter(Windows version) also available here.


Other Download:
- Pavtube old official address: http://www.pavtube.com/video-converter-mac/
- Amazon Store Download: http://www.amazon.com/Pavtube-Video-Converter-Mac-Download/dp/B00QIBK0TQ
- Cnet Download: http://download.cnet.com/Pavtube-Video-Converter/3000-2194_4-76179460.html


Other Download:
- Pavtube old official address: http://www.pavtube.com/video_converter/
- Amazon Download: http://download.cnet.com/Pavtube-Video-Converter/3000-2194_4-75734821.html
- Cnet Download: http://download.cnet.com/Pavtube-Video-Converter/3000-2194_4-75734821.html

Rip Tivo to MOV for Playback on Mac El Capitan, iPad, iPhone, Apple TV

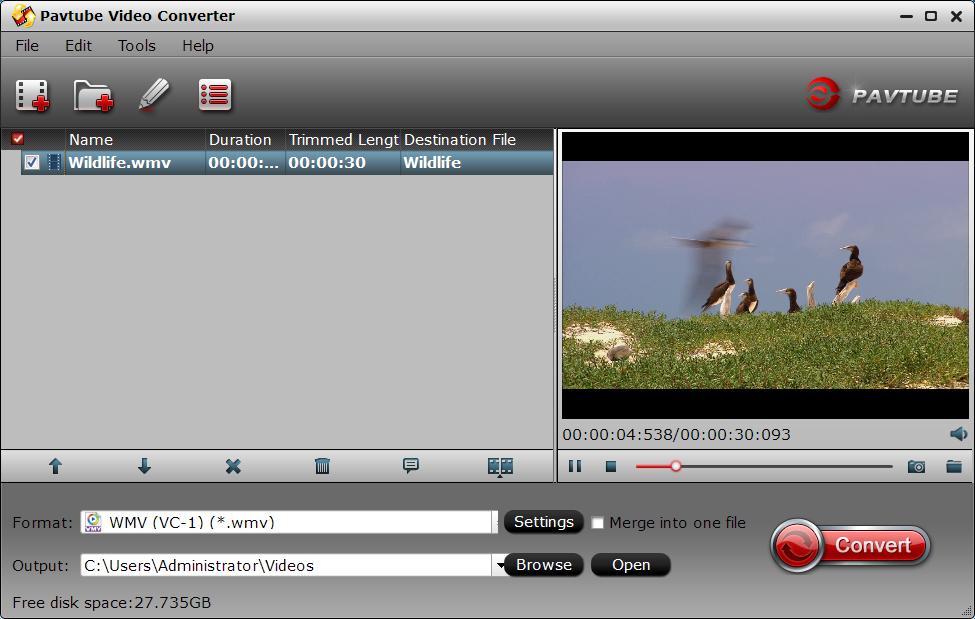
Step 1. Launch HD Converter for Mac

Run this Mac HD converter and click “Option” button to switch to “Options” window. Click on “Tivo” tab and enter the Media Access Key.


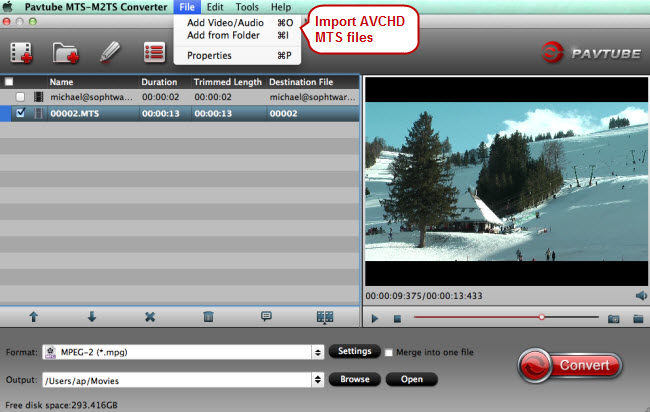
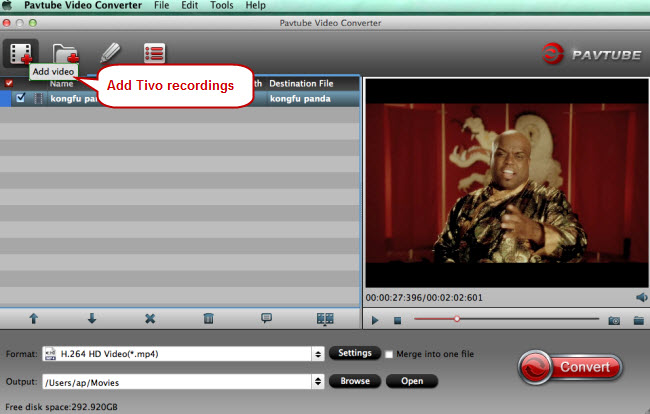
Step 2. Import Tivo recordings

Transfer Tivo recordings to Mac with TivoDecode Manager (click to get the detail steps). Then click"Add video" icon to import recorded Tivo videos.


Step 3. Convert Tivo to MOV or other formats


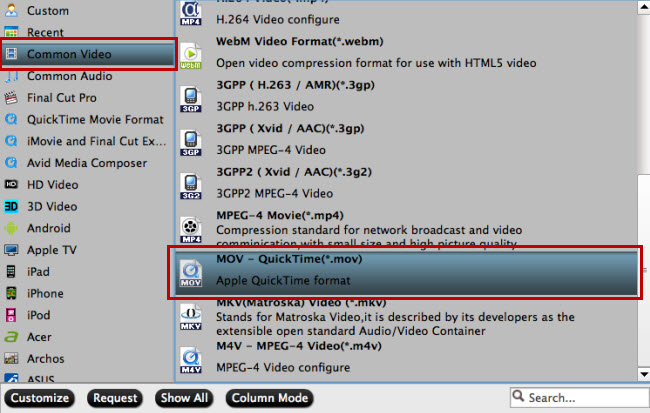
Choose an output format according to the device you own. MOV is quite common and suitable for almost all Apple devices. However, you can still select other outputs as the target video format. As the Samsung Galaxy Note 4, you can view convert to mp4 videos for watching.

Step 4. Start converting Tivo recordings on Mac

Click on “Convert” button in then right corner to realize Tivo to MOV conversion.

Read More:

Friday, October 16, 2015

Import Sony CX405 XAVC-S/AVCHD/MP4 to Sony Vegas Pro for Editing

Summary: Have you ever captured some videos with your Sony CX405 but not able to upload to edit them on Sony Vegas Pro? This article will help you a lot to solve this issue.

“I have captured some videos clips about 20 or so with my new Sony CX405, the recordings are in XAVC-S/AVCHD format with 4K resolution. I would like to edit them on Sony Vegas Pro so that I can share these interesting videos with my friends through Internet or on YouTube. But the problem is, my Sony Vegas Pro has no ability to edit such high definition files, I want to find some apps can import the Sony CX405 XAVC-S/AVCHD to Sony Vegas Pro. Can anyone suggest something to help me out?”

Vegas Pro is a contemporary NLE designed for complete creative control. New features include advanced archival tools, sophisticated audio metering, and the Vegas Pro Connect mobile iPad companion app. Vegas Pro 13 comes complete with DVD Architect Pro 6, Dolby Digital Professional Encoder, and plug-in collections from FXHOME, NewBlueFX, and iZotope.

As it claimed, Sony Vegas Pro 12 is the first native 4K XAVC editor. Sony Vegas Pro 12 and the latest version Vegas Pro 13 support a complete 4K workflow when you're working with 4K XAVC and XAVC S. Of course, working with 4K files can be taxing on your computer, especially if you don't have the most powerful machine to edit on. From our tests it looks like Sony Vegas Pro 12/13 has to create a lower resolution proxy file to display in the NLE while you edit, so you have to wait for the proxy file to be created before you can edit any 4K footage. In this process, it will cost some time.

Well, if you don't like the way, or have the old version of Sony Vegas Pro that doesn't support Sony CX405’s 4K video, an alternative way is to convert 4K video with Pavtube Video Converter and then import to Sony Vegas Pro directly. This video converter perfectly works as the Sony CX405’s 4K to Vegas Pro Converter that helps you convert XAVC, XAVC S or any 4K files to MPEG-2, which is the best format for Vegas to edit with ease. No expensive add-ons or plug-ins are required. With it, you may also transcode 4K video to Avid Media Composer, Adobe Premiere Pro, Windows Movie Maker, Pinnacle Studio and more NLE programs highly compatible formats for editing. If you are a Mac user, please turn to Pavtube Video Converter for Mac.


Other Download:
- Pavtube old official address: http://www.pavtube.com/video_converter/
- Amazon Download: http://download.cnet.com/Pavtube-Video-Converter/3000-2194_4-75734821.html
- Cnet Download: http://download.cnet.com/Pavtube-Video-Converter/3000-2194_4-75734821.html


Other Download:
- Pavtube old official address: http://www.pavtube.com/video-converter-mac/
- Amazon Store Download: http://www.amazon.com/Pavtube-Video-Converter-Mac-Download/dp/B00QIBK0TQ
- Cnet Download: http://download.cnet.com/Pavtube-Video-Converter/3000-2194_4-76179460.html

Import Sony CX405 XAVC-S/AVCHD/MP4 to Sony Vegas Pro for Editing

Step 1: Load Sony CX405 XAVC/AVCHD/MP4 video footage.

Launch and start the program on the computer, import your source Sony CX405 XAVC/AVCHD/MP4 video footage to the program by clicking "File"> "Add Video/Audio".


Step 2: Specify output file format.

From "Format" drop-down list, select to out "Adobe Premiere/Sony... "> "MPEG-2 (*.mpg)" format for editing with Sony Vegas.


Step 3: Merge into one file.

On the main interface of the program, check "Merge into one file" option to combine all the separate video footage into single one.

Step 4: Carry out the conversion process.

Press right-bottom conversion button to start GoPro Hero MP4 footage to Sony Vegas Pro conversion process.

When the conversion is complete, you can easily import Sony CX405 XAVC/AVCHD/MP4 videos to Sony Vegas Pro for professional editing.

Read More:
Watch iTunes Movies on Sony XBR 4K Ultra HD TV via USB
Edit Sony PXW-X70 XDCAM XAVC footage in FCP & Avid 
Work Around : How to convert 1080p HD MKV on Sony TV 
How to Watch iTunes Movies on Sony Xperia Z4 
Can I play MKV videos on my new Sony Bravia HDTV? 

Tuesday, October 13, 2015

How to Edit Sony A7R II 4K XAVC S in Avid Media Composer on Mac

Watching Sony 4k video is highly intriguing and gives real life experience to the viewers. But editing those super smooth and high definition videos is a Herculean task and can transform into an agony when you a lack a super computer. When you got a Sony Alpha a7 II, you can easily shot some 4k XAVC S footage. Then you would wanna know how to use the Sony A7R II XAVC S footage in Avid Media Composer or other NELs. Since there are users complained that Avid Media Composer doesn’t natively import or AMA link A7R II XAVC S files, I will show a workaround in this page. Just learn the Sony A7R II XAVC S to Avid MC workflow.

When importing and editing Sony A7R II 4K XAVC/XAVC S videos in Avid Media Composer, users always encounter video and audio problems, as XAVC (.mxf) or XAVC S (*.mp4) format is efficient, but simply isn’t engineered to maintain quality during complex post production effects processing. Uncompressed HD format delivers superior image quality, but data rates and file sizes can stop a workflow dead in its tracks. Well, Avid DNxHD format delivers both efficiency and quality without compromises. So, before transferring Sony XAVC/XAVC S to Avid MC, you’d better convert Sony XAVC/XAVC S to Avid DNxHD for smoothly editing.

Overall, UFUWare XAVC/XAVC-S Converter for Mac is just one of the best Avid XAVC Converter for you to transcode XAVC/XAVC-S files for Avid smooth editing on Mac (Yosemite/Mavericks included). The program is capable of converting Sony XAVC/XAVC-S to DNxHD, MPEG-2, Apple ProRes, AIC, etc on Mac OS X for smoothly importing and editing in various non-linear editing systems (NLE), including Avid Media Composer 5.5/6.0/6.5, Adobe Premiere Pro, Final Cut Pro, iMovie and more. If you’re using a Windows PC, please turn to its equivalent Windows version – XAVC/XAVC S Converter. Below is the workflow of Sony XAVC/XAVC S to DNxHD MOV conversion.


Other Download:
- Pavtube old official address: http://www.pavtube.com/hd-video-converter-mac/
- Amazon Store Download: http://www.amazon.com/Pavtube-Video-Converter-Mac-Download/dp/B00QI9GNZS
- AppStore Download: https://itunes.apple.com/de/app/pavtube-hd-video-converter/id502792488?mt=12
- Cnet Download: http://download.cnet.com/Pavtube-HD-Video-Converter/3000-2194_4-76177786.html

How to Edit Sony A7R II 4K XAVC S in Avid Media Composer on Mac

Step 1:Load Sony XAVC S files.

Click "File" drop-down "Add Video/Audio" or "Add from folder" option to add the Sony XAVC S files that have been transferred from your camera/camcorder to your Mac hard drive.


Step 2: Specify output file format.

From "Format" drop-down lists, you can select Avid Media Composer preferable editing codec from "Avid Media Composer" > "Avid DNxHD(*.mov)" as the output format.


Step 3: Merge into one file.

Check the merge into one file icon on the main interface to join your captured separate footage together into one single video.Step 4:Convert Sony XVAC S to Avid Media Composer.

After all the parameter setting is completed, you can start the conversion process by hitting the right-bottom convert button.

When the conversion is done, hit the "Open" button on the main interface to locate and locate and find the converted files. Then continue with your fast and fluid post workflow of Sony XVAC S footage with Avid Media Composer on Mac OS X.

Read More:

Monday, September 28, 2015

Log and Transfer Sony PXW-FS5 4K XAVC videos to FCP 6/7 for editing on Mac


Sony is pleased to introduce the PXW-FS5, a small size XDCAM Super35mm camcorder with extraordinary capabilities. When quality is everything, make the most of the FS5s Super 35 Exmor sensor and shoot 100Mbps 4K (3840 x 2160) using Sony’s advanced XAVC (Long GOP) recording system. If you need a fast turnaround, switch to Full-HD (1920×1080) recording at up to 60p XAVC 10bit 4:2:2 50Mbps. When you got a PXW-FS5 4K camera, you will wanna know the 4K workflow. So, what is currently the best and most efficient way to work with Sony PXW-FS5 4K XDCAM XAVC in FCP 6/7 on Mac?

Generally, we can use Log and Transfer or Log and Capture to import videos to FCP 6/7 for editing. But the new XAVC codec is not supported well by Final Cut Pro. Since, Apple ProRes is the most compatible codec for FCP, so if we want to edit Sony FS5 XAVC in FCP 6/7, it is necessary to convert those already shot XAVC files to ProRes .mov using third-party software. Here, you can depend on Pavtube HD Video Converter for Mac. With this best 4K XAVC converter, you can deal with 4K videos regardless in .MP4, .MXF, .MOV format to Prores for Final Cut Pro editing without much quality loss.


Log and Transfer Sony PXW-FS5 4K XAVC to FCP 6/7 for editing on Mac

Step 1. Download, install and run the 4K XAVC to FCP Converter; click "Add Videos" icon to load your source XAVC files.

Step 2. Choose Apple ProRes 422 codec for Final Cut Pro 6/7.
Click the “Profile” option, and move mouse cursor to Final Cut Pro > Apple ProRes 422 HQ (*.mov) as output format. To get 1080 videos, we need to click the “Settings” button and choose 1920*1080 as output video resolution.

Step 3. Click the Settings icon if you’d like to customize advanced audio and video parameters like Video Codec, aspect ratio, bit rate, frame rate, Audio codec, sample rate, audio channels.

Step 4. Convert Sony PXW-FS5 4K XAVC files for FCP 6/7. Click the read button Convert to start transcoding Sony XAVC files to MOV for FCP 6/7. When the conversion is completed, click “Open” button to locate the converted Apple ProRes 422 MOV files for editing with Final Cut Pro easily.


Further Reading:

Thursday, September 24, 2015

Import Canon HF R600 1080/60p AVCHD to FCP X/7/6 on Mac

Canon VIXIA HF R600 lets you capture sharp and steady Full HD video by combining a 57x Advanced Zoom range and SuperRange Optical Image Stabilizer. It features a 3.28MP CMOS image sensor and a DIGIC DV 4 Image Processor that delivers up to 1080/60p video. Video is recorded to SD/SDHC/SDXC memory cards in either MP4 (up to 35 Mbps) or AVCHD (up to 28 Mbps) formats. A 3'' capacitive LCD touch panel is provided for easy framing, quick playback, and intuitive operation.


You may have bought Canon HF R600 camcorder and recorded some videos with Canon VIXIA HF R600 in AVCHD MTS format; you find it is not so easy to use the AVCHD recordings? The AVCHD format is good for recording but not convenient for editing, because many video editing programs like FCPX/7/6 can't support AVCHD format well. In this case, how can we import Canon VIXIA HF R600 to FCP X/7/6 and editing smoothly?

Here recommend you this Pavtube HD Video Converter for Mac, which regards as the easiest AVCHD to Apple ProRes converter in the market. You can load your Canon VIXIA HF R600 AVCHD into this converter directly, thanks to the inner codec, easy loading as you can see. Multiple presets in the format list for you to choose, especially for FCP newbie, to save setting time and ease the conversion. (You can also read about 2015 Top 5 Best Mac HD Video Converter Review for Camcorder Lovers)

Tip: the Windows version is renamed as Pavtube HD Video Converter (Read review).

First, we shall transfer the AVCHD .mts files from Canon HF R600 AVCHD camcorder to Mac computer hard drive. Download Pavtube MTS/M2TS Converter for Mac as the best AVCHD to Final Cut Pro converter.


Other Download:

How to transcode Canon HF R600 1080/60p AVCHD to ProRes for FCP X/7/6 on Mac?

Step 1. Launch this converter on your Mac

Free download this converter on your Mac and even on the Yosemite, it can run smoothly. The only difference between retail version and the trail version is the watermark "Pavtube" in the generated files.
After the installation, click this "File" >"Add Video/Audio" to load Canon VIXIA HF R600 AVCHD files into this app.


Step 2. Choose ProRes 422 for Canon VIXIA HF R600 AVCHD to load into FCP X/7/6

After successfully loading your Canon VIXIA HF R600 AVCHD  files, then click the "Format" bar to choose "Final Cut Pro">"Apple ProRes  422 (*.mov)" as your output format, which turns out the native format for FCP  X/7/6.


Some new users of FCP X/7/6 will wonder, as there are so many ProRes codec to choose, which one is the best. Actually, this depends on your aims of your converted files. If you can't decide which one to choose, then you can go to this "Differences among Apple ProRes codec" article to make sure before doing the decision.

Step 3. Adjust A/V parameters for loading Canon VIXIA HF R600 AVCHD to FCP X/7/6 as ProRes

If you want to make some parameters adjustment, click this "Settings" to do this job. Honestly, the default settings are already the most suitable for loading into FCP X/7/6. But Bit rate, Frame rate, Size (pix), etc, can be adjusted. And also you can see the detailed generated file information in the below table.


Step 4. Start to convert Canon HF R600 AVCHD for FCP X/7/6 as ProRes 422 (*.mov)

After setting the file location, click this "Convert" in the main UI and start to transcode Canon HF R600 AVCHD to ProRes for FCP X/7/6 editing. If you have multiple clips to convert, batch conversion is possible, but the maximum conversion number at one time is four.

For newbie, how to transfer media files into FCP X/7/6 can be learned here for them to master FCP X/7/6 better.

Further Reading:

Tuesday, September 22, 2015

Play Zenmuse X5 and X5R 4K videos on Mac/iMac

DJI has officially launched the Zenmuse X5 and X5R, two new cameras for DJI’s Inspire One that are the world’s first commercial Micro Four Thirds (MFT) cameras designed specifically for aerial use. The two cameras feature the MFT same sensor, which DJI claims is capable of capturing 16-megapixel stills and 4K video at 24fps and 30fps with an impressive 13 stops of dynamic range.


When you have recorded many 4K videos from ZENMUSE X5R or ZENMUSE X5, you maybe want to play/watch them on Mac with QuickTime player easily.

In fact, many 4K videos are recorded in H.265/MXF/RAW/XAVC format, which QuickTime Player couldn’t recognize well. It’s a common situation that when putting your 4K video files to QuickTime for playback, you’ll be informed 4K is not in a format that QuickTime Player understands, in this case you need to convert your 4K videos to QuickTime friendly format. Here you can depend on Pavtube HD Video Converter for Mac, which is an all-in-one tool that can help you convert 4K videos to QuickTime playable MOV format quickly and easily. Besides, this top 4K excellent converter also has the ability to change your any 4K videos to various TVs, players, smartphones, tablets, and more. It is also available to customize the output resolutions to any size the users want, which is so convenient.

How to Open Zenmuse X5 and X5R 4K videos on Mac for playback?

Step 1. Load 4K video files

Launch the 4K Video Converter Mac. Drag & drop 4K files to the program directly and your files would be added instantaneously. Or you can head to the “Add” button to locate the 4K videos you want to add.


Step 2. Select output format
Click format you choose MOV as target format. This video app offers the QuickTime Movie Format for you. Or, you can also choose “Common Video -> MOV - QuickTime (*.mov)” as the output format.

Step 3. Adjust video/audio settings
Click “Settings” button; you can adjust video and audio settings, including codec, aspect ratio, bit rate, frame rate, sample rate, and audio channel.

Step 4. Start 4K video conversion on Mac
Hit the big green “Convert” button to let this smart converter start encoding 4K to mov on Mac. After the conversion, you can get the encoded files under “Open” panel. Import the converted MOV files to play in QuickTime. Now you can enjoy your Zenmuse X5 and X5R 4K videos on Mac/iMac freely.

Wednesday, September 16, 2015

Import XAVC S Files from Sony A7R II to Premiere Pro CC/CS6/CS5

Summary: Run into some problems when importing XAVC S files from Sony A7R II to Premiere Pro CC/CS6/CS5? This post displays the detailed steps required to convert Sony XAVC S to MPEG-2 with lossless quality.


The Sony A7R II is the second generation of a series that set out to prove how serious a compact system camera can be. With a full-frame sensor, the range has offered image quality similar to some of the very best DSLRs, such as the Nikon D810 and Canon 5DS R.

If you’ve got a Sony Full Frame Mirrorless Camera like A7R II, the 4K XAVC S format will not be an unfamiliar for you. The only problem usually occurred during the editing process. 4K XAVC S still cannot fully supported by some video editors like Premiere Pro can't ingest MP4 video from Sony A7R II directly.

As we all know, MPEG-2 is the codec that Premiere natively recognizes. So the problem can easily turn to be how to convert Sony A7R II 4K XAVC S footage to MPEG-2 for edting in Premiere Pro CC/CS6/CS5. After the XAVC S to MPEG-2 conversion, you can directly import and edit the 100Mbps XAVC S files in Premiere without any importing problems and need not to search for the latest Sony XAVC S Plug-ins or wait for the release of the suitable one.

Here Pavtube Video Converter, a solid tool to help users convert 4K XAVC S to MPEG-2, which ensures the best results when using in Premiere Pro CC/CS6/CS5. With this professional XAVC S to Premiere converter, you can effortlessly encode/re-encode 4K or 1080p XAVC S from Sony A7R II for smoothly importing and editing in various non-linear editing systems (NLEs), including Final Cut Pro X, FCP 6/7, iMovie, Final Cut Express, Adobe Premiere Pro, Avid Media Composer, etc.


Other Download:
- Pavtube old official address: http://www.pavtube.com/video_converter/
- Amazon Download: http://download.cnet.com/Pavtube-Video-Converter/3000-2194_4-75734821.html
- Cnet Download: http://download.cnet.com/Pavtube-Video-Converter/3000-2194_4-75734821.html

How to import Sony A7R II 4K XAVC S files to Premiere Pro CC/CS6/CS5?

Step 1: Download and have a quick installation. The trial version will have a watermark on your converted files. Except for that, there are no time limitation, no virus, and no unnecessary bundle apps while downloading. After that, click “Add Video” button to load your Sony XAVC S videos. You can load several files at once thanks to “Add from folder” button.


Step 2: Click the drop-down list in the format line to get the format box. Then choose “Adobe Premiere/Sony Vegas>>MPEG-2 (*.mpg)” as output format.


Step 3: Click the “Settings” button and set proper video/ audio parameters. My advice is to set the video size, bit rate and fame rate to be exactly as the footages so that you will suffer least quality degradation. If you would like to use default settings, simply skip this step.

Step 4: After all necessary settings, hit the “Convert” button to start the XAVC S to Premiere best supported MPEG-2 conversion.

Conclusion: After conversion, you can get the generated files by clicking “Open” button. Now, you’ll get no troubles in editing Sony A7R II XAVC S in Premiere Pro CC/CS6/CS5. Follow the steps and have a try!

Further Reading: