
Question: XAVC MXF files can’t be read in Premiere Pro CS6
“I’m currently feeling so frustrated over XAVC MXF import issues with Premiere Pro CS6. I’m intending to import one of my clients’ XAVC MXF footage from a Sony camcorder to PP CS6. Every time I try it read the various audio files fine, but refused to import the video stream, and gave me a ‘generic error’. Why does this happen? Is there anything that I missed? Does that mean I have to convert XAVC MXF to an intermediate codec so CS6 can recognize them? Any help of advice would be greatly appreciated.”
As far as we know, only the latest Adobe Premiere Pro CC has added support for the XAVC format. To be able to import and edit XAVC MXF in its former version Premiere Pro CS6, you will need to download and install plug-ins like Rovi Totalcode, which has perfect support for your XAVC MXF recordings. Unfortunately, this plug-in costs a lot of money ($350) and only comes with PC version. If you are looking for an easy and affordable way to work XVAC MXF with Premiere Pro CS6, we do recommend convert XAVC MXF to MPG format with MPEG-2 codec for use in Premiere with optimum performance. This requires a reasonable priced third party program named Pavtube Video Converter for Mac. If you are running on Windows, you can choose the equivalent version Pavtube Video Converter.


How to import XAVC MXF to Premiere Pro CS6 for editing on Mac Pro?
Step 1: Run the upgraded Mac Video Converter, and click the “Add video” button to load your original XAVC MXF recordings. If you want to load several files at one time, “Add from folder” button is available. Besides, you can also drag and drop the files to the main interface directly.

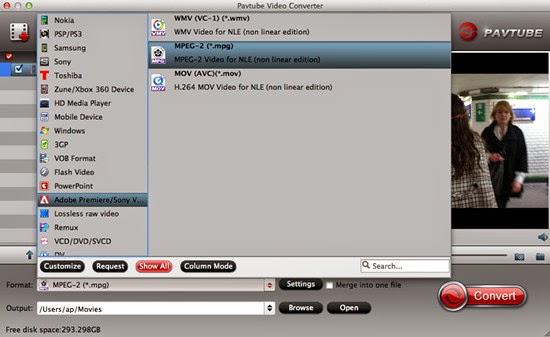
Step 2: When you launch the program and load your XAVC MXF files in , then we can choose the suitable output formats. You’d better click “Format” bar and select “Adobe Premiere/Sony Vegas>>MPEG-2 (*.mpg)” as output format.
Step 3: Click “Settings” button to customize the output video and audio settings by yourself. But if you are not good at it, you’d better use the default parameters, they will ensure you a good balance between file size and image quality basically. You can change the resolution, bit rate, frame rate as you need.
Step 4: When everything is done, you can take a preview by hitting “Play” button. If you are satisfied with the final result, you can click “Convert” button to finish the conversion work.
Conclusion: When the conversion is finished, you can click “Open” to get your generated files. Now, you can edit XAVC MXF in Premiere Pro CS6 without any hassles. Surprise! All of us can get 40% discount off before May, 1st, 2015!
Further Reading:
- Will PS4 Be Able to Play 4K XAVC-S Footage on a 4K TV?: For PS4, it’s good to use them as your home video game console for the HD 1080p resolution and if you equipped a 4K TV, then the playing experience will up to a higher level.
- Top 3 Best XAVC/XAVC S Video Converter for Mac Review: Since the 4K movie and camera have got their momentum through all the way, but progress is so rapid in the video industry that the simple fact is 4K wasn’t covered well by existing formats.
- Top 5 Best Video Converter for Mac Reviewed 2015: When you are doing to watch some videos on Mac, have you met the trouble of ‘Error message’ appeared on the screen? Usually the problem is that you do not have the application necessary to play the file.