Showing posts with label 4k to 1080p converter. Show all posts

Monday, March 19, 2018

Compress DJI Mavic Air 4K to 1080p for Editing in iMovie

4K is an up-and-coming video technology that promises a better quality picture when you're watching movies or TV shows. You can get video with 4k resolution from many where, including downloaded from Youtube, shot with UHD camcoders (Panasonic, Sony, DJI, GoPro etc), digitalize 4K Blu-ray movies. However, no matter where your 4K videos come from, for film-making lovers, edit 4K footage with iMovie to do postproduction is a good idea. But for some people who owned a old computer it is painful. Just like the man below:

"Hey Guys,

as I'm going on travels and just having a Macbook Air (2011) with me I'm having trouble editing 4k material. (Actually, even playback 4k material is a pain on that device)

So I'm wondering what's the best option for my limited hardware. Should I still record 4k material (Which I could use once home and back at my powerful desktop) but compress it down to 1080p material for the video's that I'm going to create during travels? If so, what's the easiest and fastest way to compress the material coming from the Mavic Air SD down to 1080p.

What would be your recommendation?"

This guy is looking for one way for editing DJI Mavic Air 4K on iMovie smoothly, he asked for a professional DJI Mavic Air 4K to 1080p converter which can make it easy for editing 4k footage on his old computer. So here I will share an easy-to-use and professional 4k to 1080p video converter which is deaigned for you to compress or convert 4k video by changing video format or adjusting video settings, Pavtube Video Converter for Mac | Windowscomes as winnes from its competitors will ever let you down.

Apart from compressing DJI Mavic Air 4K to 1080p without any video quality loss, it also supports you to choose any video format from it formats list. With it, you are able to 4K MKV, 4K MP4, 4K MOV, 4K AVCHD etc to it and output MP4, MOV, MKV, AVI, M4V etc with 4K/2K/SD/HD resolution. Moreover, many optimized devices presets including iMovie, Final Cut Pro, Xbox, Samsung, Apple, TVs, Wii u, HTC, and more for you to select, so you are free to get the most standard video format for inputting to iMovie for postpruduction. Besides, if you are familiar with the video parameters, you are able to adjust video audio codec, rasolution, bit rate, frame rate, channels, and more.

With this converter, you are able to edit DJI Mavic Air 4K footage before you output, such as you can merge several 4k footage parts into one, trim to cut the part you don't need, crop the black area or the area you want to cut, remove or replace the audio of the source video, add external subtitle to the 4K footage, more thing you can do please refer to this article.

Step by Step to Compress DJI Mavic Air 4K to 1080p for Editing in iMovie

Step 1: Load DJI Mavic Air 4K video into the program.

Start the program on your computer, click "File" menu and select "Add Video/Audio" or "Add from folder" to import DJI Mavic Air 4K video.

load dji mavic air 4k

Step 2. Select iMovie most standard video format

Navigate your cursor to "iMovie and Final Cut Ex..." and select "Apple InterMediate Codec(AIC)(*.mov)" from it submenu. If you have other needs, you can browse the whole list to get the video formats you want.

h264 mov imovie

Step 3. Compress DJI Mavic Air 4k to 1080p for smooth editing

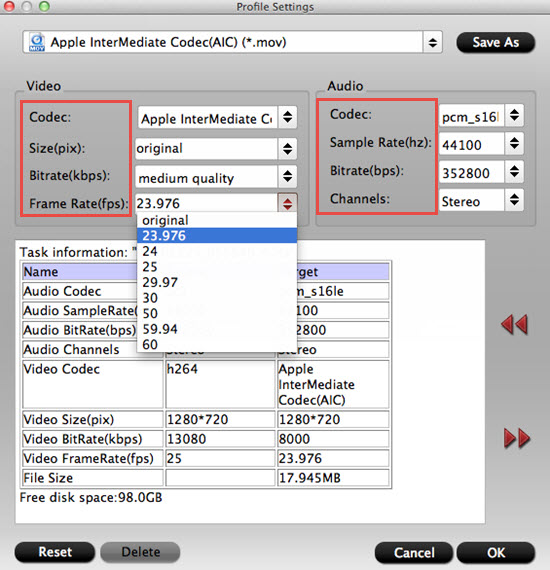
After you have defined the output video fornat, then hit the Settings button, in the next window, you are able to adjust video parameters, including video audio codec, bit rate, resolution, frame rate, channels...

To compress DJI Mavic Air 4k to 1080p, you just need to change video resolution from 3840*2160 to 1920*1080. If you still feel frustrated about video large size, you can lower the video bit rate to get smaller video file size.

imovie setting

Step 4. Start DJI Mavic Air 4k to 1080p conversion

To start DJI Mavic Air 4k to 1080p conversion, just hit the red Convert button on the UI, when the conversion stops, click Open to locate the folder with generated file. Now you are free to input the 4k footage to iMovie for further editing.

Sunday, July 12, 2015

Tricks for Downsizing GoPro Hero 4K Video to 1080p

Summary: Are you troubled with how to downsize GoPro Hero 4K video to 1080p for playback and editing? Sometimes, 4K video can’t be played properly most likely your computer is not able to process the data of the large HD files fast enough. Check out the tips below.


Hot search: GoPro Hero 4K video to DropBox | GoPro Hero 4K video to Sony Movie Studio | GoPro Hero 4K video to Vimeo | GoPro Hero 4K video to VLC | GoPro Hero 4K video to Pinnacle Studio

We know that GoPro Hero cameras can capture professional-quality videos, for example Hero3 White can capture 1080p 30fps video, Hero3+ Silver can capture gorgeous 1080p 60fps video, Hero4 can take time lapse videos with high data rates, Hero4 Black can shoot incredible high-resolution 4K 30fps and 2.7K 60fps video and the high frame rate 1080p 120fps video.

What is the difference between 1080p and 4K resolution?
A High Definition TV with 1080p resolution is composed of two million pixels (1920*1080), while a 4K TV (aka Ultra High Definition) has over eight million pixels (3840*2160). Therefore, 4K has around four times more resolution than 1080p and produces a clearer picture.

As we know, the majority of playback, editing work is still being finished in 1080p. In most cases, we still need to downscale most of the 4K video files to 1080p. In fact, you may not see any real differences if you're not doing much to the footage. One of the huge benefits to 4K, that you can do a lot to the image and retain detail for a beautiful 1080p finish. For those who wanna play and edit GoPro Hero 4K videos on old computer (playing a 4K video requires more computing power and it could be more time consuming), we suggest you to convert all GoPro Hero 4K videos to 1080p then play in 1080p and smart-render.

Best solutions to downscale GoPro Hero 4K video to 1080p:
Although there are numbered tools and utilities can convert and compress the ultra HD videos, few of them can process at a fast speed. Well, Pavtube Video Converter for Mac is considered to be the best 4K to 1080p converter. It is surely in the support of compressing GoPro Hero 4K videos to 1080p faultlessly. For Windows users, Pavtube Video Converter is the alternative choice.


Other Download:
- Pavtube old official address: http://www.pavtube.com/video-converter-mac/
- Amazon Store Download: http://www.amazon.com/Pavtube-Video-Converter-Mac-Download/dp/B00QIBK0TQ
- Cnet Download: http://download.cnet.com/Pavtube-Video-Converter/3000-2194_4-76179460.html

How to downsize GoPro Hero 4K video to 1080p?

Step 1: Download and have a quick installation. The trial version will have a watermark on your converted files. Except for that, there are no time limitation, no virus, and no unnecessary bundle apps while downloading. After that, click “Add Video” button to load your GoPro Hero 4K videos. You can load several files at once thanks to “Add from folder” button.


Step 2: Click the “Format” drop down list to select output format. If you want to play GoPro Hero 4K videos on decent media player, you’d better set a preset profile that best meets your needs. For instance, if you want to play GoPro Hero 4K videos on VLC smoothly, “HD Video>>H.264 HD Video (*.mp4)” would be the best choice.


Step 3: Click “Settings” button; you can adjust video and audio settings, including codec, aspect ratio, bit rate, frame rate, sample rate, and audio channel. To down-convert ultra HD 4K to 1080p, do remember adjusting video size to 1920*1080. That is the exact 1080p.

Step 4: At the end, hit “Convert” button to let the 4K to 1080p conversion begin.

Conclusion: When the conversion finished, check the generated 1080p video, you will certainly be satisfied with its final video quality. It would be easier for you to playback and edit.

Further Reading: