Bandicam is an application that allows you to record everything that happens on your screen, including any program that uses graphic technologies DirectX or OpenGL, such as the majority of modern video games. The program's configuration options allow you to modify the quality and size of the video, the type of codex that you want to use, the frames per second, the channels and the bit rate of the audio, or even whether you want the mouse cursor to appear or not. Even though, people still meet trouble when they try to import Bandicam recordings to After Effects, which pop up a windows with this message "Unsupported format or damaged file", just like the question below, why this happened? Keeping reading.
"Hello, I know in AE your supposed to import your lossless video files, but I'm recording my screen using bandicam. It has a special codec that uses the gpu + cpu, and only works with NVIDIA CUDA graphics cards (which I have) and uses the H.264 format. The only container you can use is AVI. The problem is there really is no lossless codec, and since this codec uses the gpu as well, the videos turn out spotless. Amazing quality and amazing fps. So I really want to use this codec, but AE wont import it. It says its an unsupported format."
So to output the formats with best settings for Adobe After Effects video editing, there are two ways for you. One is to utilize Bandicam itself to output different video container with different codec. As you can see from the picture to make it clear.
Bandicam - Best settings for Adobe Premiere, video editing
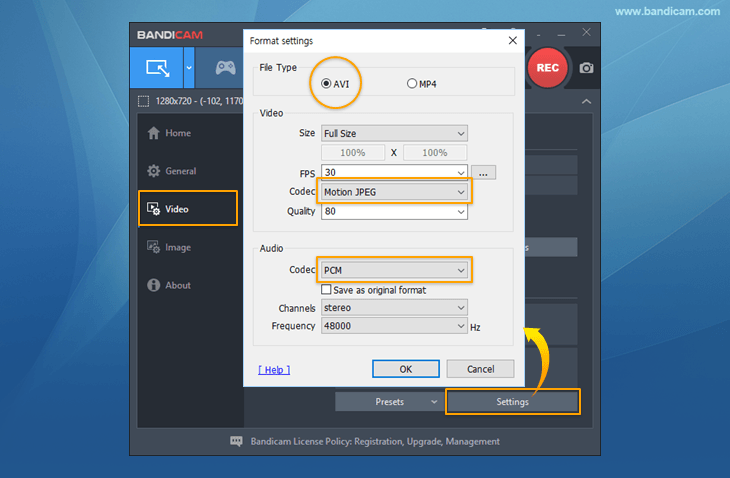
AVI: Bandicam settings for Adobe Premiere (Recommended for most users)
To edit the recorded video with Adobe Premiere with the AVI container, choose the "Motion JPEG and PCM" codecs.
Motion JPEG (M-JPEG or MJPEG) is a video format in which each video frame is a JPEG image, therefore each frame is a keyframe, so you can edit the recorded video easily.
MP4: Bandicam settings for Adobe Premiere (Recommended for advanced users)
To edit the recorded video with Adobe Premiere with the MP4 container, choose "Prefer CFR".
Adobe Premiere doesn't support VFR (Variable Frame Rate), so you have to choose the "Prefer CFR" option to edit the recorded video in Adobe Premiere.
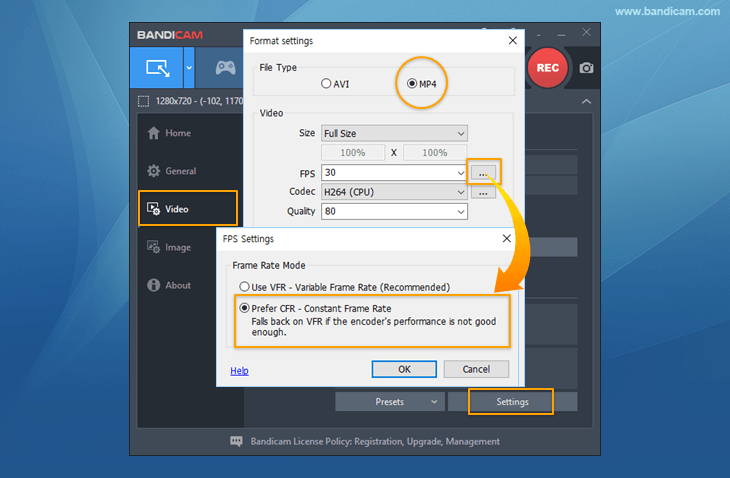
* Caution) If the encoder's performance is not good enough, the video will be saved as VFR and you could have the video and audio syncing issue. In this case, you have to use the "Motion JPEG" and "PCM" codecs or Sony Vegas. If you have the syncing issue with the "Motion JPEG" and "PCM" codecs, you have to reduce the video resolution of the recording target.
The other solution comes as the best way to solve the problem. You have to get a Bandicam to After Effects video converter, to make it short, here I will share my video converter with you which is called Pavtube Video Converter Ultimate, it is a professional and easy-to-use software to convert any video formats and Blu-ray/DVD to supported format like MPEG-2 for editing in After Effects any version. Besides, it also features some practical editing functions, including mergeing clips, trimming movie files, adding subtitles to your original files, replacing audio tracks, etc. catering for your different needs.
With it, you can effortlessly convert your DVD files including DVD discs, DVD Folder, DVD IFO File, DVD ISO Image File for smoothly importing and editing in various non-linear editing systems (NLE), including After Effects, Adobe Premiere, Final Cut Pro, iMovie, Avid Media Composer, Davinci Resolve and more.
Now download the best Bandicam to After Effects Converter and follow the tips below to achieve your goal smoothly.


If you are running a Mac computer, please turn to the alternative Mac version: Pavtube iMedia Converter for Mac.
Easy steps to convert Bandicam recordings to After Effects editable video
Note: This guide takes the Windows version screenshots for example. The way to convert Bandicam recordings to After Effects on Mac OS is the same. Just make sure you get the right version.
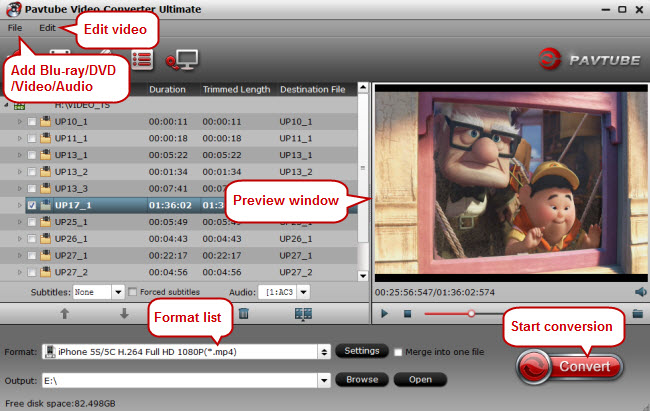
Step 1. Import Bandicam RecordingsDownload the video converter for After Effects from the above button. After the download is over, run it and click "File" to add source Bandicam recordings into this tool for After Effects as well as other editing systems like Adobe Premiere, Avid Media Composer, etc.
On the main interface, there is a preview window provided for you to preview the Bandicam recordings to ensure the files are what you want to rip. You can also take snapshots of the Bandicam recordings when previewing them.
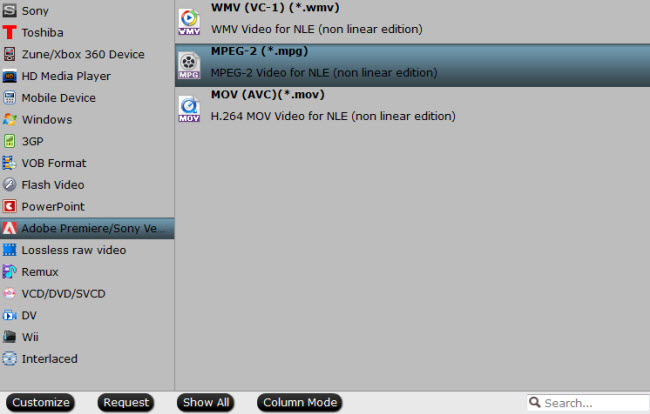
Step 2. Choose After Effects native format - MPEG-2
Click "Browse" to set the output path to save the converted videos and choose the output format. Since we have known the best format for After Effects CC, just go to the output format list where you need to follow "Adobe Premiere/Sony Ve…"> "MPEG-2 (*.mpg)."
Tip: Adjust video and audio settings
Click "Settings" button and customize proper video/audio parameters including Video size, bitrate, fame rate, Audio codec, sample rate, audio channels and more.
Click on the "Convert" button which is red in right bottom screen to start converting Bandicam recordings to MPEG-2 - the perfect format for After Effects to import and edit. Just wait for the process to finish. After that, you can get the converted videos and just open After Effects and import the converted videos for editing.
The main steps of how to use After Effects are listed below:
1. Start After Effects.
2. Create a "new composition" either using the traditional method or by simply using the short cut keys "Ctrl+N".
3. Save the new composition as a new project by clicking File>Save.
4. Now import the required files into the workspace in your newly created composition: File>Import>File. You can also build a composition through layers and edit these layers from the edit tab.
5. Now you can simply drag and drop files from the "project tab" to the "timeline tab", "composition tab" or "layer tab".
6. You can also transform your 2D layers by bringing the cursor over the composition tab and zooming in or else wise by by "scrolling out".
To move a 3D layer press "cmd+W" for mac or "cntrl+W" for Windows.
7. Lastly, you may add animations, effects and presets by visiting the "Transform" or "Contents" Tab.
8. Click Windows>Effects and Presets for further options.
9. Save all your work before exiting After Effects.
Related Articles
Any Product-related questions?support@pavtube.com