Copy the “100M3D_R” and the “100S3D_L” folders from the DCIM folder on the SD card to a location on your computer. It is very important to place both these folders in the same location. For example, create a new folder on your computer that represets the event; for example, “bike ride” and then copy both the LEFT and RIGHT eye camera folders into that same folder. In the top folder (“bike ride”) you should see both “100M3D_R” and 100S3D_L” listed as separate folders.
Click the IMPORT NEW FILES button and browse to the “100M3D_R” folder that contains the files you want to import.
Select the top folder and click Open. If you used the above method for maintaining the correct file structure, GoPro Studio will automatically locate the corresponding files from the “100S3D_R” and “100S3D_L” folders and import these files as 3D.
Press ‘Command+S’ on your keyboard to save the project.
Manually Importing
There may occasionally be times in which you will need to manually import a pair of 3D files. This can be the case if your files have been renamed or moved to folders that are not using the default folder names recorded in‐camera. Fortunately, GoPro Studio lets you manually import and pair these files using the Manual Import option.
1. Secondary‐click on a blank area of the Import Bin and select “Manual Import...” from the context menu that is displayed. This opens the Manual Import Window.
2. Use the BROWSE buttons to find the left and right source files.
3. The SKIP BACK and SKIP AHEAD buttons can be used to step through the clips frame‐by‐ frame. Use these to compare your left and right images to make sure that they are synced with each other.
4. Click the OK button to pair the two clips.
After importing your 3D files, you’ll see the word “3D” underneath their thumbnails in the Import Bin. This indicates that the files were successfully imported as 3D video files. You can now trim them and choose advanced conversion settings in the same way that you can with 2D files.
Note:
According to GoPro Studio support website, GoPro Studio has strict requirements of video formats, it only supports
Step 1: Import & Convert
The following formats can be imported into "Step 1: Import & Convert" and converted into GoPro CineForm files for use in "Step 2: Edit".
MP4 video files from the original HD Hero Original, HD Hero 2, HERO3, and HERO3+.
MOV video files from Canon and Nikon DSLRs (except in Windows 8)
JPG files from GoPro HD Hero, Hero 2 and Hero 3 cameras (.jpgs from other sources may work, but have not been tested nor are they officially supported)
"Step 2: Edit" can import the following file formats
Video formats: GoPro CineForm AVI or MOV files (MOV only on Mac)
Audio formats: MP3, WAV, AIFF, M4A and CAF
And as we can see, GoPro Studio does not support all the 3D/2D videos. So next we will show you how to import the special 3D and other videos to GoPro Studio.
Part 2. How to Import special 3D video to GoPro Studio for editing?
Besides the format incompatibility issue, GoPro Studio also has some other limitations. This is why we always have GoPro Studio issues while editing 3D or converting 3D video : won't import videos, crashes, can't output files... Then how to edit those incompatible 3D videos in GoPro Studio?
To solve this dilemma, you need to take a little up front time and set up a workflow that will convert your video into a more editing-friendly format for GoPro Studio like MP4 or MOV. Pavtube Video Converter is the solid tool to help users make the Video to GoPro Studio transcoding on Windows PC (Windows 10 included).
This program features high efficiency and seamless conversion. With it, you can transcode any 3D AVI, MKV, WMV, FLV, and some MP4 or MOV video to GoPro Studio compatible MP4 or MOV format. Besides, its also can convert other video like AVI, MP4, MKV, MOV, MPEG-2, DNxHD, and more videos to GoPro Studio editable format. Besides GoPro Studio, this powerful video tool also provide you the wonderful output format for popular editors like Adobe Premiere, Avid Media Composer, Windows Movie Maker, Pinnacle Studio, PowerDirector, etc. (read review)
Hot search: iPhone videos to GoPro Studio, GoPro Cineform MOV files from GoPro Studio to Premiere/Avid/FCP, alternative to GoPro Studio
If you're editing Videos in GoPro Studio on Mac, try Pavtube Video Converter for Mac. If not, download and get it from below:


Other Download:
- Pavtube old official address: http://www.pavtube.com/video_converter/
- Amazon Download: http://download.cnet.com/Pavtube-Video-Converter/3000-2194_4-75734821.html
- Cnet Download: http://download.cnet.com/Pavtube-Video-Converter/3000-2194_4-75734821.html
Convert 3D/2D Video to GoPro Studio friendly format on Windows (Windows 10 included)
Note: The Mac version steps are same with the Windows version
Step 1. Add 3D videos
Install and run the Video to GoPro Studio Converter on your computer, then click "Add Video" button to browse and load your rvideos which you've transferred to your Windows PC.

Step 2. Specify output file format.
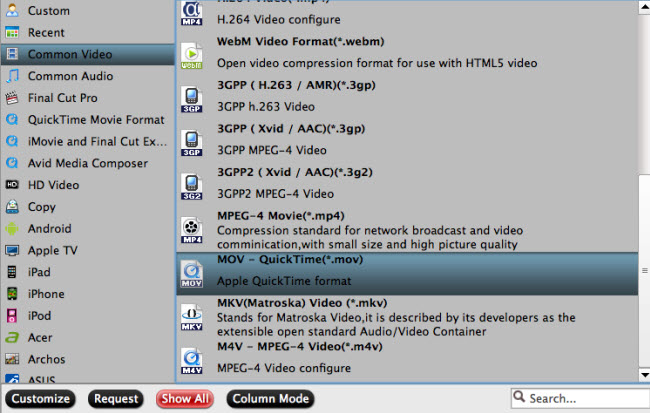
Click “Format” bar, from its drop-down selection, define “MOV – QuickTime (*.mov)” as the output profile format.

Step 3. Transcode files to QuickTime MOV format.
Carry out video to QuickTime Conversion process by clicking the right-bottom “Convert” button. When the conversion is over, click “Open” on the main interface to locate the converted files to transfer and import into the GoPro Studio without any problem.
Read More: