Though Adobe Premiere Elements with stunning features is popular video editing software for us. The point here, sometimes, you will find it's a painful experience when loading Sony codec’s XAVC-I/L files into Premiere Elements 13. So how make Sony XAVC recordings accepted by Premiere Elements 13 will be the top point for most user. May be in the following article, you may find some solutions.
‘I just got the Sony splash-proof wearable video camera the HDR-AS100VR. When I wanna edit the XAVC recordings to Premiere Elements 13 for editing and then send to my partners, something wrong happened there like ‘Unknown Errors’, what should I do?’ Asan enthusiast-level video editing application, Premiere Elements 13 has no ability of working with all video formats. No matter for the common AVI or the latest codec H.265/HEVC. Any good solutions there?
Then to solve the problem, we just need to look for a powerful third party program to convert XAVC S videos into MPEG-2, or MOV. Why not have a try of the Pavtube Video Converter for Windows/Mac? It is much professional on dealing with XAVC S videos into Premiere Elements supported formats. What’s more, you can adjust or edit videos with personal style. More details you can take the related review.
Learn how to transcode Sony XAVC to MPEG-2 MPG for editing in Premiere Elements:
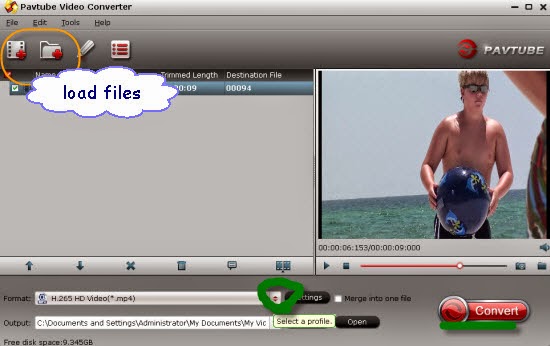
Step 1.Add your XVAC files in
Launch this XAVC to Premiere Elements program, on the main interface, we can add our original files with ‘Add videos’ as individual video clips, or with ‘Add from folder’, we can load them in a complete folder. Look as the screen shot below.
Step 2.Select best output for Premiere Elements
Then we are going to come to the top important step, select the best output one for Premiere Elements. Tap the ‘Format’ bar on left of the preview window, drop down the output list, nearly on the bottom of the list, we suggest to find the ‘Adobe Premiere Pro/Sony Vegas’>>’MPEG-2 (*,mpg)’ as the best. Also, MOV and WMV you can have a try.
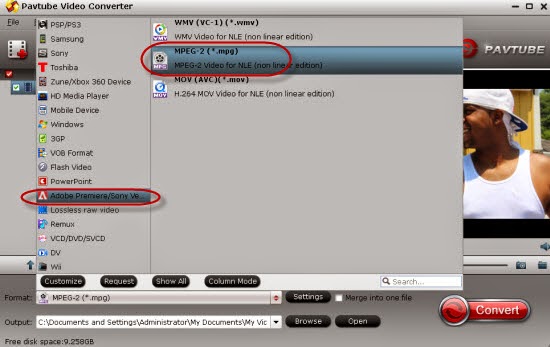
Notes: If you are fond of the higher quality and smaller size, H.265/HEVC could also be a good choice for you if you need. You won’t be disappointed here!
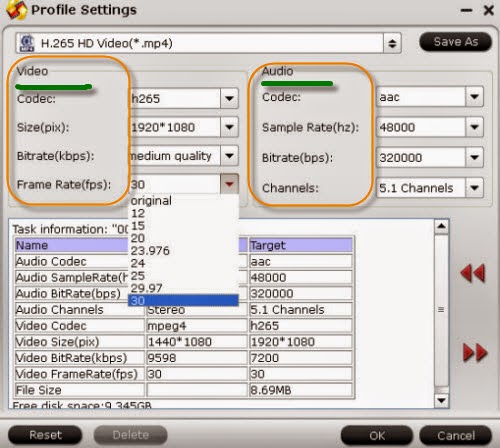
Step 3. Optional function for advanced users
Still Pavtube studio keeps the ‘Settings’ item down for those who wanna more adjustments on their output videos. To adjust the video codec, video size, bitrates or frame rate or some audio channels, why not take around of this function?
At the end of this conversion, tap the ‘Convert’ icon on the main interface, we can easily get the MPEG-2 MPG output recordings which can be editing well in Premiere Elements 13. With the concise workflow and fast speed, we won’t wait for a long time.
See more?