If you ask me how to import our JVC HD Everio GZ-RX110BE 1080/50p AVCHD MTS files to Premiere Pro CC or CS for editing, please read the following article.

Overview: If you get the recordings from JVC HD Everio GZ-RX110BE camera, have you ever met some questions on how to the 1080p/50p AVCHD MTS files in Premiere Pro CC/CS? During the following paper, you won’t miss the solutions. Additionally, for other JVC videos editing in iMovie/FCE, etc, we can also take a good reference.
First of all, I don’t know how what the features this JVC GZ-RX110BE camera attracts you so much, but there indeed some main hot points exist for those JVC fans. Something we should know like below:
- Waterproof to 5m;
- 1/5.8-inch CMOS with 2.5Mpixels;
- AVCHD video format at up to 1080/50p;
- shockproof when dropped from up to 1.5m;
- 40x optical zoom; 60x dynamic zoom;
- Wi-Fi control via Android or iOS app
The AVCHD format from JVC camcorders is not friendly for Mac. To edit, play or share JVC AVCHD footage on Mac, you will need to convert JVC MTS files to best compatible format for Mac OS. Only by converting can you avoid video playback, editing and importing problems due to the recorded AVCHD format. Fortunately, in the following paper, I can share the JVC AVCHD MTS to Premiere Converter for you, it’s the best workaround to handle this job well.
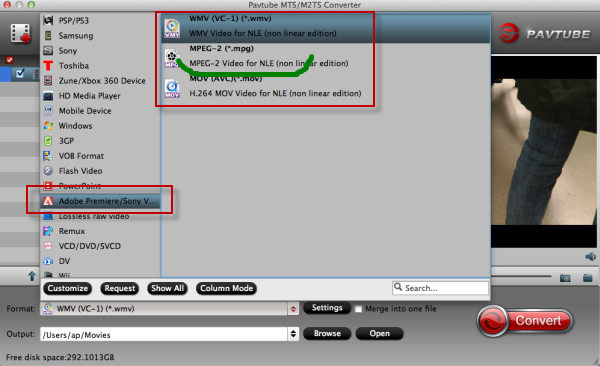
To get the work done, Pavtube MTS/M2TS Converter for Mac/Windows is highly recommended. It's a professional yet decent JVC GZ-RX110BE AVCHD to Premiere Pro Converter which can help you transcode JVC GZ-RX110BE .mts video to Premiere Pro supported video format (h.264 MOV/mpeg-2 MPG/ wmv3 WMV) with several simple steps. Just do some clicks on your mouse with your finger, you can easily convert JVC GZ-RX110BE files to Premiere Pro on Windows/Mac.
Notes: After tested so well, this program can work well with the latest Mac operation OS X Yosemite and Windows 10. So you will not worry about the updated versions there.
When download the program from the official website, do not forget to load your original JVC MTS files in as the first step. Then we could find the suitable ones as output list as we mentioned above. Drop down the list, select the ‘Adobe Premiere Pro/Sony Vegas’>>’MPEG-2 MPG’ as the most compatible one. Surely we can make the MOV and WMV as the other choices.
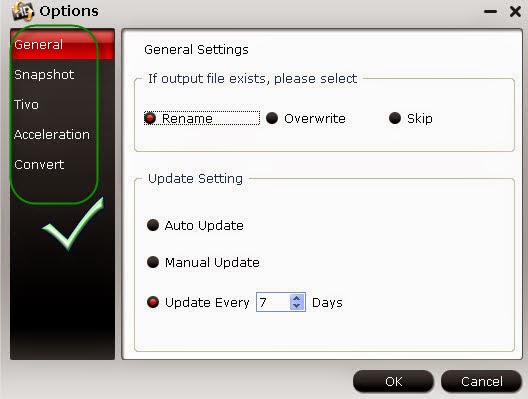
We also have the optional choices here, on the main interface, ‘Settings’ and ‘Edit’ are tow effective ones we should pay attention to. Adjust your video and audio settings in ‘Settings’ or make some output video effects in ‘Edit’. In other words, we sometimes call this program as Tiny Editor’. Today, I’d like to introduce the ‘Options’ there to you. There you can find some different optional functions that differs from some other related programs.
Of course the functions we mentioned above you can just only take a reference. If you have done all the preparation work, just click the ‘Convert’ we can let the program go. With a faster speed, we can get our output files for Premiere Pro as soon as possible.
Tips: No ideas of transferring files to Premiere Pro CC/CS? Some related transferring guides could help you out of the trouble. Do you wanna a try? Good luck!
Related: