Sunday, February 23, 2014

Sync/Tranfer Digital Copy to Asus Transformer Book T100 for watching while away from home

In below article you can learn about how to legally get rid of DRM protection from Digital Copy to freely play them on Asus Transformer Book T100 when away with work or going travelling anywhere you like.

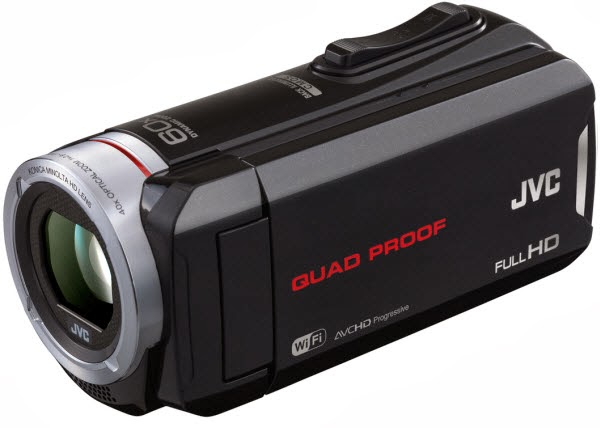
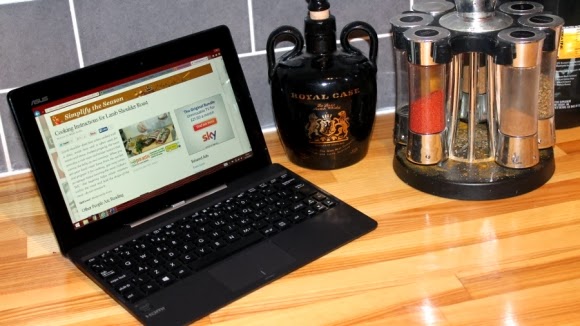
The Transformer Book T100 is a 10 inch Windows tablet with a detachable keyboard station which lets you use the system like a laptop. I spent most of my time using the Transformer Book T100 as a laptop, surf the web on the couch, read an eBook, watch a video, or play a casual game, and the device was able to handle both scenarios with ease. It has a faster processor than any netbook to date, offers long battery life, has a relatively high-resolution display, which makes it better for watching videos on Transformer Book T100. 
 
Perhaps you are a video lover and collected many Blu-ray or DVD disc at home, then how to get digital copy files from Blu-ray/DVD playable on your Transformer Book T100 for enjoying when you are away from home?

Literally, Digital Copies are DRM protected. Usually it will be attached as an independent disc (DVD) with its code in your Blu-ray set; it requires a code to be playback on Windows, Mac, IOS devices or authorized tablets. To watch DRM movies on your Asus Transformer Book T100, you'll have to remove the DRM protection from Digital Copy first.

With Pavtube ChewTune - a top Digital Copy to Transformer Converter (Reach the Mac version here: Digital Copy to Tranformer Converter for Mac), you can easily accomplish this goal painless.

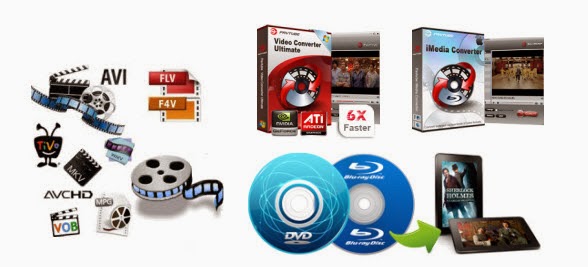
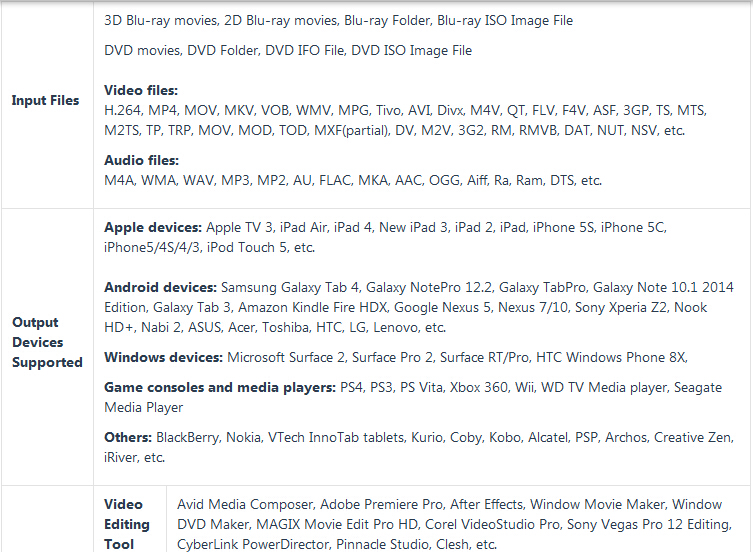
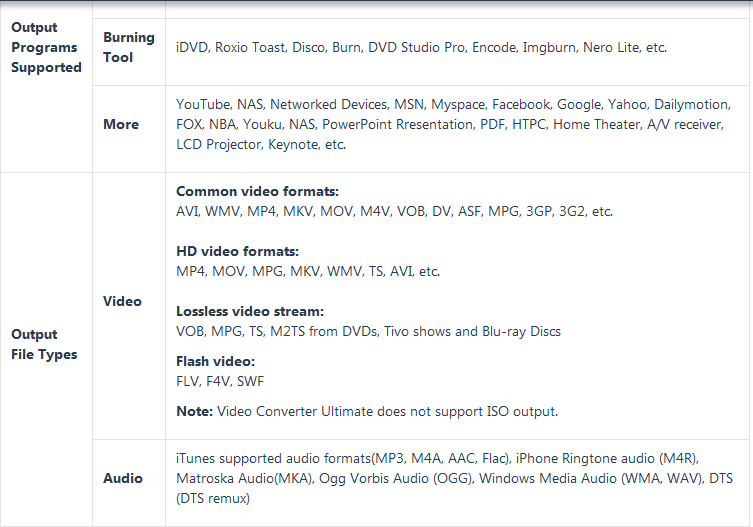
The professional DRM Converter can legally remove DRM protection from BD/DVD Digital Copy movies, and convert Digital Copy movies to Tranformer supported format like MP4. Besides, this Digital Copy movie converter can also convert iTunes M4V, Amazon WMV, BBC iPlayer videos to MKV, AVI, WMV, MOV, M4V, MP4, FLV, etc. so it is an useful tool for your all portable devices, like Samsung Galaxy Note 3, Galaxy Tab 3, Nexus 7 2, Nexus 10, Sony Xperia Z1, LG G-Pad, Moto X, Asus Transformer Prime and more.

Tips: Money saving bundles:

ByteCopy($42) + Vidpie($29) = Only $54.9, Save $16.1
Video Converter Ultimate($65) + Vidpie($29) = Only $74.9, Save $19.1
BDMagic($49) + Vidpie($29) = Only $49.9, Save $28.1
DVDAid($35) + Vidpie($29) = Only $49.9, Save $14.1

Before converting:

1. Transfer digital copy to computer

2. Get DRM removal tool installed on your PC/Mac: 

Tutorials: Convert Blu-ray/DVD Digital Copy Movies to Asus Transformer Book T100


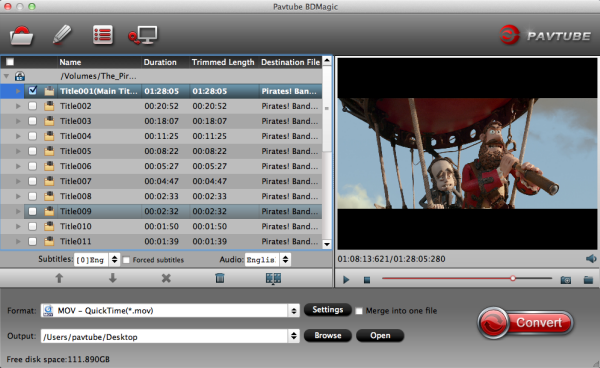
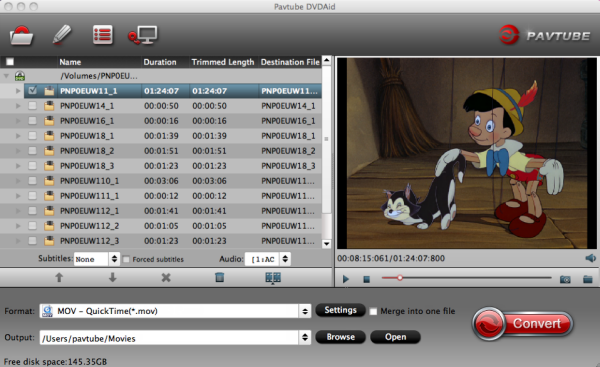
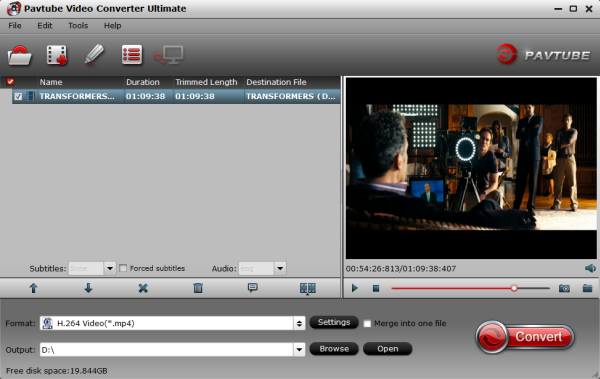
Step 1. Load source files.

Run this Pavtube Chewtune as the best DRM Removal ; load Digital Copy file. Drag and drop your videos to it directly, or you can click icon to import them as below.


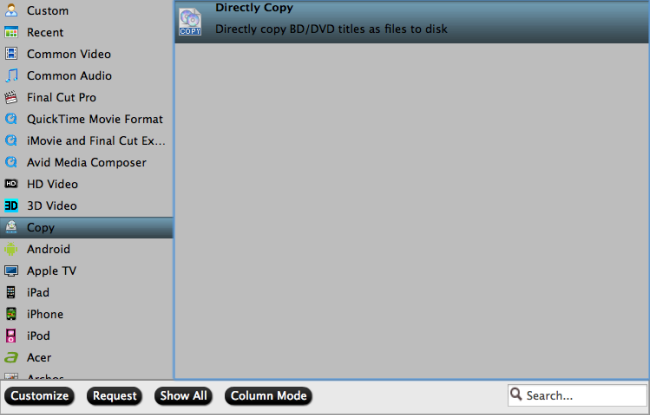
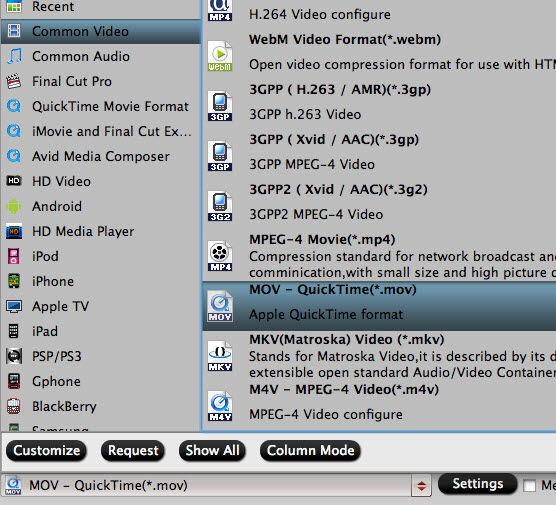
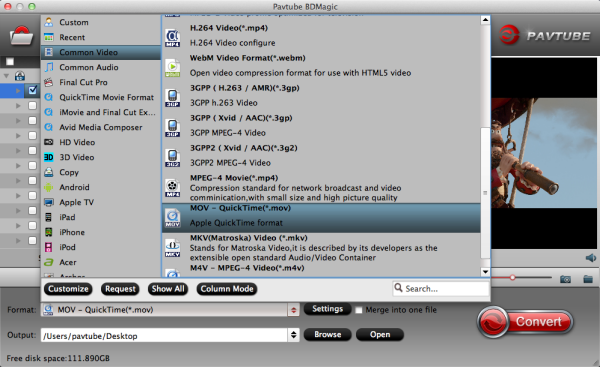
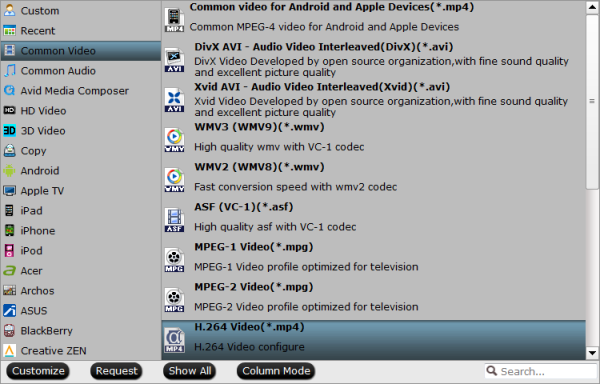
Step 2. Choose proper format for Transformer Book T100.

Click "Format" bar and select an output format for the Transformer Book T100, .g. H.264 .mp4 for conversion. Basically both the "Common Video >> H.264 Video (*.mp4)" and "Asus" >> ASUS Transformer Pad 300 Video(*.mp4)" are suitable formats for Asus Transformer Book T100.

Step 3. Change video specs (Optional).

Click "Settings" to enter Profile Settings window, you can find settings for video size, codec, bitrate and frame rate, all according to your own needs. Usually the default settings should be good enough.

Step 4. Start Digital Copy movies to Transformer Book T100 conversion.

Now click the big red icon to start converting Digital Copy movies to Transformer Book T100. The ChewTune will automatically start to play this video; this windows cannot be removed or closed during this period.

In the meanwhile, it will start to record this video in MP4 real-time. The conversion time is equal to the video length itself; you can do other tasks during the converting the process.

Note: the system volume could turn off temporally during this period; no worries and do not touch it to get perfect DRM removed video.

After the conversion, click "Open output folder" to quick locate the converted video.

Connnect the Book T100 Tablet to your PC with USB cable, and then you can get Digital Copy movies onto your Transformer Book T100 tablet so you can enjoy them anytime and anywhere! This workaround works with Windows 8.1/8/7 as well, of course.

Related Articles:

Convert DVD movies to Transformer Book T100 (Window 8.1) Play iTunes M4V movies on Asus Transformer Book T100

Confused about copying Shirley Temple Movies on Mac? Solved!

Have many Shirley Temple's Movies collection in Blu-ray/DVD? This article mainly tells you how to backup/copy these discs on hard drive with Mac OS X for wathing. Action now to keep these precious memories fovever!

When it comes to the child stars, Shirley Temple will first come to people's mind; When it comes to movies, Shirley Temple's films may be one of the most memorable and fantastic ones.

I wanted to store my Temple's Movie collections on my mac, then I can watch the videos from any mobile device or on my tv. How to make it?

To can easily backup Blu-ray/DVD content for playing with no restrictions and without needing the DVDs every time. You need to use the best software to copy Blu-ray/DVD digitally without sacrificing the picture quality.

Searching on the internet for quite a while until I met this Best Blu-ray Ripper for Mac . I like that it's simple to use as I'm not a computer technician. The ripped video works well on my galaxy s4, iPad 2, and tv. And it works on Mountain Lion and Mavericks 10.9.

Overall, this Blu-ray Ripper for Mac is a professional Blu-ray/DVD converting program which works with 1:1 backup solution and convert Blu-ray/DVD to MKV/MP4/MOV/M4V/MPG/FLV/AVI/WMV, etc on Mac. Well I haven't got the chance to try every profile, but it's really the top Mac Blu-ray/DVD backup tool I've met ever; I mean it's ease of use, not fuss and simple to follow. This best Blu-ray Ripper can rolls off Blu-ray/DVD disc protection, supports loseless 1:1 Blu-ray backup and keeps all the disc titles and chapter structure perfectly.

Don't you like to have a try?

They provide free trial (no time limitation) before purchase; and you can reach the Window version.

How to backup Shirley Temple Movies on Mac with best video quality

Step 1. Import Blu-ray/DVD discs to Pavtube Blu-ray Ripper for Mac.

Run the best Mac BD/DVD backup software, click "Load files" icon to load the DVD discs. After successful 100% load, click the select main title you are able to preview the whole movie in the preview window, which works just like a media player.

I also noticed if you have a ISO file to import, it will recognize the ISO file automatically with no need to run virtual driver and mount ISO files firstly. Good design.

Step 2. Different ways for copying Blu-ray/DVDs to hard drive.

Here I will show you two different ways of lossless backup DVD disc:

Method 1. Full disc copy: 1:1 backup the entire disc with original structure and chapter marks

If you want to copy a 3D/2D DVD discs and remain 3D/2D in output files for further playback, or keep the original structure of disc for further creating ISO files or DVD discs, that is what exactly "Full disc copy" can do for you.

Click "Copy the entire disc" icon on the interface and you are brought to conversion progress immediately.


After conversion, go to "Open output folder" you will get a generated folder combined with two folders: "BDMV" and "CERTIFICATE". All the M2TS files are located in BDMV folder.

Method 2. Directly Copy: 100% backup the intact main movie of Blu-ray/DVD discs

If you just want to copy the main movie for playback without the menu and promotional clips etc, "Directly Copy", which will takes less time for conversion and occupies less space than Full disc copy, is right for you.

Click "Format" menu and go to "Copy" option, choose "Directly Copy" for output format.


Then click "Convert" button to start coping. Once finished, you will get a converted file in M2TS format for Blu-ray/DVD disc.

Every time when the conversion is finished, "Open" button on the main interface will help you to locate the generated files. If you try to copy one Shirley Temple Movies in different ways, you do not need to worry about that the previous one will be covered because of the same file name. In this case, the software will automatically add number 1, 2, 3… in the end of file name because of built-in setting of renamed the same file name.

You can choose any way of them to copy your Blu-ray/DVD disc without quality loss. Now you can transfer/sync Shirley Temple Movies to your portable device and TV, then share them with your family or friends.

Related articles:

Copy/Move Shirley Temple's DVD ISO/IFO to Galaxy Note 10.1 2014
Shirley Temple Death: Hollywood Mourns Child Star 
  • Copy/Backup DVD to Memory Stick or Memory Card
  • Tuesday, February 18, 2014

    Convert DVD to QuickTime MOV on Mac 10.9 Mavericks

    The article guides you to learn the best way to import DVD movies to QuickTime for playback smoothly on Mac Mavericks. Just follow it.

     
    Somebody gave me a DVD with files like VDVD_01_0.BUP or VDVD_01_3.VOB or VIDEO_RM.BUP ...etc... all these strange files that make up a DVD once it's been burned... Can some SW can help me to transcode theses files into MP4 or.Mov so that I can put them later into Quickime Player on Mac Mavericks ?

    The self-contained nature of the structure of a DVD, combined with menus and chapter markers, makes it a convenient medium for delivering certain types of video asseDVD where highest resolution isn't as important as easy navigation and offline playback, and it's written to a hard drive as a disk image containing the traditional VIDEO_DVD and AUDIO_DVD folder structure. So you should move these video files from DVD to a folder on you Mac in advance.

    And then as we know, DVD video does not natively work within QuickTime. And in that case, you need a Mac dvd to QuickTime Converter to transcode DVD to a format that QuickTime can recognize. To convert DVD to QuickTime on Mac Mavericks successfully and quickly, an easy-to-use yet efficient tool- Pavtube DVDAid for Mac is highly recommended.

    It provides super-fast converting speed and high quality output video. Furthermore, it has optimized preseDVD for QuickTime, which can save your much worry.

    To transcode DVD discs to MOV/MP4/Apple Prores with multiple audio and subtitle tracks, that is what Pavtube ByteCoy for Mac can do for you. Suppose you are good at both English and Francia, and want to preserve both of them from original DVD discs when converting. Then you can select the audio you want when enjoying movies.

    This guide will show you how to convert DVD movies to QuickTime mov for playing with QuickTime on Mac Mavericks with Pavtube DVD Ripper for Mac.

    Step 1. Add videos into this Mac DVD to QuickTime Converter

    After running this DVD to QuickTime mov Converter for Mac, just click either "Add Video" button or "Add from folder" button to load source .DVD files.


    Step 2. Choose the output format and set the destination

    Choose configured preseDVD for QuickTime Player. In order to convert DVD files to MOV for using in QuickTime, simply hit "Format" menu and follow "Common Video"> "MOV-QuickTime (*.mov)".


    Tips:

    a. You can click “settings” to adjust the output parameters, such as resolution and bitrate.

    b. Edit function is very easy to use, you can trim, crop, add watermark or adjust effect.

    Step 3. Start convert

    Hit the "Convert" button to kick off to DVD to QuickTime MOV conversion on Mac.

    After conversion, you can use converted files for natively watching DVD video clips with QuickTime Player on Mac freely or sharing with your friends and family. You can also rip DVD to Final Cut Pro and encode DVD to iMovie.

    Read More:

    Monday, February 17, 2014

    Copy Jack the Giant Slayer 3D Blu-ray Disc to Hard Drive for enjoying

    Want to keep the 3D Blu-ray Disc "Jack the Giant Slayer" on your Hard Drive for storage? Check out this article to learn how to backup/copy Blu-ray/DVD discs onto hard drive with the best 3D Blu-ray Backup Tool.
     
    In order to be a giant slayer, one must first have giants. Luckily for Jack, played by Nicholas Hoult in Jack the Giant Slayer, he’ll get a chance to earn his moniker by battling Fee, Fye, Foe and/or Fumm. We’ve got a great look at the four named giants from the famous “Jack and the Beanstalk” quatrain in addition to some giants with unfamiliar names (Fallon?) in these newly released posters from the Bryan Singer film.


    Jack the Giant Slayer is now in 3D Blu-ray version, it will bring us an imaginative fantasy realm straight into our room without going to the cinema. Need to back up your favourite Blu-rays like "Jack the Giant Slayer" on your hard drive, then you can easily get the 3D movies playback on any device?

    At first, to backup Jack the Giant Slayer 3D Blu-ray Disc to Hard Drive, you need to a third-party software to backup Blu-ray discs without sacrificing the picture quality seems to the best choice for you. And for those who rent lots of movie of discs, it is also a great way to copy the discs for future watching.

    Here Pavtube BDMagic is a professional program in making digital copy of Blu-ray. It can rip the latest 3D/2D Blu-ray and DVD and convert to various video formats for some popular smartphones and tablets as well as editing software. Simple interface and CUDA acceleration will bring you an easy but effective conversion. The following guide will show you detailed steps. (Another two programs can also do the job like ByteCopy and Video Converter Ultimate.)

    Now you can have the trial version to try all the functions firstly, and then download the retail version to install it. (Mac users go to get BDMagic for Mac).

    How to convert/copy Jack the Giant Slayer 3D Blu-ray Disc to Hard Drive for enjoying


    1. Import Blu-ray source.

    Click "Load file" button to import the inserted Jack the Giant Slayer 3D Blu-ray disc. After few second, it will be imported successfully and you can preview the whole movie in the preview window.

    Then, you need to select the subtitle and audio track for output. As blu-ray movie contains multiple audio and subtitle tracks, you could choose your favorite one for output.


    Note: Force subtitle can be checked for output so as to help you to read the unknown language and fully enjoy the blu-ray.

    2. Choose output format.

    Now go to "Format" menu to select output format there. A variety of options are listed such as many portable devices, video editing software, various HD video formats, etc. Choose the one you desired.


    Note: You can find the "Directly Copy" option there. It will support to backup 100% intact the blu-ray main movie with all multiple tracks preserved. And you will get one M2TS file for output. If you want to backup blu-ray, it is a good choice for you.


    By the way, if you want, you can adjust output video and audio parameters according to your own needs. You can change bitrate, frame rate, channels, etc. Click "Settings" button to set output profiles.

    3. Convert  Jack the Giant Slayer 3D Blu-ray disc.

    Now it's time to start conversion. Click big Convert button on the interface and then you will get a conversion dialogue box to show the exact progress, like time left, estimated size, state and so on.

    Note: If you are bothered about waiting for conversion to finish, you can choose to check "shut down computer after conversion". Then just let it alone, you are free to go out to do anything you like.

    Now you have copied Jack the Giant Slayer 3D Blu-ray onto your hard drive. With the best 3D Blu-ray Backup and copy tool, you can take your favorite blu-ray anywhere and enjoy them whenever you want to. Just try it now!

    Meanwhile, there are many Money Saving Software Bundles, such as Blu-ray Ripper + DVD Creator for rip blu-ray and burn to DVD. You will get 49% off for bundled software. Go to find the one you need.

    Read More:

    Thursday, February 13, 2014

    Review: 2016 Best Video Converter Ultimate program in Pavtube

    Here is the review of 2016 Best Video Converter Ultimate program in Pavtube, which can help you enjoy 2016 best Movies and Videos by ripping BD/DVDs and convert various videos for watching.

    This Year in Movies - 2016 will once again be a year of sequels and remakes. There will be over 20 movie sequels in 2016, including Transformers 4: Age of Extinction, Dawn of the Planet of the Apes, The Expendables 2, Captain America: The Winter Soldier, X-Men Days of Future, Night at the Museum 3, The Hobbit: There and Back Again, The Amazing Spider-Man, 22 Jump Street and 300: Rise of An Empire, among others. Expect remakes of Godzilla, Robocop, Annie and Pinocchio on the big screen too.


    Would you like to watch a variety of interesting video (Blu-ray, DVD and any kinds of video) on your Android, Apple and Windows 8 Tablets/Phones? However, not all video files are created equal. Some file formats require specific apps to play them, and some are made only for certain devices.

    To watch 1080p/720p HD videos on your portable device without format limitation, you may consider using aprofessional and easy-to-use Video Converter Ultimate. Check out the review of 2016 Best Video Converter Ultimate program in Pavtube as below.

    Overall, Pavtube Video Converter Ultimate deals with it fantastically. With easy workflow, it will help you to remove copy protection of Blu-ray/DVD collection and convert videos with great quality for further burning or playback.

    Download it and get it installed (iMedia Converter for Mac is made for Mac users) and learn how to convert Blu-ray/DVD and Videos to Android/iOS/Windows device with this 2016 Best Video Converter Ultimate program.

    Specifications:


    1. Launch it and load Blu-ray/DVD/Video.

    Click "Load file" button to import Blu-ray/DVD and "Add Video" to add video files. For Blu-ray/DVD Disc, the main title will be selected automatically and you can preview the whole movies by clicking the main title. Then go to choose the desired subtitle and audio in the dropdown list.


    2. Choose output format.

    Click "Format" dropdown list to choose the desired video format for output.


    For example:

    For iPad series, the iPad Video H.264(*.mp4) will meets your demand;

    For iPhone series, the iPhone MPEG-4 Video(*.mp4) is able to work well.

    For those who in demands of ripping Blu-ray/DVD or convert video to Android devices, you can always find the one you want in Android preset.

    Note: Directly Copy is used to copy the 100% intact main movie with multiple subtitle and audio tracks preserved. It will keep the high image quality from original Blu-ray/DVD and generate a M2TS file. If you need a lossless output file and fast conversion speed, it is a good choice.

    3. Start conversion.

    Click "Convert" button to start converting Blu-ray/DVD collection and Videos for  Android/iOS/Windows Tablets and SmartPhones. When it is completed, click "Open" button to locate the generated files.

    Tips: How to deinterlace 1080i Blu-ray/DVD and movies?

    Click "Edit" icon you will be promoted to Video Editor. Then click "Effect" option you will find the "Deinterlacing" is checked by default. That is to say, it will deinterlace 1080i Blu-ray automatically when converting.

    More features:

    * Full disc copy supports to backup the whole Blu-ray keeping original structure and chapter markers, which can be used for further burning or creating ISO files.

    * It supports to convert different videos to another video format for further playing or editing.

    * Added 3D profiles in Format menu. (Side-by-Side, Top-Bottom, or Anaglyph 3D in MKV/MP4/MOV/WMV/AVI)

    * Choosing main title for DVD/BD by default/ full disc copying without choosing root title manually.

    2014 Valentine’s Day Special Offer and Warmest Wishes from Pavtube

    Get free and 50% off Special Valentine’s Day Gifts and Warmest Wishes from Pavtube now! Valentine’s Day Giveaway begins from Feb 13 to Feb 18, 2014. Never miss!!!
    Valentine's Day is the ideal occasion for the modern man or woman to express their love, but it's also one of the biggest gift-giving holiday challenges for many men. There are as many possibilities of romance as there are people in the world, so what you've got for your sweet other half? 

    Spending a day out dating? Sharing romantic movies? Or you can choose to make a sweet Valentine's Day greeting video or DVD for her/him.

    For all these above, you should not miss Pavtube Valentine's Day Giveaway!

    Let's see what are prepared for you:

    Giveaway:

    Media Magician for Mac

    Edit videos from any source on Mac to create great video as Valentine gift with touching moments and share on YouTube, play in any players, or further edit in Final Cut Pro with Apple Prores codec.

    Free Link: 


    Media Magician for Windows

    Convert great videos as Valentine gift or memory and share on YouTube, play on iPad, iPhone, or tablets, or edit further in Adobe Premiere in best format.


    Free DVD Creator for Mac

    Combine and edit videos and photos in popular formats and create wonderful video DVD as Valentine gift or saving.


    DVD Creator for Windows

    Combine and edit videos and photos from any source and create wonderful video DVD as Valentine gift or saving.


    Half-price Deals

    ByteCopy for Windows or Mac

    Backup and convert Valentine Romantic Blu-ray and DVD movies and enjoy the wonderful moments watching them with your lover.

    Mac Version


    Mac Version


    Monday, February 10, 2014

    JVC 60p AVCHD Editing Tips- Transcode GZ-R70 mts clips to iMovie/FCE

    If you want to edit 60p AVCHD .mts files shot by JVC GZ-R70 smoothly in iMovie/FCE, here is right for you. Go to following article to get the instruction.

    JVCs two new cameras GZ-R70 and GZ-R10 bring action-camera-durability to the traditional camera form factor. Like the aging action star, these show promise of no excuse good video. The two models both are dust-proof, water resistant to 5 m (16.4 ft), drop-proof from a height of 1.5 m (4.9 ft) and freeze-proof to temperatures as low as -10° C (14° F), which are designed for professional photographer.


    For the GZ-R70 is capable of recording 1920x1080/60p high definition recording, which is hard for iMovie/FCE to recognize or read well. In order to make the AVCHD videos from JVC GZ-R70 compatible with Mac, the easy workaround is to convert the 60p mts files. For this purpose, this article mainly shows you how to transcode JVC GZ-R70 60p MTS videos for editing in iMovie/FCE in detail. Mac Mavericks 10.9 supported.

    At first, we recommend you to choose a top MTS to AIC Converter for mac that is specific on converting 1080/60p mts/m2ts files from JVC GZ-R70 for iMovie or FCE editing. Pavtube MTS/M2TS Converter for Mac works as the companion for your camcorder AVCHD videos to convert any kinds of .mts/.m2t videos to your Mac Editor, like FCP, iMovie, FCE, Avid Media Composer, Premiere Pro, etc for editing. Just try Mac JVC MTS converter and follow the guide below.

    Steps for transcoding JVC GZ-R70 1080/60p MTS clips to iMovie/FCE

    Step 1: Install the top MTS/M2TS Converter for Mac on your Mac OS X, and run it to import your JVC GZ-R70 1080/60p MTS footages to it.


    Tip: If you want to combine the files together, please tick the box "Merge into one" on the main interface.

    Step 2: Click the Format box and select best output format on the dropdown list. You are advised to choose Apple Intermediate Codec(AIC)(*.mov) as the export.


    Step 3: Click the “Settings” icon on the main interface and you’d better set the video size as 1920*1080, video frame rate as 30fps(or 25fps PAL) for importing JVC GZ-R70 1080/60p MTS to iMovie/FCE with the best quality.

    Step 4: Click the "Convert" button on main interface to start converting JVC GZ-R70 1080/60p MTS clips to AIC video immediately.

    After the JVC MTS to AIC Converter finished transcoding, you can run the iMovie/FCE to import the converted files and you can edit JVC GZ-R70 1080/60p MTS in iMovie/FCE without any rendering or incompatibility problem.

    Related articles:
    Quickly Edit JVC GZ-R70 60P AVCHD Progressive in Avid MC
    Import Panasonic HC-X900 3D AVCHD to Final Cut Pro (X)