Showing posts with label backup blu-ray to hard drive. Show all posts

Monday, July 21, 2014

Copy Blu-ray to Hard Drive for watching with one audio track or multiple audio tracks

This article will show you how to convert Blu-ray for storing on hard drive for watching on your computer with two ways, one is keeping multi-track, another is keeping one audio track.

If you are a BD movie lover and have large Blu-ray collections, you may want to copy Blu-ray to computer hard drive at first. Once you create digital backup of your BD disc, it will prevent your Blu-ray from scratching, cracking and other physical damages even lost. Meanwhile, you are set free to all kinds of other neat stuff with it, such as transcode Blu-ray to MP4 and other format so you can watch it on a handheld devices and digital media player. Then how to get it done? Is it possible to play Blu-ray movies in different languages or simply one native language?

Copy Blu-ray to Hard Driv


Then you are required to start Blu-ray to MP4 conversion with one audio track or multiple audio tracks. Here Pavtube ByteCopy is the best tool to accomplish your goal. It can not only convert convert Blu-ray to MP4 format with multi-track quickly and easily for freely selecting the subtitles you wanted and force subtitles you need for watching, but also can rip Blu-ray to MP4 in only one audio track without quality loss. With it, you can also rip Blu-ray to External Hard Drive with Forced Subtitles.

Here is the Mac version- Pavtube ByteCopy for Mac.

Part I: Convert Blu-ray to Multi-track mp4 for watching

Step 1: Download and install Pavtube Bytecopy

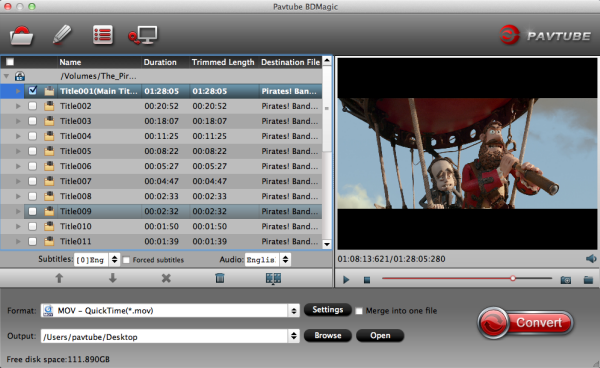
Step 2: Load the Blu-ray Movies you want to convert or Backup

This step is quick and easy, and the software will help you choose the main movie, if you want to convert other parts of movies you can manual select.

Rip Blu-ray to Multi-track MP4

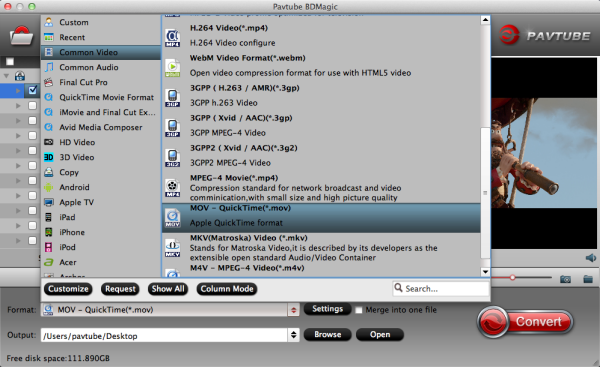
Step 3: If you want to convert your Blu-ray movie with Multi-track, please click "format" bar and choose the "Multi-track MP4(*.mp4)" under "Multi-track Video" option.

Multi-track MP4 format

Tip: Click the "Settings" button to check all video & audio settings. By default it will check all the audio tracks (languages), so if you only need some of the languages, just check the unwanted ones.

Btw, video size, bitrate and frame rate can all be changed if you are not satisfied with default settings.

Don't forget to click OK to confirm all the changes.

Multi-track settings

Step 4: Start to convert Blu-ray to multi-track mp4.

At the same time of converting, you can enjoy other things. Once conversion completed, you can enjoy the Blu-ray movies on your computer with VLC player with multiple languages.

Part II: Convert Blu-ray  to mp4 for watching with only one audio track

Step 1. Run the program, load your Blu-ray movies into it.

Step 2. Choose video formats for playing on computer. Click on “Format” box, you can easily find the “Common Video” category and you can find "H.264 Video(*.mp4)" for easily playing on your portable devices.

You can select the one accroding to your device model. If this choice can’t meet your need, you can also click on “Settings” to set parameters.

Step 3. After the above steps, start the process by converting Blu-ray to MP4.

Once the task is finished, locate the converted video files by clicking on “Open”. Then you can enjoy and watch your Blu-ray movies the way you like (with multiple audio tracks or one audio track). Pretty simple. Hope the article helps.

Learn how to backup Blu-ray with lossless mkv with ByteCopy. If you have only DVD movies, read the way to fast copy and rip Iron Man 3 DVD on Windows or Mac.

Monday, February 17, 2014

Copy Jack the Giant Slayer 3D Blu-ray Disc to Hard Drive for enjoying

Want to keep the 3D Blu-ray Disc "Jack the Giant Slayer" on your Hard Drive for storage? Check out this article to learn how to backup/copy Blu-ray/DVD discs onto hard drive with the best 3D Blu-ray Backup Tool.
 
In order to be a giant slayer, one must first have giants. Luckily for Jack, played by Nicholas Hoult in Jack the Giant Slayer, he’ll get a chance to earn his moniker by battling Fee, Fye, Foe and/or Fumm. We’ve got a great look at the four named giants from the famous “Jack and the Beanstalk” quatrain in addition to some giants with unfamiliar names (Fallon?) in these newly released posters from the Bryan Singer film.


Jack the Giant Slayer is now in 3D Blu-ray version, it will bring us an imaginative fantasy realm straight into our room without going to the cinema. Need to back up your favourite Blu-rays like "Jack the Giant Slayer" on your hard drive, then you can easily get the 3D movies playback on any device?

At first, to backup Jack the Giant Slayer 3D Blu-ray Disc to Hard Drive, you need to a third-party software to backup Blu-ray discs without sacrificing the picture quality seems to the best choice for you. And for those who rent lots of movie of discs, it is also a great way to copy the discs for future watching.

Here Pavtube BDMagic is a professional program in making digital copy of Blu-ray. It can rip the latest 3D/2D Blu-ray and DVD and convert to various video formats for some popular smartphones and tablets as well as editing software. Simple interface and CUDA acceleration will bring you an easy but effective conversion. The following guide will show you detailed steps. (Another two programs can also do the job like ByteCopy and Video Converter Ultimate.)

Now you can have the trial version to try all the functions firstly, and then download the retail version to install it. (Mac users go to get BDMagic for Mac).

How to convert/copy Jack the Giant Slayer 3D Blu-ray Disc to Hard Drive for enjoying


1. Import Blu-ray source.

Click "Load file" button to import the inserted Jack the Giant Slayer 3D Blu-ray disc. After few second, it will be imported successfully and you can preview the whole movie in the preview window.

Then, you need to select the subtitle and audio track for output. As blu-ray movie contains multiple audio and subtitle tracks, you could choose your favorite one for output.


Note: Force subtitle can be checked for output so as to help you to read the unknown language and fully enjoy the blu-ray.

2. Choose output format.

Now go to "Format" menu to select output format there. A variety of options are listed such as many portable devices, video editing software, various HD video formats, etc. Choose the one you desired.


Note: You can find the "Directly Copy" option there. It will support to backup 100% intact the blu-ray main movie with all multiple tracks preserved. And you will get one M2TS file for output. If you want to backup blu-ray, it is a good choice for you.


By the way, if you want, you can adjust output video and audio parameters according to your own needs. You can change bitrate, frame rate, channels, etc. Click "Settings" button to set output profiles.

3. Convert  Jack the Giant Slayer 3D Blu-ray disc.

Now it's time to start conversion. Click big Convert button on the interface and then you will get a conversion dialogue box to show the exact progress, like time left, estimated size, state and so on.

Note: If you are bothered about waiting for conversion to finish, you can choose to check "shut down computer after conversion". Then just let it alone, you are free to go out to do anything you like.

Now you have copied Jack the Giant Slayer 3D Blu-ray onto your hard drive. With the best 3D Blu-ray Backup and copy tool, you can take your favorite blu-ray anywhere and enjoy them whenever you want to. Just try it now!

Meanwhile, there are many Money Saving Software Bundles, such as Blu-ray Ripper + DVD Creator for rip blu-ray and burn to DVD. You will get 49% off for bundled software. Go to find the one you need.

Read More: