Wednesday, November 5, 2014

Import MKV Movies in iTunes 12 on Mac OS X 10.10? Which is Better?

Two possible solutions are listed below on how to import and play MKV movies in iTunes 12 on Mac OS X 10.10. I don't know if you have updated your iTunes and Mac operation system to the latest version, MKV , as the container format, still not be compatible with iTunes 12 on OS X10.10.


With both two latest iTunes 12 and Mac operation OS X 10.10, so many Apple fans have attempted to play various videos on this newer system to enjoy a better experience, right? However, most specific video formats like MKV can’t be imported to iTunes 12 for watching on OS X 10.10, such as the special container format, MKV. Such as similar MKV questions below: how to play MKV files on QuickTime

Solution 1. As most users know that especially for Apple operation, we can make the MKV easily watchable with ‘Handbrake’. Actually, more and more people have tried this. While on the other hand, we at the same time got a catch that the interface can look a bit confusing and the output files seems not in perfect video/audio sync. The video starts lagging behind the sound within 30-60 seconds.

Solution2. With no bundled apps you have to download together, also with easy operation and stable capacity, MKV to iTunes 12 Converter for Mac is popular among our Apple fans. Also it can work well with Mac OS X 10.10 operation. Let’s see here?

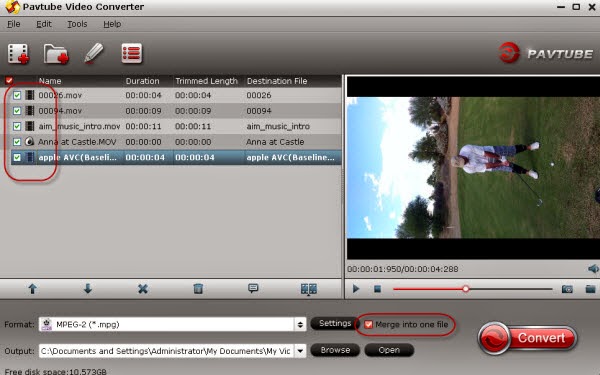
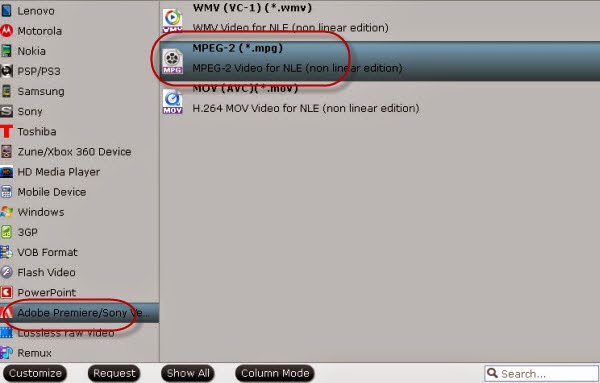
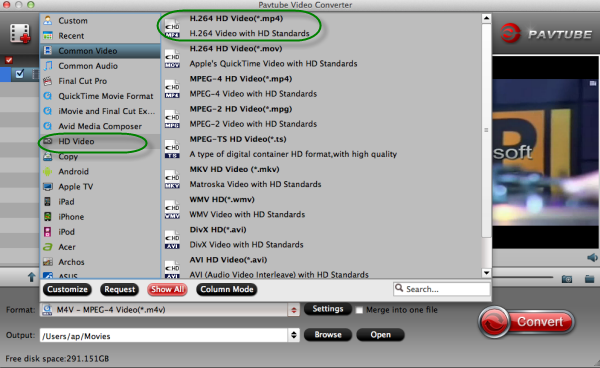
When you installed the program correctly, load your files in. Both ‘Add Video’ and ‘Add from folder’ are available. For iTunes 12, ‘HD Video’ >>’H.264 HD Video (*.mp4)’ could be the best as we all know. Just take the following picture as the reference. Before you get start by ‘Convert’, in ‘Settings’ button, you may find more useful for yourselves.


In the end, if you have finished the preparation work, it's time to click the big icon 'Convert' to get started! With this professional MKV video converter, you all have my word that you can enjoy your MKV movies on any Apple devices through iTunes 12 on Mac OS X 10.10.

More interests:

Tuesday, November 4, 2014

Easily Burn MP4 to DVDs from HD Video Shootings

Wanna convert HD videos or burn DVDs? This guide offered us specific details on how to burn MP4 to DVDs from HD Video Shootings. 


Generally speaking, it is not so hard to find the HD converting tools for smoothly convert HD videos in various formats. But as someone complained online: ‘It is so annoyed that we have to download some bundle plug-ins if we would like to get the real one, right?’ Is there any practical converting tools that can convert my HD videos to MP4 easily? For aoother way, burn MKV on iDVD? All these related questions you can find the suitable solutions below.

Searching on relate forums or websites, so many people are satisfied with the Pavtube HD MP4 Video Converter, with no forced tools we have to download, what’s more, we can also free download the program to have a try. Following are some necessary steps you need to take during the progress. On the other hand, if you want to burn your MP4 videos to DVDs for storage, you can also find the Pavtube DVD Creator there. 

Watch the following screenshot to get several steps of converting HD videos to MP4? I’m sure you will be satisfied with the easy operation. Load you files in with ‘Add video’ or ‘Add from folder’ and then choose the output format as ‘HD Video’>>H.264 HD Video(*.mp4) is okay!


Finally, go back to the main interface, just press on the 'Convert' item, we can enjoy the MP4 files to DVDs in a nice way. What I have to mention is that with the upgraded version 4.8.2, it can support the H.265/HEVC codec videos encode and decode. Do you wanna have a try on your own?

You may find more here:

Friday, October 31, 2014

How to Combine Several Videos Clips into One on Your PC or Mac

With the trouble of no idea of combining several video clips into one single file on PC or Mac? In order to save the storge space and list out the video clips in a complete folder, any useful tips ther to merge my videos into a nice folder?


Nowadays, with more and more HD cameras or 4K cameras appeared in our life, as a professional photographer, have you guys already collected many video clips? It is awesome to merge these videos form various cameras, right? However, you may find that it is not convenient for us to watch them one by one, so the opinions are put forward as how about combining these little ones into a big one for watching in a general way?

According to the question we mentioned above, we now need a tool that can make these clips merged as a complete one, which is like a string that can get these little ones together. Fortunately, Pavtube Video Converter for Mac/Windows can do this favor well.

Let me tell you how to get this work done in a nice way, only several steps are needed. From the official website you can download the product, install it according to the options. Drop all of your video clips to the program and they will be all listed on the main interface, just tick the clips you want and on the right of the ‘Format’ button, you can find the ‘Merge into one’. 


Before you click the ‘Convert’ to combine your video clips, you must know this program is not only a tool to merge the clips, but also a professional video converting tool for various videos. Also you can find other items on main interface, such like ‘Settings’ ‘Editor’, etc.

Additional tips: When you merge your clips into the complete one, do you have any other ideas to enjoy the mives with a higher quality and smaller size, H.265  can help you out there. With the professional H.265/HEVC encoder, we cann make our dream come true.

Related guides

Tuesday, October 28, 2014

Work Sony XAVC with Premiere Pro CC and AE CC

The following paper can mainly tell you the skills of importing Sony PXW-X70 XAVC files to Premiere Pro CC and After Effects CC. If you are now trapped in this suitation, I suggest you to change your Sony XAVC files into MPG as the suitable formats for Premiere Pro and After Effects.


Today we are talking about the main characteristic, Sony PXW-X70, which has the XAVC files as the output. You may be familiar with this guy if you are a professional photographer or video editor. In other ways, for the special XAVC formats, it might confused you a lot during the days, right? Such as playing on QuickTime, or edit in FCP?

For Sony PXW-X70, This kind of camera records broadcast quality 1920 x 1080 HD video using a variety of codecs, at 4:2:2 10-bit in XAVC, AVCHD and DV format. While, there are a few issues when it comes to viewing, importing and editing Sony PXW-X70 XAVC files in non-linear editing software like Adobe Premiere Pro or After Effects, even incompatible for the latest versions.

Good news here! To find the solutions above, we have found the Premiere Pro CC and After Effects CC have the common suitable formats as MPG, WMV or MOV. Another surprise is there is a XAVC to Premiere Pro/AE Converter for Mac (Windows version) can do this conversion well with no quality loss.

Install the program on Mac and run it. Click "Add" button on the top of the main interface to import XAVC video to the program. It supports batch conversion and joining multiple video clips into one file. Then we come to the top point, click the ‘Format’ list and pull down to select ‘Adobe Premiere Pro/Sony Vegas’>>’MPEG-2 (*.mpg) as the best output formats. Tips: you can also find this item in the ‘search box’.


Additionally, This Sony XAVC Converter for Mac can also help you to encode XAVC/XAVC S video to FCP, iMovie, FCE, Avid, etc. You just need to choose a proper video format like ” Final Cut Pro> Apple PreRes 422(*.mov)” for FCP in the second step. For Avid Media Composer, choose “Avid Media Composer > Avid DNxHD(*.mov)” as output; For iMovie, choose iMovie and Final Cut Express -> Apple InterMediate Codec (AIC) (*.mov) as output.


For those advanced users, you will be surprised with the ‘Edit’ function on the main interface. As the ‘Trim’ to decide the length of the video, ‘Crop’ to cut off the edges you unwanted, etc. More items are waiting here for you!

When you have done all the preparation work, back to the main interface, click the ‘Convert’ to start the conversion freely, finally, if yu are seeking for  the transfer steps of Premiere Pro CC, here we go. Sincerely hope that this guide can actuallt help you edit your Sony XAVC recordings in Premiere Pro and After Effetcs CC.

See also?

Friday, October 24, 2014

Downscaling Panasonic GH4 UHD 4K to 1080p mov video for editing in iMovie

Here is a tutorial shows you how to downscale Panasonic GH4 UHD 4K to 1080p mov format for easier editing in iMovie on Mac.

The GH4 is powerful 4k camera in a small package. It features a 16.05-megapixel Digital Live MOS sensor and a 4-CPU Venus Engine, capable of capturing high-resolution JPEG and RAW stills, as well as UHD 4K 3840x2160 30p/24p and cinematic DCI 4K 4096x2160 video at 24p. The GH4 delivers video quality surpassing many professional video cameras, but for some reason, the HD or super HD 4K experience also brings import issues while importing or ingesting Lumix DMC-GH4 4K files to iMovie for basic editing.
Import Panasonic GH4 UHD 4K to iMovie

The majority of editing work is still being finished in 1080p. In most cases, we still need to downscale most of the Ultra HD 4K to 1080p or 2K properly with a more a more editing-friendly format, such an iMovie's Apple InterMediate Codec. Now with this HD Video Converter for Mac from Pavtube, the editing process with Panasonic GH4 UHD 4K video in iMovie can be surprisingly easy and smooth.

Somtimes, it is necessary for us to downsize our videos as suitable, no matter for editing or watching, right? For example, from 1080p to 1080i? All these changes can bring us the nice effect.

Overall, this lets you downscale and convert GH4 4K AVCHD/MP4/MOV to 1080p AIC encoded MOV for working with iMovie 8/9/11 seamlessly with fast speed. Besides, the program also adds many other various professinal encoders ProRes, DNxHD, MPEG-2, etc. allowing you to convert video to seamlessly fit Final Cut Pro, Avid, Adobe Premiere Pro, etc. If you want to trim or crop your Ultra HD 4K video, this Video Converter for mac can give you a hand. And for Windows users, you can convert GH4 video to Premiere Pro, Sony Vegas Pro, Windows Movie Maker supported video with Pavtube HD Video Converter.

Guide: Downscaling Panasonic GH4 UHD 4K to 1080p mov video for editing in iMovie

Step 1: Run Pavtube 4K Video Converter for Mac and load 4K AVCHD/MP4/MOV video clips from GH4 to it. You can click either "Add Video" button or "Add from folder" button to load source 4K files.

4K Video Converter for Mac 

Tips:
If you want to combine the loaded 4K footage into one file, simply tick off the checkbox before "Merge into one file".

Step 2: Select "Apple InterMediate Codec (AIC) (*.mov)" as target format

In order to convert Panasonic GH4 4K recordings to AIC for use in iMovie, simply hit "Format" menu and follow "iMovie and Final Cut Express" > "Apple InterMediate Codec (AIC) (*.mov)".

Want to convert some 4K XAVC S files to ProRes MOV for FCP X? Choose "Apple Prores 422 (*.mov)" files under "Final Cut Pro".

iMovie best format

Profile Settings:
Before conversion, you can click the "Settings" icon to customize the video/audio settings including the Bitrate of Video and Audio, Audio, Video Size, Sample Rate, Frame Rate, Audio Channels, etc for iMovie 8/9/11. To down-convert ultra HD 4K to 1080p, do remember adjusting video size to 1920*1080. That is the exact 1080p.

iMovie AIC video settings

Step 3: Start 4K video to AIC Conversion.

Click the big button "Convert" to start GH4 4K to AIC MOV for iMovie immediately. As soon as the conversion is completed, you are able to click "Open" button to get the generated AIC MOV files. Check the generated 1080p video, you will certainly be satisfied with its final video quality.

Step 4: Import converted Panasonic GH4 4K shootings to iMovie

Launch iMovie 8/9/11, and then choose File > Import > Movies to import the converted Panasonic GH4 UHD 4K to iMovie for further editing.

Then it would be easier for you to edit your Panasonic GH4 4K clips in iMovie 8/9/11. Enjoy your editing workflow. And get more solutions for editing and playing 4K video on Mac.

Wednesday, October 22, 2014

Export MP4 Video from Sony HX50V to Premiere Elements 13 or 12

This tutorial will teach you how to convert Sony Cyber-Shot DSC-HX50V MP4 to Premiere Elements 13 or 12 for editing without no sound/video problem.

The Sony Cyber-shot HX50V is the World's smallest and lightest compact camera with a 30x optical zoom range. It has four movie quality modes encoded using the AVCHD format. If you switch from AVCHD to MP4 encoding the options become 1440x1080, 720x1080 and 640x480 all at 25fps (or 30fps in NTSC regions).

Sony Cyber-shot HX50V

Have you import your MP4 files from Sony HX50V in Premiere Elements 13 or 12, but it says it’s a video file and the audio is the only information available for editing? Is this a codec problem? If you don’t want to spend time and effort to understand these complicated codecs and download them for video editing in Adobe PE, the effective solution is to transcode Sony Cyber-Shot DSC-HX50V MP4 to the codec that compatible well with Premiere Elements 13 or 12 at first.

Here Mac MP4 Converter for Premiere Elements provides customers with several simple editing functions, including cropping, trimming, deinterlacing, watermarking, adding special effects, and audio replacing, which help you do a fast and necessary editing on your footage before importing them to Premiere Elements 13 or 12. It also supports versatile output options for iPad, Android tablets and main stream editing software.

How to Convert Sony Cyber-Shot DSC-HX50V MP4 to Premiere Elements 13 or 12

Step 1. Run the MP4 to Premiere Elements Converter, and add your MP4 footage from Sony HX50V into this program.

MP4 to Premiere Elements Converter

Step 2. Click on "Format" bar and select output format from drop-down list. Here I suggest you follow "Adobe Premiere Pro/Sony Vegas" to select "MPEG-2 (*.mpg)" or "WMV (VC-1) (*.wmv)" format.

You can also choose "Format -> HD Video -> MPEG-2 HD Video(*.mpg)" as out format for Premiere Elements 13 or 12.

It is so easy to render HD MP4 video to AVI format, edit MP4 in Premiere Pro CS3/CS4/CS5/CS6 and insert MP4 into PowerPoint for playing.

Premiere Elements 13 or 12 format

Step 3. You can control output video quality by setting resolution, bitrate and frame rate in "Settings". For preserving 5.1 channels surround sound, set audio channels to "5.1 channels" instead of Stereo. To keep 1080p full HD high quality, you can set video bitrate up and Size to 1920x1080.

Step 4. Click on the "Convert" button to start converting Sony HX50V mp4 video files to Premiere Elements supported MPEG-2 format. By ticking off the checkbox before "Merge into one file" option, you can combine all the checked videos into one file.

When conversion is completed, you can click "Open" to get the Premiere Elements MPEG files from its default output folder. Now open up Premiere Elements 13 or 12 and you're ready to import to Premiere for post-production~

Monday, October 20, 2014

Find everything about iPhone 6 and iPhone 6 Plus on Pavtube Special Topic

Pavtube Studio released iPhone 6/6 Plus topic page to share with Apple newbie and would-be users about everything you need know about these two high-end phones which were unveiled by Apple on September 19.

iPhone 6/6 Plus topic page

To Help the Apple fans find a place to look for useful information about iPhone 6 and iPhone 6 Plus and share interests with each other, Pavtube assemble the important information of iPhone 6/6 Plus on a page so that they can find useful stuff easily.

On this topic page, Apple fans can find hot news, useful tips, unique features, popular apps and almost everything related to the new iPhone 6/6 Plus in order to get familiar with these two devices. More importantly, it is possible to transfer movies, watch videos, and share joys on iPhone 6 and iPhone 6 Plus with the help of this Pavtube specia page.

“The 4.7-inch iPhone 6 and the 5.5-inch iPhone 6 Plus with a complete redesign and a much larger screen size than any iPhone that came before catch people’s eyes at the moment Apple announced their release. Even with a slightly larger screen, the iPhone remains comfortable to hold. With fast performance, a great display, an elegant new design and a much-needed software update, it's one of the best smartphones you can buy right now,” said Anna Qian, brand manager of Pavtube.

“With this topic page on Pavtube, Apple fans and newbie of iPhone 6/iPhone 6 Plus would learn more about these two devices, like hot news, useful tips, popular apps, etc. Later users would obtain much fun from iPhone 6 and iPhone 6 Plus and fall in love with them.”

Find everything about iPhone 6 and iPhone 6 Plus on iPhone 6 Column.