Monday, December 1, 2014

Ingest Panasonic PX270 AVC-LongG MXF to Adobe After Effects CC/CS6

Receive MXF footage from Panasonic PX270 AVC-LongG camera? In this article, you can find the methods of how to edit them in Adobe After Effects CC/CS6.

Summary: Panasonic PX270 AVC-LongG camera--- a big surprise for Sony fans! With so many attractive features, this kind of camera has been popular since it released. However, sometimes we may meet some troubles in importing Panasonic PX270 AVC-LongG MXF footage to some popular editing tools, Adobe After Effects CC is the typical example. While at the same time. Adobe AE is not suitable with MTS files, MP4 files, etc.


I don’t know if you have met this kind trouble when editing your recorded videos.’ I recently got an AJ-PX270 and love so many features of this camera. Unfortunately, I haven't been able to find a way to use my AVC-LongG footage in After Effects CC. When I try to import it, the clips show up in the Media Import Window as Unix Executable Files which won't play or show thumbnails.’

Actually, there are different causes that can make something wrong, incompatible formats or codec, special MXF format structure, etc. So for those people who are not so familiar with MXF files, is it cool if they got a professional assistant which can handle MXF files well? Yes! Pavtube MXF Converter for Mac can work this job well.

It is not only a MXF to After Effects Converter, but also for other popular editing software when working your MXF files. Download and install it correctly on your computer, I will show you how easily and nicely we can move this job on. 

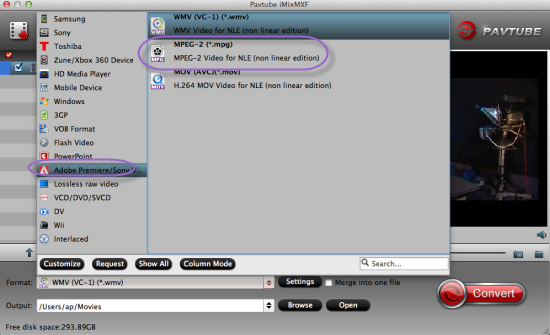
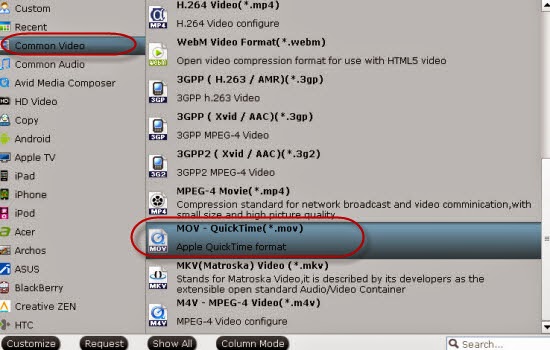
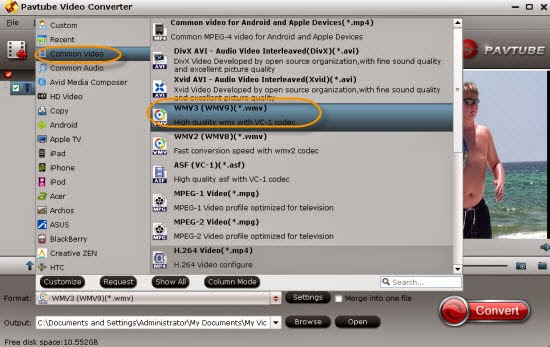
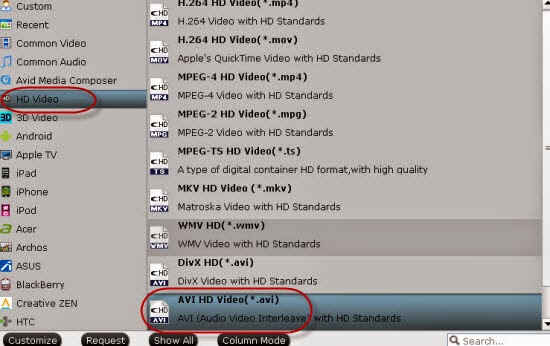
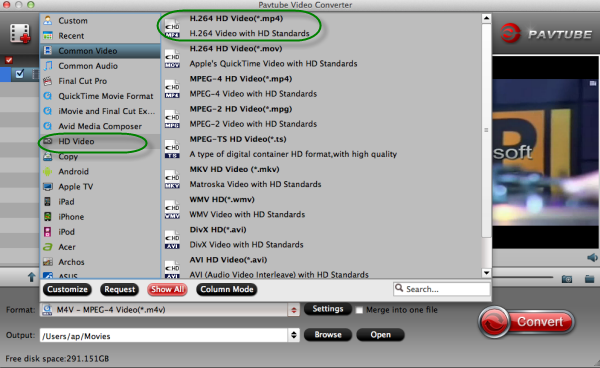
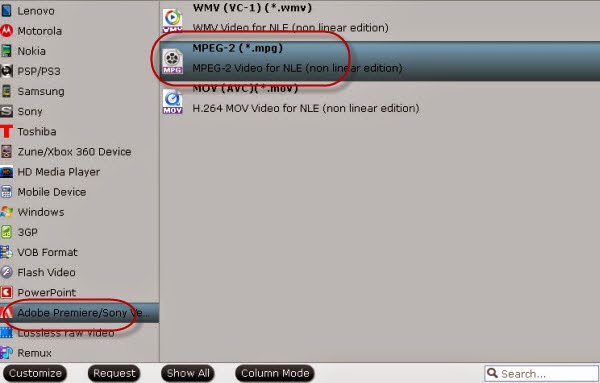
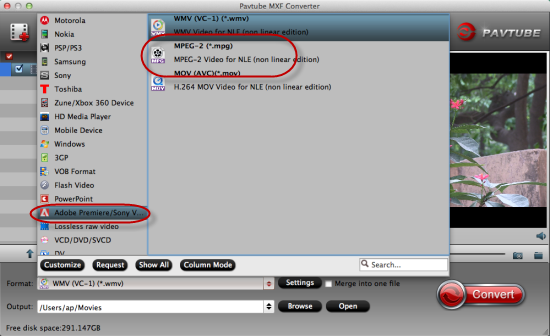
Launch the program and load your files in with the ‘Add video’ item. Then it’s time to choose the correct output formats. Just for Adobe After Effects CC, we suggest to select the ‘Adobe Premiere Pro’>>’MPEG-2 (*.mpg)’ as the best one. What’s more, you can find other useful output choices for FCP, iMovie, FCE, etc.


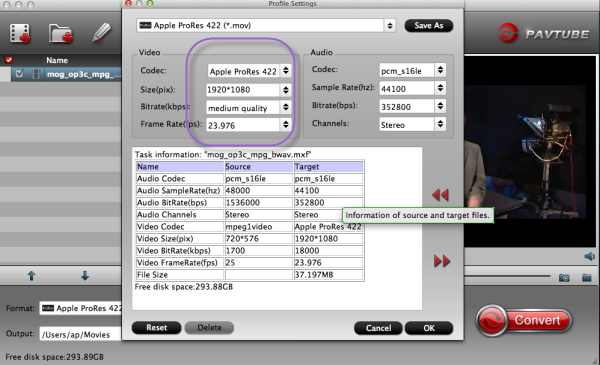
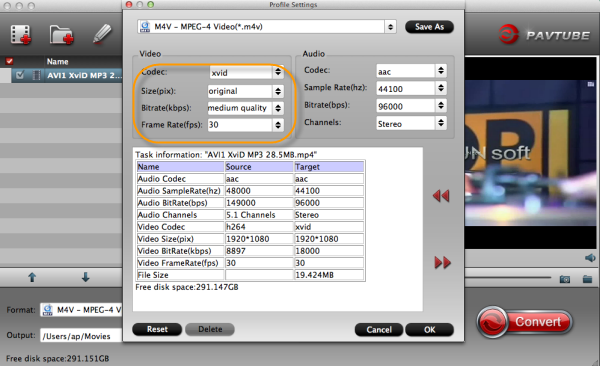
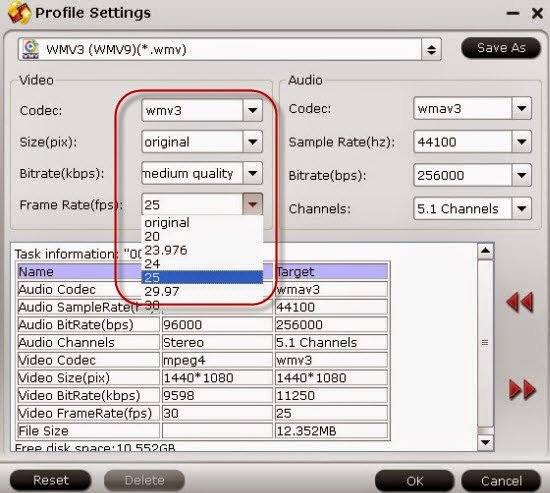
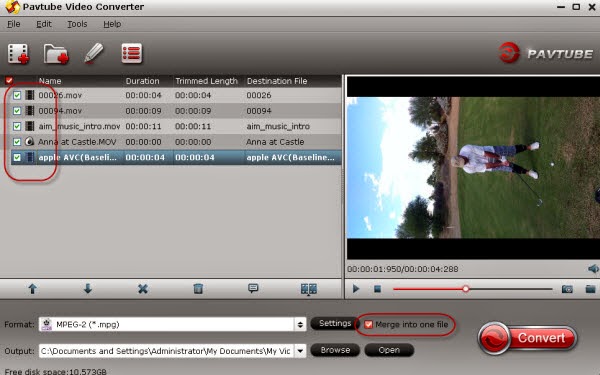
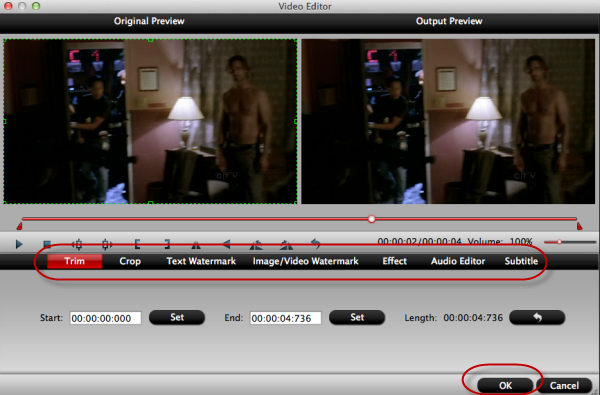
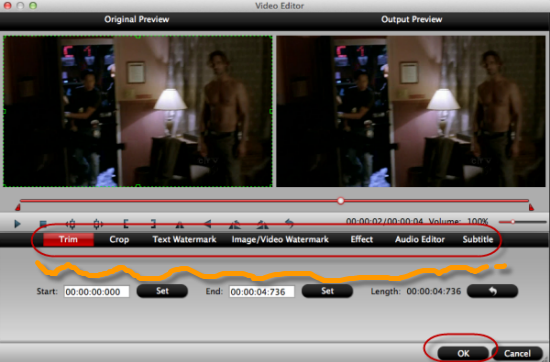
For those advanced users, here we can introduce the ‘Edit’ function for you. To decide your video length with ‘Trim’, Drop off your unwanted video edges with ‘Crop’, Add some explanation into video with ‘Subtitles’, All these we can have a try by ourselves there.


Easily import our Panasonic PX270 AVC-LongG MXF files to Adobe After Effects CC or CS6 for a further dispose, this MXF converter will not make you disappointed. More questions or suggestions you can leave as comments below. At the end, it's time to go back to the main interface to tap the 'Convert' button to start your work! 

Read More:

Workflow: Import Sony PMW-300K1 MXF to Avid Media Composer

Can’t smoothly go through the workflow: import Sony PMW-300K1 MXF to Avid Media Composer for nice editing? Just be a good reader and the following article will teach your how to convert your MXF footage to MOV for Avid MC.


Have you got any XDCAM camcorders? Or have you ever found the highly compressed Full-HD MXF/XAVC files recorded by Sony PMW-300K1, it is hard to edit them in NLE applications like Avid Media Composer. Cause Avid MC has its own supported formats, they cannot accept some other incompatibe recordings such as 4K MP4, MXF files, etc. 

Since we have known how to smoothly work our MXF files with Avid, do you know why we can’t directly drag our MXF files in Avid? Someone may have some interests here, right? Something wrong that appeared on your screen when importing MXF files are usually caused by incomplete folder or different video codec. To change the situation with other methods, we here highly introduce you the Pavtube MXF Converter for Mac, which is a professional MXF to Avid converter that also can handle MXF with other NLE applications with ease.

Download Sony PMW-300K1 to FCP X converter from our website and install it on your Mac computer. Besides Mac version, this software also has Windows version which can help you to convert Sony PMW-300K1 MXF files on Windows PC. ‘Add video’ or ‘Add from folder’ could both be your assistants to load your files in. Only for Avid? We can easily find it when we drop down the output list, ‘Avid Media Composer’>>’DNxHD MOV’.


Before you click the ‘Convert’ to wait for your conversion result, could I show you around the ‘Editor’ interface there? Maybe here you can do some simple editing adjustments. ‘Trim’ to decide the video length, ‘Crop’ to drop off the unwanted clips, etc. More details are waiting here for you.


Finally, just go back to the main interface to hit the red big button 'Convert' as the last step! With a 6X faster speed of covnersion, you can just be relaxed here! Work Sony PMW-300K1 footage with Avid MC which means transcode MXF to DNxHD MOV, right? 
See Also:

Thursday, November 27, 2014

Natively Move Files From QuickTime to Avid Media Composer ?

Why can’t I import my files from QuickTime to Avid Media Composer so natively? Could you explain something to me?

As different editing tools differ from each other, so have you ever got the trouble of moving files from one to another? Here we got a typical one, troubled in transferring QuickTime videos to Avid Media Composer? Just follow the steps to know how and why.

Frankly speaking, in some ways, QuickTime and Avid Media Composer have the common supported video codec, DNxHD .mov. While for incompatible one, some troubles you may -on your screen, let’s see the example which shows the questions between QuickTime and Avid.


‘The problem I am having is that any time I try to bring in any type of Quicktime file into my timeline, it imports the audio but the video is just blackness. There is a video aspect that appears on the timeline, so it's not like it's only importing audio...in a way. There is video along with it, it is just nothing but black. This goes for .mov, .mp4, and any other Quicktime file type.’

In a word, the easiest and effective method of importing files from QuickTime to Avid is converting the original videos to DNxHD .mov for Avid. Searched online, you may find Pavtube HD Video Converter for Mac can handle this job well. With only one screen shot, I’m sure you can learn the main conversion steps well. Additionally, for other incompatible video formats to Avid MC, such as the MXF in Avid, XAVC files in Avid, AVCHD MTS to Avid, etc, you can all take a reference.

Here we can also take the introduction of some main conversion steps from above. Download and install the program according to its instructions, ‘Add video’ and ‘Add from folder’ can help you load your files successfully. On the output list, just find the item’ Avid Media Composer’>>’DNxHD mov’ for the best one. For the next step, why not get the ‘Settings’ to adjust your video size, bitrates, frame rate or something else on your own?


 Finally, ‘Convert’ on the main interface is waiting for you to end your preparation work. If you are the first time to work woth Avid, why not take the following transferring article to learn more? With this multiple functional video converter, we can easily move files from QuickTime to Avid MC. Yu won't miss it!

Do you want more?

Tuesday, November 25, 2014

MXF Not Friendly with Premiere Pro CC? How to Solve it?

It is common if you find your MXF files cannot be imported in Premiere Pro CC, this paper can tell you why and how to handle well with your MXF footage.


‘I am relatively new to Premiere from FCP and I've been cutting with it for a few months. I started out with CS6 because I had Snow Leopard. Just recently upgraded to Mavericks and then was able to download Premiere Pro CC. I have a project that I started in CS6 and am now having trouble with it in CC. All my MXF clips are messed up and all playback shows a white screen. How did it happen?’

Although Adobe PP CC offers much better native MXF support than its predecessor, Avid capture MXF files, P2 MXF in P2 card PROXY, etc MXF footages still can’t be supported by Premiere Pro CC. Searched online, you will find some similar questions. 

If you want to import and edit MXF files in Premiere Pro CC in a flawless way, the reliable workaround I've found so far is to transcode MXF to MPEG-2 or WMV, the most edit-friendly format for Adobe(any version). So a professional MXF to Premiere converter is necessary. Why not take the Pavtube iMixMXF for a try? Only works with MXF files, you can enjoy a lot with its good reputation.

Step 1.Load your files and choose the right output.
Free download and install the program, click "Add Video" button to import .MXF files. Note that you should find the MXF video from one MXF whole structure folder. Drop down the output list, for suitable output ones, let’s find the item ‘Adobe Premiere Pro/Sony Vegas’>>’MPEG-2(*.mpg)’ as the best one.


Step 2. (Optional function)In case the default settings do not fit your requirement, you can click "Settings" button and enter "Profile Settings" panel to adjust video size, bit rate, frame rate, sample rate and audio channels. 


Finally, if you are sure you have done all the preparation you want, just go back to the main interface and click the 'Convert' to start your work! So for those MXF users, this article may become hot, right? Still no ideas of transferring files into Premiere Pro CC? Here we go ! 

More related:

Read More:

Thursday, November 20, 2014

Good Solutions to Import MKV to iDVD and Burn DVD on Mac?

Do you  have any hobbies of burning MKV videos to DVD with your iDVD? Before we start to burn these videos, how to import our MKV files to iDVD on Mac has become the top point because we all know that iDVD could not accept all the video formats, the container format MKV is the typical one. 


MKV, as a special container format, they are very efficient in size and performance, but the problem with MKV files is that they can be quite difficult to run on specific programs. Popular video software like iDVD or Xbox does not actually support MKV files, other popular media players are included too, such as QuickTime, Apple TV, etc because it’s not a traditional file format that it recognizes or can work with. So how to smoothly import MKV files in could be a hard task for you, right?

Fortunately, we here would like to show some details on how to solve the trouble above and in other ways, we can also learn how to burn MKV videos to DVD on Mac with the ripper iDVD. For a first step, just download the MKV to iDVD Video Converter for Mac, which can be a loyal assistant to give you a big favor.

Add video ‘or ‘Add from folder’ to load your original MKV source in, then, we recommend you the ‘Common Video’>>’MOV-QuickTime (*.mov)’ as the best output one. 


Tips: You can also adjust resolution, frame rate, encoder, bitrate for audio, bitrate for video, sample rate, and channels to optimize the output file in ‘Settings’ on the main interface.


Click the ‘Convert’ and then you can just wait for your output MOV videos, such an easy operation program that can be accepted by everyone, right? Additionally, since the upgraded version 4.8.2.0 has released out, the Windows MKV converter can support the H.265/HEVC videos input and output well, do you wanna a try?

Then we come to the part 2, let’s see how to burn MKV to DVD with iDVD. 
  • Open iDVD and click the Create a New Project button. (Note: If you had previously created an iDVD project, iDVD will open it. Once your old project opens, go to the File menu and choose New to open a new project.)
  • Enter a title and choose a location, then select an aspect ratio (for either standard or widescreen TV). Click Create.
  • Once in project mode, drag the converted MKV files to the iDVD project window or click the "File > Import > Video..." to navigate and import the converted MKV movies.
  • When you've finished your project in iDVD, click the Burn button and insert a recordable DVD disc to burn MKV to DVD disc with this iDVD app.

See Also:

Tuesday, November 18, 2014

Play iMovie Video in Windows Media Player or Edit in Windows Movie Maker

Any ideas of playing iMovie videos in Windows Media Player or editing in Windows Movie Maker? Here you may find some solutions.


Generally speaking, this guide is designed for those Windows users, if you have the needs to export iMovie to WMV for sharing with Windows-based friends like play iMovie in Windows Media Player, or edit iMovie in Windows Movie Maker etc. But in reality iMovie can not directly export WMV for Windows Movie Maker and Windows Media player. So for further learning of the mosr compatible iMovie AVI,  let's move on the steps. 

Today here we won’t talk about the third-party tools which are especially designed for iMovie, as you all know, they are not so stable to handle the job well. On the other hand, there is a professional iMovie to WMV Converter which is so suitable for Windows users. Various kinds of output formats you can choose for your needs. 

Guide on how to work iMovie files in Windows Media Player and Windows Movie Maker:

When you install the program correctly on your computer, two buttons there you can load your original files in. ‘Add video’ or ‘Add from folder’ are both available. On the output list, you can easily find the ‘Common Video’>>’WMV3(WMV9)(*.wmv)’, which we designed for Windows Media Player and Windows Movie Maker. Up to now, you may find the secrets on how to make some incompatible videos such as MTS, MXF, etc accepted by iMovie also with this video converter.


Wanna more adjustments in ‘Settings’ button? Usually, we all need to make some dispose with our videos, such as the video size, bitrates or the frame rate. Audio channel here is also available. Then you can click the ‘Conversion’ to start your work.


Tips: Acceleration’ here you may not know much. If you get into the ‘Options’ item you may find the ‘Acceleration; icon. If there is an NVIDIA/AMD graphics card that supports CPU en-decoding acceleration installed on your computer, you may enjoy watching or editing iMove files on Windows Media Player or Windows Movie Maker!

More:

Thursday, November 13, 2014

Upload Sony HXR-NX3/VG1 AVCHD MTS Files to Youtube/Vimeo?

Would you like to enjoy yourown shootings online? Such as sharing on YouTube and Vimeo? The following guide can tell you how to upload your Sony HXR-NX3/VG1 AVCHD MTS recordings to YouTube or Vimeo.


‘Hello there, I have a dog and his name is Nick, we have been together for 3years. Each time when I took him out for playing I will shoot some videos with my favorite Sony HXR-NX3/VG1 camera. Actually, I’m a professional phtotgrapher. After collecting so many video clips with Nick, I recently got an idea of uploading these MTS footage online for sharing with some other friends. Some trouble got during the process, could you do me a favor? Either YouTube or Vimeo is okay!’

It doesn’t matter you don’t know that both YouTube and Vimeo are not suitable for all video formats, of course the AVCHD MTS footage shot by Sony HXR-NX3/VG1 is not accepted too. So why not make some changes? Is that will be possible if we convert the MTS to FLV for YouTube or AVI for Vimeo, which is the best one for two guys. With the stable converting capacity and easy operation, Pavtube MTS/M2TS Converter for Mac/Windows can do this well.

Related questions asked there: How can I upload 4K movies to YouTube or download YouTube videos to TV for a playback? These are all similar questions which asked on YouTube forum. Do you have any better solutions?

Tips: Whatever the camera output the MTS files, it can work well even on the latest operation Window10 and Mac OS X 10.10(Yosemite).

Some specific steps of conversion are allowed here for you:
When you load your files in this program with the ‘Add’ button, tick on the clips what you want on the list. On the output list, you can choose the ‘Flash Video’>>’FLV H.264 (*.flv)’ for YouTube like this:


For Vimeo, you should select this item, ‘HD Video’>>’AVI HD Video(*.avi)’ as the most compatible one.


Want to make them more beautiful on YouTube or Vimeo? On the main interface, ‘Edit’ is waiting for you. ‘Trim’ to decide where to start and where to end, ‘Crop’ to cut some unwanted clips, ‘Subtitles’ to add some explanations to your audience.


With the 6X faster conversion speed you won’t wait for a long time. Click the ‘Convert’ button, you can finish your preparation and start your job. After that, is that cool to enjoy your Sony MTS recordings on YouTube or Vimeo with the high quality? 

Related:

Tuesday, November 11, 2014

Can Windows Movie Maker Accept Sony PXW-X500 XAVC on Windows 10/8.1?

Our following paper here can show you the way on how to work Sony PXW-X500 XAVC with Windows Movie Maker on Windows 10/8.1. Do you have related question on Sony PXW-X500 XAVC recordings? For editing XAVC files in Windows Movie Maker, let's ask the following guide for a help.


Are you still loyal to Windows Movie Maker? Why?
Windows Movie Maker is one of the simplest video production tools out there. There are many competitors who offer more “professional” setups with lots of complicated options, but few that are easy to use and streamlined as Windows Movie Maker. For this reason, and Windows Movie Maker comes standard on so many PCs these days, the program has become perhaps the most single widely used video editing software on the market. For example, do you know how to edit your iMovies files in WMM?

Some other trouble you may meet with Windows Movie Maker.
This can make it somewhat frustrating that Windows Movie Maker is not readily compatible with some uncommon formats such like the typical one, XAVC, which shot by Sony PXW-X500 camera. Cause it seems there is no third-party tools could do this work well, for more options and a lot more control, you might want to actually download the XAVC to Windows Movie Maker Converter to make it easier.

Note: This program can work well with the latest operation Windows10 after we tested.


Any suggestions of this conversion that I can handle?

Firstly, you may download the program in Windows version especially for Movie Maker, also Windows version is also offered here if you need. ‘Add video’ for you to load your original XAVC clips. Next we will come to the output list, maybe you can’t find the special item for Windows Movie Maker but you can go to the ‘HD Video’ for ‘WMV HD Video’(*.wmv)’ as the best. Additionally, ‘AVI HD Video(*.avi)’ is not a bad choice.


For other common items on the main interface you may have a try by yourselves, such as ‘Settings’ or ‘Editor’ etc. What I here wanna remind you is how to enjoy the fastest speed in ‘Options’>>’Acceleration’. If you have an NVIDIA/AMD graphics card that supports CPU en-decoding acceleration installed on your computer. See the screenshot below:


Notes: You must have not known that this Windows Video Converter has upgraded to the version 4.8.2 which is specially designed for H.265/HEVC videos. Do you have any interests? In the end, browse your folder position to choose the right place and click the ‘Convert’ the start your job. 
More related:

Thursday, November 6, 2014

Again Celebration of Halloween Converters Promotion by Pavtube Studio!


This paper mainly tells us the introduction of several popular video converters on Pavtube studio which also has the Halloween discount!


Searched online, you guys may know so many popular videos converters that can especially meet most photographers or video editor’s requirements. With different functions or prices, it is hesitating for us to make some decisions, right? Follow the 2014 Halloween which past only several days, here we introduce some Pavtube Video Converters with special Halloween discounts. More details on Halloween Topic Page?

Pavtube MTS/M2TS Converter for Windows/Mac, especially for converting MTS/M2TS/M2T/TS/AVCHD/MOD/TOD footage to almost all video formats. What’s more, so many popular editing tools or media devices you can find listed on output items in this program. What else we also call it as a simple editor because you can adjust your files in ‘Editor’, like trim, crop, subtitles, etc. Let’s just make our MTS/M2TS compatible with everything.

Pavtube Video Converter for Windows/Mac, which is a functional assistant that can handle almost all HD/SD audio/video formats. For another way, it’s the best one for Tivo/DVR recordings. So other items you can have a try on main interface such as ‘Settings’, ‘Editor’, ‘Merge into one’, etc. All Windows operation it can work well. Also, GPU acceleration technology is available. For example,  iPad Air 2, iPad Mini 3, iPhone 6 plus, iPhone 6, Galaxy Note 4, Galaxy Note Edge, Nexus 6, Nexus 9, Kindle Fire HDX, Surface Pro 3, etc are offered there.

Pavtube HD Video Converter for Windows/Mac, the biggest highlight this one can handle HD digital camcorder footages such as AVCHD (MTS, M2TS), MXF, MOV, etc. Others? Deinterlace to get the better video, advanced adjustments for some professional video editors, wide range of outputs and supported devices, etc.

Pavtube MXF Converter for Windows/Mac, especially designed for MXF footages which shot by MXF cameras. For example, it can convert MXF files for free playback on iDevices, Android devices and media players. Furthermore, MXF files batch conversion can be also supported. Is that cool?

Pavtube MXF MultiMixer/iMixMXF, do you know the biggest characteristic of this program? Keep multiple audio tracks/channels in multi-track MKV/MP4/MOV formats, surely with rich editing functions. On the output list, you can find the item ‘Multi-track Video’ that other products don’t have. Others for example, batch conversion, merging and splitting. 
For Blu-ray or DVD rippers, you can also see here. Pavtube DVDAid for Windows/Mac or BDMagic for Windows/Mac. I’m sure it can meet your needs such as ‘Copy’ files, rip DVDs or Blu-rays, etc.

Whatever video formats shot by cameras you wanna edit for a nice enjoyment or upload on websites, the programs we mentioned above can do you a big favor. For now, I have to mention here is to celebrate the 2014 Halloween, such a big discount on this paper! 50% OFF on all BD/DVD or Video tools! Only 5 days left! What are you waiting for?

Wednesday, November 5, 2014

Import MKV Movies in iTunes 12 on Mac OS X 10.10? Which is Better?

Two possible solutions are listed below on how to import and play MKV movies in iTunes 12 on Mac OS X 10.10. I don't know if you have updated your iTunes and Mac operation system to the latest version, MKV , as the container format, still not be compatible with iTunes 12 on OS X10.10.


With both two latest iTunes 12 and Mac operation OS X 10.10, so many Apple fans have attempted to play various videos on this newer system to enjoy a better experience, right? However, most specific video formats like MKV can’t be imported to iTunes 12 for watching on OS X 10.10, such as the special container format, MKV. Such as similar MKV questions below: how to play MKV files on QuickTime

Solution 1. As most users know that especially for Apple operation, we can make the MKV easily watchable with ‘Handbrake’. Actually, more and more people have tried this. While on the other hand, we at the same time got a catch that the interface can look a bit confusing and the output files seems not in perfect video/audio sync. The video starts lagging behind the sound within 30-60 seconds.

Solution2. With no bundled apps you have to download together, also with easy operation and stable capacity, MKV to iTunes 12 Converter for Mac is popular among our Apple fans. Also it can work well with Mac OS X 10.10 operation. Let’s see here?

When you installed the program correctly, load your files in. Both ‘Add Video’ and ‘Add from folder’ are available. For iTunes 12, ‘HD Video’ >>’H.264 HD Video (*.mp4)’ could be the best as we all know. Just take the following picture as the reference. Before you get start by ‘Convert’, in ‘Settings’ button, you may find more useful for yourselves.


In the end, if you have finished the preparation work, it's time to click the big icon 'Convert' to get started! With this professional MKV video converter, you all have my word that you can enjoy your MKV movies on any Apple devices through iTunes 12 on Mac OS X 10.10.

More interests:

Tuesday, November 4, 2014

Easily Burn MP4 to DVDs from HD Video Shootings

Wanna convert HD videos or burn DVDs? This guide offered us specific details on how to burn MP4 to DVDs from HD Video Shootings. 


Generally speaking, it is not so hard to find the HD converting tools for smoothly convert HD videos in various formats. But as someone complained online: ‘It is so annoyed that we have to download some bundle plug-ins if we would like to get the real one, right?’ Is there any practical converting tools that can convert my HD videos to MP4 easily? For aoother way, burn MKV on iDVD? All these related questions you can find the suitable solutions below.

Searching on relate forums or websites, so many people are satisfied with the Pavtube HD MP4 Video Converter, with no forced tools we have to download, what’s more, we can also free download the program to have a try. Following are some necessary steps you need to take during the progress. On the other hand, if you want to burn your MP4 videos to DVDs for storage, you can also find the Pavtube DVD Creator there. 

Watch the following screenshot to get several steps of converting HD videos to MP4? I’m sure you will be satisfied with the easy operation. Load you files in with ‘Add video’ or ‘Add from folder’ and then choose the output format as ‘HD Video’>>H.264 HD Video(*.mp4) is okay!


Finally, go back to the main interface, just press on the 'Convert' item, we can enjoy the MP4 files to DVDs in a nice way. What I have to mention is that with the upgraded version 4.8.2, it can support the H.265/HEVC codec videos encode and decode. Do you wanna have a try on your own?

You may find more here:

Friday, October 31, 2014

How to Combine Several Videos Clips into One on Your PC or Mac

With the trouble of no idea of combining several video clips into one single file on PC or Mac? In order to save the storge space and list out the video clips in a complete folder, any useful tips ther to merge my videos into a nice folder?


Nowadays, with more and more HD cameras or 4K cameras appeared in our life, as a professional photographer, have you guys already collected many video clips? It is awesome to merge these videos form various cameras, right? However, you may find that it is not convenient for us to watch them one by one, so the opinions are put forward as how about combining these little ones into a big one for watching in a general way?

According to the question we mentioned above, we now need a tool that can make these clips merged as a complete one, which is like a string that can get these little ones together. Fortunately, Pavtube Video Converter for Mac/Windows can do this favor well.

Let me tell you how to get this work done in a nice way, only several steps are needed. From the official website you can download the product, install it according to the options. Drop all of your video clips to the program and they will be all listed on the main interface, just tick the clips you want and on the right of the ‘Format’ button, you can find the ‘Merge into one’. 


Before you click the ‘Convert’ to combine your video clips, you must know this program is not only a tool to merge the clips, but also a professional video converting tool for various videos. Also you can find other items on main interface, such like ‘Settings’ ‘Editor’, etc.

Additional tips: When you merge your clips into the complete one, do you have any other ideas to enjoy the mives with a higher quality and smaller size, H.265  can help you out there. With the professional H.265/HEVC encoder, we cann make our dream come true.

Related guides

Tuesday, October 28, 2014

Work Sony XAVC with Premiere Pro CC and AE CC

The following paper can mainly tell you the skills of importing Sony PXW-X70 XAVC files to Premiere Pro CC and After Effects CC. If you are now trapped in this suitation, I suggest you to change your Sony XAVC files into MPG as the suitable formats for Premiere Pro and After Effects.


Today we are talking about the main characteristic, Sony PXW-X70, which has the XAVC files as the output. You may be familiar with this guy if you are a professional photographer or video editor. In other ways, for the special XAVC formats, it might confused you a lot during the days, right? Such as playing on QuickTime, or edit in FCP?

For Sony PXW-X70, This kind of camera records broadcast quality 1920 x 1080 HD video using a variety of codecs, at 4:2:2 10-bit in XAVC, AVCHD and DV format. While, there are a few issues when it comes to viewing, importing and editing Sony PXW-X70 XAVC files in non-linear editing software like Adobe Premiere Pro or After Effects, even incompatible for the latest versions.

Good news here! To find the solutions above, we have found the Premiere Pro CC and After Effects CC have the common suitable formats as MPG, WMV or MOV. Another surprise is there is a XAVC to Premiere Pro/AE Converter for Mac (Windows version) can do this conversion well with no quality loss.

Install the program on Mac and run it. Click "Add" button on the top of the main interface to import XAVC video to the program. It supports batch conversion and joining multiple video clips into one file. Then we come to the top point, click the ‘Format’ list and pull down to select ‘Adobe Premiere Pro/Sony Vegas’>>’MPEG-2 (*.mpg) as the best output formats. Tips: you can also find this item in the ‘search box’.


Additionally, This Sony XAVC Converter for Mac can also help you to encode XAVC/XAVC S video to FCP, iMovie, FCE, Avid, etc. You just need to choose a proper video format like ” Final Cut Pro> Apple PreRes 422(*.mov)” for FCP in the second step. For Avid Media Composer, choose “Avid Media Composer > Avid DNxHD(*.mov)” as output; For iMovie, choose iMovie and Final Cut Express -> Apple InterMediate Codec (AIC) (*.mov) as output.


For those advanced users, you will be surprised with the ‘Edit’ function on the main interface. As the ‘Trim’ to decide the length of the video, ‘Crop’ to cut off the edges you unwanted, etc. More items are waiting here for you!

When you have done all the preparation work, back to the main interface, click the ‘Convert’ to start the conversion freely, finally, if yu are seeking for  the transfer steps of Premiere Pro CC, here we go. Sincerely hope that this guide can actuallt help you edit your Sony XAVC recordings in Premiere Pro and After Effetcs CC.

See also?

Friday, October 24, 2014

Downscaling Panasonic GH4 UHD 4K to 1080p mov video for editing in iMovie

Here is a tutorial shows you how to downscale Panasonic GH4 UHD 4K to 1080p mov format for easier editing in iMovie on Mac.

The GH4 is powerful 4k camera in a small package. It features a 16.05-megapixel Digital Live MOS sensor and a 4-CPU Venus Engine, capable of capturing high-resolution JPEG and RAW stills, as well as UHD 4K 3840x2160 30p/24p and cinematic DCI 4K 4096x2160 video at 24p. The GH4 delivers video quality surpassing many professional video cameras, but for some reason, the HD or super HD 4K experience also brings import issues while importing or ingesting Lumix DMC-GH4 4K files to iMovie for basic editing.
Import Panasonic GH4 UHD 4K to iMovie

The majority of editing work is still being finished in 1080p. In most cases, we still need to downscale most of the Ultra HD 4K to 1080p or 2K properly with a more a more editing-friendly format, such an iMovie's Apple InterMediate Codec. Now with this HD Video Converter for Mac from Pavtube, the editing process with Panasonic GH4 UHD 4K video in iMovie can be surprisingly easy and smooth.

Somtimes, it is necessary for us to downsize our videos as suitable, no matter for editing or watching, right? For example, from 1080p to 1080i? All these changes can bring us the nice effect.

Overall, this lets you downscale and convert GH4 4K AVCHD/MP4/MOV to 1080p AIC encoded MOV for working with iMovie 8/9/11 seamlessly with fast speed. Besides, the program also adds many other various professinal encoders ProRes, DNxHD, MPEG-2, etc. allowing you to convert video to seamlessly fit Final Cut Pro, Avid, Adobe Premiere Pro, etc. If you want to trim or crop your Ultra HD 4K video, this Video Converter for mac can give you a hand. And for Windows users, you can convert GH4 video to Premiere Pro, Sony Vegas Pro, Windows Movie Maker supported video with Pavtube HD Video Converter.

Guide: Downscaling Panasonic GH4 UHD 4K to 1080p mov video for editing in iMovie

Step 1: Run Pavtube 4K Video Converter for Mac and load 4K AVCHD/MP4/MOV video clips from GH4 to it. You can click either "Add Video" button or "Add from folder" button to load source 4K files.

4K Video Converter for Mac 

Tips:
If you want to combine the loaded 4K footage into one file, simply tick off the checkbox before "Merge into one file".

Step 2: Select "Apple InterMediate Codec (AIC) (*.mov)" as target format

In order to convert Panasonic GH4 4K recordings to AIC for use in iMovie, simply hit "Format" menu and follow "iMovie and Final Cut Express" > "Apple InterMediate Codec (AIC) (*.mov)".

Want to convert some 4K XAVC S files to ProRes MOV for FCP X? Choose "Apple Prores 422 (*.mov)" files under "Final Cut Pro".

iMovie best format

Profile Settings:
Before conversion, you can click the "Settings" icon to customize the video/audio settings including the Bitrate of Video and Audio, Audio, Video Size, Sample Rate, Frame Rate, Audio Channels, etc for iMovie 8/9/11. To down-convert ultra HD 4K to 1080p, do remember adjusting video size to 1920*1080. That is the exact 1080p.

iMovie AIC video settings

Step 3: Start 4K video to AIC Conversion.

Click the big button "Convert" to start GH4 4K to AIC MOV for iMovie immediately. As soon as the conversion is completed, you are able to click "Open" button to get the generated AIC MOV files. Check the generated 1080p video, you will certainly be satisfied with its final video quality.

Step 4: Import converted Panasonic GH4 4K shootings to iMovie

Launch iMovie 8/9/11, and then choose File > Import > Movies to import the converted Panasonic GH4 UHD 4K to iMovie for further editing.

Then it would be easier for you to edit your Panasonic GH4 4K clips in iMovie 8/9/11. Enjoy your editing workflow. And get more solutions for editing and playing 4K video on Mac.

Wednesday, October 22, 2014

Export MP4 Video from Sony HX50V to Premiere Elements 13 or 12

This tutorial will teach you how to convert Sony Cyber-Shot DSC-HX50V MP4 to Premiere Elements 13 or 12 for editing without no sound/video problem.

The Sony Cyber-shot HX50V is the World's smallest and lightest compact camera with a 30x optical zoom range. It has four movie quality modes encoded using the AVCHD format. If you switch from AVCHD to MP4 encoding the options become 1440x1080, 720x1080 and 640x480 all at 25fps (or 30fps in NTSC regions).

Sony Cyber-shot HX50V

Have you import your MP4 files from Sony HX50V in Premiere Elements 13 or 12, but it says it’s a video file and the audio is the only information available for editing? Is this a codec problem? If you don’t want to spend time and effort to understand these complicated codecs and download them for video editing in Adobe PE, the effective solution is to transcode Sony Cyber-Shot DSC-HX50V MP4 to the codec that compatible well with Premiere Elements 13 or 12 at first.

Here Mac MP4 Converter for Premiere Elements provides customers with several simple editing functions, including cropping, trimming, deinterlacing, watermarking, adding special effects, and audio replacing, which help you do a fast and necessary editing on your footage before importing them to Premiere Elements 13 or 12. It also supports versatile output options for iPad, Android tablets and main stream editing software.

How to Convert Sony Cyber-Shot DSC-HX50V MP4 to Premiere Elements 13 or 12

Step 1. Run the MP4 to Premiere Elements Converter, and add your MP4 footage from Sony HX50V into this program.

MP4 to Premiere Elements Converter

Step 2. Click on "Format" bar and select output format from drop-down list. Here I suggest you follow "Adobe Premiere Pro/Sony Vegas" to select "MPEG-2 (*.mpg)" or "WMV (VC-1) (*.wmv)" format.

You can also choose "Format -> HD Video -> MPEG-2 HD Video(*.mpg)" as out format for Premiere Elements 13 or 12.

It is so easy to render HD MP4 video to AVI format, edit MP4 in Premiere Pro CS3/CS4/CS5/CS6 and insert MP4 into PowerPoint for playing.

Premiere Elements 13 or 12 format

Step 3. You can control output video quality by setting resolution, bitrate and frame rate in "Settings". For preserving 5.1 channels surround sound, set audio channels to "5.1 channels" instead of Stereo. To keep 1080p full HD high quality, you can set video bitrate up and Size to 1920x1080.

Step 4. Click on the "Convert" button to start converting Sony HX50V mp4 video files to Premiere Elements supported MPEG-2 format. By ticking off the checkbox before "Merge into one file" option, you can combine all the checked videos into one file.

When conversion is completed, you can click "Open" to get the Premiere Elements MPEG files from its default output folder. Now open up Premiere Elements 13 or 12 and you're ready to import to Premiere for post-production~

Monday, October 20, 2014

Find everything about iPhone 6 and iPhone 6 Plus on Pavtube Special Topic

Pavtube Studio released iPhone 6/6 Plus topic page to share with Apple newbie and would-be users about everything you need know about these two high-end phones which were unveiled by Apple on September 19.

iPhone 6/6 Plus topic page

To Help the Apple fans find a place to look for useful information about iPhone 6 and iPhone 6 Plus and share interests with each other, Pavtube assemble the important information of iPhone 6/6 Plus on a page so that they can find useful stuff easily.

On this topic page, Apple fans can find hot news, useful tips, unique features, popular apps and almost everything related to the new iPhone 6/6 Plus in order to get familiar with these two devices. More importantly, it is possible to transfer movies, watch videos, and share joys on iPhone 6 and iPhone 6 Plus with the help of this Pavtube specia page.

“The 4.7-inch iPhone 6 and the 5.5-inch iPhone 6 Plus with a complete redesign and a much larger screen size than any iPhone that came before catch people’s eyes at the moment Apple announced their release. Even with a slightly larger screen, the iPhone remains comfortable to hold. With fast performance, a great display, an elegant new design and a much-needed software update, it's one of the best smartphones you can buy right now,” said Anna Qian, brand manager of Pavtube.

“With this topic page on Pavtube, Apple fans and newbie of iPhone 6/iPhone 6 Plus would learn more about these two devices, like hot news, useful tips, popular apps, etc. Later users would obtain much fun from iPhone 6 and iPhone 6 Plus and fall in love with them.”

Find everything about iPhone 6 and iPhone 6 Plus on iPhone 6 Column.

Saturday, October 18, 2014

How to Import Video into Avid Media Composer?

This article outlines the recommended workflow for importing all kinds of videos and codecs into your Avid Media Composer.  

Follow the detailed instructions to get started importing all your media files into Avid Media Composer. (Whether you're new to Avid's popular non-linear editor, or are a seasoned digital video professional, you're sure to enjoy this free tutorial)


How to Import video into Avid Media Composer 

First, make sure the right bin or folder is selected, otherwise the ‘Import…’ option might be greyed out. Then, go to File > Import…. You will be prompted to select the video or stills you want to import. You must choose a transcode format if you are using this method. I recommend DNxHD while you’re in Avid:

AvidTranscodeBox


These files are found in the ‘Avid MediaFiles’ folder. There is also a *.pmr file which lists all the online media files.

However, many would prefer to use AMA to avoid transcoding to any intermediary codec. In this case, you must first open AMA by going to File > AMA Link…:

AvidAMAImportBox


Only the codecs you have installed individually will show up. Avid puts this down to the ease with which they can update plug-ins when necessary, but that’s just them being lazy. I think they should consider your convenience above their own.

Once you select the video file, it will show up in the selected bin, in its native format and wrapper. You can also create a new Import setting by going to your Project panel and choosing Settings. Right click on Import and select Duplicate. You can customize this import setting and use that to drag and drop files into bins directly. Import processes can be automated to make life faster.

While importing, it is a good idea to keep the Console panel open. It will show you if there are any errors while importing, and is great for troubleshooting problems:

AvidConsoleErrors


Avid Supported Codecs

There are many codecs and container options out there. Just when you think you have a handle on things, a new codec is announced. It’s a way of life, which is unlikely to be ‘corrected’ soon.

H.264

H.264 is the ubiquitous codec, and it looks like it will stay for quite some time. AvidMedia Composer supports H.264 natively, via AMA as mentioned above. TheQuicktime plug-ins are installed by default. For MXF plugins, use this link.

AVCHD

AVCHD is a ‘version’ of the MPEG-4 AVC specification, or H.264, and Avid Media Composer supports AVCHD natively with the default plug-in (only in the MOV wrapper), via AMA as mentioned above. Avid says you’ll need to perform a one-time-only free activation of the Dolby AC-3 codec to use the plug-in, which happens in the background if you have an active Internet connection.

For AVCHD not in MOV wrappers, you’ll need to download the specific plug-in here.

XDCAM

Avid Media Composer treats XDCAM with kid gloves, so to speak. XDCAM and XDCAM HD follow the MXF OP1a standard, and need to be converted to MXF OP Atom. Similarly, XDCAM EX is MP4, and needs to be converted to the same. Use this link to download the XDCAM plug-ins.

The utility that can do this is Sony Content Browser (The manual incorrectly still recommends the XDCAM viewer, which has been phased out).

XDCAM codecs are supported at native resolutions only. For videos on the XDCAM and Avid Media Composerworkflow, click here. For a detailed workflow guide, click here (PDF).

XAVC

At the time of this writing, there isn’t a plug-in for 4K XAVC, though XAVC Intra 100 is supported within Media Composer.

CANON XF (MXF)

This applies to files from both the XF series cameras as well as the Cinema EOS line (Cxxx). You’ll need to install the Canon XF and MXF plug-in from this link.

Once that is installed, restart Avid Media Composer. You can then import it natively via AMA as mentioned above.

HDV and DV

HDV is still supported natively, in both transport stream form as well as wrapped as MOV, etc. The video file is rewrapped as MXF, but is used natively.

Of course, you can also Capture HDV from a camera or tape deck directly. For DV and HDV, this method is preferable over Import… since you will also get important metadata and timecode this way (if the camera supplies it).

MPEG-4

Like H.264, Avid Media Composer supports MPEG-4 natively, via AMA as mentioned above. The Quicktime plug-ins are installed by default. For MXF plugins, use this link.

X.264

X.264 is not supported by Avid Media Composer unless you rewrap it into a MOV container.

The Quicktime plug-ins are installed by default.

PRORES

Prores works natively via the Quicktime plug-ins. If you use the AMA method, you can edit natively in MOV wrappers. If you want to use the other Import method, Avid rewraps the video into an MXF wrapper (codec is still Prores).

Here’s a good video that explains how to get your Prores workflow going:

DNxHD

This is Avid’s baby. All kinds of DNxHD are supported natively via either of the import methods mentioned above.

Now have a clear idea of how to import video into Avid Media Composer, right?

Still have issues? How to edit video from a camera that Avid Media Composer doesn’t recognize ?


As most of the video codecs, formats are not natively supported by Avid, plug-in is always needed. However, it would be a complex process to download, install a pile of video codecs and plug-ins. So here offers some easy and fast way to turn your unsupported videos to formats that Avid MC likes.

a.  Convert AVCHD video files into Avid Media Composer native DNxHD .mov.

b. Encode P2 MXF files and Avid MXF to Avid Media Composer for editing.

c. If your MXF files have 2 audio tracks or more, here is a program named iMixMXF with multi-track preserving and mixing features. You can download the trial version for evaluation!

d. Futhermore, you can transcode your MOV, XAVC and XDCAM video to DNxHD .mov before importing to Avid Media Composer.