Tuesday, December 9, 2014

Convert Movies or YouTube Videos for a Playback on Note 3 and Tablet

Our guide has a topic on getting rid of the trouble of converting movies and YouTube videos to suitable one for play back on Android tablet.


Summary: During the following article, what we should pay attention to is how to play our  movies and YouTube videos on Android tablet or Note 3 with VLC media player on the way. I know most of you are interested in YouTube videos but do you all know clearly that how to upload HD videos to YouTube for nice sharing?

For a first step, I wanna know how will you guys do with the videos download from YouTube. Play on TV? Not really. With the popularity of bigger and bigger handle tablets, most of people prefer to watching YouTube videos on tablets or smart phones when they are waiting for train, bus or someone else. It seems that it will become a kind fashion in daily life. According to this way, some problems appeared there when we importing our video files to these media devices.

No doubt if you download videos from YouTube, usually we must do some changes with these footage to make it accepted by media players such as VLC. How did you do that if you got the incompatible videos? Today here, we introduced you a professional VLC video converter called Pavtube Video Converter for Windows/Mac individually for Windows and Mac users. 

Question1: What could this video converter do? 
As a professional video converter, it can accept all video formats and give you various videos you want as output. Besides, we can adjust our video settings and effects there. With an easy operation and functional editing, it can do this job well. 

Question2: Any more details on this conversion job?
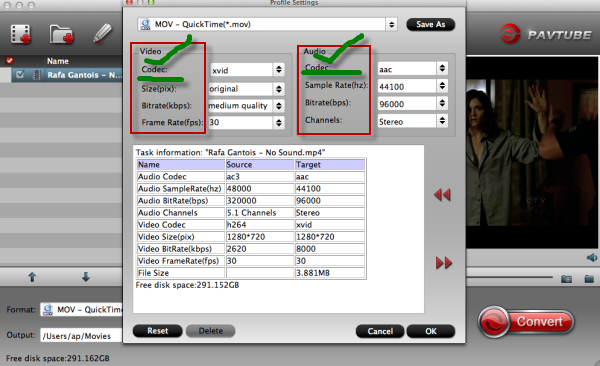
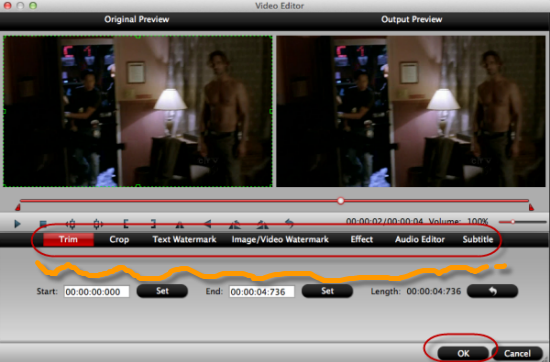
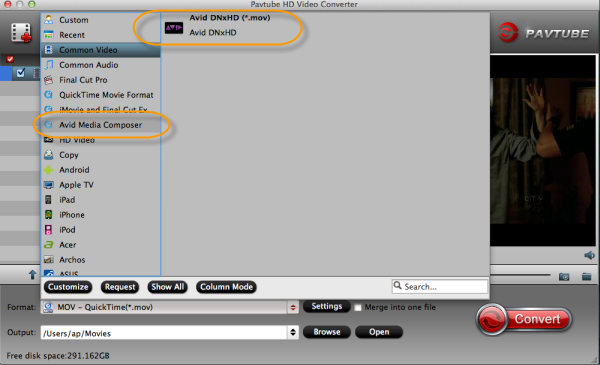
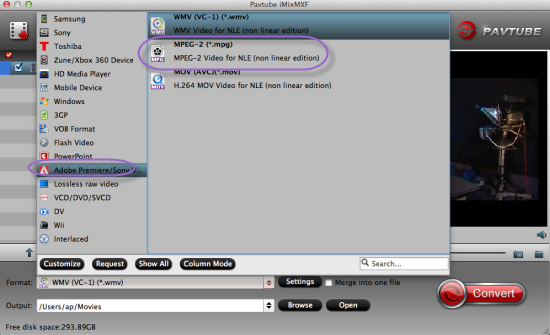
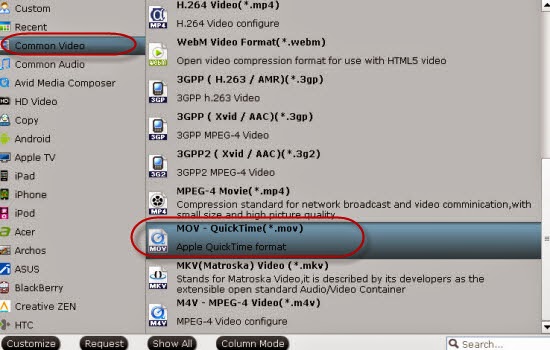
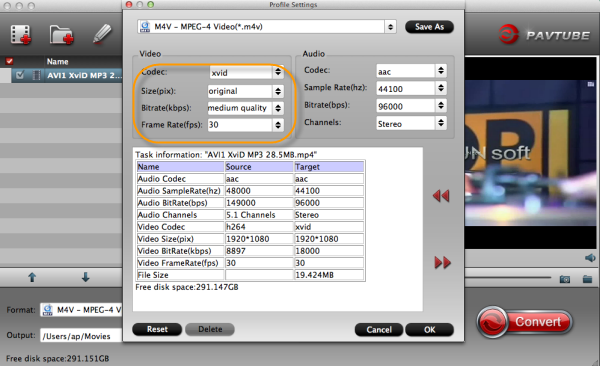
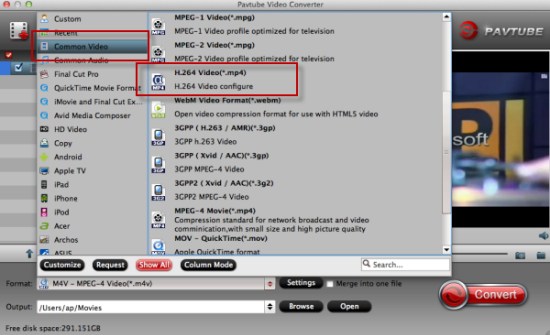
Surely, we have the step-by-step- guide here for you. As long as you download and install the program according to its instructions. With ‘Add video’ or ‘Add from folder’, we can import our videos correctly. Especially for VLC, which one could we choose as the output? No worries about it. Click the ‘Format’ and come to the output list, just select the ‘Common Video’>>’H.264 Video (*.mp4)’ to be the best one. See the screen shot below.


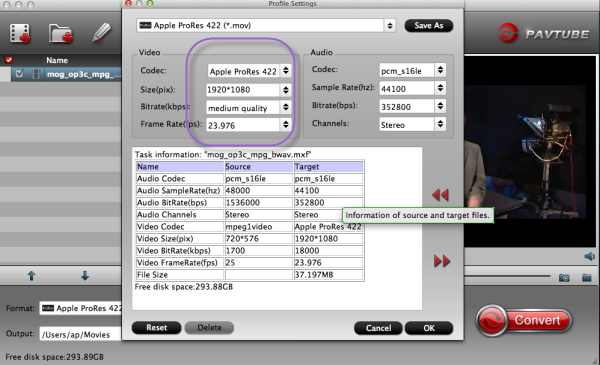
What’s more, in order to obtain the perfect effect on your media player, we may do some adjustment in ‘Settings’ button. Wanna a suitable video size for your handle tablet? You can set the video size as ‘1280*720’, for other bitrates, audio channels, you can adjust them as you need.


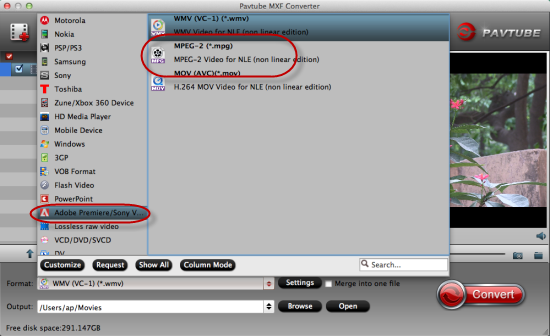
Additionally, no matter for Android tablet or Note 3, drop down the output list, you can find the ‘Android’ item there, so it is unnecessary to be confused on which format you should choose as the best.


Finally, if you have done all the preparation work, why not go back to the main interface to click the ‘Convert’ button to finish your work. Is that cool we can enjoy various kinds of YouTube videos on Note 3 or orther tablets? For more related guides?

  • Related:
  • Thursday, December 4, 2014

    Move Panasonic GH4 4K video to FCP X---Choose Apple ProRes or ProRes HQ?

    Have no idea of choosing Apple ProRes or ProRes HQ when moving Panasonic GH4 MP4 videos to FCP X for a nice editing?


    Overview: Cause we all know that there are several types of Apple ProRes codec which could all be suitable for Final Cut Pro X. However, usually we don’t know how to make a right choice, right? In this article, as the example of moving Panasonic GH4 4K videos to FCP X, for Apple ProRes 422 and Prores HQ, which one could we choose as the better one? If you have aother NELs like DaVinci Resolve, Avid, etc for requirements, here we go.

    Detailed introduction of Apple ProRes and ProRes HQ we can learn below:

    Apple ProRes 422, the original and common one which was used frequently in our life, target data rate of approximately 145 Mbps (1920 x 1080 at 60i). Generally speaking, it can meet our requirements when transcoding our videos.

    Apple ProRes 422 HQ, for a first step, ‘HQ’ we can surely understand as ‘high quality’. It offers the utmost possible quality for 4:2:2 or 4:2:0 sources (without an alpha channel) and provides the following: Target data rate of approximately 220 Mbps (1920 x 1080 at 60i).

    Any converting assistant there we can convert our GH4 4K videos to ProPres for FCP X?


    Fortunately, today we here have a nice choice for you. Pavtube HD Video Converter for Mac, which can offer you the complete Apple ProRes codec for you. Such an easy assistant that each one could work well. Open the program, with ‘Add video’ and ‘Add from folder’ we can import our source files successfully. Drop down the output list, you can find all kinds of Apple ProRes there. In order to preserve the 4K definition, we here strongly recommend the ‘Apple ProRes Codec 422 HQ (*.mov)’ for you!


    Note: For these two kinds of ProRes codec, which one we should select depends on the original video definition you know. We should match them well to achieve the best effect.

    Also, in the ‘Settings’ button, we can additionally set our video codec , video size, frame rate or even the audio channel if we want, right? More details you can have a try on your own or watch the following screen shot.


    In the end, go back to the main interface, the red button'Convert'  is waiting for a click to start the job. With this Mac HD Video Converter, do you still worry about your Panasonic GH4 4K videos editing in FCP? Good luck!

    Want more:

    Monday, December 1, 2014

    Ingest Panasonic PX270 AVC-LongG MXF to Adobe After Effects CC/CS6

    Receive MXF footage from Panasonic PX270 AVC-LongG camera? In this article, you can find the methods of how to edit them in Adobe After Effects CC/CS6.

    Summary: Panasonic PX270 AVC-LongG camera--- a big surprise for Sony fans! With so many attractive features, this kind of camera has been popular since it released. However, sometimes we may meet some troubles in importing Panasonic PX270 AVC-LongG MXF footage to some popular editing tools, Adobe After Effects CC is the typical example. While at the same time. Adobe AE is not suitable with MTS files, MP4 files, etc.


    I don’t know if you have met this kind trouble when editing your recorded videos.’ I recently got an AJ-PX270 and love so many features of this camera. Unfortunately, I haven't been able to find a way to use my AVC-LongG footage in After Effects CC. When I try to import it, the clips show up in the Media Import Window as Unix Executable Files which won't play or show thumbnails.’

    Actually, there are different causes that can make something wrong, incompatible formats or codec, special MXF format structure, etc. So for those people who are not so familiar with MXF files, is it cool if they got a professional assistant which can handle MXF files well? Yes! Pavtube MXF Converter for Mac can work this job well.

    It is not only a MXF to After Effects Converter, but also for other popular editing software when working your MXF files. Download and install it correctly on your computer, I will show you how easily and nicely we can move this job on. 

    Launch the program and load your files in with the ‘Add video’ item. Then it’s time to choose the correct output formats. Just for Adobe After Effects CC, we suggest to select the ‘Adobe Premiere Pro’>>’MPEG-2 (*.mpg)’ as the best one. What’s more, you can find other useful output choices for FCP, iMovie, FCE, etc.


    For those advanced users, here we can introduce the ‘Edit’ function for you. To decide your video length with ‘Trim’, Drop off your unwanted video edges with ‘Crop’, Add some explanation into video with ‘Subtitles’, All these we can have a try by ourselves there.


    Easily import our Panasonic PX270 AVC-LongG MXF files to Adobe After Effects CC or CS6 for a further dispose, this MXF converter will not make you disappointed. More questions or suggestions you can leave as comments below. At the end, it's time to go back to the main interface to tap the 'Convert' button to start your work! 

    Read More:

    Workflow: Import Sony PMW-300K1 MXF to Avid Media Composer

    Can’t smoothly go through the workflow: import Sony PMW-300K1 MXF to Avid Media Composer for nice editing? Just be a good reader and the following article will teach your how to convert your MXF footage to MOV for Avid MC.


    Have you got any XDCAM camcorders? Or have you ever found the highly compressed Full-HD MXF/XAVC files recorded by Sony PMW-300K1, it is hard to edit them in NLE applications like Avid Media Composer. Cause Avid MC has its own supported formats, they cannot accept some other incompatibe recordings such as 4K MP4, MXF files, etc. 

    Since we have known how to smoothly work our MXF files with Avid, do you know why we can’t directly drag our MXF files in Avid? Someone may have some interests here, right? Something wrong that appeared on your screen when importing MXF files are usually caused by incomplete folder or different video codec. To change the situation with other methods, we here highly introduce you the Pavtube MXF Converter for Mac, which is a professional MXF to Avid converter that also can handle MXF with other NLE applications with ease.

    Download Sony PMW-300K1 to FCP X converter from our website and install it on your Mac computer. Besides Mac version, this software also has Windows version which can help you to convert Sony PMW-300K1 MXF files on Windows PC. ‘Add video’ or ‘Add from folder’ could both be your assistants to load your files in. Only for Avid? We can easily find it when we drop down the output list, ‘Avid Media Composer’>>’DNxHD MOV’.


    Before you click the ‘Convert’ to wait for your conversion result, could I show you around the ‘Editor’ interface there? Maybe here you can do some simple editing adjustments. ‘Trim’ to decide the video length, ‘Crop’ to drop off the unwanted clips, etc. More details are waiting here for you.


    Finally, just go back to the main interface to hit the red big button 'Convert' as the last step! With a 6X faster speed of covnersion, you can just be relaxed here! Work Sony PMW-300K1 footage with Avid MC which means transcode MXF to DNxHD MOV, right? 
    See Also:

    Thursday, November 27, 2014

    Natively Move Files From QuickTime to Avid Media Composer ?

    Why can’t I import my files from QuickTime to Avid Media Composer so natively? Could you explain something to me?

    As different editing tools differ from each other, so have you ever got the trouble of moving files from one to another? Here we got a typical one, troubled in transferring QuickTime videos to Avid Media Composer? Just follow the steps to know how and why.

    Frankly speaking, in some ways, QuickTime and Avid Media Composer have the common supported video codec, DNxHD .mov. While for incompatible one, some troubles you may -on your screen, let’s see the example which shows the questions between QuickTime and Avid.


    ‘The problem I am having is that any time I try to bring in any type of Quicktime file into my timeline, it imports the audio but the video is just blackness. There is a video aspect that appears on the timeline, so it's not like it's only importing audio...in a way. There is video along with it, it is just nothing but black. This goes for .mov, .mp4, and any other Quicktime file type.’

    In a word, the easiest and effective method of importing files from QuickTime to Avid is converting the original videos to DNxHD .mov for Avid. Searched online, you may find Pavtube HD Video Converter for Mac can handle this job well. With only one screen shot, I’m sure you can learn the main conversion steps well. Additionally, for other incompatible video formats to Avid MC, such as the MXF in Avid, XAVC files in Avid, AVCHD MTS to Avid, etc, you can all take a reference.

    Here we can also take the introduction of some main conversion steps from above. Download and install the program according to its instructions, ‘Add video’ and ‘Add from folder’ can help you load your files successfully. On the output list, just find the item’ Avid Media Composer’>>’DNxHD mov’ for the best one. For the next step, why not get the ‘Settings’ to adjust your video size, bitrates, frame rate or something else on your own?


     Finally, ‘Convert’ on the main interface is waiting for you to end your preparation work. If you are the first time to work woth Avid, why not take the following transferring article to learn more? With this multiple functional video converter, we can easily move files from QuickTime to Avid MC. Yu won't miss it!

    Do you want more?

    Tuesday, November 25, 2014

    MXF Not Friendly with Premiere Pro CC? How to Solve it?

    It is common if you find your MXF files cannot be imported in Premiere Pro CC, this paper can tell you why and how to handle well with your MXF footage.


    ‘I am relatively new to Premiere from FCP and I've been cutting with it for a few months. I started out with CS6 because I had Snow Leopard. Just recently upgraded to Mavericks and then was able to download Premiere Pro CC. I have a project that I started in CS6 and am now having trouble with it in CC. All my MXF clips are messed up and all playback shows a white screen. How did it happen?’

    Although Adobe PP CC offers much better native MXF support than its predecessor, Avid capture MXF files, P2 MXF in P2 card PROXY, etc MXF footages still can’t be supported by Premiere Pro CC. Searched online, you will find some similar questions. 

    If you want to import and edit MXF files in Premiere Pro CC in a flawless way, the reliable workaround I've found so far is to transcode MXF to MPEG-2 or WMV, the most edit-friendly format for Adobe(any version). So a professional MXF to Premiere converter is necessary. Why not take the Pavtube iMixMXF for a try? Only works with MXF files, you can enjoy a lot with its good reputation.

    Step 1.Load your files and choose the right output.
    Free download and install the program, click "Add Video" button to import .MXF files. Note that you should find the MXF video from one MXF whole structure folder. Drop down the output list, for suitable output ones, let’s find the item ‘Adobe Premiere Pro/Sony Vegas’>>’MPEG-2(*.mpg)’ as the best one.


    Step 2. (Optional function)In case the default settings do not fit your requirement, you can click "Settings" button and enter "Profile Settings" panel to adjust video size, bit rate, frame rate, sample rate and audio channels. 


    Finally, if you are sure you have done all the preparation you want, just go back to the main interface and click the 'Convert' to start your work! So for those MXF users, this article may become hot, right? Still no ideas of transferring files into Premiere Pro CC? Here we go ! 

    More related:

    Read More:

    Thursday, November 20, 2014

    Good Solutions to Import MKV to iDVD and Burn DVD on Mac?

    Do you  have any hobbies of burning MKV videos to DVD with your iDVD? Before we start to burn these videos, how to import our MKV files to iDVD on Mac has become the top point because we all know that iDVD could not accept all the video formats, the container format MKV is the typical one. 


    MKV, as a special container format, they are very efficient in size and performance, but the problem with MKV files is that they can be quite difficult to run on specific programs. Popular video software like iDVD or Xbox does not actually support MKV files, other popular media players are included too, such as QuickTime, Apple TV, etc because it’s not a traditional file format that it recognizes or can work with. So how to smoothly import MKV files in could be a hard task for you, right?

    Fortunately, we here would like to show some details on how to solve the trouble above and in other ways, we can also learn how to burn MKV videos to DVD on Mac with the ripper iDVD. For a first step, just download the MKV to iDVD Video Converter for Mac, which can be a loyal assistant to give you a big favor.

    Add video ‘or ‘Add from folder’ to load your original MKV source in, then, we recommend you the ‘Common Video’>>’MOV-QuickTime (*.mov)’ as the best output one. 


    Tips: You can also adjust resolution, frame rate, encoder, bitrate for audio, bitrate for video, sample rate, and channels to optimize the output file in ‘Settings’ on the main interface.


    Click the ‘Convert’ and then you can just wait for your output MOV videos, such an easy operation program that can be accepted by everyone, right? Additionally, since the upgraded version 4.8.2.0 has released out, the Windows MKV converter can support the H.265/HEVC videos input and output well, do you wanna a try?

    Then we come to the part 2, let’s see how to burn MKV to DVD with iDVD. 
    • Open iDVD and click the Create a New Project button. (Note: If you had previously created an iDVD project, iDVD will open it. Once your old project opens, go to the File menu and choose New to open a new project.)
    • Enter a title and choose a location, then select an aspect ratio (for either standard or widescreen TV). Click Create.
    • Once in project mode, drag the converted MKV files to the iDVD project window or click the "File > Import > Video..." to navigate and import the converted MKV movies.
    • When you've finished your project in iDVD, click the Burn button and insert a recordable DVD disc to burn MKV to DVD disc with this iDVD app.

    See Also: